Altenew Craft Your Life Project Kit: Hello Beautiful Release Blog Hop + Giveaway ($300 in total prizes)

Altenew Craft Your Life Project Kit: Hello Beautiful Release Blog Hop + Giveaway ($300 in total prizes)

Hello, everyone! Welcome to Altenew’s Craft your Life Kit: Hello Beautiful Release and giveaway! Thank you, Maryam Perez, for sending all of you over to my blog. For the complete details of the blog hop, make sure to visit the Altenew Card Blog.

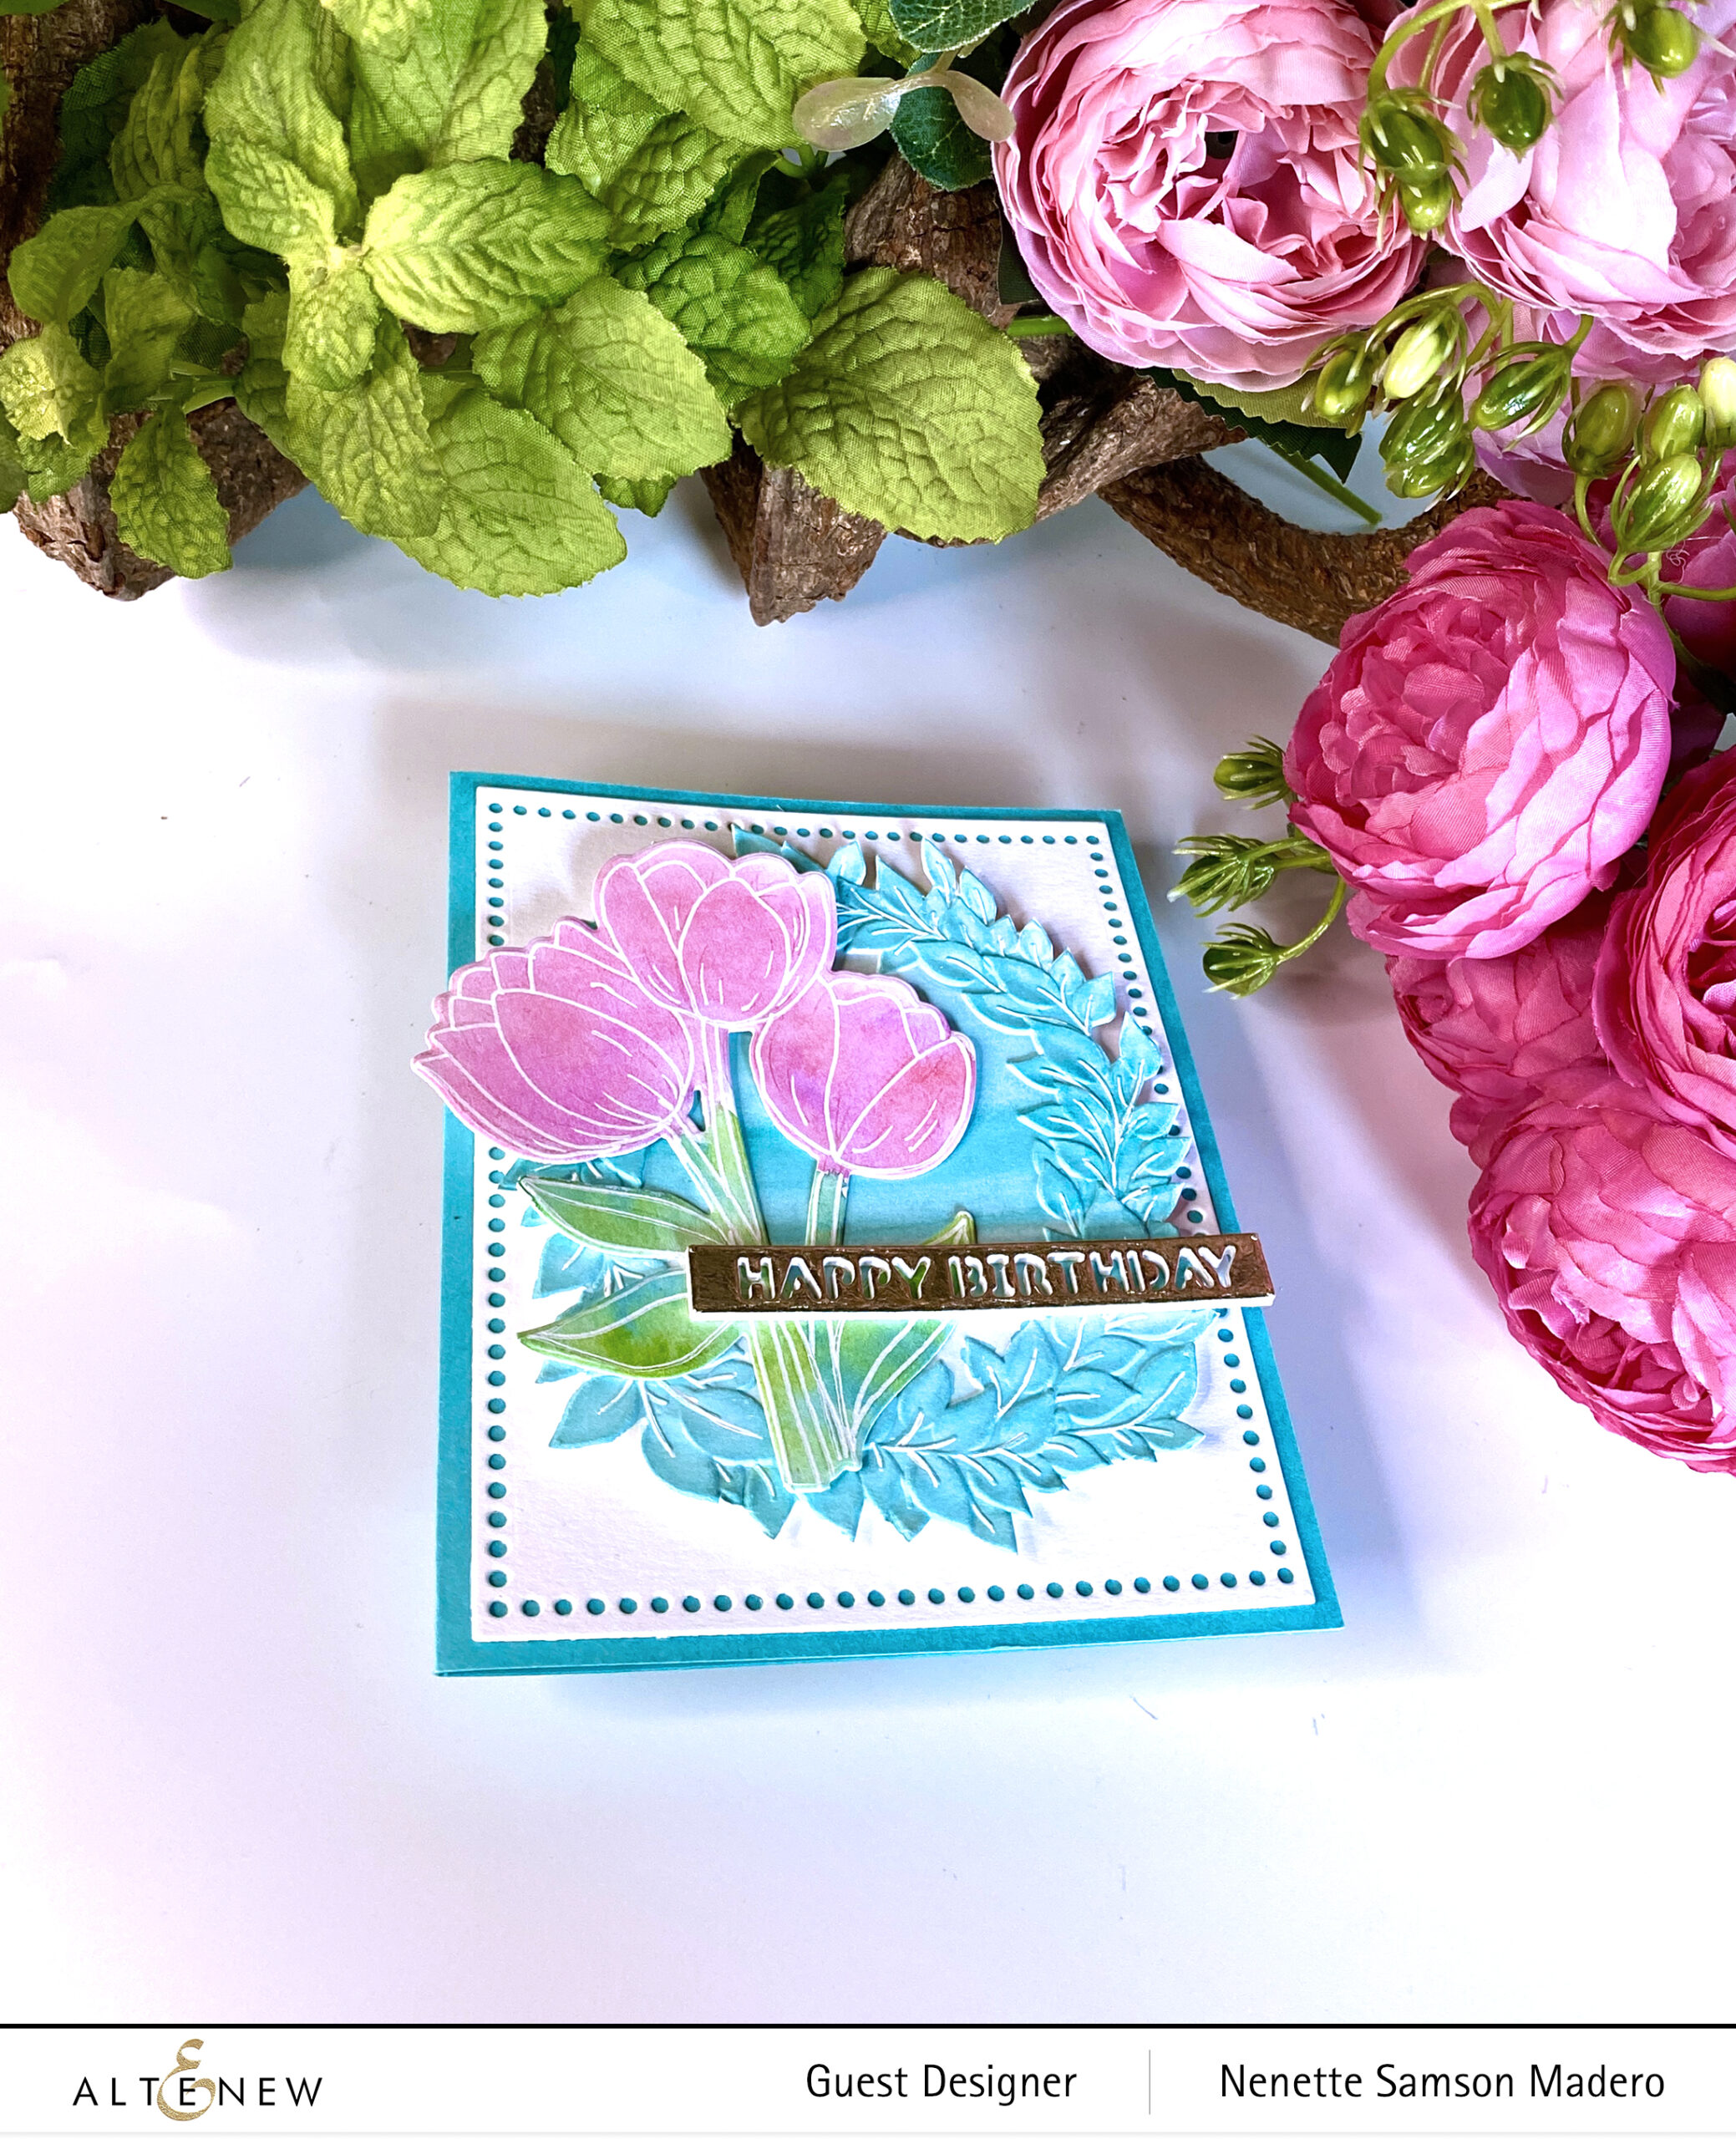
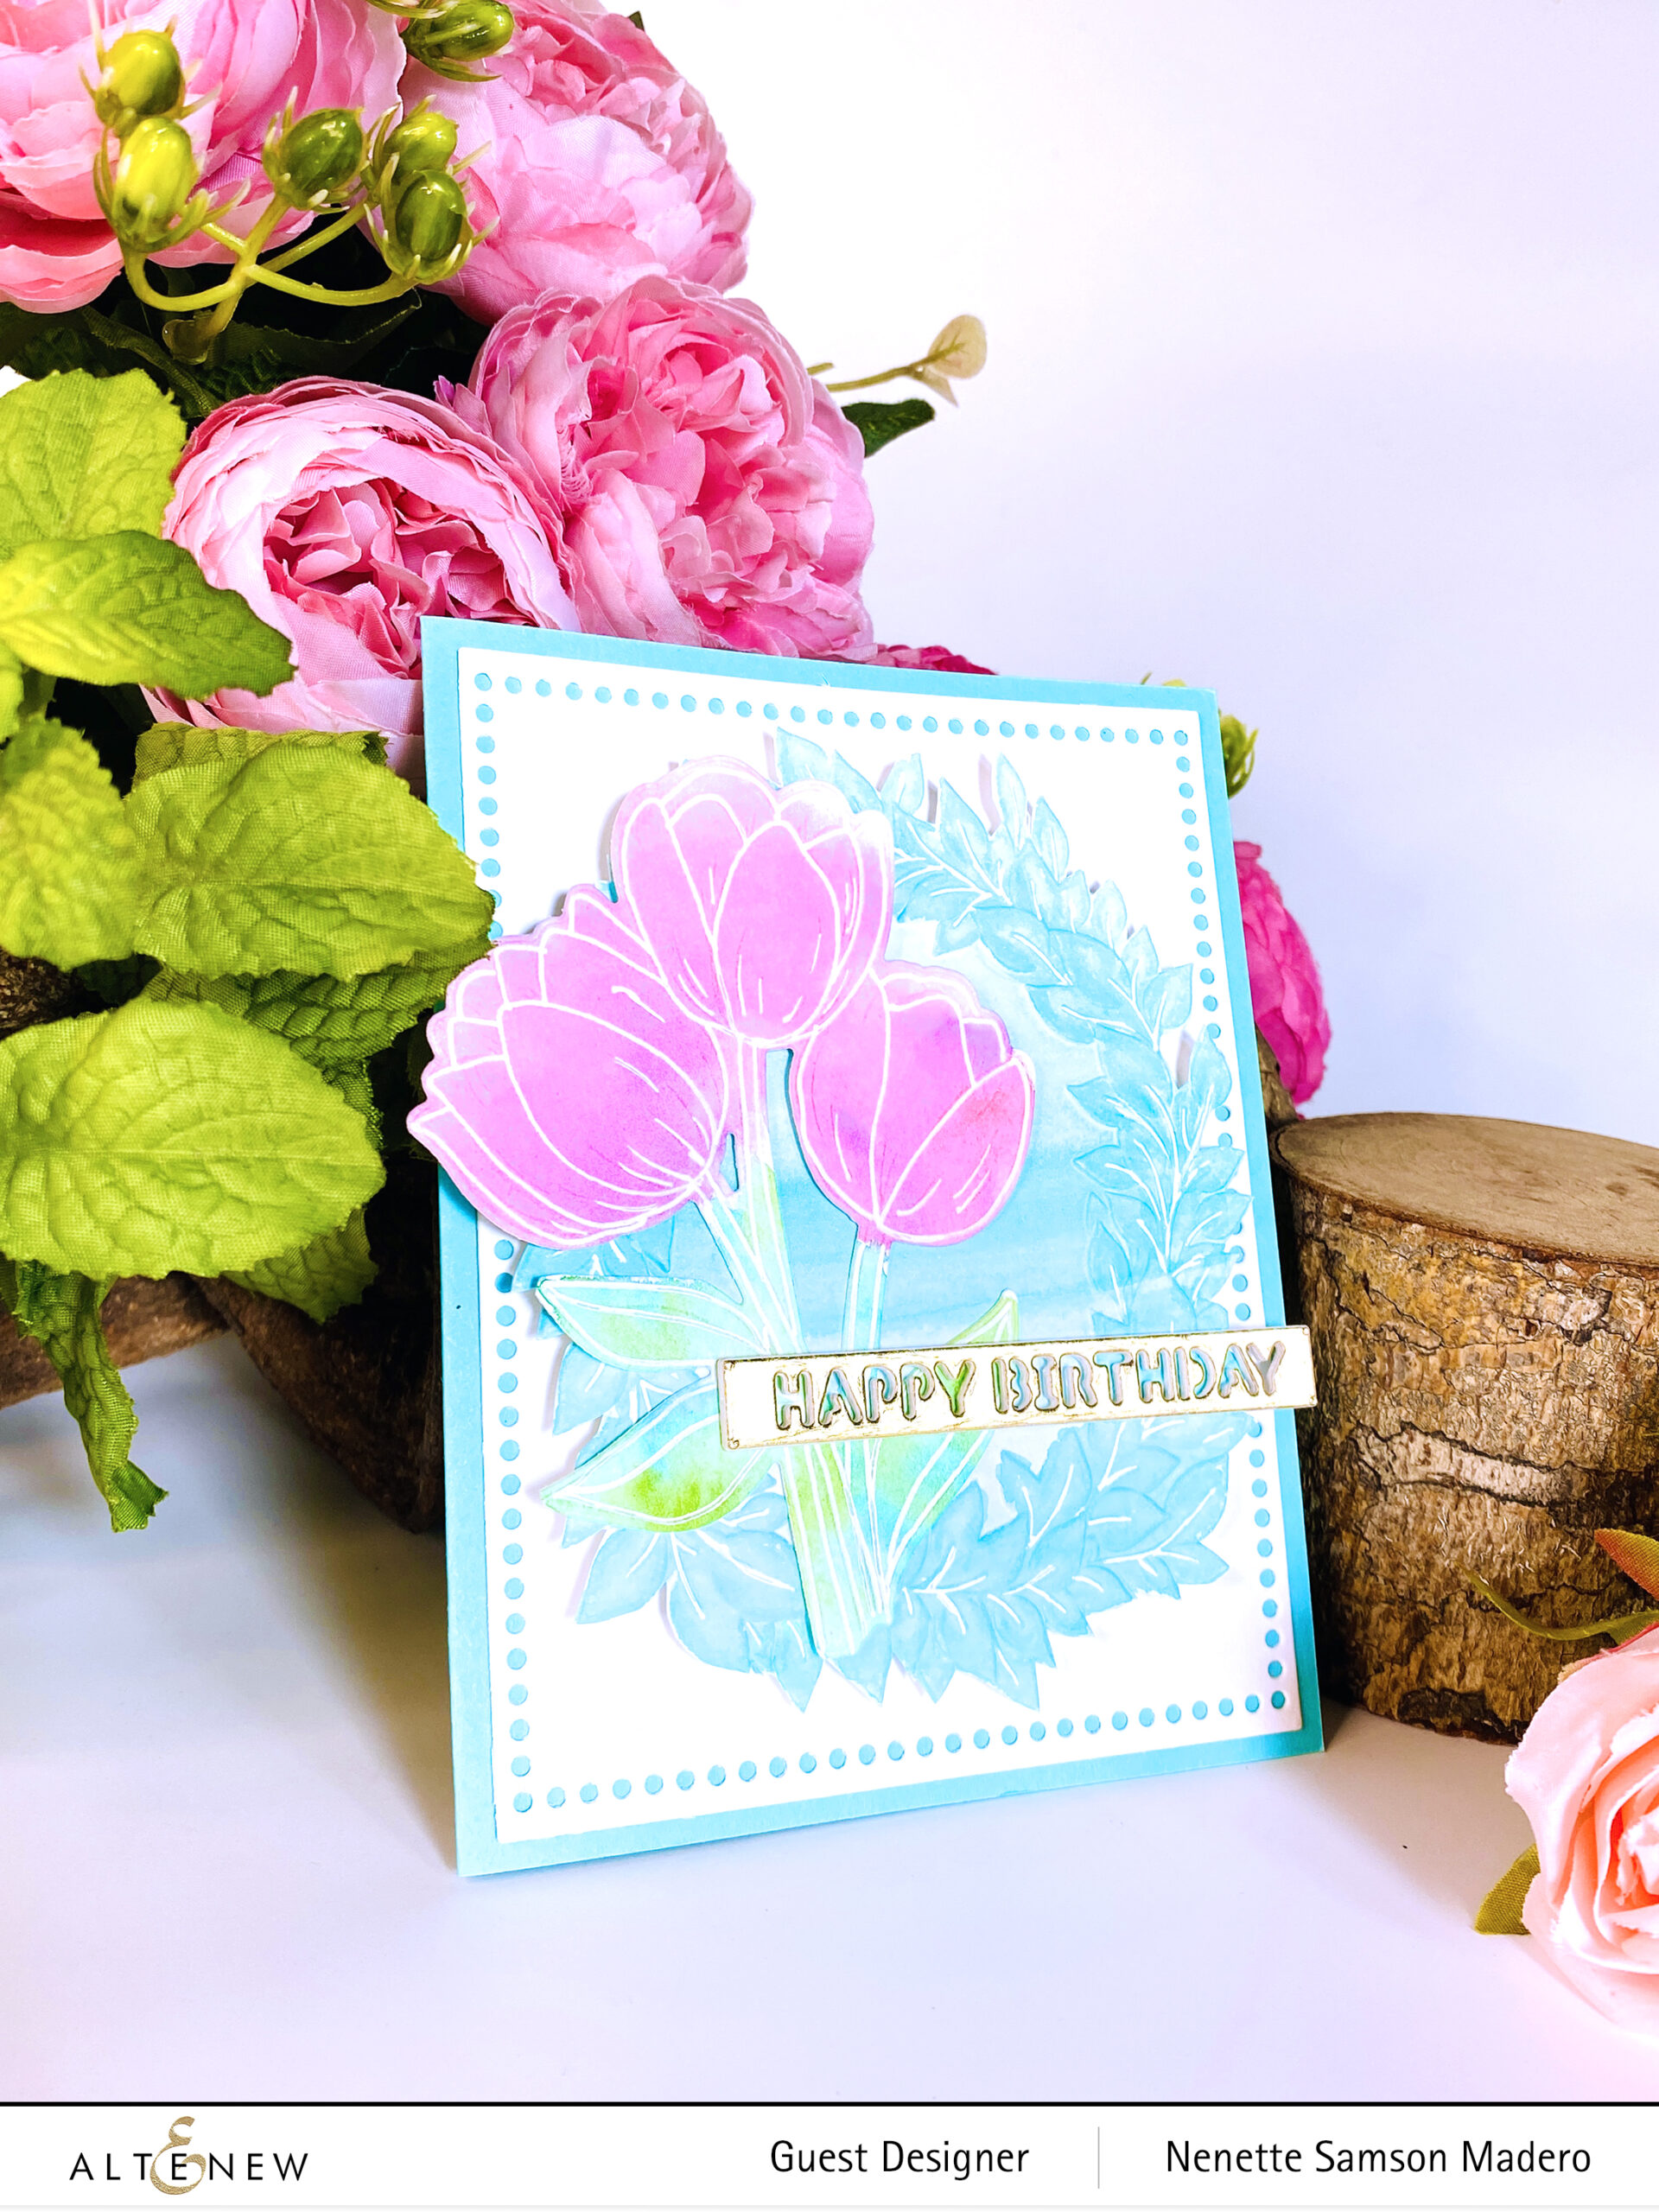
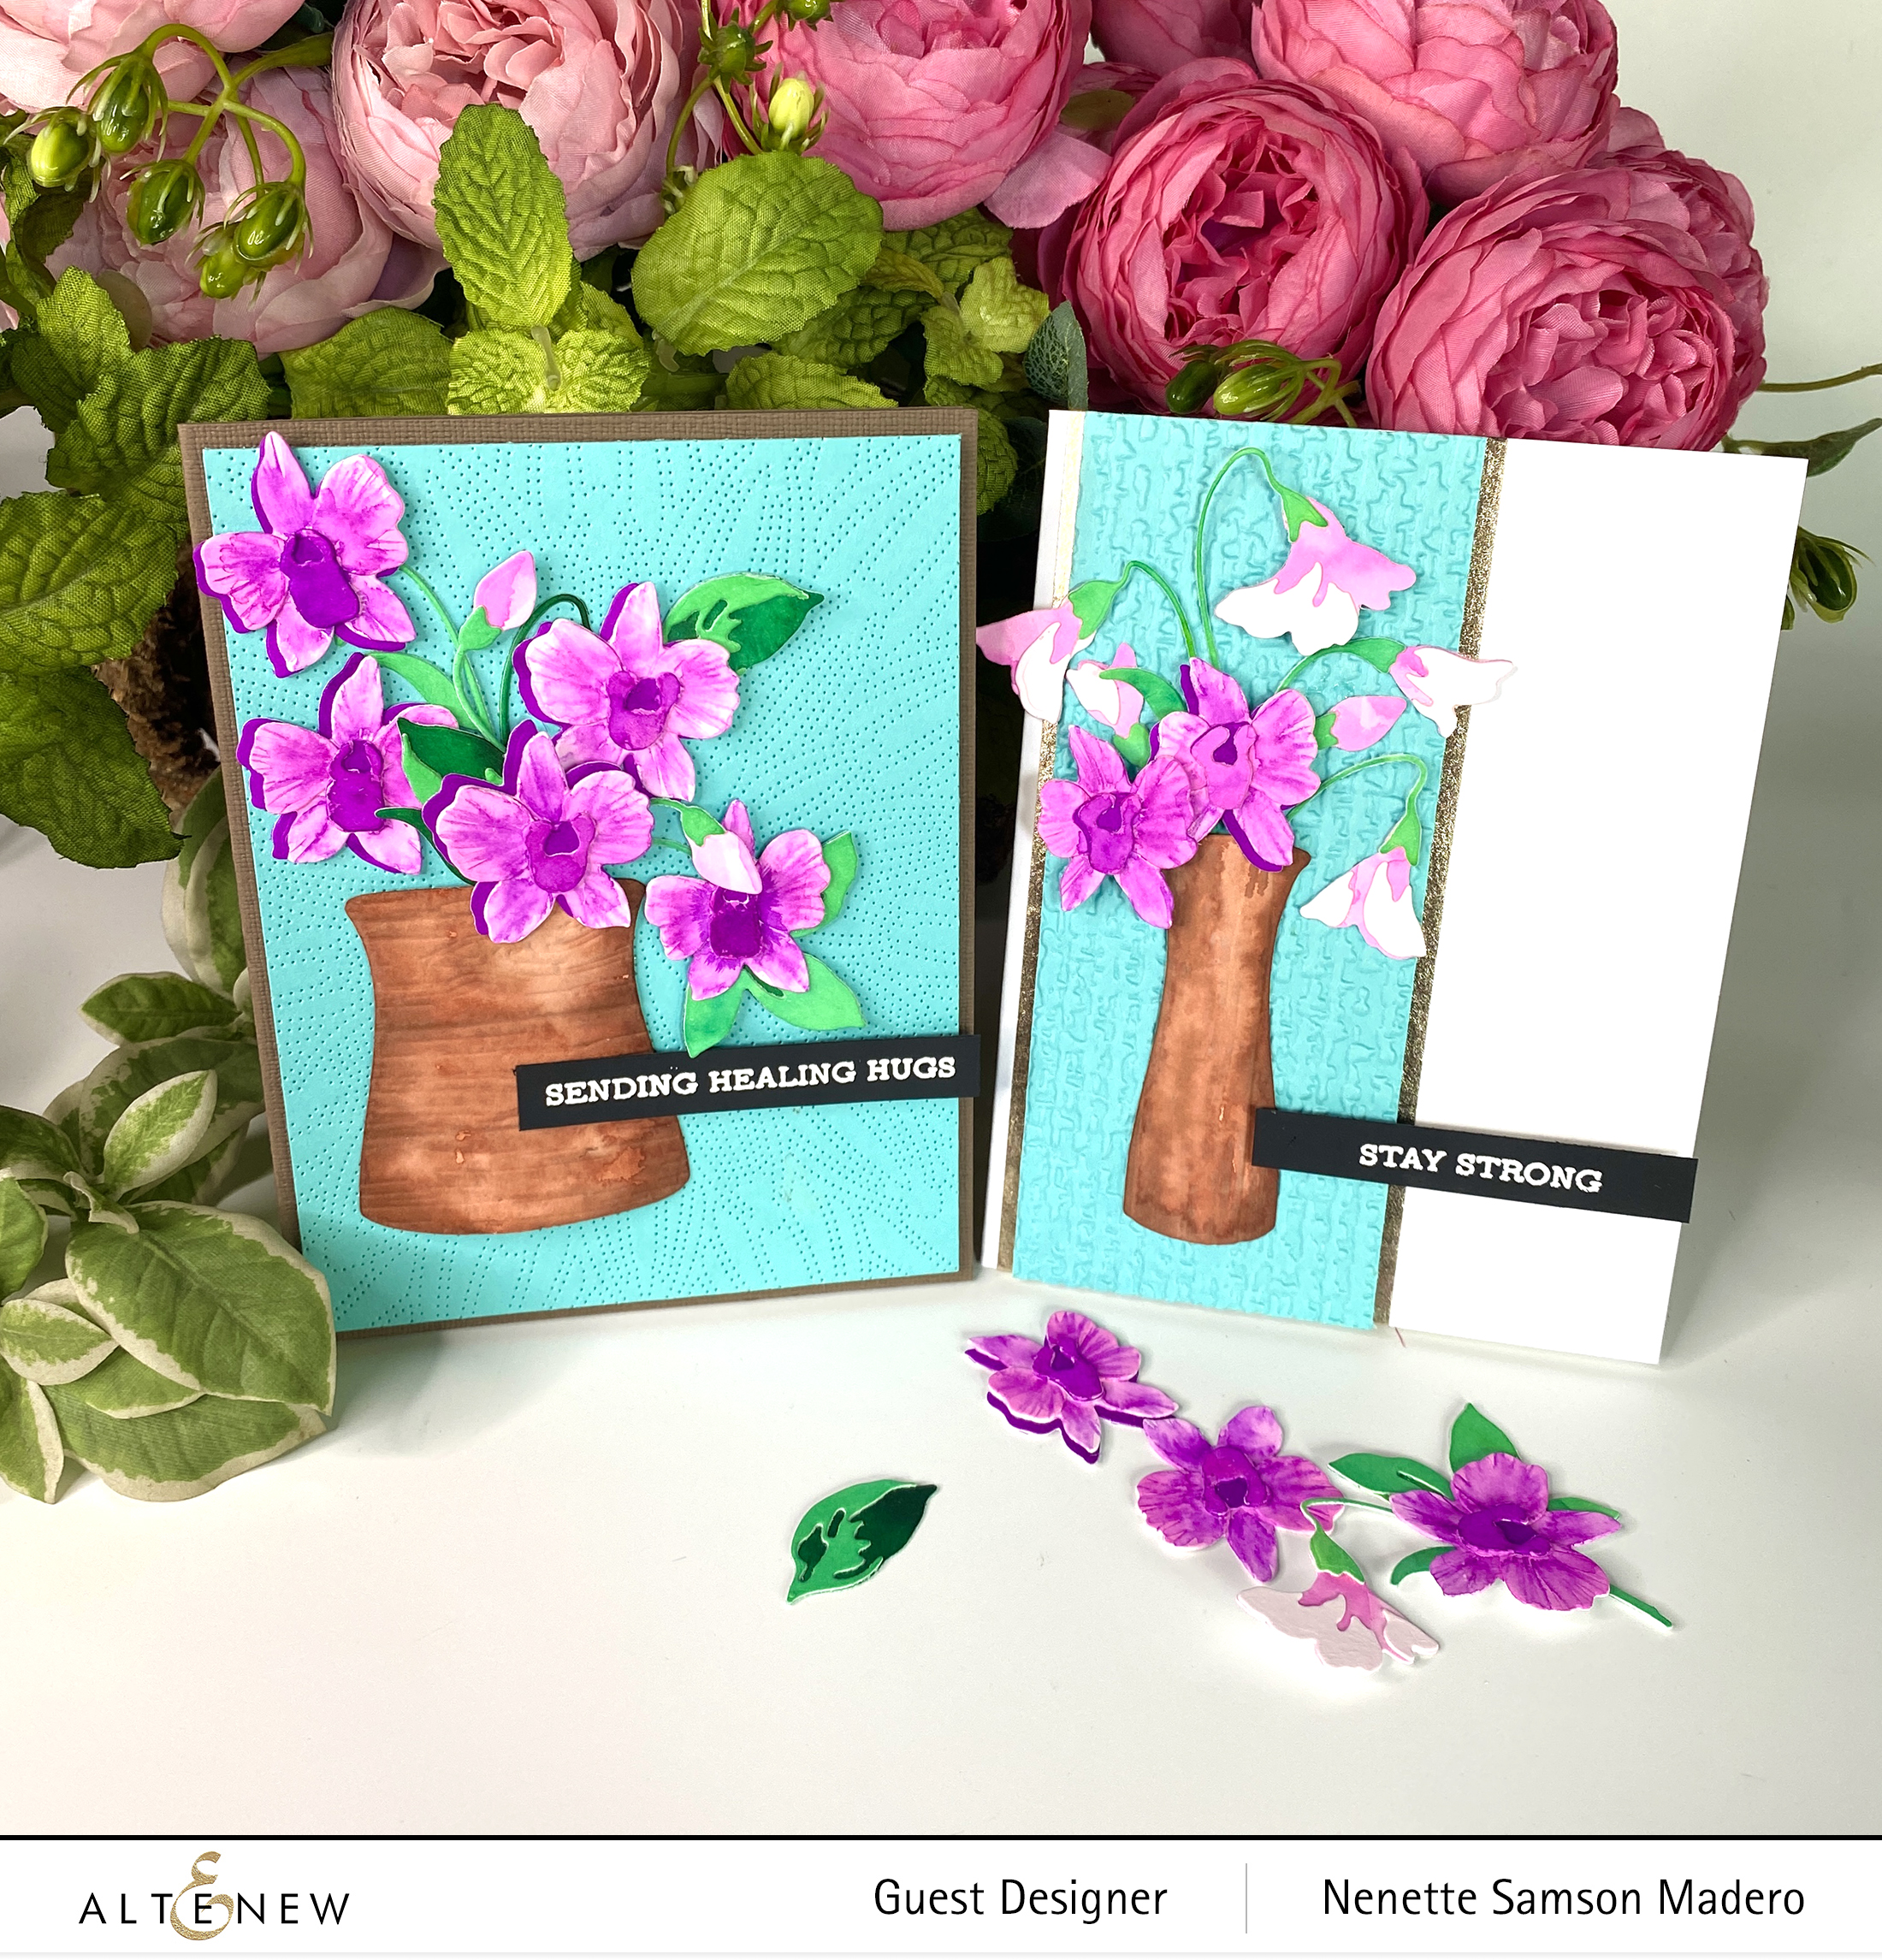
There is nothing like a bouquet of flowers to bring you joy and contentment! Enjoy our Craft Your Life Project Kit, an exciting monthly package that is sure to get the creative juices flowing! Featuring a 6×8 stamp set, coordinating die set, as well as a stencil and embossing folder to fit the theme, this project kit has almost everything you need to start crafting. Just add ink and cardstock, and you’ll be good to go! This kit features a gorgeous stamp set with three beautiful floral clusters. The flowers and leaves were drawn with great care, giving special attention to the folds and curves of the petals. The set includes eight messages great for everyday occasions. The kit also features FIVE coloring stencils which will allow you to color the floral clusters in two coloring layers. Furthermore, there is a matching die for each of the floral clusters and an embossing folder featuring an elaborate version of one of the floral clusters from the stamp set. Pair them together for the best results. Take a look at this beautiful kit!

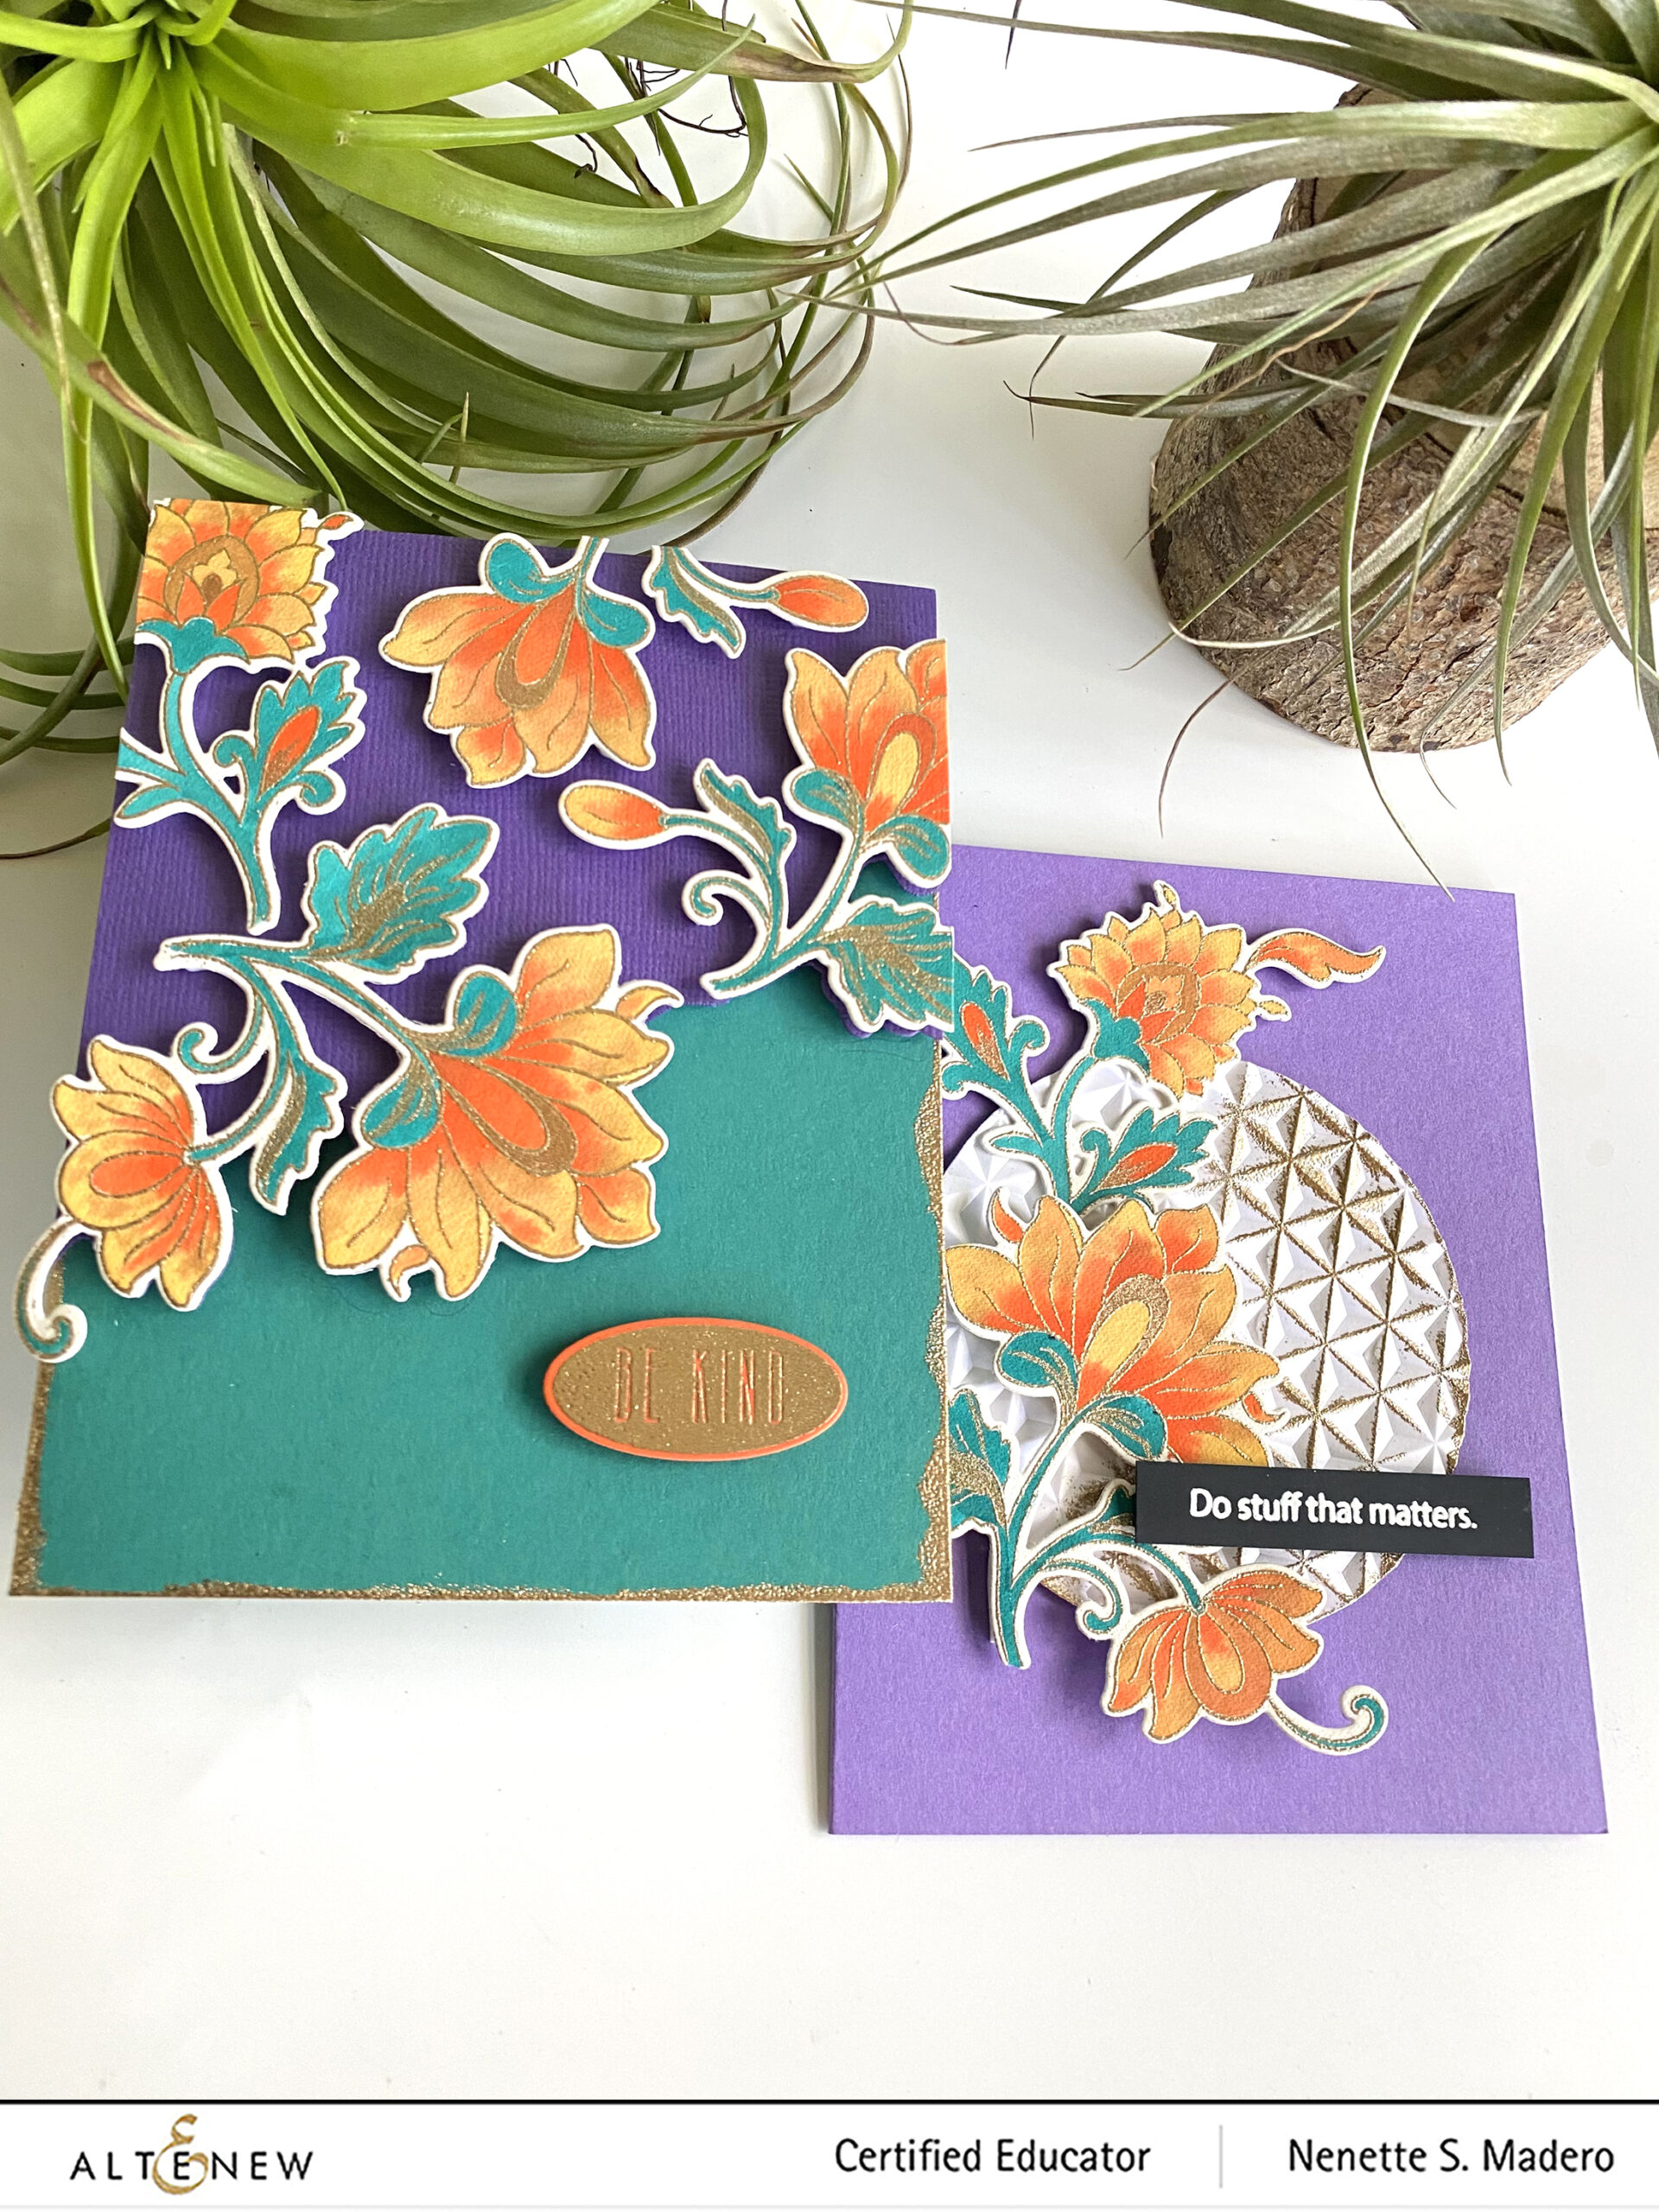
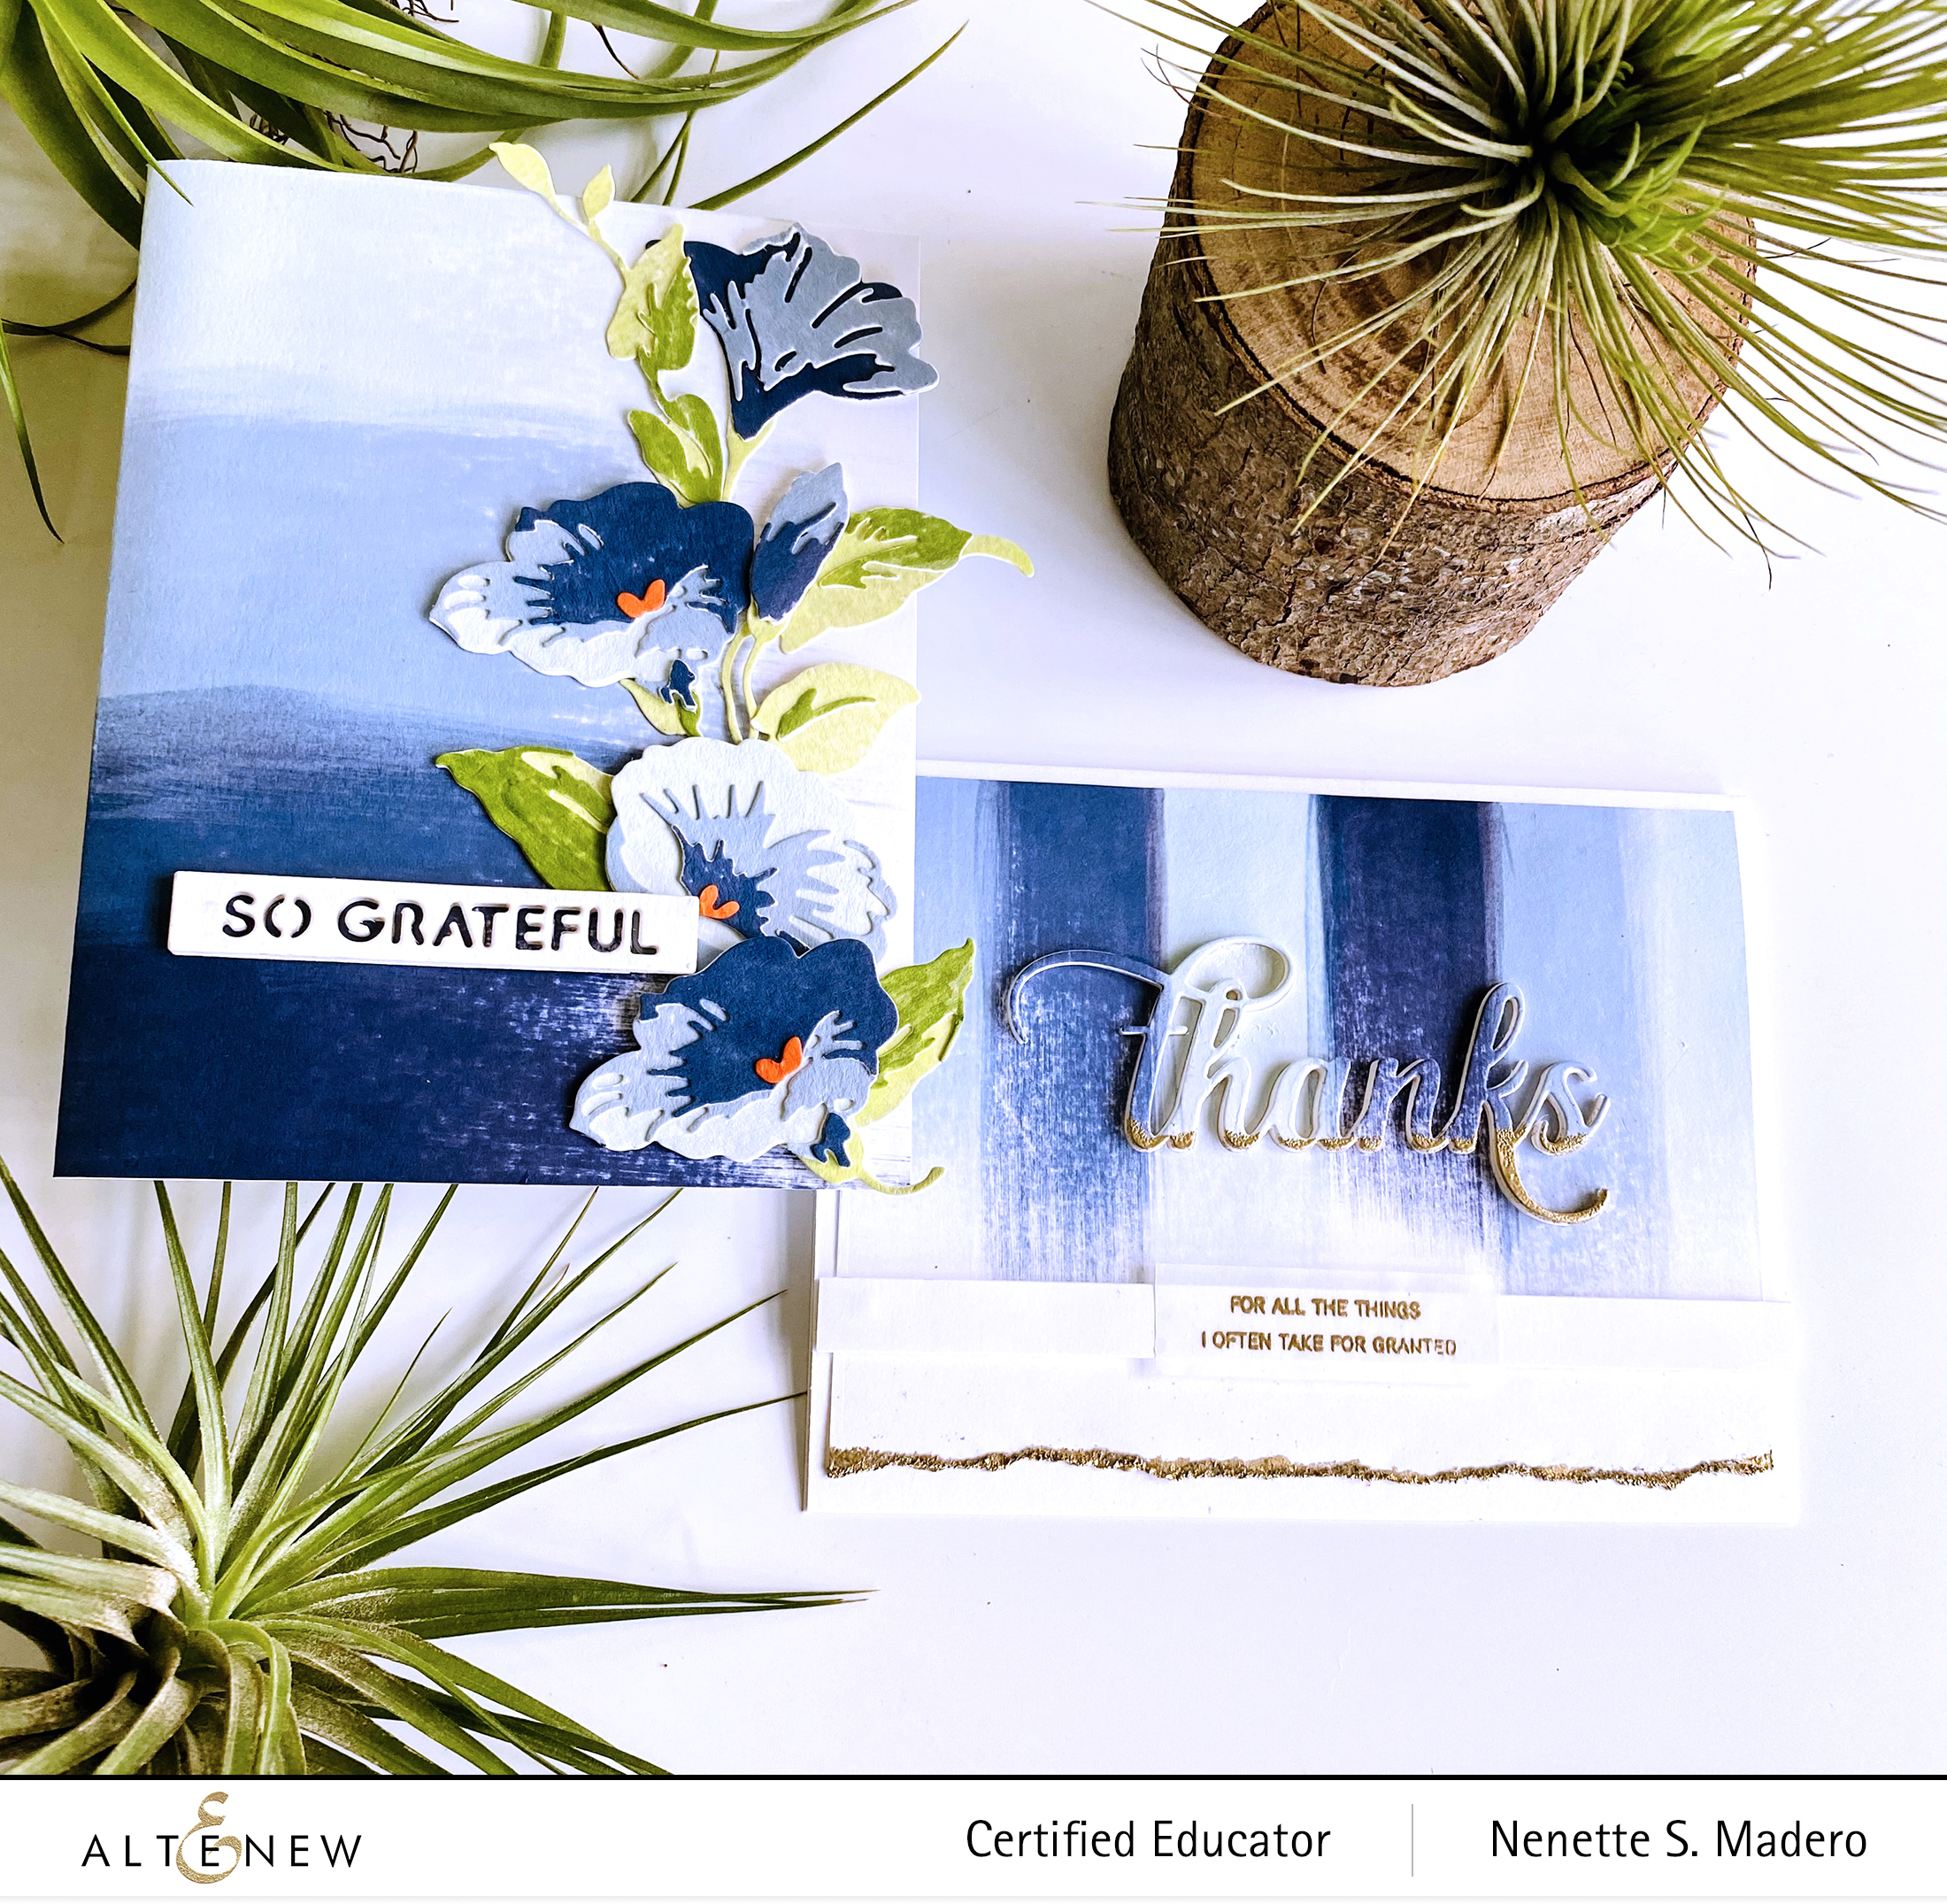
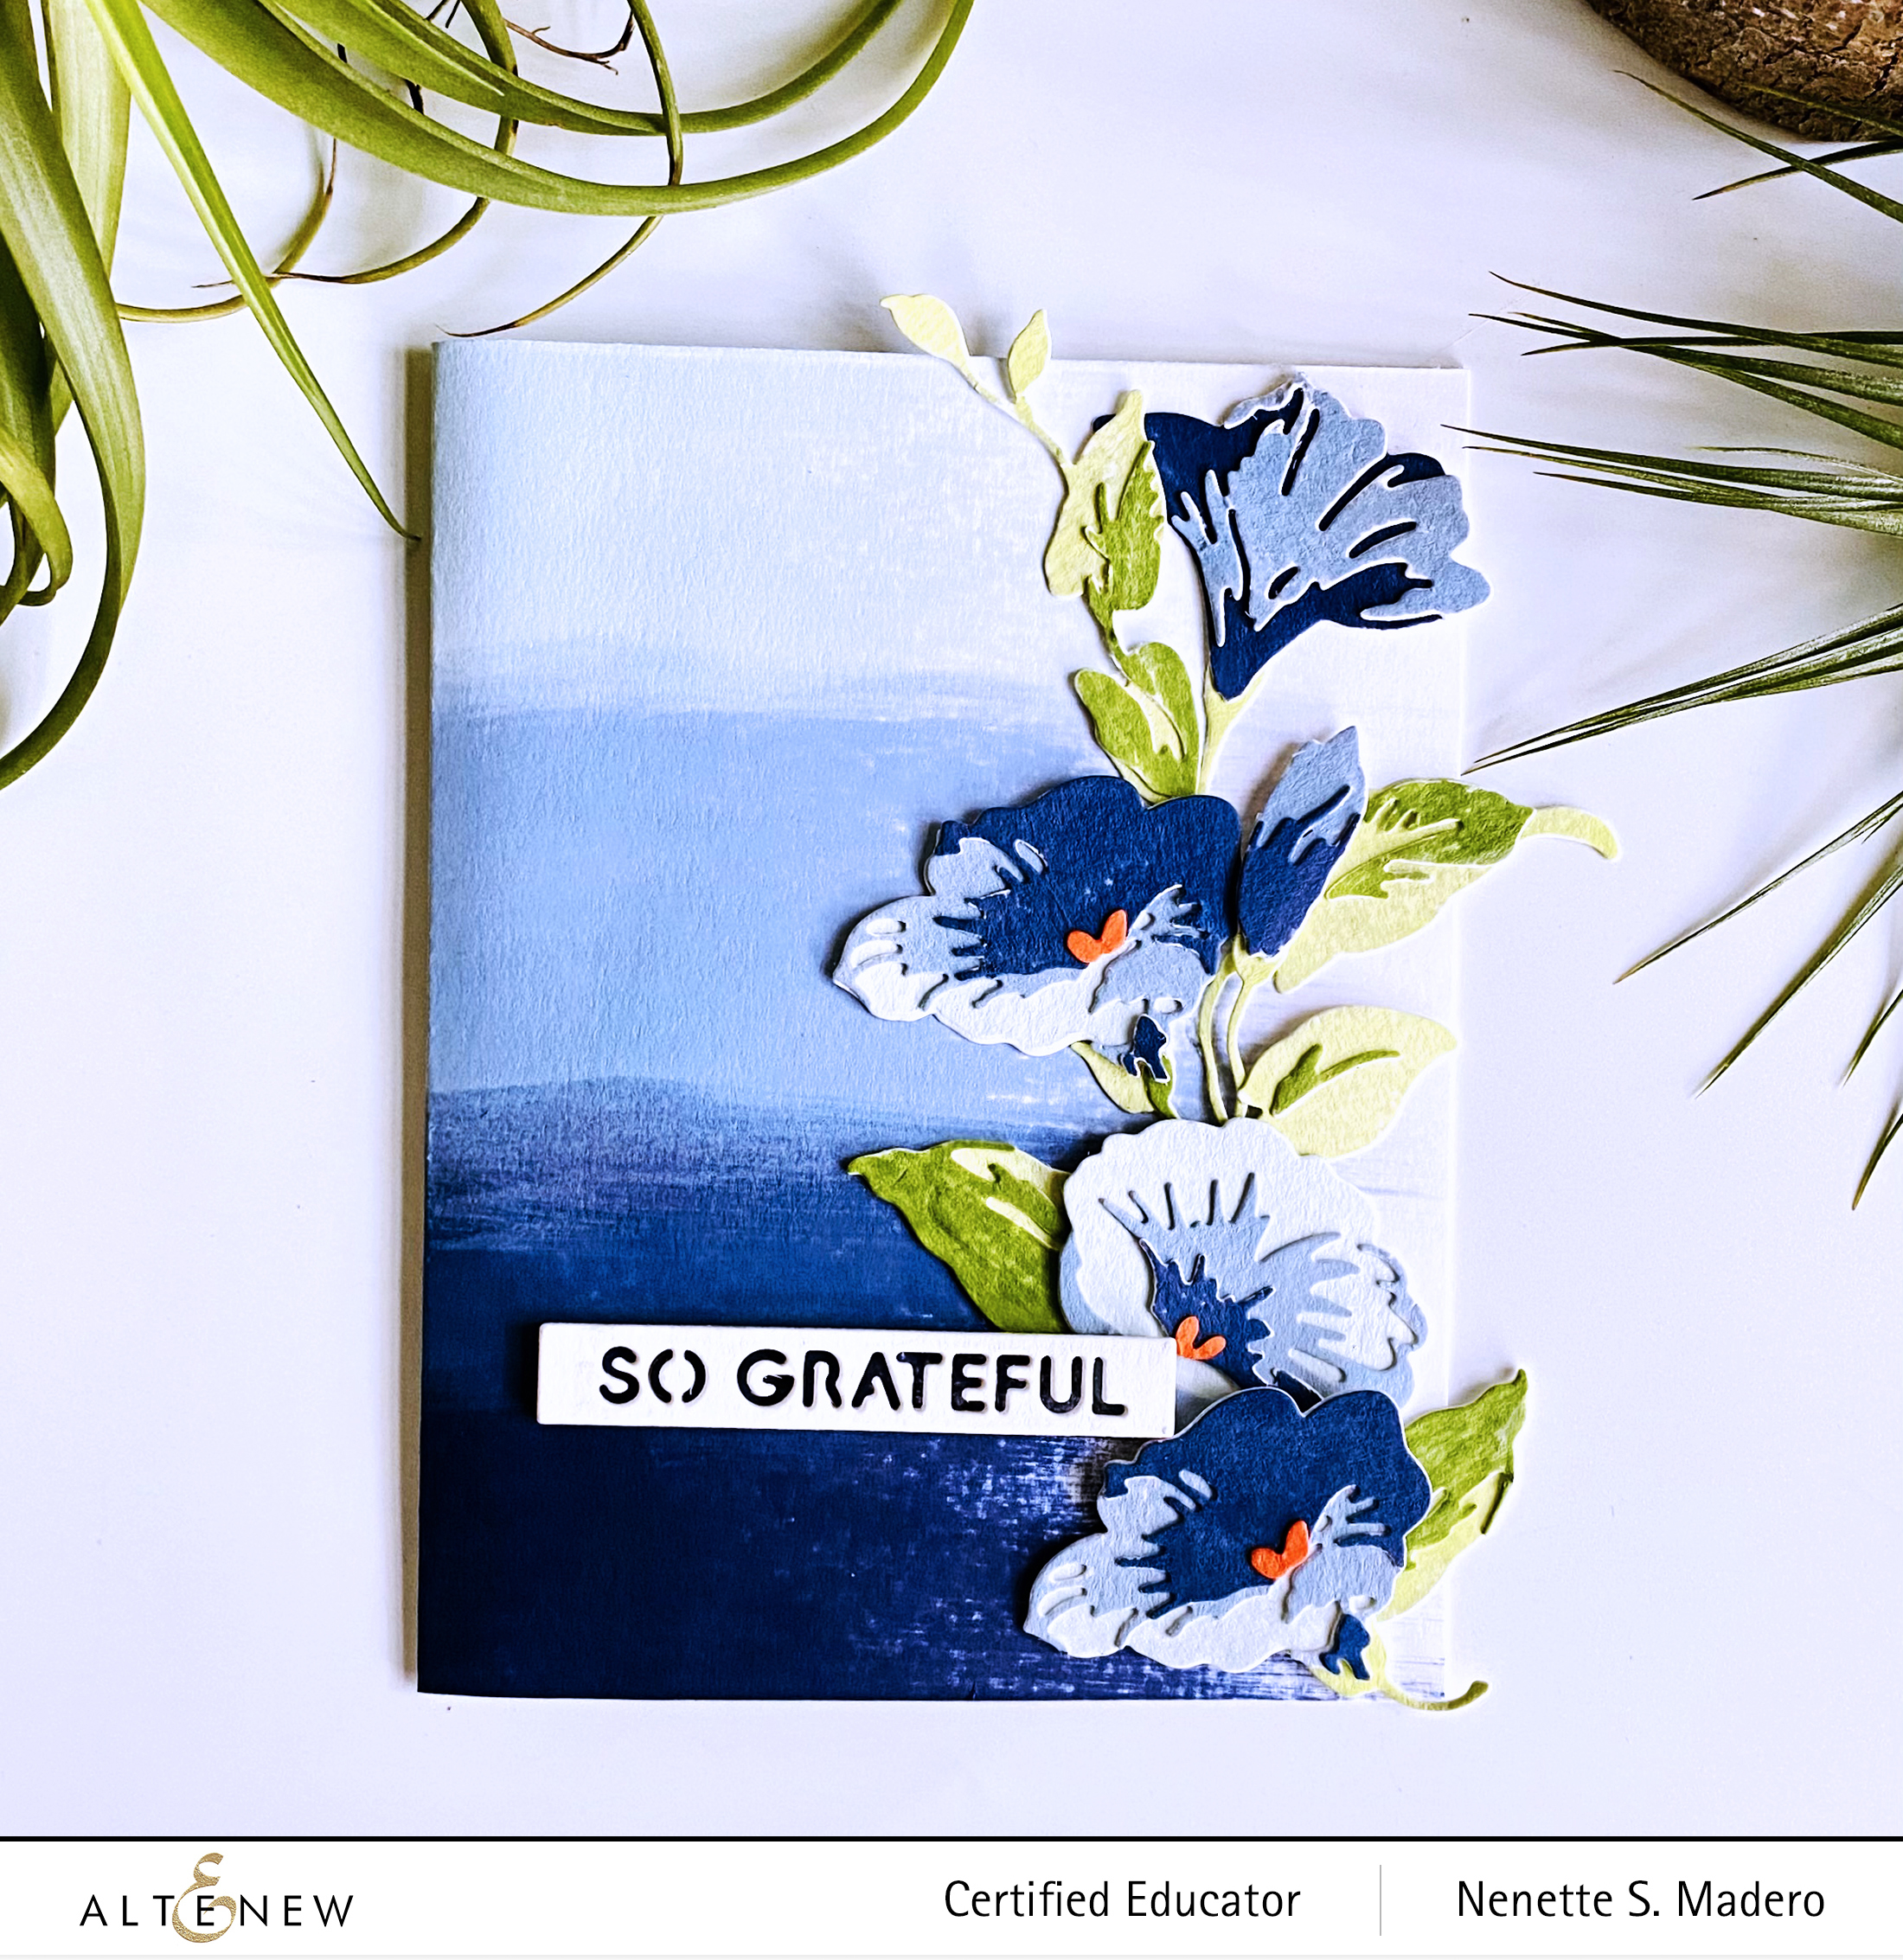
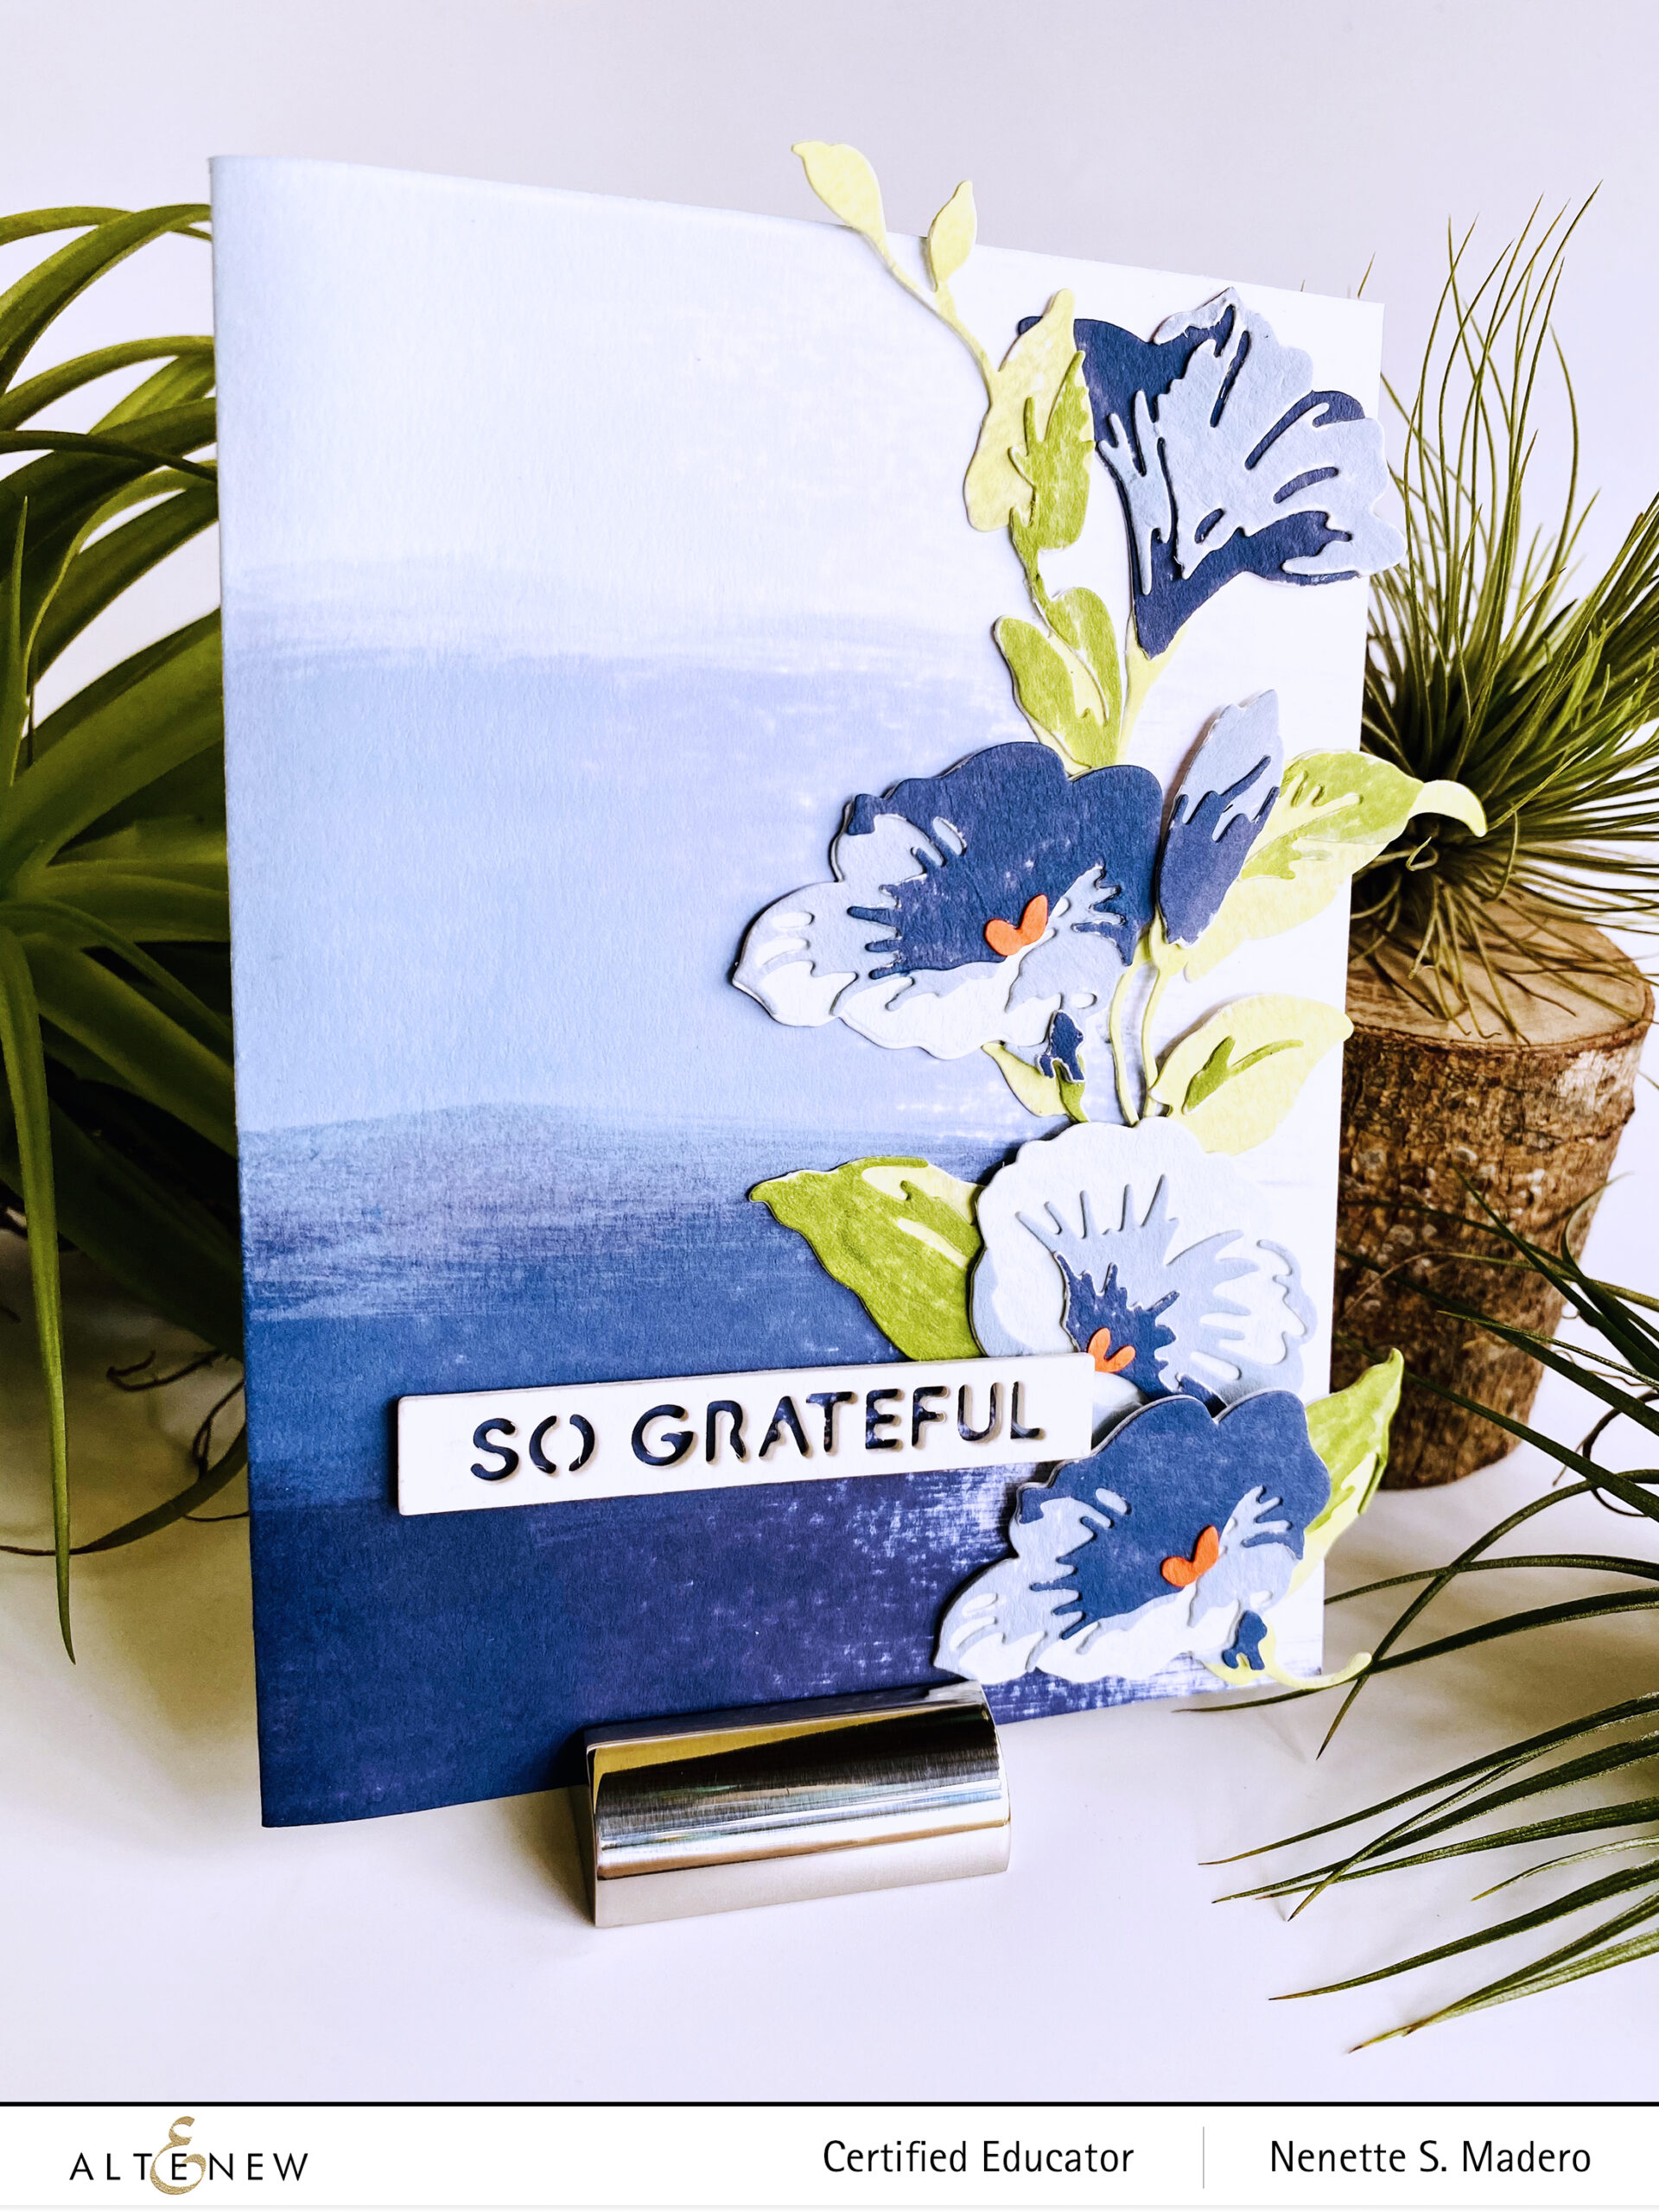
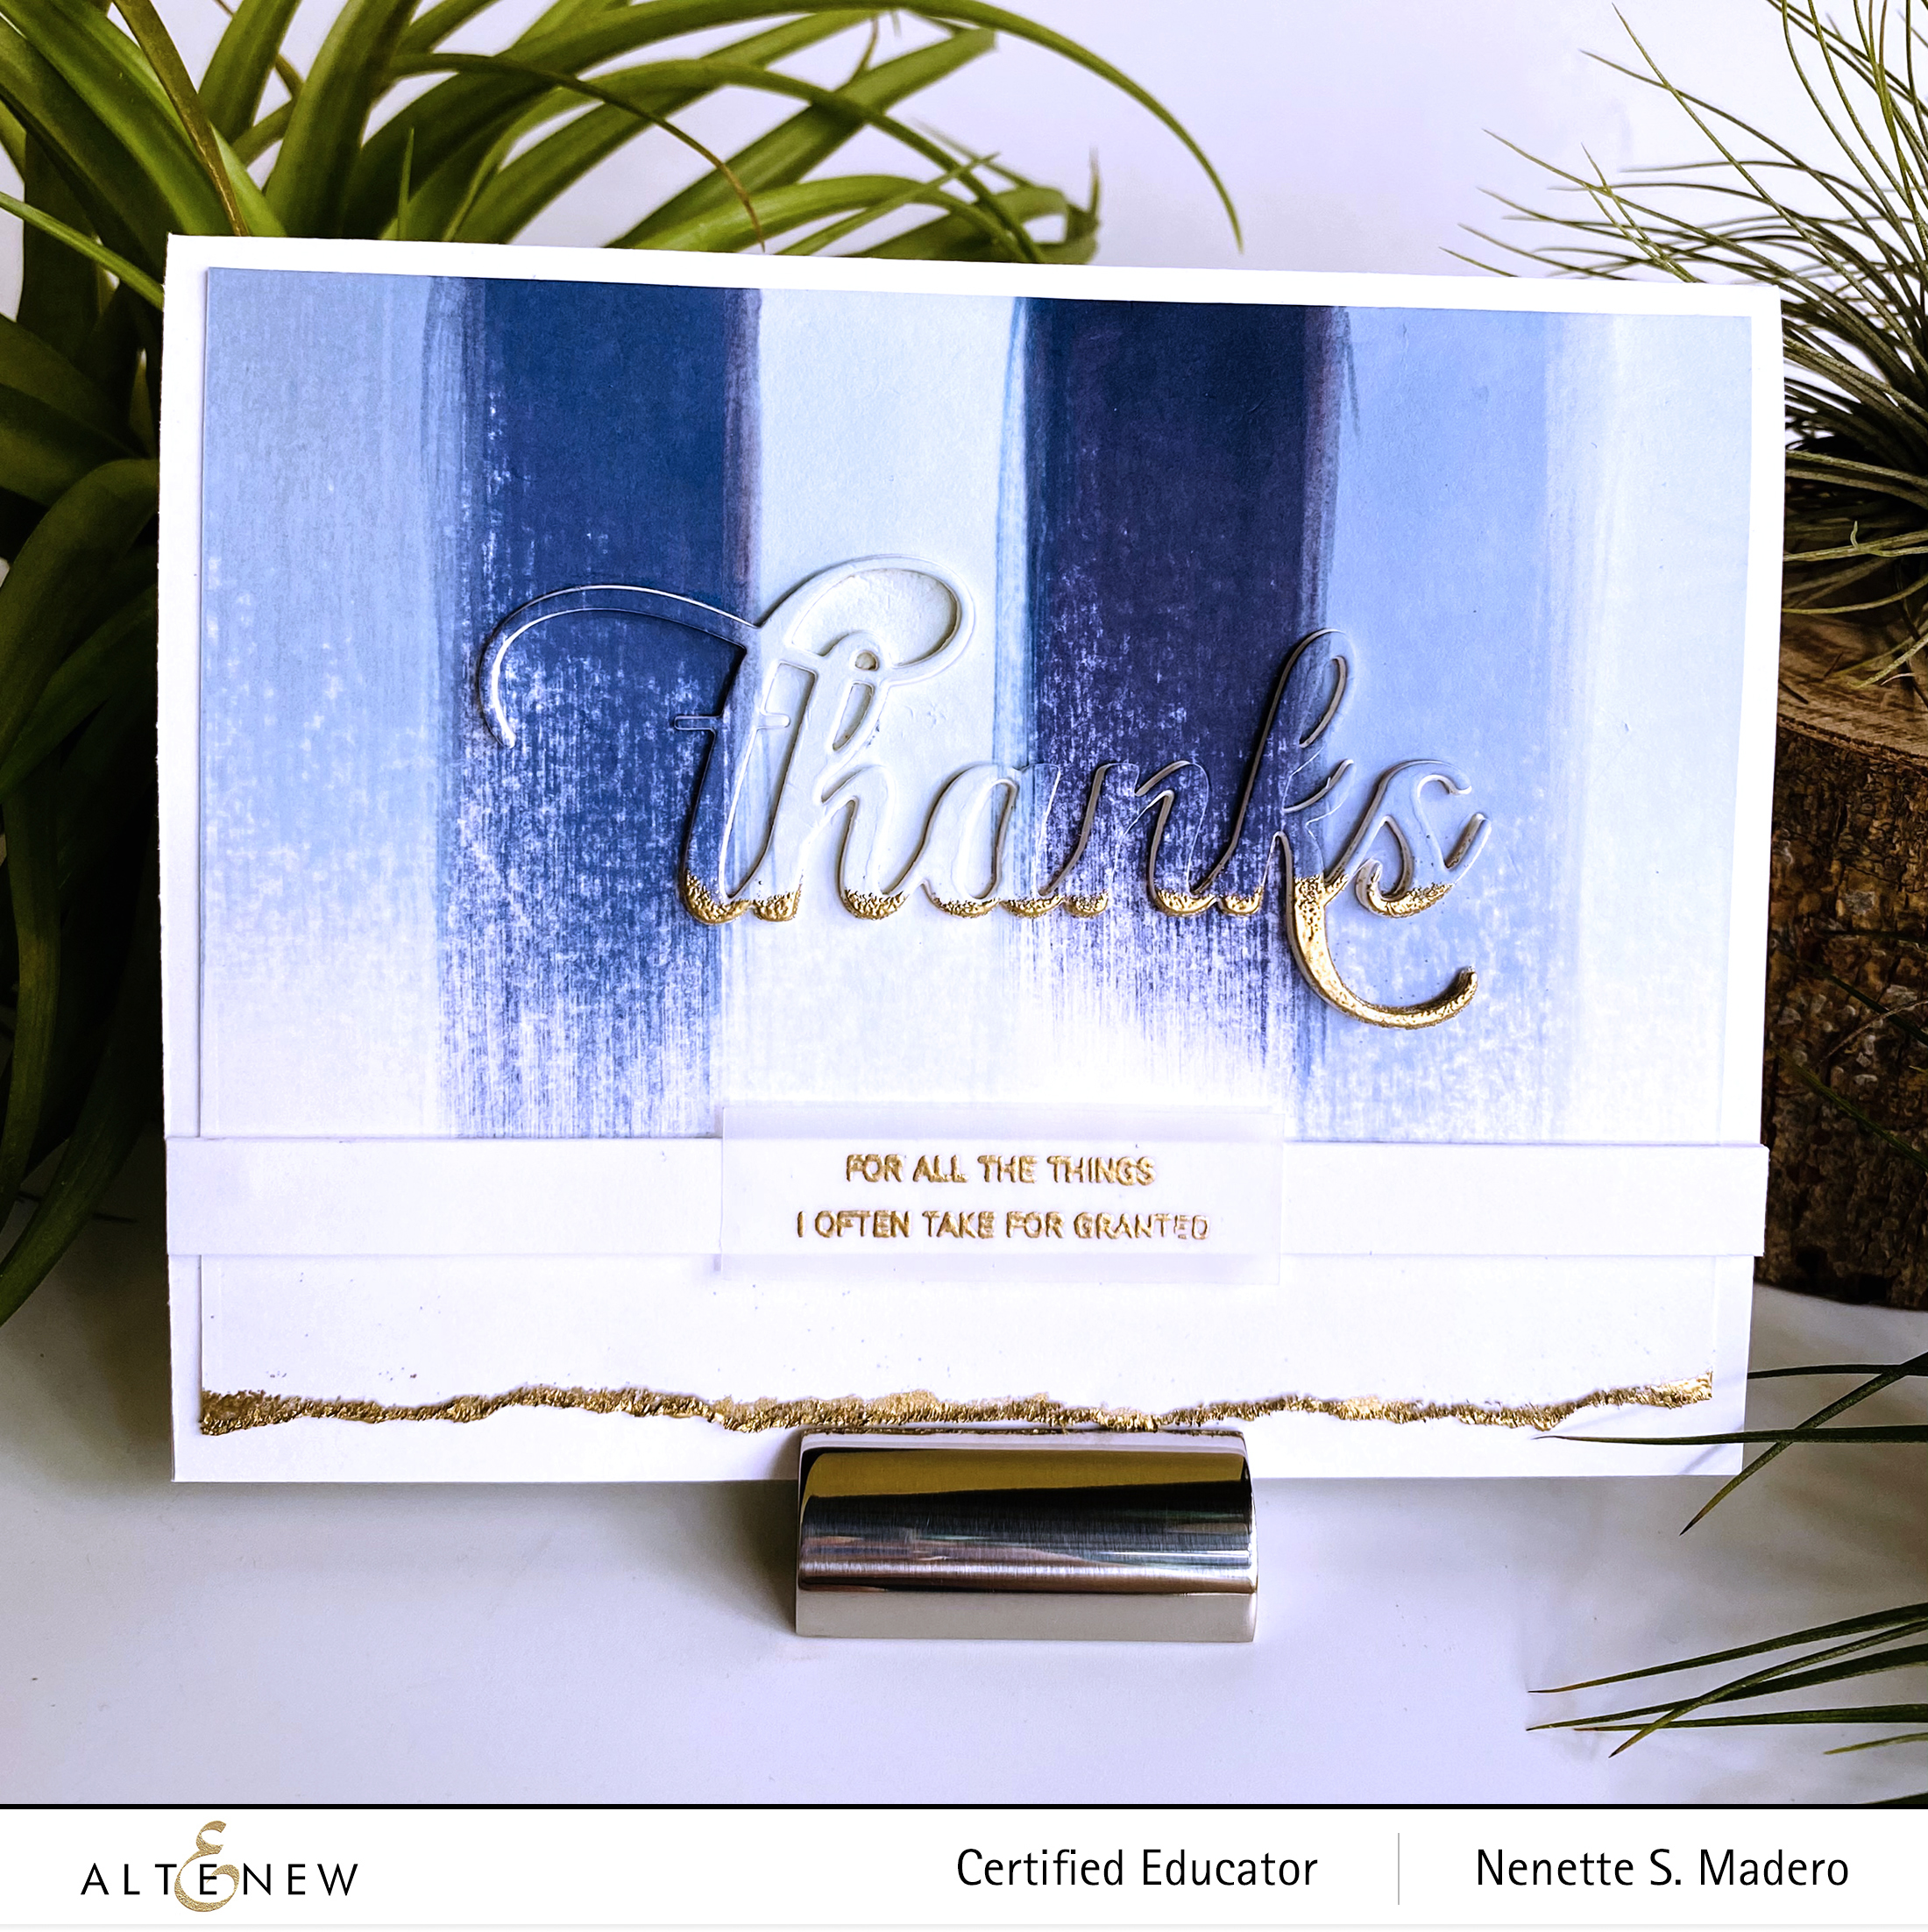
I created 4 cards using the stamp set and stencils in this release. Let me know which one you like ok?


HELLO


HELLO BEAUTIFUL STAMP AND STENCIL, FANCY HELLO DIE, WILDFLOWER PAPER PACK, GOLD FOIL WASHI TAPE, NATURE’S WONDER AND MARTIAN TERRAIN DYE INKS, PURE WHITE EMBOSSING POWDER
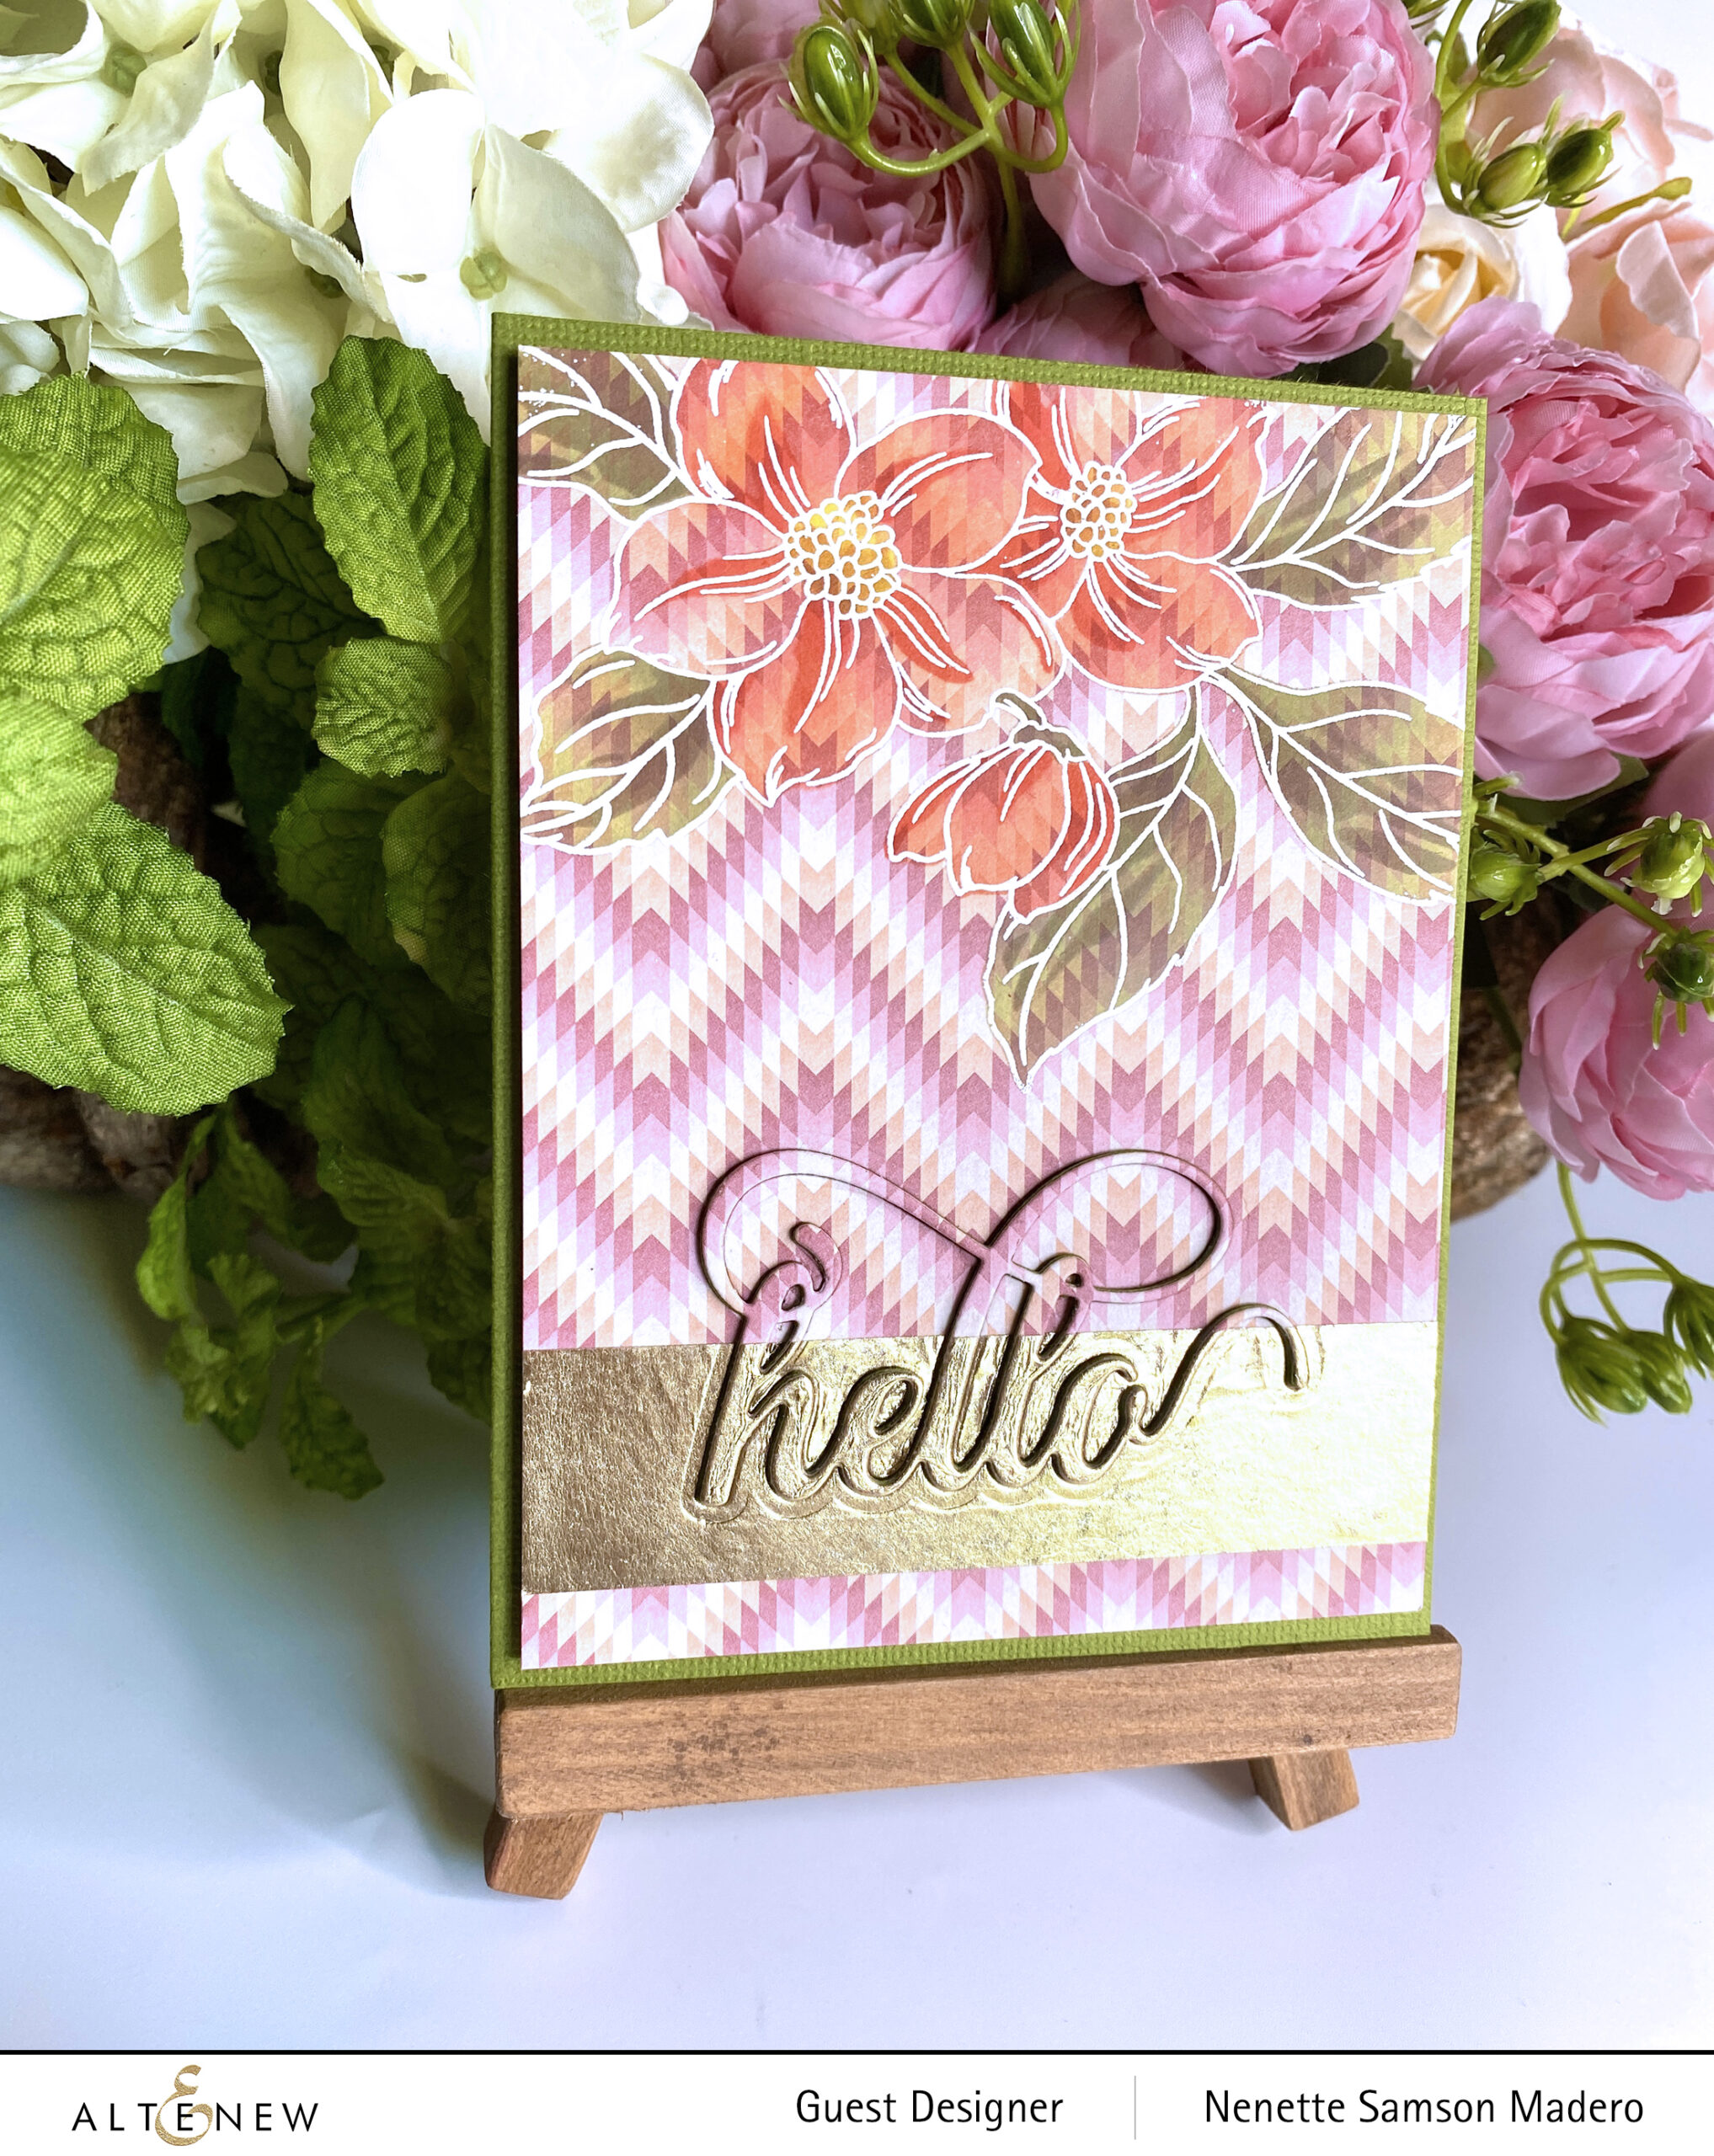
  1. Stamp the floral design using Versamark Ink and emboss with Pure White Embossing powder.
  2. Color the flowers and leaves using the stencil and dye inks.
  3. Add a strip of gold foil washi tape and die cut the word hello. Die cut additional hello 4 times to create a thicker die cut.
  4. Assemble the card.

I love the look of this card! The translucent dye inks allow the patterned paper to show through the flowers and leaves in a subtle way. The stencils make it so easy to color this set.
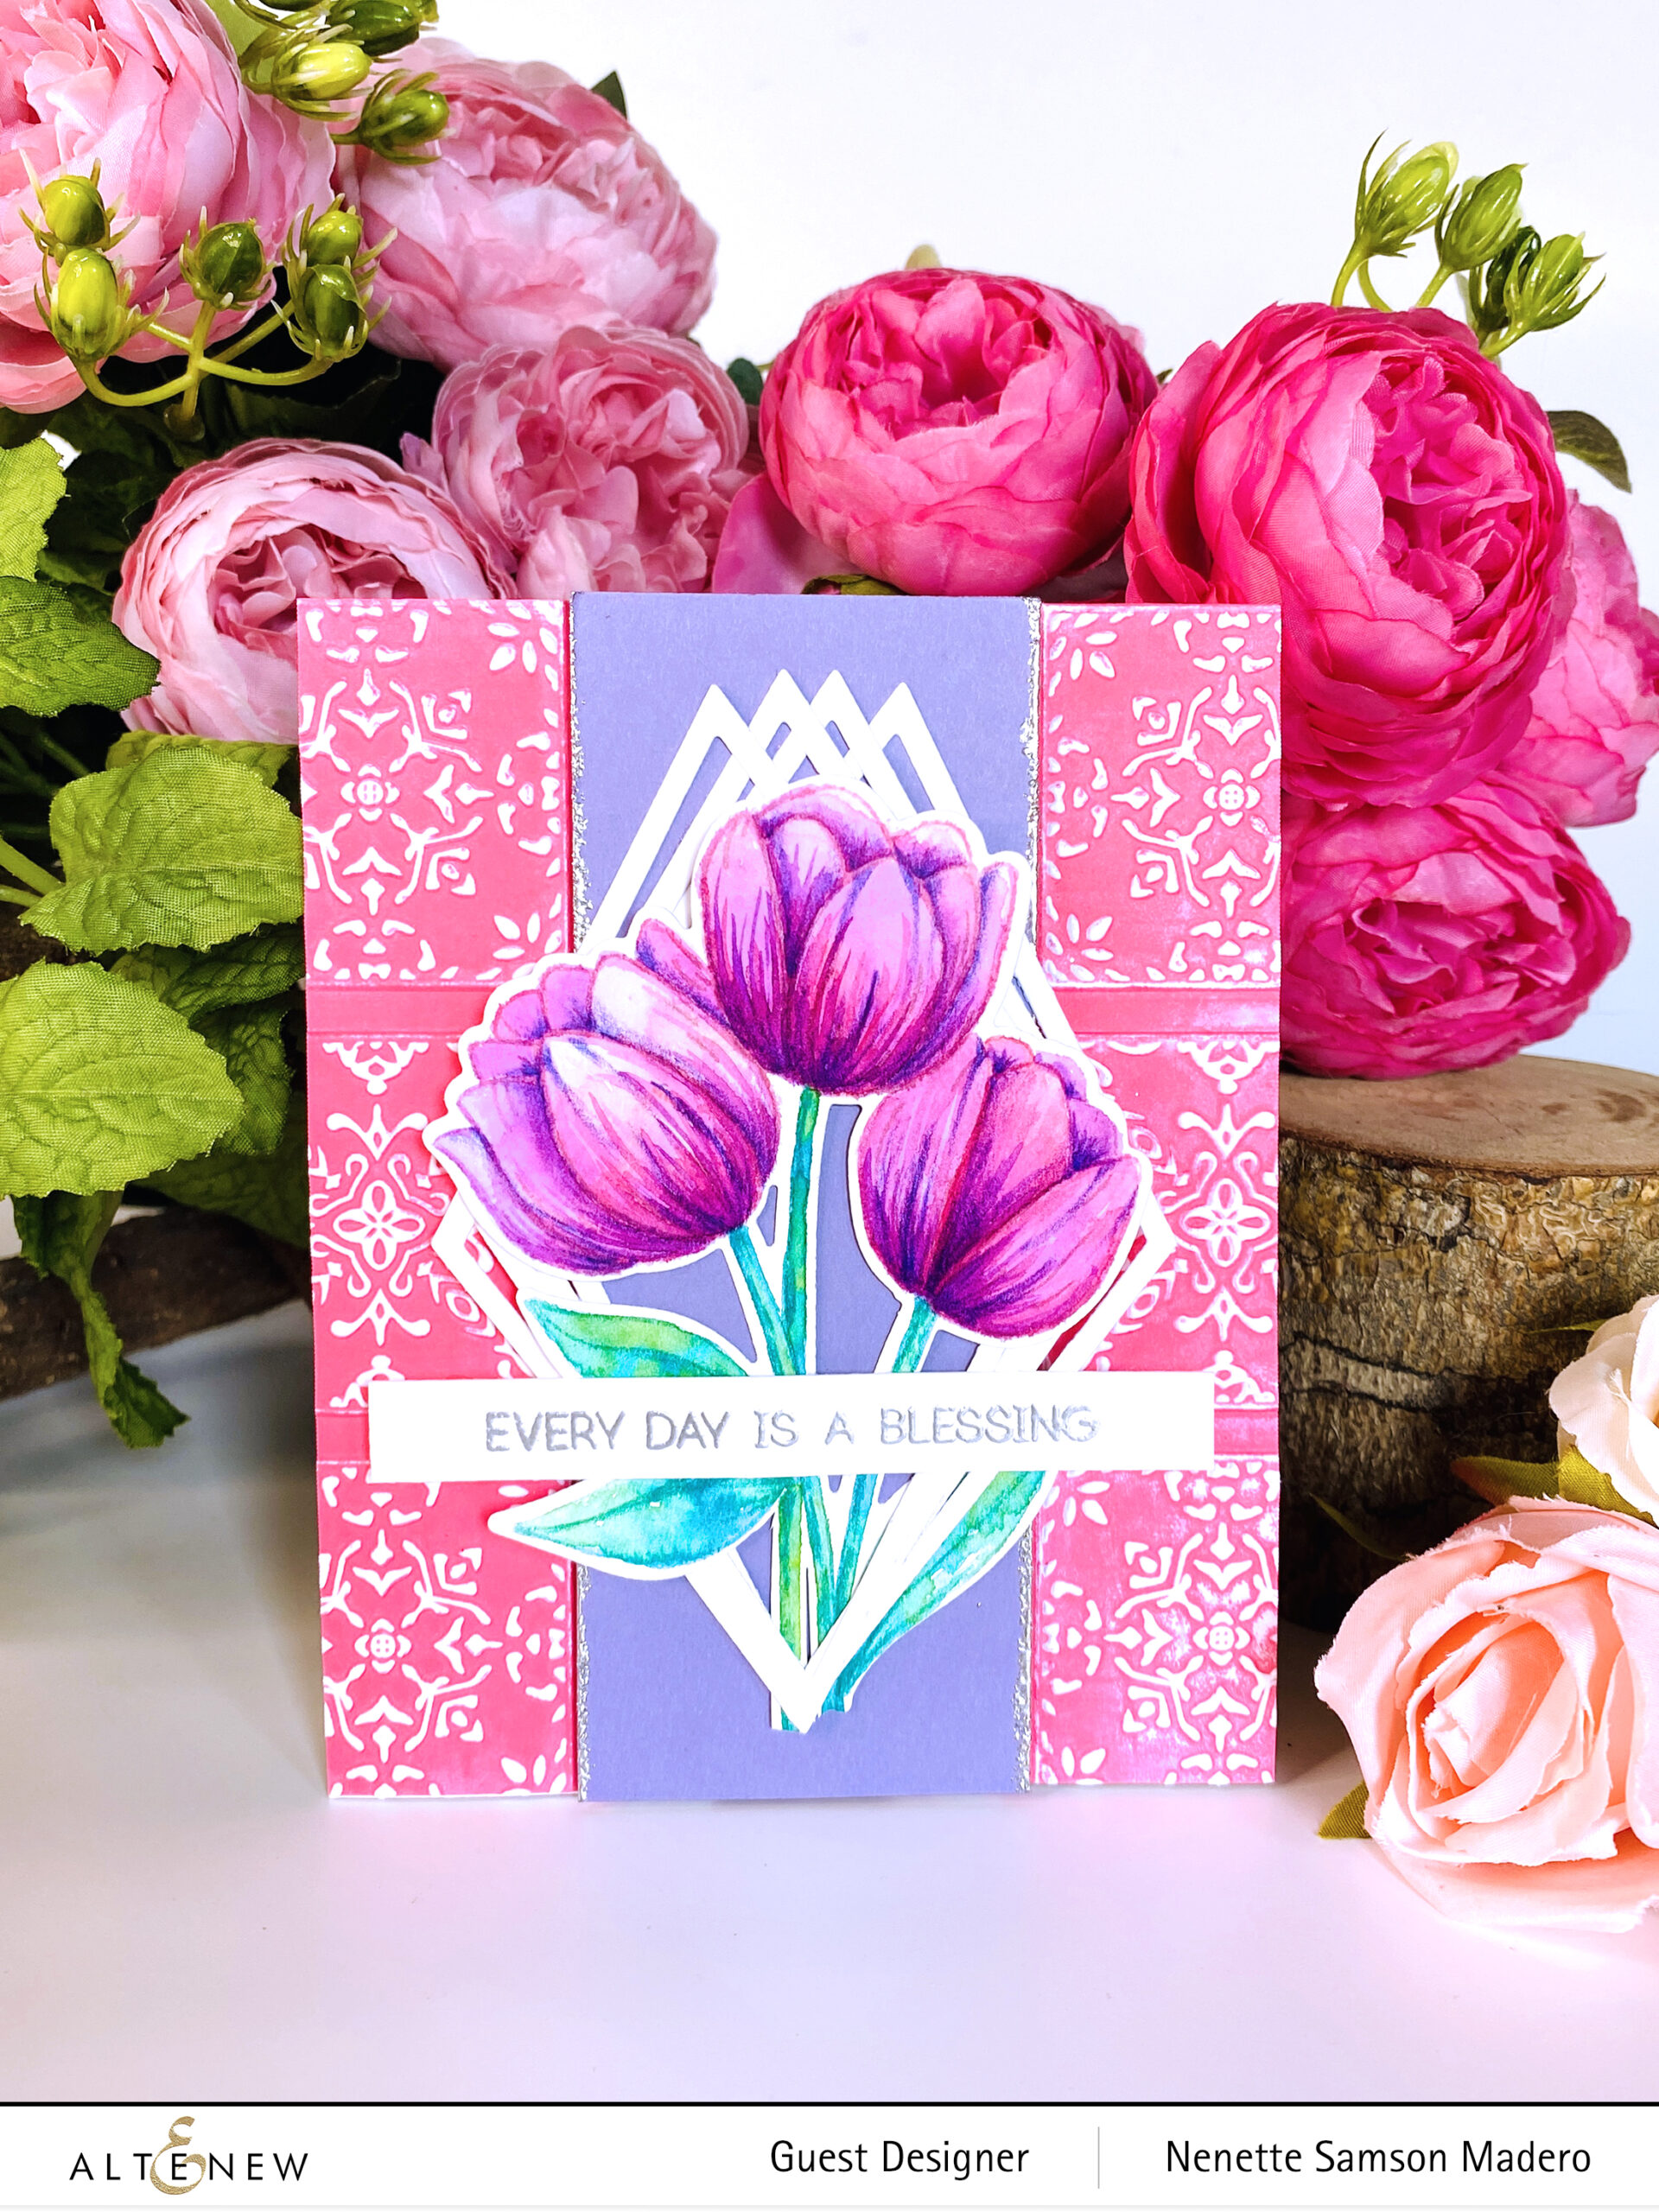
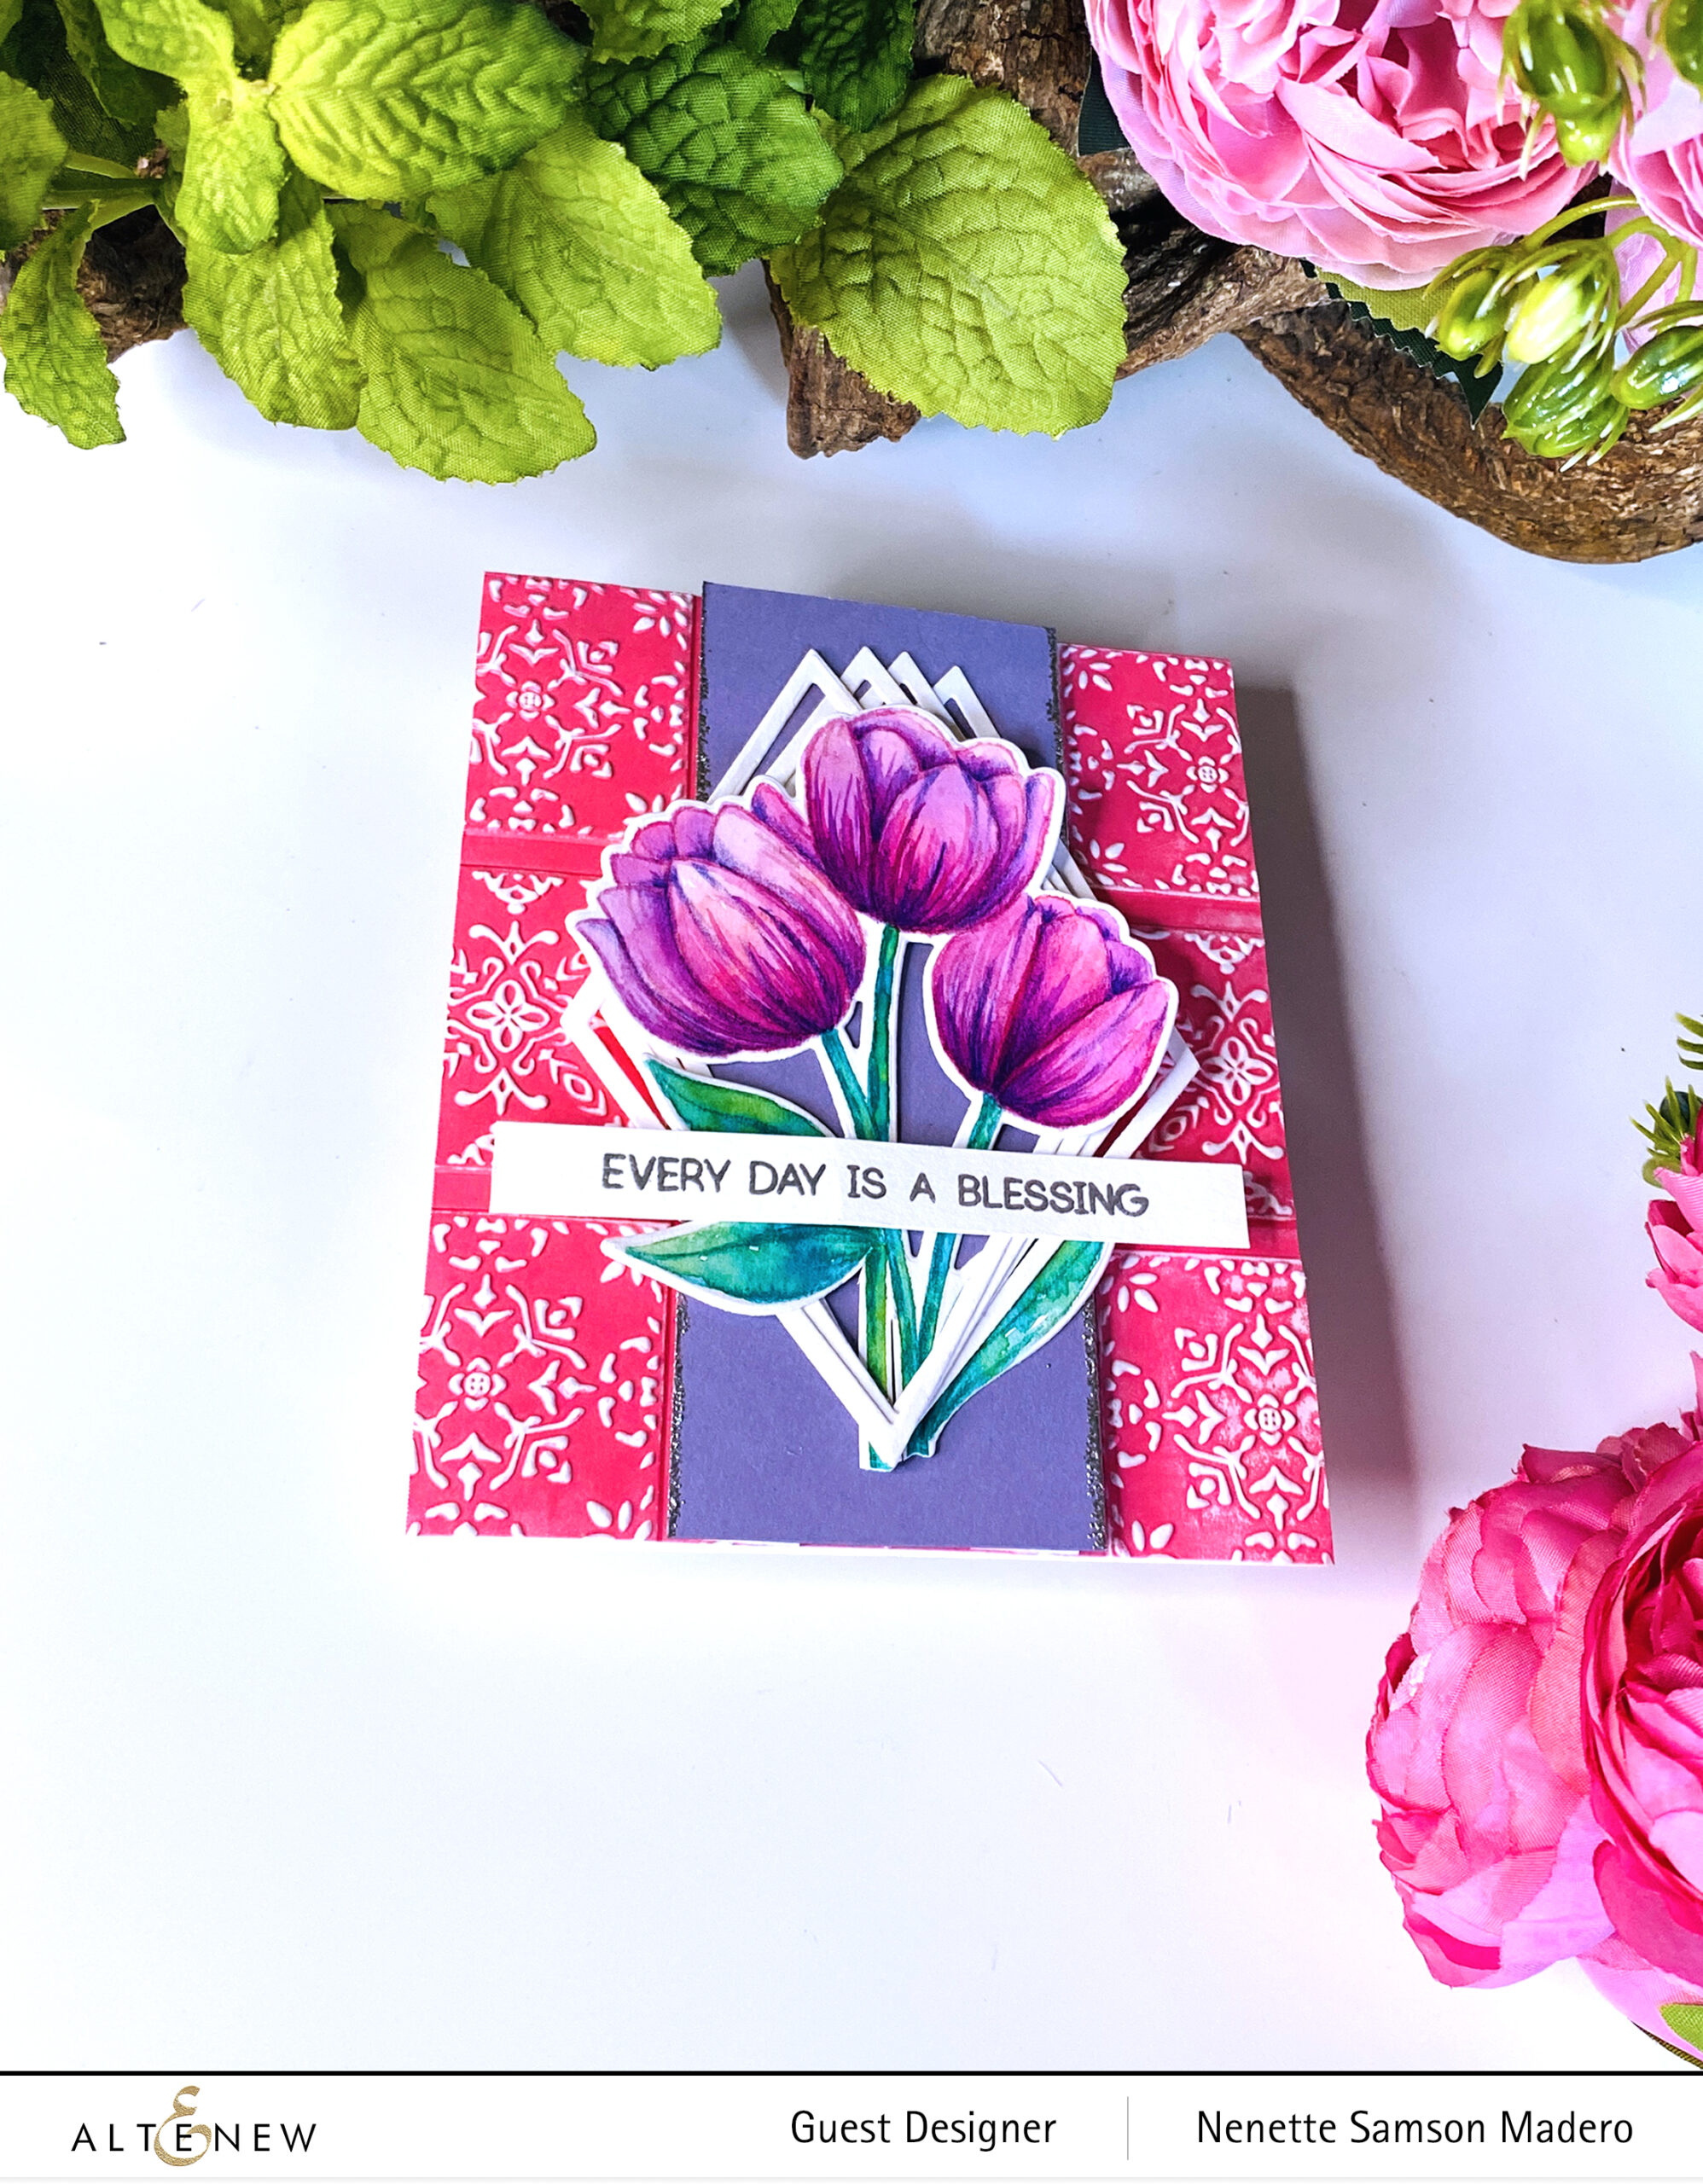
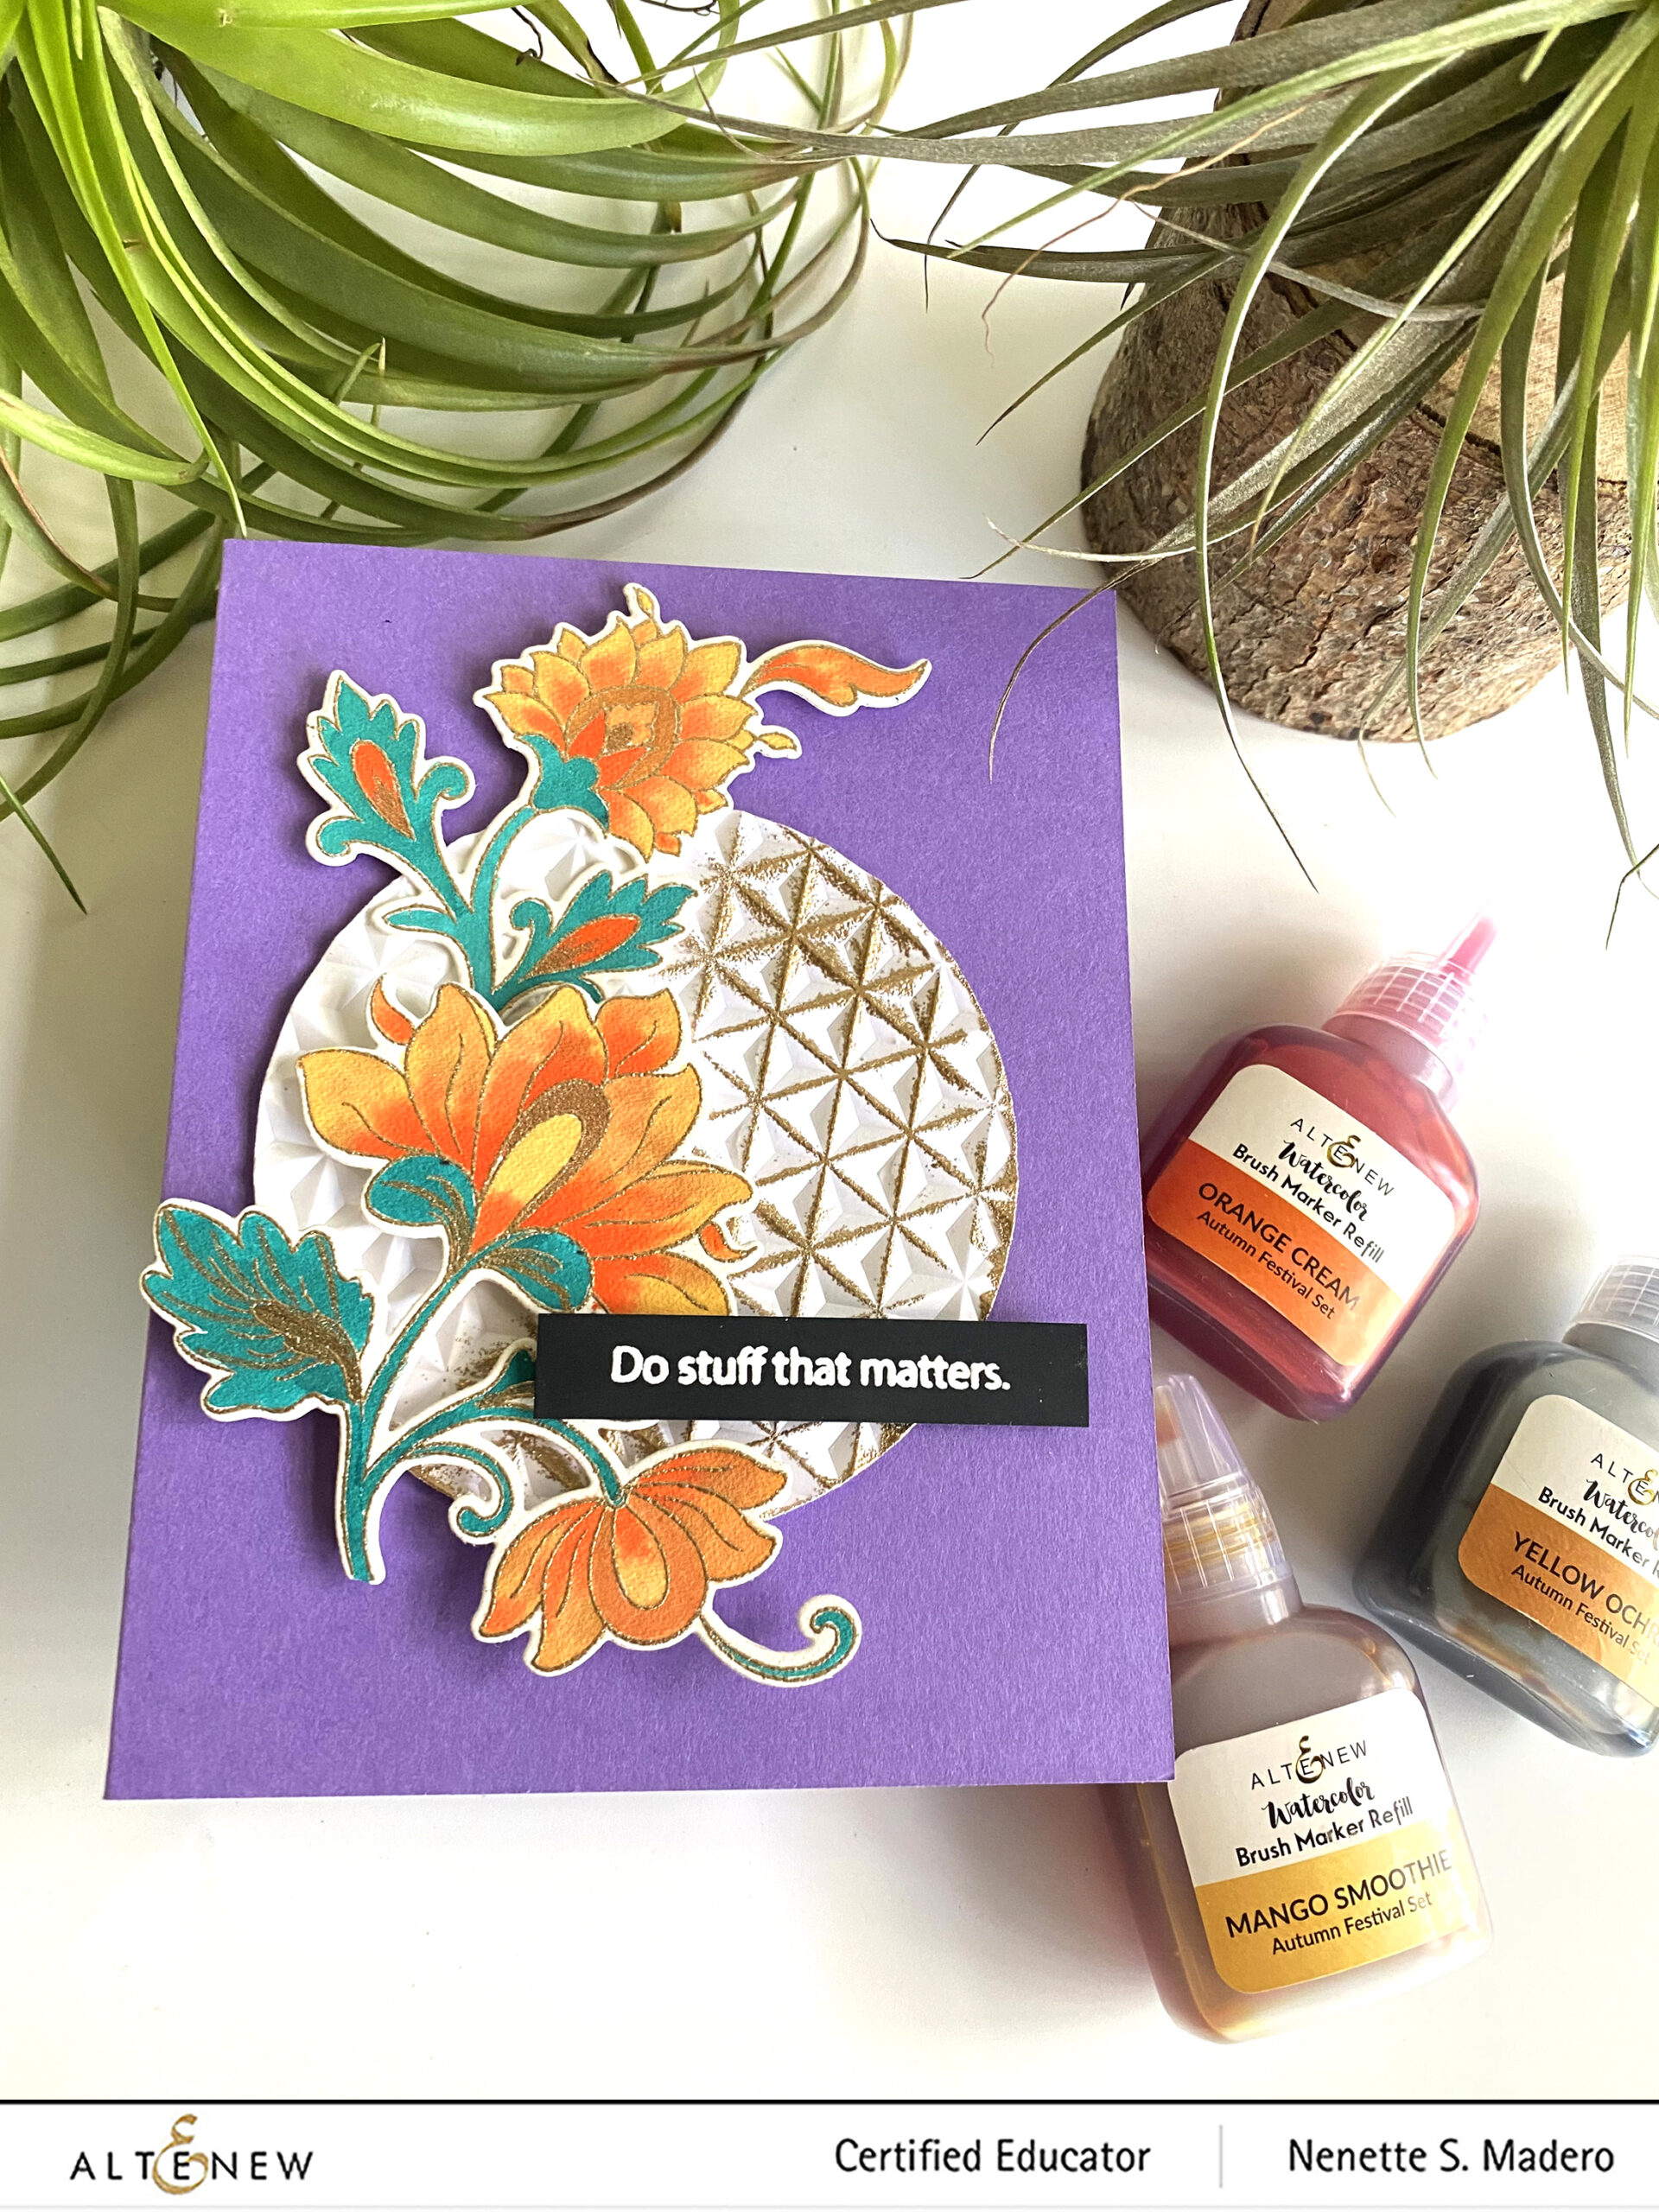
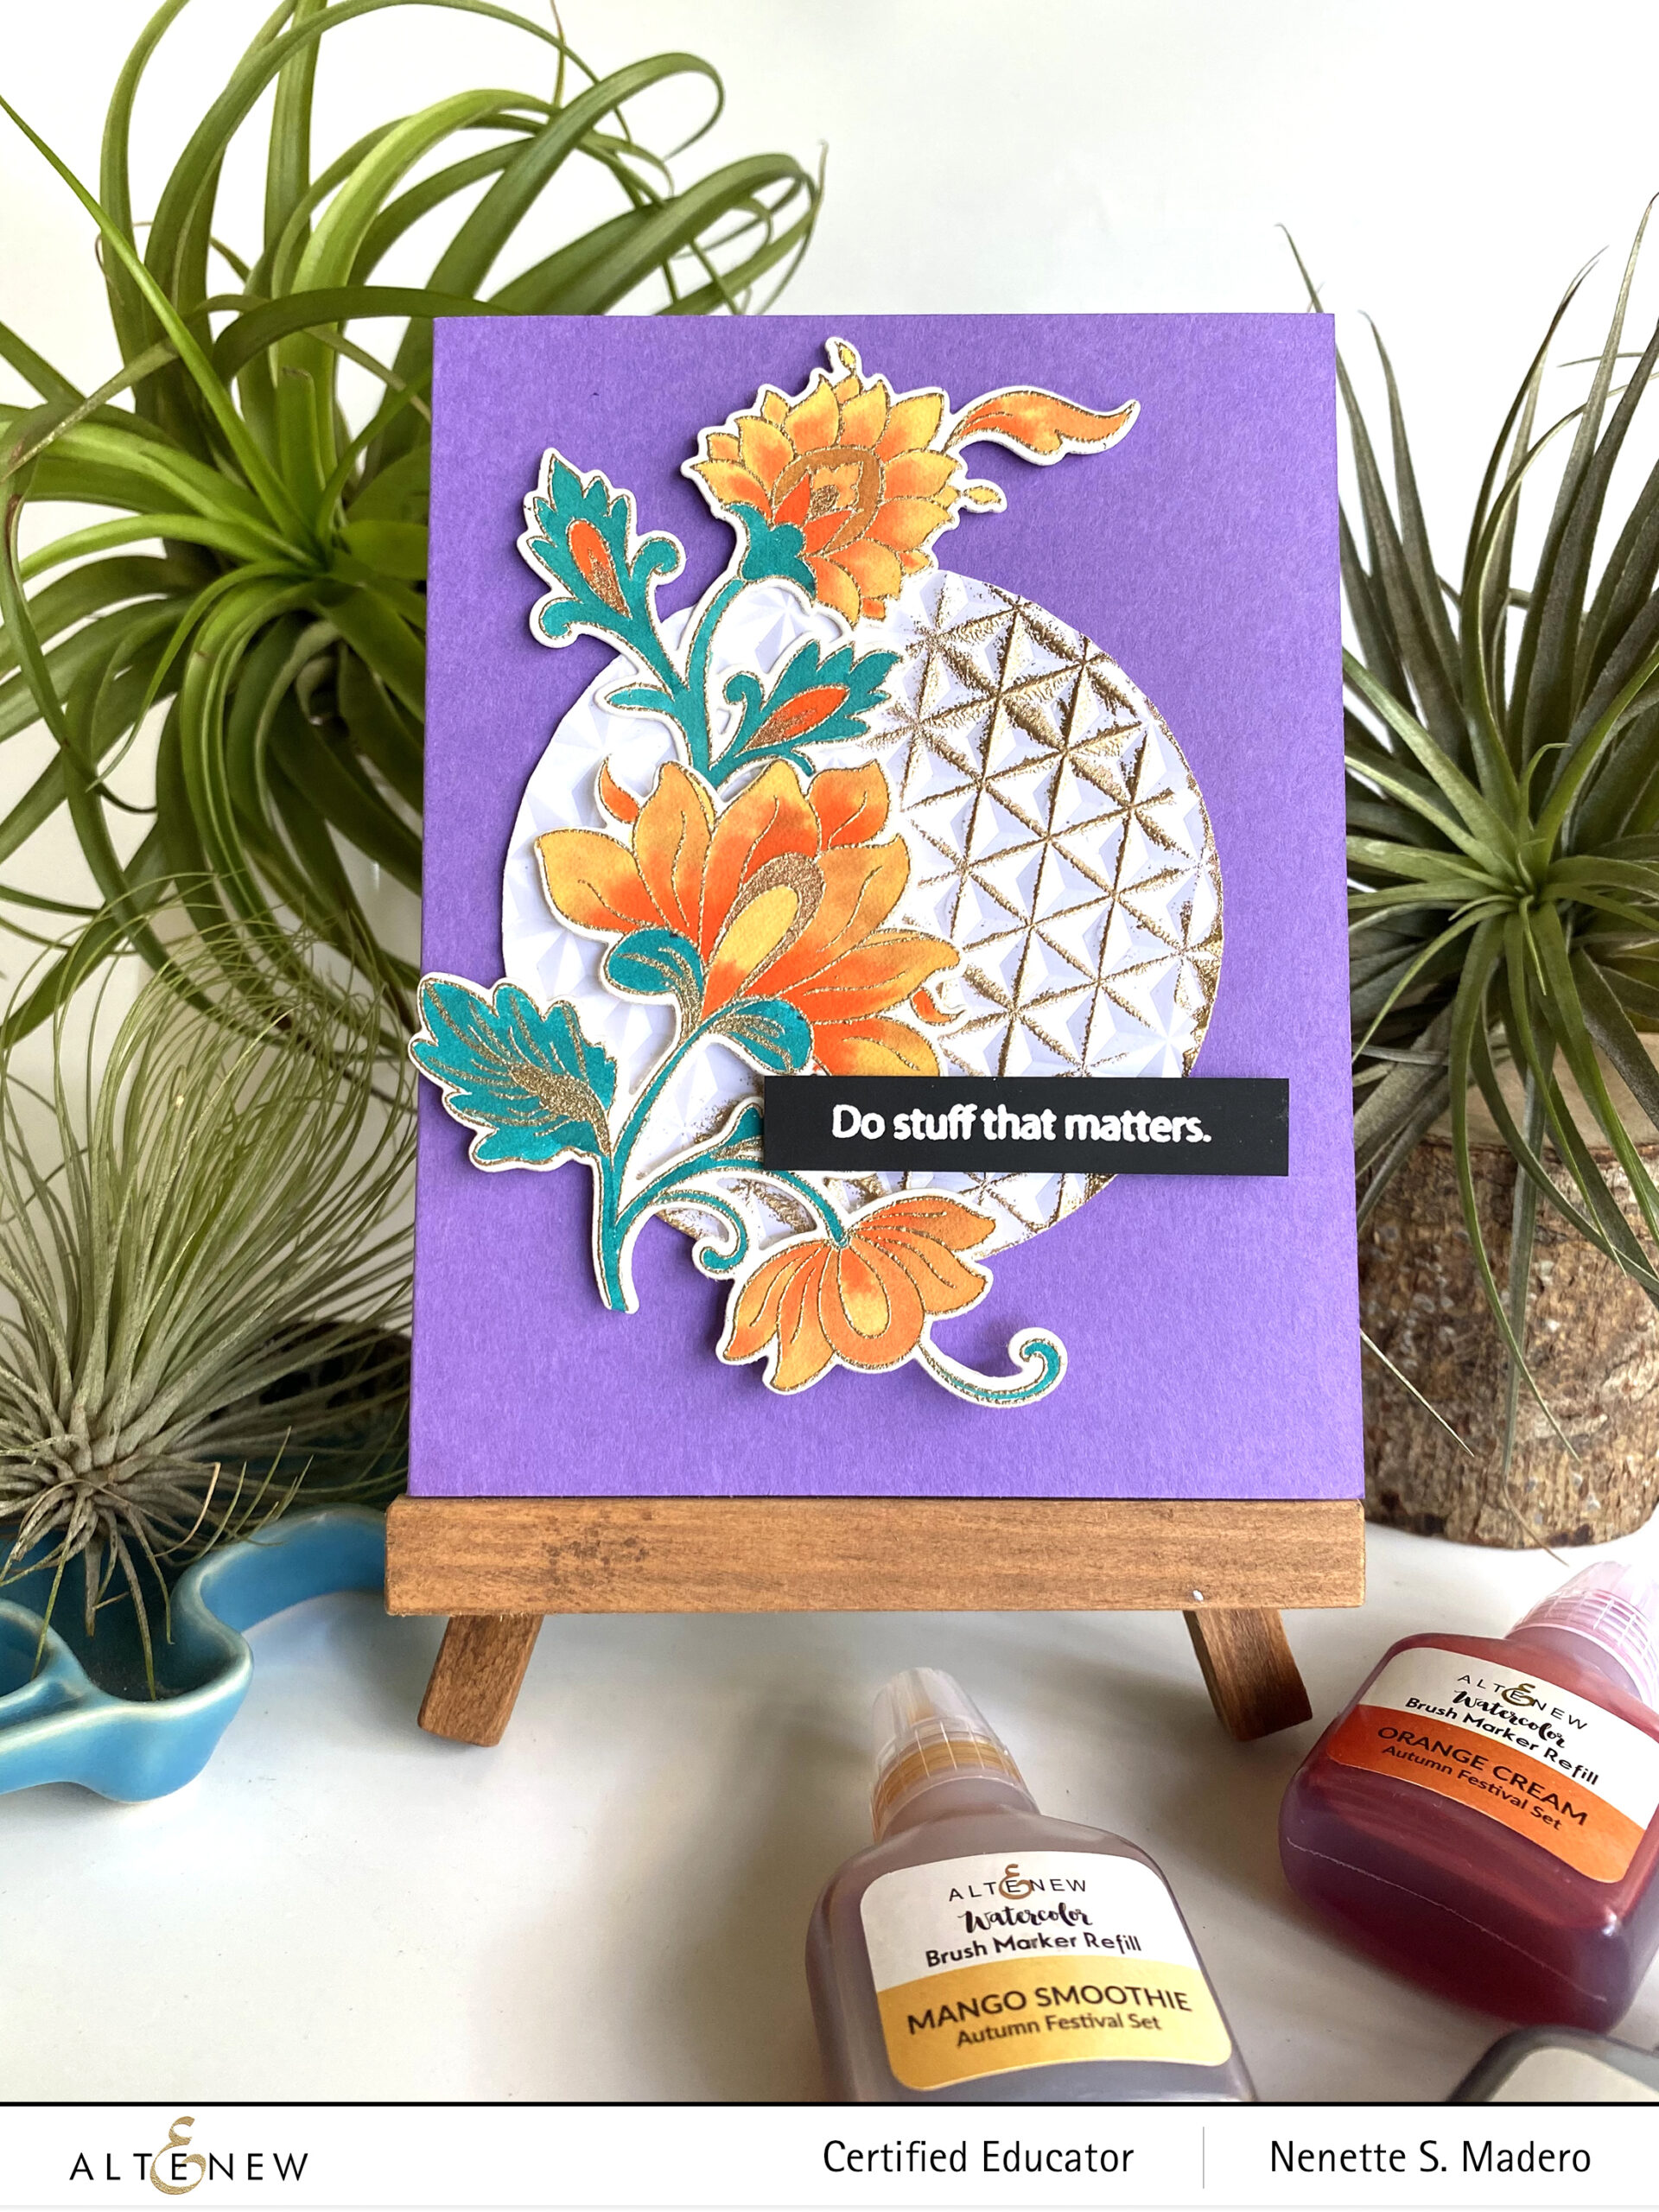
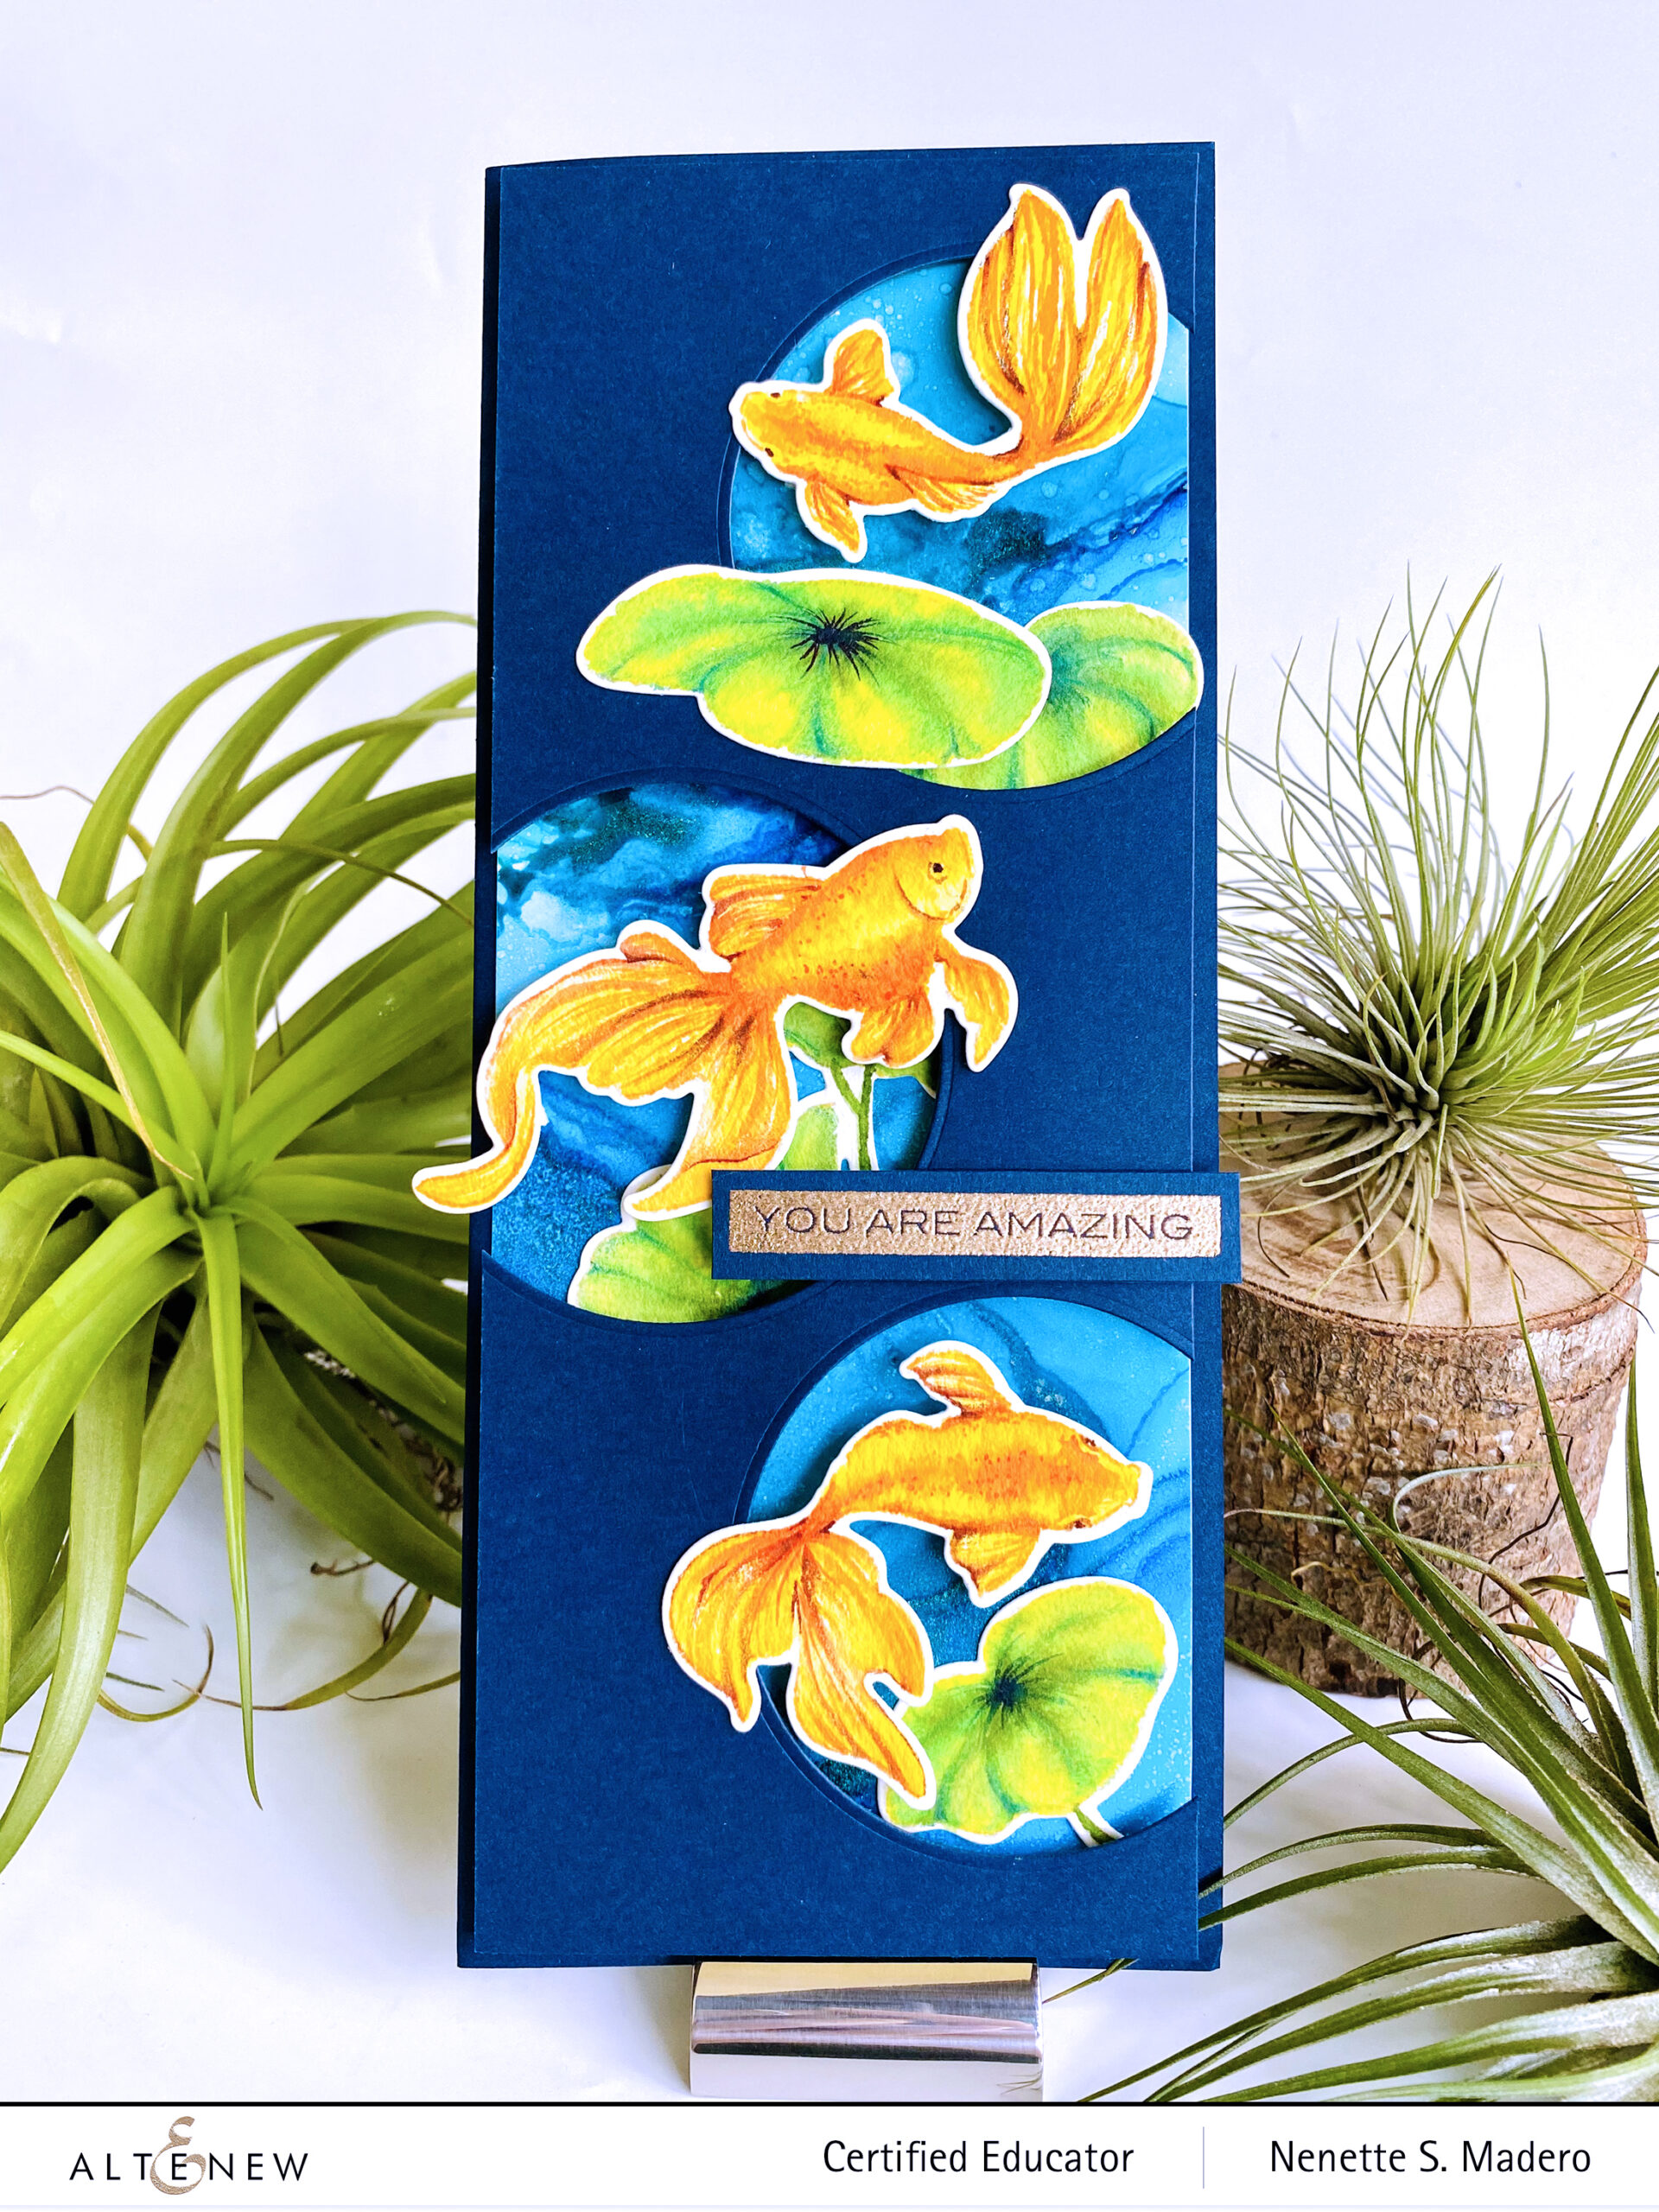
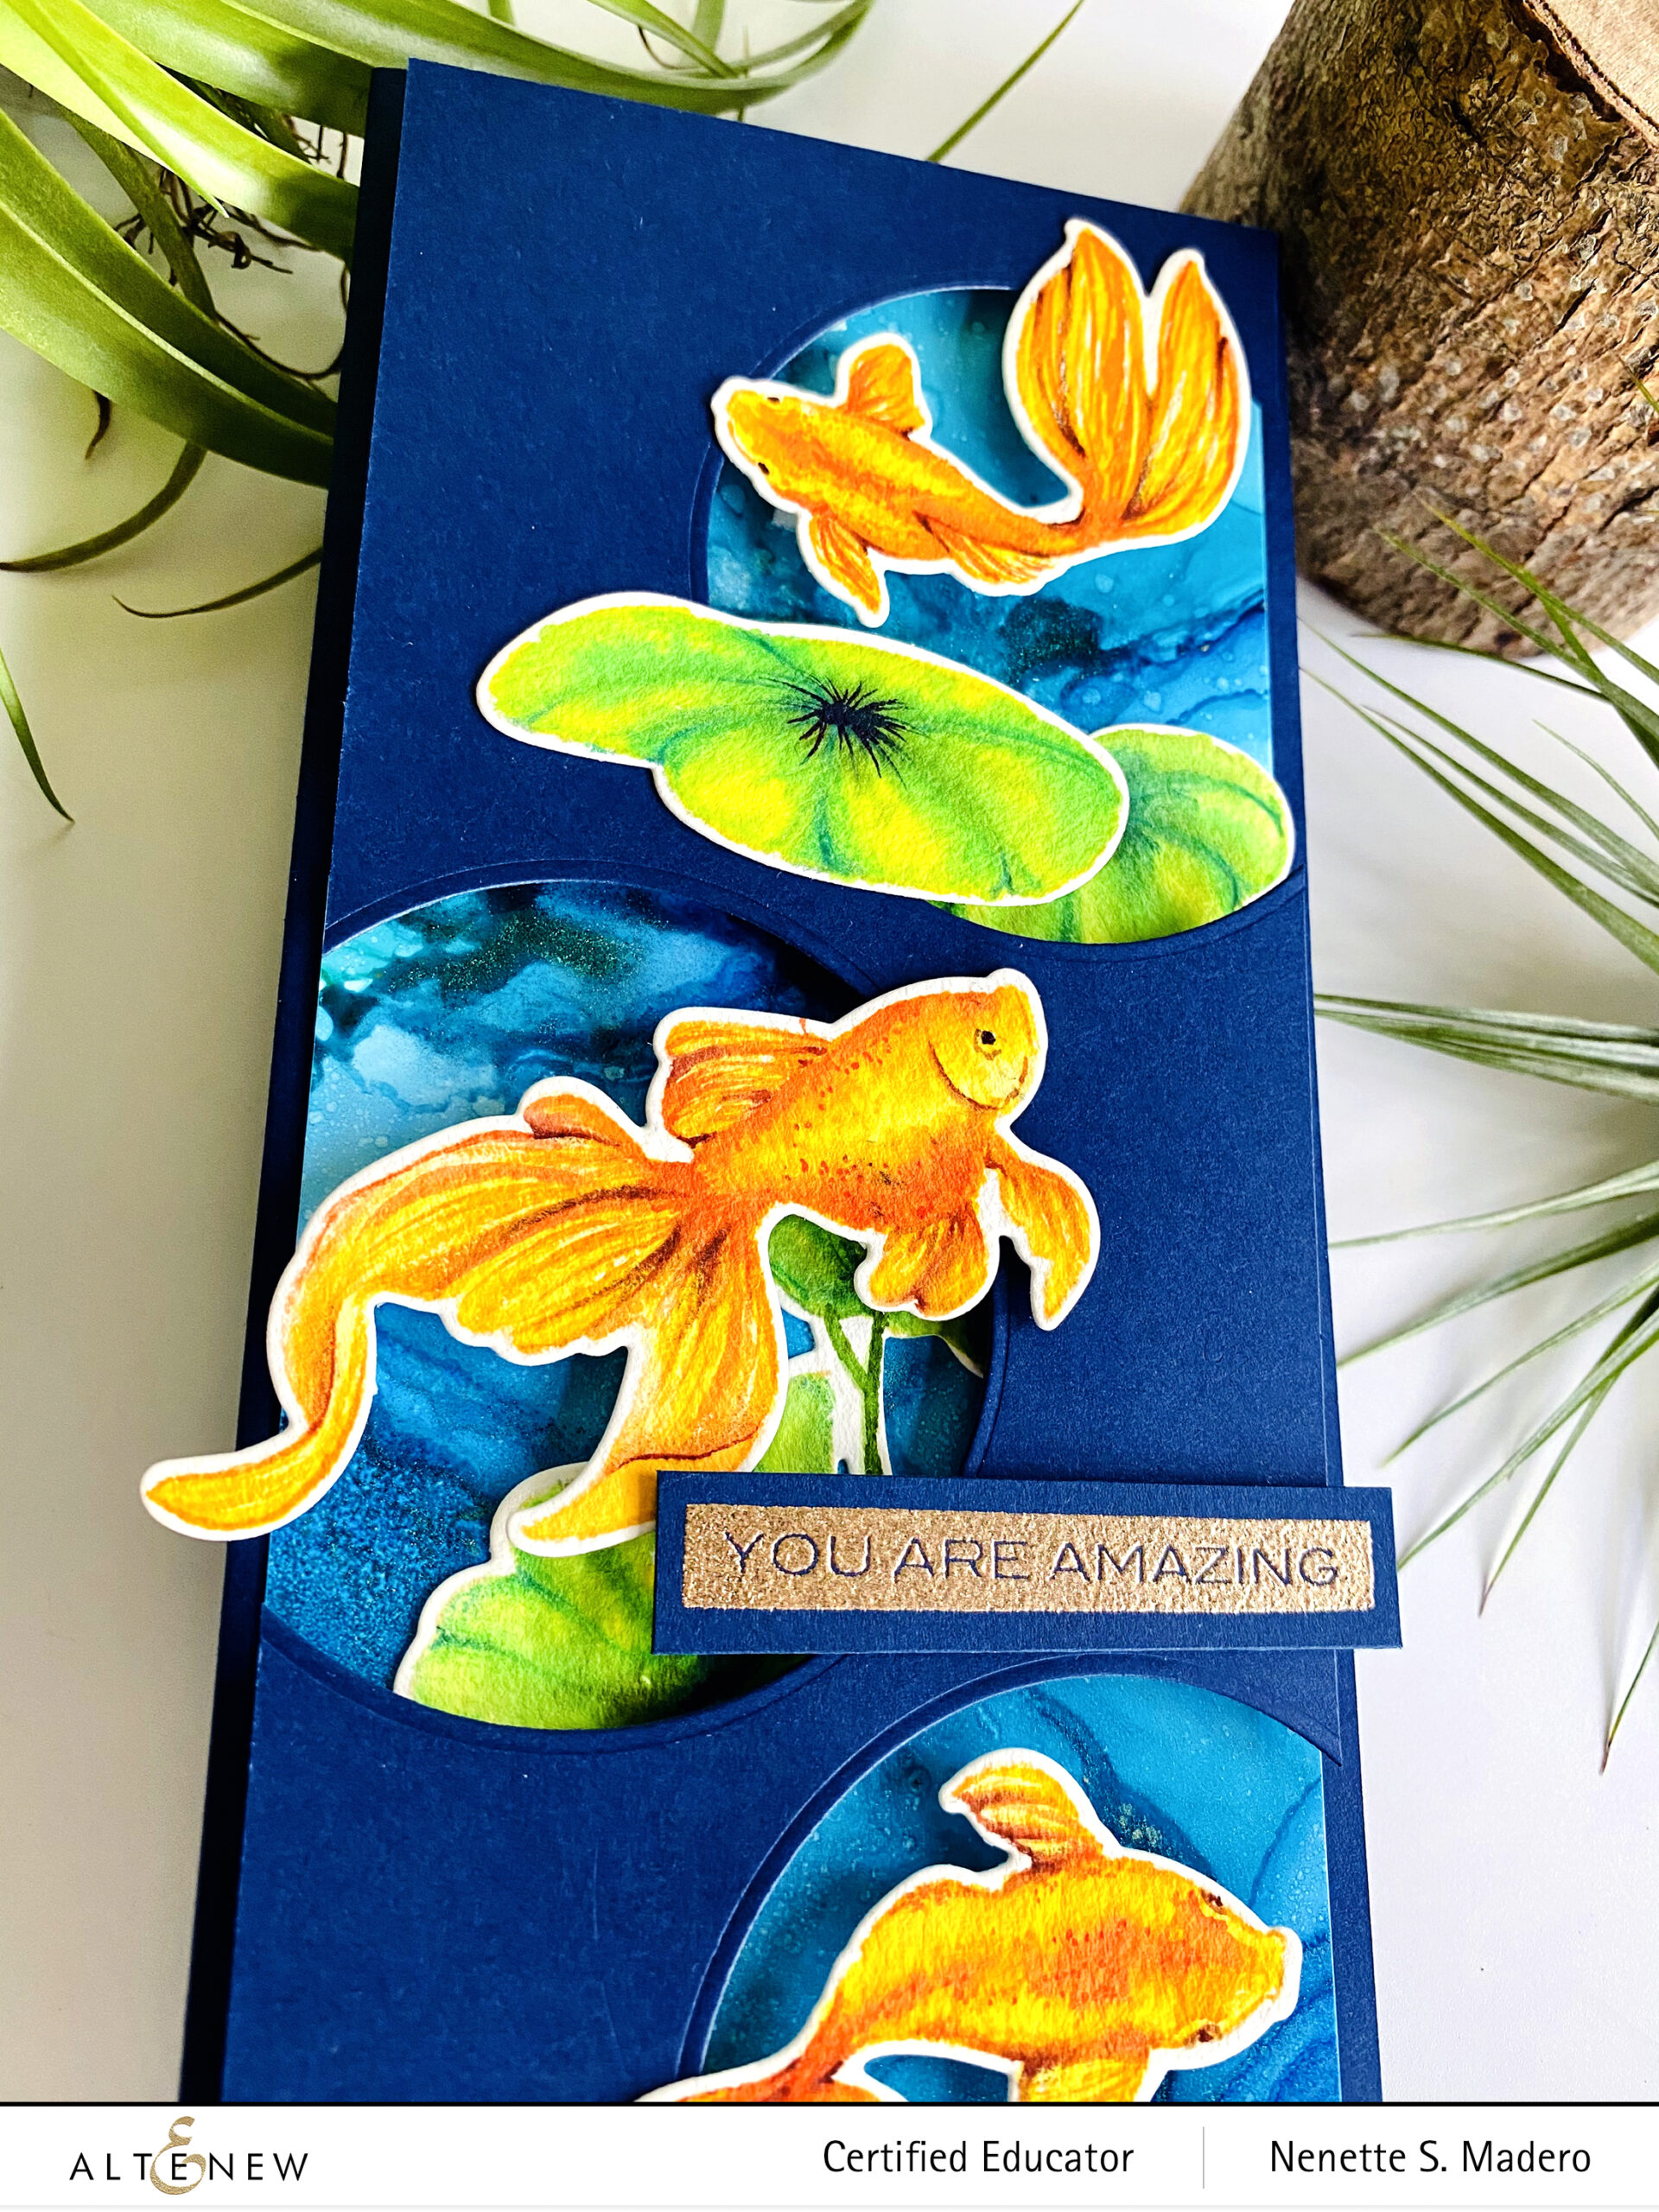
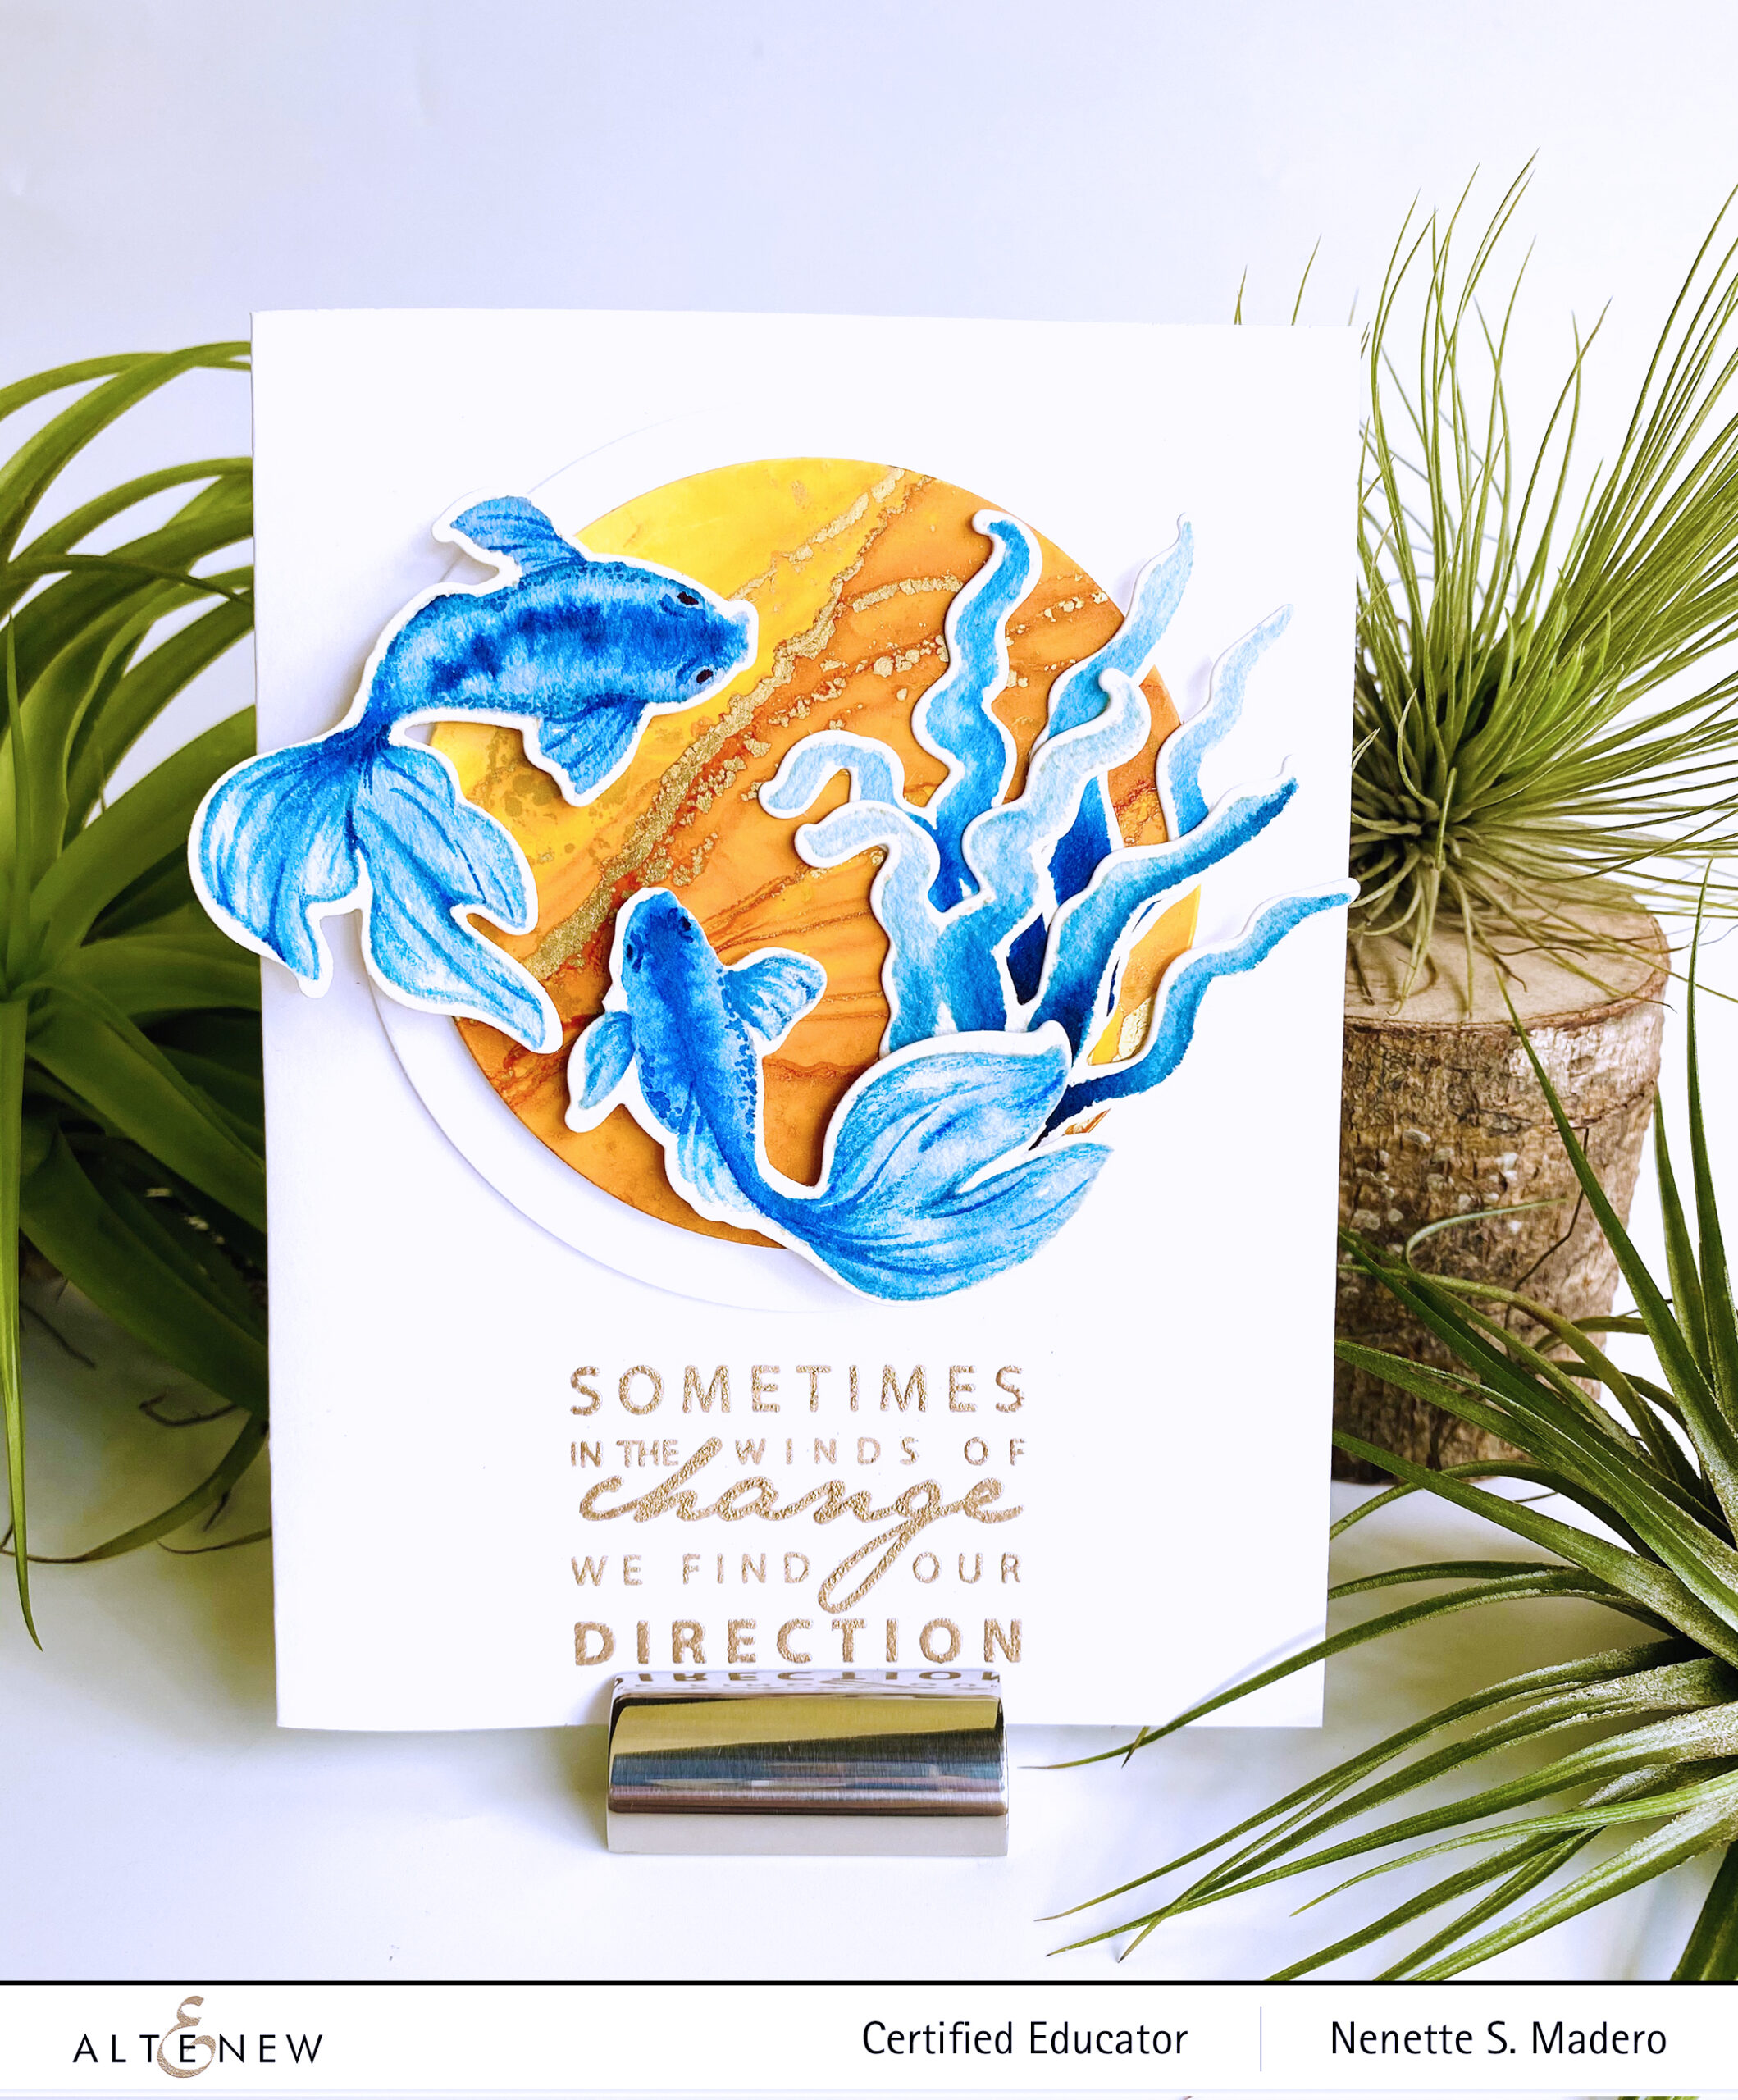

MAY YOU BE BLESSED…


HELLO BEAUTIFUL STAMP AND DIE SET, SUMMER GARDEN PAPER, ROSE GOLD EMBOSSING POWDER, WATERCOLOR BRUSH MARKERS, CIRCLE QUILT COVER DIE, WATERCOLOR PAPER, CARDSTOCK, VERSAMARK INK
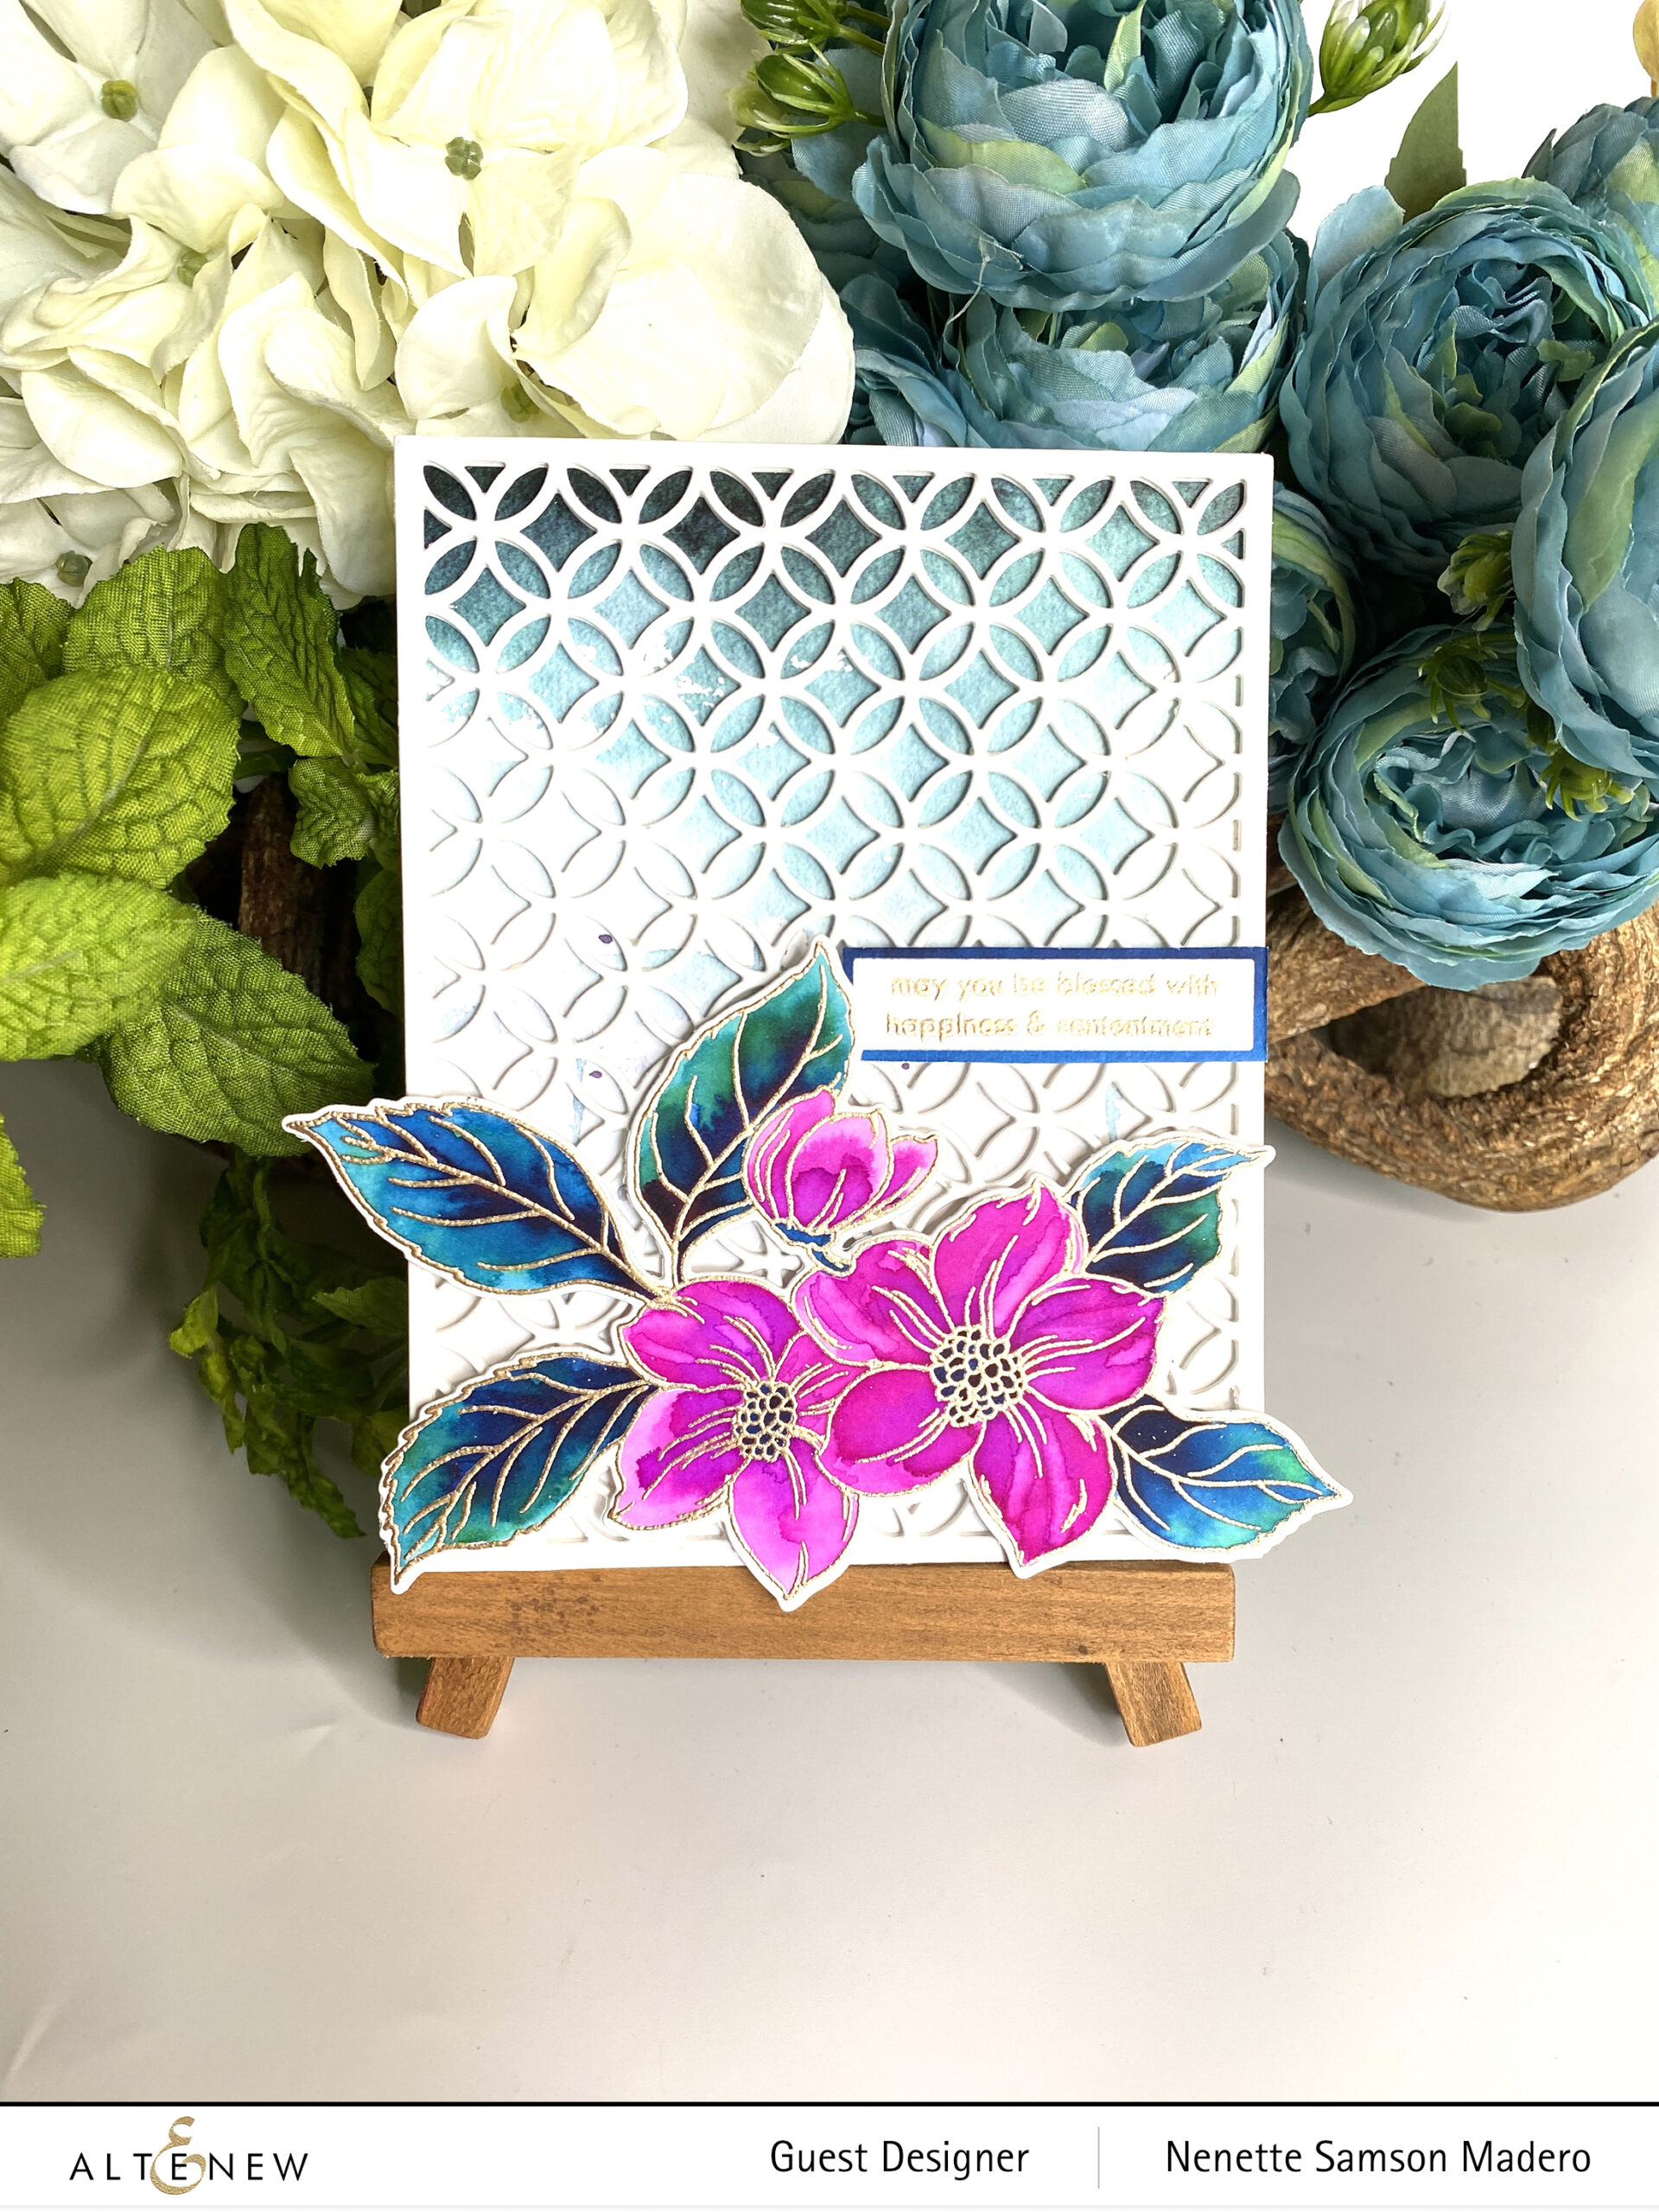
  1. Stamp the image on watercolor paper using Versamark Ink and embossing using Rose Gold embossing powder. Color with Watercolor Brush markers then die cut.
  2. Stamp and emboss the sentiment.
  3. Die cut 5 times the Circle Quilt Cover die and adhere on top of each other with adhesive.
  4. Assemble the card.

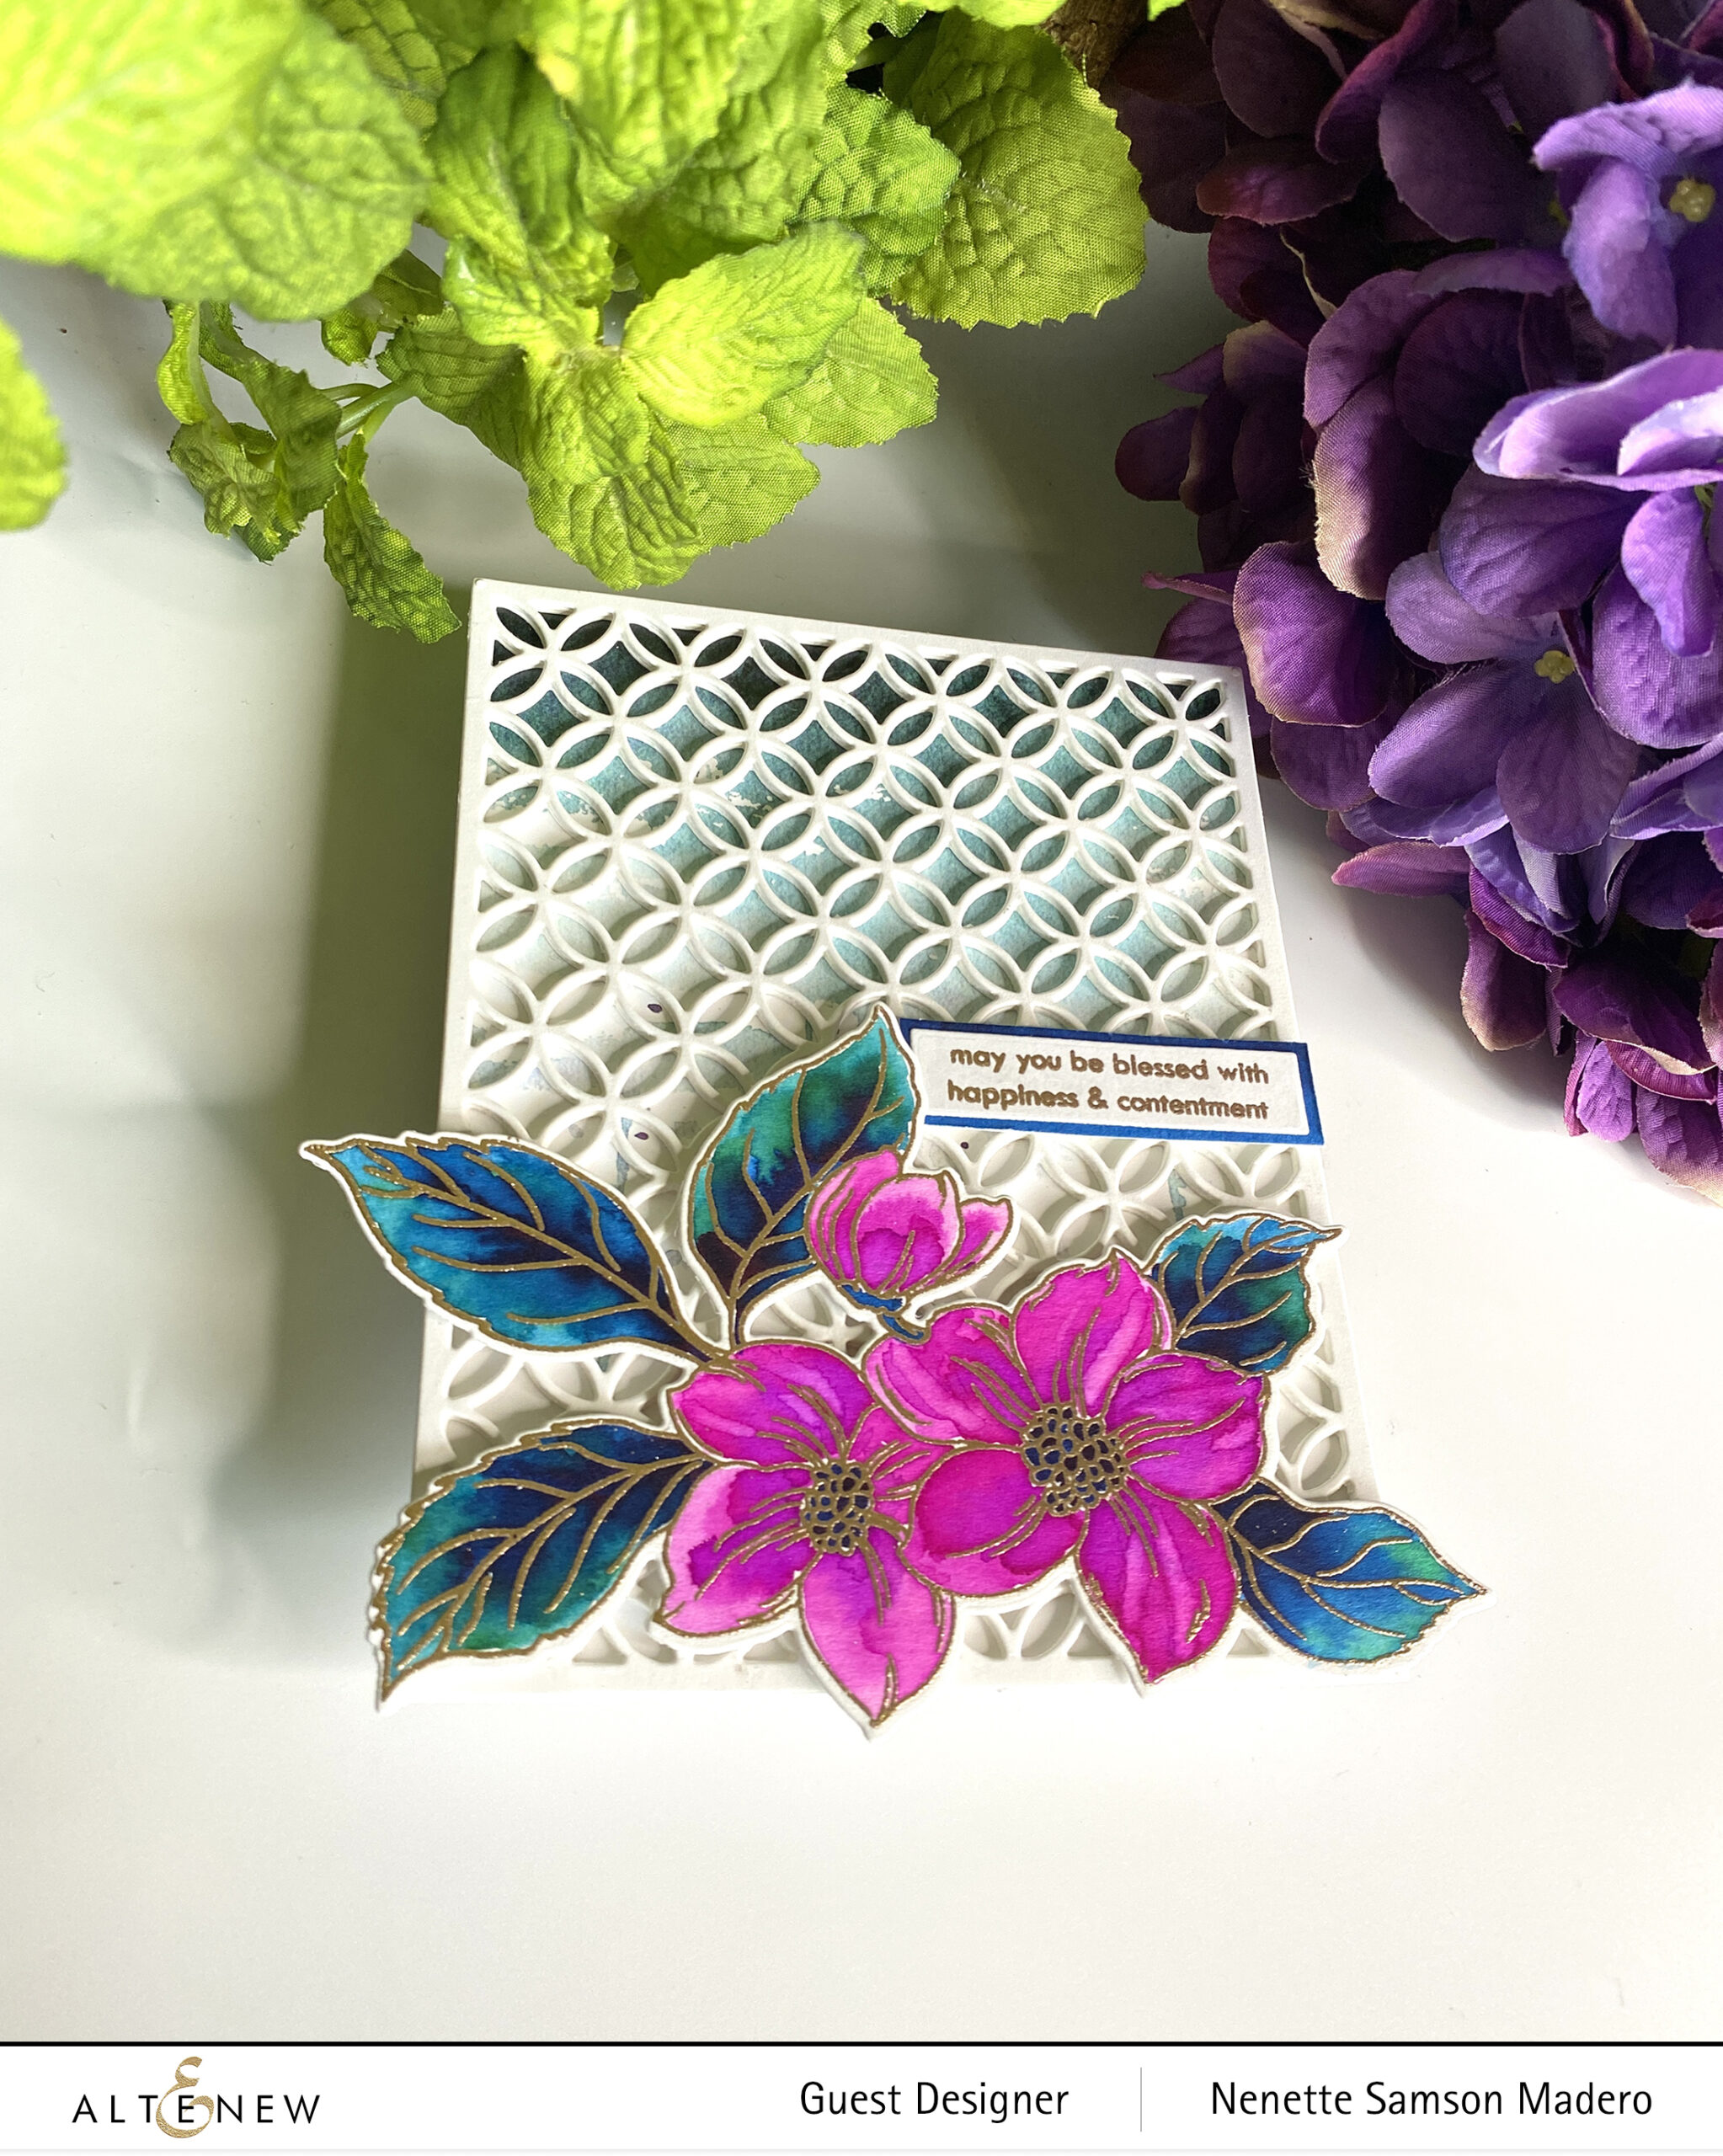
Using patterned paper as the background makes this card one step faster. Go through your patterned papers and see what pattern will go with your stamped and painted florals!
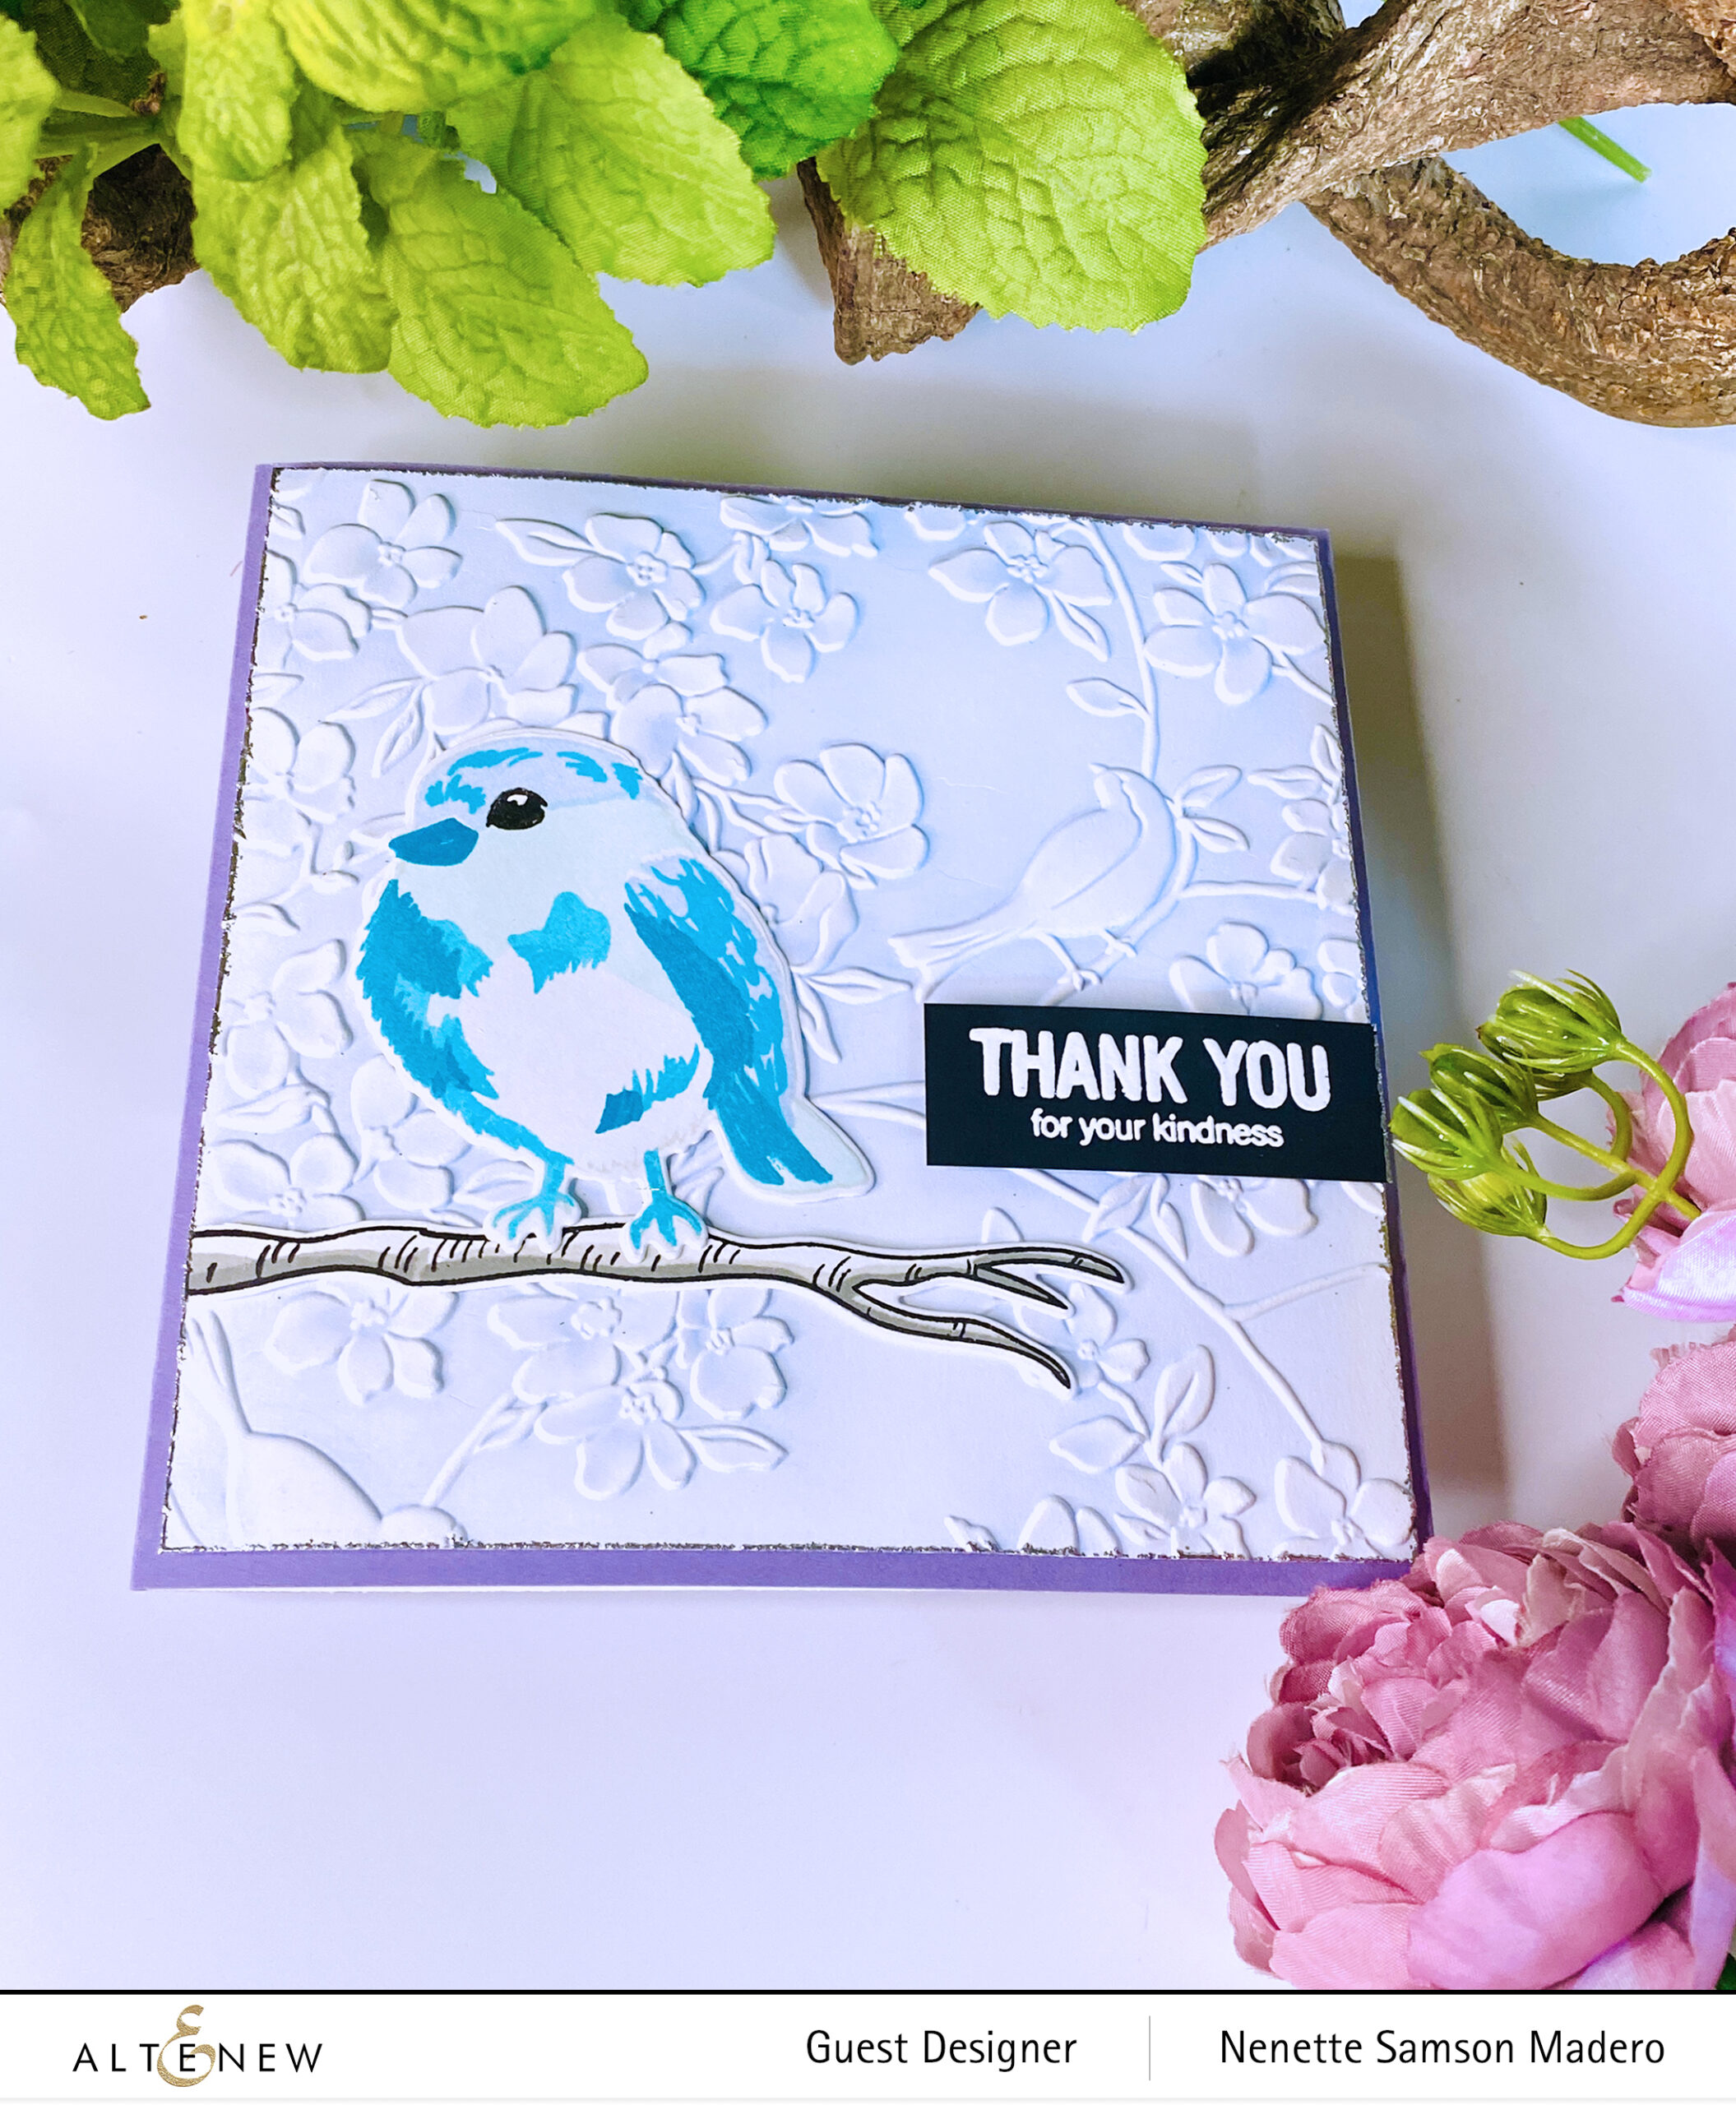
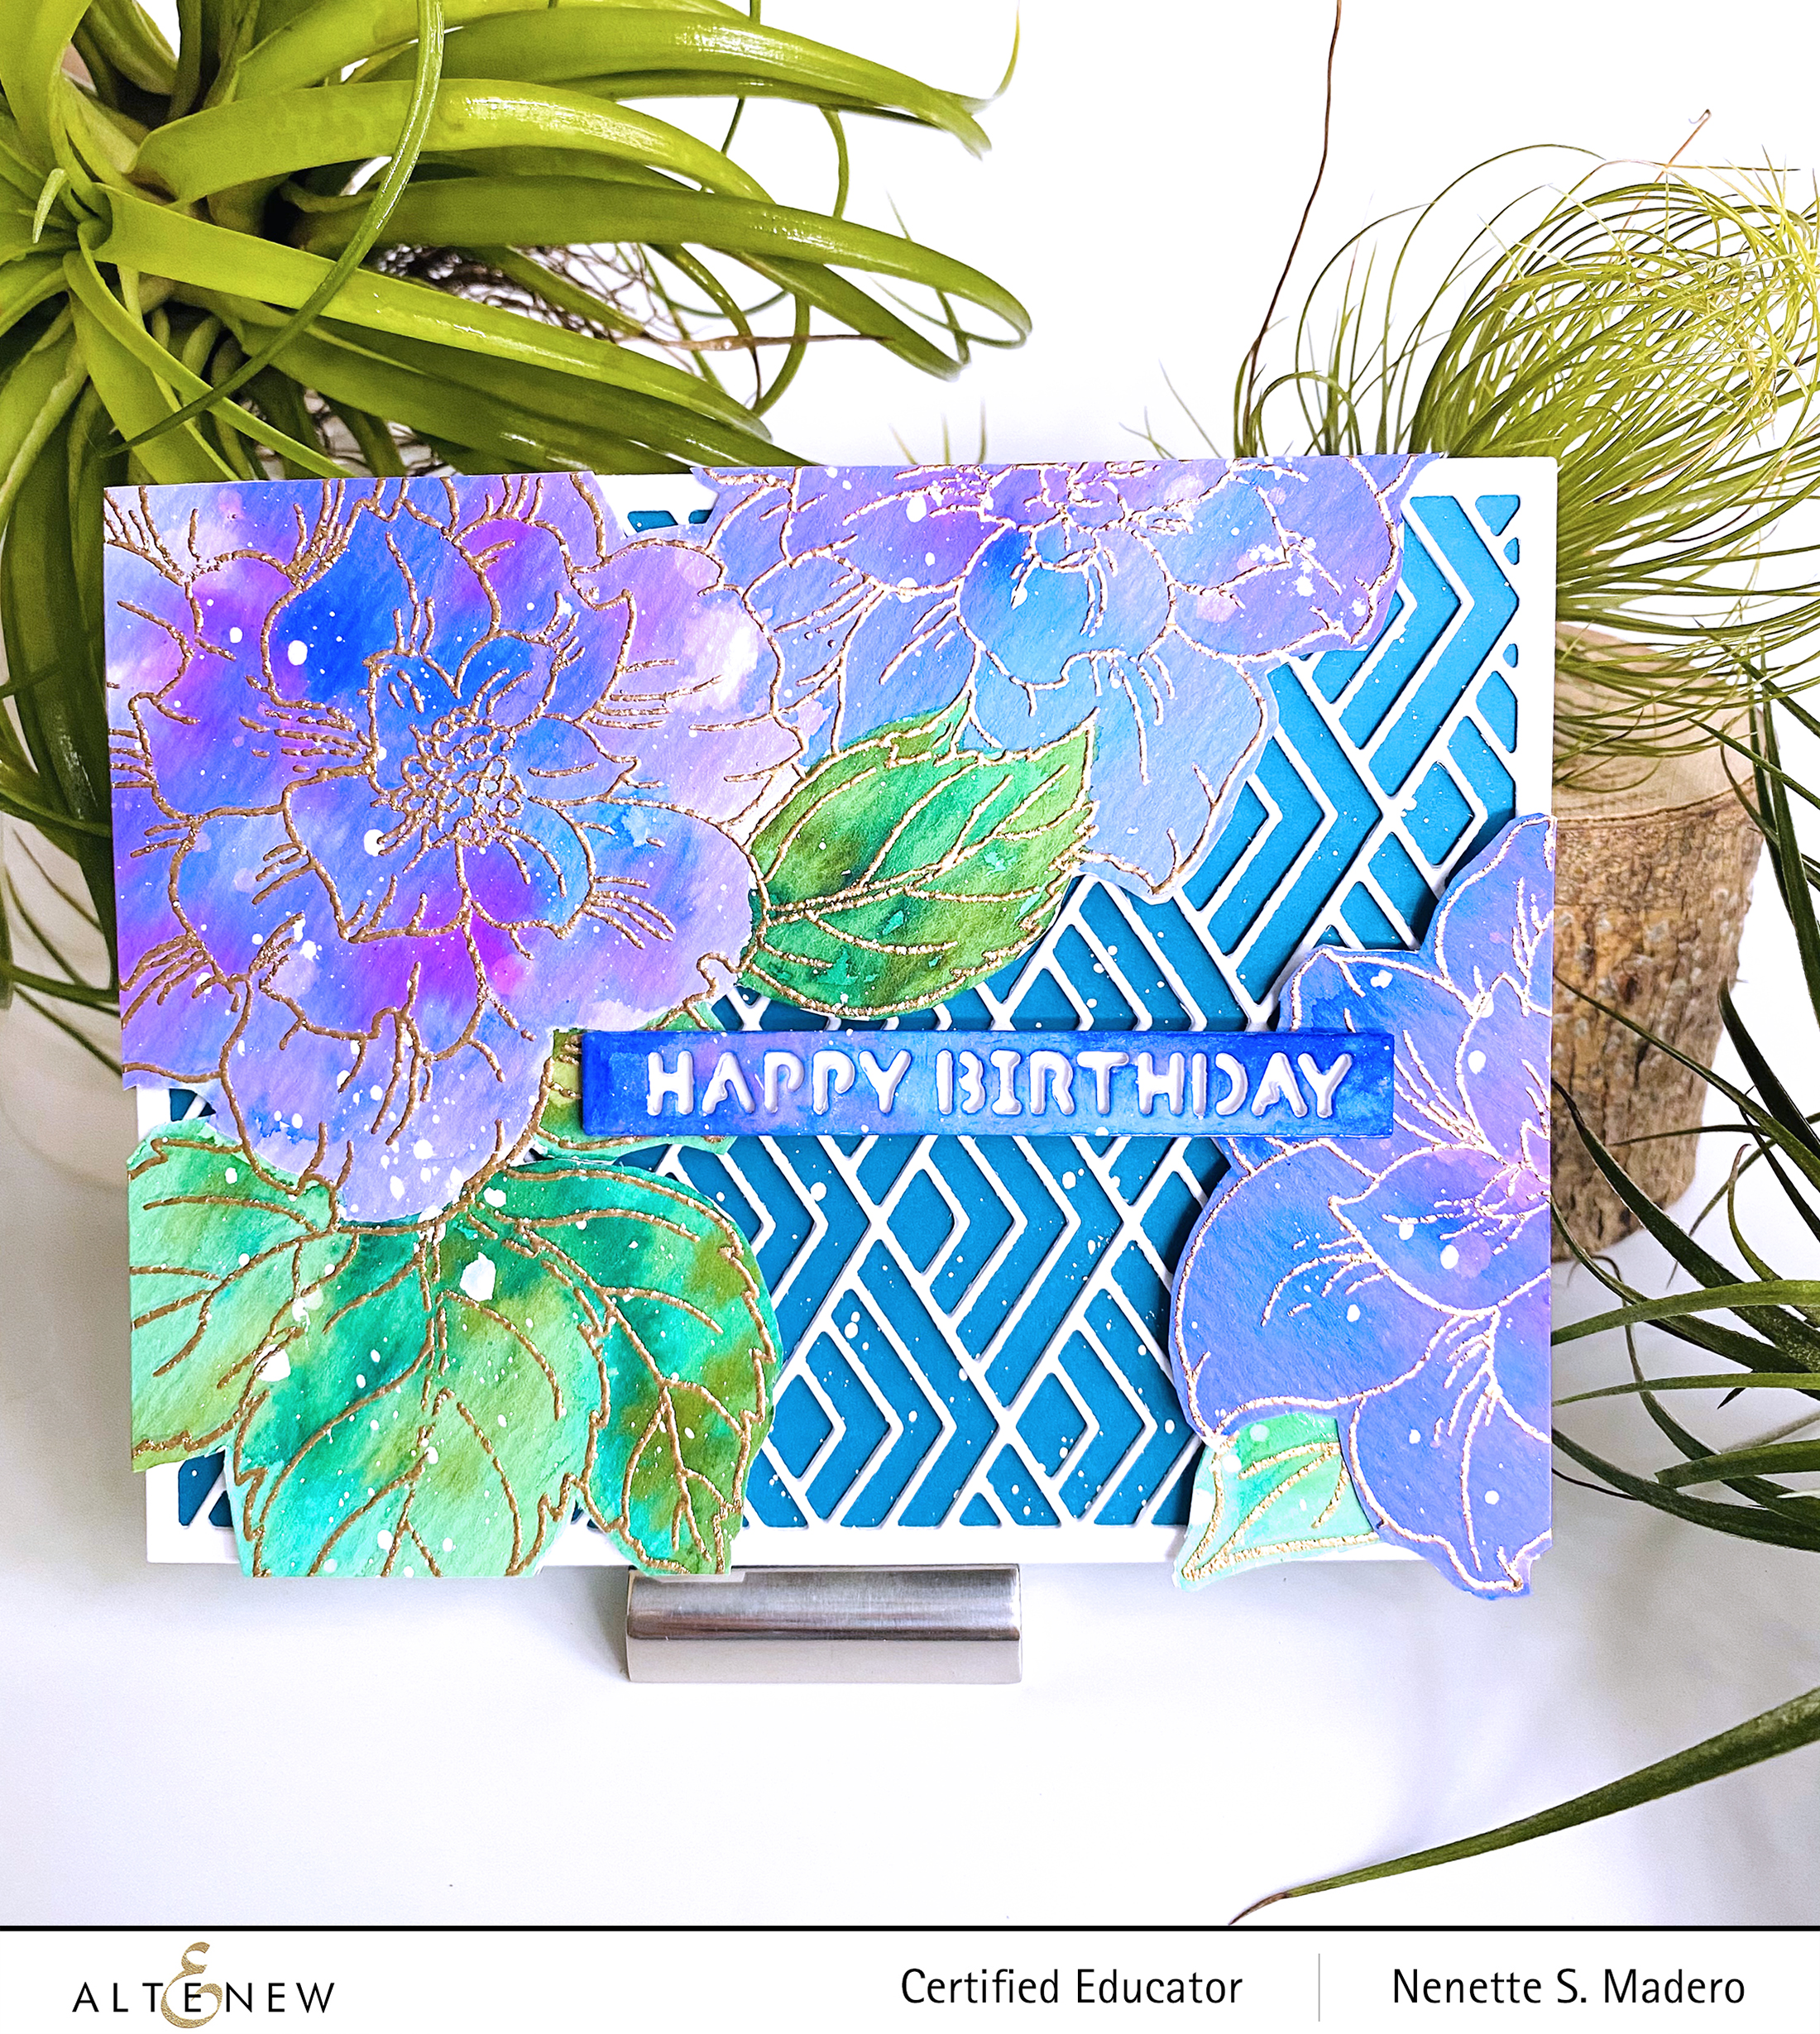
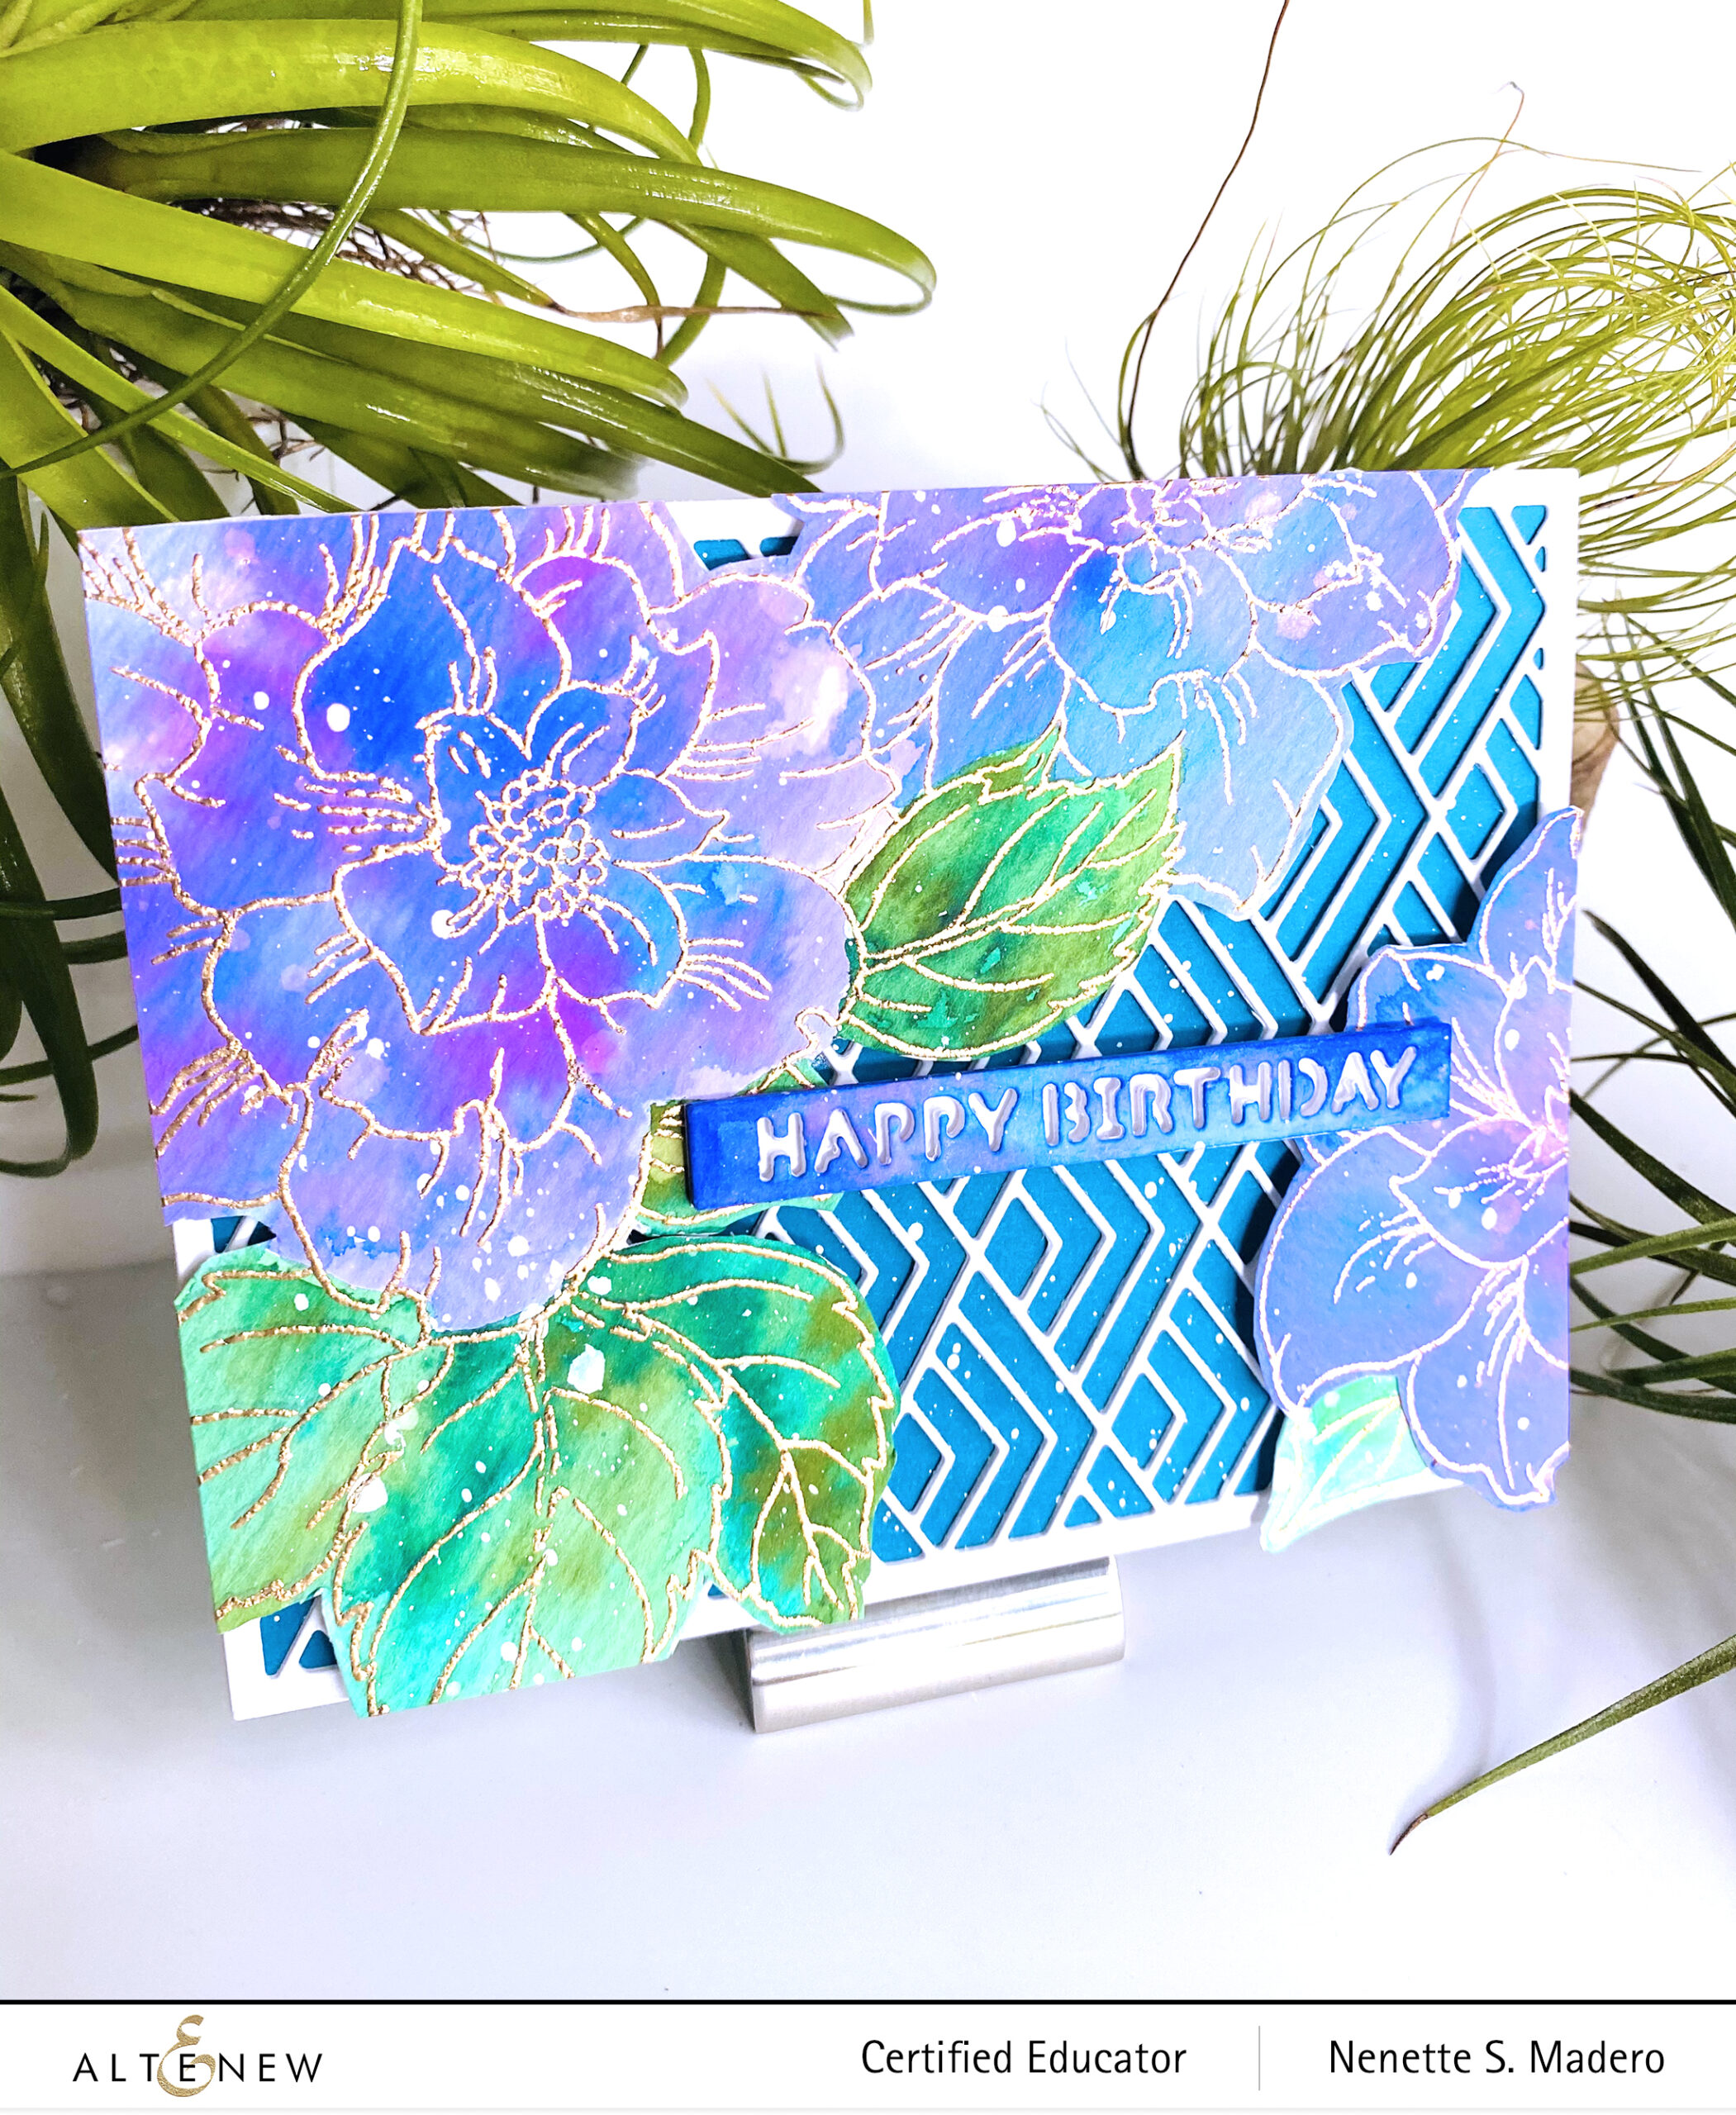


THINKING OF YOU

HELLO BEAUTIFUL STAMP AND DIE, ROSE GOLD EMBOSSING POWDER, MIDNIGHT VIOLET, PURPLE WINE, DESERT NIGHT AND EMERALD WATERCOLOR BRUSH MARKERS, DISTRESS OXIDE INKS, WATERCOLOR PAPER, DYLUSIONS WHITE LINEN PAINT, VERSAMARK INK

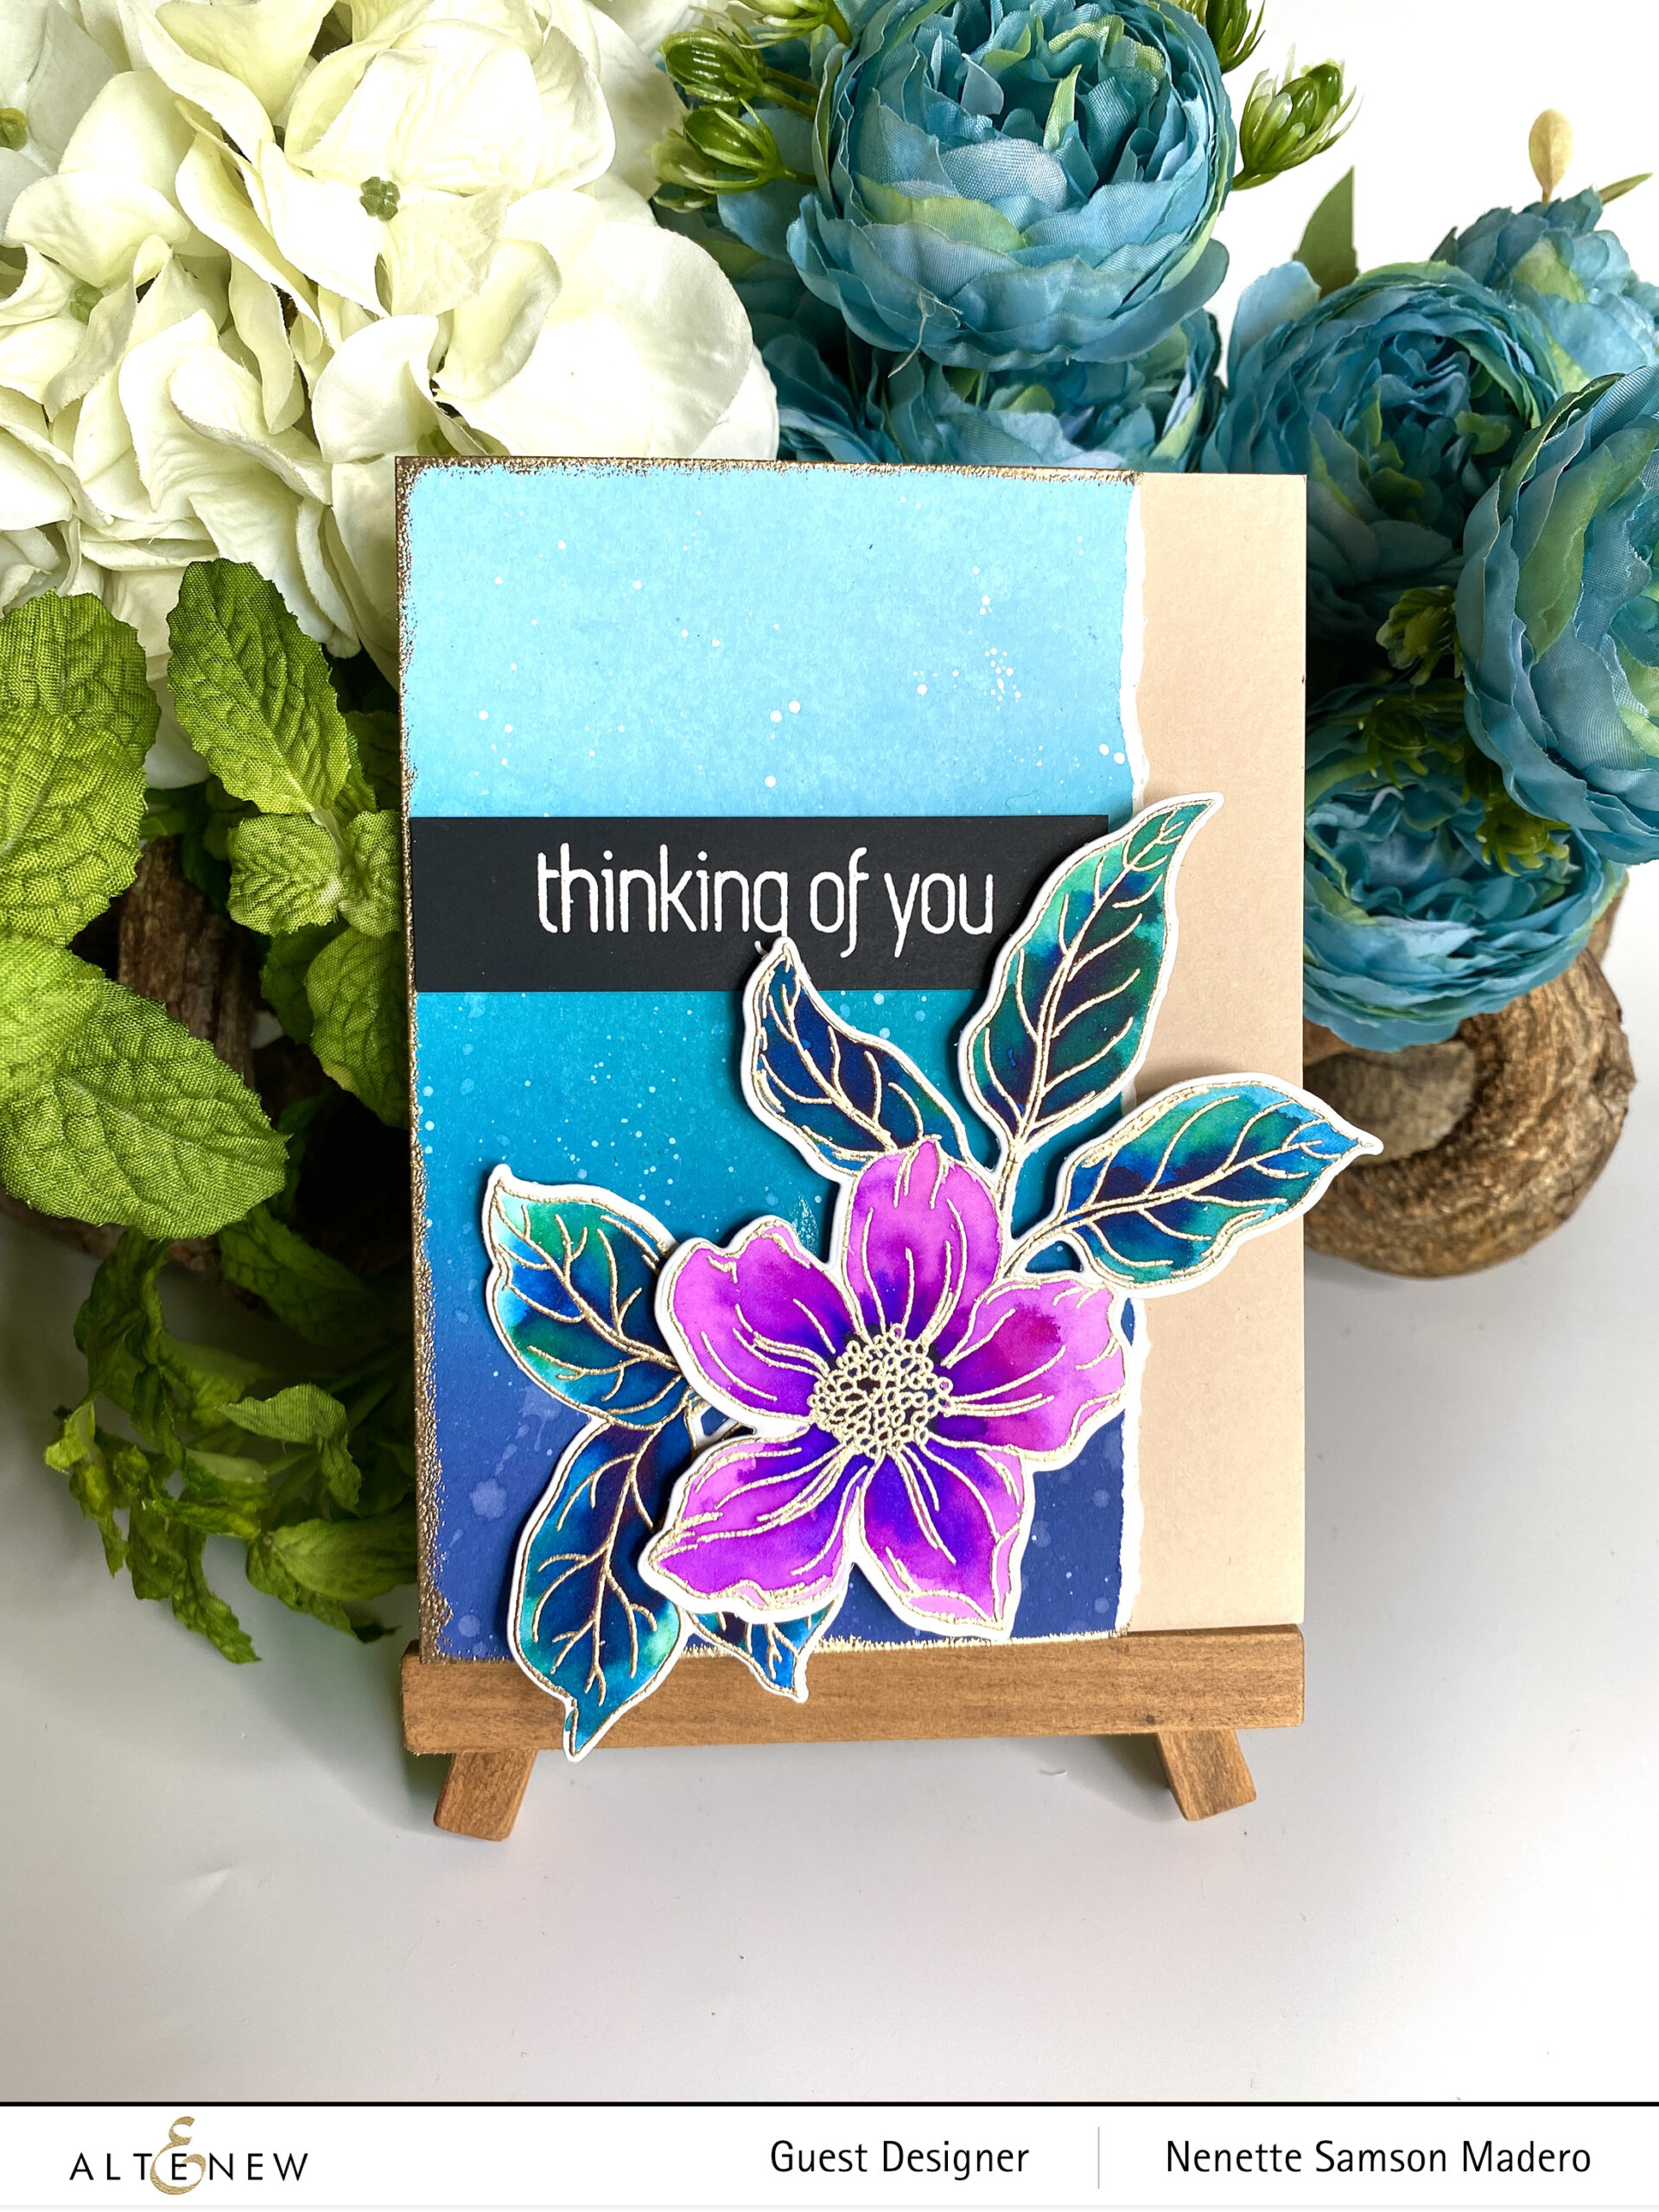
  1. Stamp and emboss the floral image using Rose Gold embossing powder and color with watercolor brush markers.
  2. Create an ombre background using Distress Oxide inks. Add water and white splatters.
  3. Tear one end and emboss the other 3 edges with Rose gold embossing powder.
  4. Emboss the sentiment on black cardstock.
  5. Assemble the card.

Most of the time, I stamp, emboss and watercolor extra images so that I have extras that I can easily use for another card.


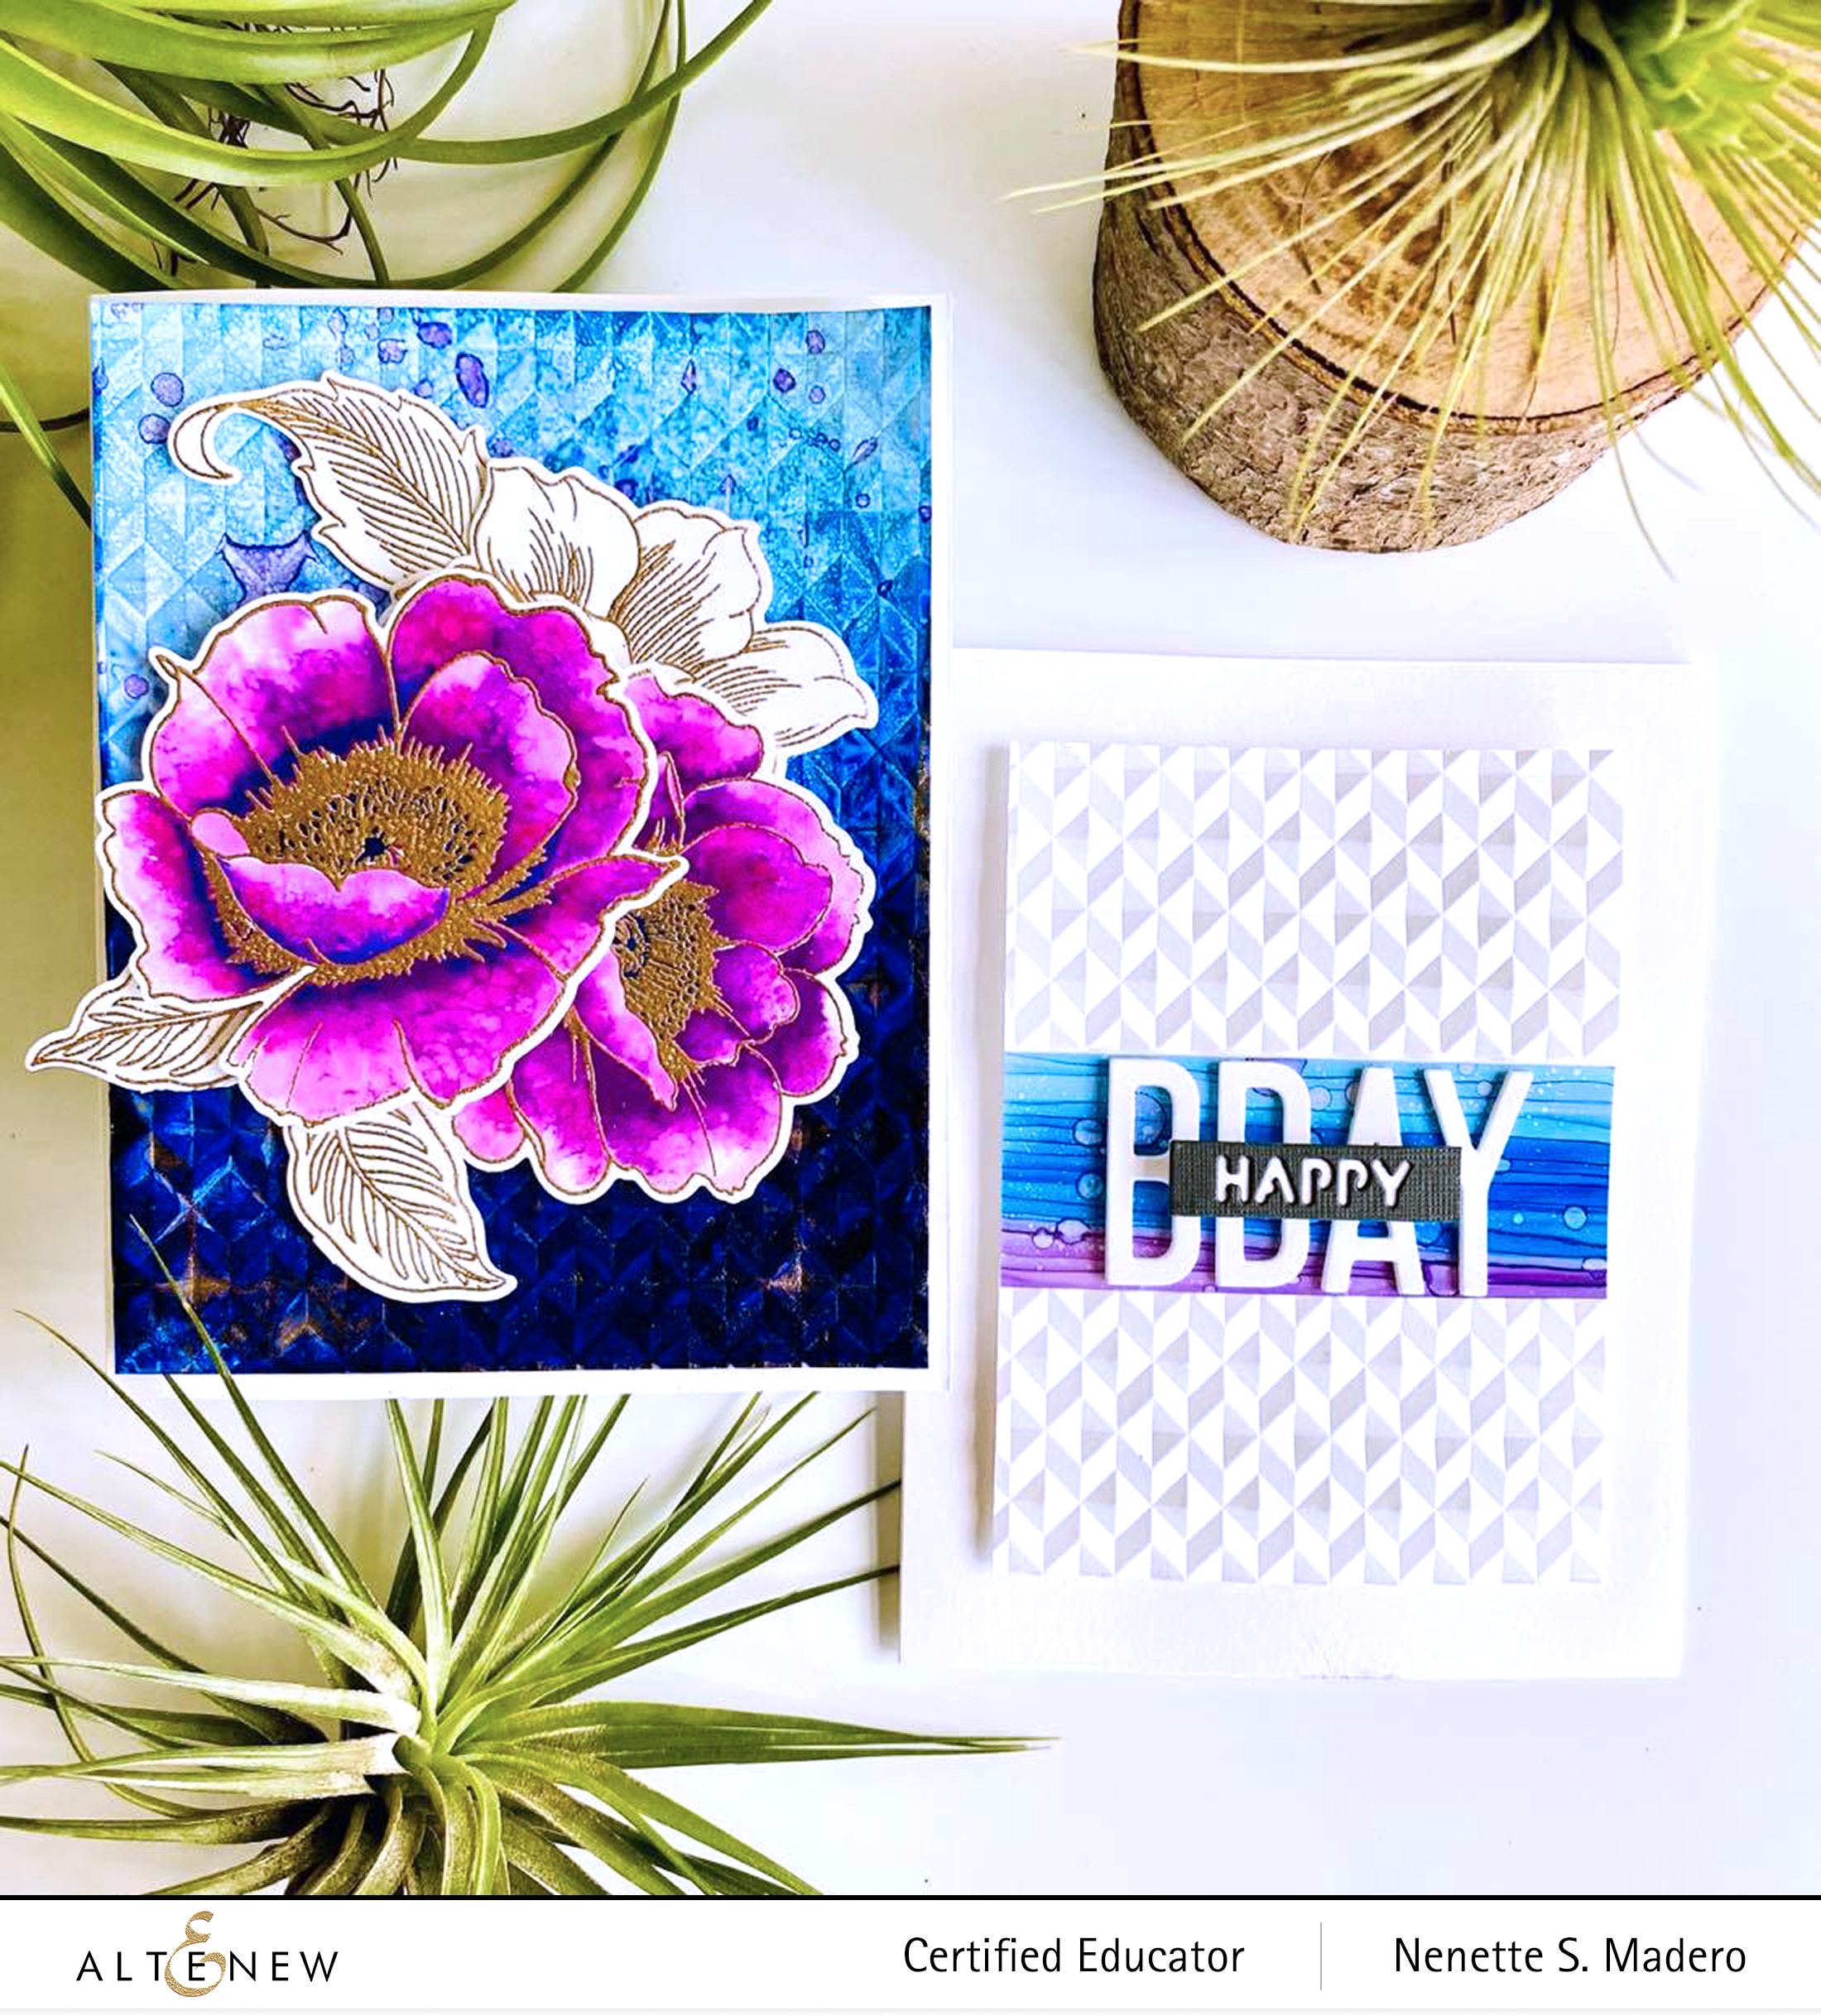
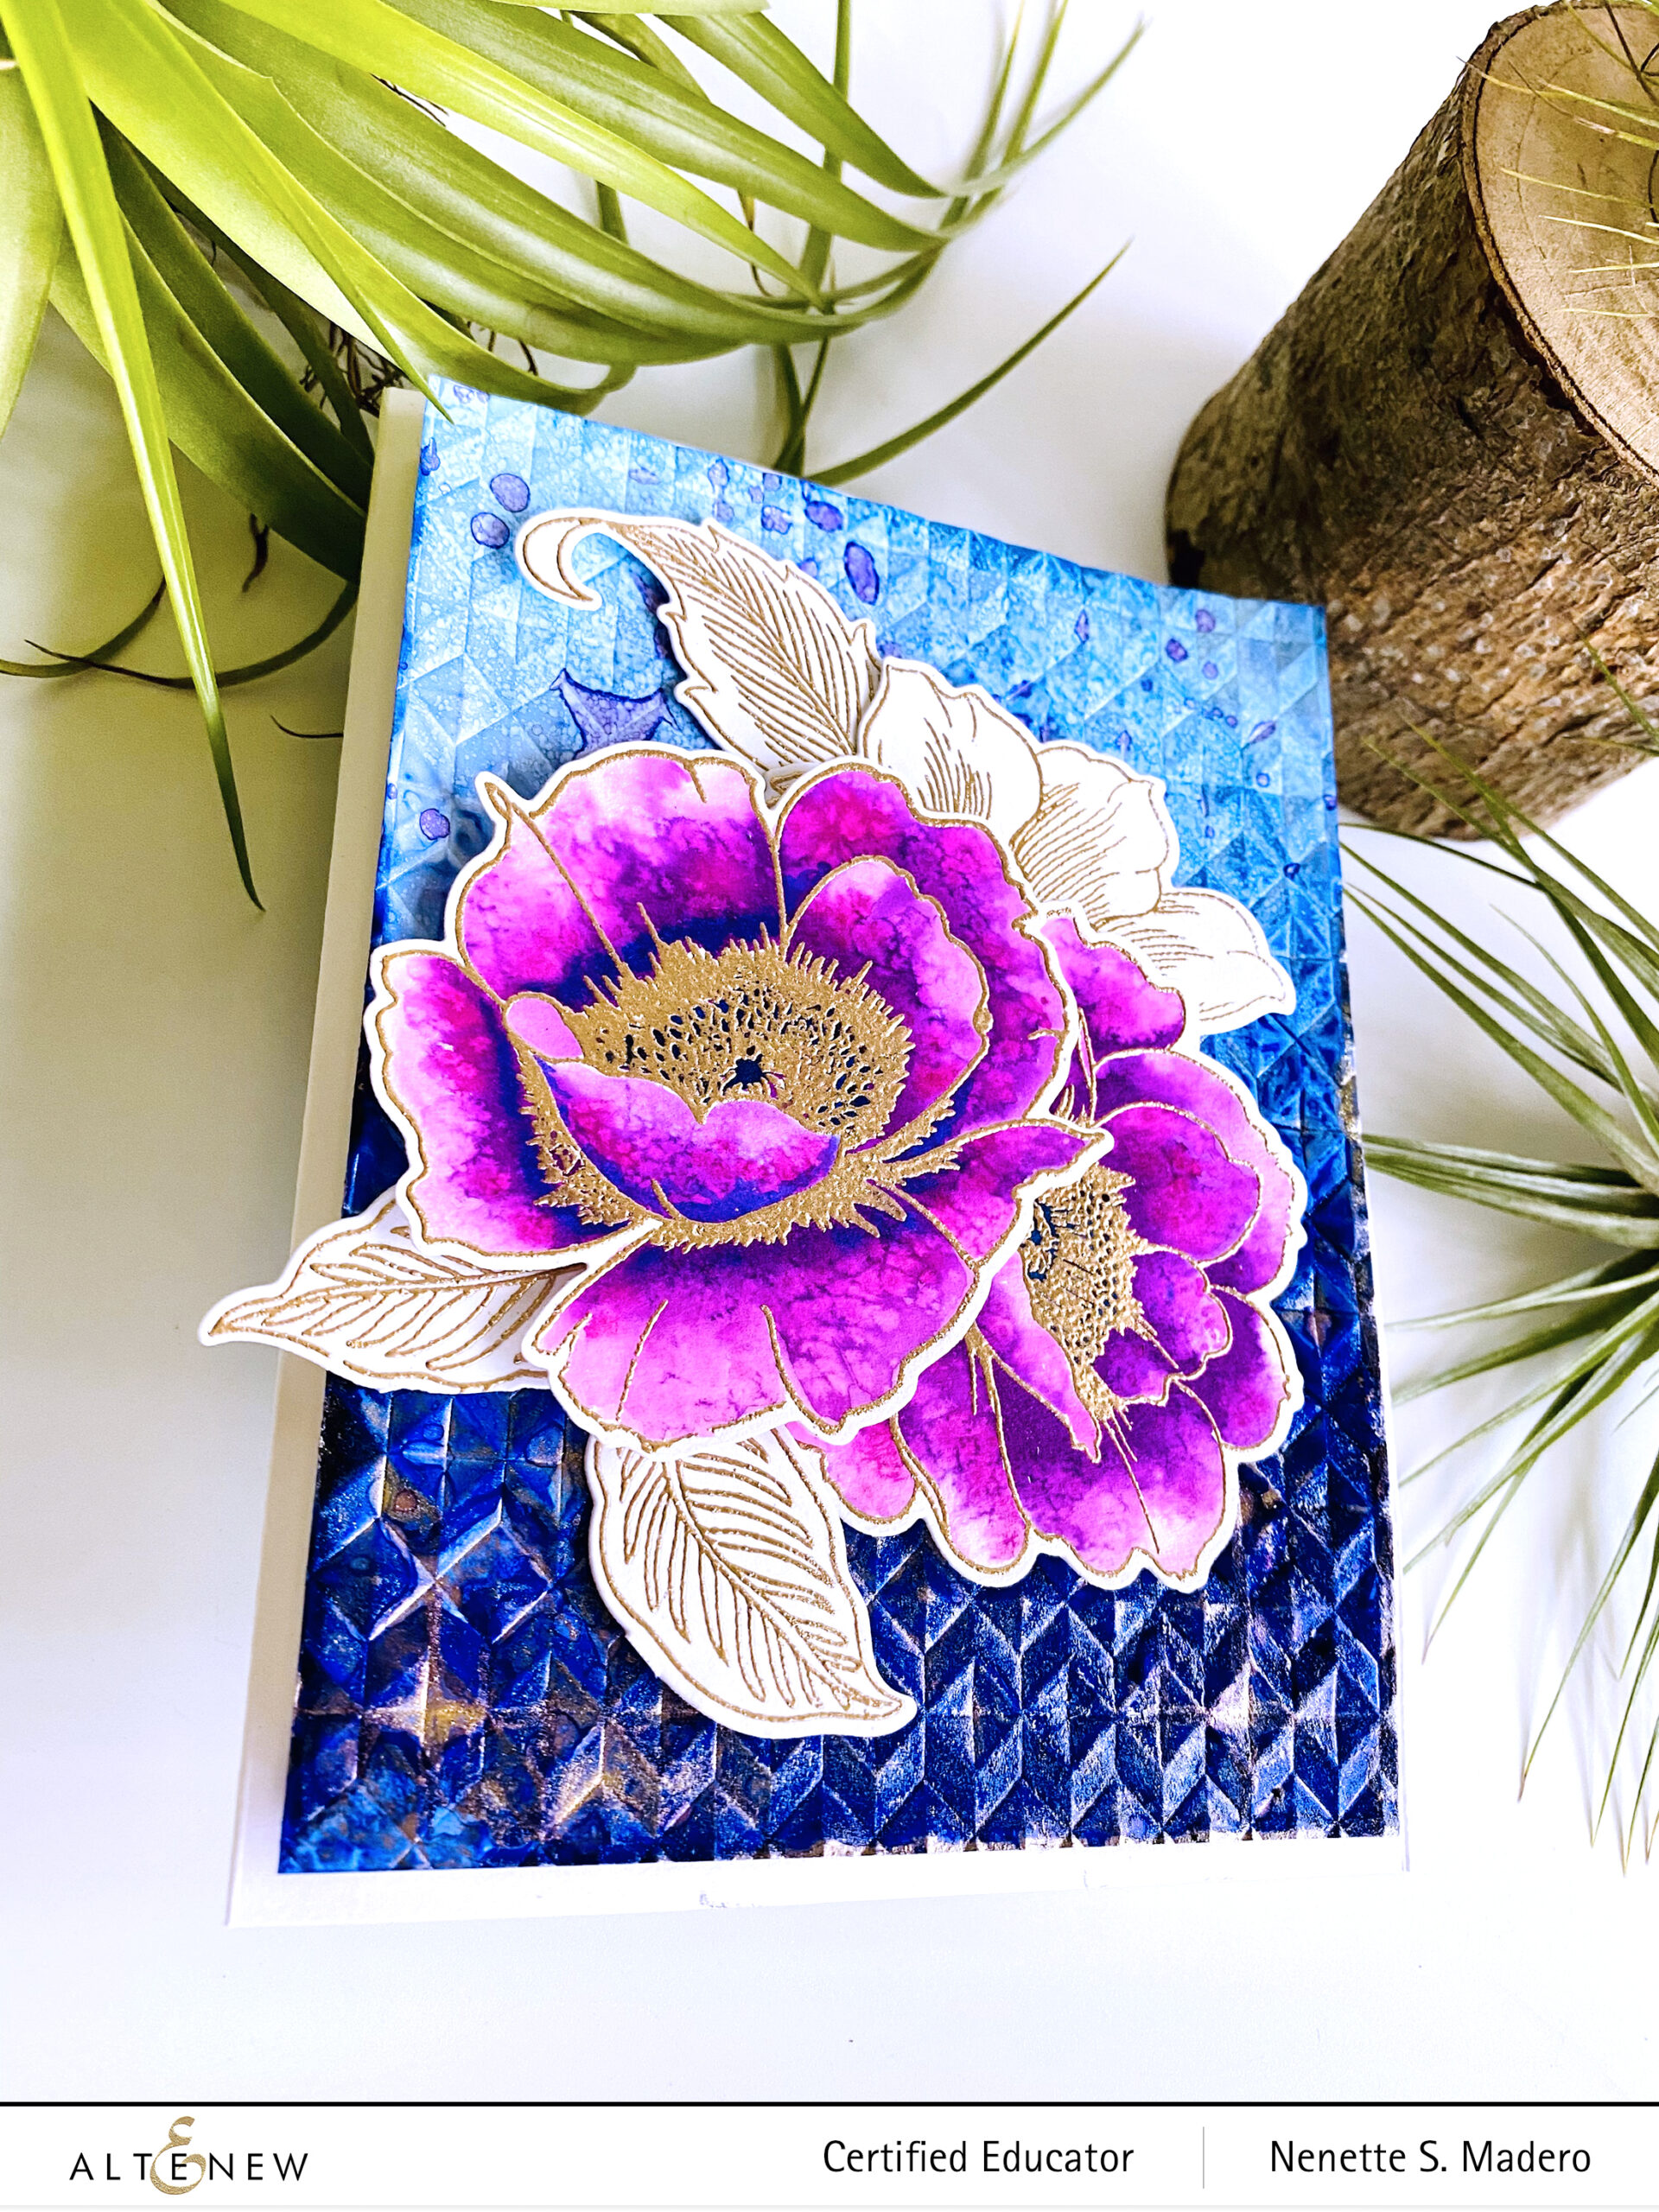
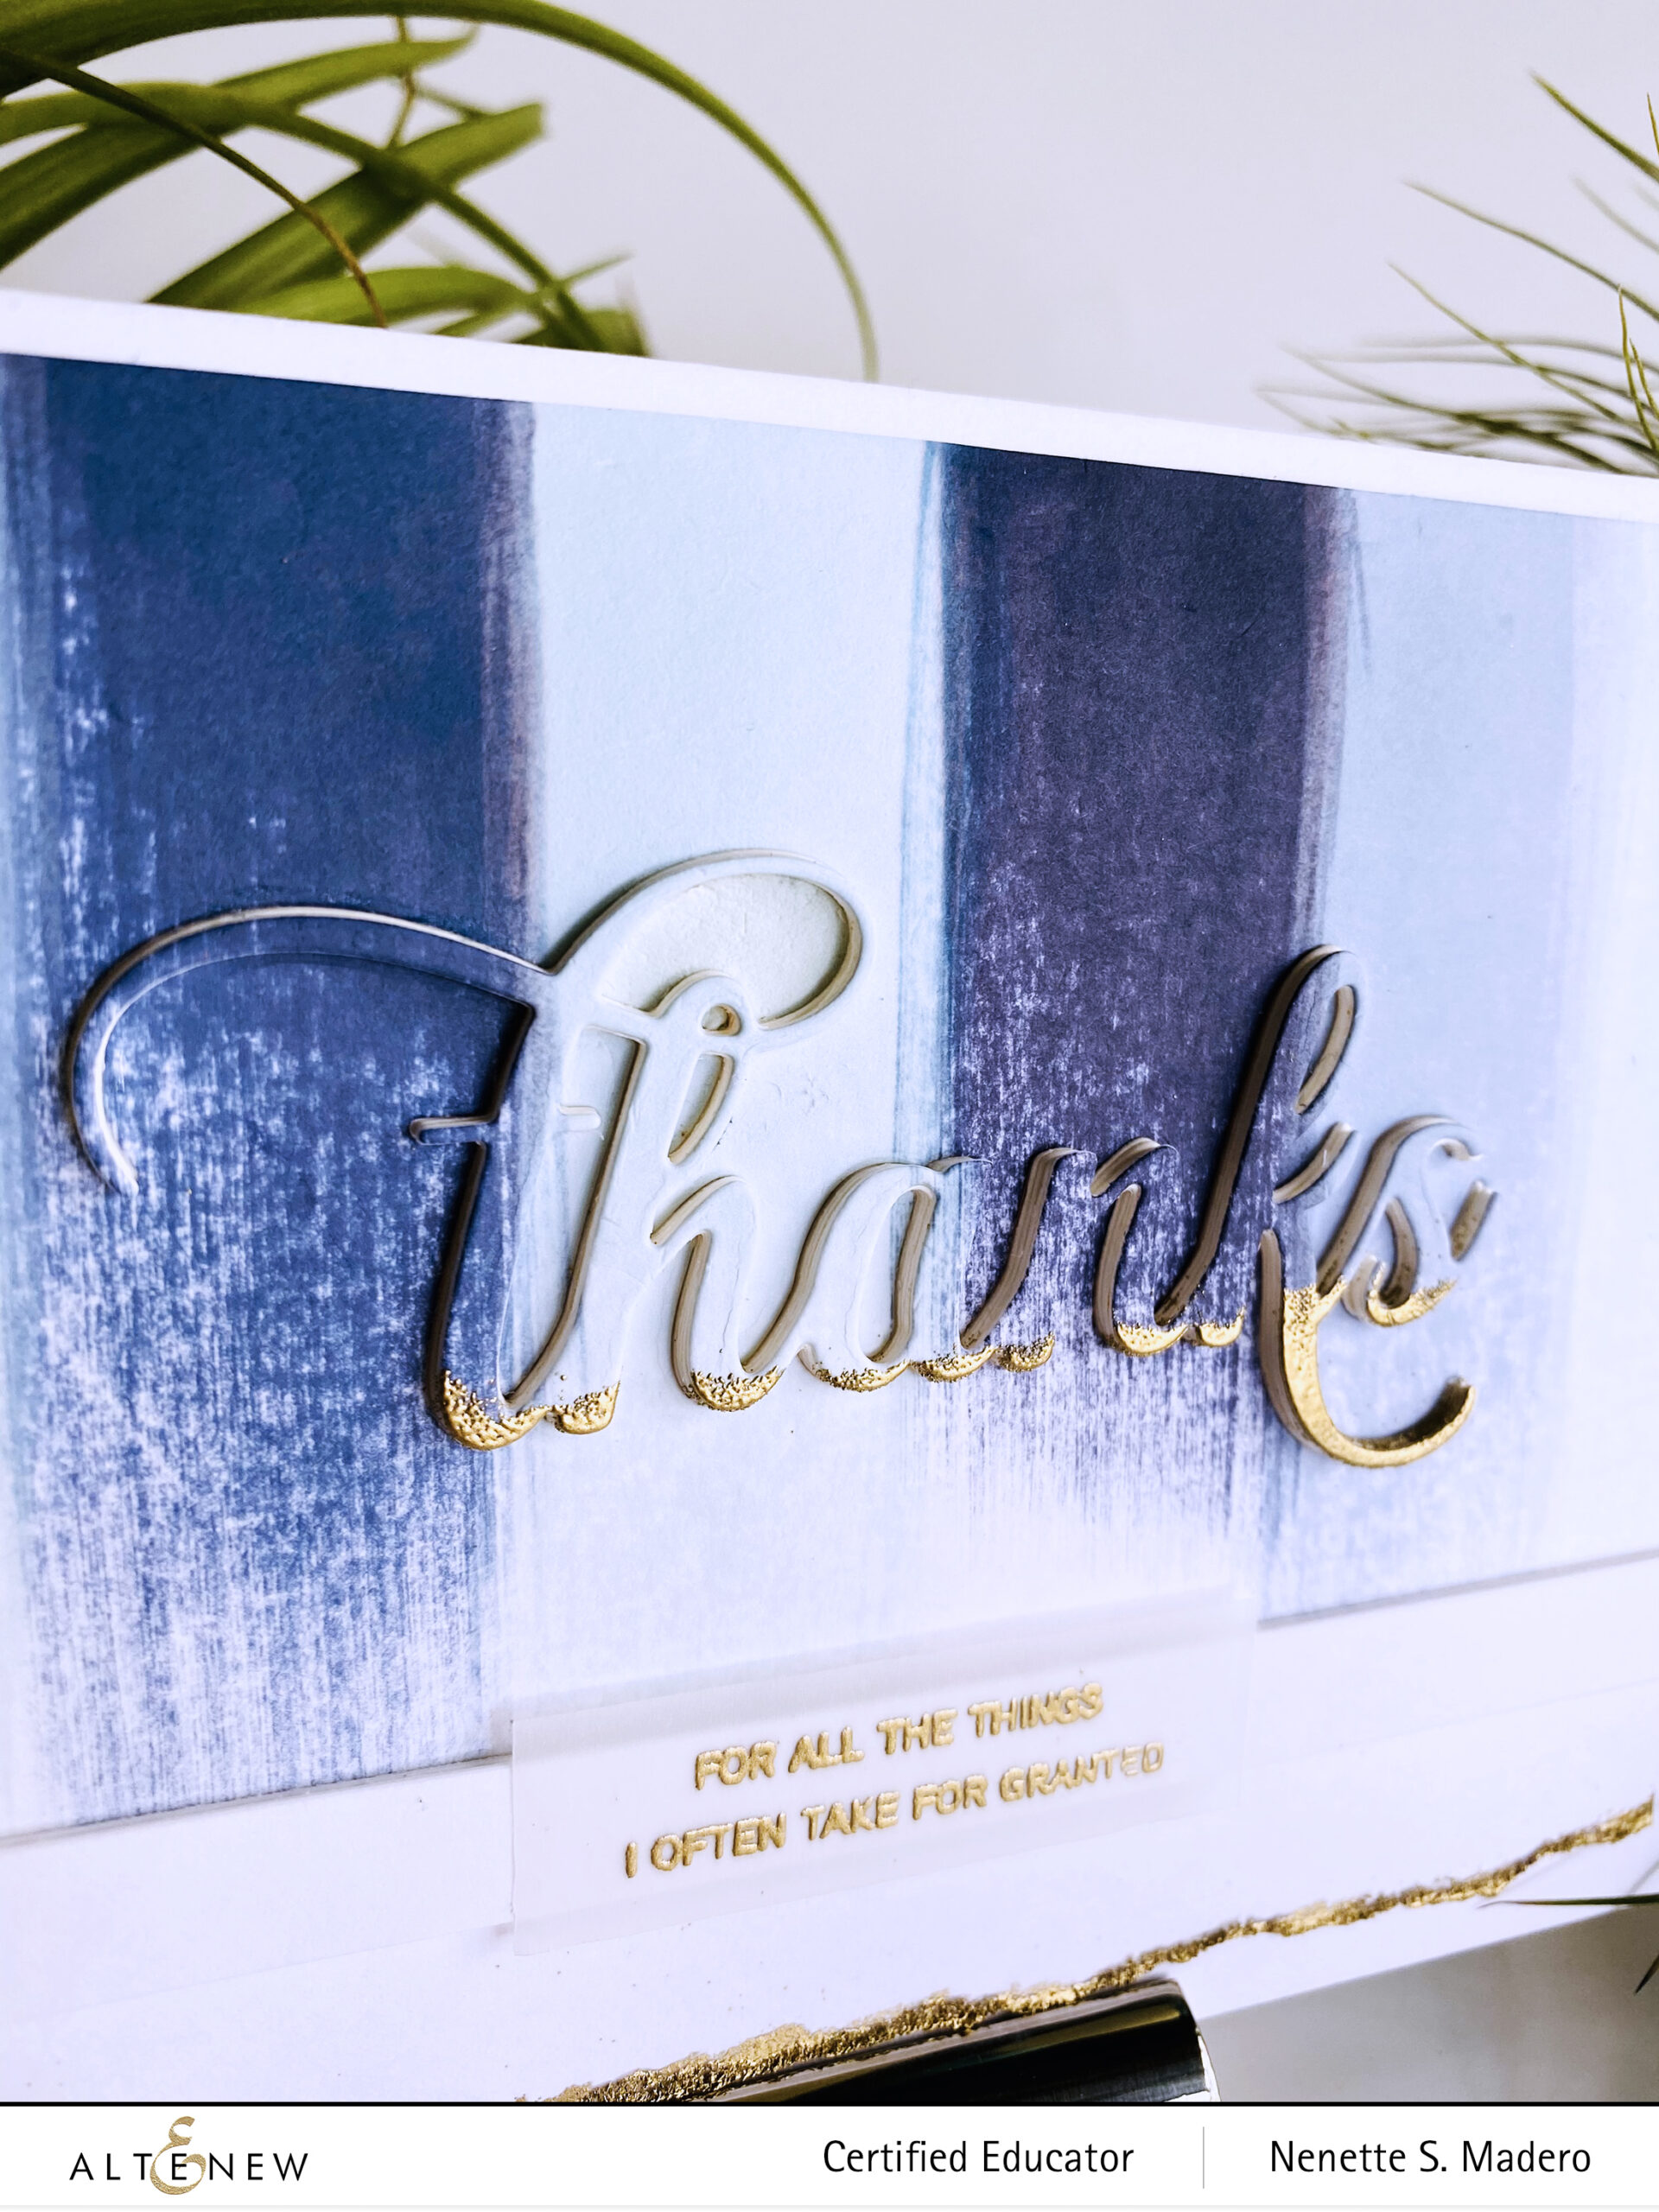
THE BEST FEELING OF HAPPINESS…


HELLO BEAUTIFUL STAMP, SISTERS OF THE HEART SENTIMENT, ROUNDED RECTANGLES DIE, DOTTED SWIRLS DEBOSSING DIE, ROSE GOLD AND PURE WHITE EMBOSSING POWDER, VERSAMARK INK, DISTRESS OXIDE INKS
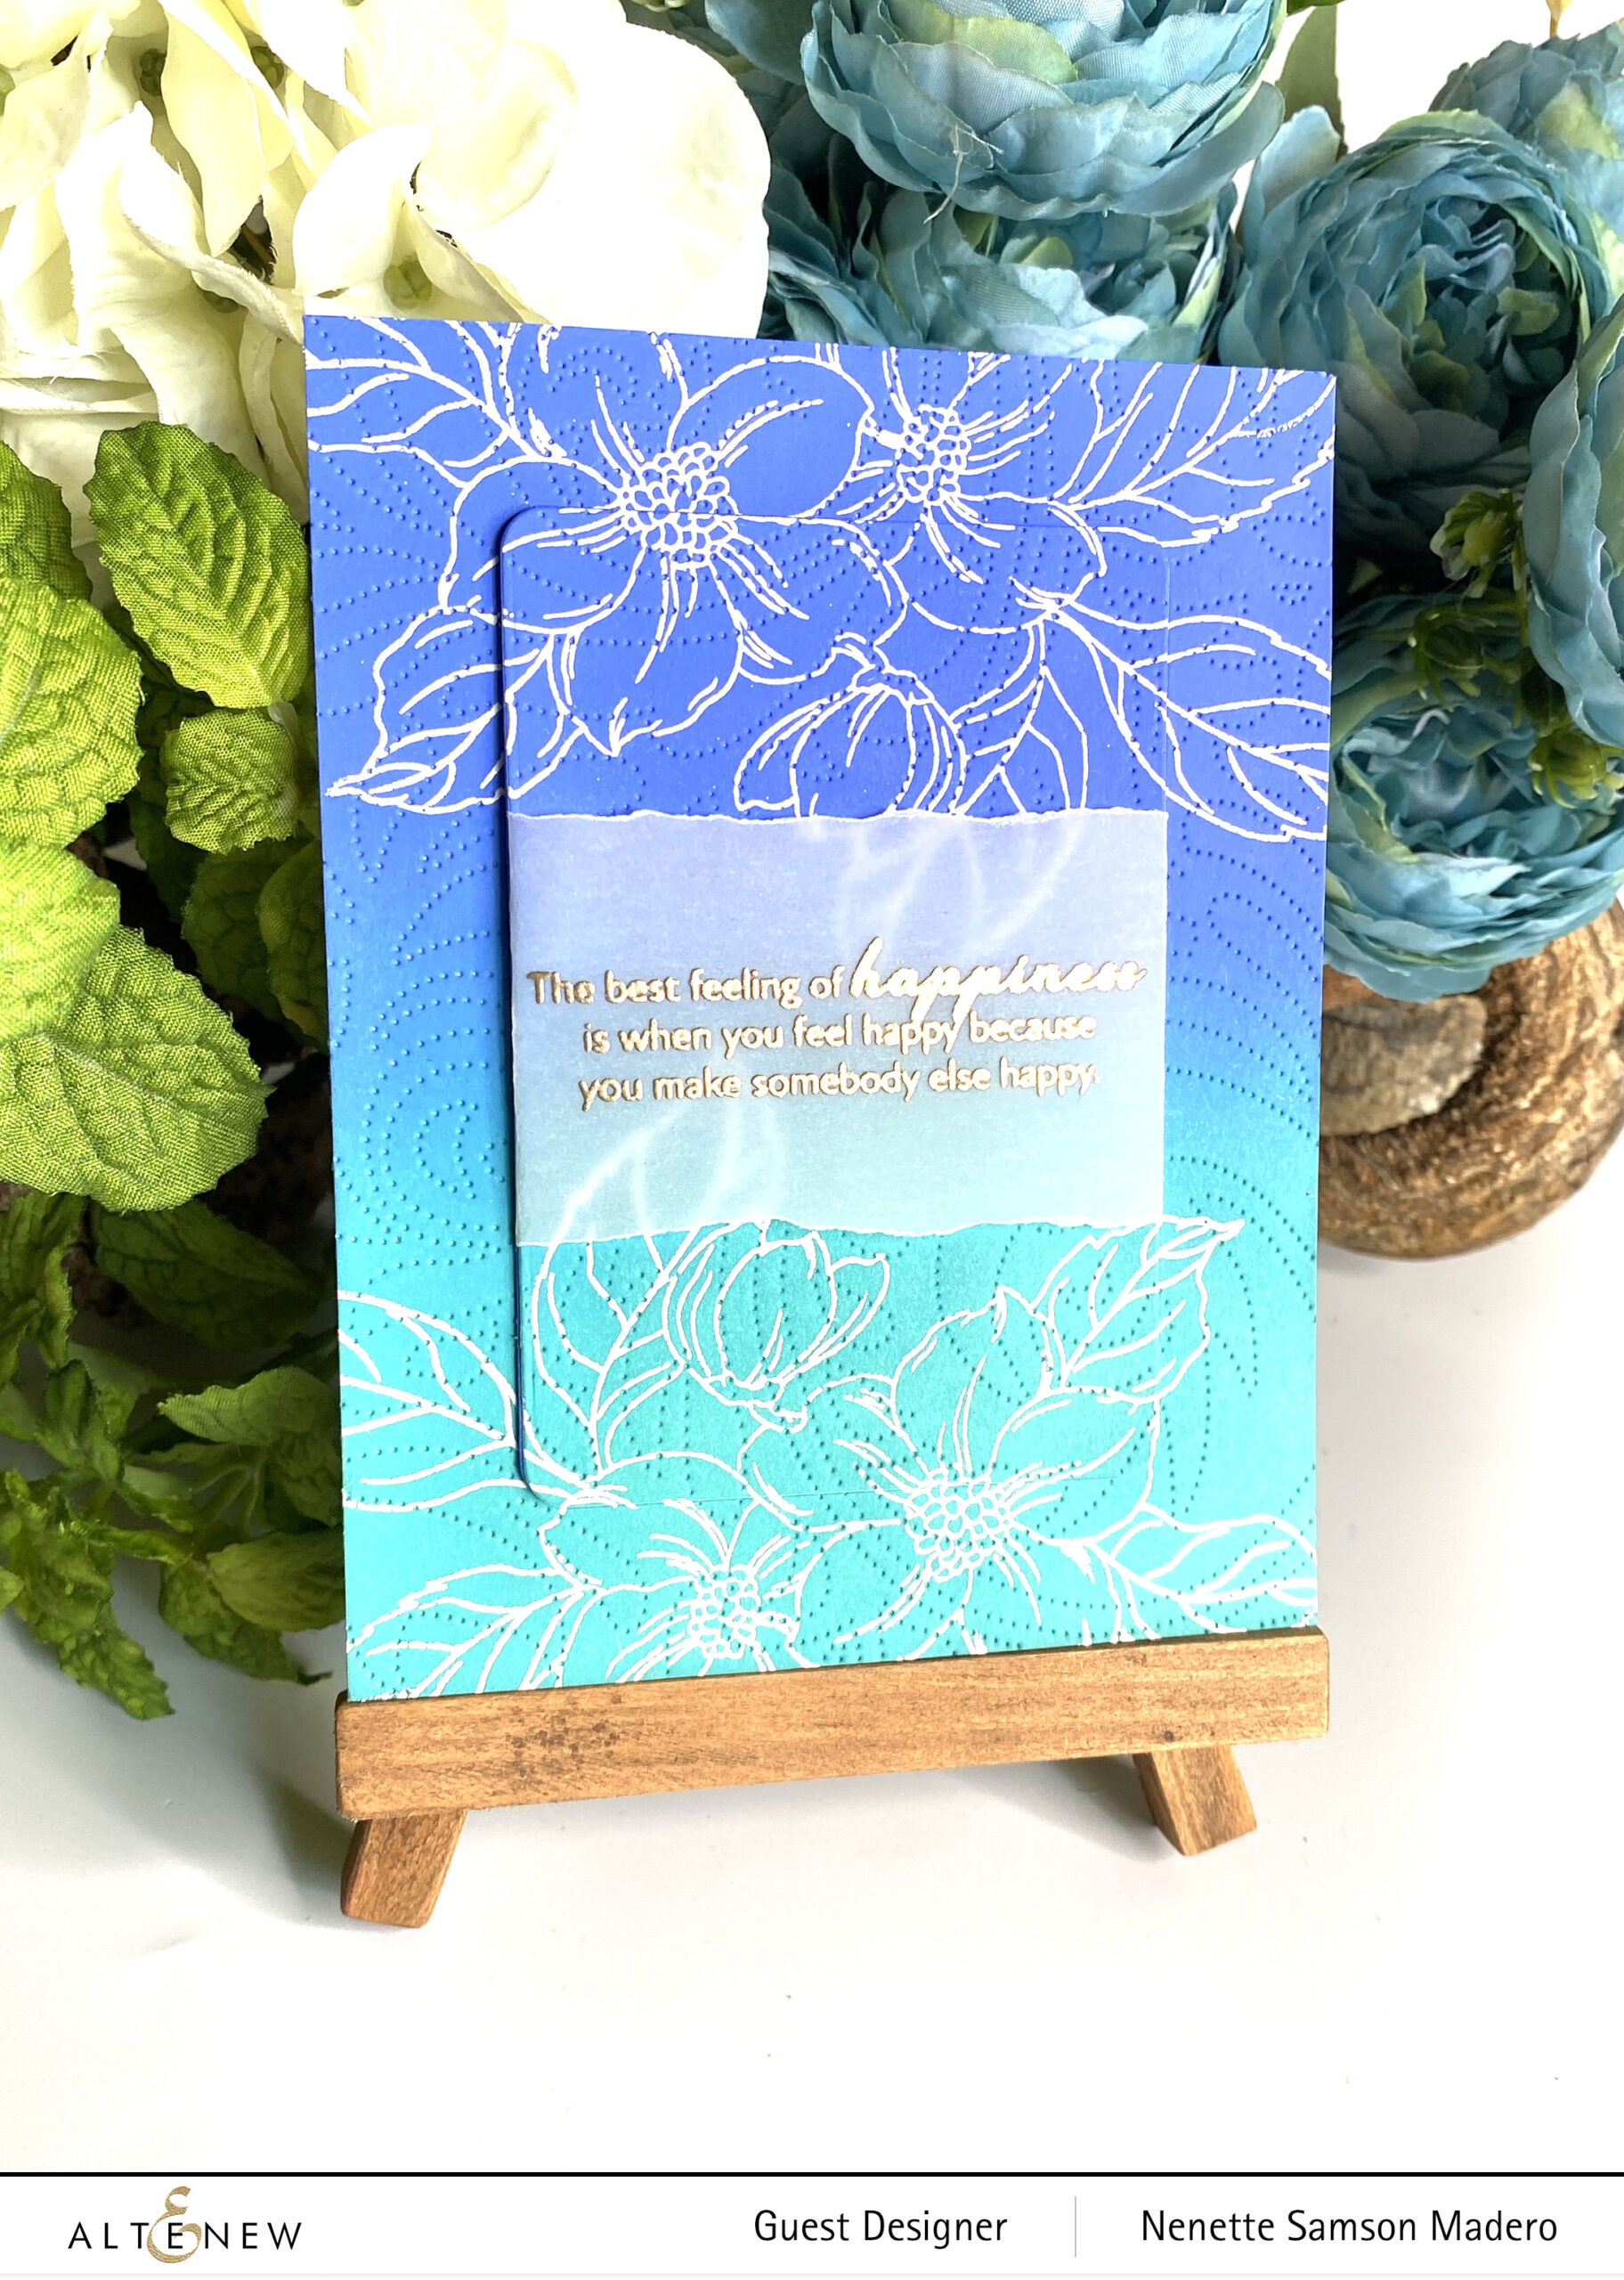
  1. Create an ombre card front using Distress Ink Oxides.
  2. Use the Dotted Swirls Debossing die to crate a debossed pattern.
  3. Stamp the floral image from the Hello Beautiful Stamp set at the top and bottom of the card front and emboss using Pure White embossing powder.
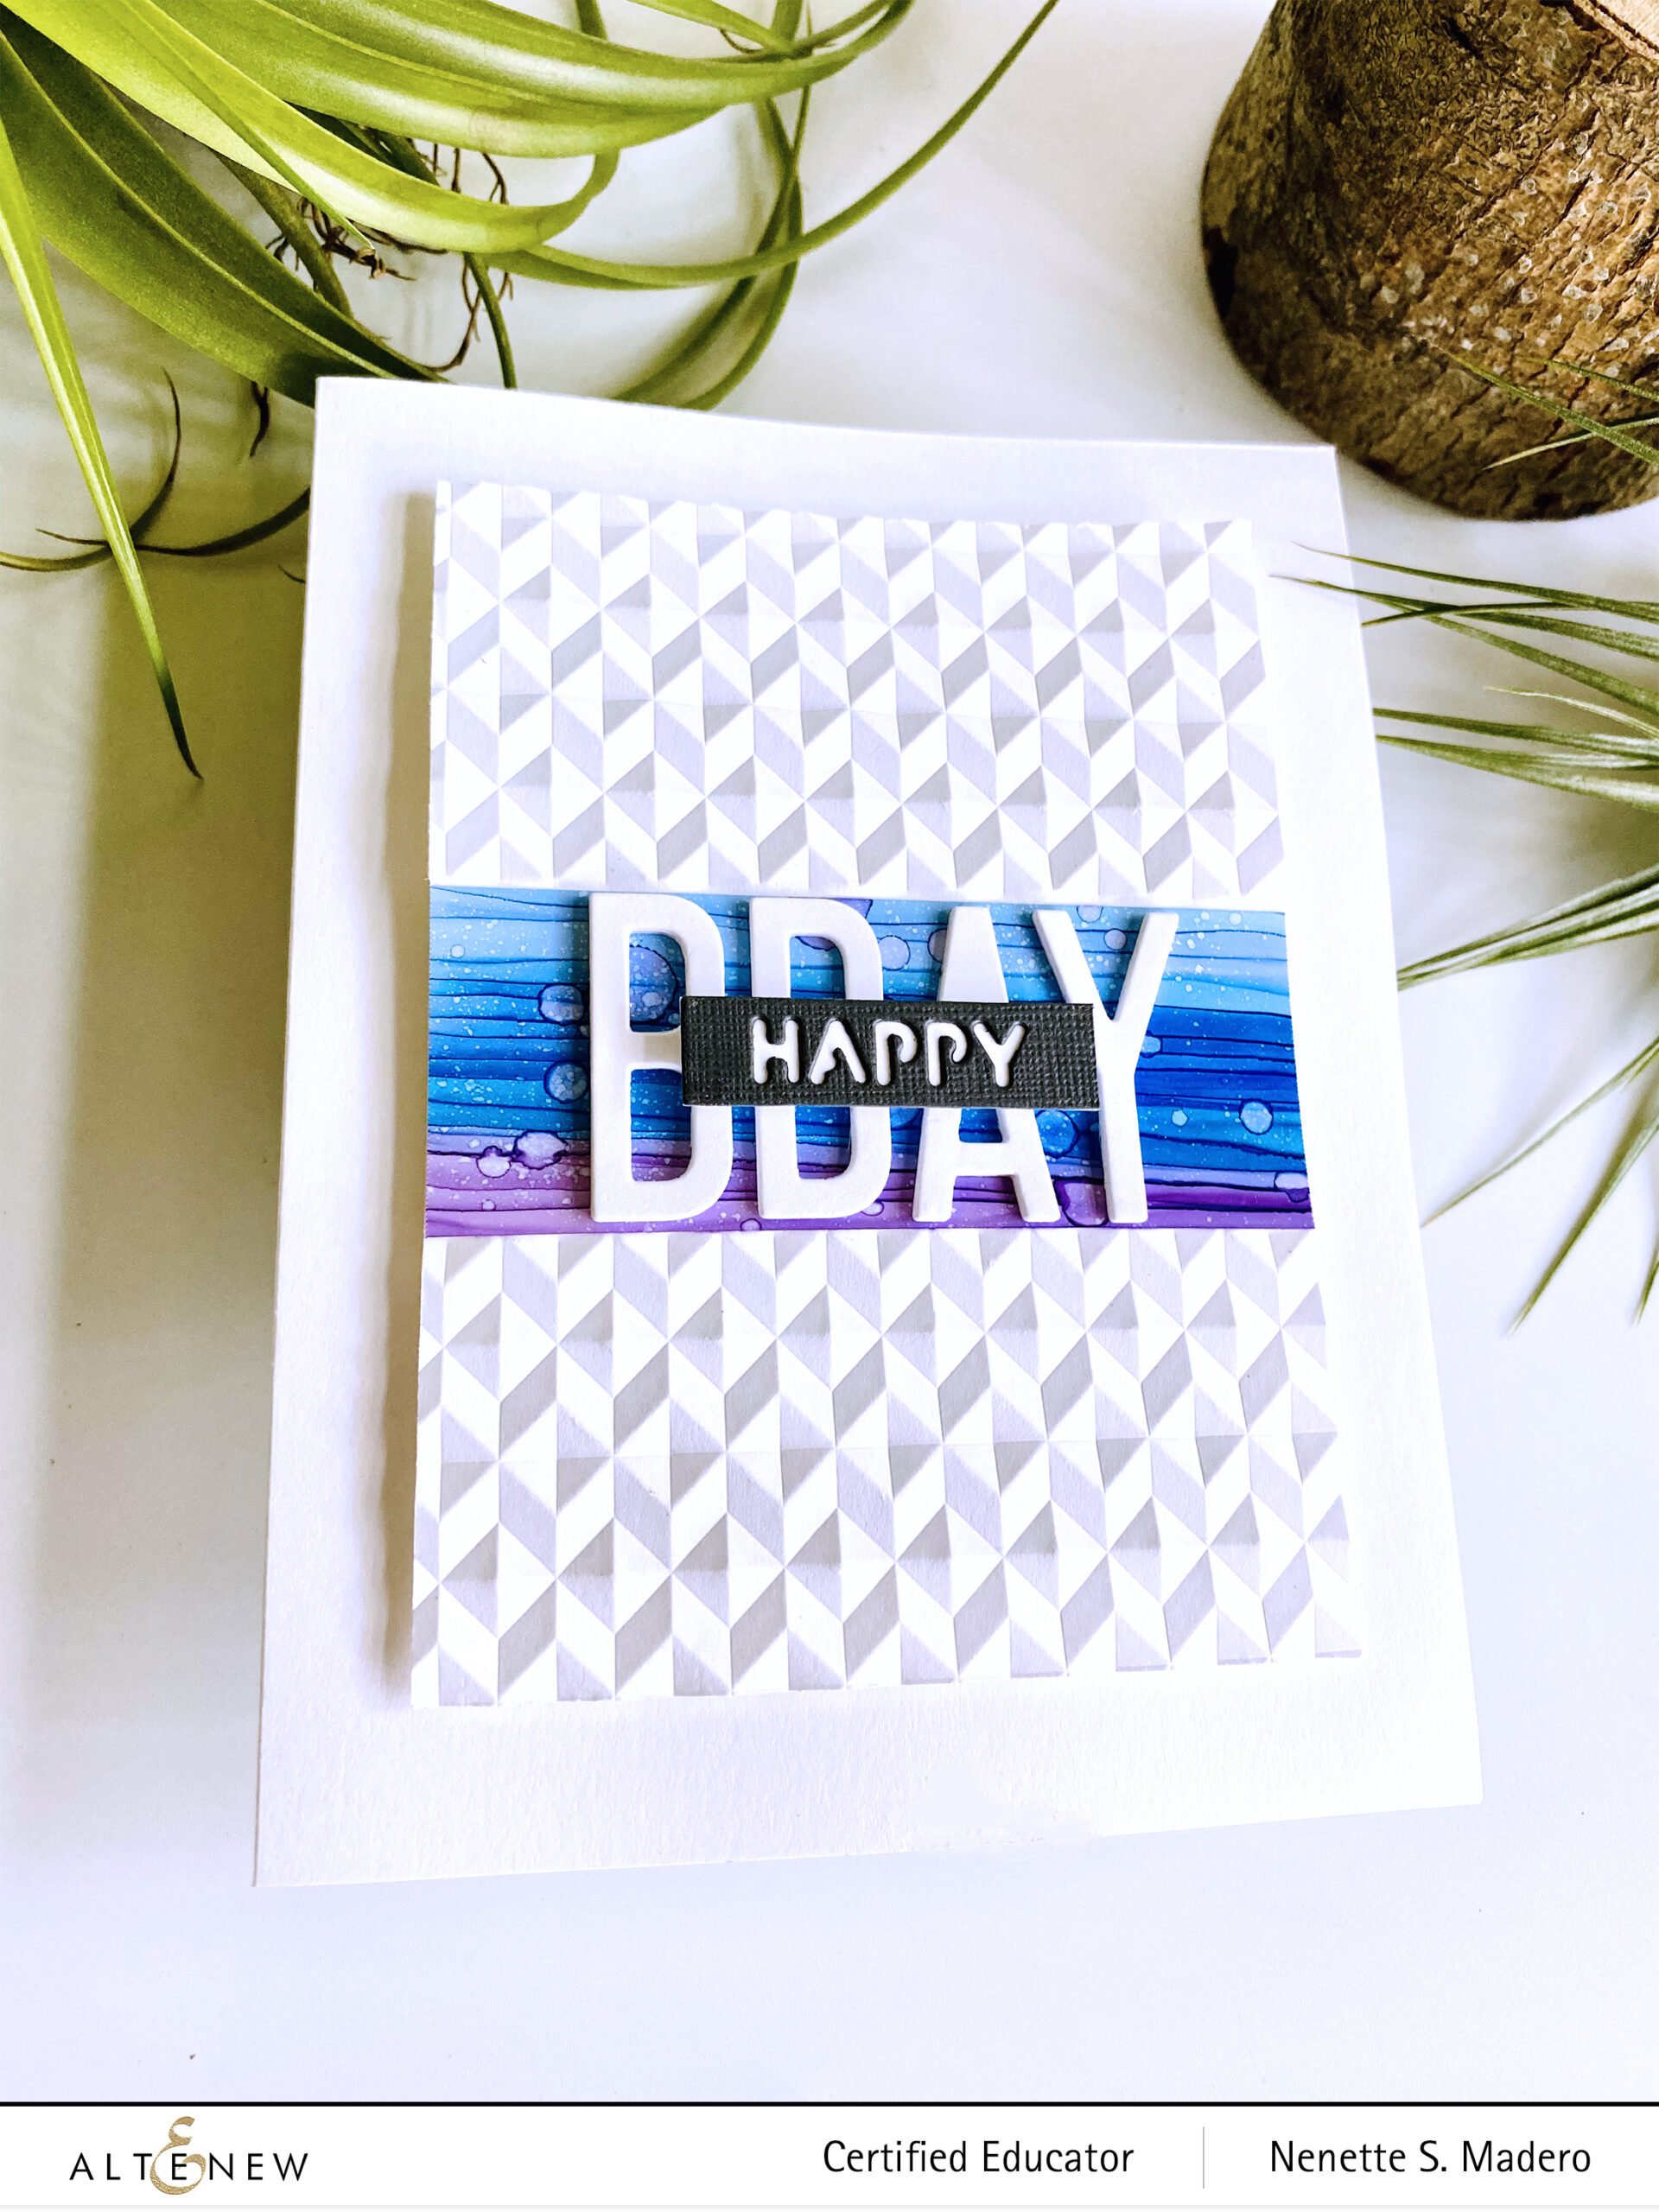
  4. Die cut the center using the Rounded Rectangles die. Add 4 more rectangles and adhere on top of each other.
  5. Stamp and emboss the sentiment on vellum.
  6. Assemble the card.

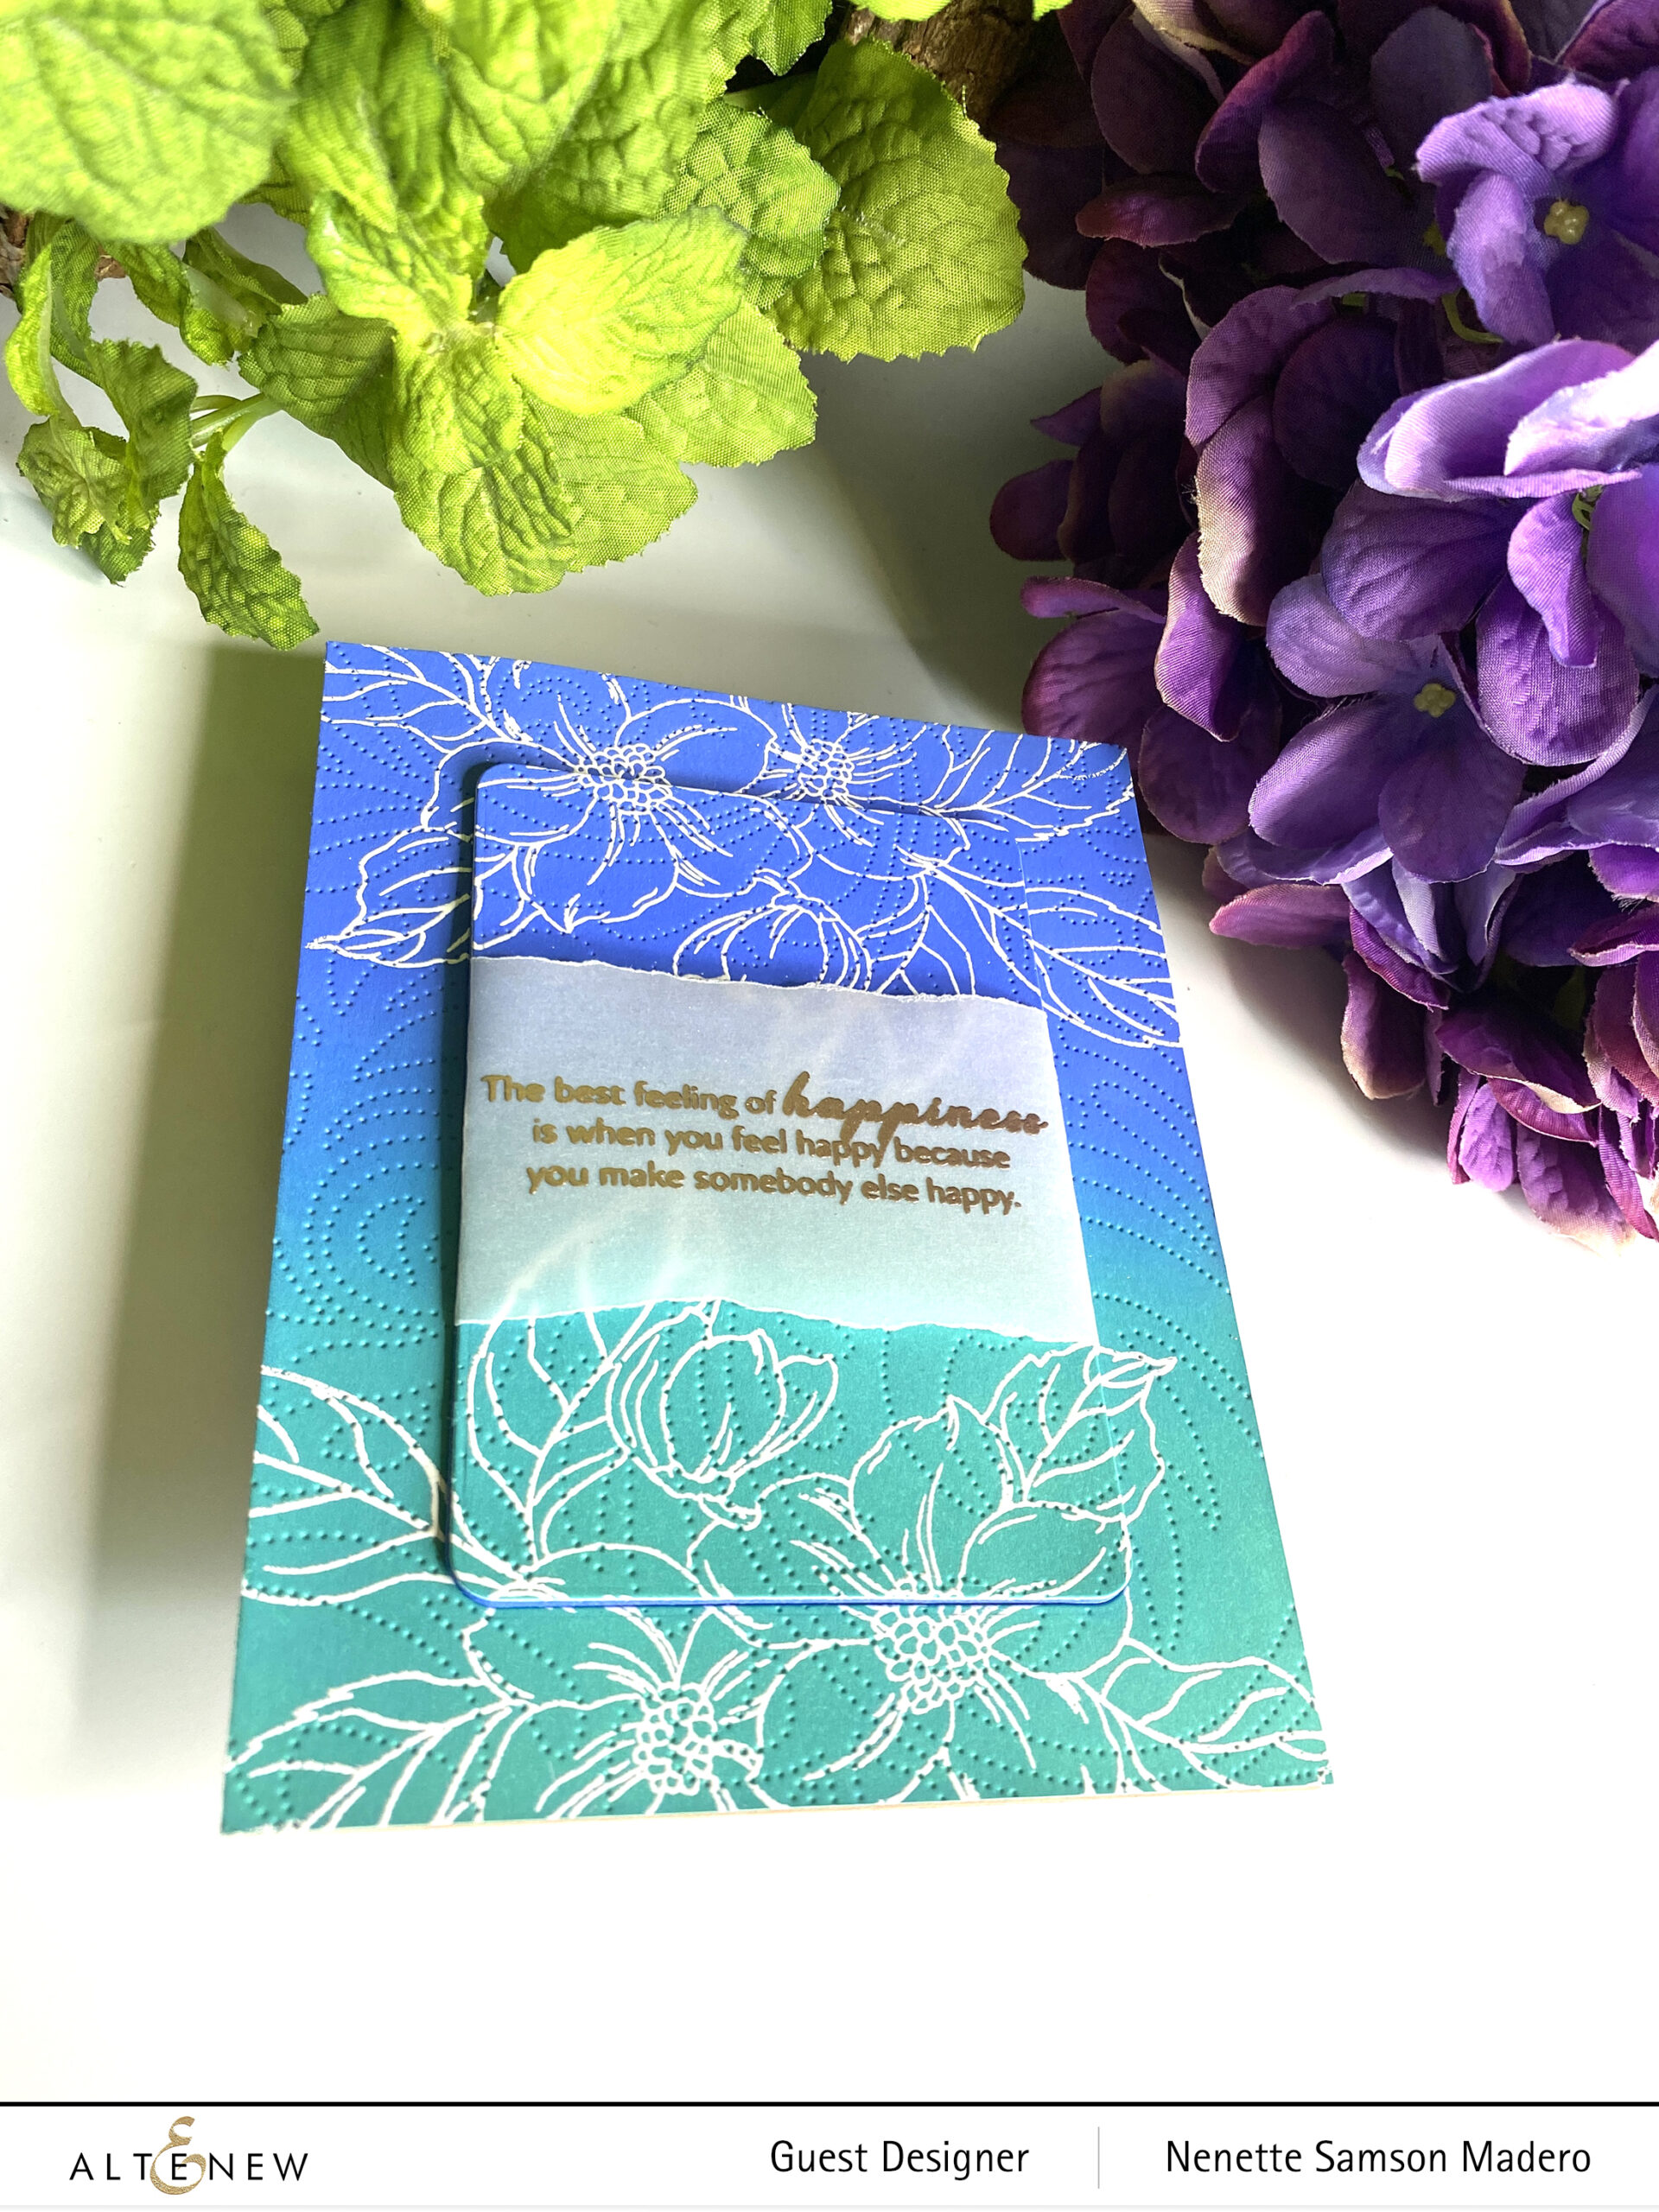
I love the look of outline stamps on an ombre background! Adding a few more rounded rectangles gave some dimension to the card.


GIVEAWAYS


$300 in total prizes! To celebrate this release, Altenew is giving away a $50 gift certificate to 2 lucky winners and a $ 25 gift certificate to 8 winners! Please leave a comment on the Altenew Card Blog and/or each designer’s blog post on the blog hop list below by 09/18/2021 for a chance to win. Altenew will draw 10 random winners from the comments left on each stop of this blog hop and announce the winners on the Altenew Winners Page on 09/20/2021.

Thank you so much for dropping by! Next up: Michelle Short. Make sure to leave a comment to get a chance to win a prize from Altenew! I love hearing from you and appreciate all your wonderful comments. If you haven’t yet, I hope you can follow me on Instagram as well @mylittleatticstudio. Until my next post–be safe everyone and keep on crafting!

Altenew Craft-A-Flower: Dendrobium Orchid Release Blog Hop + Giveaway ($200 in total prizes)

Altenew Craft-A-Flower: Dendrobium Orchid Release Blog Hop + Giveaway ($200 in total prizes)

Welcome to my blog, my crafty friends! If you just came from my friend, Colleen Balija, then you’re on the right track. For the full blog hop list, please visit the Altenew Card Blog. Take a look at this beautiful Craft-a- Flower: Dendrobium Orchid!!!

Here are two cards that I made using this layering die set.


SENDING HEALING HUGS


CRAFT-A-FLOWER: DENDROBIUM ORCHID, DECK PLANKS 3D EMBOSSING FOLDERS, DOTTED STARBURST DEBOSSING COVER DIE, SENTIMENT STRIPS 2 STAMP, PURE WHITE EMBOSSING POWDER, WATERCOLOR BRUSH MARKERS, VERSATILE VASES DIE
  1. Create different watercolor washes of increasing intensity for the different layers of the flowers, stems and leaves using Fabriano waterolor paper.
  2. Die cut the different parts of the orchids, leaves and stems and layer on top of each other with adhesive. Add streaks to mimick veins of petals.
  3. Emboss letterpress paper using the Deck Planks 3D embossing folder and add color and shade using watercolor.
  4. Create a debossed card panel using the Dotted Starbust Debossing cover die.
  5. Stamp and emboss the sentiment on black cardstock.
  6. Assemble the card using foam squares and adhesive.

I love creating floral arrangements so I enjoyed making this card. The embossing folder gave some texture to the vase.


STAY STRONG


CRAFT-A-FLOWER: DENDROBIUM ORCHID, ORGANIC LINEN 3D, SENTIMENT STRIPS 2 STAMP, PURE WHITE EMBOSSING POWDER, GOLDEN WASHI TAPE, WATERCOLOR BRUSH MARKERS, VERSATILE VASES DIE
  1. Create different watercolor washes of increasing intensity for the different layers of the flowers, stems and leaves using Fabriano watercolor paper.
  2. Die cut the different parts of the orchids, leaves and stems and layer on top of each other with adhesive. Add streaks to mimick veins of petals.
  3. Emboss letterpress paper using the Deck Planks 3D embossing folder and add color and shade using watercolor.
  4. Emboss teal cardstock using Organic Linen 3D embossing folder.
  5. Add gold washi tape strips to teh border of the embossed panel.
  6. Stamp and emboss sentiment using Pure White Embossing powder.
  7. Assemble the card.

I love how these cards turned out and enjoyed arranging them like there were real flowers.


GIVEAWAY PRIZES


$200 in total prizes! To celebrate this release, Altenew is giving away a $50 gift certificate to 2 lucky winners and a $20 gift certificate to 5 winners! Please leave a comment on the Altenew Card Blog and/or each designer’s blog post on the blog hop list below by 09/13/2021 for a chance to win. Altenew will draw 7 random winners from the comments left on each stop of this blog hop and announce the winners on the Altenew Winners Page on 09/15/2021.

NEXT UP: Joylita Dsouza. Thank you so much for dropping by! Let me know which card you like more in the comments section below and get a chance to win a prize from Altenew! Hope you can follow me on IG @mylittleatticstudio for my latest creations. Stay safe everyone and take care! Happy crafting!

Altenew Thanks and Blessings Stamps/Dies/Stencils/Embossing Folders Collection Release Blog Hop + Giveaway ($300 in total prizes)

Altenew Thanks and Blessings Stamps/Dies/Stencils/Embossing Folders Collection Release Blog Hop + Giveaway ($300 in total prizes)

Welcome to my blog, everyone!!! If you just came from Joylita Dsouza‘s blog, then you’re on the right track. For the full blog hop list, head on to the Altenew card blog. There are a lot of wonderful products in this release! You can find the whole collection here. Below are some samples of how you can make use of some of the products from this release.

CARTOON TULIPS STAMP AND DIE BUNDLE
FLOWING WREATH 3D EMBOSSING FOLDER

HAPPY BIRTHDAY


CARTOON TULIPS STAMP AND DIE BUNDLE, FLOWING WREATH 3D EMBOSSING FOLDER, MIX AND MATCH FAME DIE, ESSENTIAL SENTIMENT STRIPS DIE, GOLD FOIL WASHI TAPE, FOAM SQUARES, ADHESIVE, WATEROCOLOR PAPER, CARDSTOCK, WHITE PIGMENT PEN
  1. Create a watercolor wash. Emboss with the Flowing Wreath 3D embossing folder. Use a white pigment pen to highlight the leaf veins. Cut the outer portion to create a frame.
  2. Stamp the Cartoon Tulips image on watercolor paper using Antique Linen distress ink. Do a color wash on the petals and leaves and outline the image with a white gel pen.
  3. Die cut the Happy Birthday sentiment 4 times. Adhere gold washi tape on the 5th before die cutting. Layer on top of each other with glue.
  4. Die cut the dotted border from the Mix and Match Frame die.
  5. Assemble the card.

This tulip outline set comes with layering stamps so that if you are not comfortable in watercoloring, you can easily stamp the layers! It’s also very easy to watercolor because the flowers and leaves have big spaces wherein you can play with blending colors.


THANK YOU FOR YOUR KINDNESS


BIRD OF THE WOODS STAMP AND DIE BUNDLE, ALTENEW DYE INKS, ROSE GOLD EMBOSSING POWDER, FRAYED LEAF MIXED MEDIA INK, ARECA PALM 3D EMBOSSING FOLDER, NEENAH SOLAR WHITE CS, ARTIST MARKERS, CARDSTOCK, FOAM SQUARES
  1. Stamp the different layers of the bird. Mask the bird then stamp the branch.
  2. Fussy cut the bird and the branch without cutting the lower portion.
  3. Apply ink on the flat surface of the Areca Palm 3D embossing folder to create a letterpress look.
  4. Stamp the sentiment. Add two orange dots and a thin line for added interest.
  5. Emboss the edge of the card base using Versamark Ink and Rose Gold embossing powder.
  6. Assemble the card.

Don’t you just love this cute little bird?! <3 You can create a scene using all the foliage 3D embossing folders to change the background.

BLOSSOMING BRANCHES 3D EMBOSSING FOLDER

THANK YOU FOR YOUR KINDNESS


BIRD OF THE WOODS STAMP AND DIE BUNDLE, BLOSSOMING BRANCHES 3D EMBOSSING FOLDER, PURE WHITE EMBOSSING POWDER, PIGMENT INK, ZING SILVER GLITTER FINISH EMBOSSING POWDER, DYE INKS
  1. Add pigment ink to the flat surface of the embossing folder and emboss.
  2. Stamp the bird using dye inks. Stamp the branch as well.
  3. Stamp and emboss the sentiment with Pure white embossing powder.
  4. Emboss the edges of the embossed background with silver glitter finish.
  5. Assemble the card.

I paired the Blossoming Branches 3D embossing folder with the Bird of the Woods. Isn’t this a perfect match? 🙂


EVERY DAY IS A BLESSING


CARTOON TULIPS STAMP AND DIE BUNDLE, GREATEST BLESSING STAMP SET, ANTIQUE SILVER EMBOSSING POWDER, FINE FRAMES DIAMOND DIE, DREAMY TILES 3D EMBOSSING FOLDER, ARTIST WATERCOLOR PAN SET, MIXED MEDIA CORAL BERRY PIGMENT INK, ANTIQUE LINEN DISTRESS INK, FABER-CASTELL COLORED PENCILS
  1. Stamp the Cartoon Tulips on watercolor paper using Anitque Linen Distress Ink and watercolor the flowers, stems and leaves. Add details using colored pencils then die cut.
  2. Stamp and emboss the sentiment with Versamark Ink and Antique Silver embossing powder.
  3. Die cut the fine frames diamond 4 times.
  4. Add Coral Berry pigment ink to the flat surface of the Dreamy Tiles 3D embossing folder and emboss.
  5. Cut out a strip of purple cardstock and emboss the edges with silver embossing powder.
  6. Assemble the card.

All of the elements in this card draw the eye to the tulips– the purple strip, the diamond die cuts and the position of the sentiment strip. I can’t wait to make more cards using this lovely stamp set.

  • Get a FREE brand new Thanks and Blessings Release Mini Inspiration Guide with every order from 09/03/2021 through 09/05/2021. Shop HERE!
  • Get a FREE brand new Online Cardmaking Class with every order from the new Thanks and Blessing Stamp & Die Release Collection from 09/03/2021 through 09/09/2021. Shop HERE!

GIVEAWAY PRIZES


$300 in total prizes! To celebrate this release, Altenew is giving away a $50 gift certificate to 2 lucky winners and a $25 gift certificate to 8 winners! Please leave a comment on the Altenew Card Blog and/or each designer’s blog post on the blog hop list below by 09/09/2021 for a chance to win. 

Altenew will draw 10 random winners from the comments left on each stop of this blog hop and announce the winners on the Altenew Winners Page on 09/11/2021.

Next up is my dear and talented friend, Sandhya Iyer. Make sure to leave a comment below to get a chance to win a prize from Altenew! I hope you liked the cards I created for this hop. I love hearing from all of you and your comments just inspire me to be more creative!

Thank you so much for dropping by. Stay safe and keep on crafting!

Altenew Educators “Favorite Old/New Altenew Stamp” Blog Hop and Linky Party + Giveaway

Altenew Educators “Favorite Old/New Altenew Stamp” Blog Hop and Linky Party + Giveaway

Hello friends! Welcome to Altenew’s Educators “Favorite Old/New Altenew Stamp blog hop! If you just came from Vicki Finger’s blog, then you’re on the right track. We were assigned to choose a favorite stamp set from our old or new stash and highlight it in this post. I decided to create from an old AND a new stamp. It wasn’t easy to pick a favorite… I have too many!!! Anyway, for the old stamp set, I chose one of my all-time favorites– the Persian Motifs Stamp and die set.

I have always loved the vintage Indian woodblock designs and this stamp set reminds me of that. I created two cards using the Persian Motifs stamp and die set.


BE KIND


MATERIALS: PERSIAN MOTIFS STAMP AND DIE , BLOCK SENTIMENTS STAMP AND DIE, ROSE GOLD EMBOSSING POWDER, WATERCOLOR BRUSH MARKERS- MANGO SMOOTHIE, ORANGE CREAM, YELLOW OCHRE, LAGOON, EMERALD, WATERCOLOR PAPER, VERSARMARK INK, ROSE GOLD EMBOSSING POWDER, METALLIC WATERCOLOR PAN SET, CARDSTOCKS, foam squares

Now, more than ever, we should remind ourselves, daily, to be kind to one another. Sadly, there is so much hatred and injustice around the world. I’ve been listening to a podcast by Fr. Mike Schmitz and this message struck me. We have to remember that we are all part of one world and that it’s not a battle between race or ethnicities. Even in the midst of all the brokenness, we can still find peace and be united if we just BE KIND to one another.

STEPS:

  1. Prep the paper with antistatic tool and stamp images on watercolor paper with Versamark ink and emboss with Rose Gold embossing powder.
  2. Color images using watercolor brush markers.
  3. Add metallic details using the metallic watercolor pan set.
  4. Arrange the images temporarily on purple cardstock. Mark with pencil the edges of the flowers.
  5. Arrange the dies for partial die cutting to remove the lower part of the purple cardstock.
  6. Add embossed gold edges to the lower part of the card front using Versamark ink and Rose Gold embossing powder.
  7. Add foam sheet to the back of the purple cardstock and foam squares to the floral images for added dimension.
  8. Emboss the sentiment with Rose Gold embossing powder then die cut.
  9. Assemble the card.

More often than not, I usually stamp, emboss and watercolor more than what I need. Since I had extras, I decided to create a second CAS card using the same stamp set.


DO STUFF THAT MATTERS


MATERIALS: PERSIAN MOTIFS STAMP AND DIE, HELLO HYDRANGEA STAMP SET, WATERCOLOR BRUSH MARKERS- MANGO SMOOTHIE, ORANGE CREAM, YELLOW OCHRE, LAGOON, EMERALD, WATERCOLOR PAPER, VERSARMARK INK, ROSE GOLD EMBOSSING POWDER, PURE WHITE EMBOSSING POWDER, METALLIC WATERCOLOR PAN SET, DIAMOND STARS 3D EMBOSSING FOLDER, CARDSTOCKS, foam squares, Versamark ink

STEPS:

  1. Prep the paper with the antistatic tool then stamp and emboss the images from the Persian Motifs Stamp.
  2. Add more details using the Metallic Watercolor pan set.
  3. Emboss white cardstock using the Diamond Stars embossing folder.
  4. Add Versamark Ink to the embossed parts and emboss with Rose Gold embossing powder.
  5. Stamp the sentiment from the Hello Hydrangea stamp set with Versamark ink and emboss with Pure White embossing powder.
  6. Assemble the card using foam squares for added dimension.

For the new stamp, I chose two of my favorites– the Courageous You Stamp set which was released sometime in July 2020. I love the huge image that can cover the whole card front! Another favorite of mine is the Essential Sentiment Strips die– the easiest way to add a dimensional sentiment to your card. <3


HAPPY BIRTHDAY


MATERIALS: COURAGEOUS YOU STAMP AND DIE SET, STACKED DIAMONDS COVER DIE, ESSENTIAL SENTIMENT STRIPS DIE, ROSE GOLD EMBOSSING POWDER, WATERCOLOR BRUSH MARKERS, WATERCOLOR PAPER, WHITE GOUACHE PAINT, VERSAMARK INK

STEPS:

  • Stamp the image onto watercolor paper using very light dye ink. (I used a Misti and didn’t move the watercolor paper after stamping.)
  • Loosely paint over the entire flowers going over the outlines using Turquoise, Ultraviolet, Midnight violet, Sea Breeze and Ultramarine for the flowers and Emerald, Sweet Leaf and Moss for the leaves.
  • After the watercolor dries, add spatters of water and allow to sit for 10 seconds. Dry with a paper towel to remove some ink to create texture.
  • When the image is dry, prep the paper with the antistatic tool then re-stamp again the outline image with Versamark Ink and emboss with Rose Gold embossing powder. (Remember, I left the image inside the Misti so that I can restamp again.)
  • Die-cut the image as well as the Stacked Diamonds cover die.
  • Die-cut the sentiment die 4 times and watercolor the 1st layer using the leftover inks.
  • Add white cardstock to the back of the sentiment strip die cut.
  • Adhere the cover die onto the card front and attach the flowers and sentiment with foam squares.
  • Add white gouache splatters.
  • Add the sentiment strip die cut using foam squares.

PRIZES


Altenew is giving away a $20 gift certificate to 5 lucky winners! Please leave a comment on the Altenew Card Blog by 4/4/2021 for a chance to win. 

Altenew will also draw a winner to receive a $15 Altenew gift certificate from the comments left on each designer’s blog on the blog hop list below. All winners will be announced on the Altenew Winners Page on 4/6/2021.

There’s MORE! What’s a hop without YOU?! We have included an Inlinkz at the Altenew blog for you to enter your gorgeous Altenew “Old/New Favorite Altenew Stamp” creations. Altenew will pick 2 of our favorite handmade creations from those who joined the linky party and they will each receive a $15 Altenew gift certificate!


HOP LIST

Altenew Card Blog

Bridget Casey

Colleen Balija 

Teresa Litchfield

Katrina Howe

Rosie Neustaedter

Terri Marie Koszler

Tenia Nelson

Pam Boedeker

Nandini Karmarkar

Amy Hill

Irina Fonina

Natasha Davies

Karen Brown

Helen Kalb

Patty Mello

Roteja Galvan

Eva Bussom

Fiona Duff

Jaycee Gaspar

Vicki Finger

Nenette S. Madero <– YOU ARE HERE

Teri Wilson

Rachael Shedeed

Neha Aggarwal

Kari VanNoy

Teri Stokes

Amber Rain Davis

Virginia Lu

Sandra Woodson

Next up is the amazing Teri Wilson. Hope you liked the cards I made using old and new stamp and die sets. I’m sure you have your own favorite Altenew stamps as well. I’d love to know which one is yours! Leave a comment below to get a chance to win some fabulous prizes from Altenew. Hope we can be friends on IG as well (@mylittleatticstudio). This is where I post my latest creations, too. Thank you so much for dropping by and stay safe always. Happy crafting!!


IG: @mylittleatticstudio | FB: My Little Attic Studio | nenette@mylittleattic.com | www.mylittleattic.com

Altenew Certified Educators For the Love of Altenew Instagram Blog Hop

Altenew Certified Educators For the Love of Altenew Instagram Blog Hop

Hello everybody!!!

I am joining a fun INSTA hop where all of us Educators will be sharing our love for Altenew through our handmade goodness/creations! The IG hop starts from @altenewllc so make sure you start from the beginning! I thought of creating a blog post as well for those of you who would like to know how I created the cards.

For this hop, I thought of creating 2 cards using the same inks, embossing folders and or stamps to make 1 easy to create card (CAS) and 1 intermediate card with more techniques involved. Let’s get started!


YOU ARE AMAZING/ SOMETIMES IN THE WINDS OF CHANGE…


MATERIALS:

STEPS:

  • Create a background to mimic the water by using different shades of blue and gold alcohol inks on Nara paper. Wet the surface of the paper with alcohol before dropping the alcohol inks. Move the colors using a hairdryer. The last step is to spray the background using a misting spray with alcohol to create the “bubbles”.
  • For the goldfish, stamp the images onto watercolor paper using Antique linen distress ink or any light colored ink. Color the images using watercolor and colored pencils.

  • Die-cut the images using the coordinating dies. Use a circle die for the card front to create windows.
  • Stamp the sentient using Versamark Ink and emboss using Rose Gold embossing powder.
  • Assemble the card using adhesive and foam squares.

Here’s a CAS card using the same basic materials as the first card.

ADDITIONAL MATERIALS:

STEPS:

  • Create the background using alcohol inks and the gold ink
  • Color the images using watercolor and colored pencils
  • Die-cut 2 circles as base for the fishes
  • Stamp the sentiment using Versamark Ink and Rose Gold embossing powder
  • Assemble the card with foam squares for added dimension.

HAPPY BIRTHDAY


Here’s another pair of cards using the same materials to create two totally different cards.

Again, I used alcohol inks to create this wonderful textured background as a base of my card. Below are the materials.

MATERIALS:

STEPS:

  • Add alcohol to Nara paper then drop of alcohol ink to create an ombre background. Add Pinata brass while the surface is still wet. Use a dryer to dry the surface.
  • Add droplets of diluted alcohol ink using the paintbrush to create added texture.
  • Dry emboss the background with the Angled Mosaic 3D embossing folder and add more alcohol inks to darken certain areas.
  • Stamp floral images on watercolor paper with Vesamark Ink and emboss using Rose Gold embossing powder.
  • Watercolor the images. Add salt while the petal is still wet to create some texture.
  • Assemble the card using foam squares and adhesive.

ADDITIONAL MATERIALS:

DIES: FINE ALPHABET DIE, ESSENTIAL SENTIMENT STRIPS DIE

STEPS:

  • Cut a strip of Nara paper and paint lines using a brush and alcohol inks. Dilute the inks if necessary to create an ombre effect.
  • Add drops of diluted inks and spray pure alcohol as well for added texture to the background.
  • Die cut the letters and sentiment several times and adhere on top of each other.
  • Emboss a plain white rectangular Cardstock using the Angled Mosaic 3D embossing folder leaving the center area flat.
  • Assemble the card using foam squares and adhesive.

SO GRATEFUL/THANKS


Here is the 3rd set of cards. I recently got the latest set of the Northern Shore mini dye inks and wanted to test the colors so I swiped the ink cube onto white cardstock. I loved the look so I went ahead and created these cards. 🙂 No colored cardstock to match the inks? No problem! Make your own colored cardstock using the ink cubes!

MATERIALS:

STEPS:

  • For the card base, swipe the mini ink cubes directly onto Neenah Solar white cardstock. Make sure they overlap and leave some white space.
  • Die cut the Morning Glory die using textured cardstock and color using the ink cubes to match the background.
  • Color the leaves using artist markers.
  • Assemble the card using foam squares and adhesive.

ADDITIONAL MATERIALS:

FANCY THANKS DIE, PAINT-A-FLOWER: CALLA LILY FOR THE SENTIMENT, ROSE GOLD EMBOSSING POWDER, VERSAMARK INK, VELLUM

STEPS:

  • Swipe the dye inks on Neenah Solar White cardstock to create some stripes. Leave about 1/4 of the bottom white.
  • Tear the edge and emboss using Rose Gold embossing powder and Versamark Ink.
  • Die cut the Thanks from the card front and from scrap paper then adhere on top of each other for added thickness to the diecut.
  • Ink the base of the word with Versamark Ink and emboss using Rose Gold embossing powder.
  • Stamp the sentiment on vellum using Versamark Ink and emboss with Rose Gold embossing powder.
  • Cut strips of white paper and adhere on top of each other to create a border.
  • Assemble the card.

Altenew is giving away a $20 gift certificate to 5 lucky winners! For a chance to win, please follow @altenewllc and @mylittleatticstudio and leave a comment on IG to get a chance to win!!!

Altenew will draw 5 random winners from the comments left on each stop of this Instagram hop and announce the winners on Altenew’s Educator Instagram hop post on 03/05/2021.

Head over to your NEXT STOP: Eva Bussom — @evabussom. Make sure you follow all the other educators’ IG to see the wonderful creations! Below is the complete list.

Hop List:

@altenewllc
@rotejas_magic
@kariavan
@taniaahmed
@crown_focus
@irishrosecreations
@treasuresinletters
@sandespoema
@_michelleomurray
@terismailbox
@channellingmarthaau
@yesvirginialu
@notableink
@teresakim16
@altenew_planner_girl
@craftylemur
@karens_mini
@handmadebytasha13
@everyday_expressions
@pixelmavensretreat
@handmadebyteris
@sevenscrafts
@bridgetcaseydesigns
@mylittleatticstudio <– YOU ARE HERE
@evabussom
@irenemcbeatle
@cardrefinery
@jaycee.gaspar
@mes_cartes_a_moi
@auzztrinkletsncrafts
@rosieneust
@paperaddictpam
@tenianelson

I hope you liked the cards I created for this IG hop. Thank you so much for dropping by!!! Please don’t forget to leave a comment in IG to get a chance to win a prize! Stay safe everyone and happy crafting! ❤️

P.S. I changed the format of my post. Please let me know if the bullet points for the steps are easier to follow than writing them in paragraph form. Thanks everyone <3