Altenew Educators “Favorite Old/New Altenew Stamp” Blog Hop and Linky Party + Giveaway

Altenew Educators “Favorite Old/New Altenew Stamp” Blog Hop and Linky Party + Giveaway

Hello friends! Welcome to Altenew’s Educators “Favorite Old/New Altenew Stamp blog hop! If you just came from Vicki Finger’s blog, then you’re on the right track. We were assigned to choose a favorite stamp set from our old or new stash and highlight it in this post. I decided to create from an old AND a new stamp. It wasn’t easy to pick a favorite… I have too many!!! Anyway, for the old stamp set, I chose one of my all-time favorites– the Persian Motifs Stamp and die set.

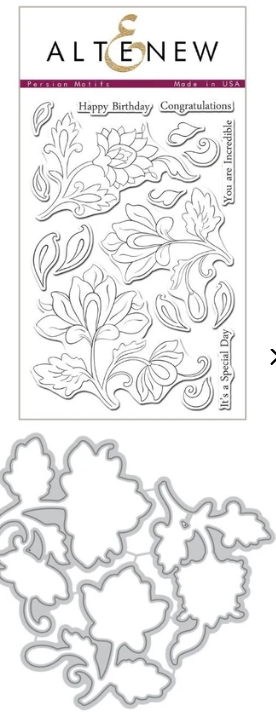
I have always loved the vintage Indian woodblock designs and this stamp set reminds me of that. I created two cards using the Persian Motifs stamp and die set.
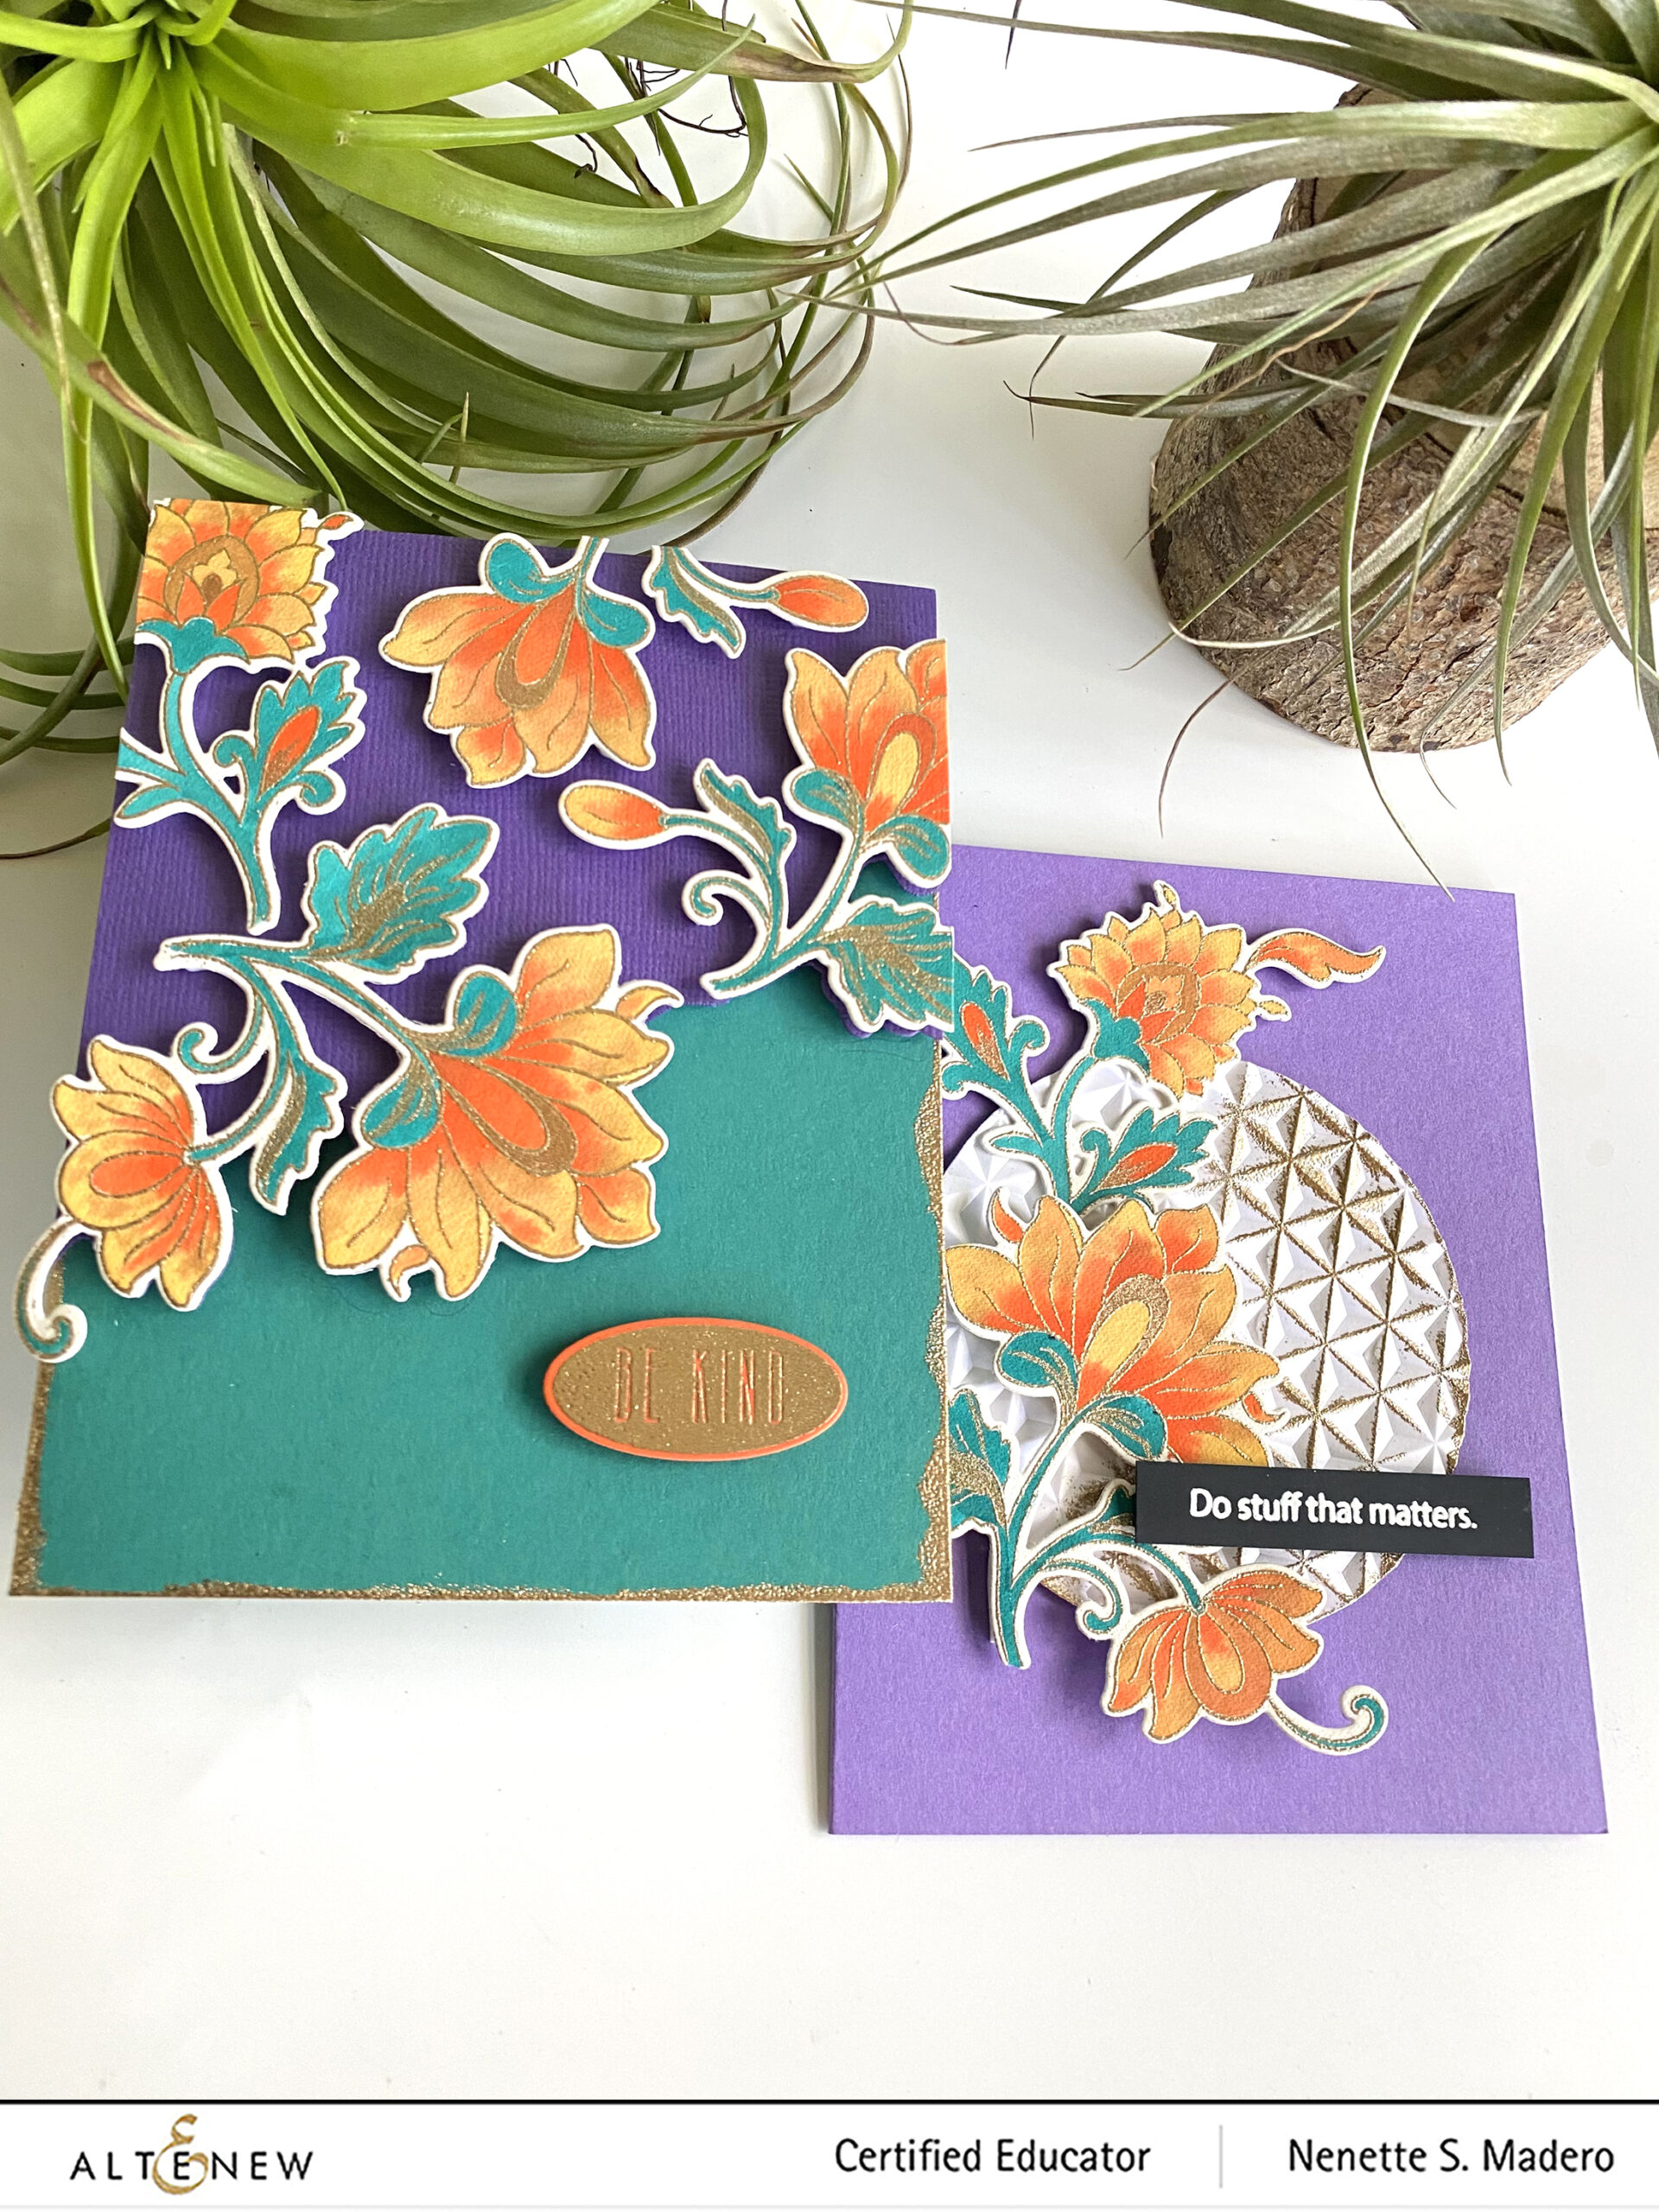
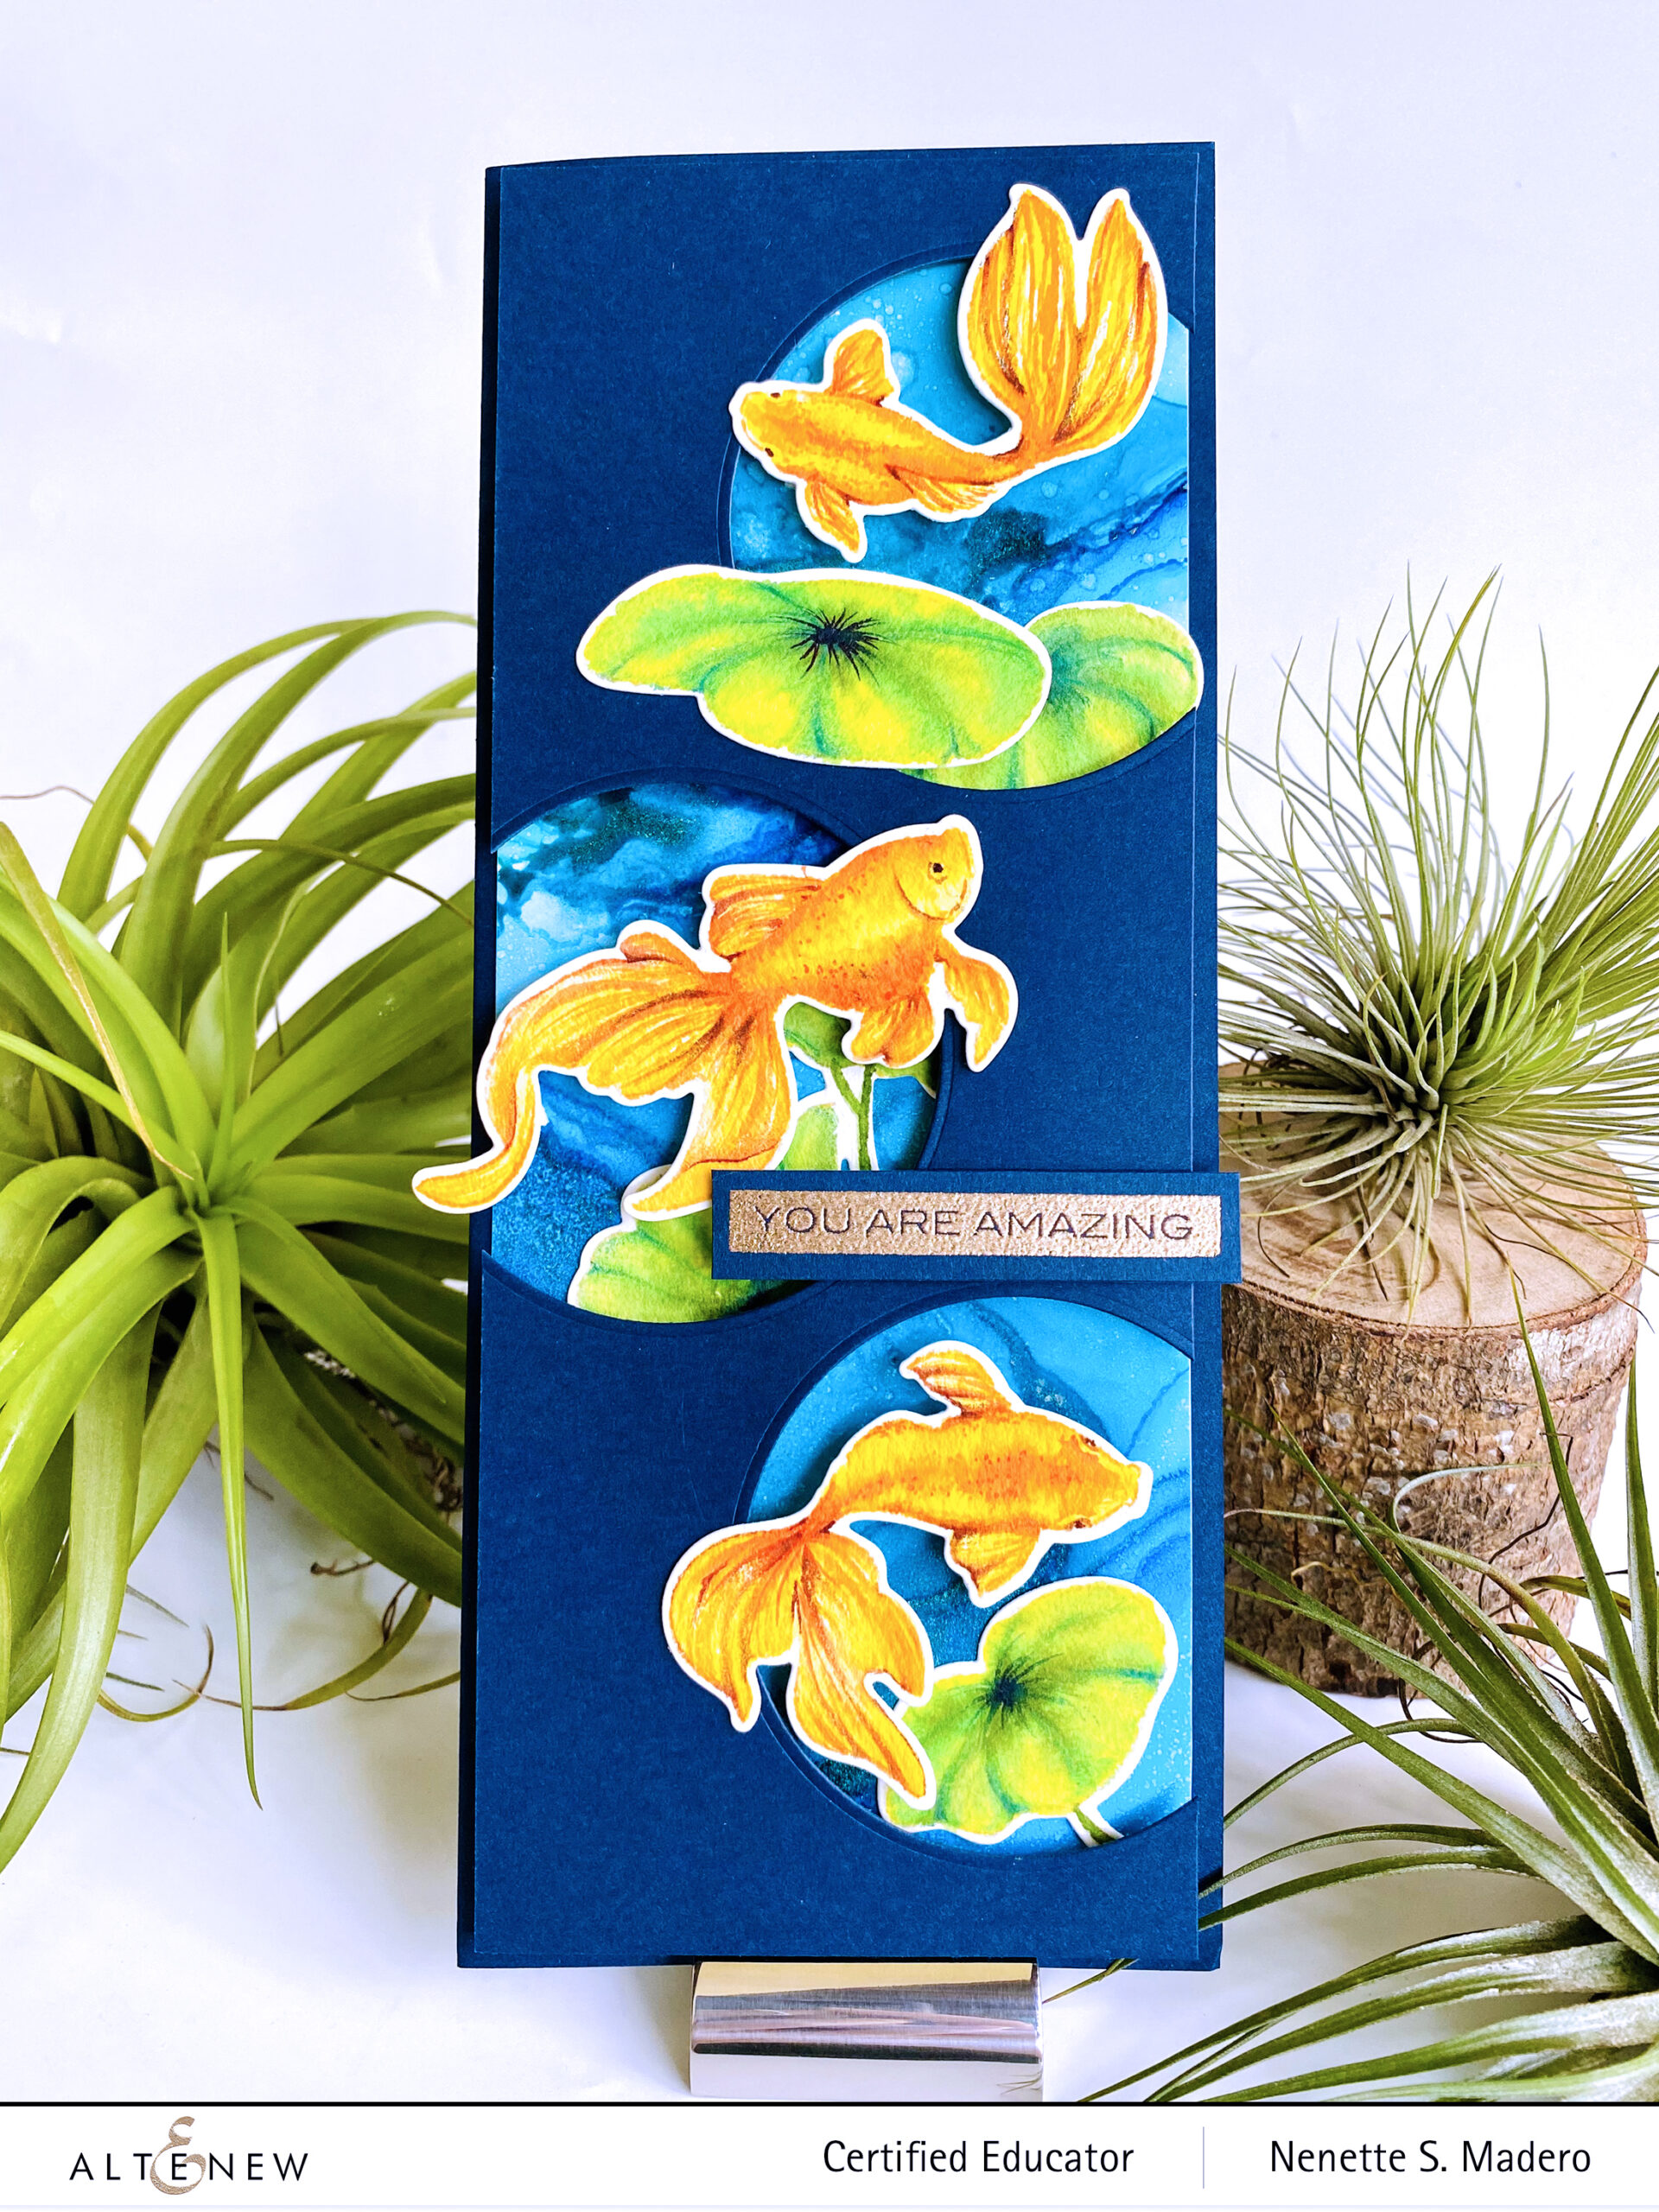
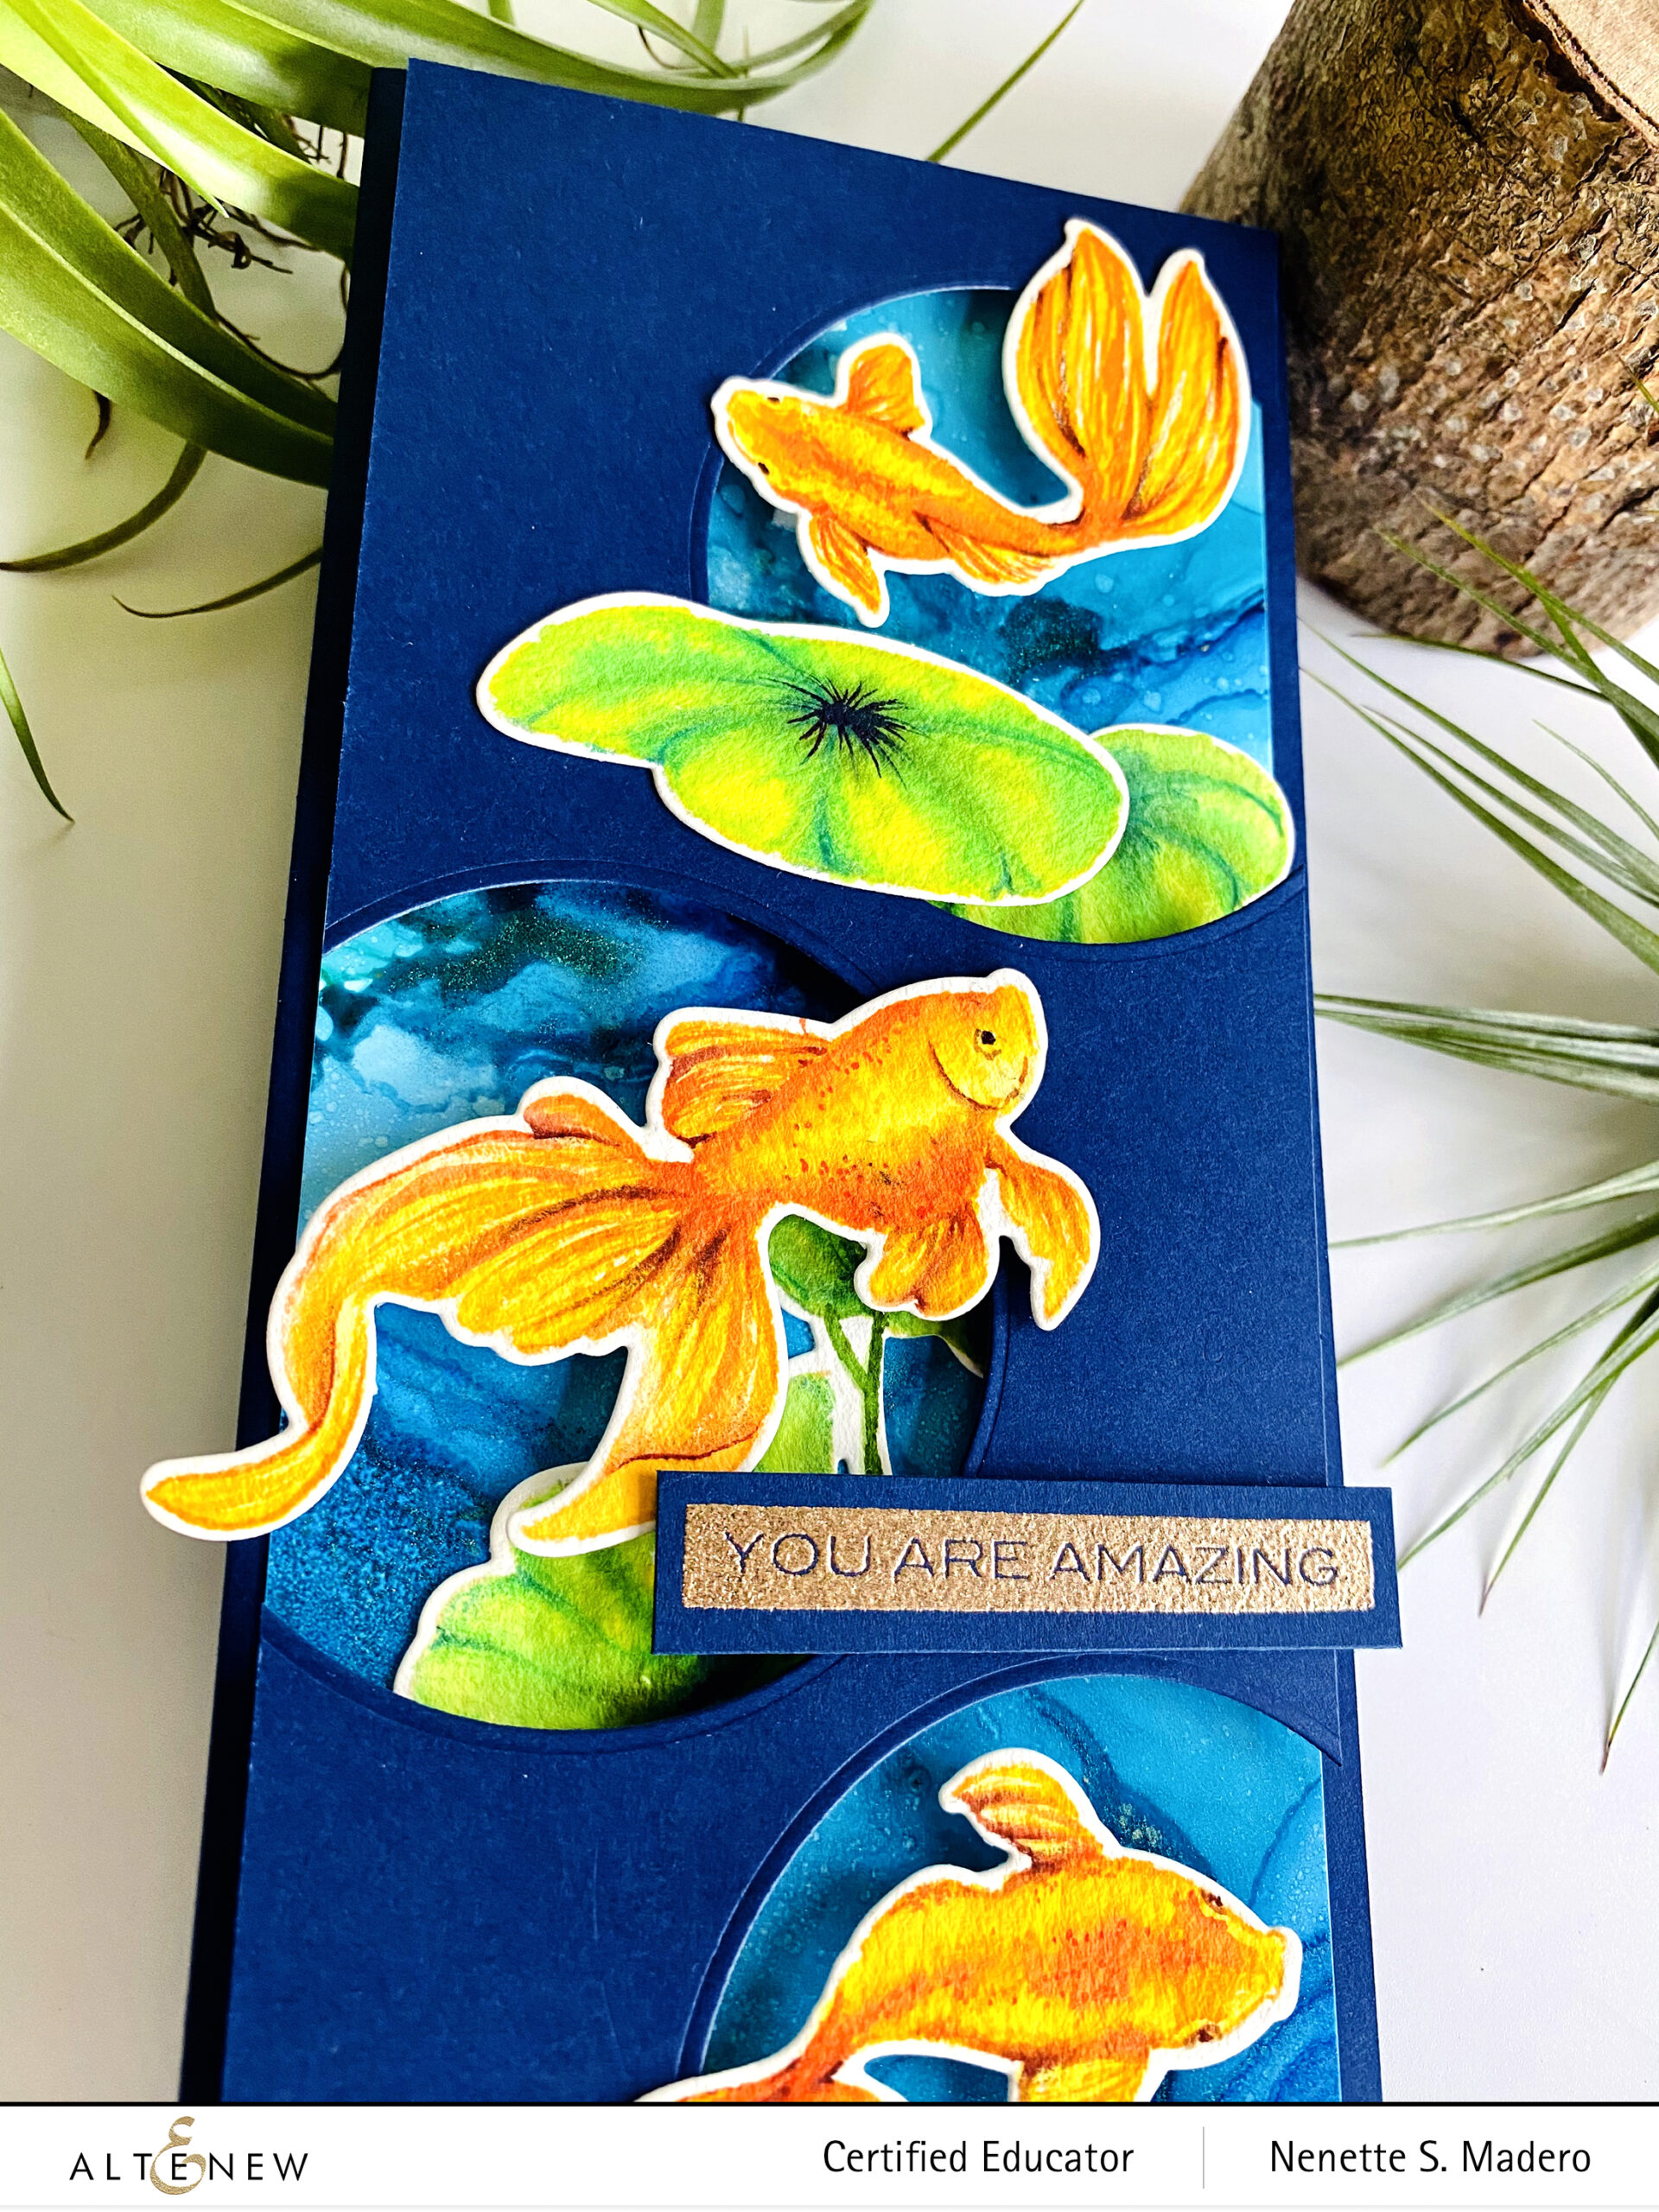
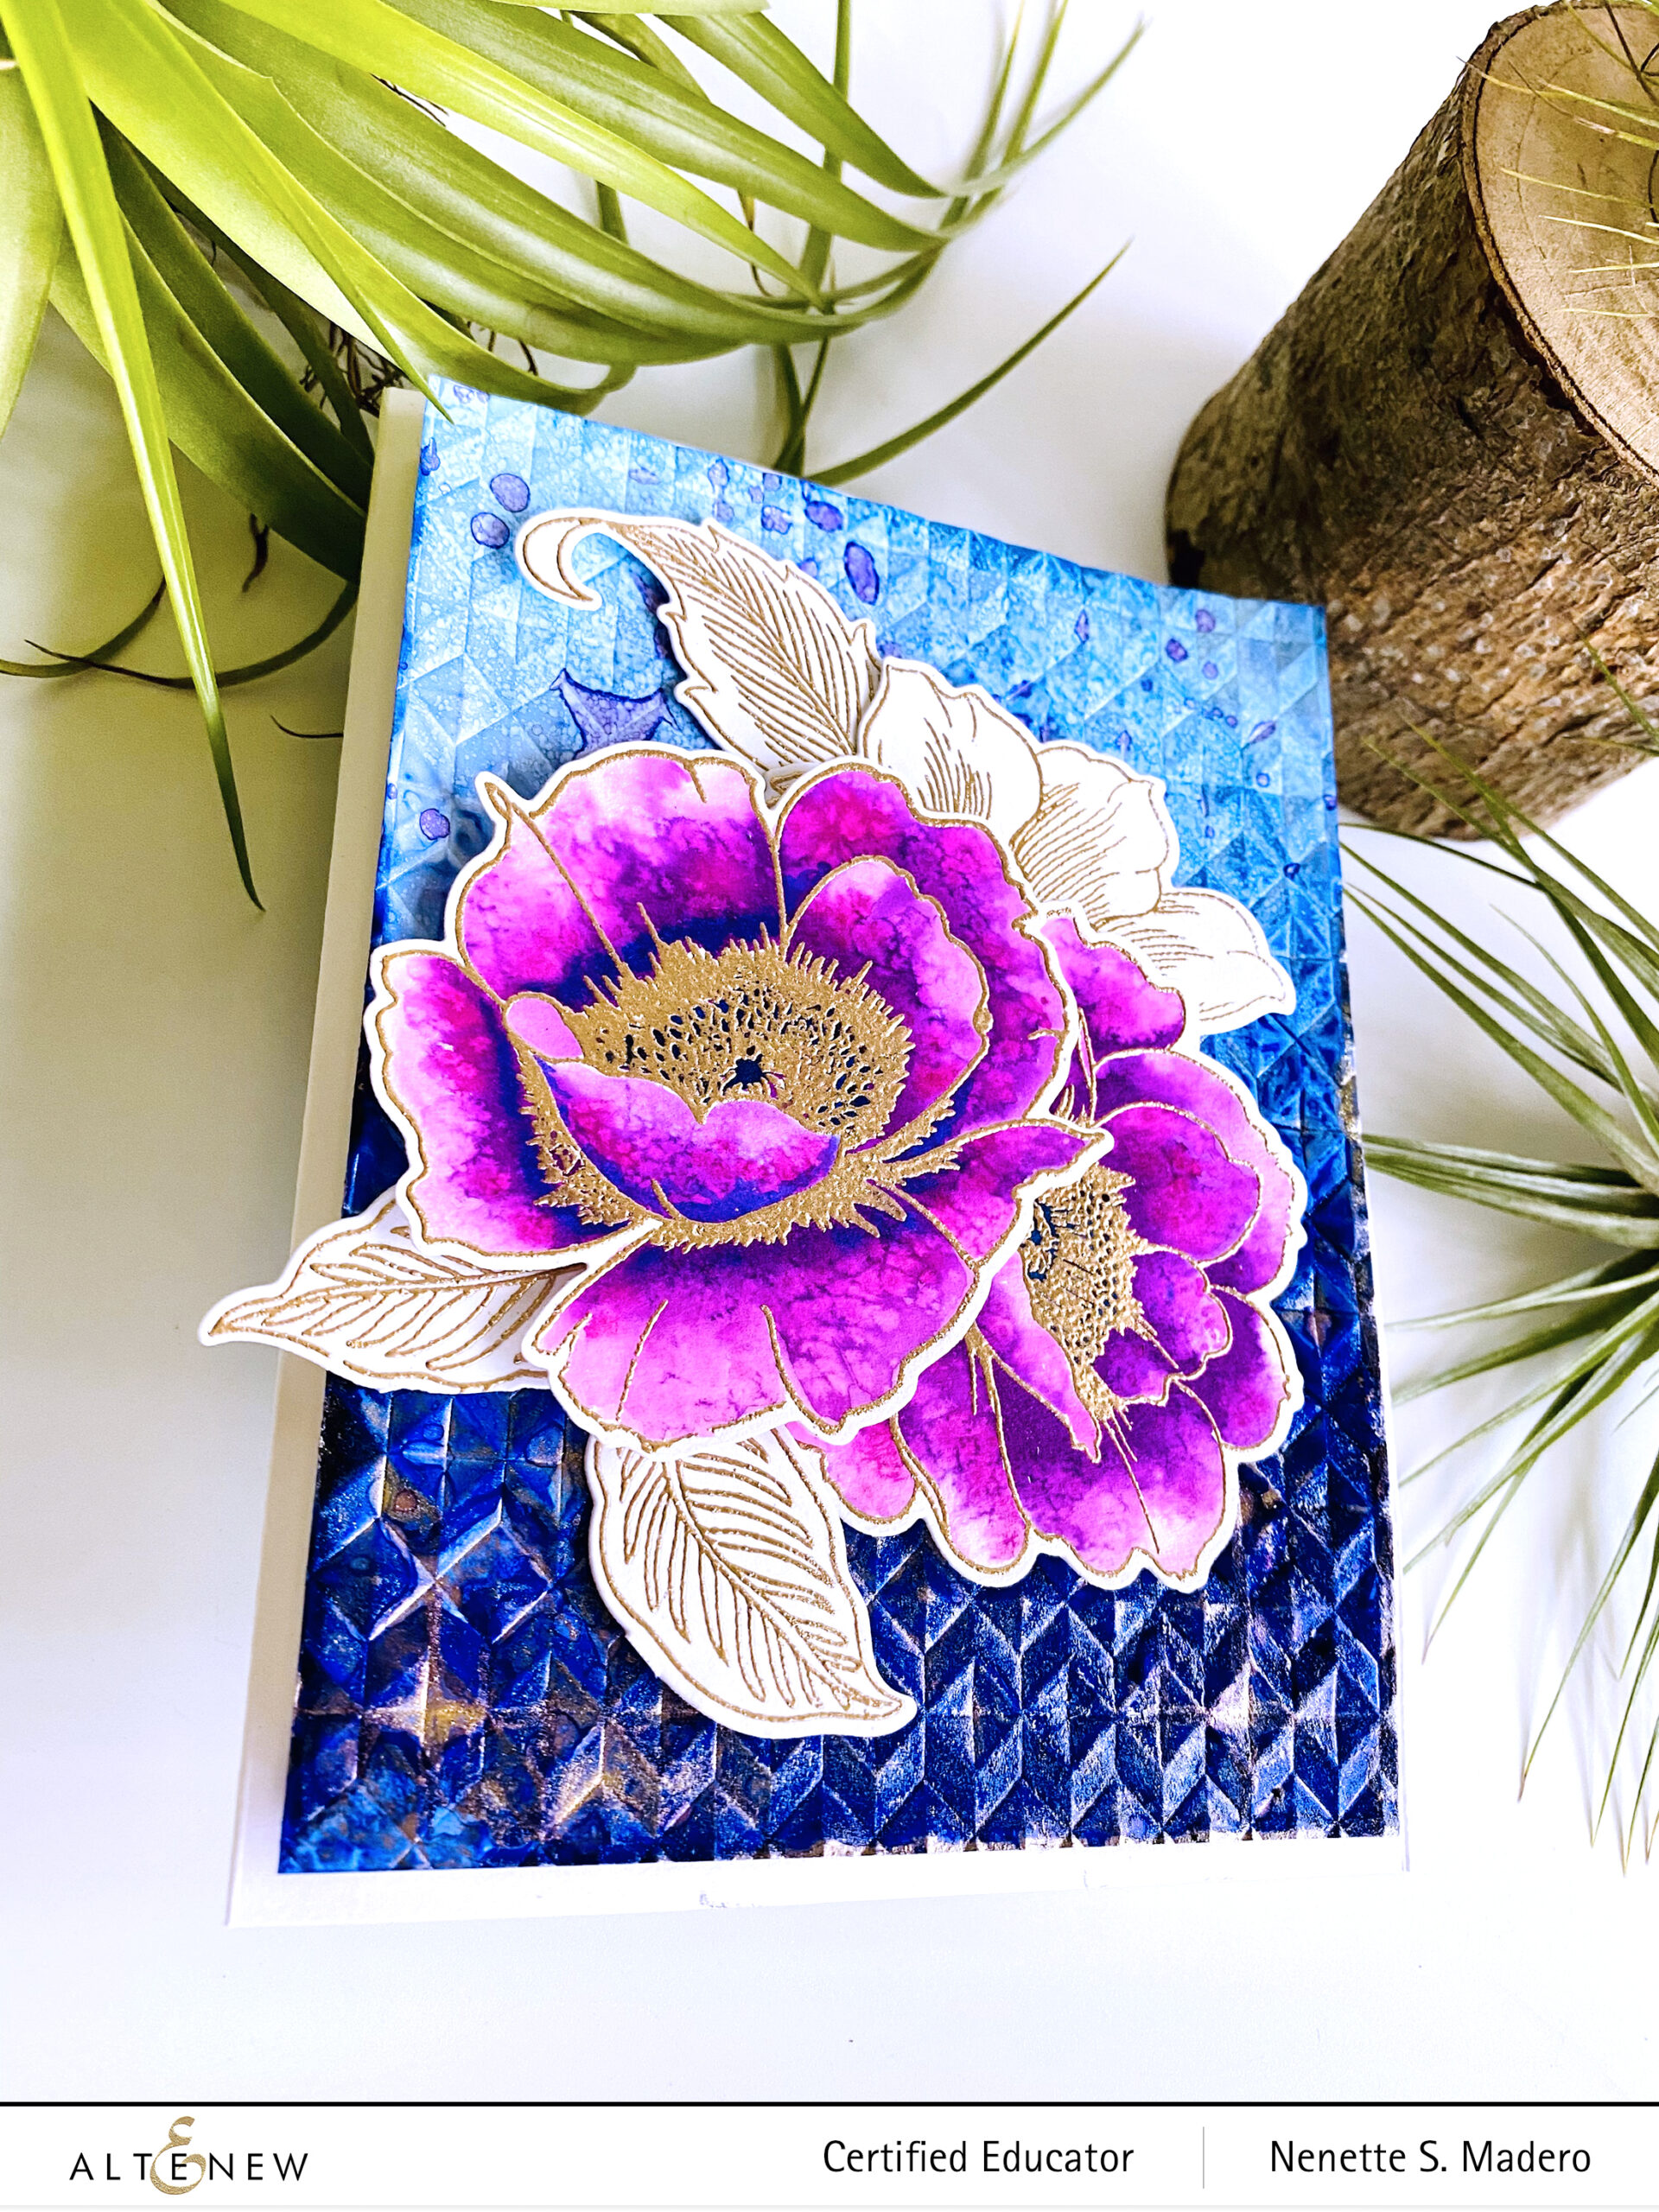
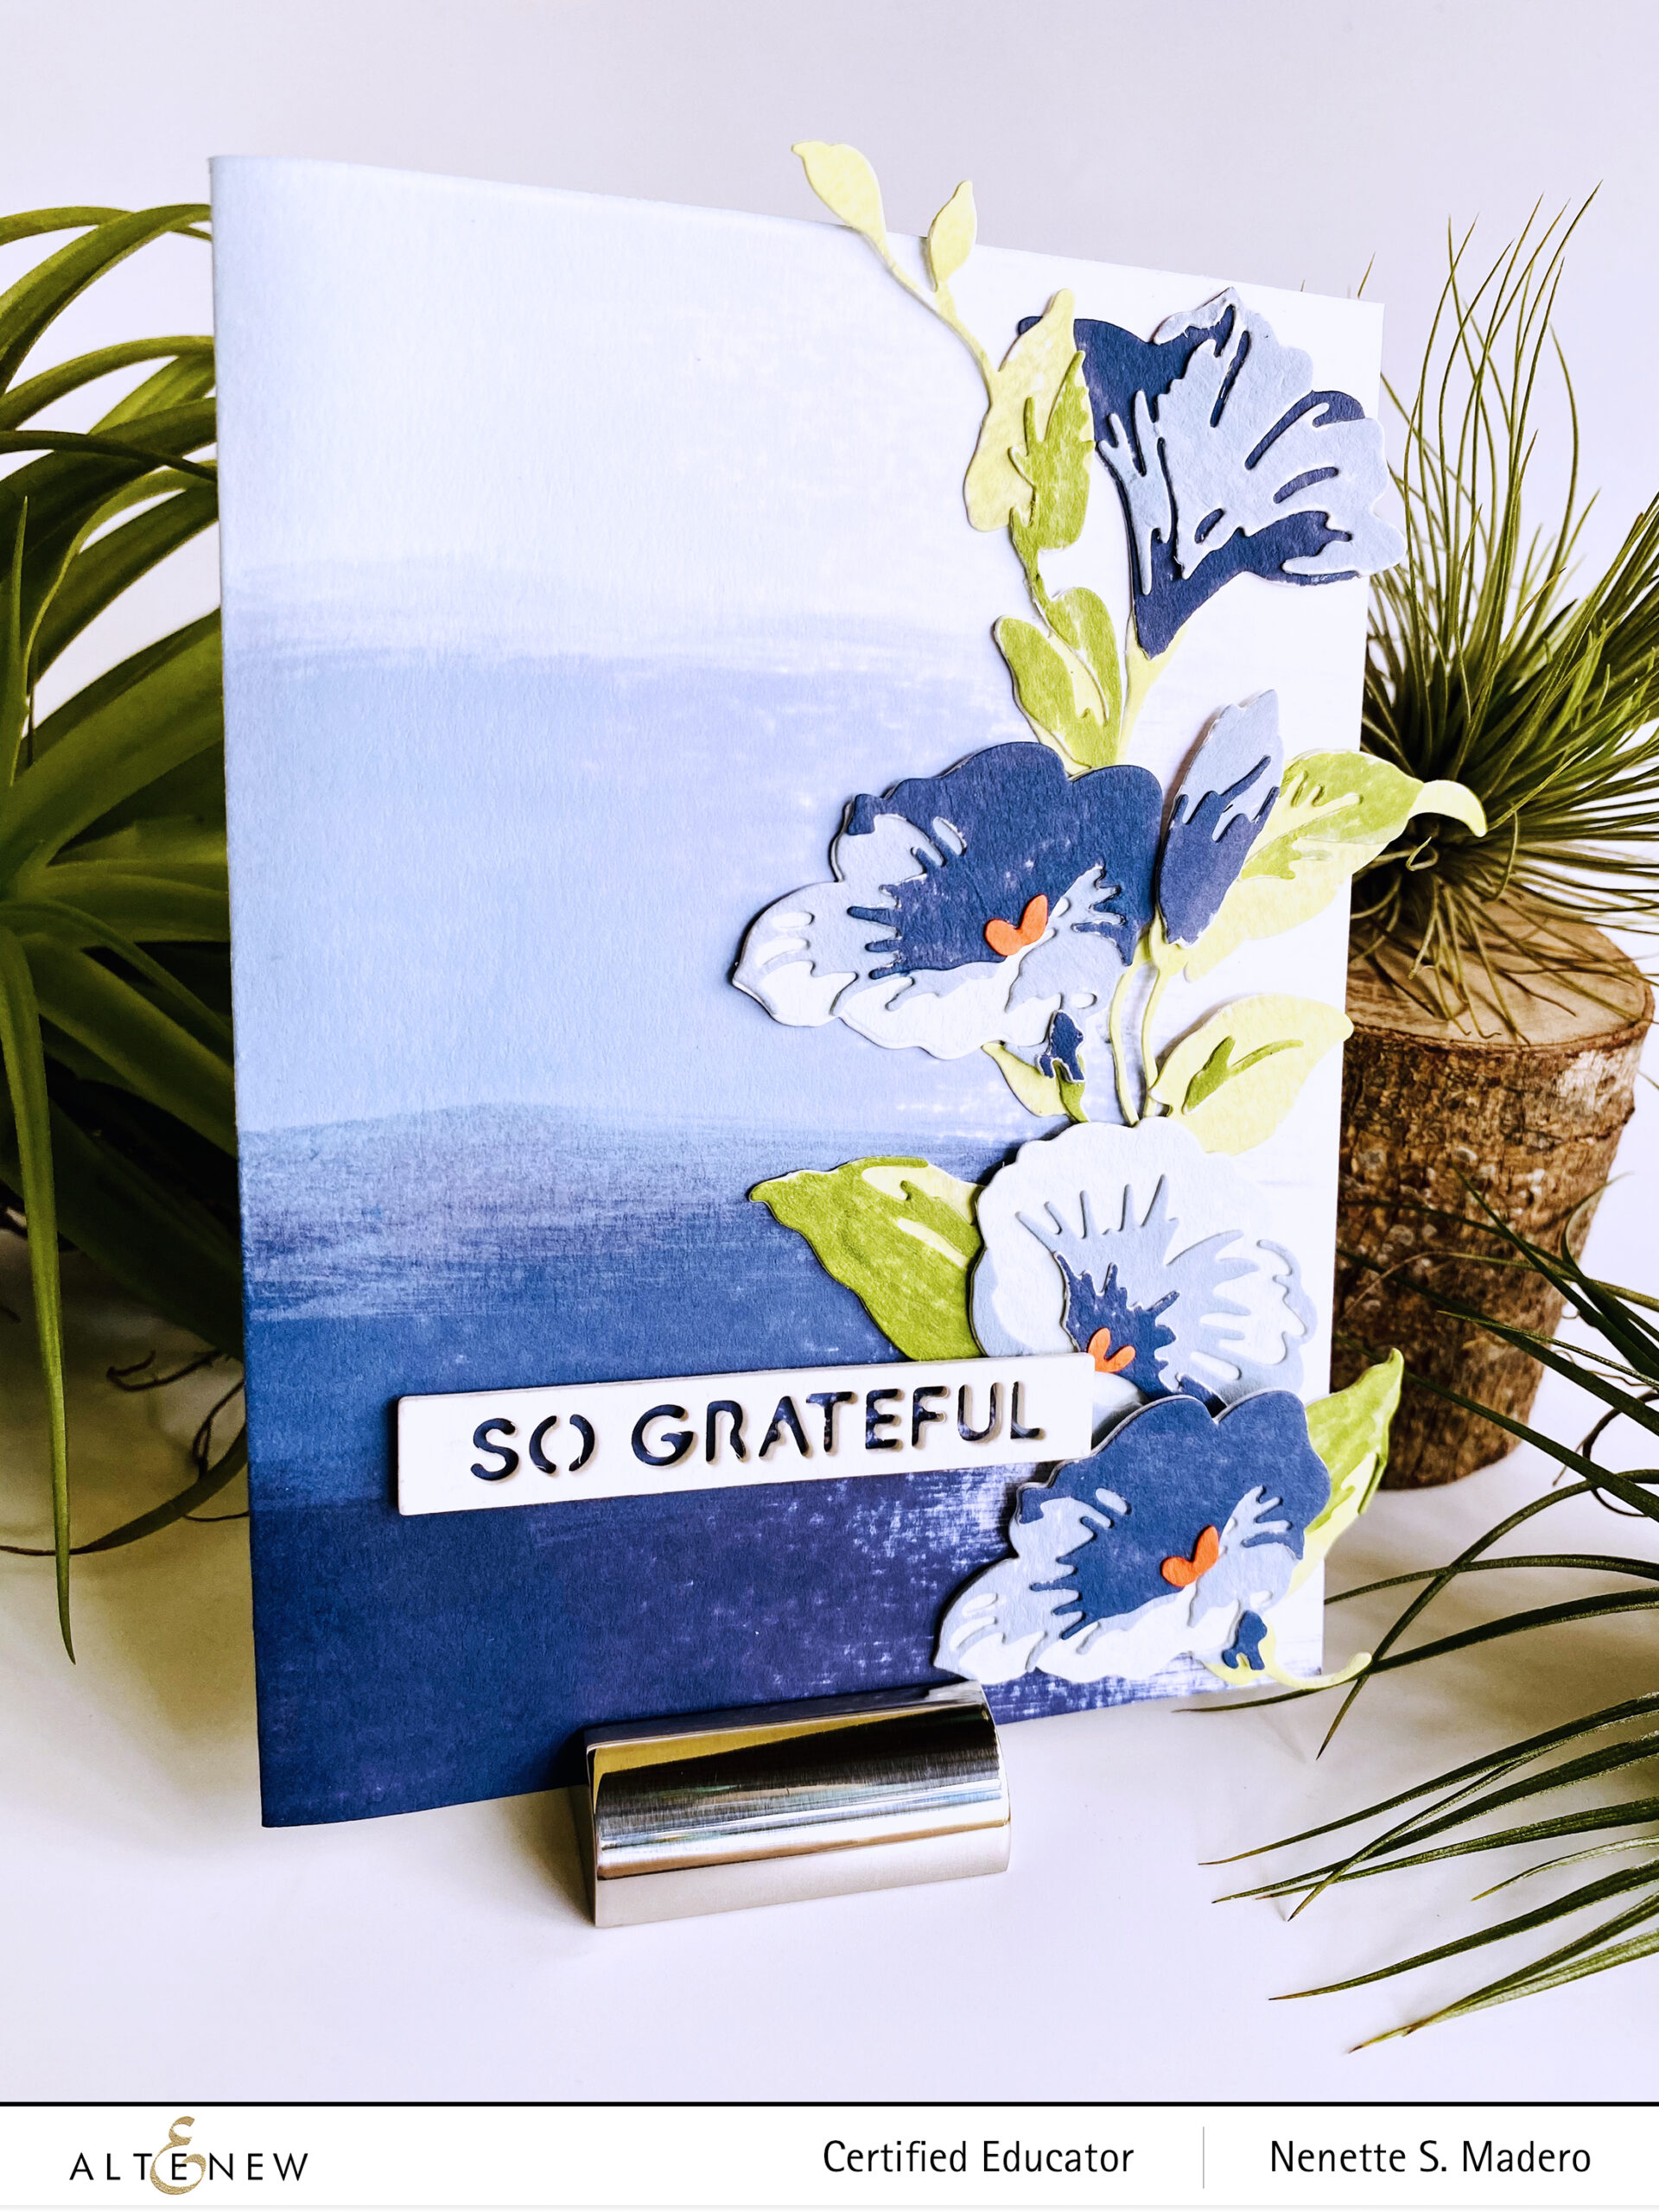
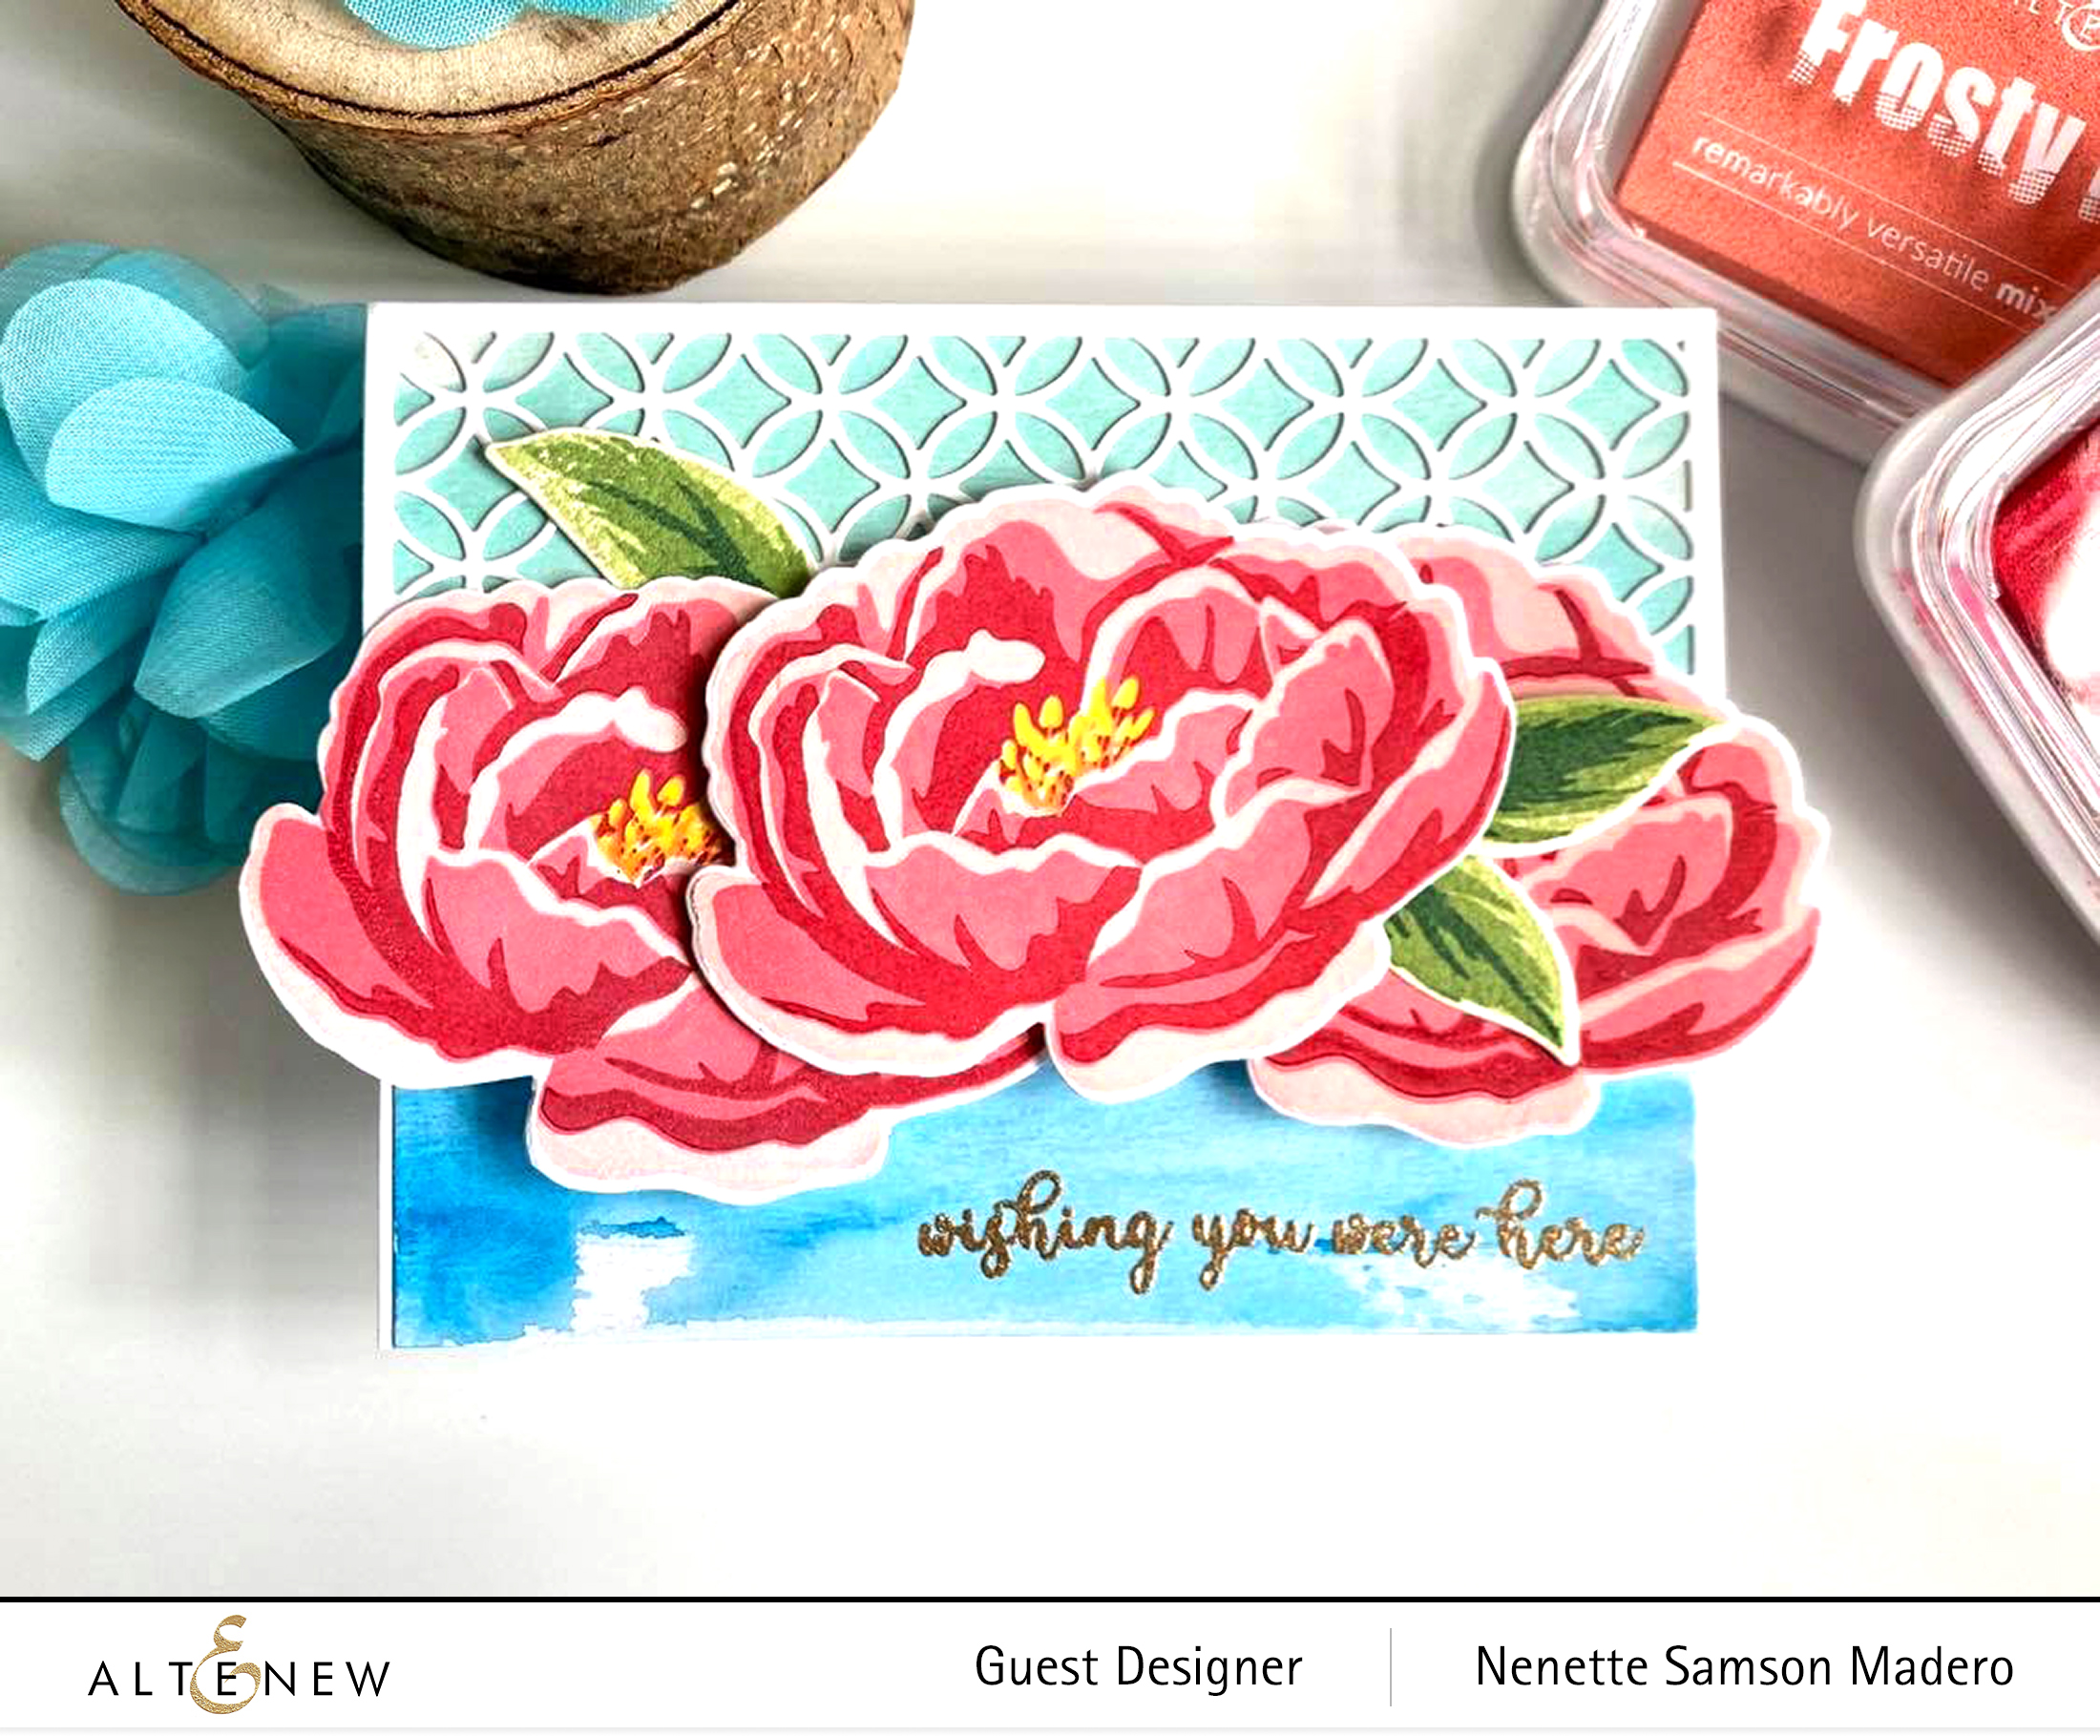
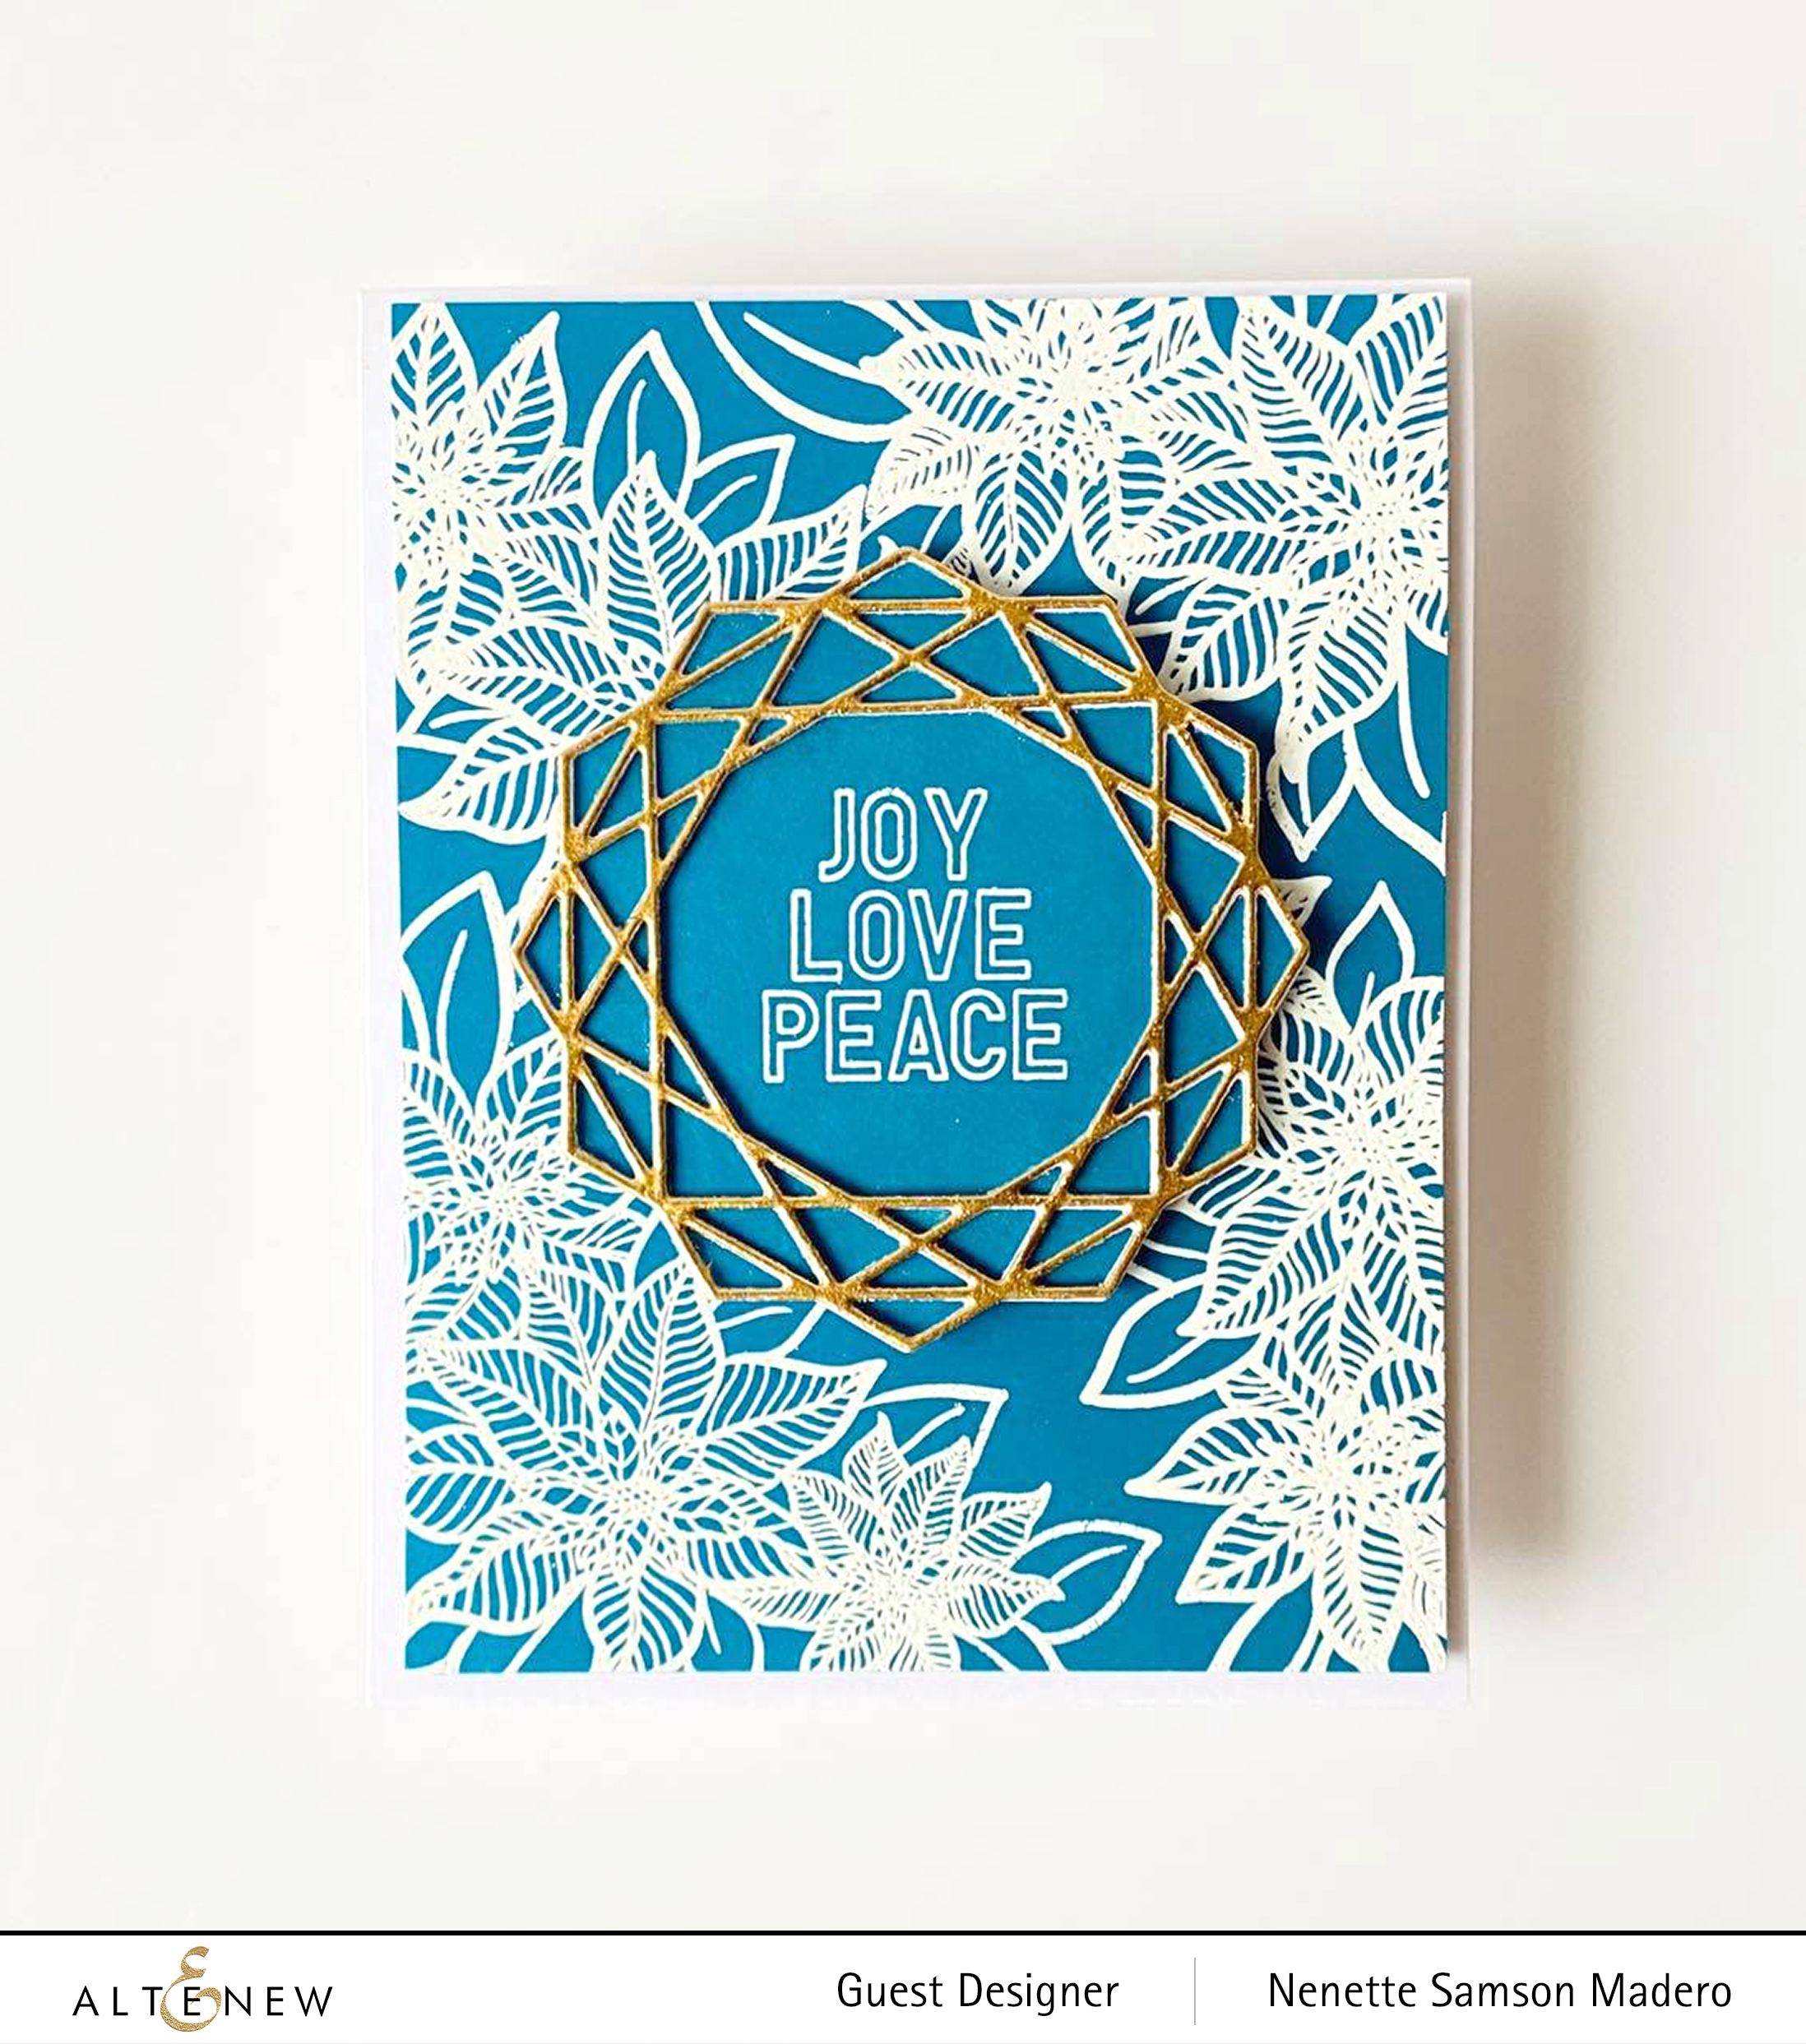
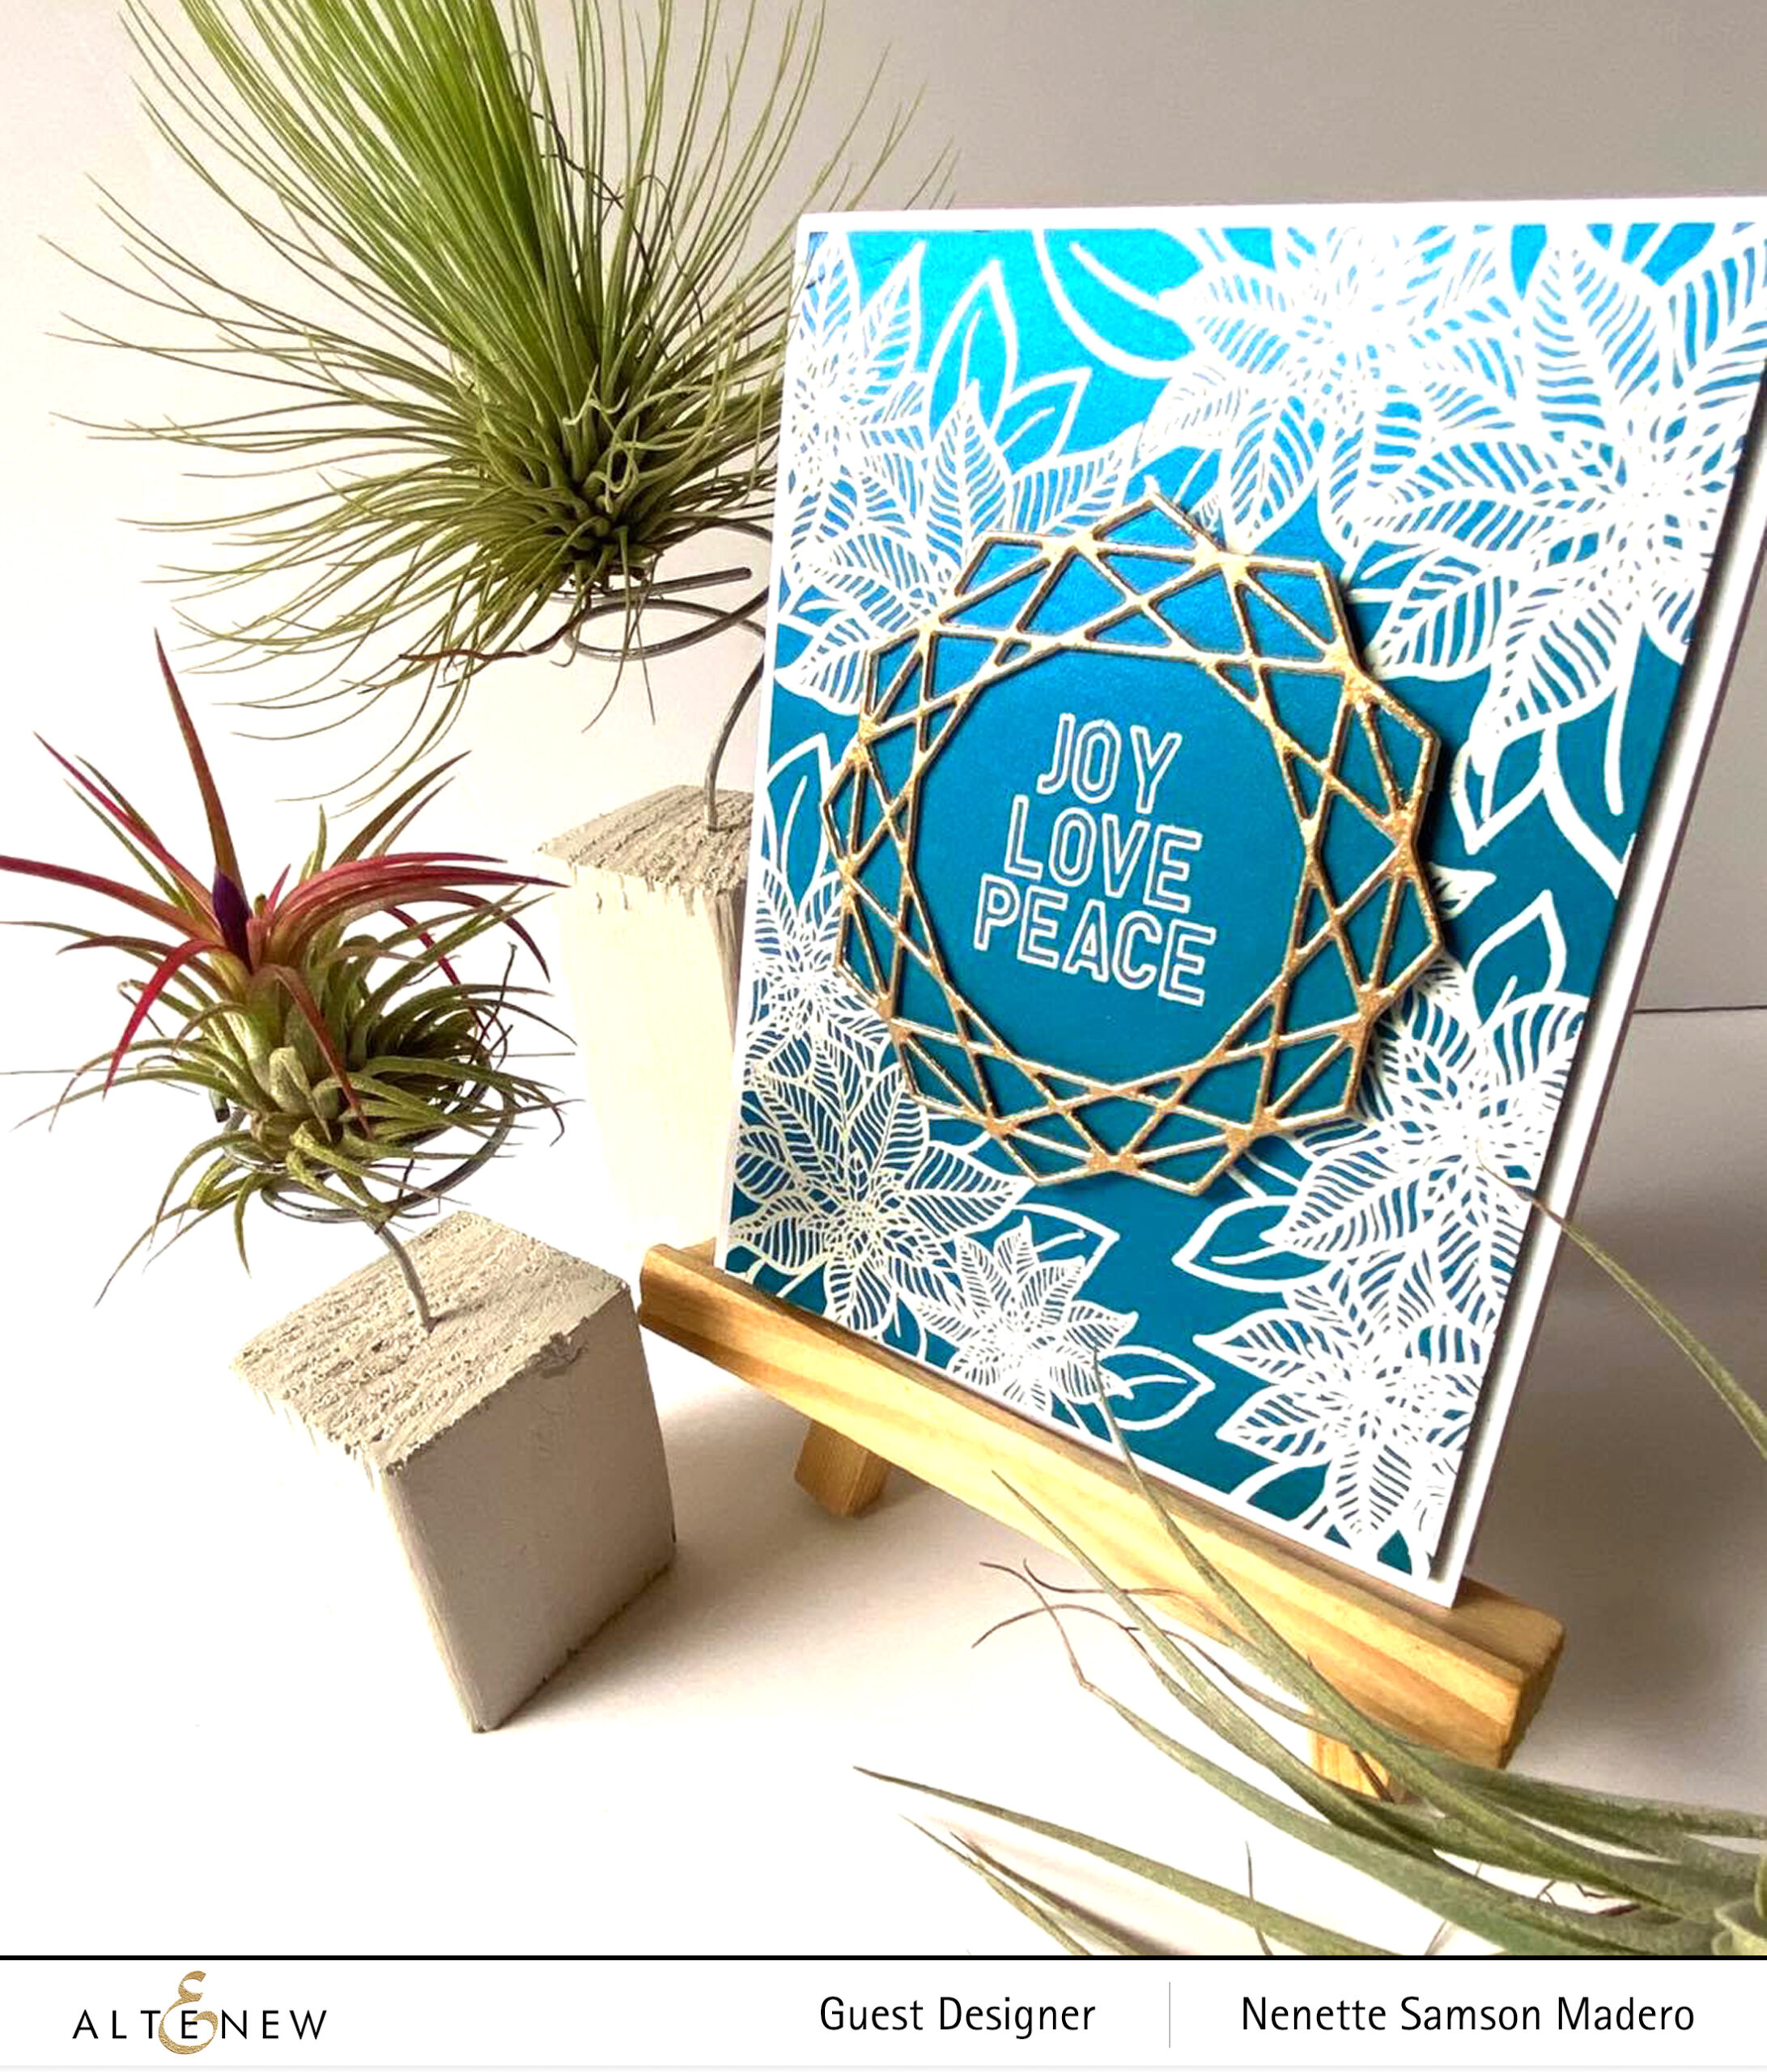
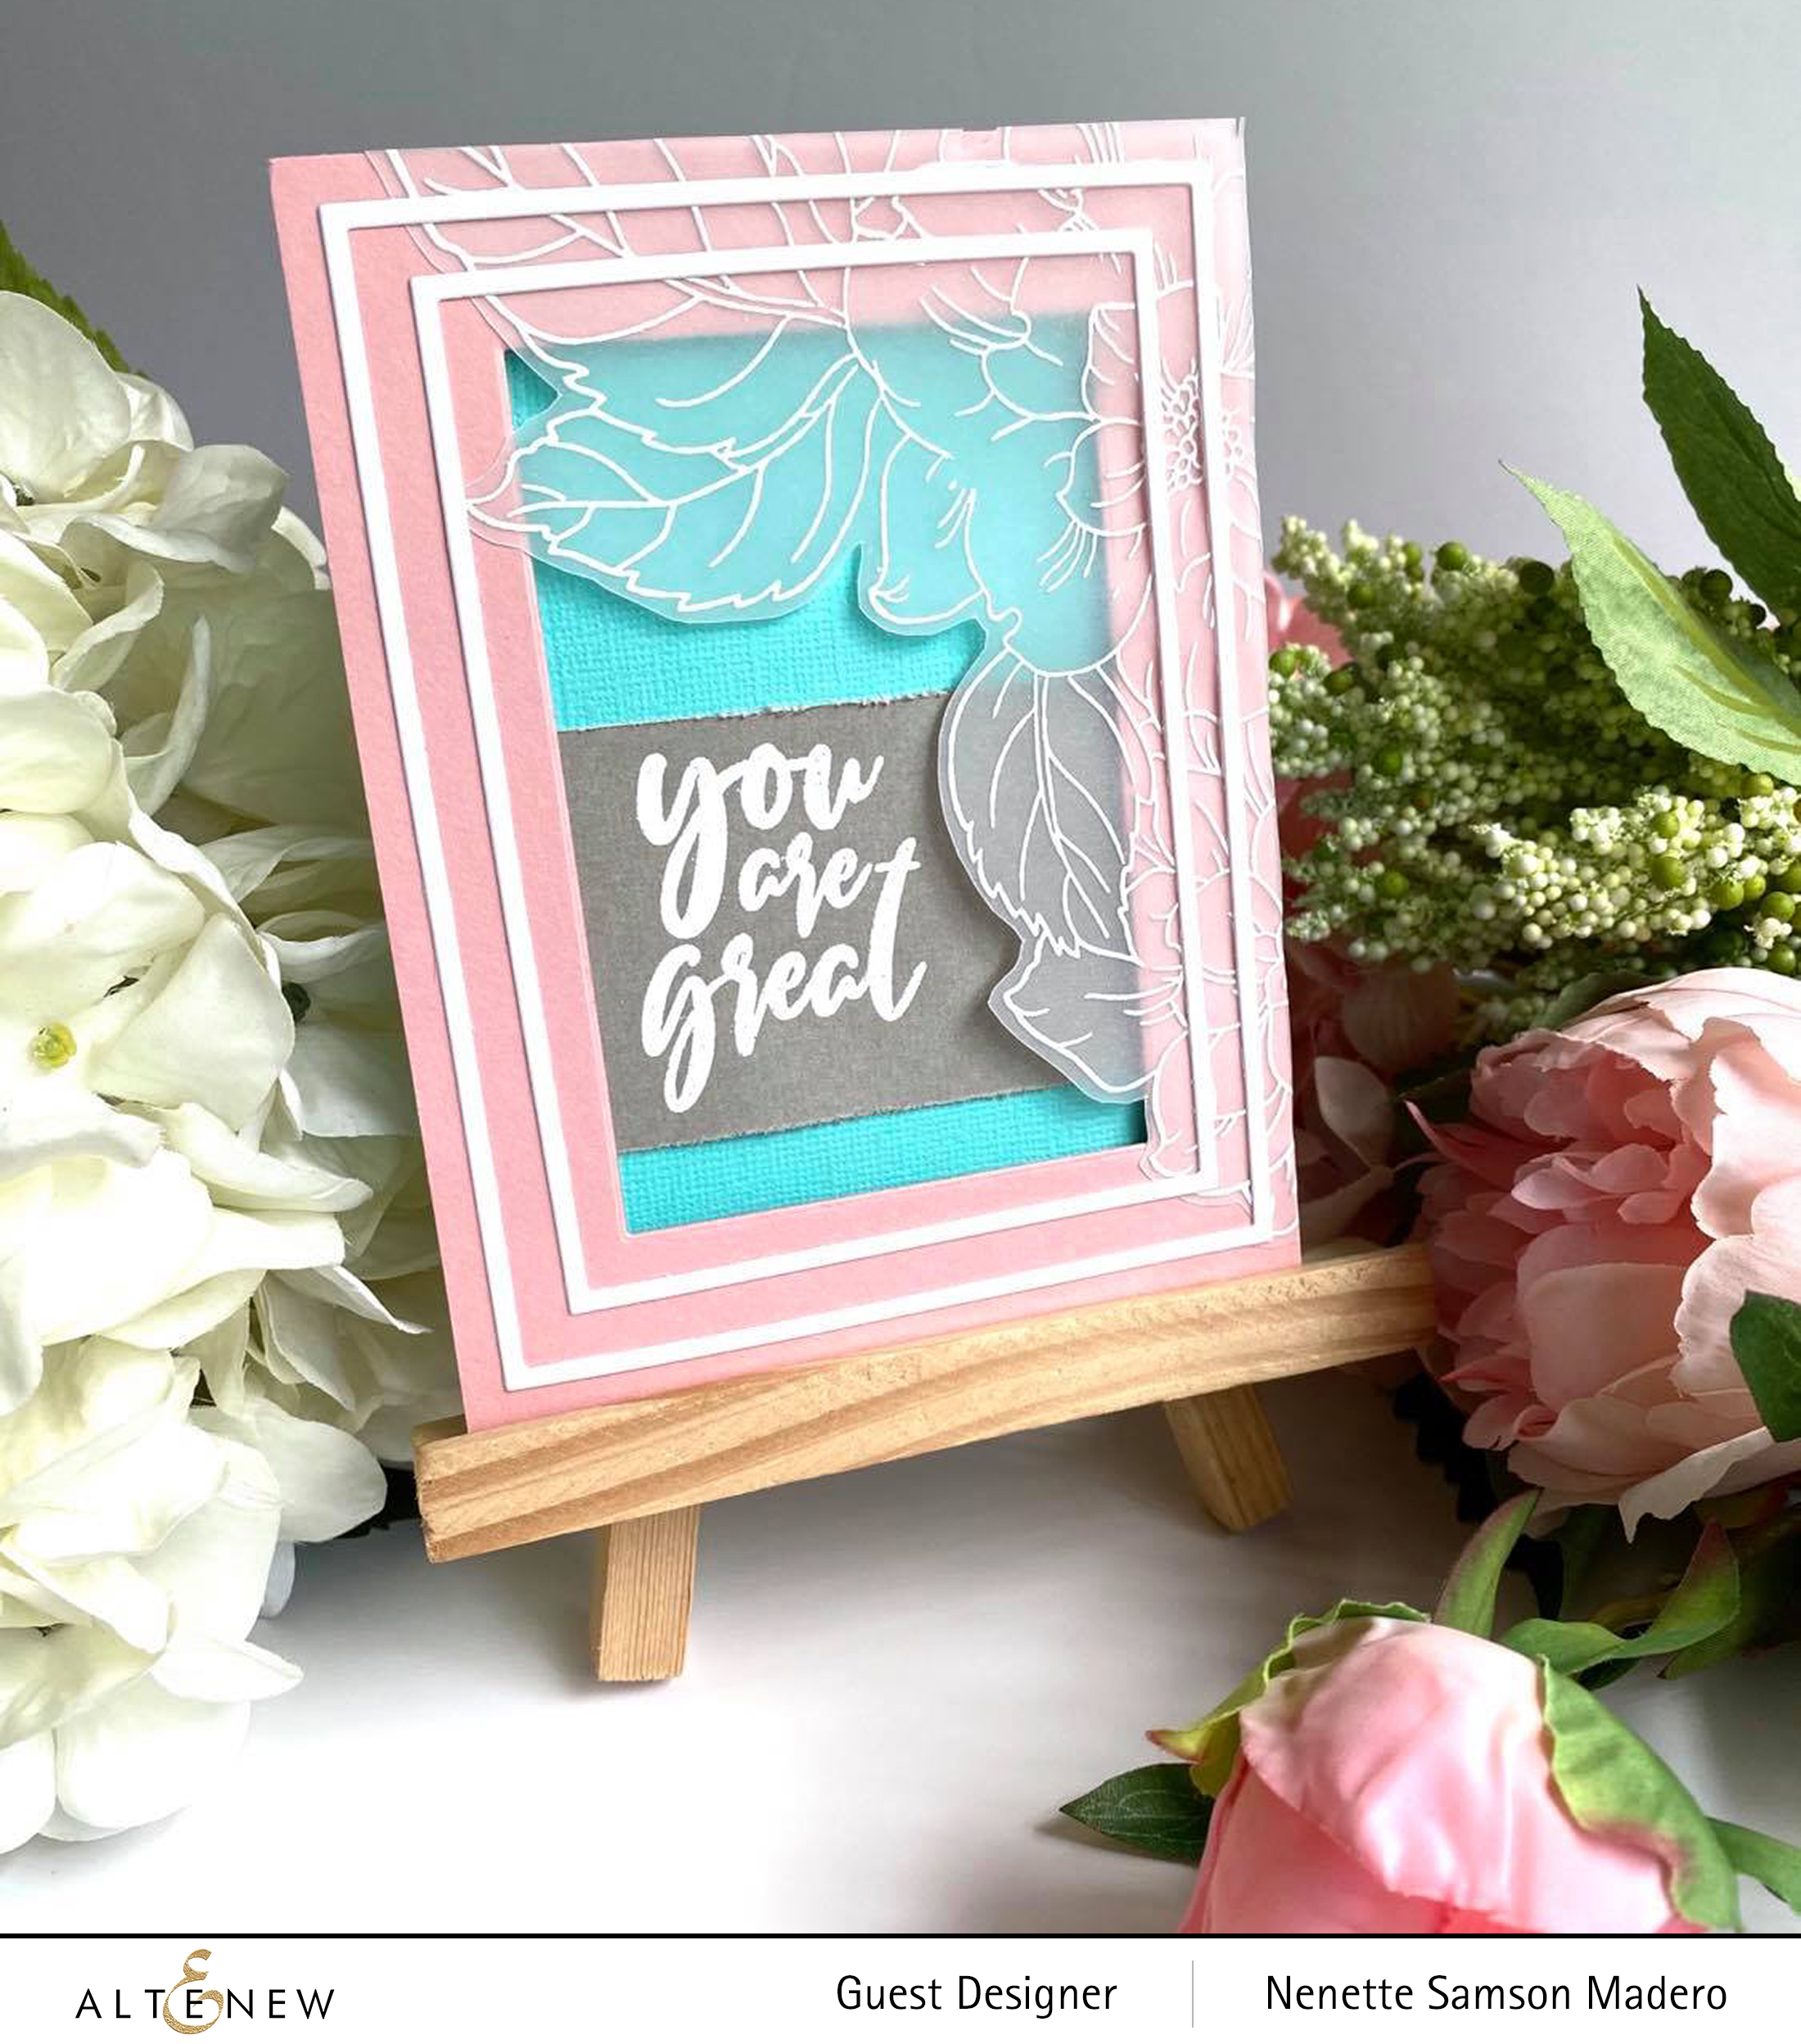
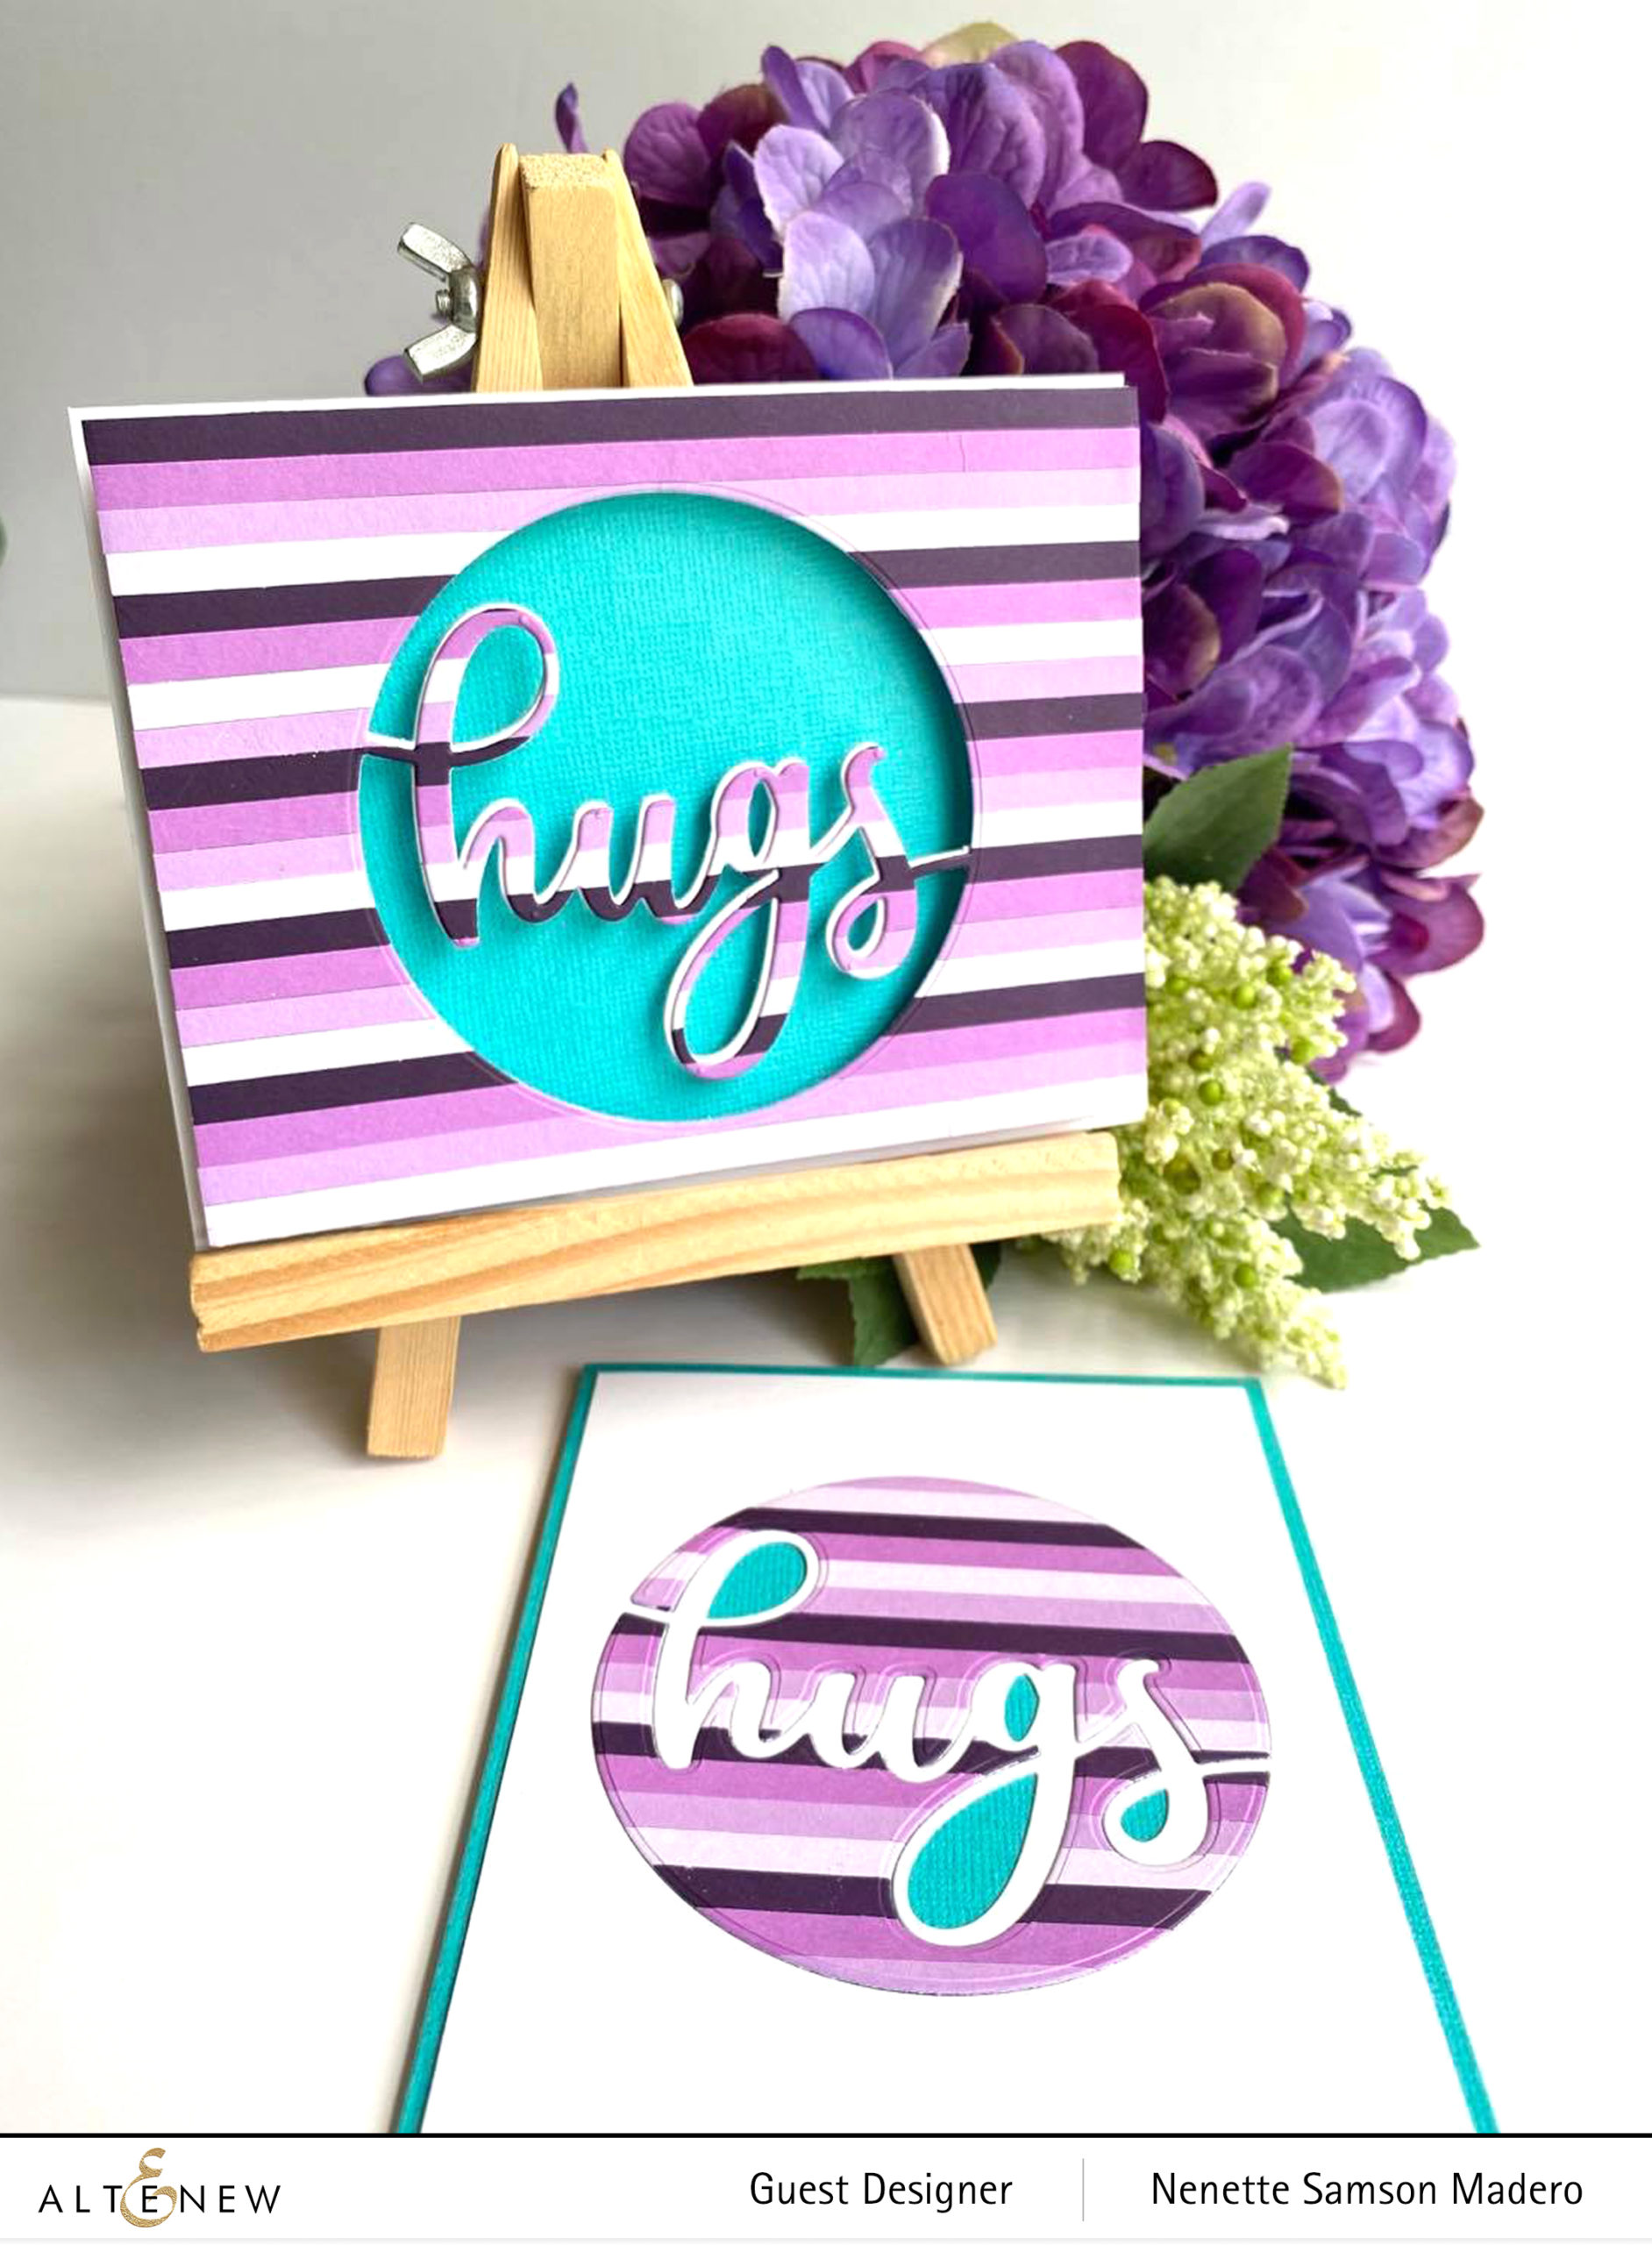
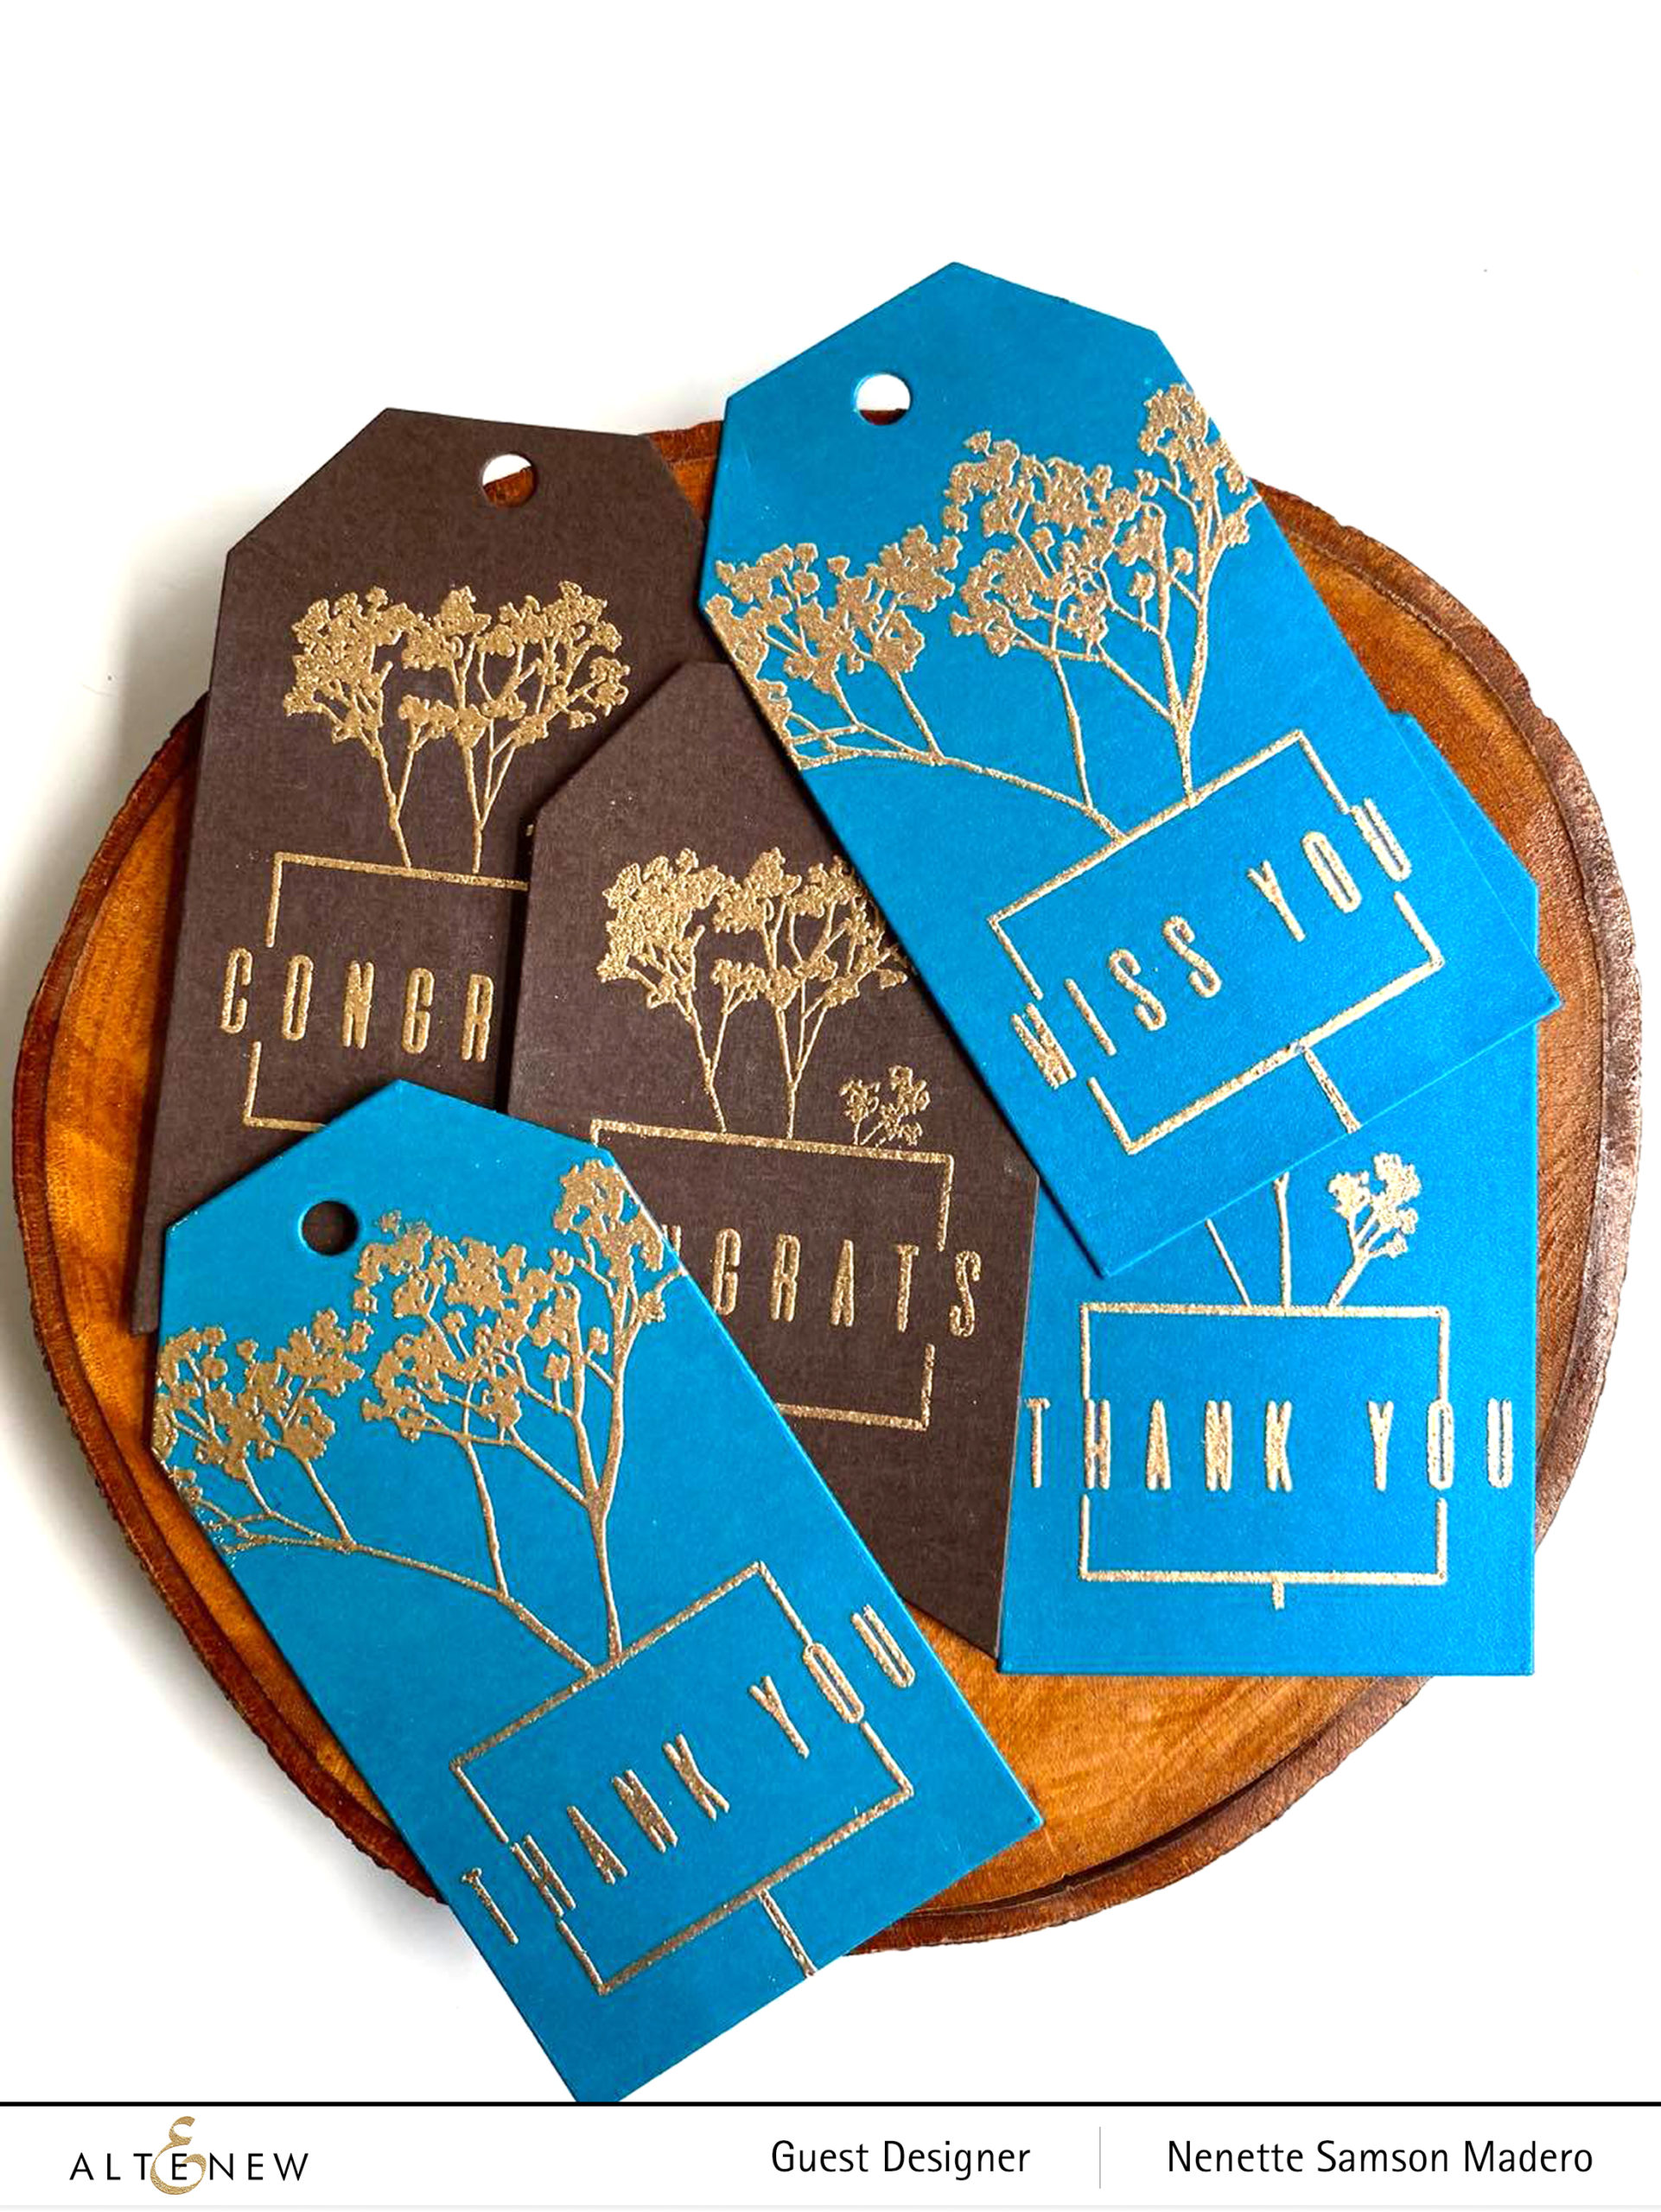

BE KIND


MATERIALS: PERSIAN MOTIFS STAMP AND DIE , BLOCK SENTIMENTS STAMP AND DIE, ROSE GOLD EMBOSSING POWDER, WATERCOLOR BRUSH MARKERS- MANGO SMOOTHIE, ORANGE CREAM, YELLOW OCHRE, LAGOON, EMERALD, WATERCOLOR PAPER, VERSARMARK INK, ROSE GOLD EMBOSSING POWDER, METALLIC WATERCOLOR PAN SET, CARDSTOCKS, foam squares

Now, more than ever, we should remind ourselves, daily, to be kind to one another. Sadly, there is so much hatred and injustice around the world. I’ve been listening to a podcast by Fr. Mike Schmitz and this message struck me. We have to remember that we are all part of one world and that it’s not a battle between race or ethnicities. Even in the midst of all the brokenness, we can still find peace and be united if we just BE KIND to one another.

STEPS:

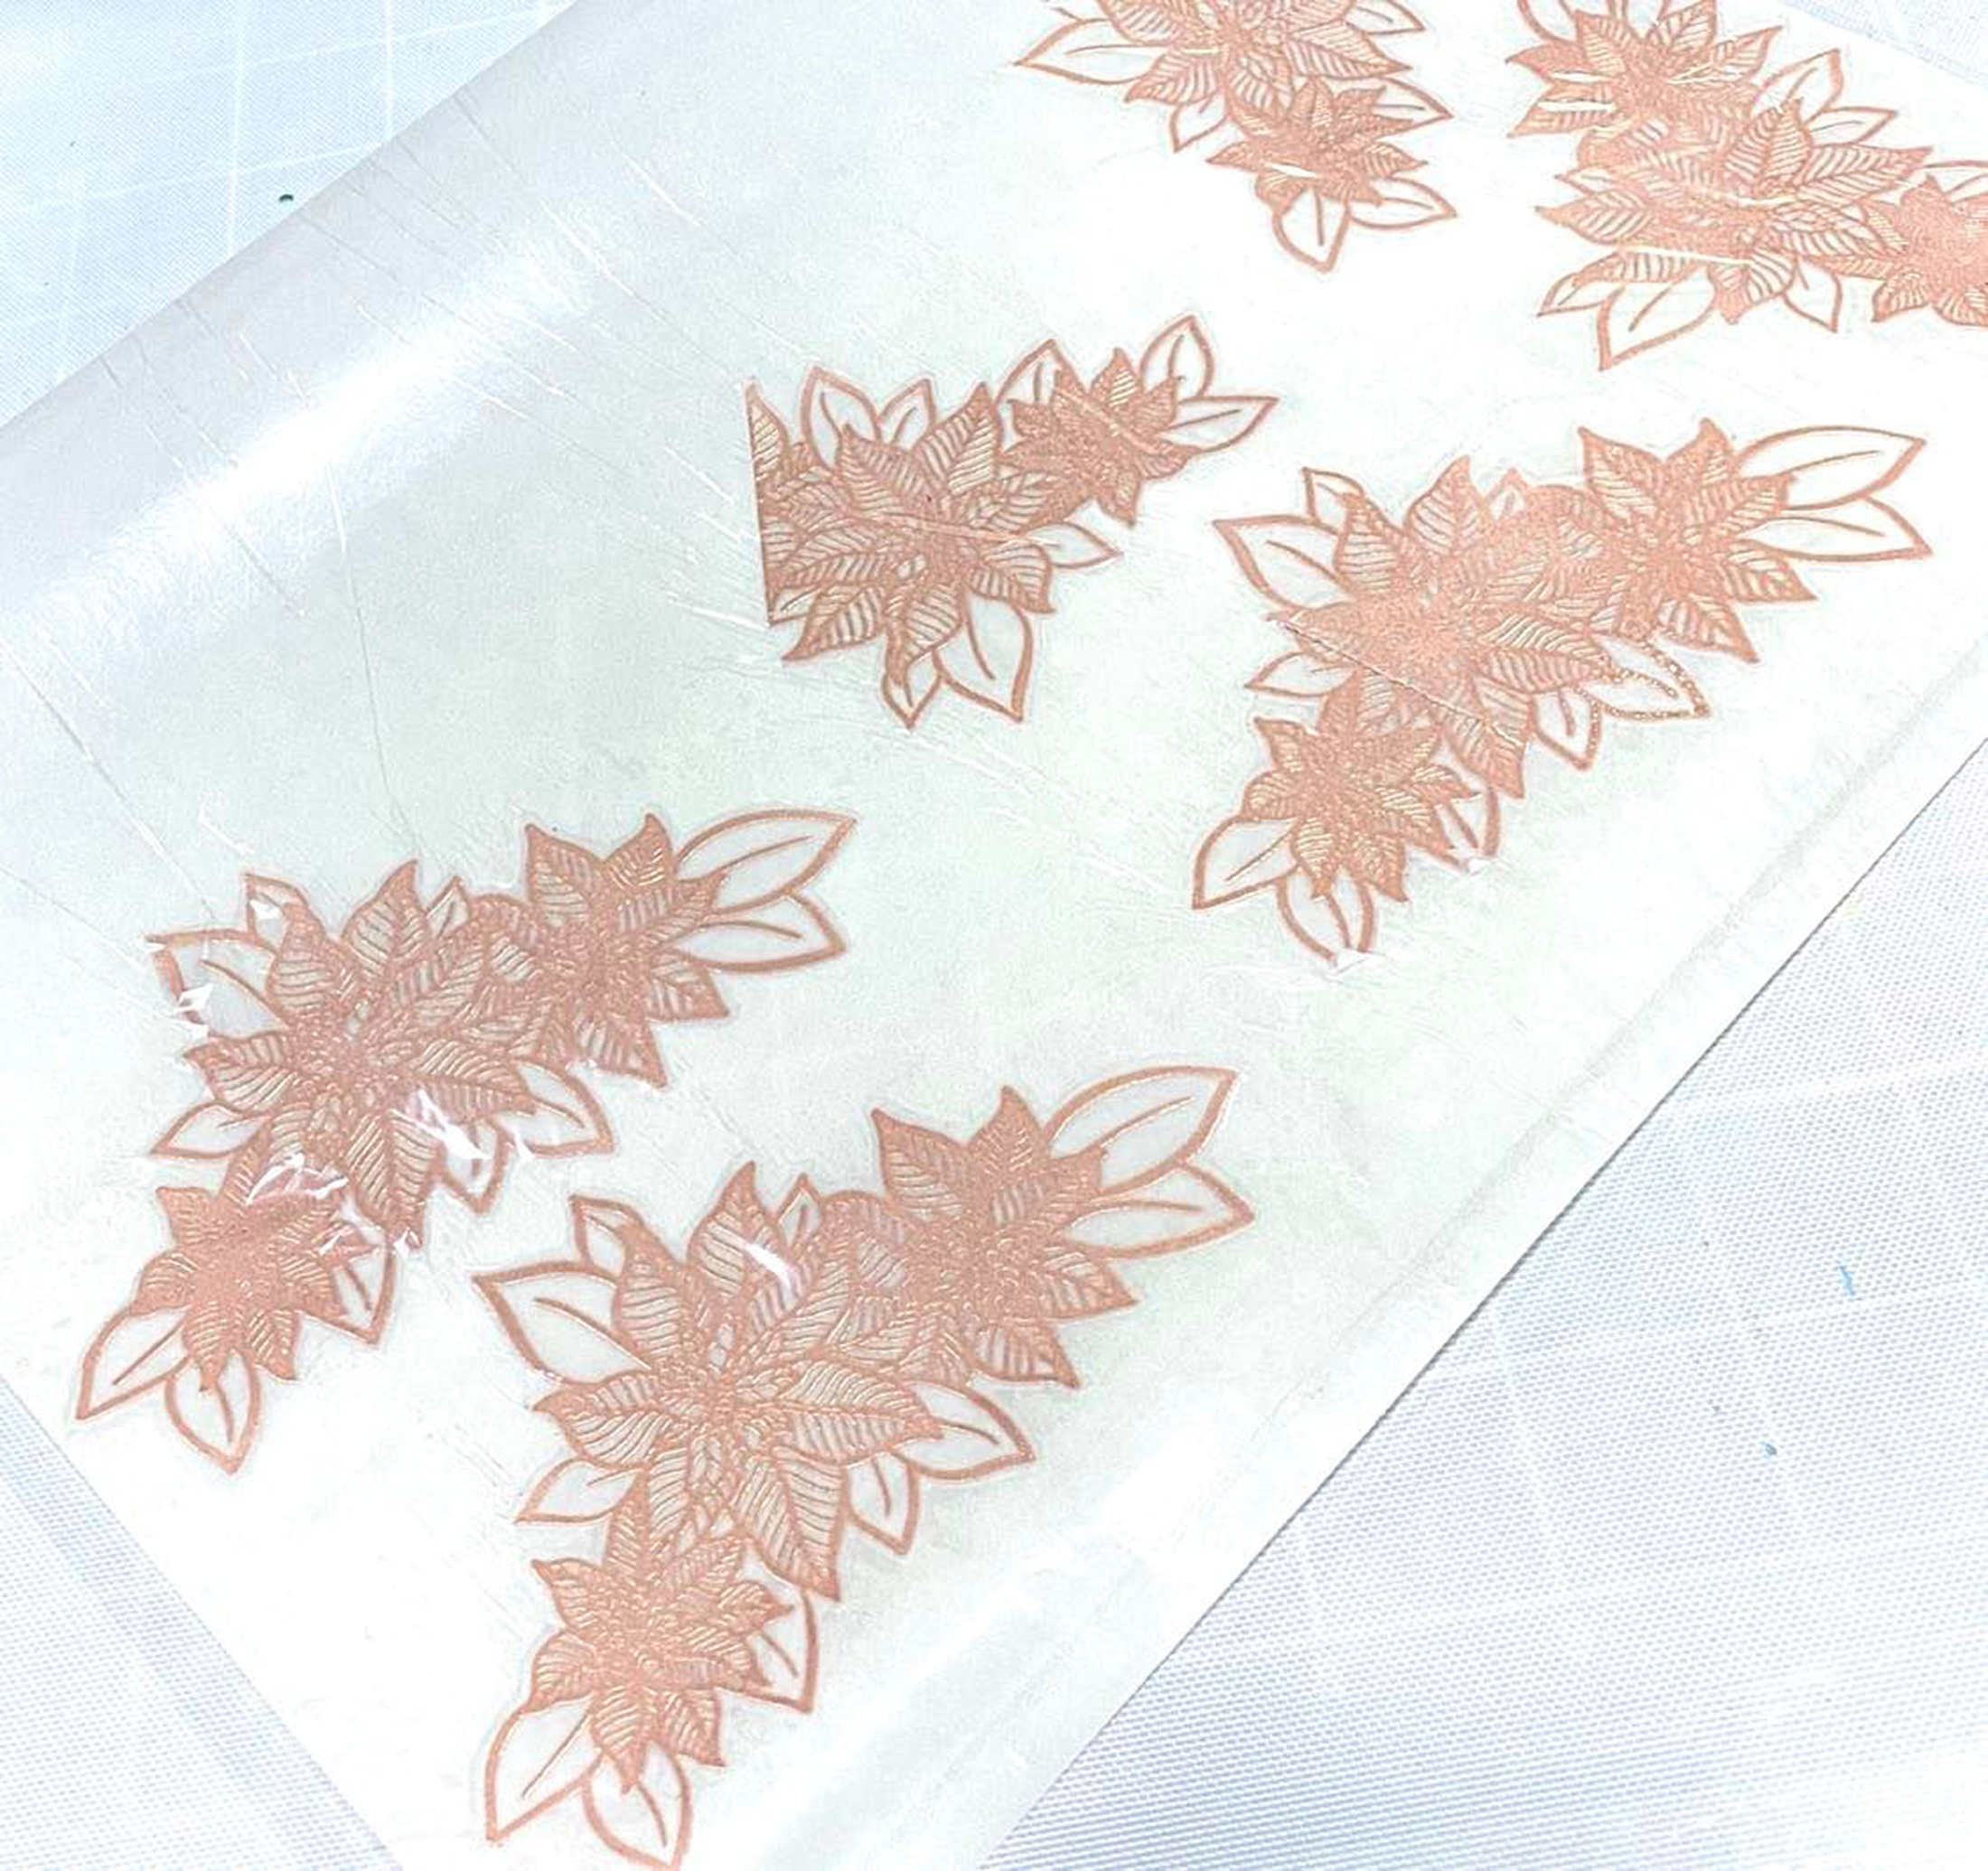
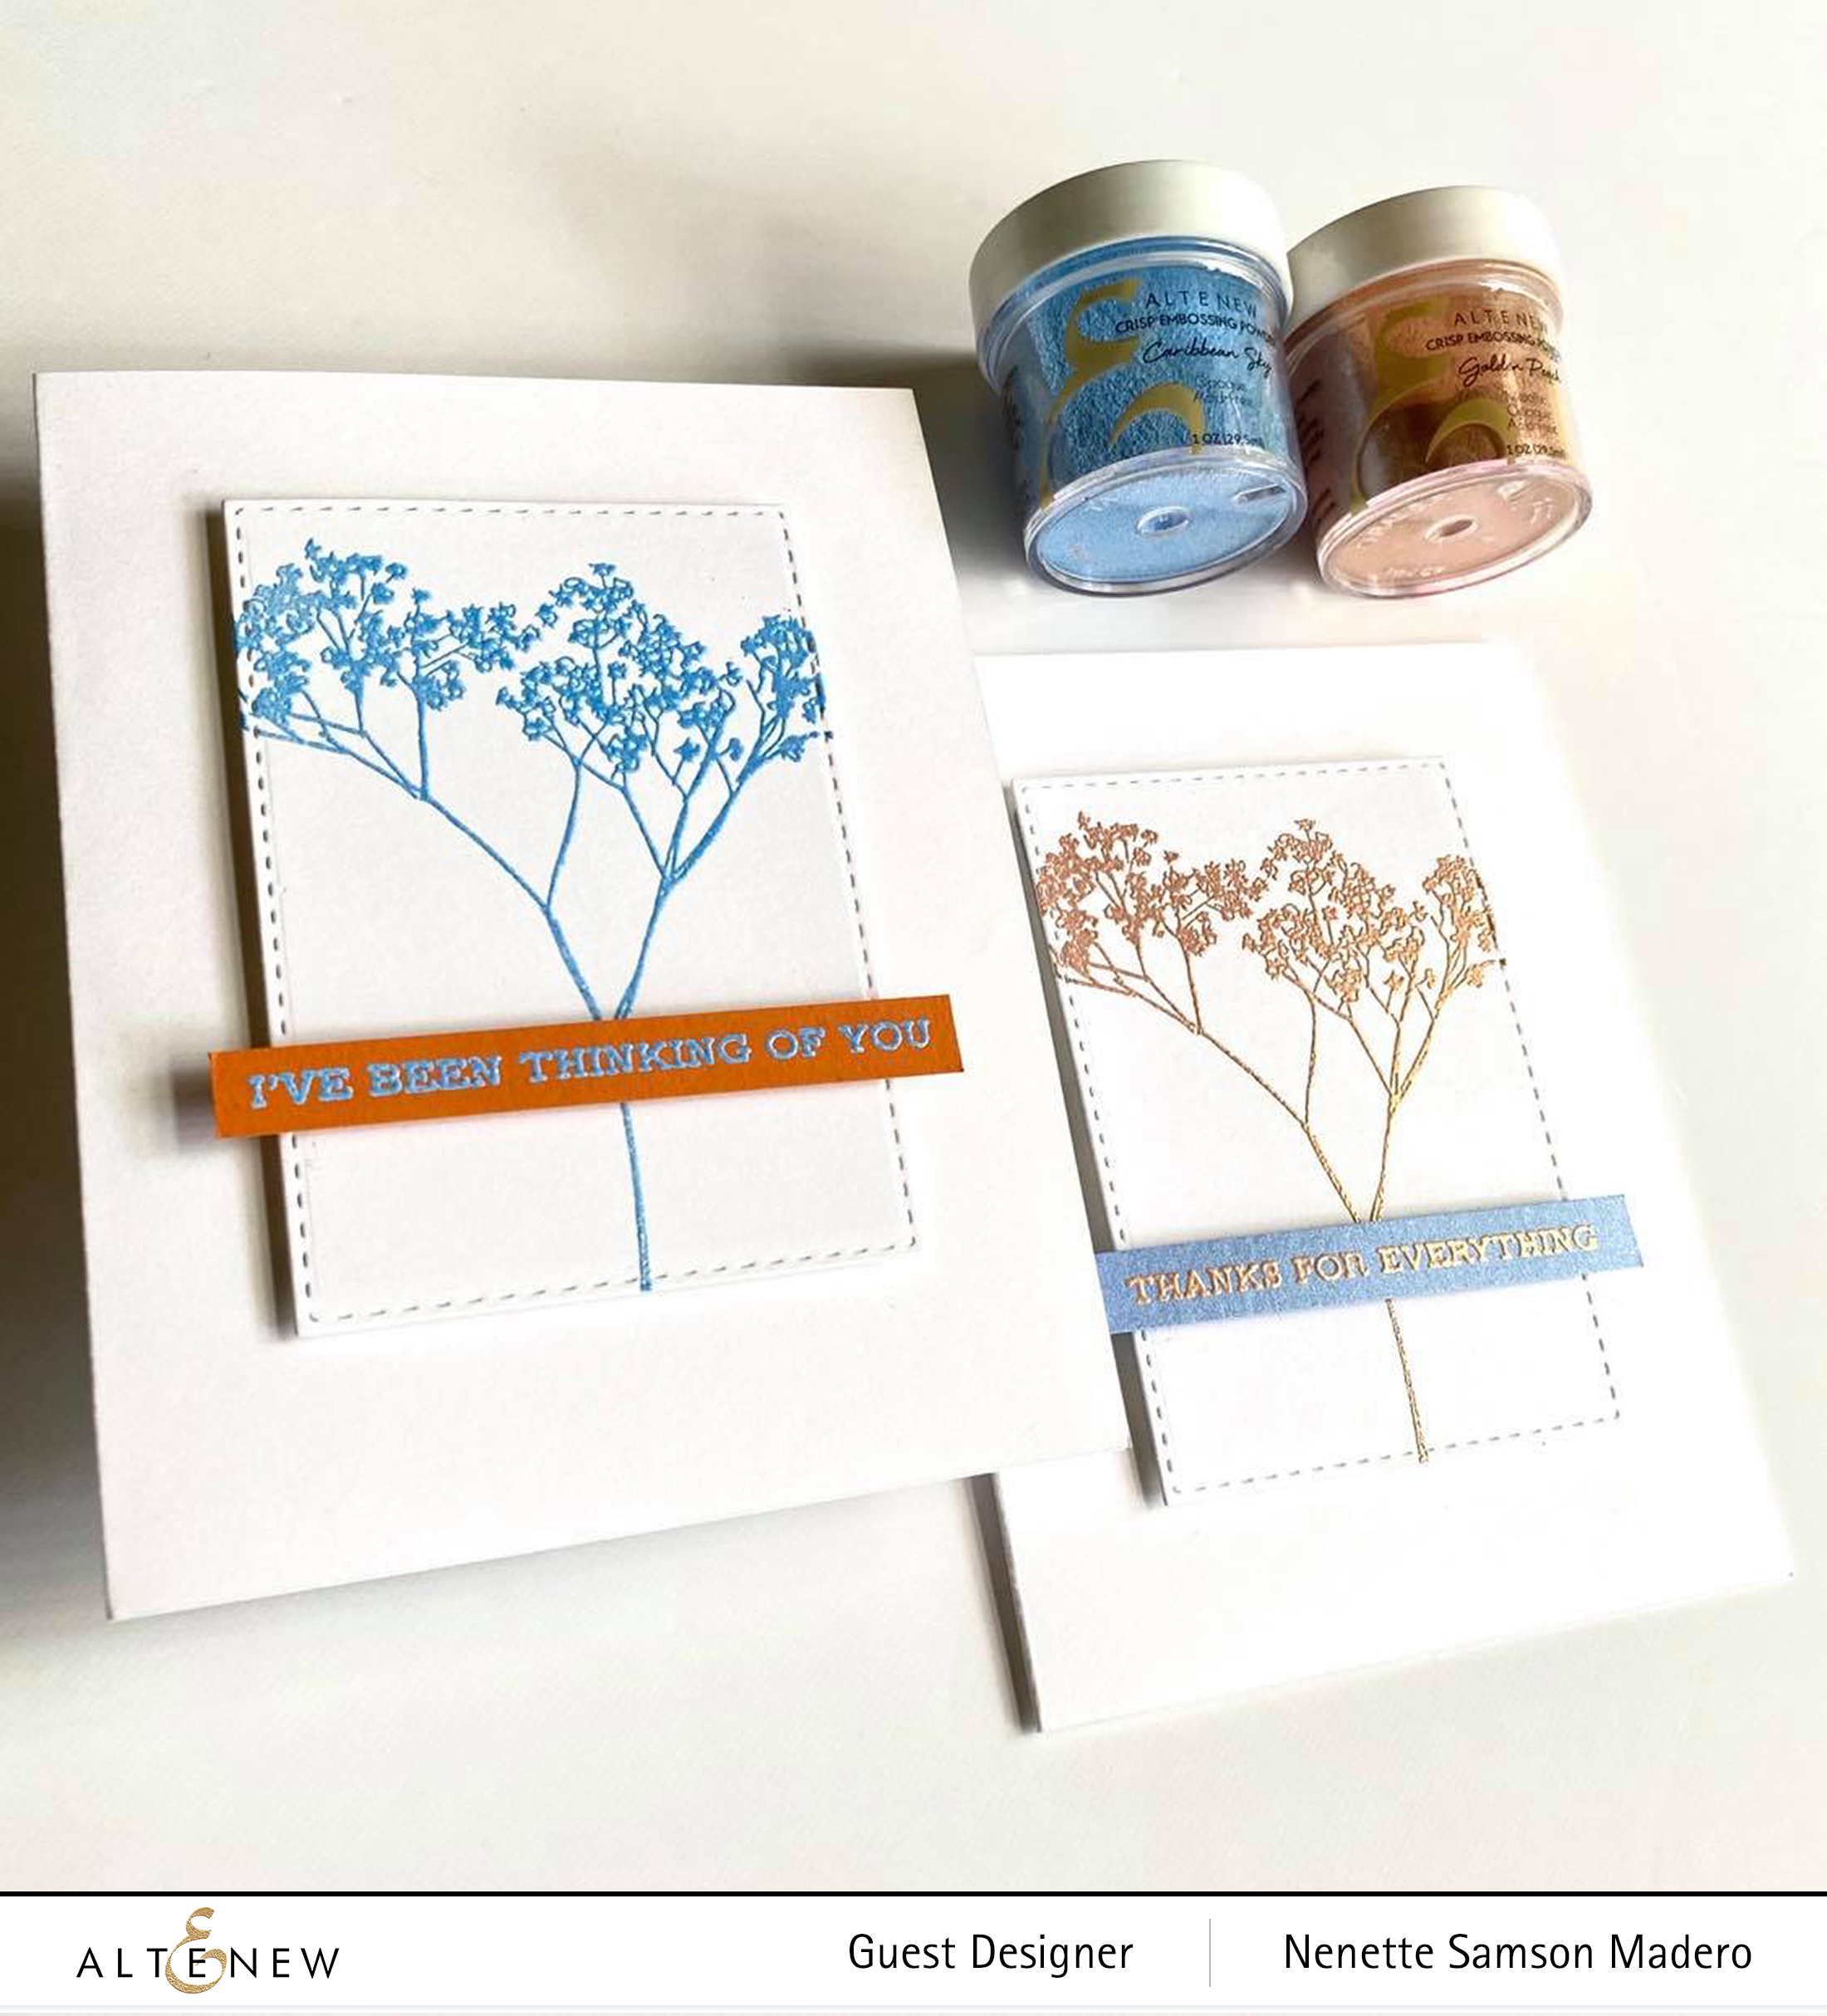
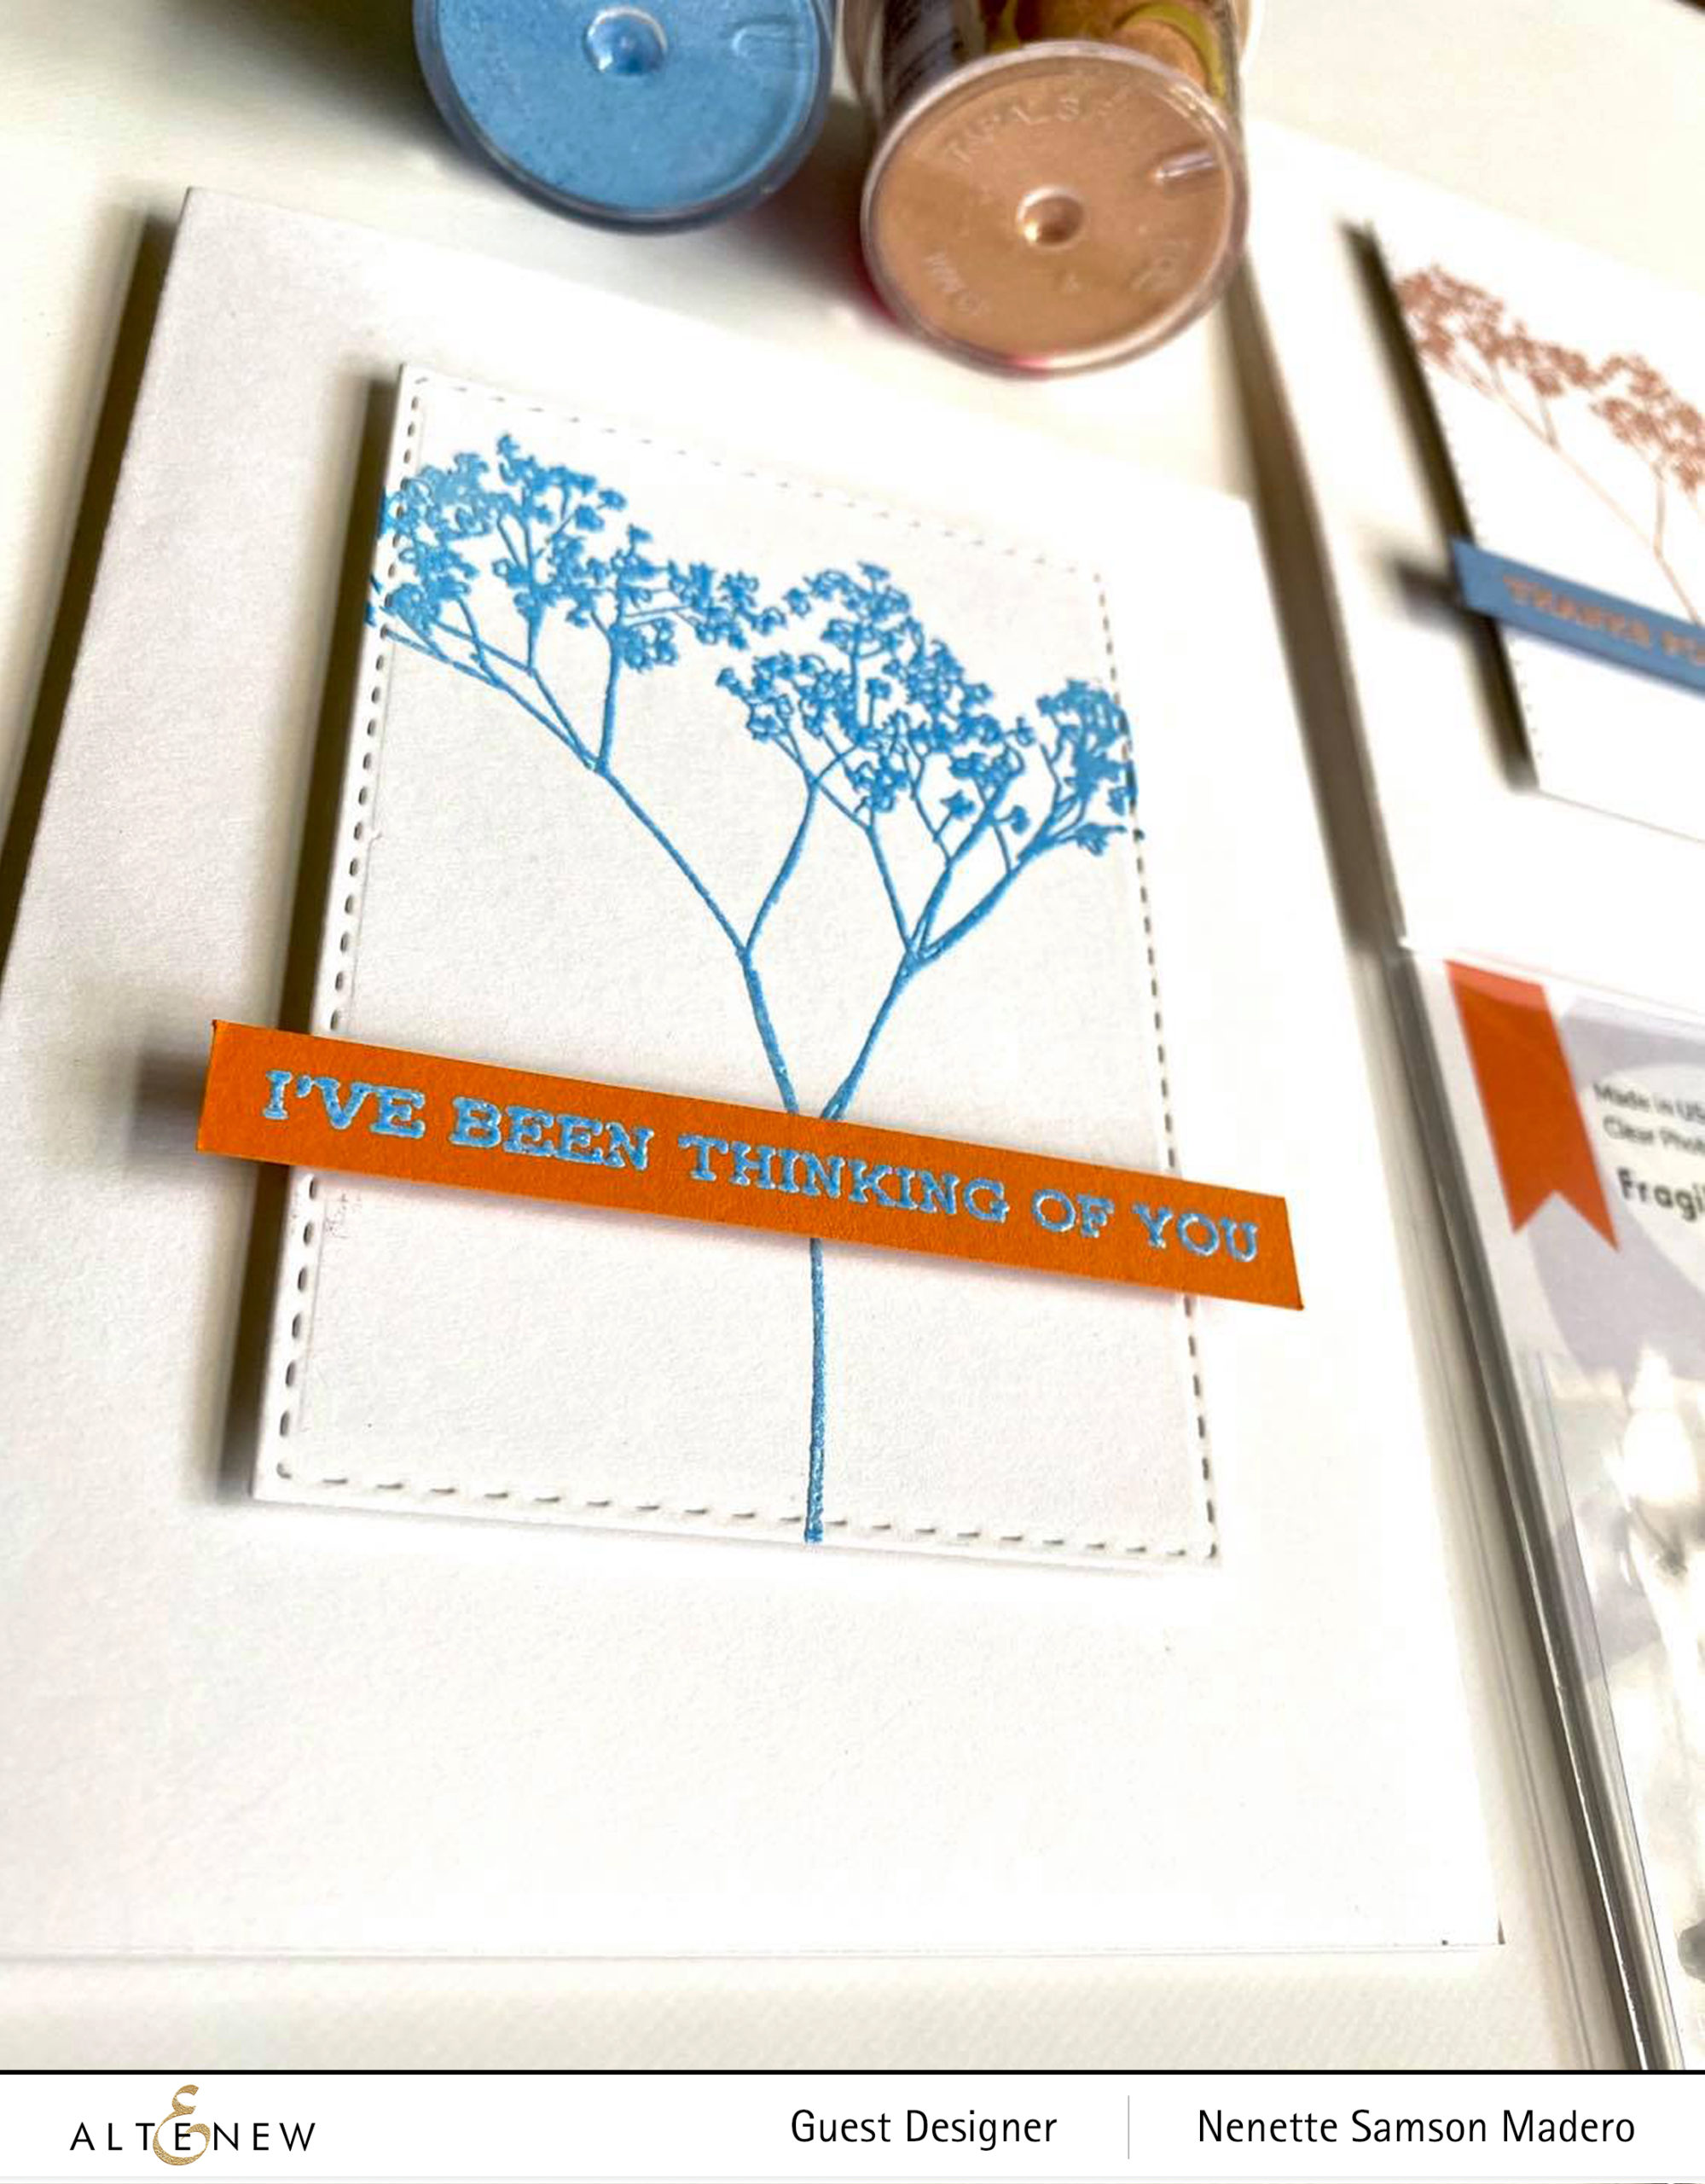
  1. Prep the paper with antistatic tool and stamp images on watercolor paper with Versamark ink and emboss with Rose Gold embossing powder.
  2. Color images using watercolor brush markers.
  3. Add metallic details using the metallic watercolor pan set.
  4. Arrange the images temporarily on purple cardstock. Mark with pencil the edges of the flowers.
  5. Arrange the dies for partial die cutting to remove the lower part of the purple cardstock.
  6. Add embossed gold edges to the lower part of the card front using Versamark ink and Rose Gold embossing powder.
  7. Add foam sheet to the back of the purple cardstock and foam squares to the floral images for added dimension.
  8. Emboss the sentiment with Rose Gold embossing powder then die cut.
  9. Assemble the card.

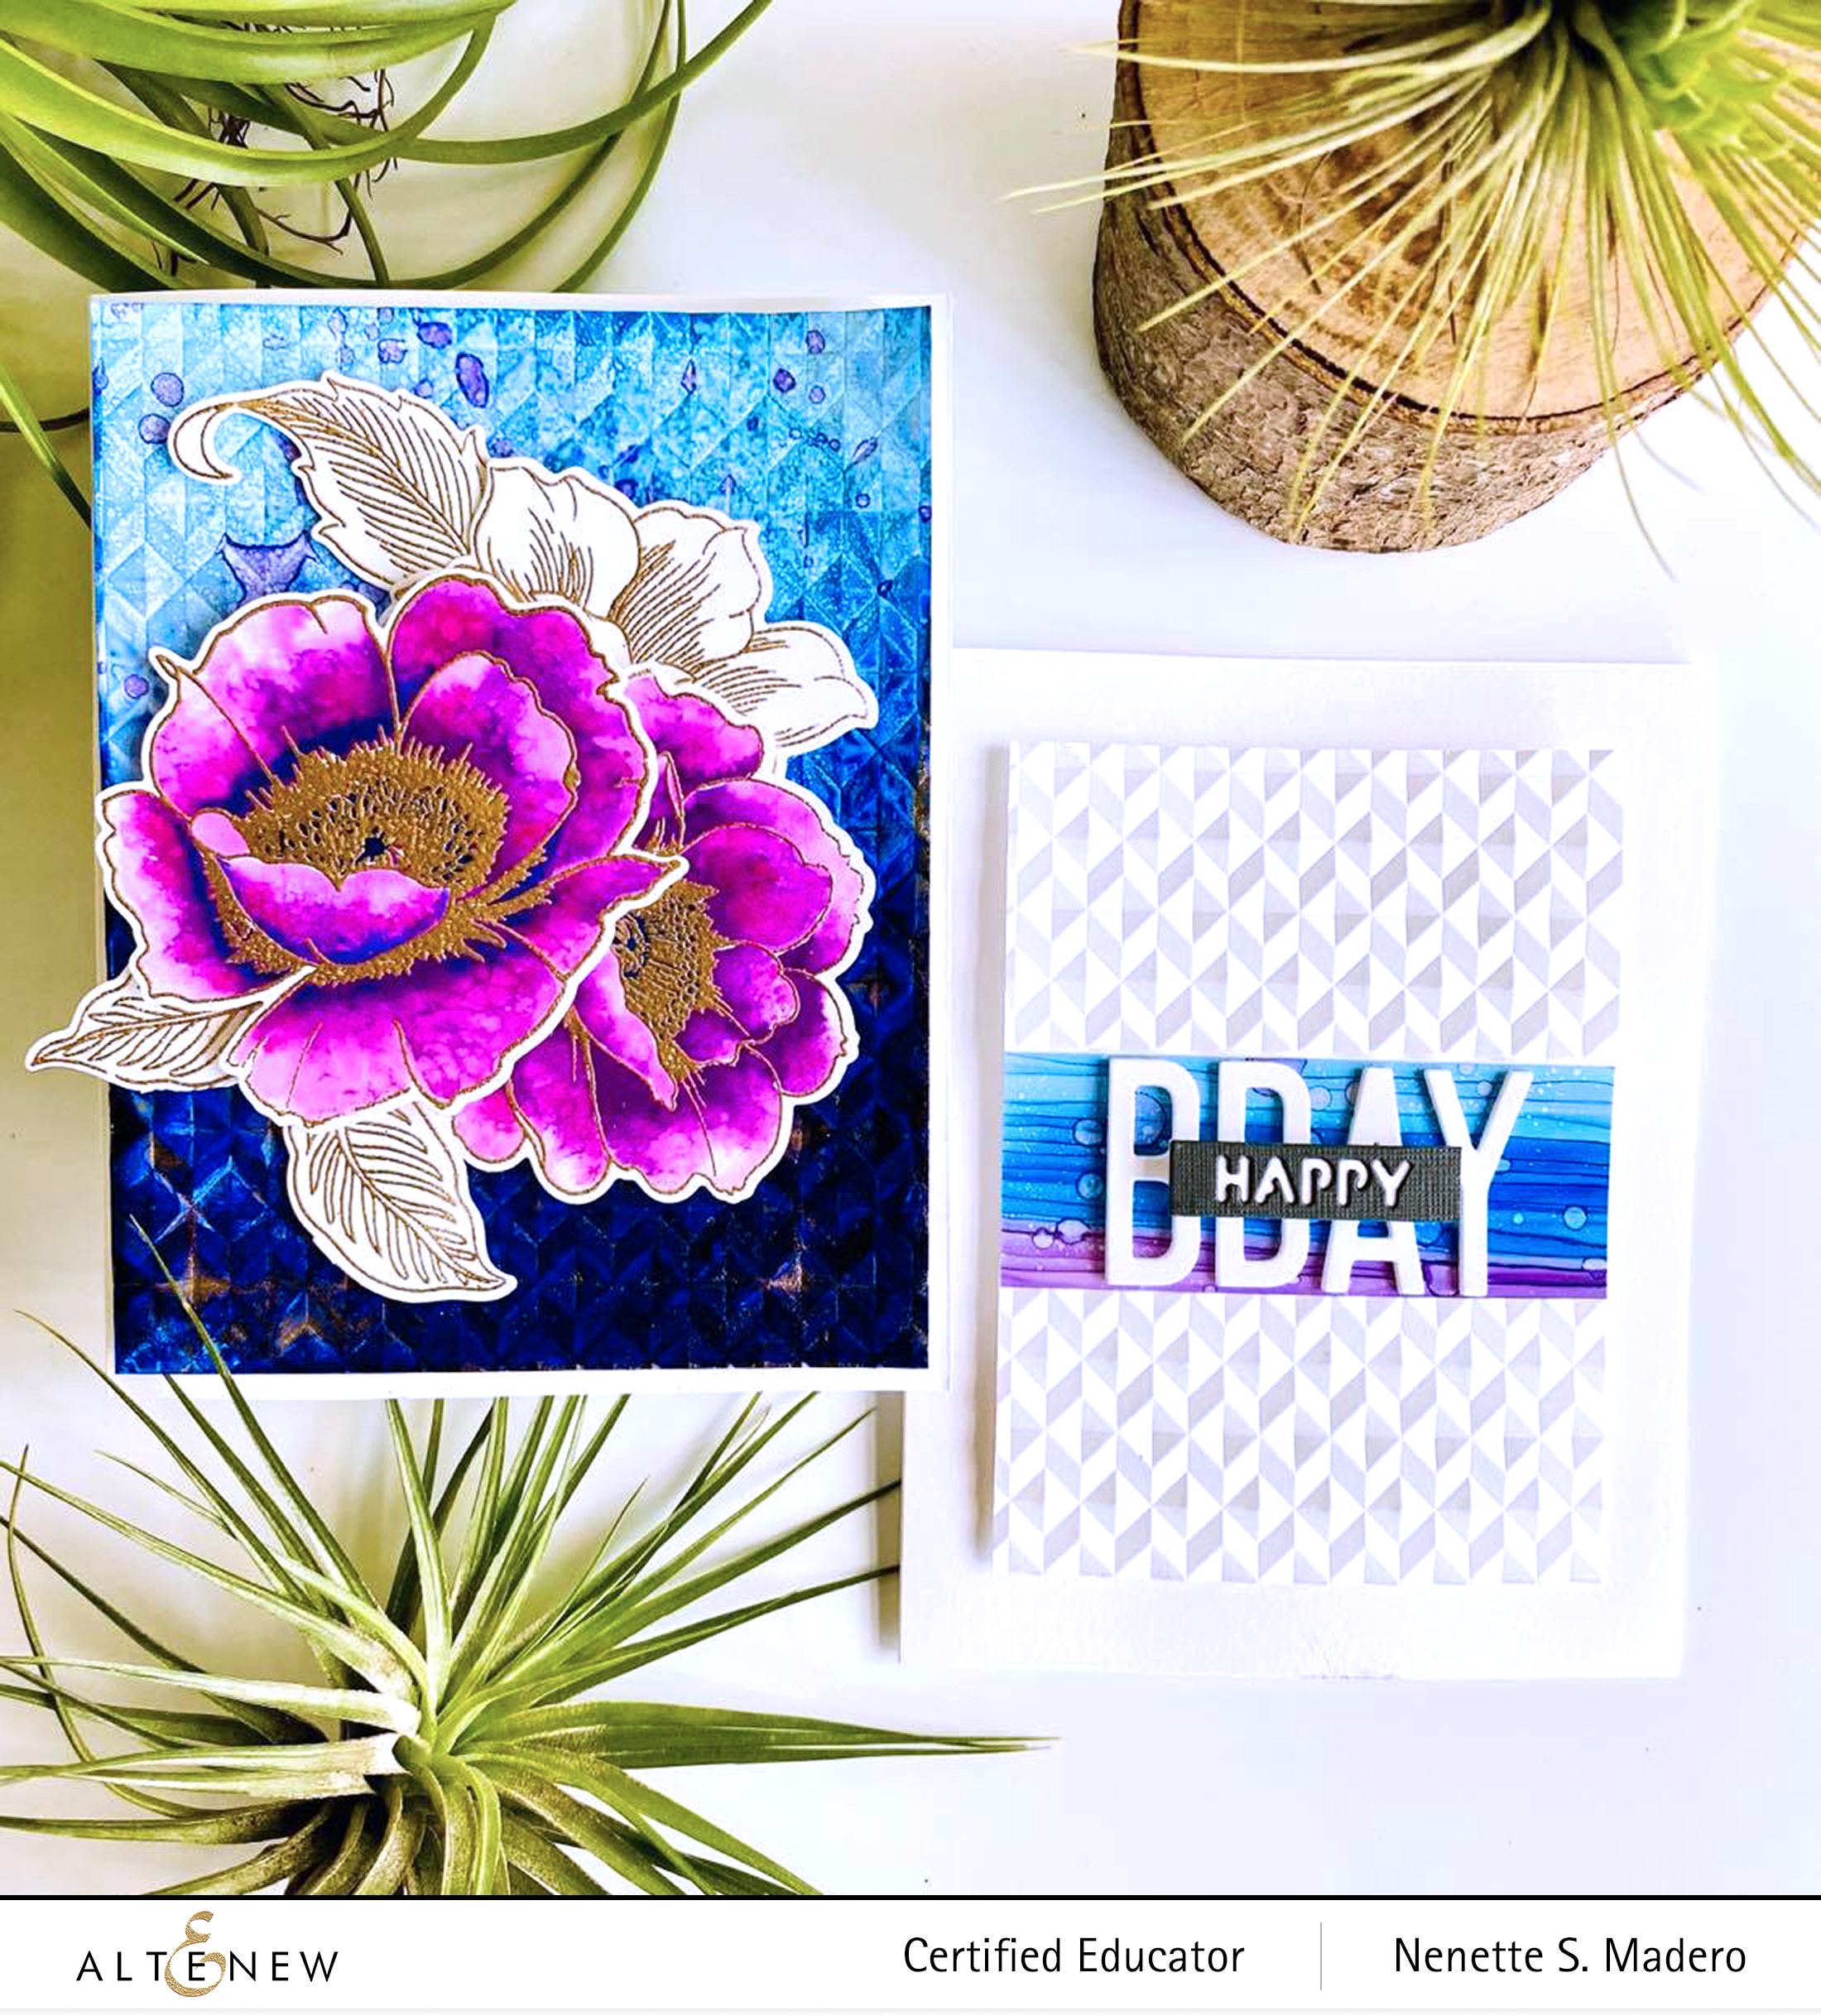
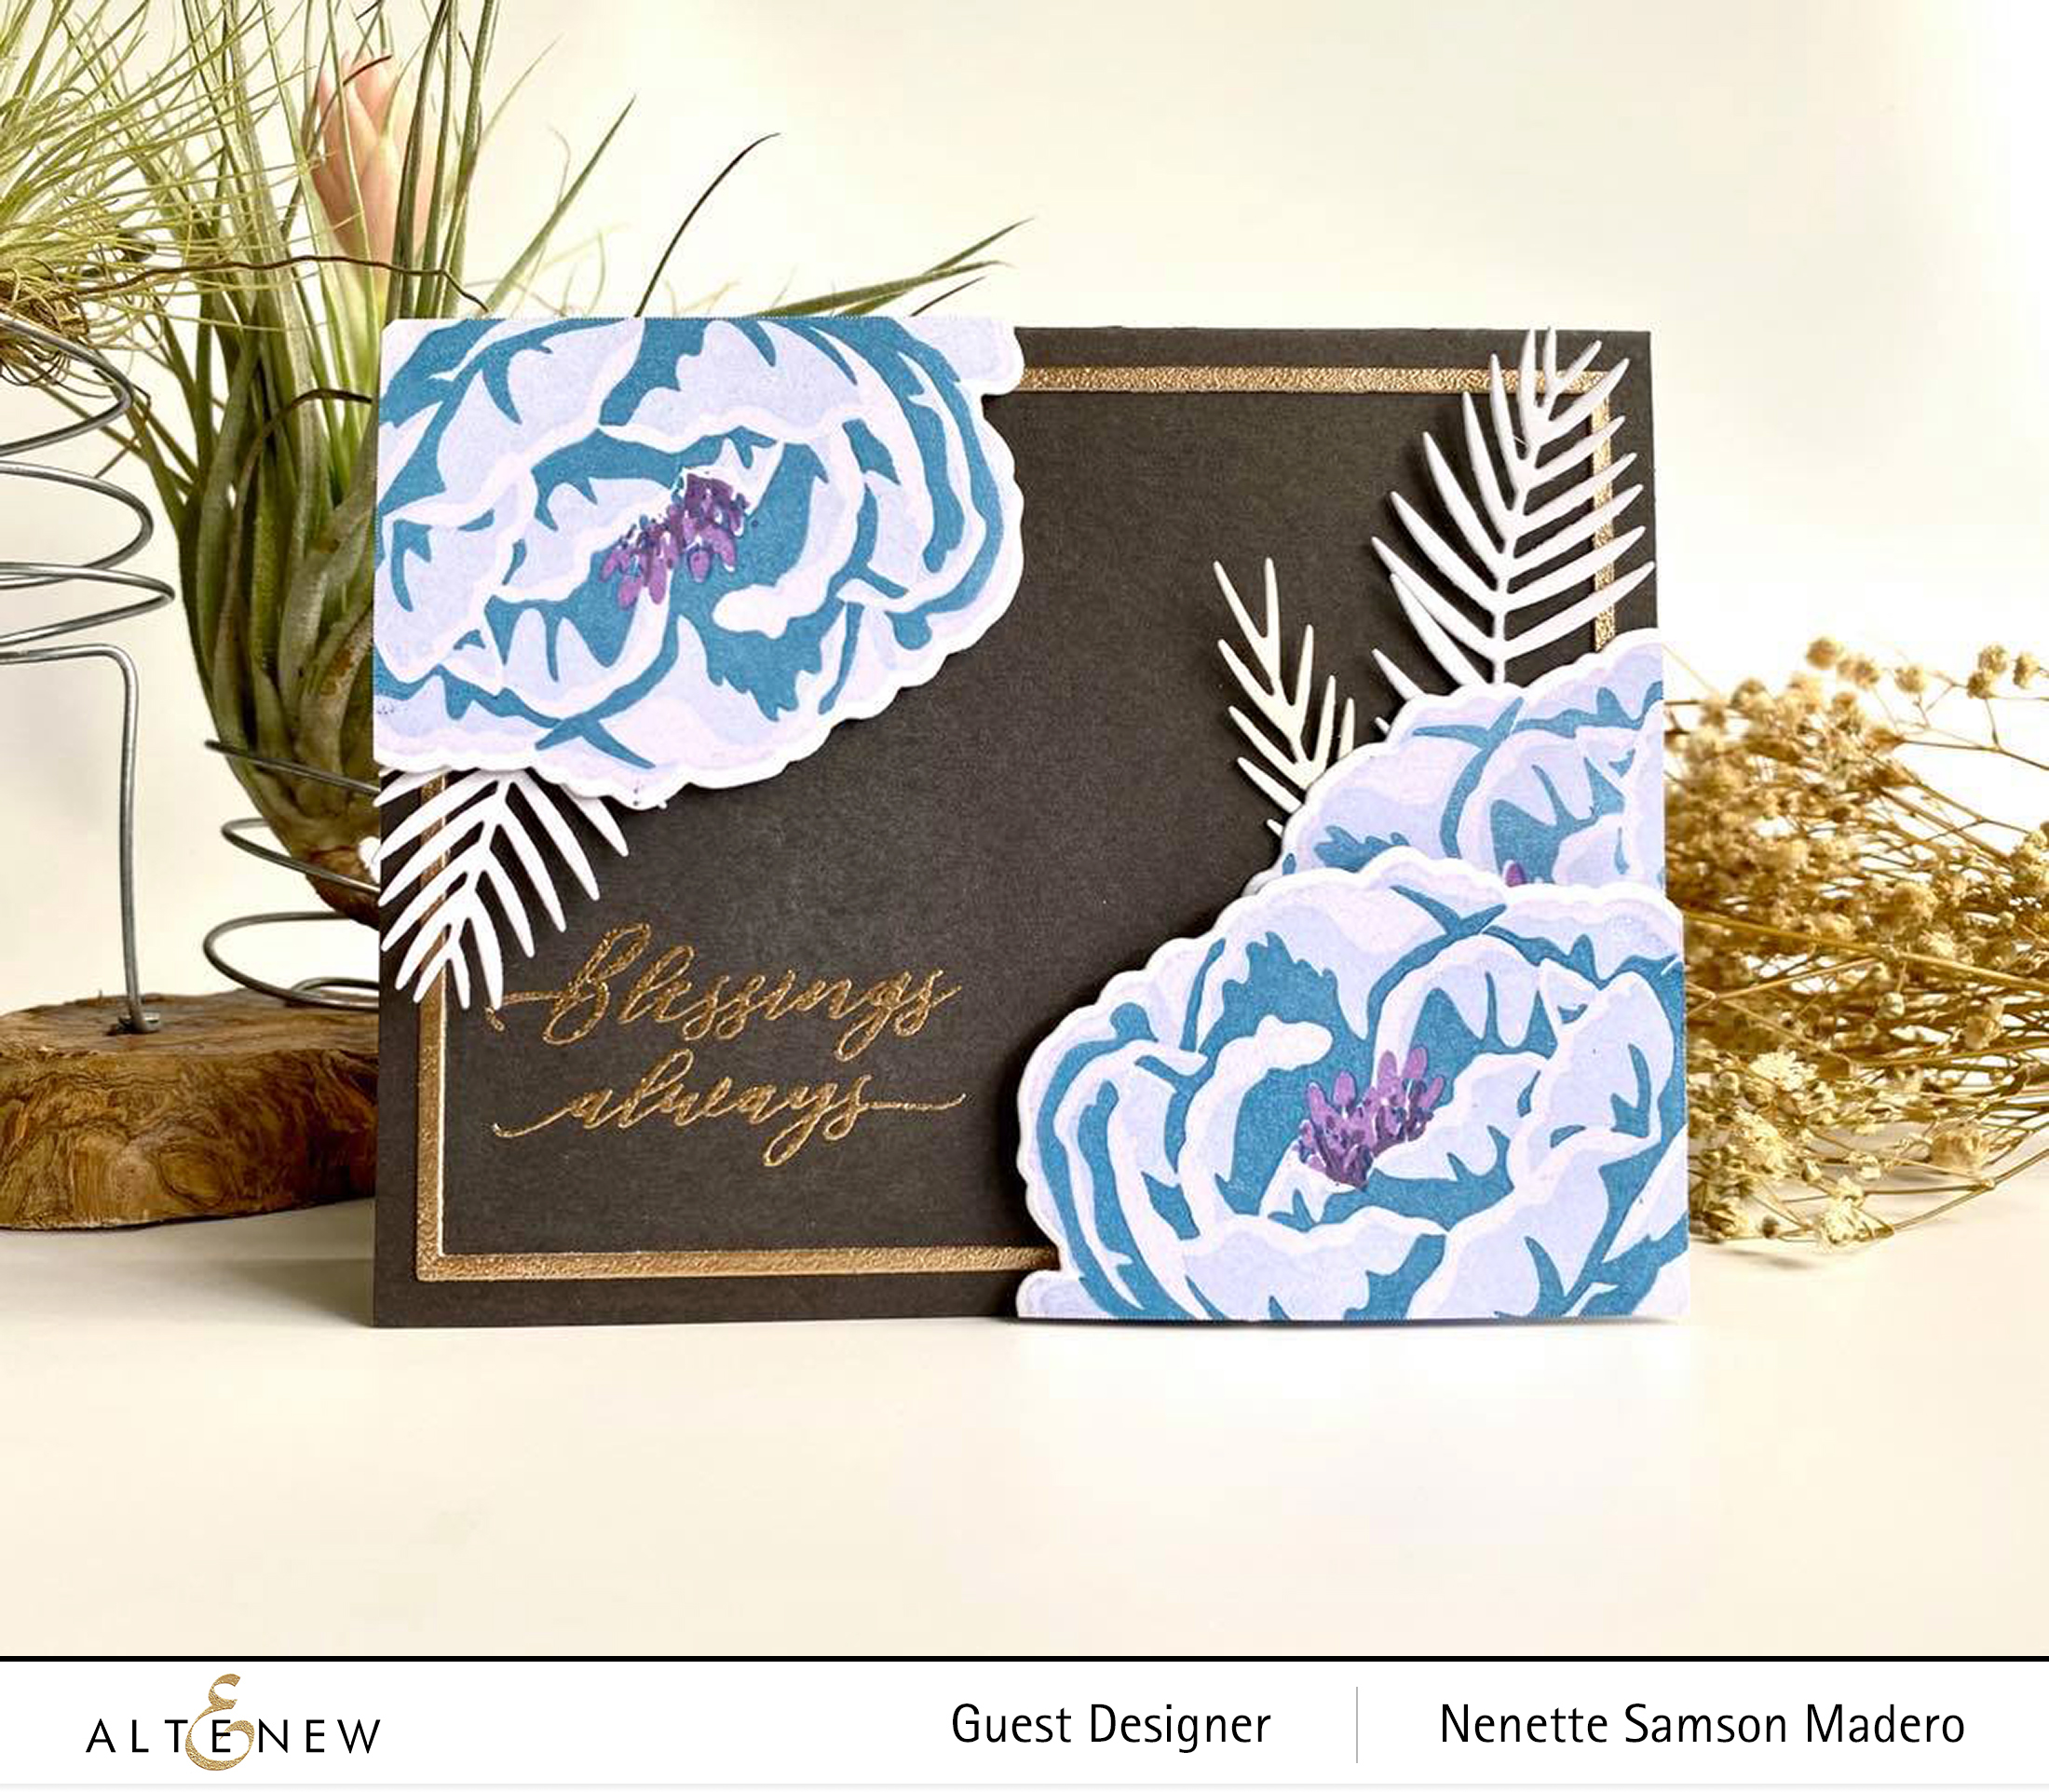
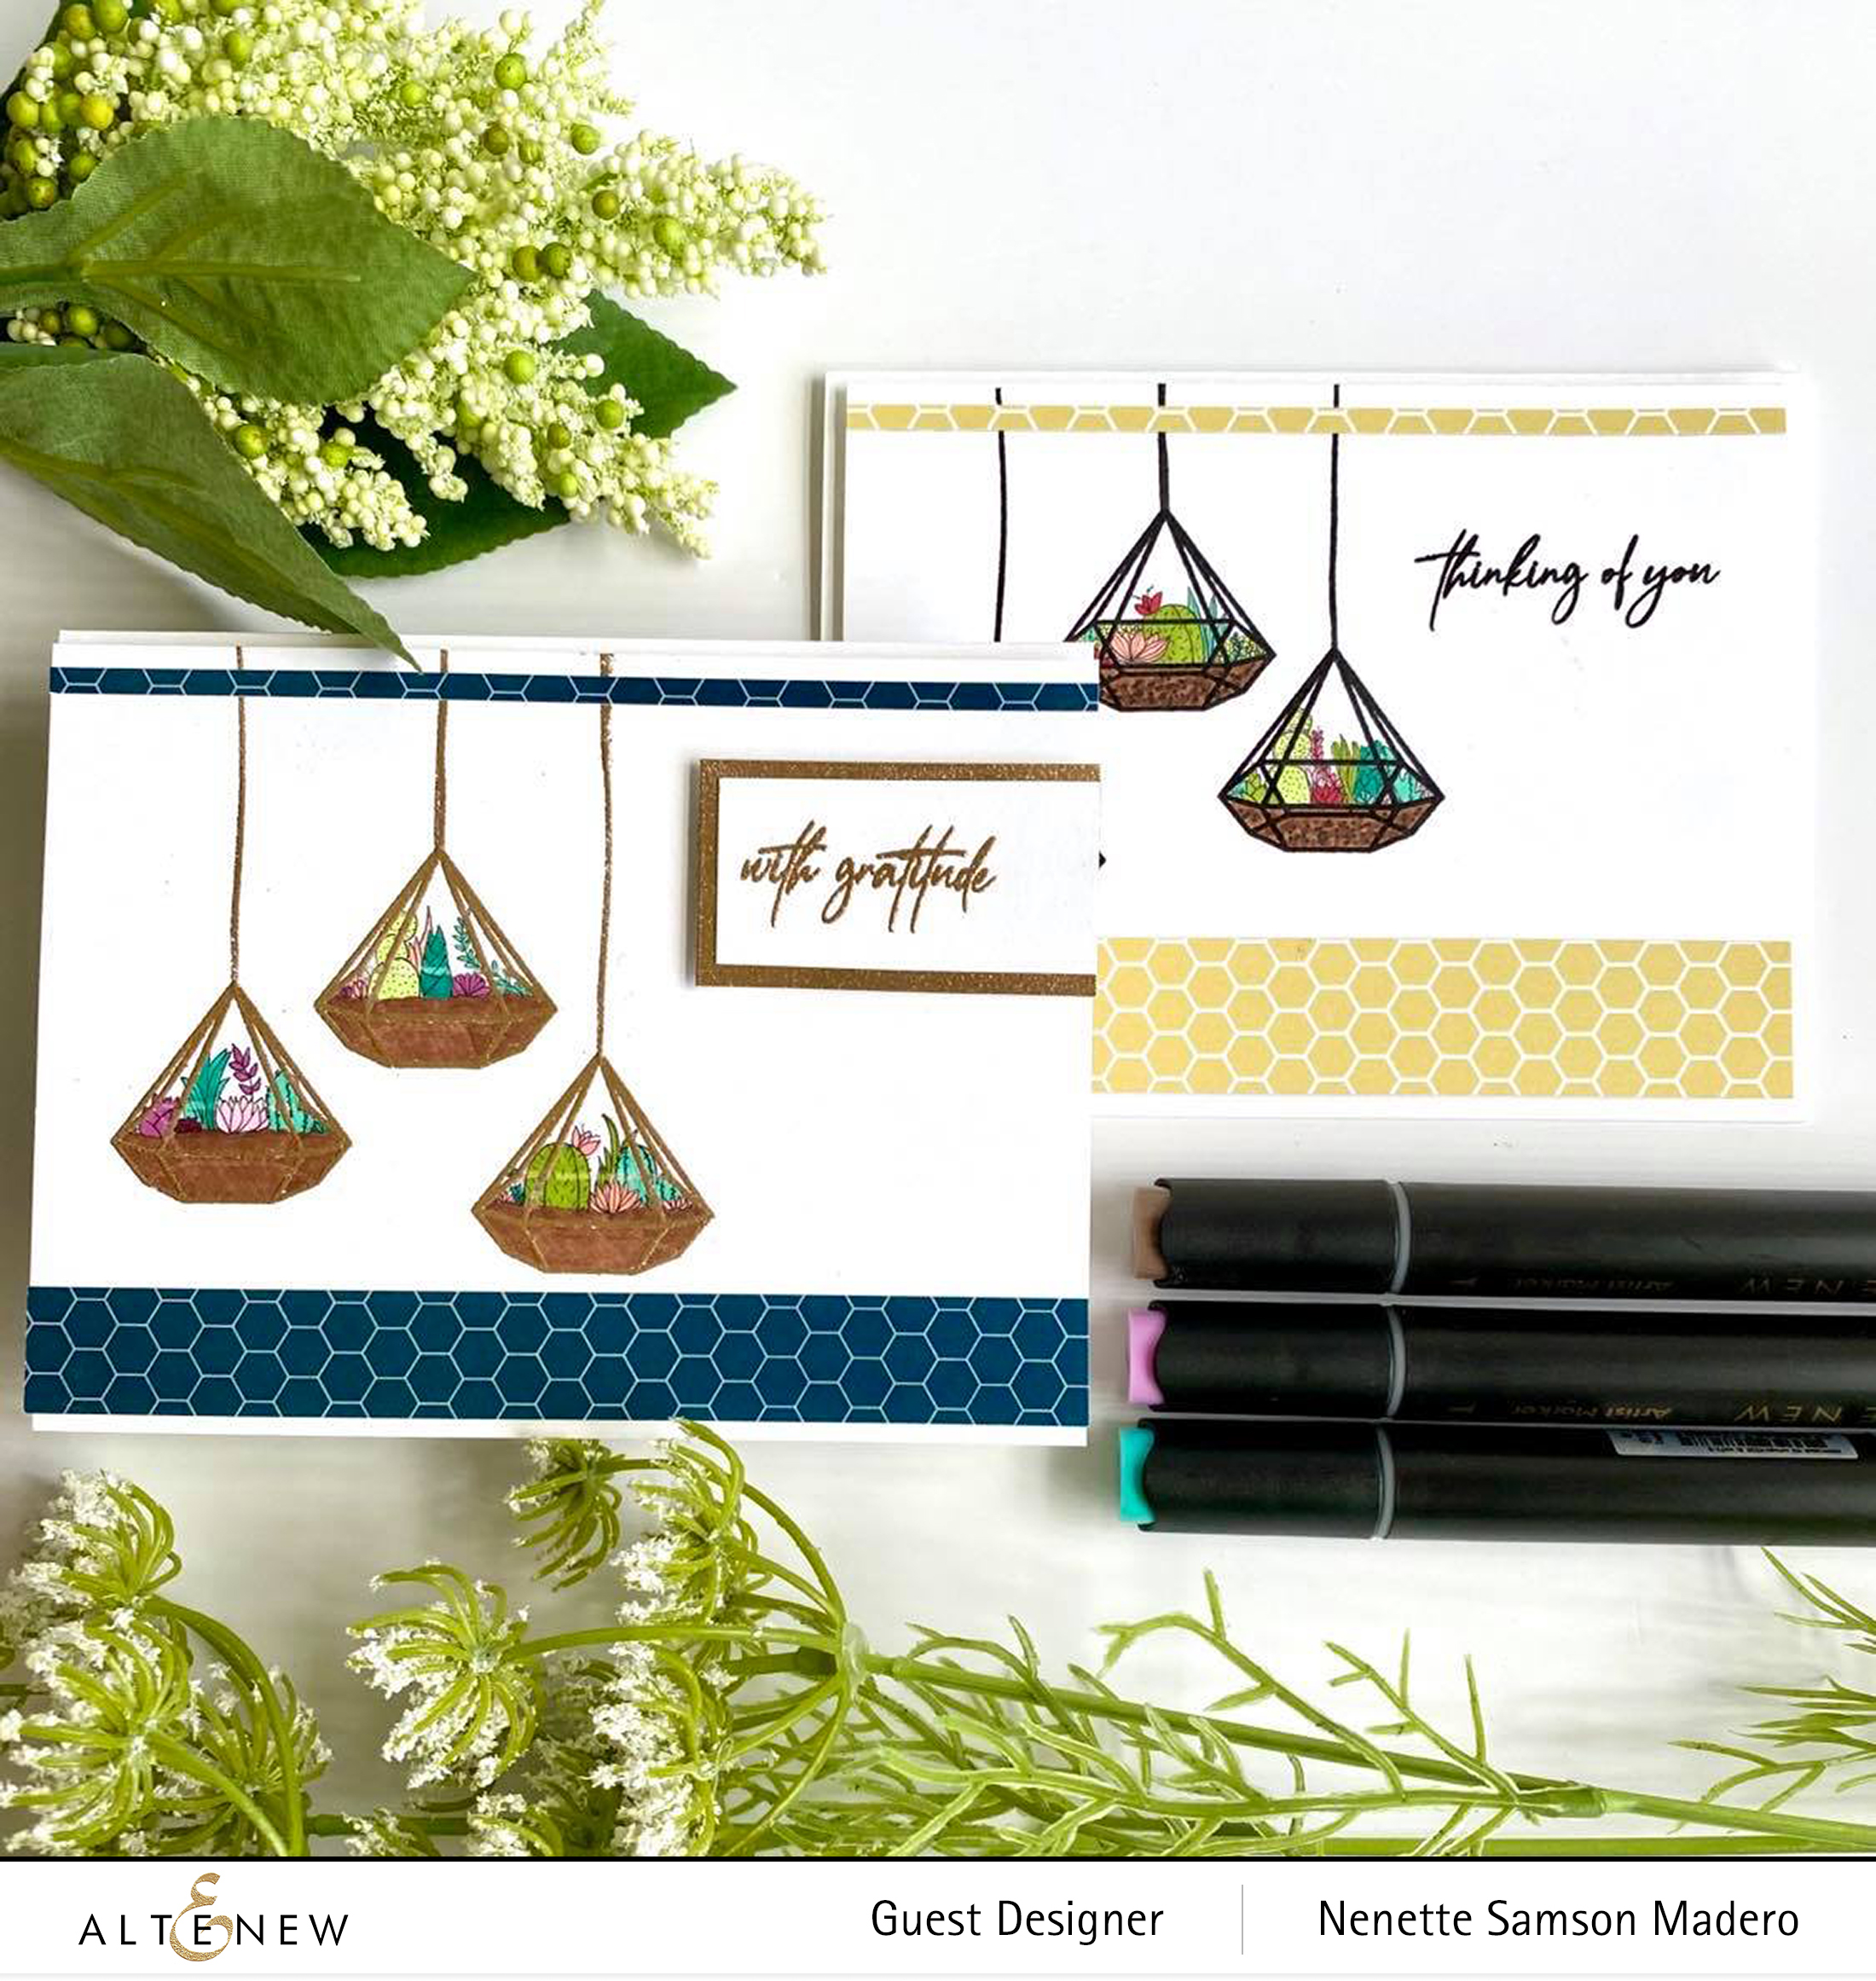
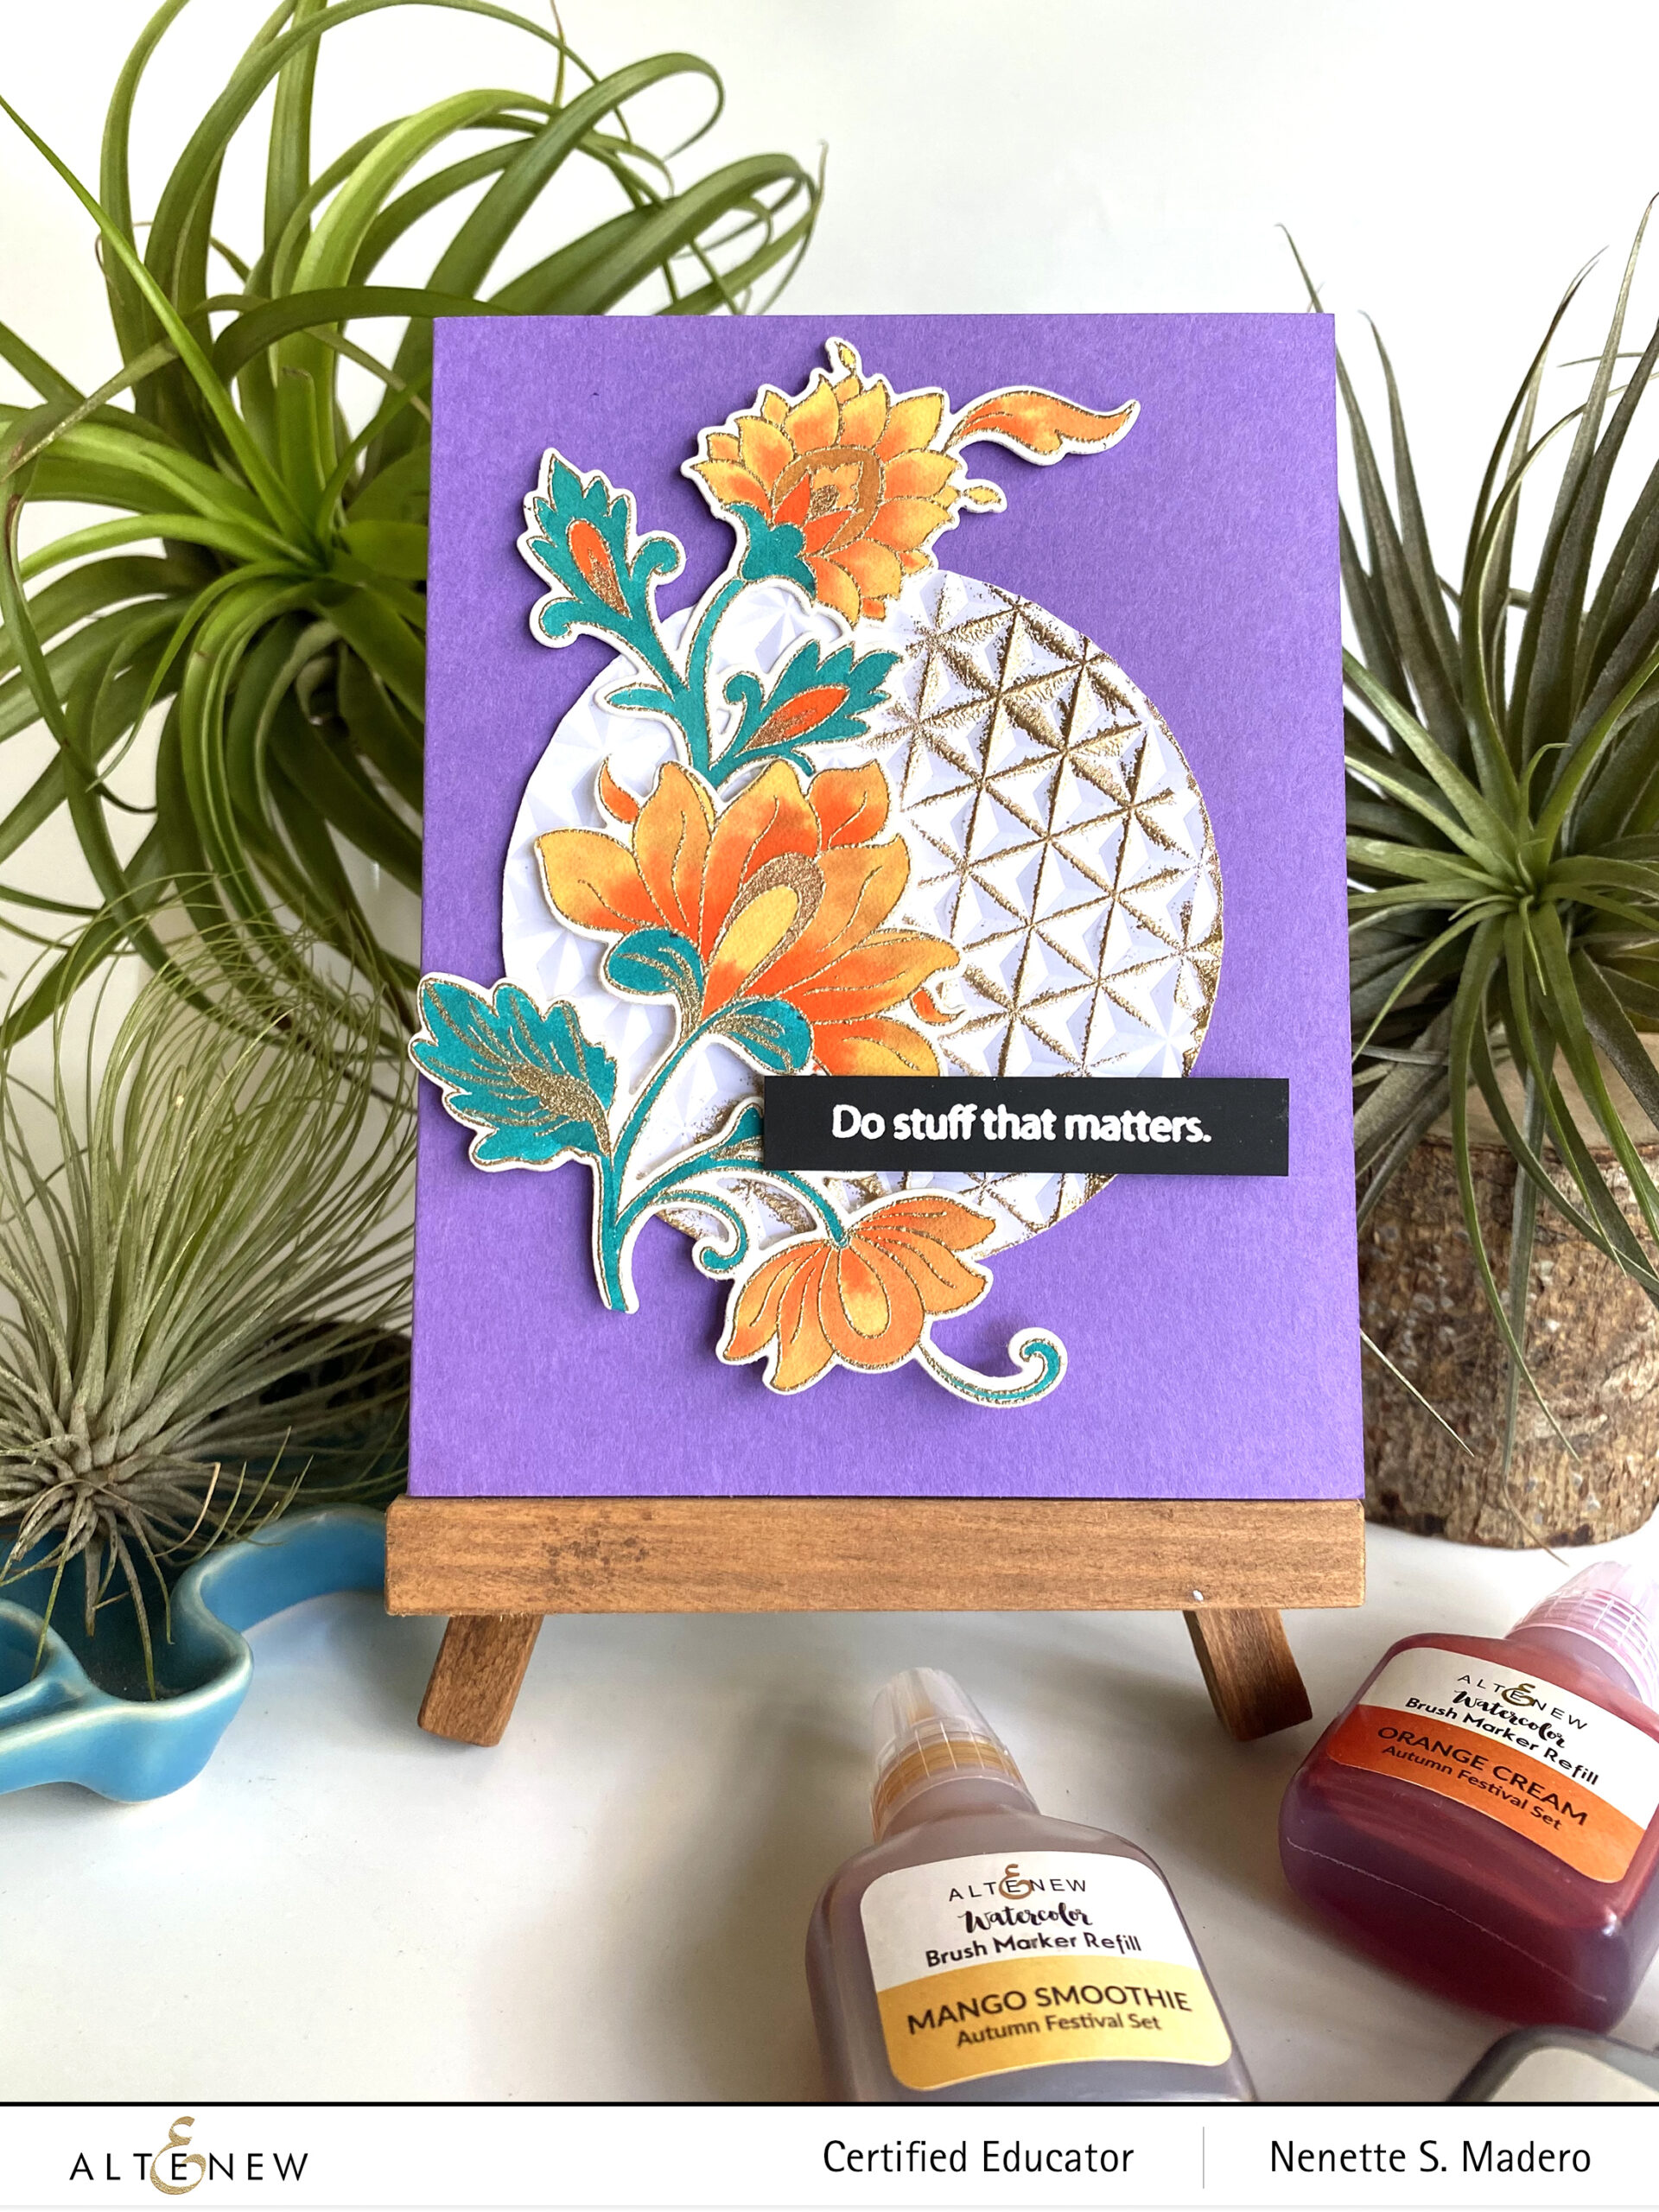
More often than not, I usually stamp, emboss and watercolor more than what I need. Since I had extras, I decided to create a second CAS card using the same stamp set.


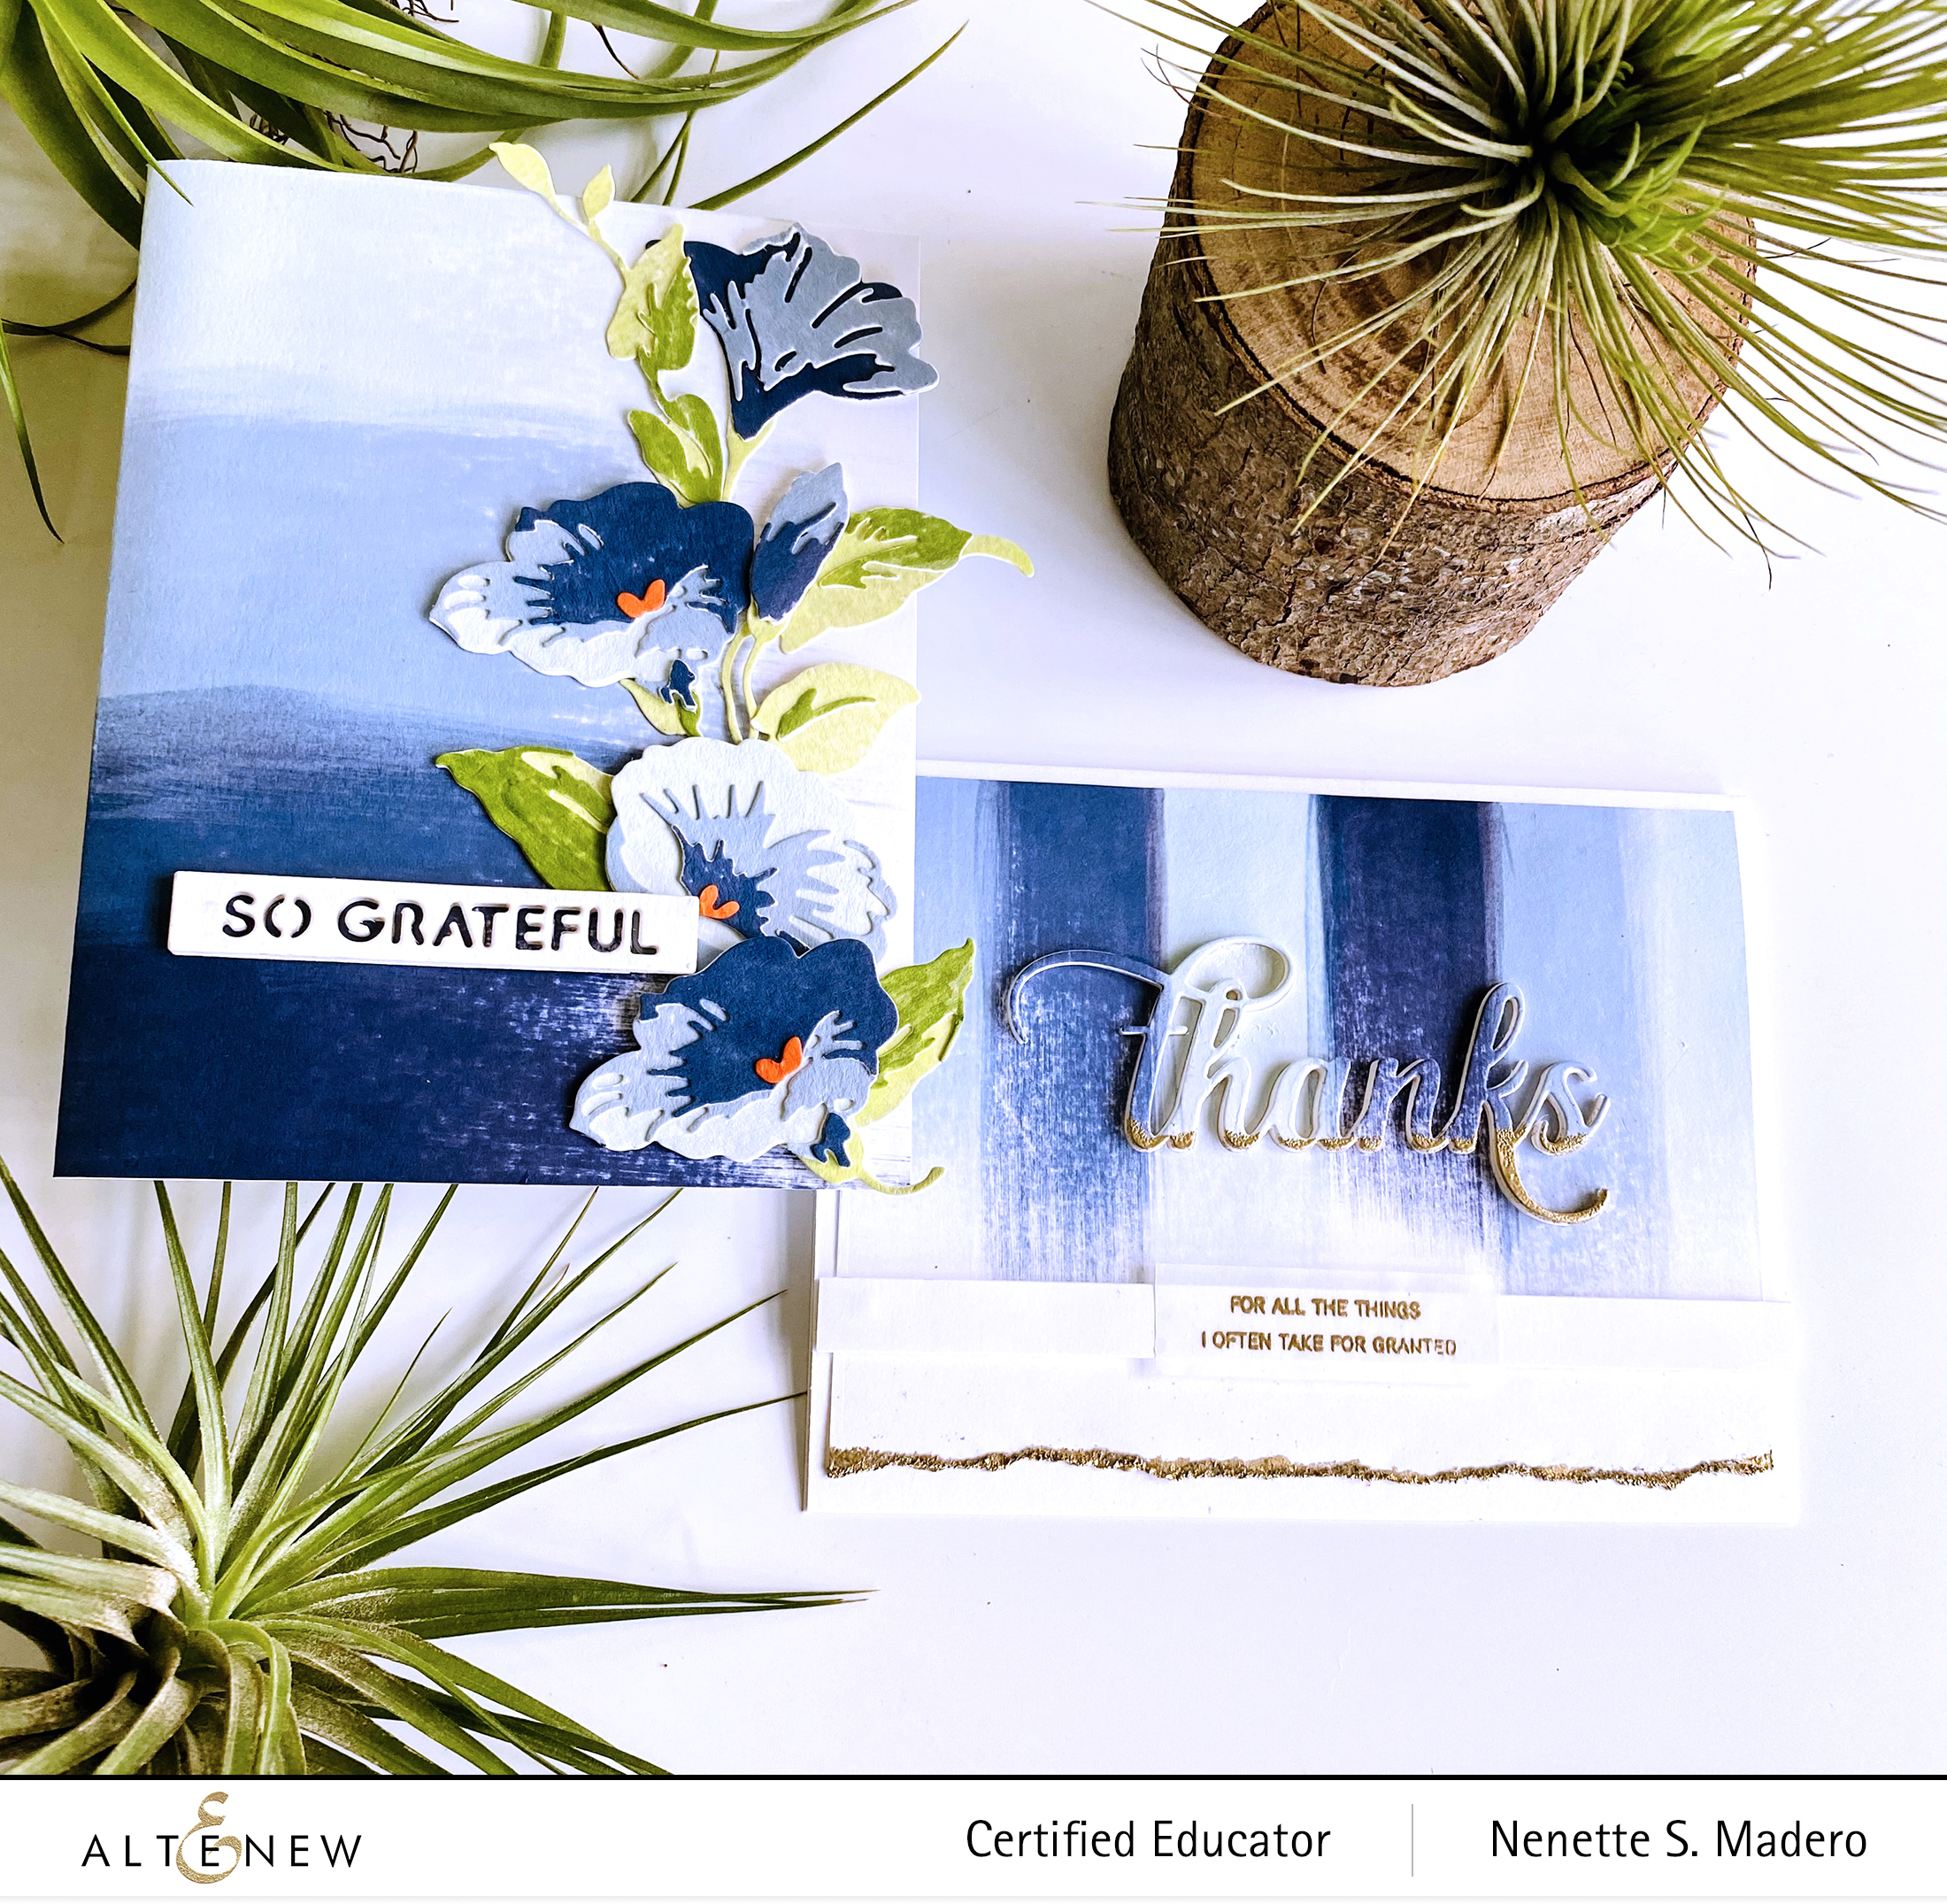
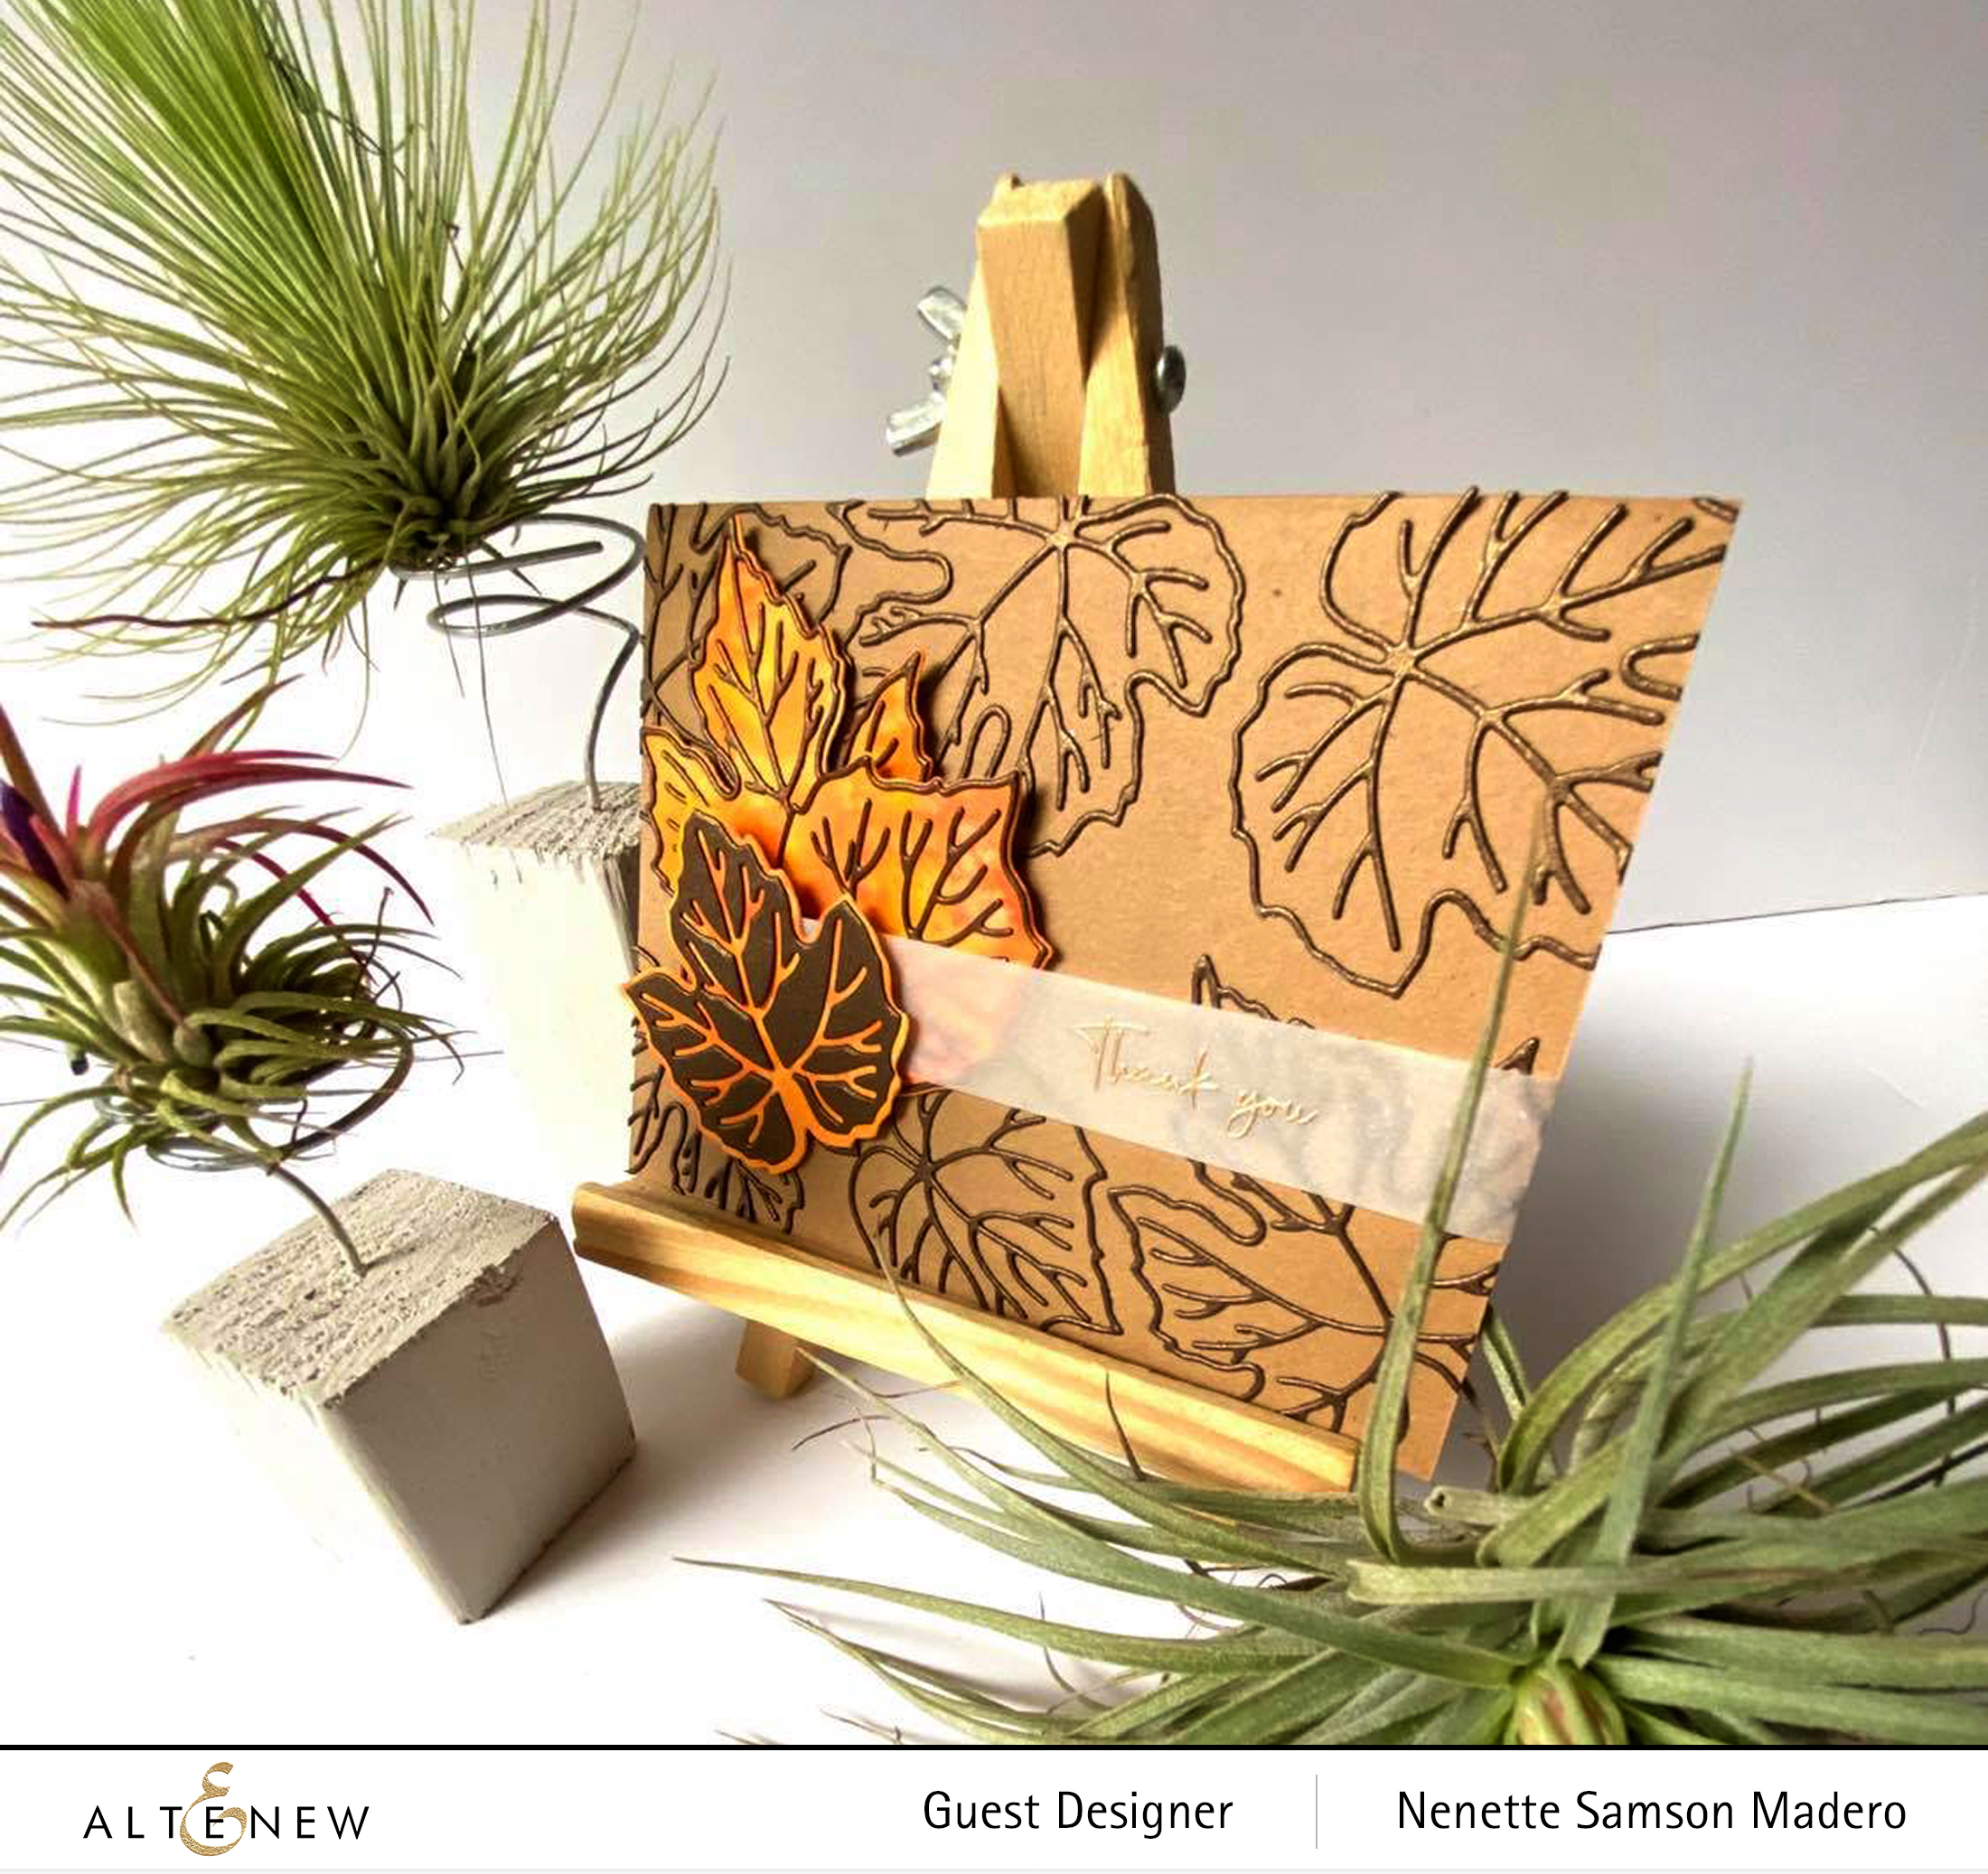
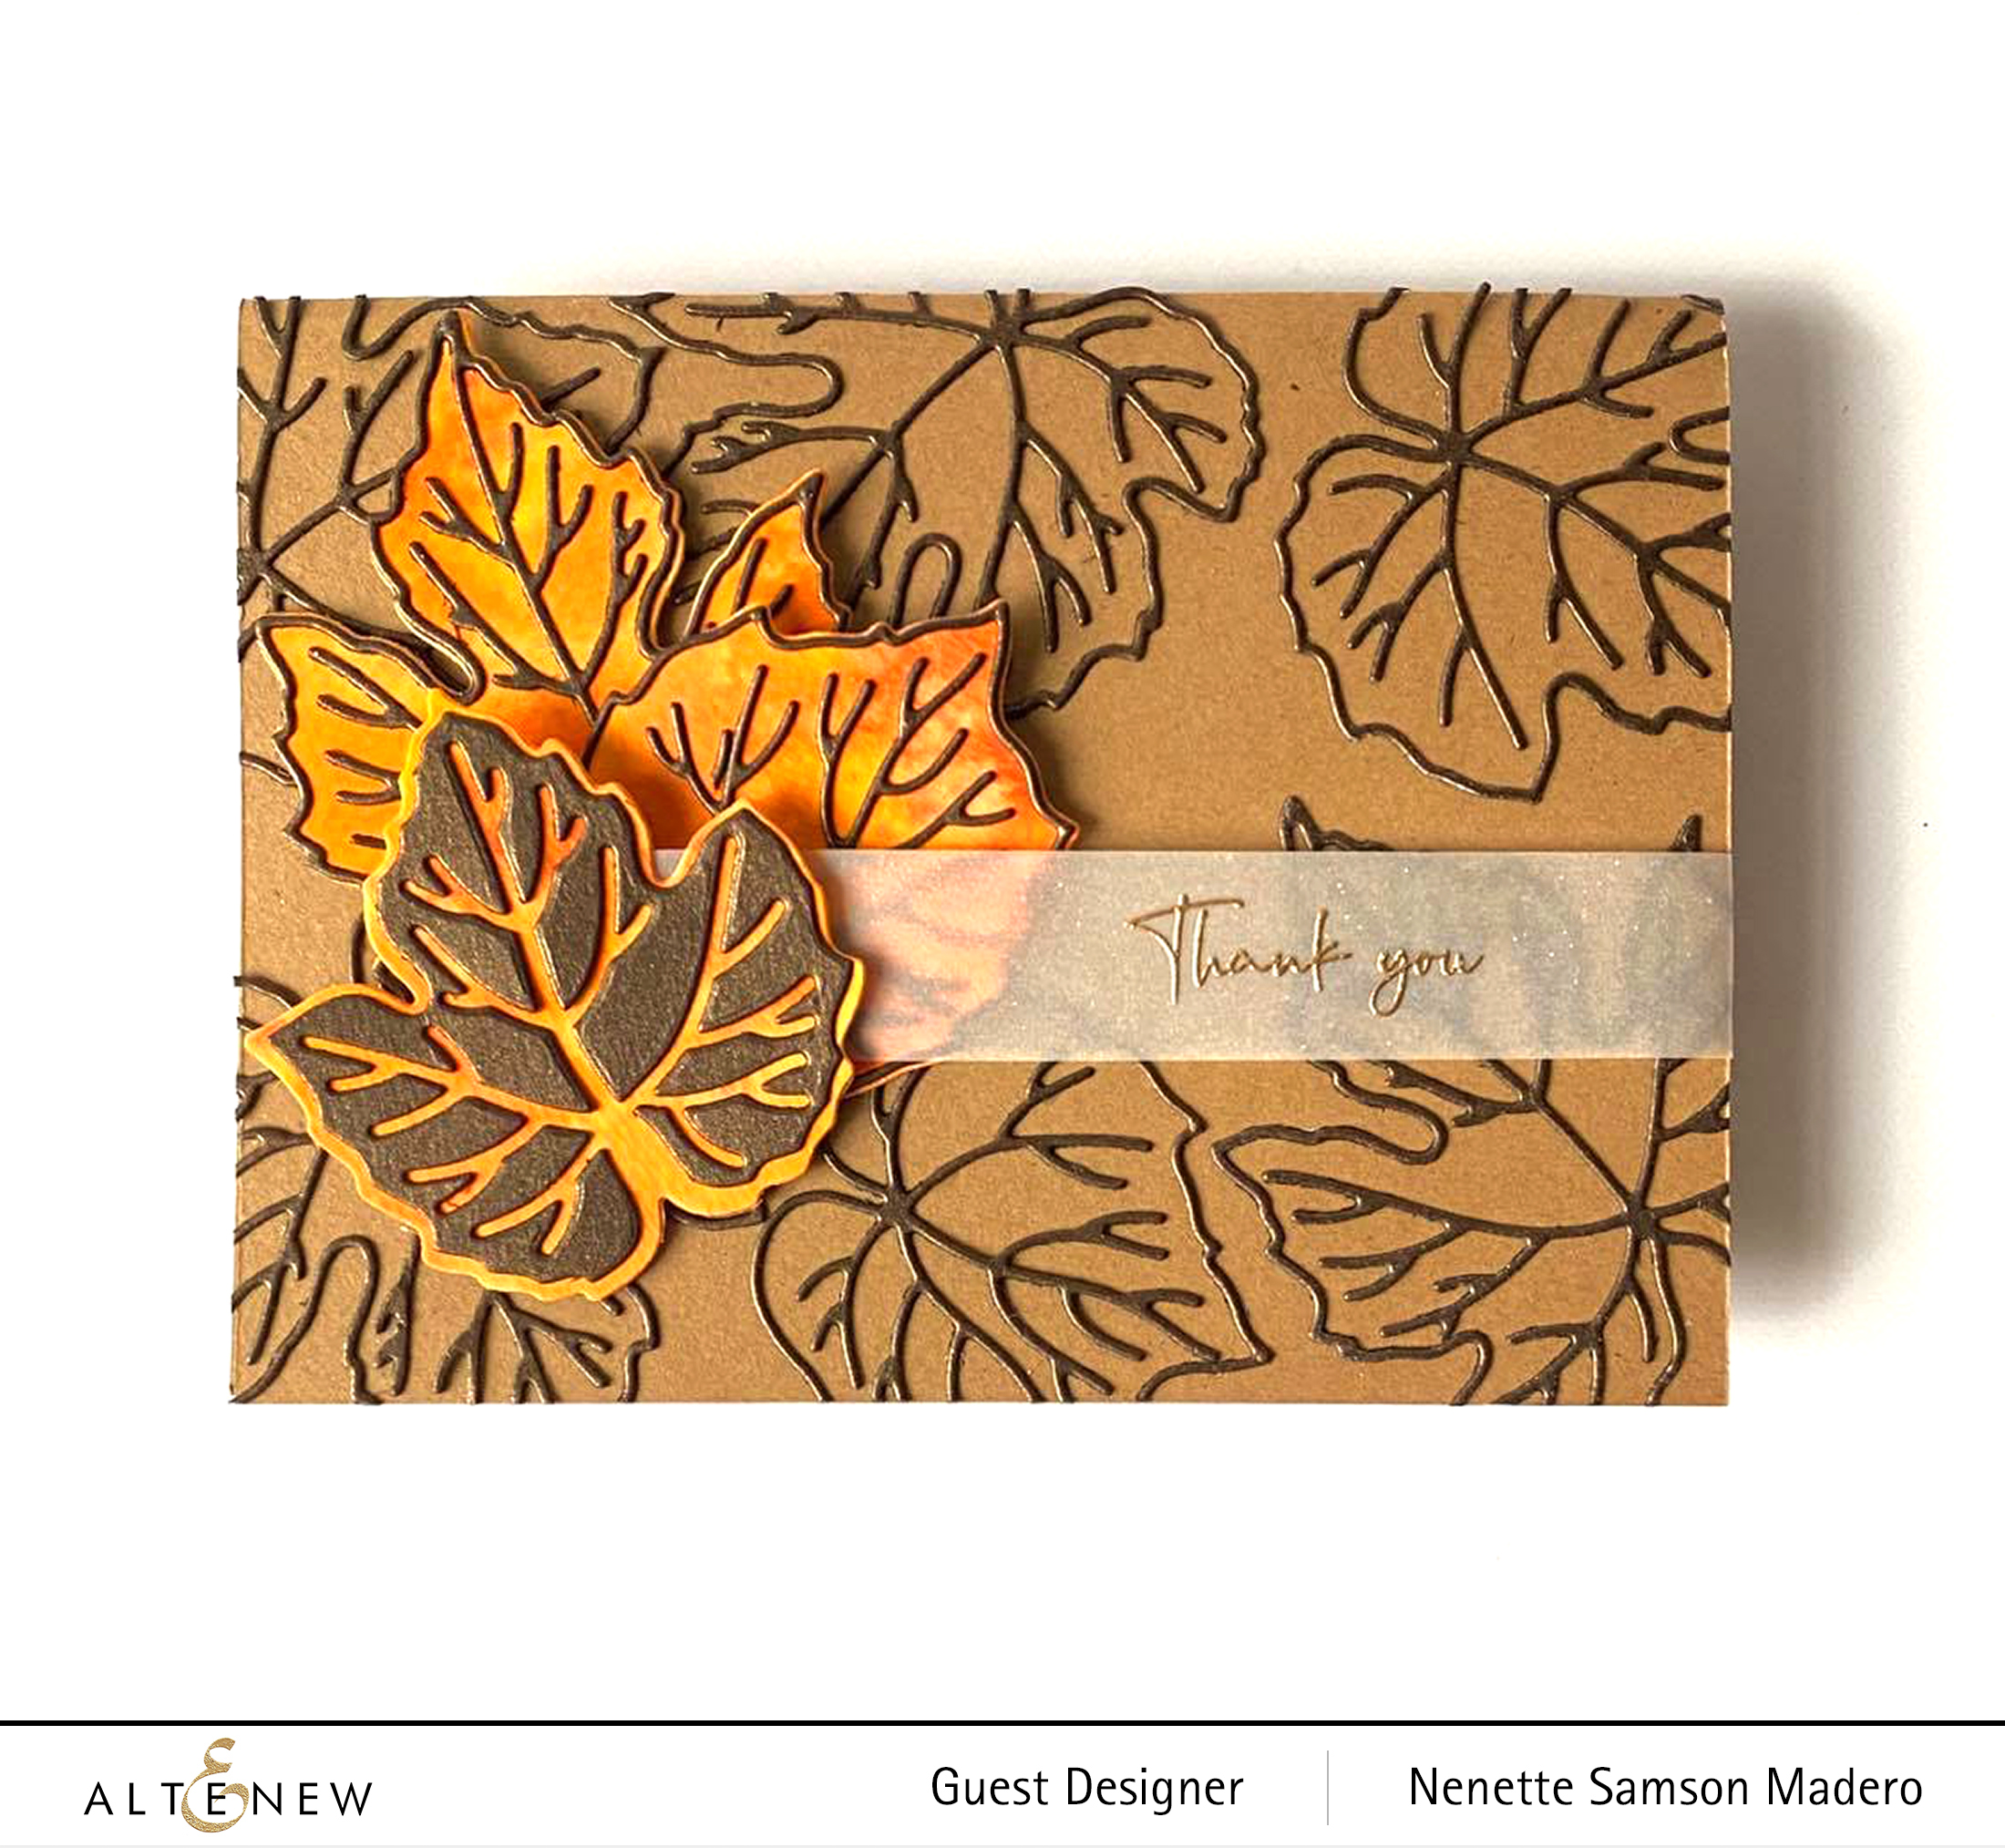
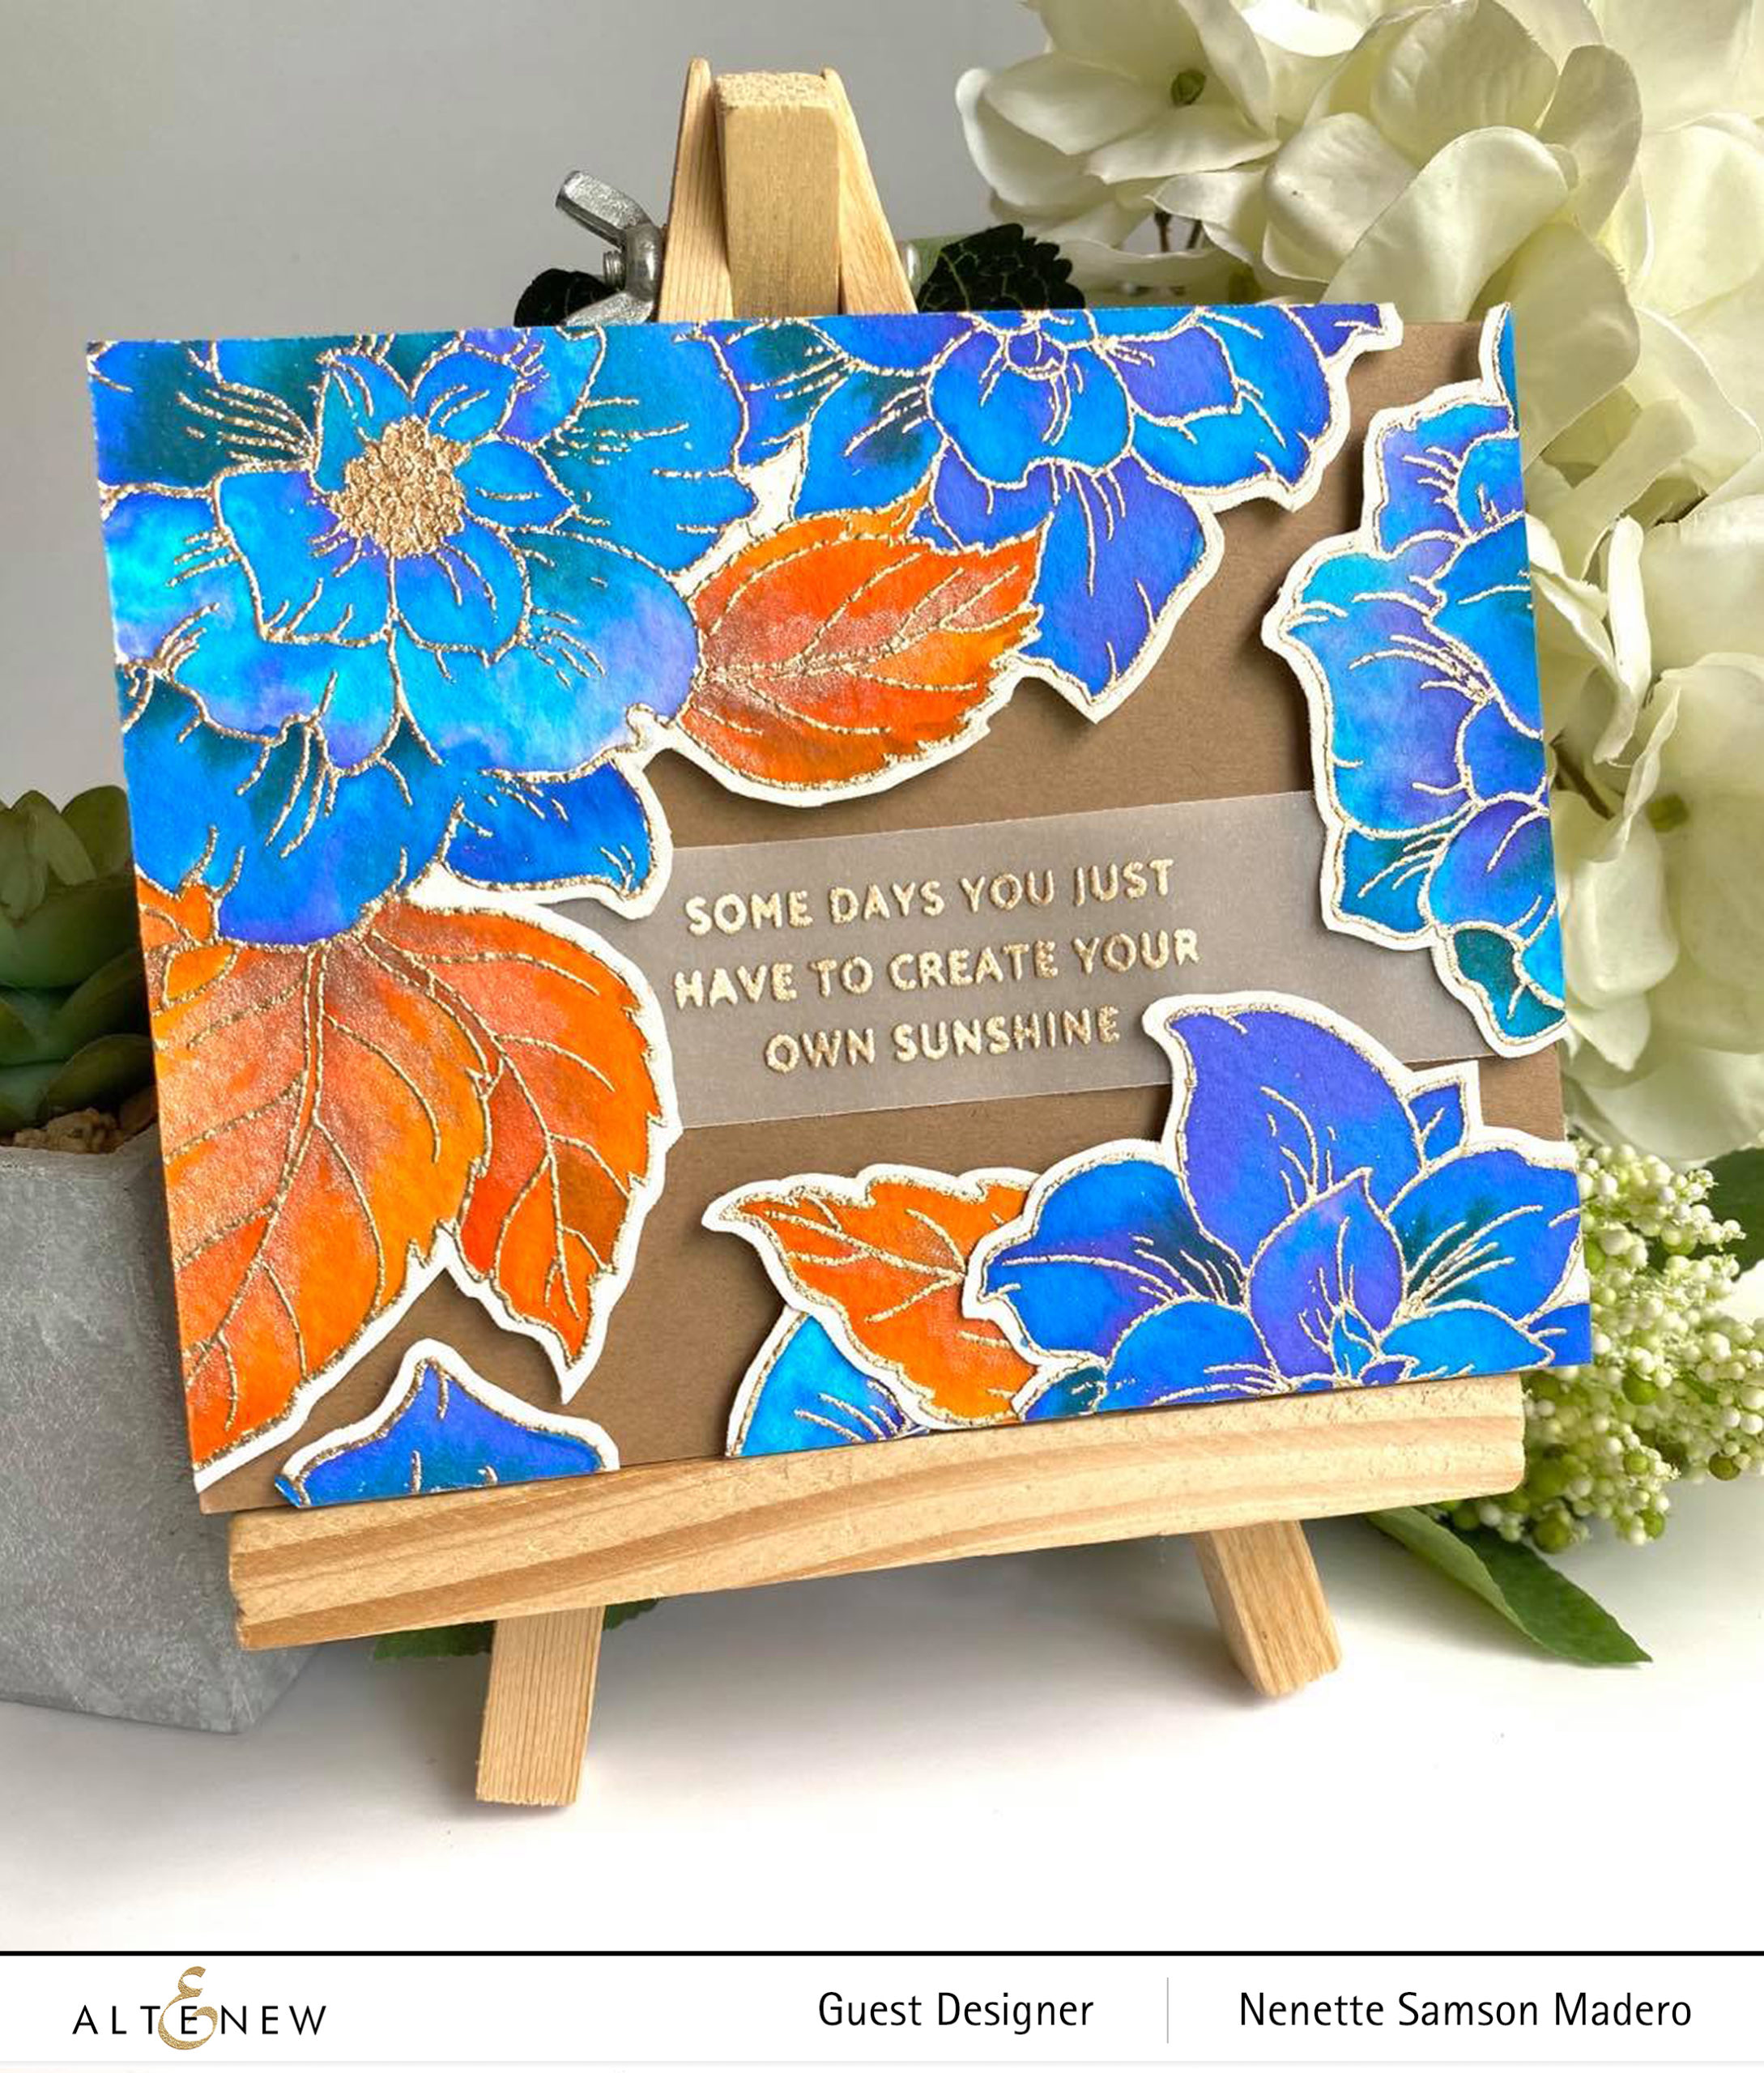
DO STUFF THAT MATTERS


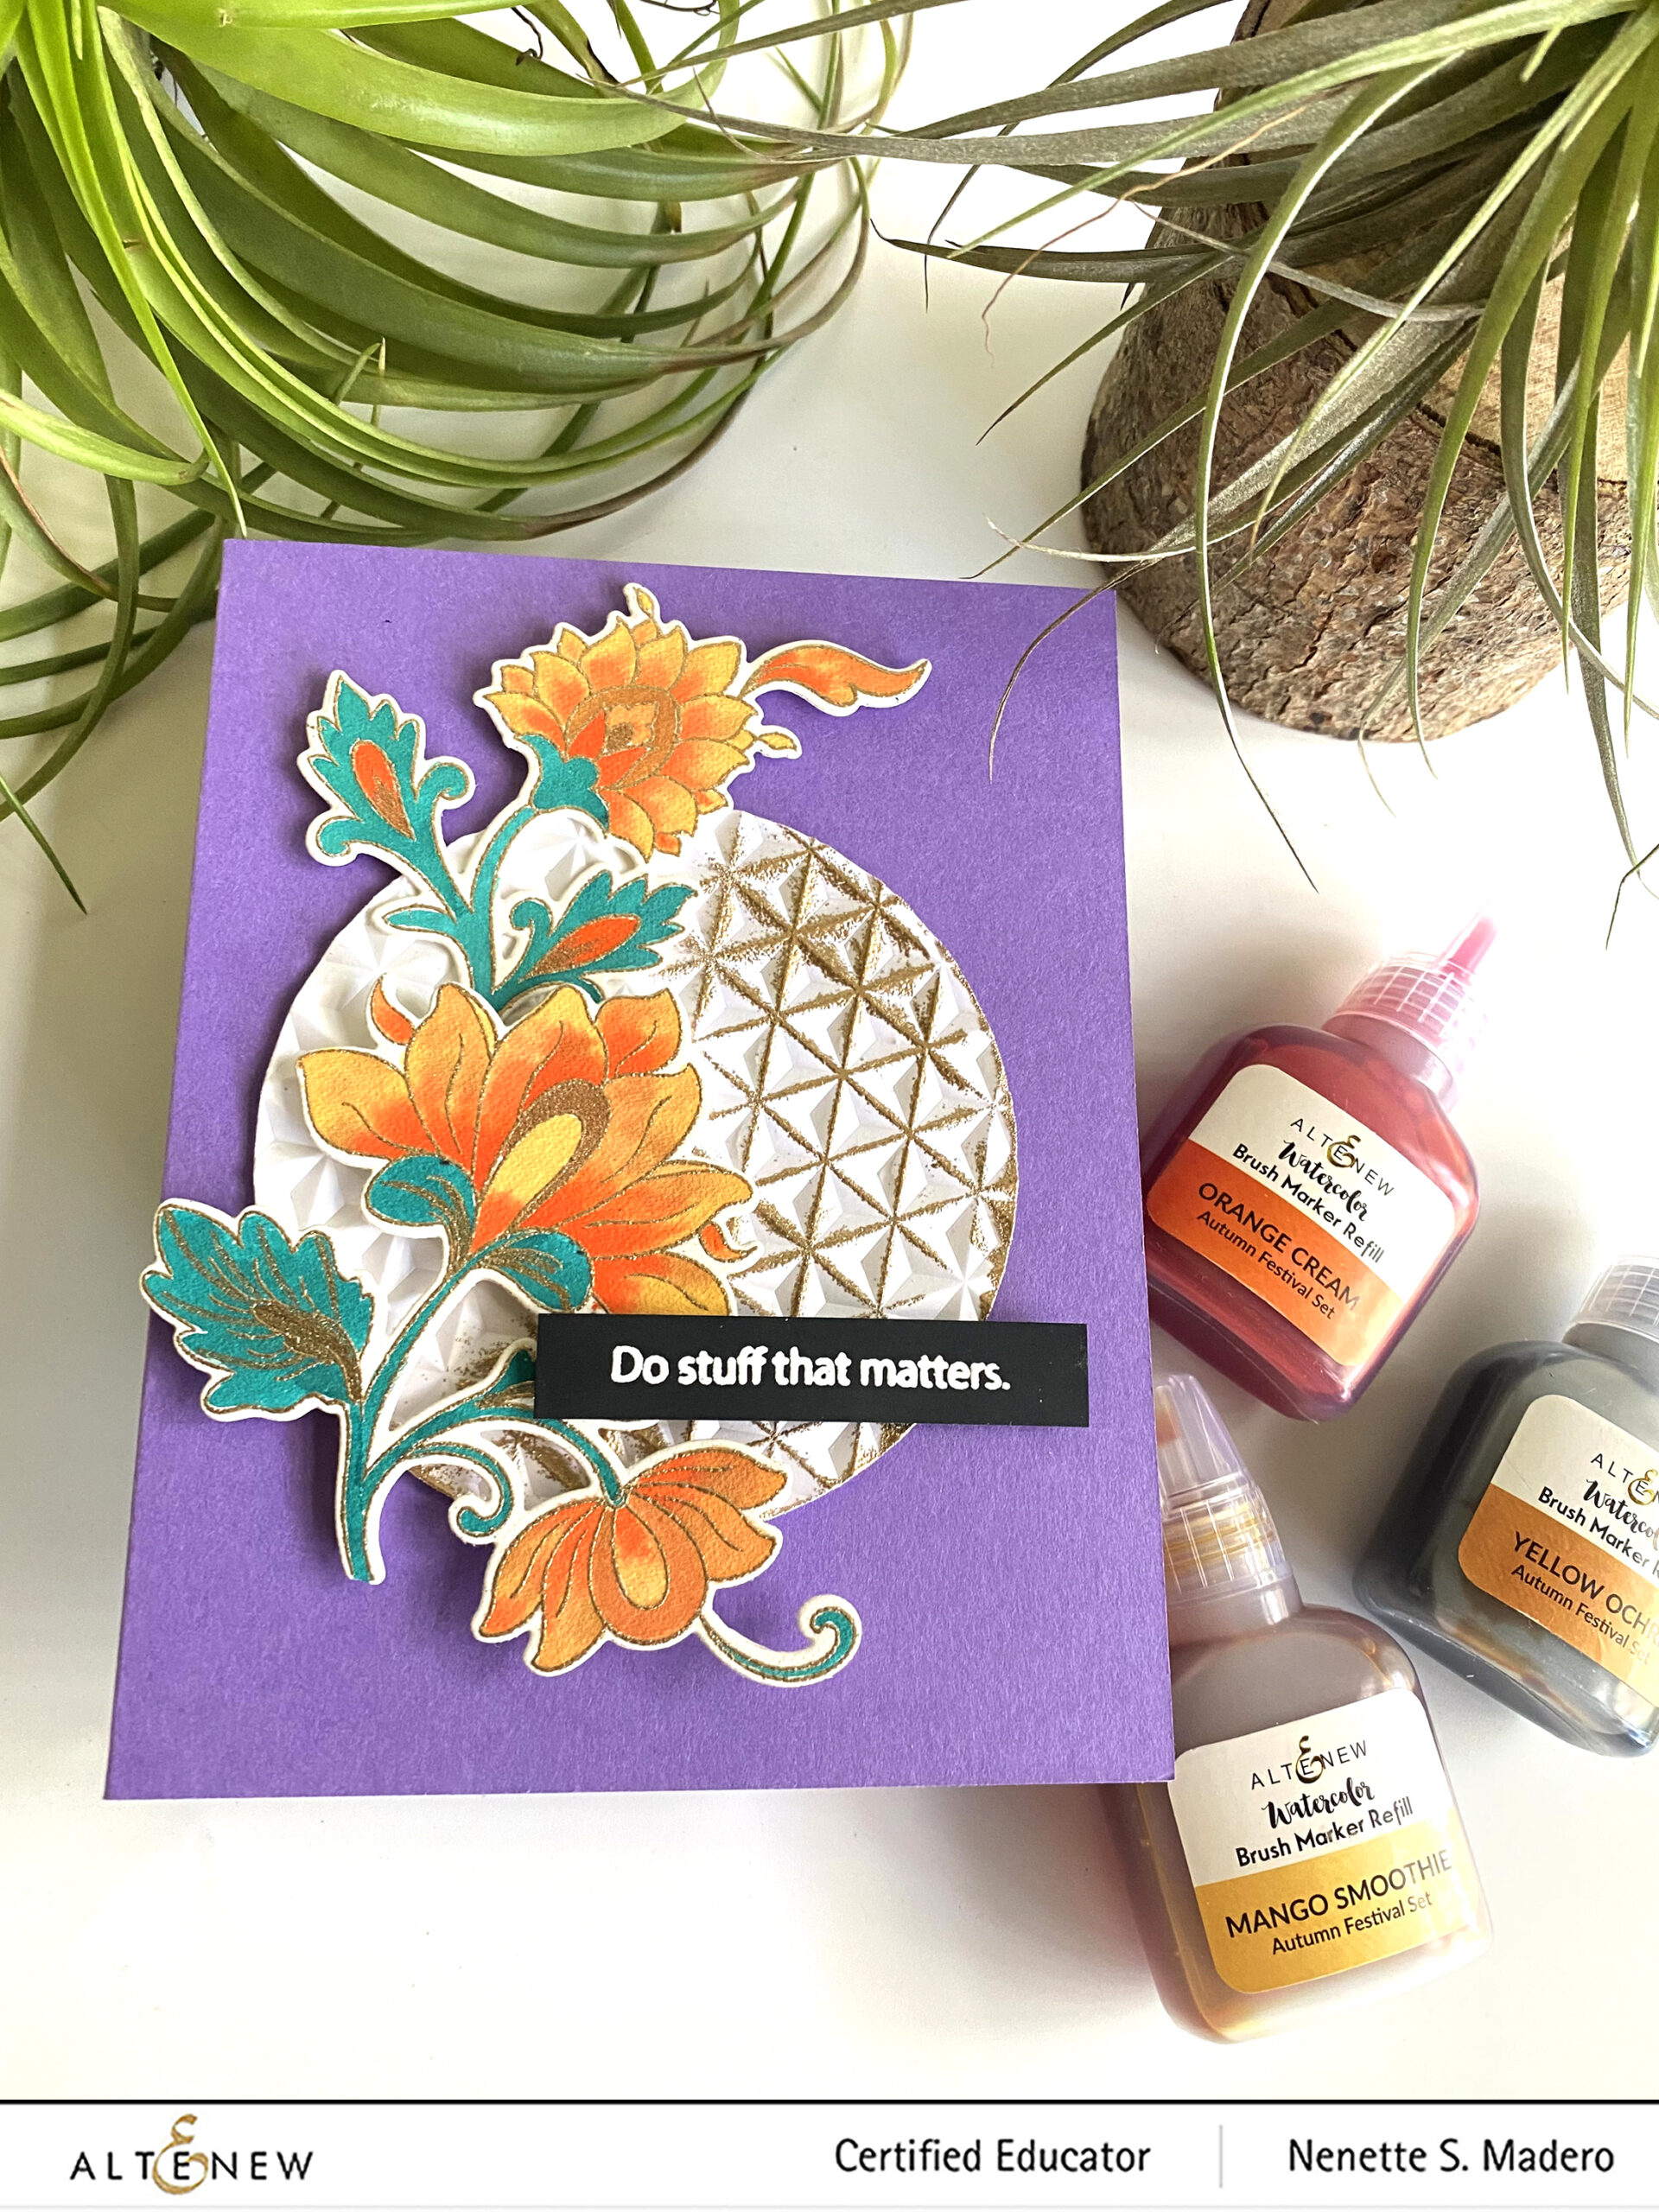
MATERIALS: PERSIAN MOTIFS STAMP AND DIE, HELLO HYDRANGEA STAMP SET, WATERCOLOR BRUSH MARKERS- MANGO SMOOTHIE, ORANGE CREAM, YELLOW OCHRE, LAGOON, EMERALD, WATERCOLOR PAPER, VERSARMARK INK, ROSE GOLD EMBOSSING POWDER, PURE WHITE EMBOSSING POWDER, METALLIC WATERCOLOR PAN SET, DIAMOND STARS 3D EMBOSSING FOLDER, CARDSTOCKS, foam squares, Versamark ink

STEPS:

  1. Prep the paper with the antistatic tool then stamp and emboss the images from the Persian Motifs Stamp.
  2. Add more details using the Metallic Watercolor pan set.
  3. Emboss white cardstock using the Diamond Stars embossing folder.
  4. Add Versamark Ink to the embossed parts and emboss with Rose Gold embossing powder.
  5. Stamp the sentiment from the Hello Hydrangea stamp set with Versamark ink and emboss with Pure White embossing powder.
  6. Assemble the card using foam squares for added dimension.

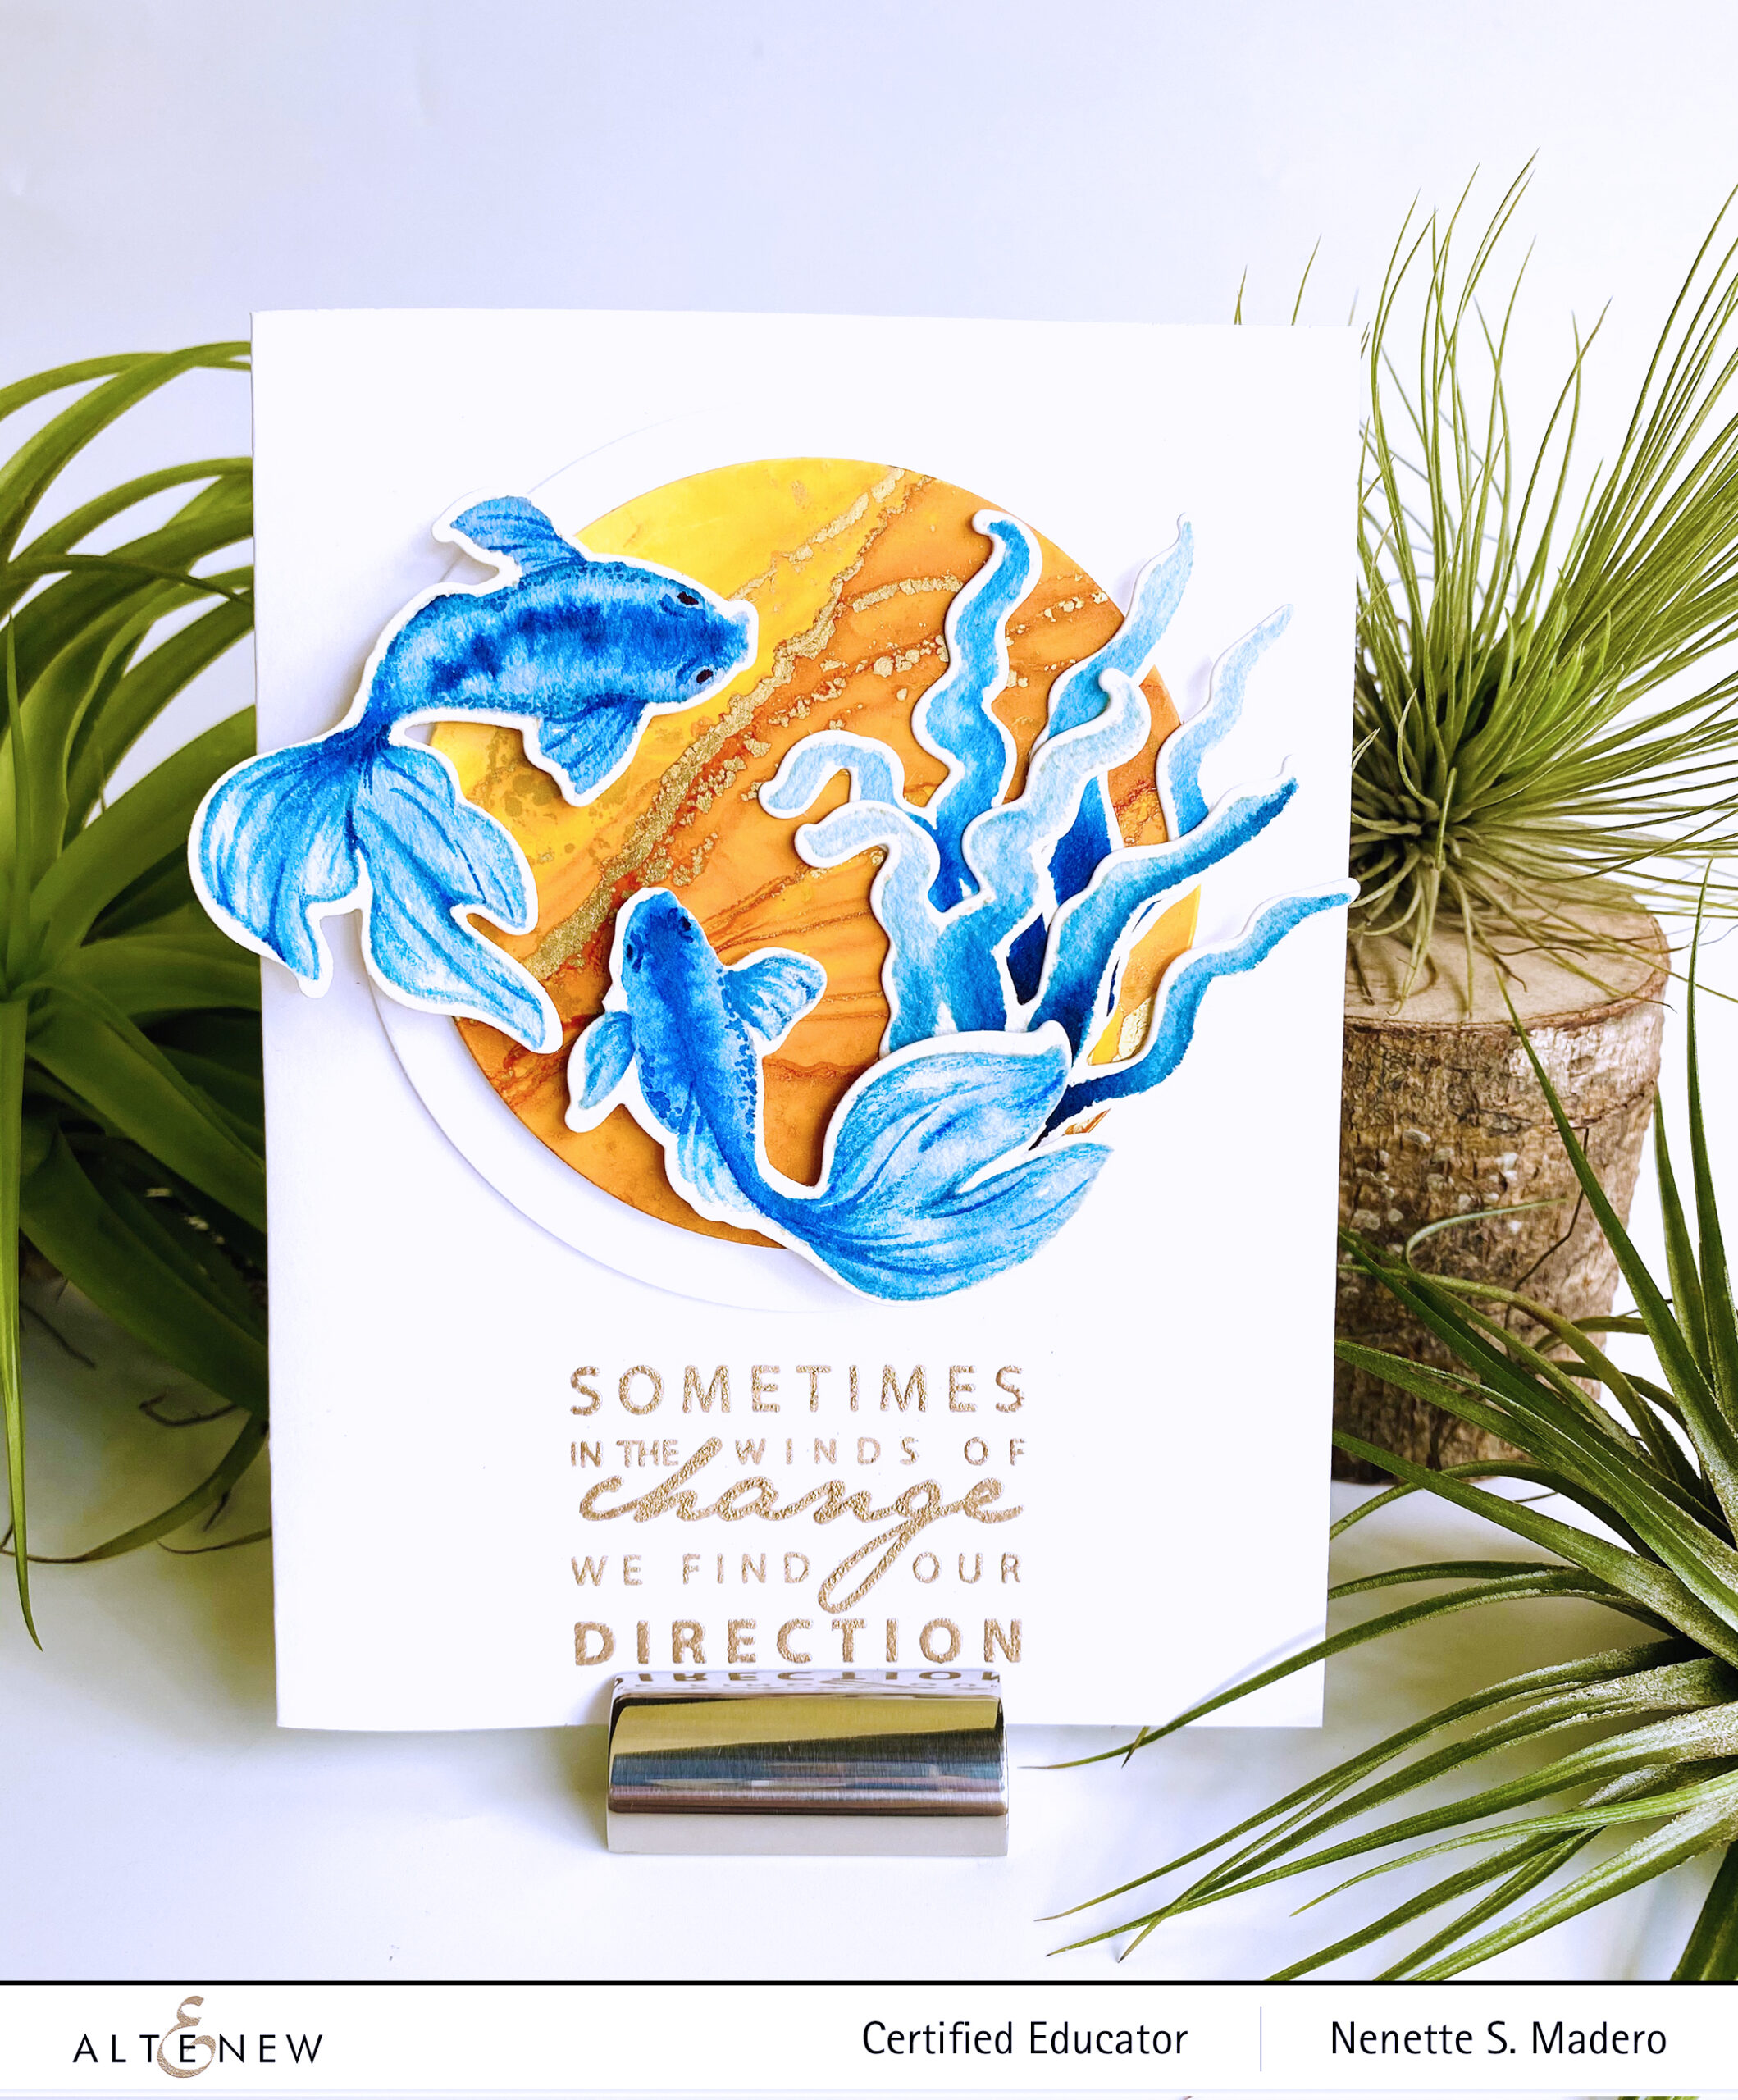
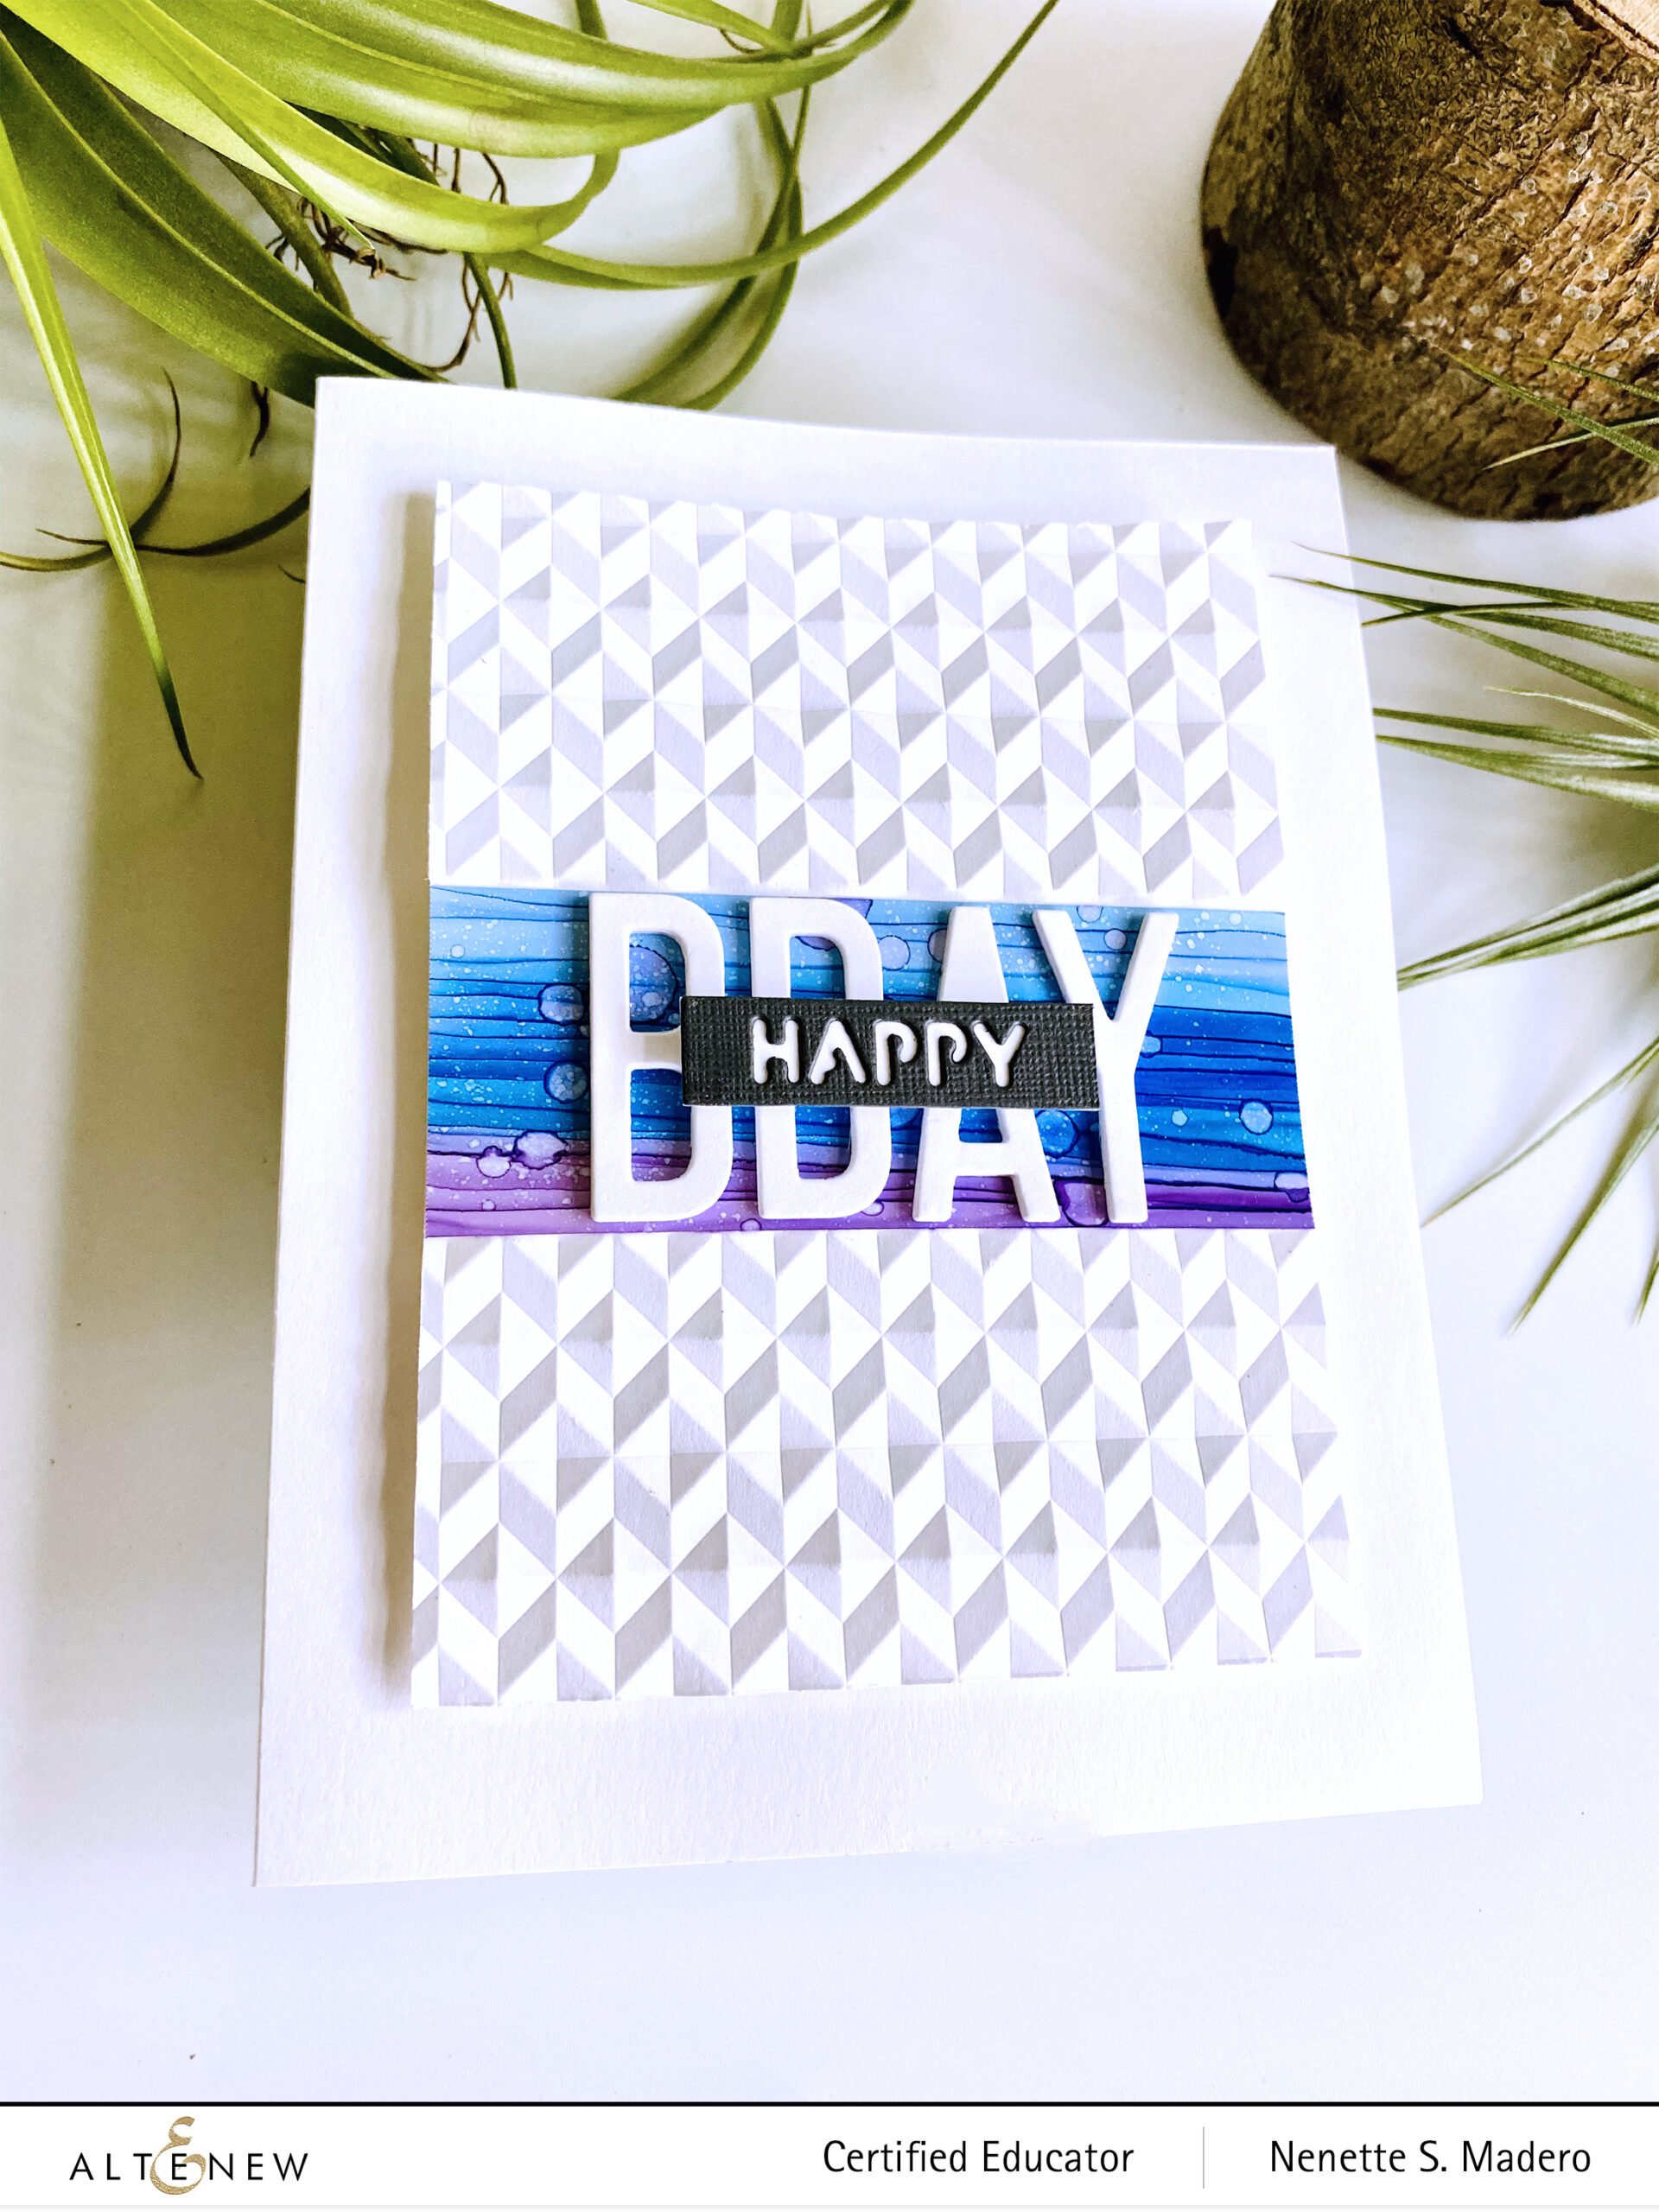
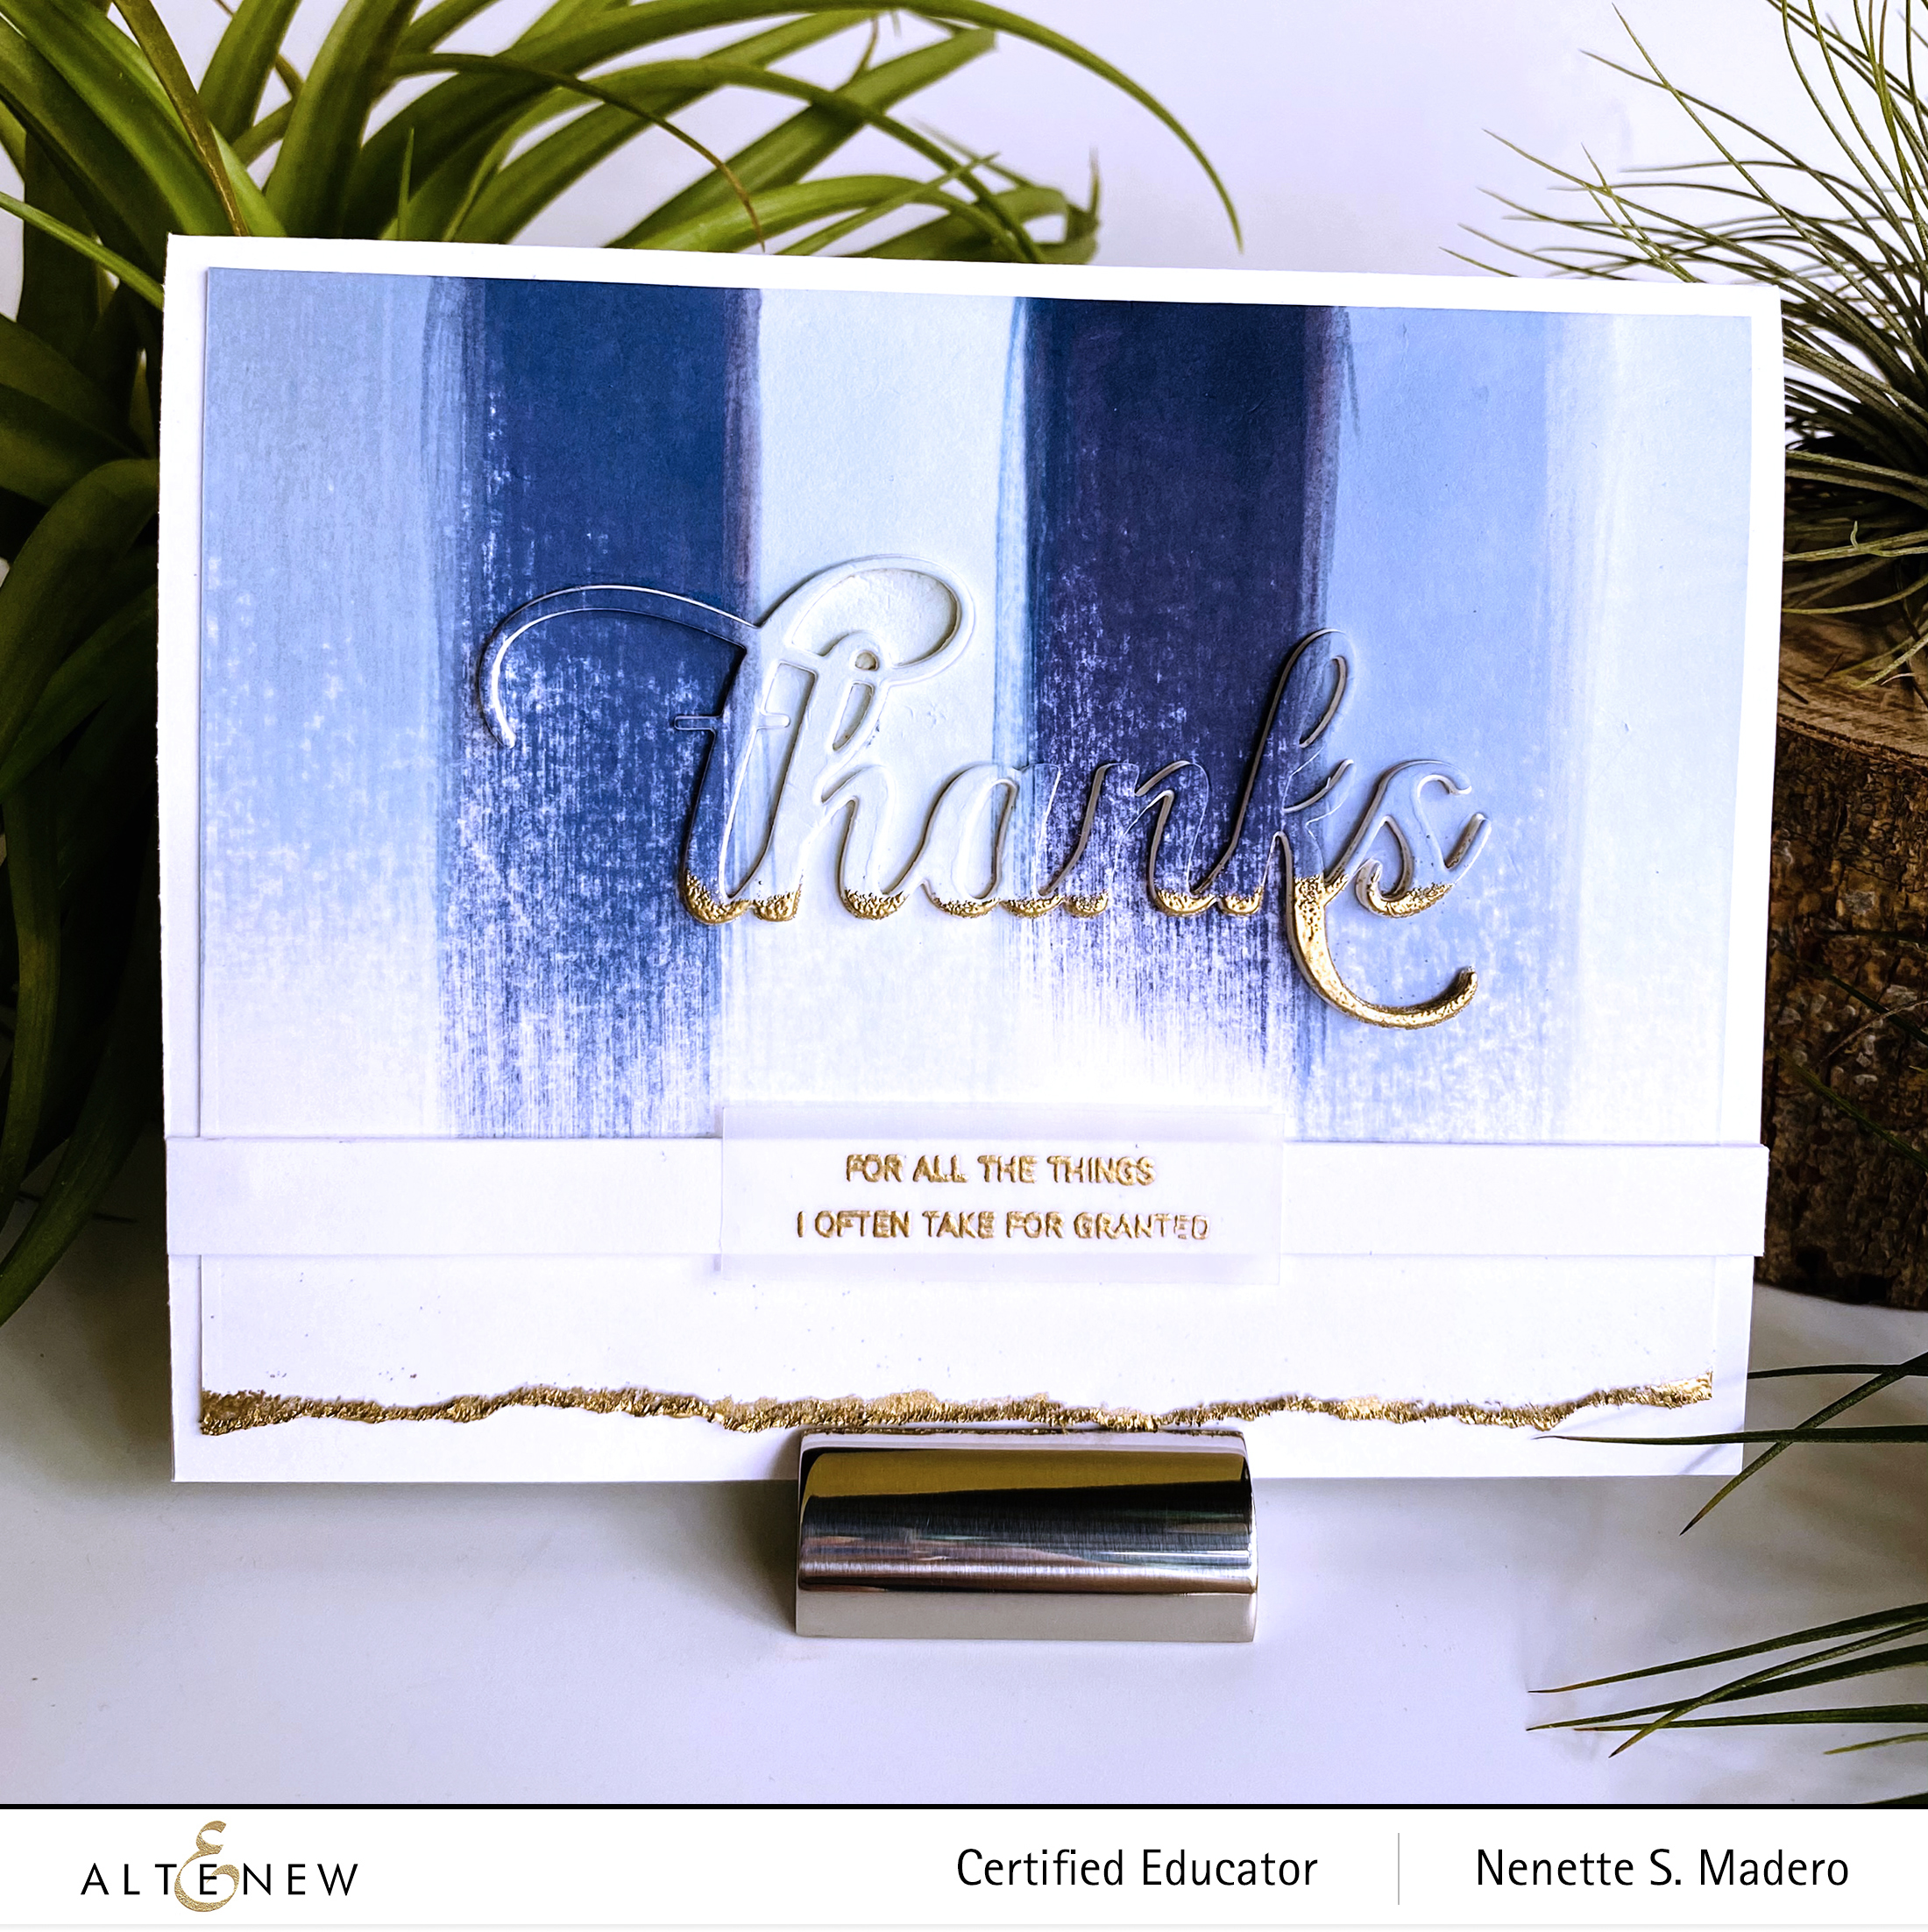
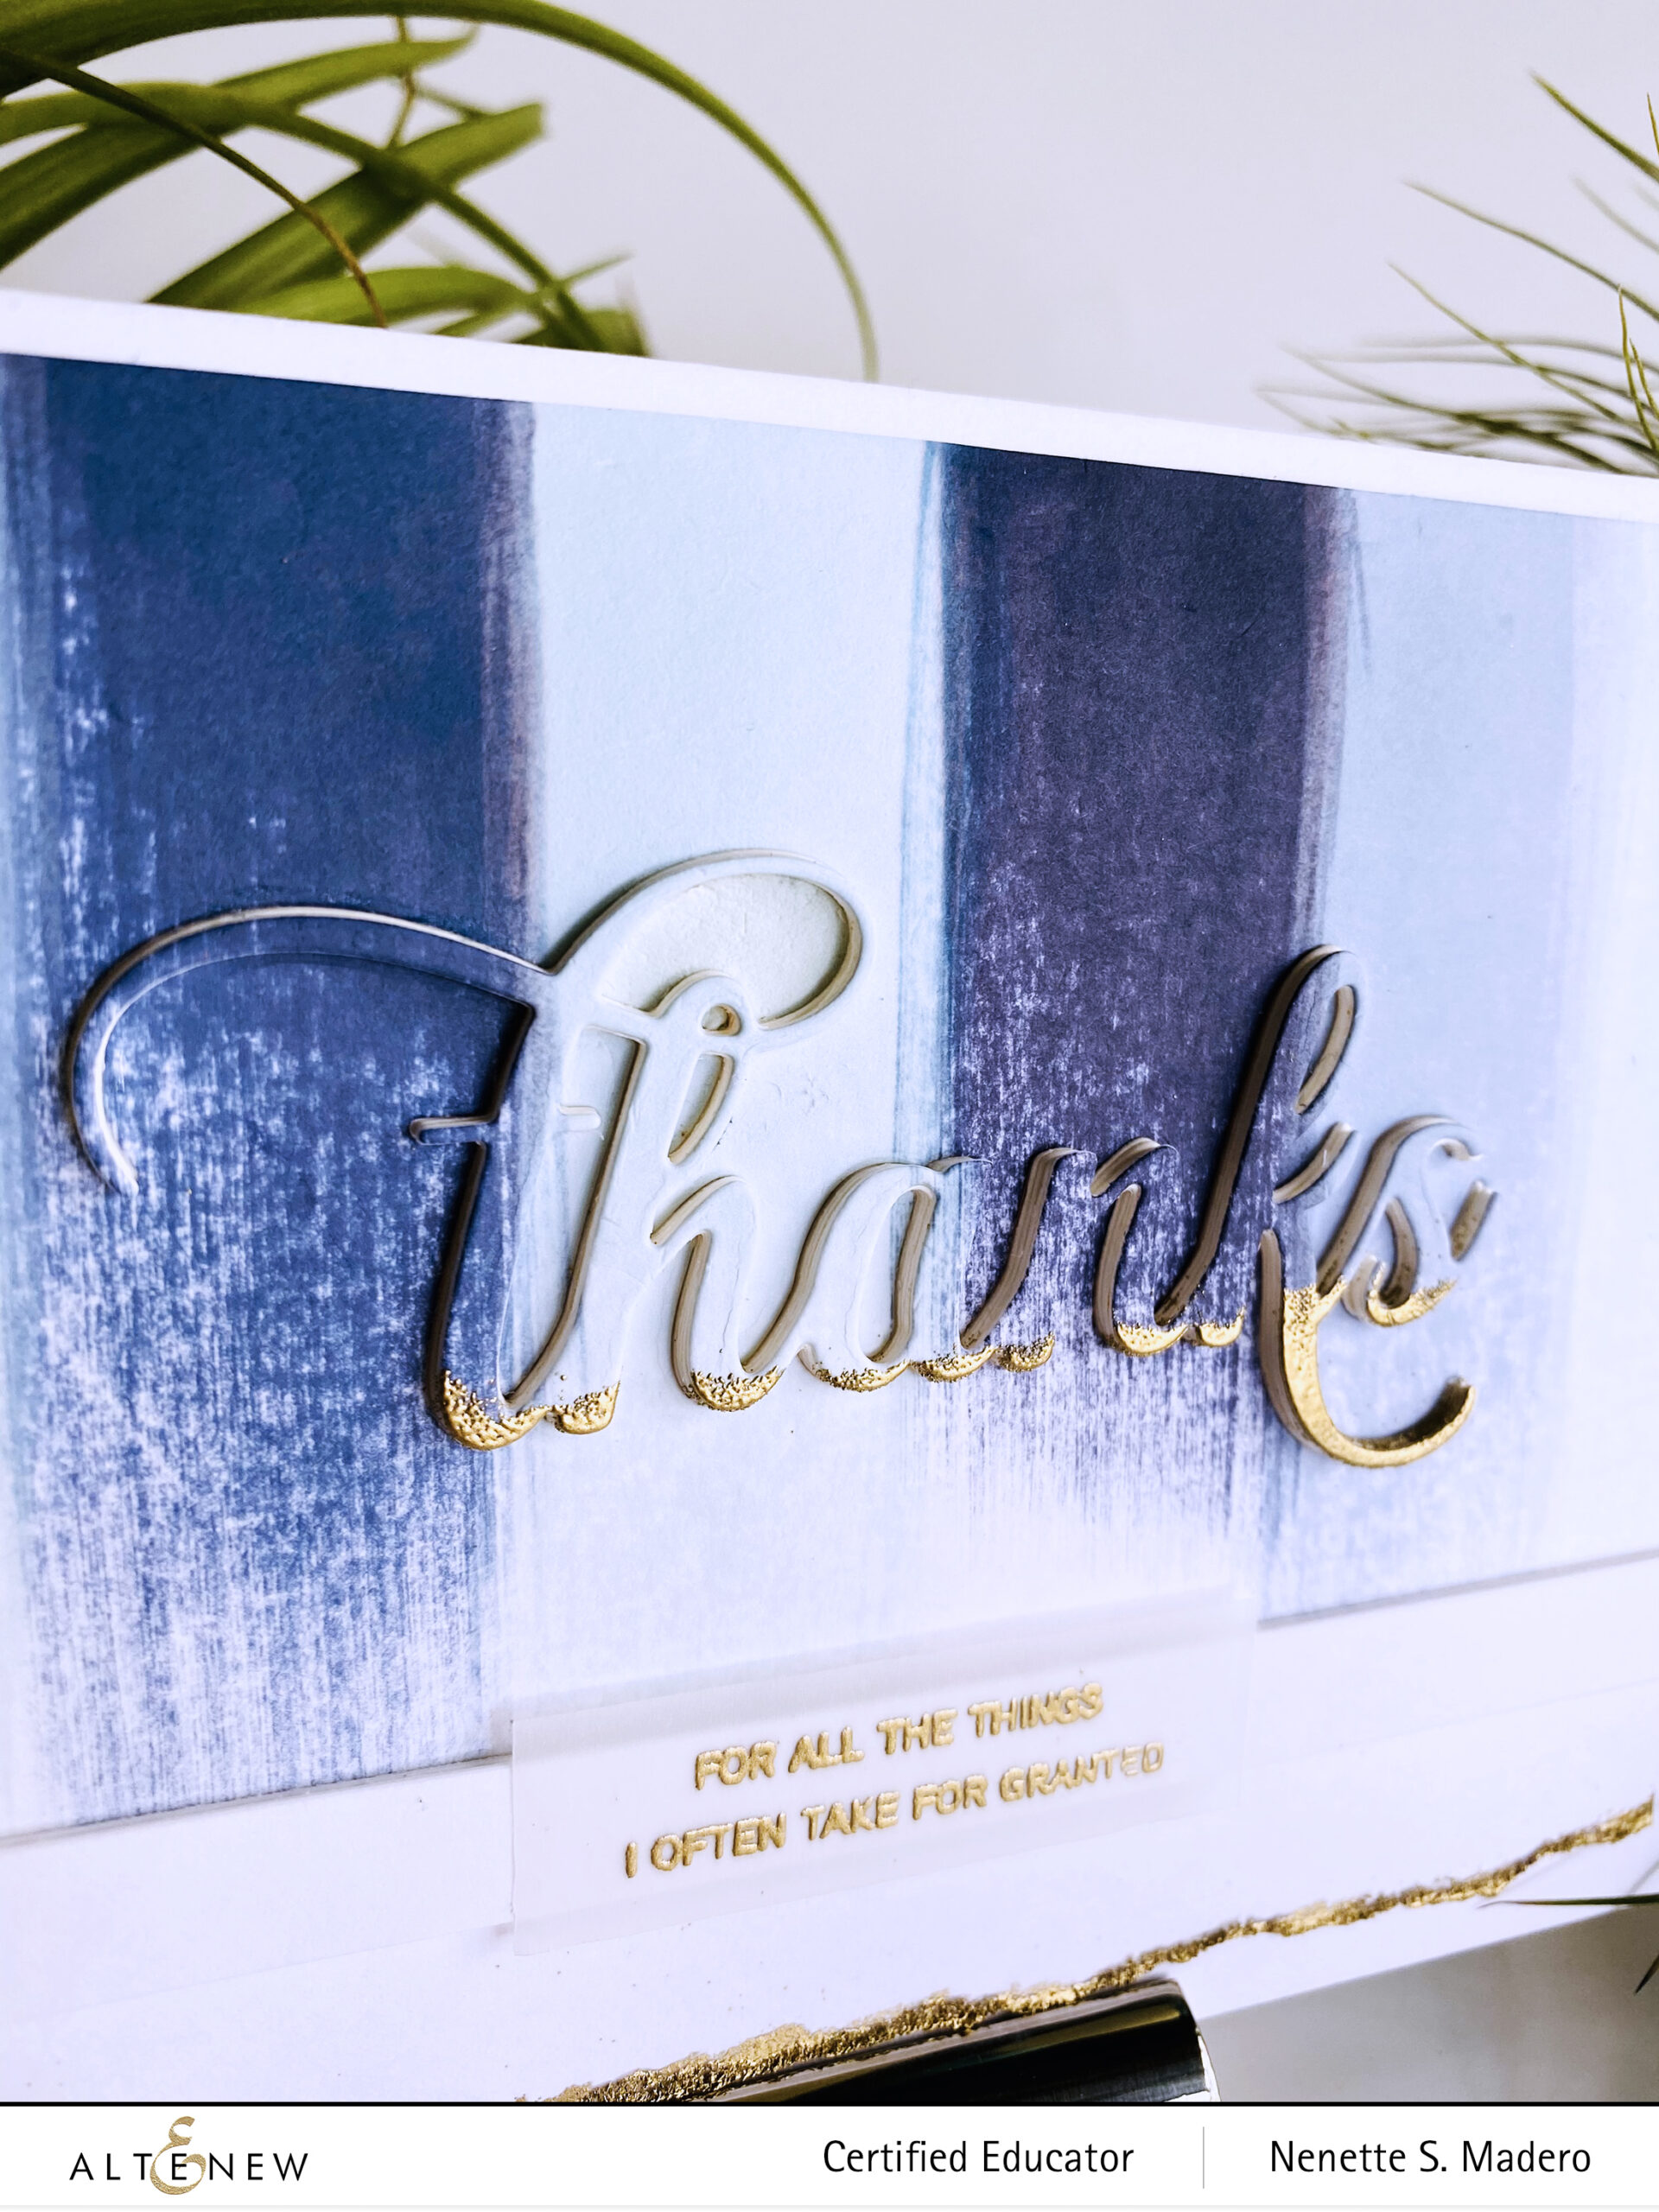
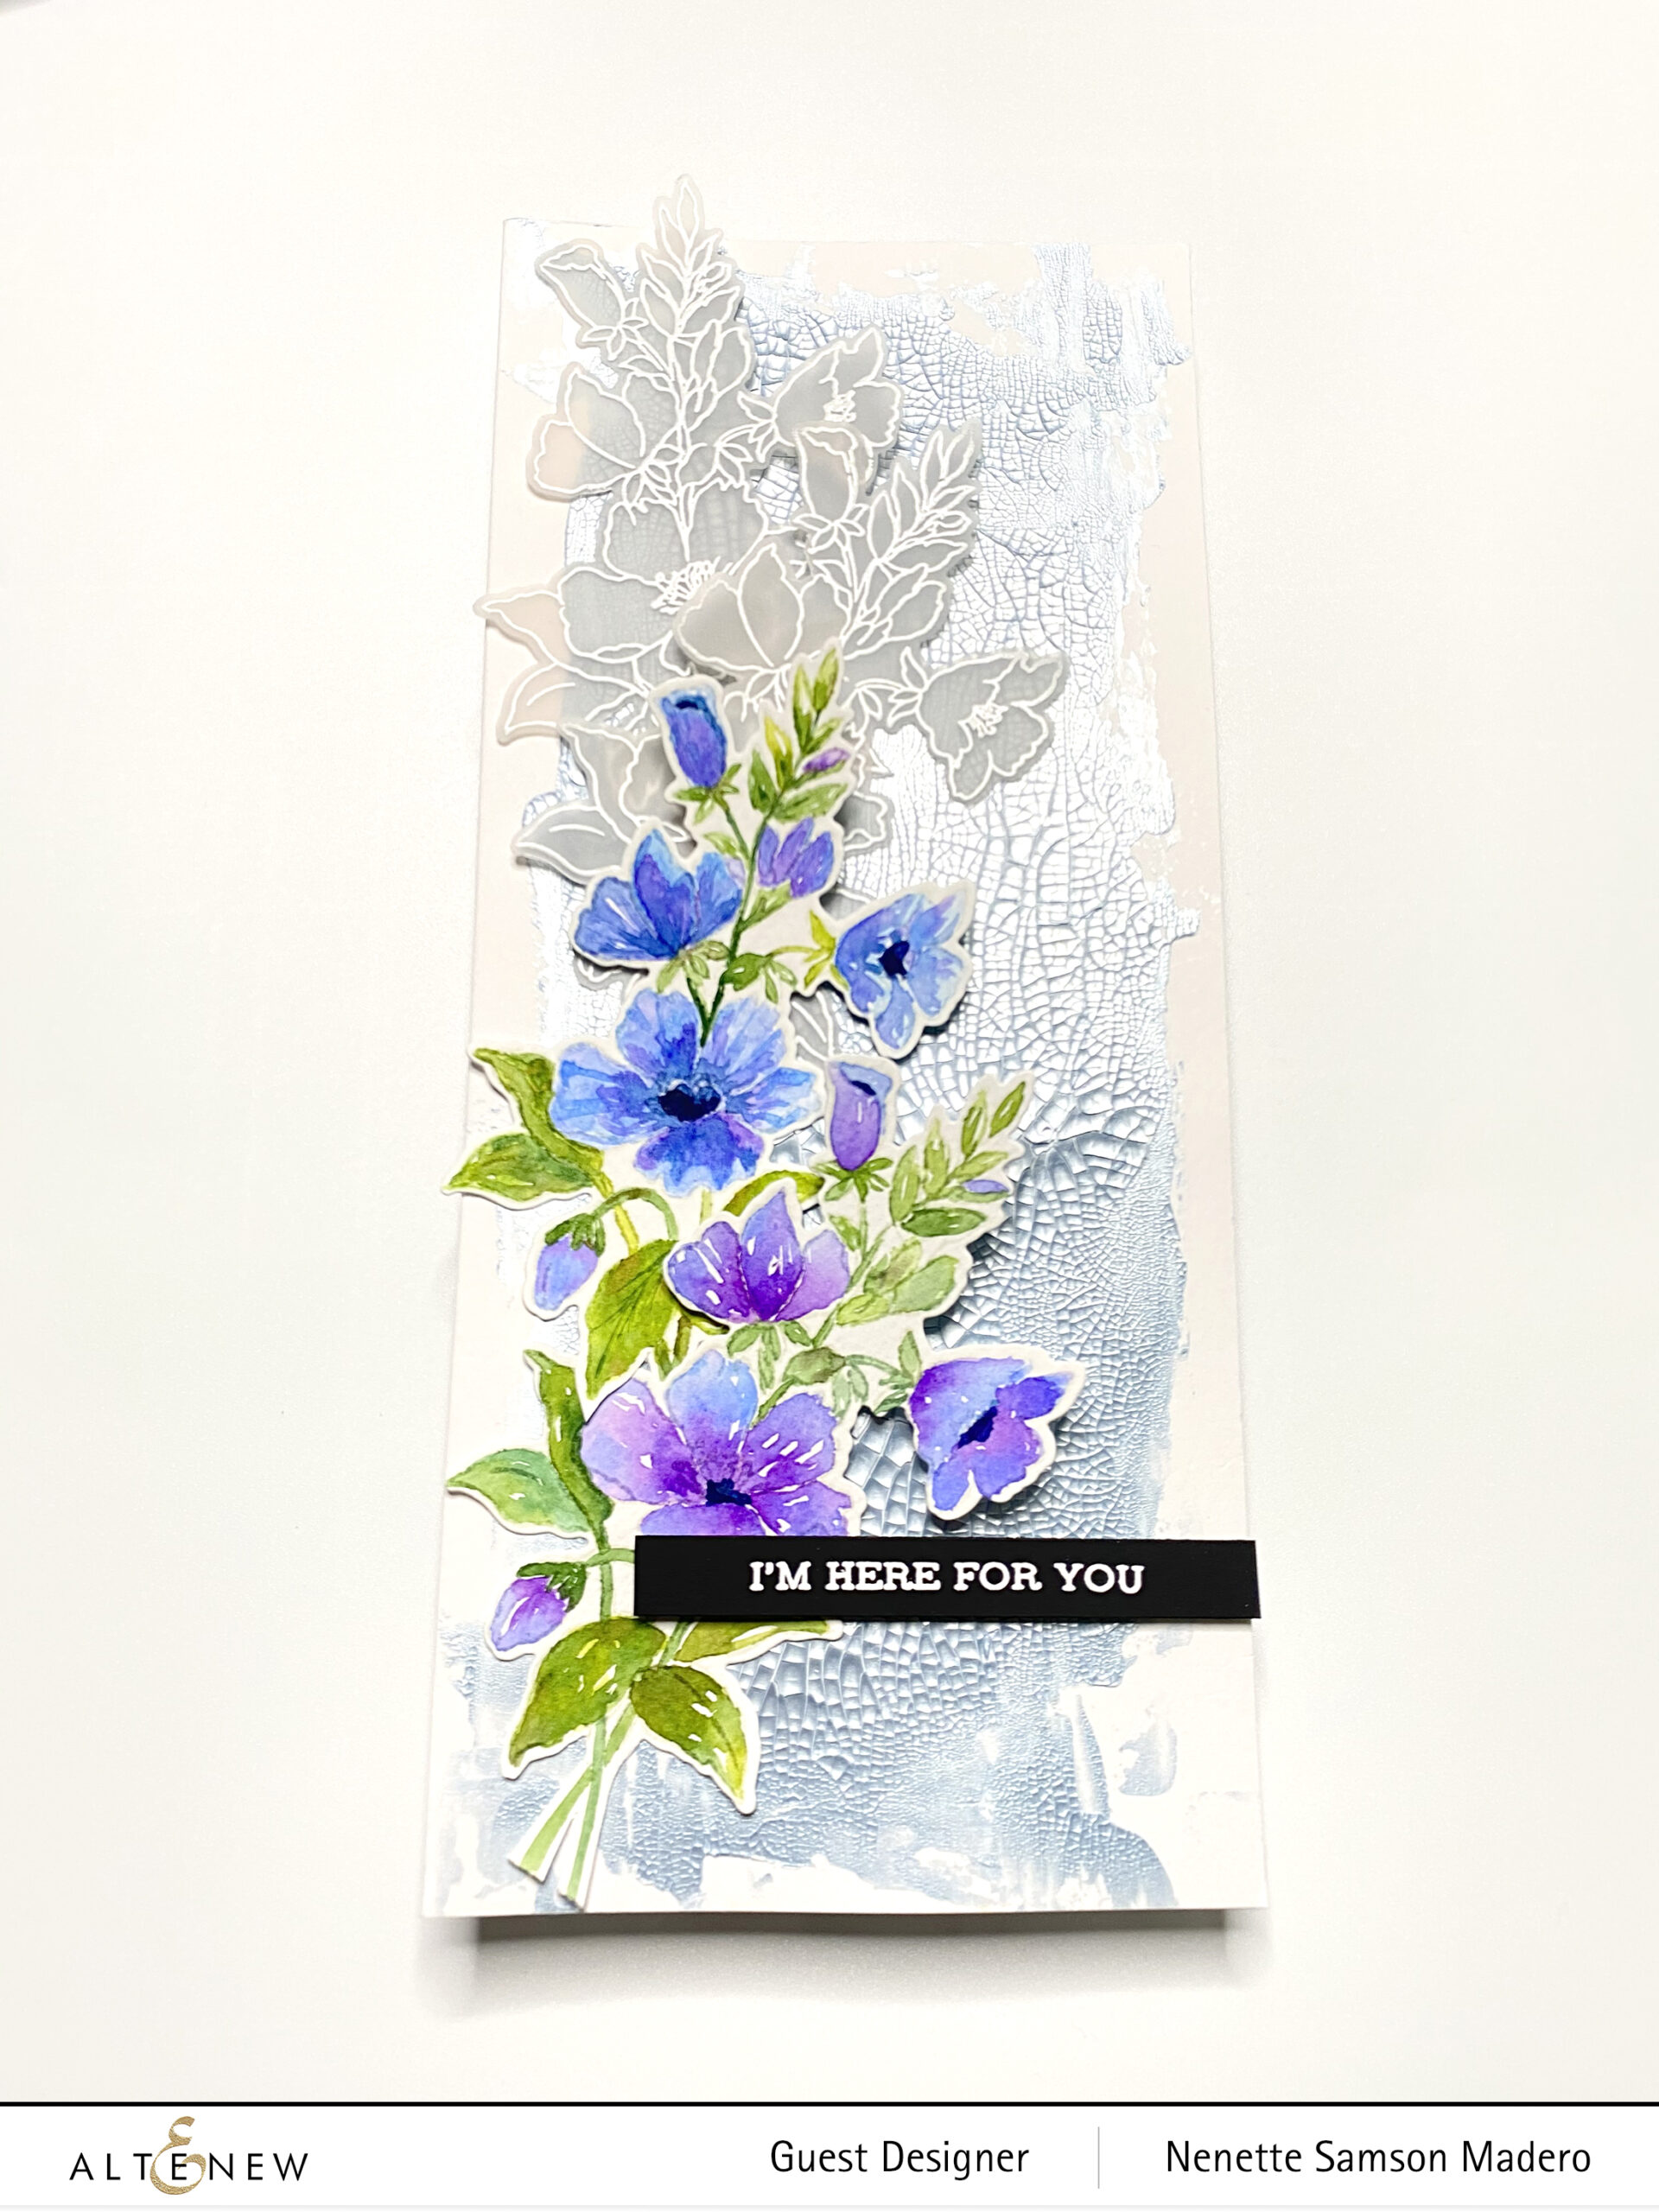
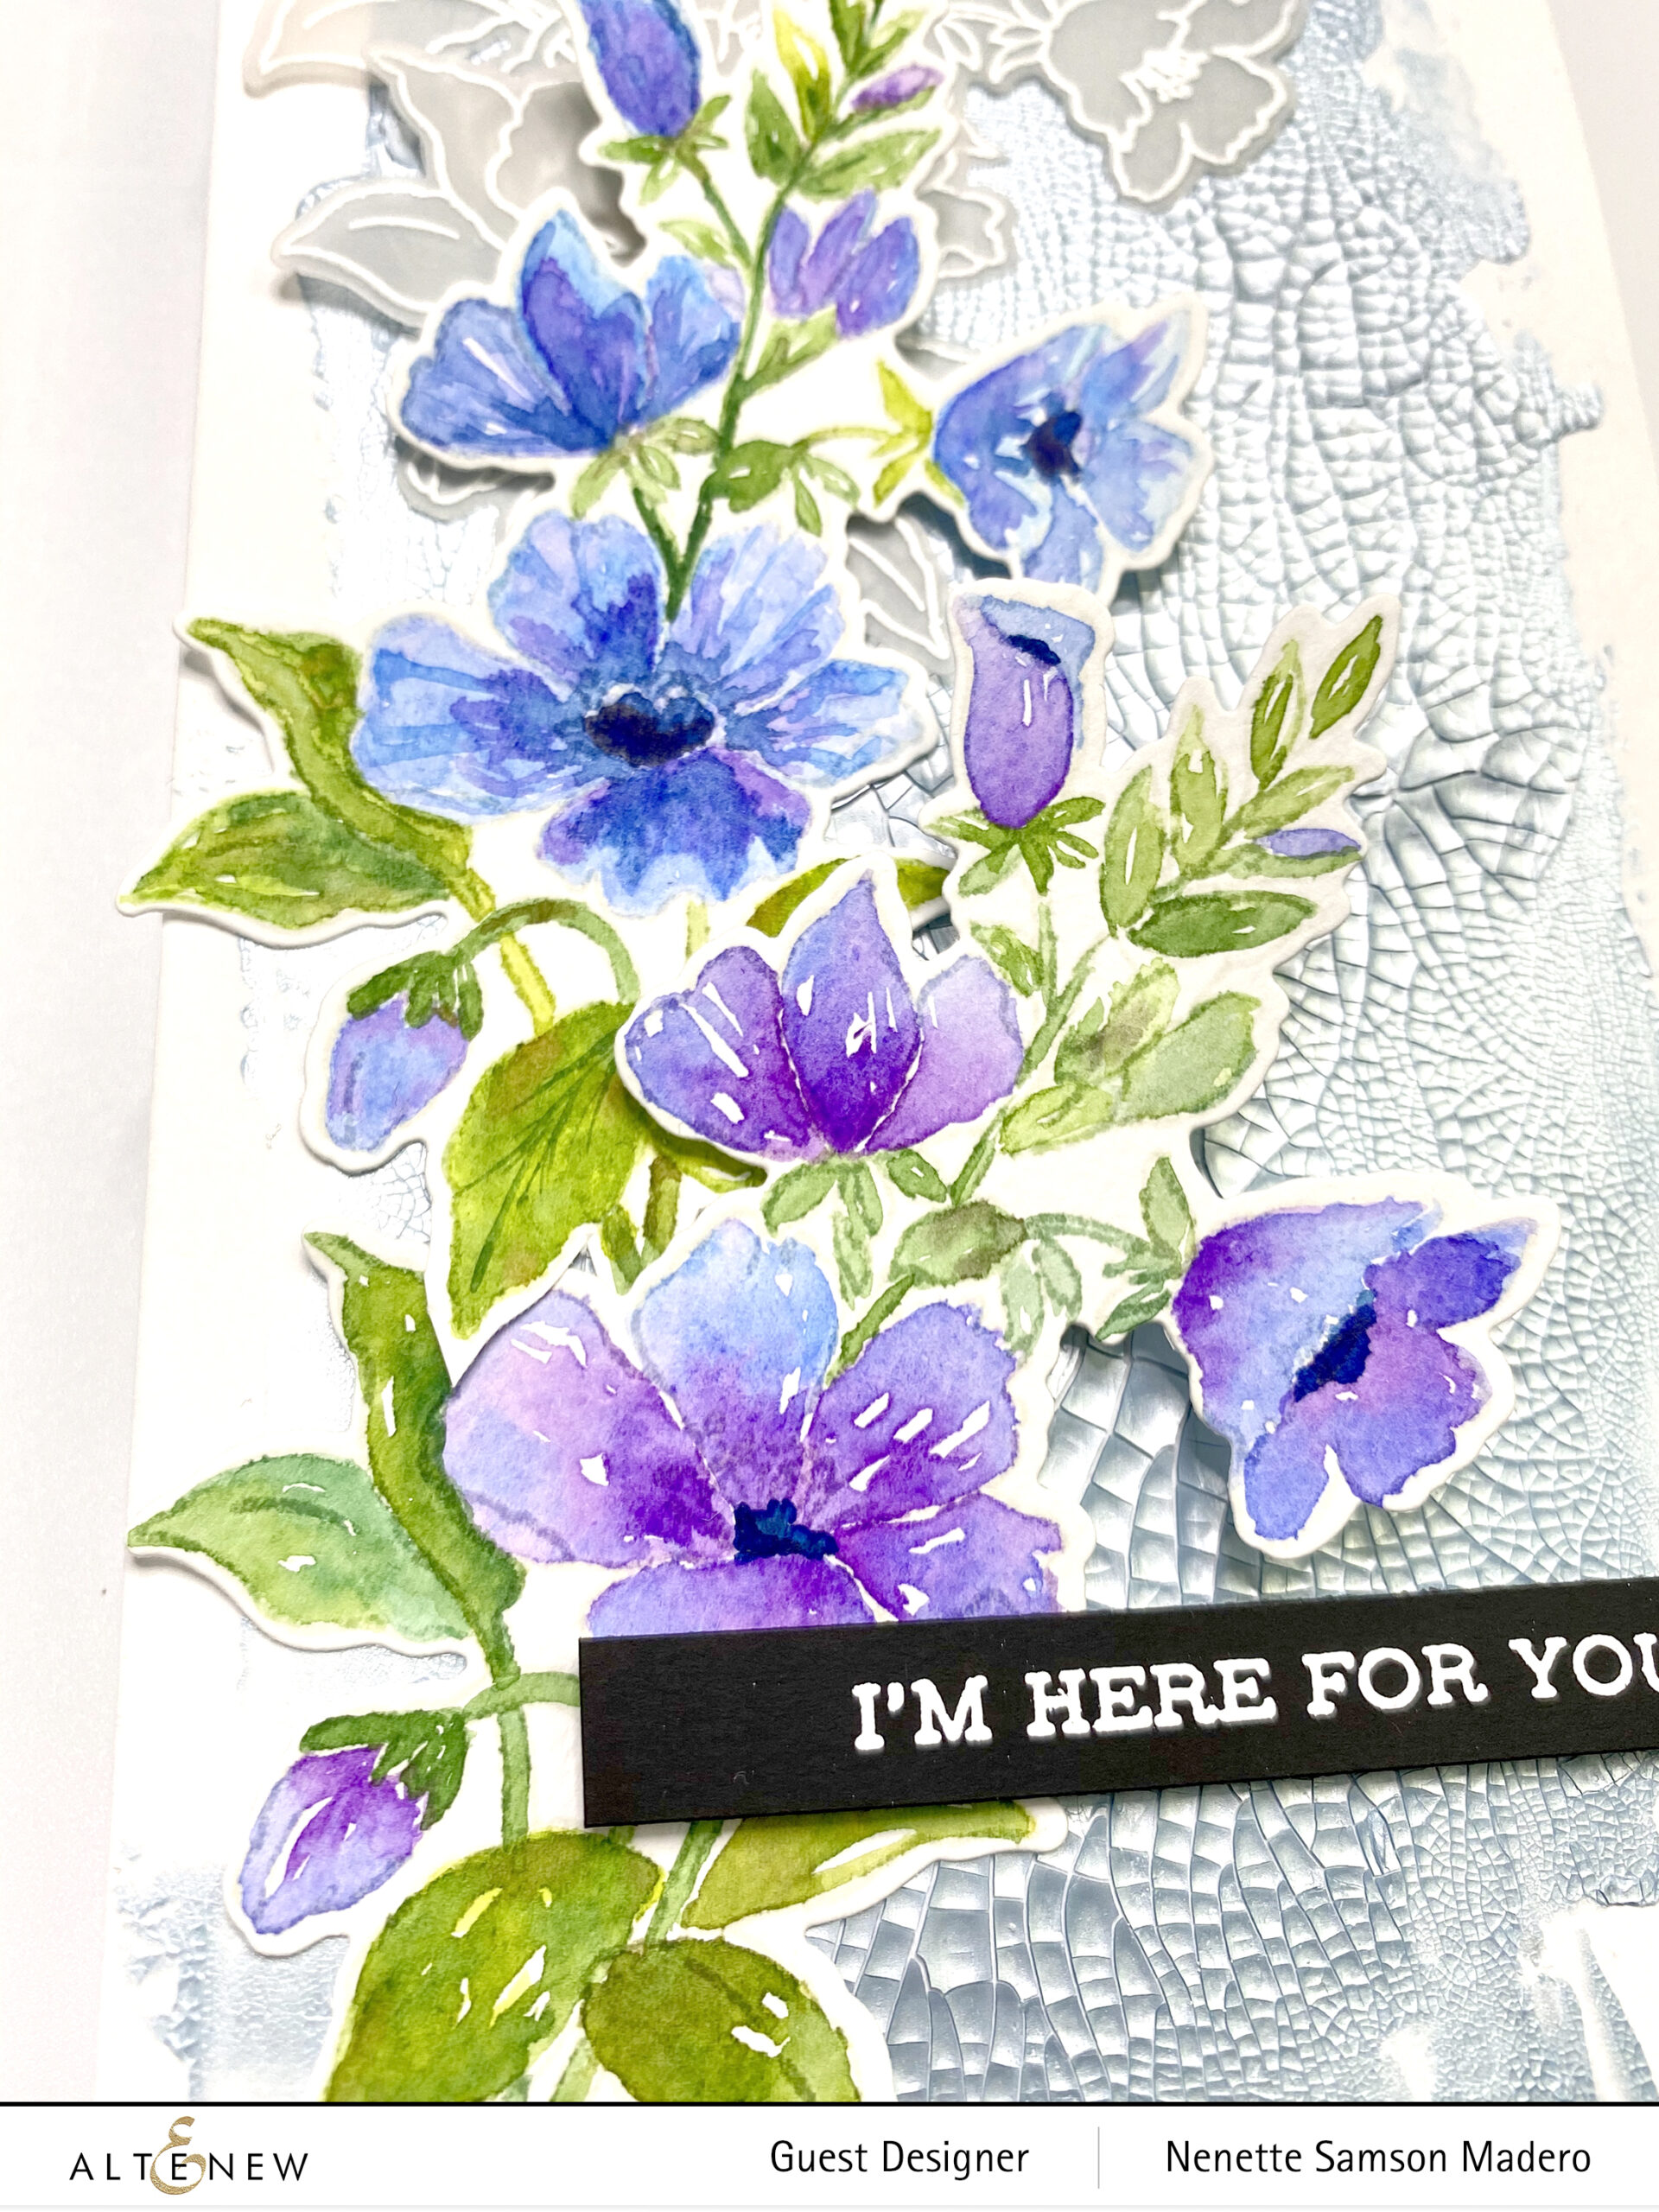
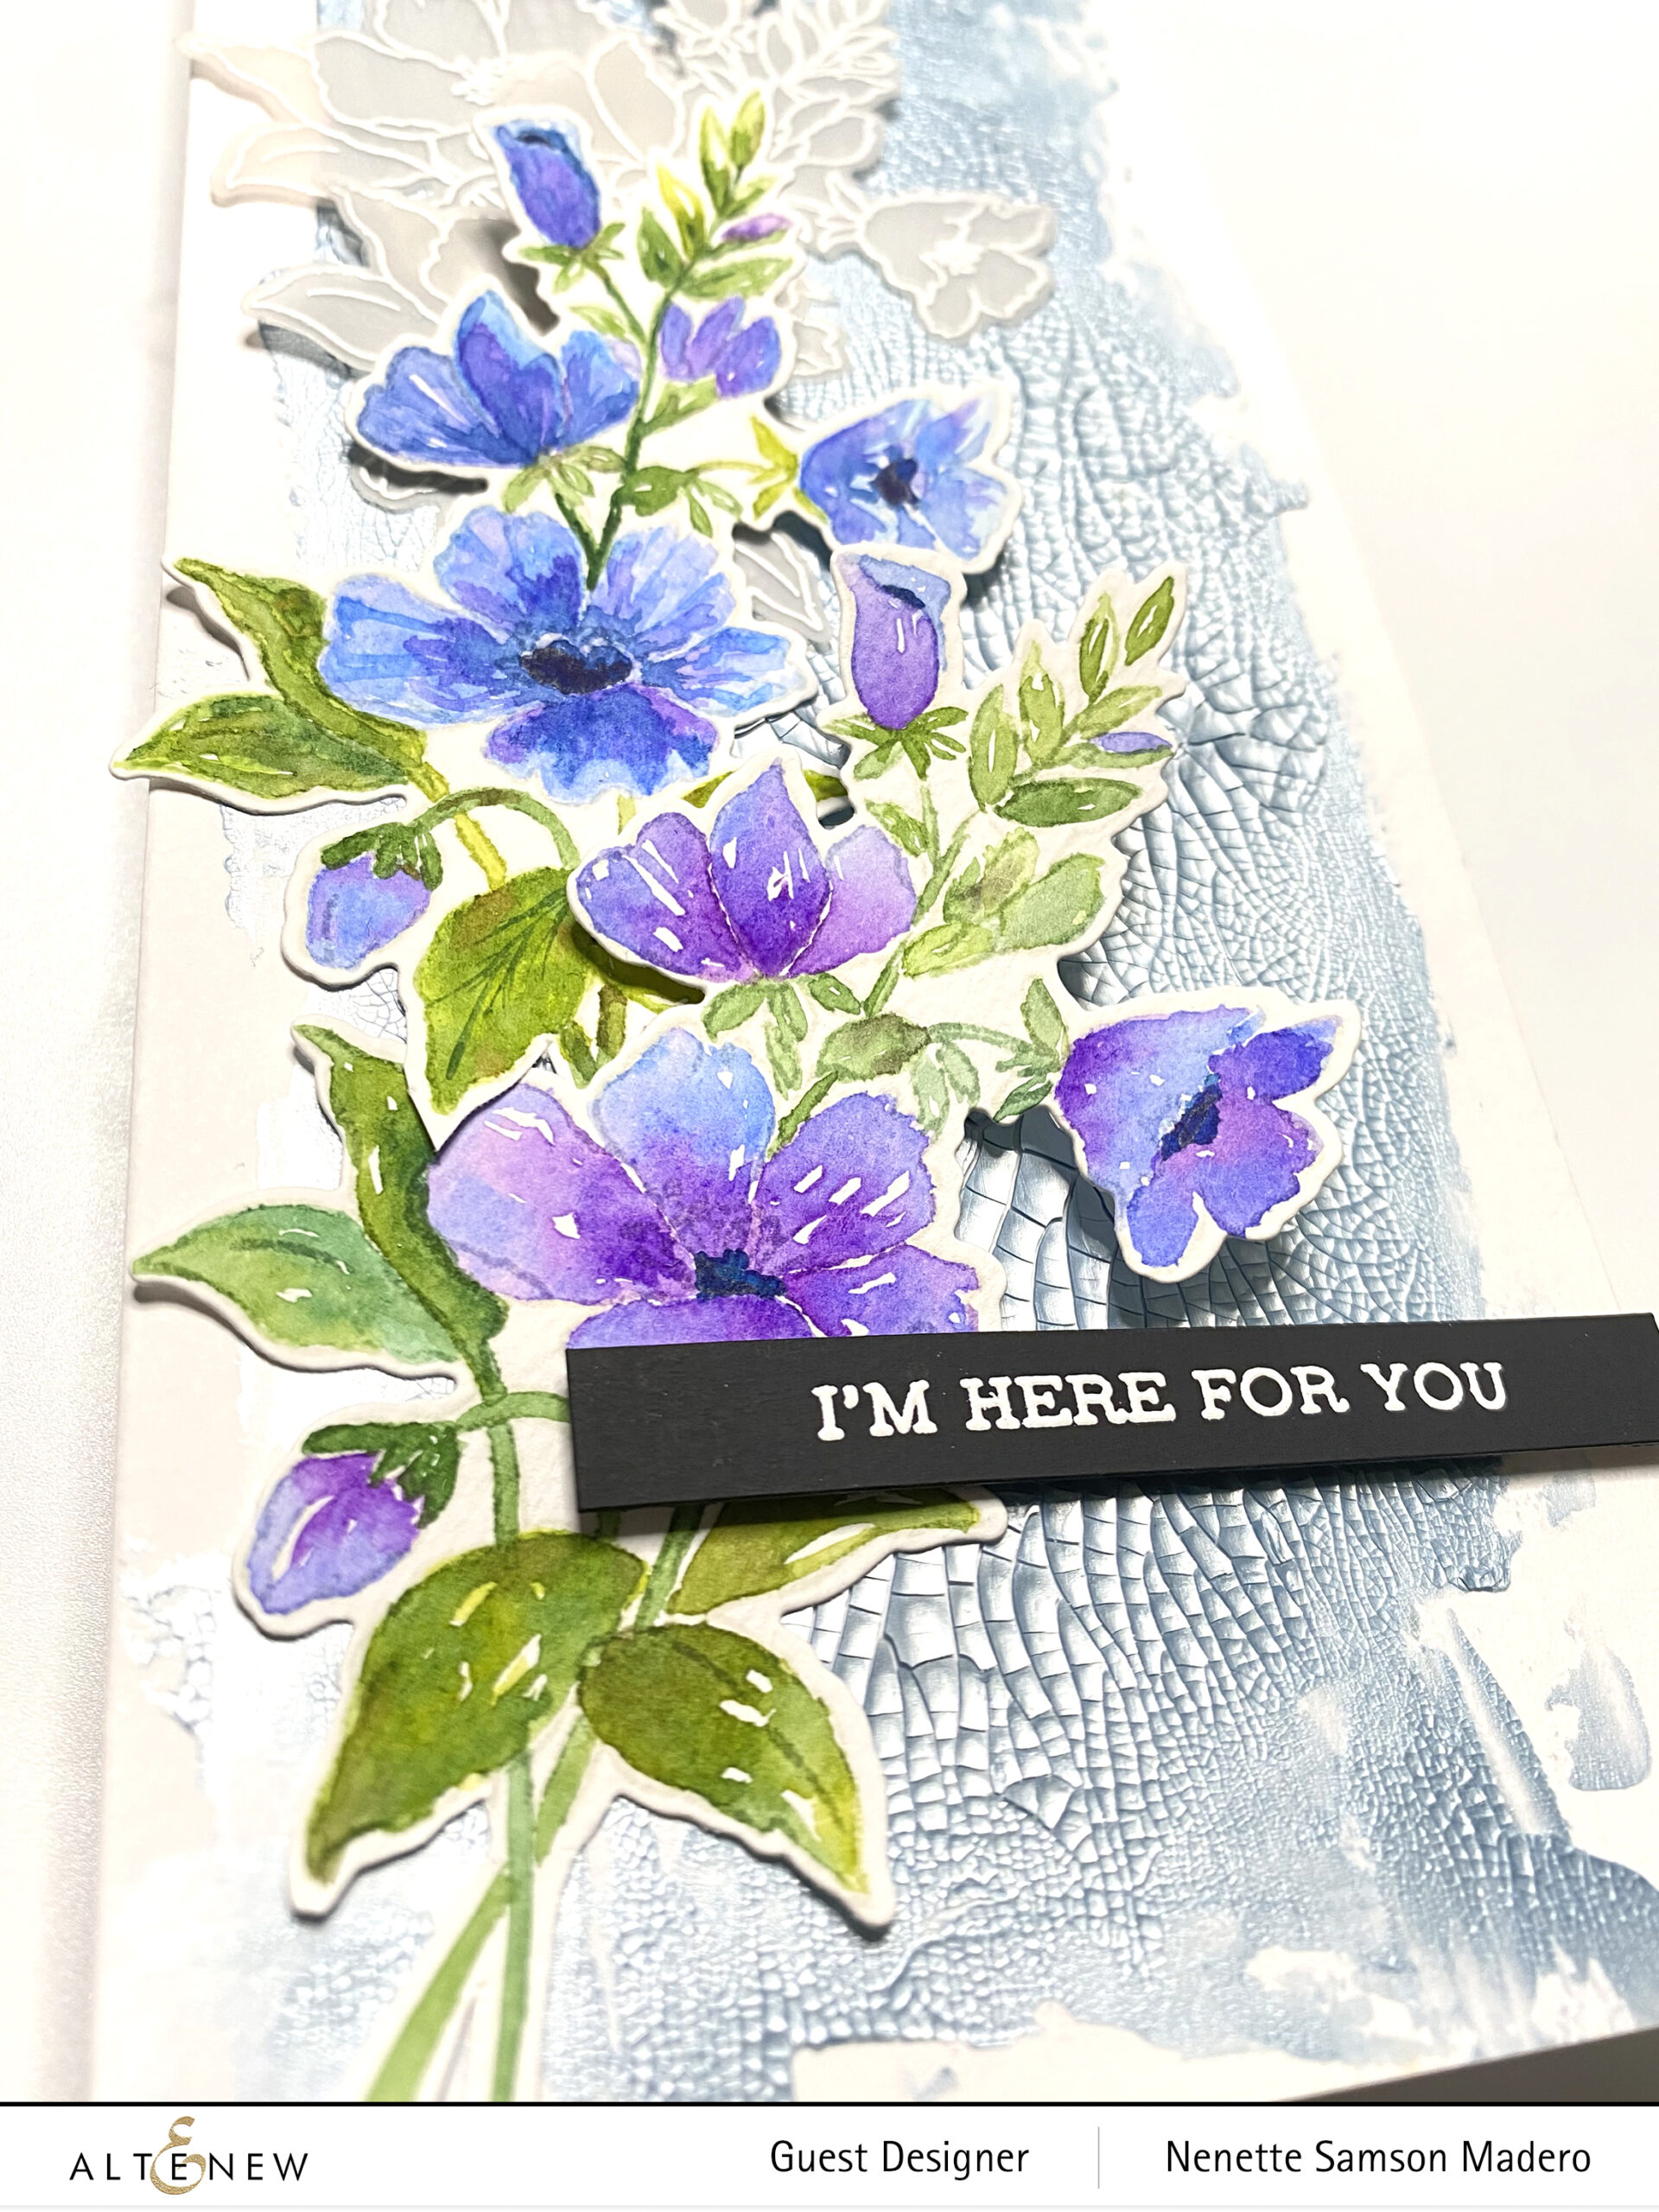
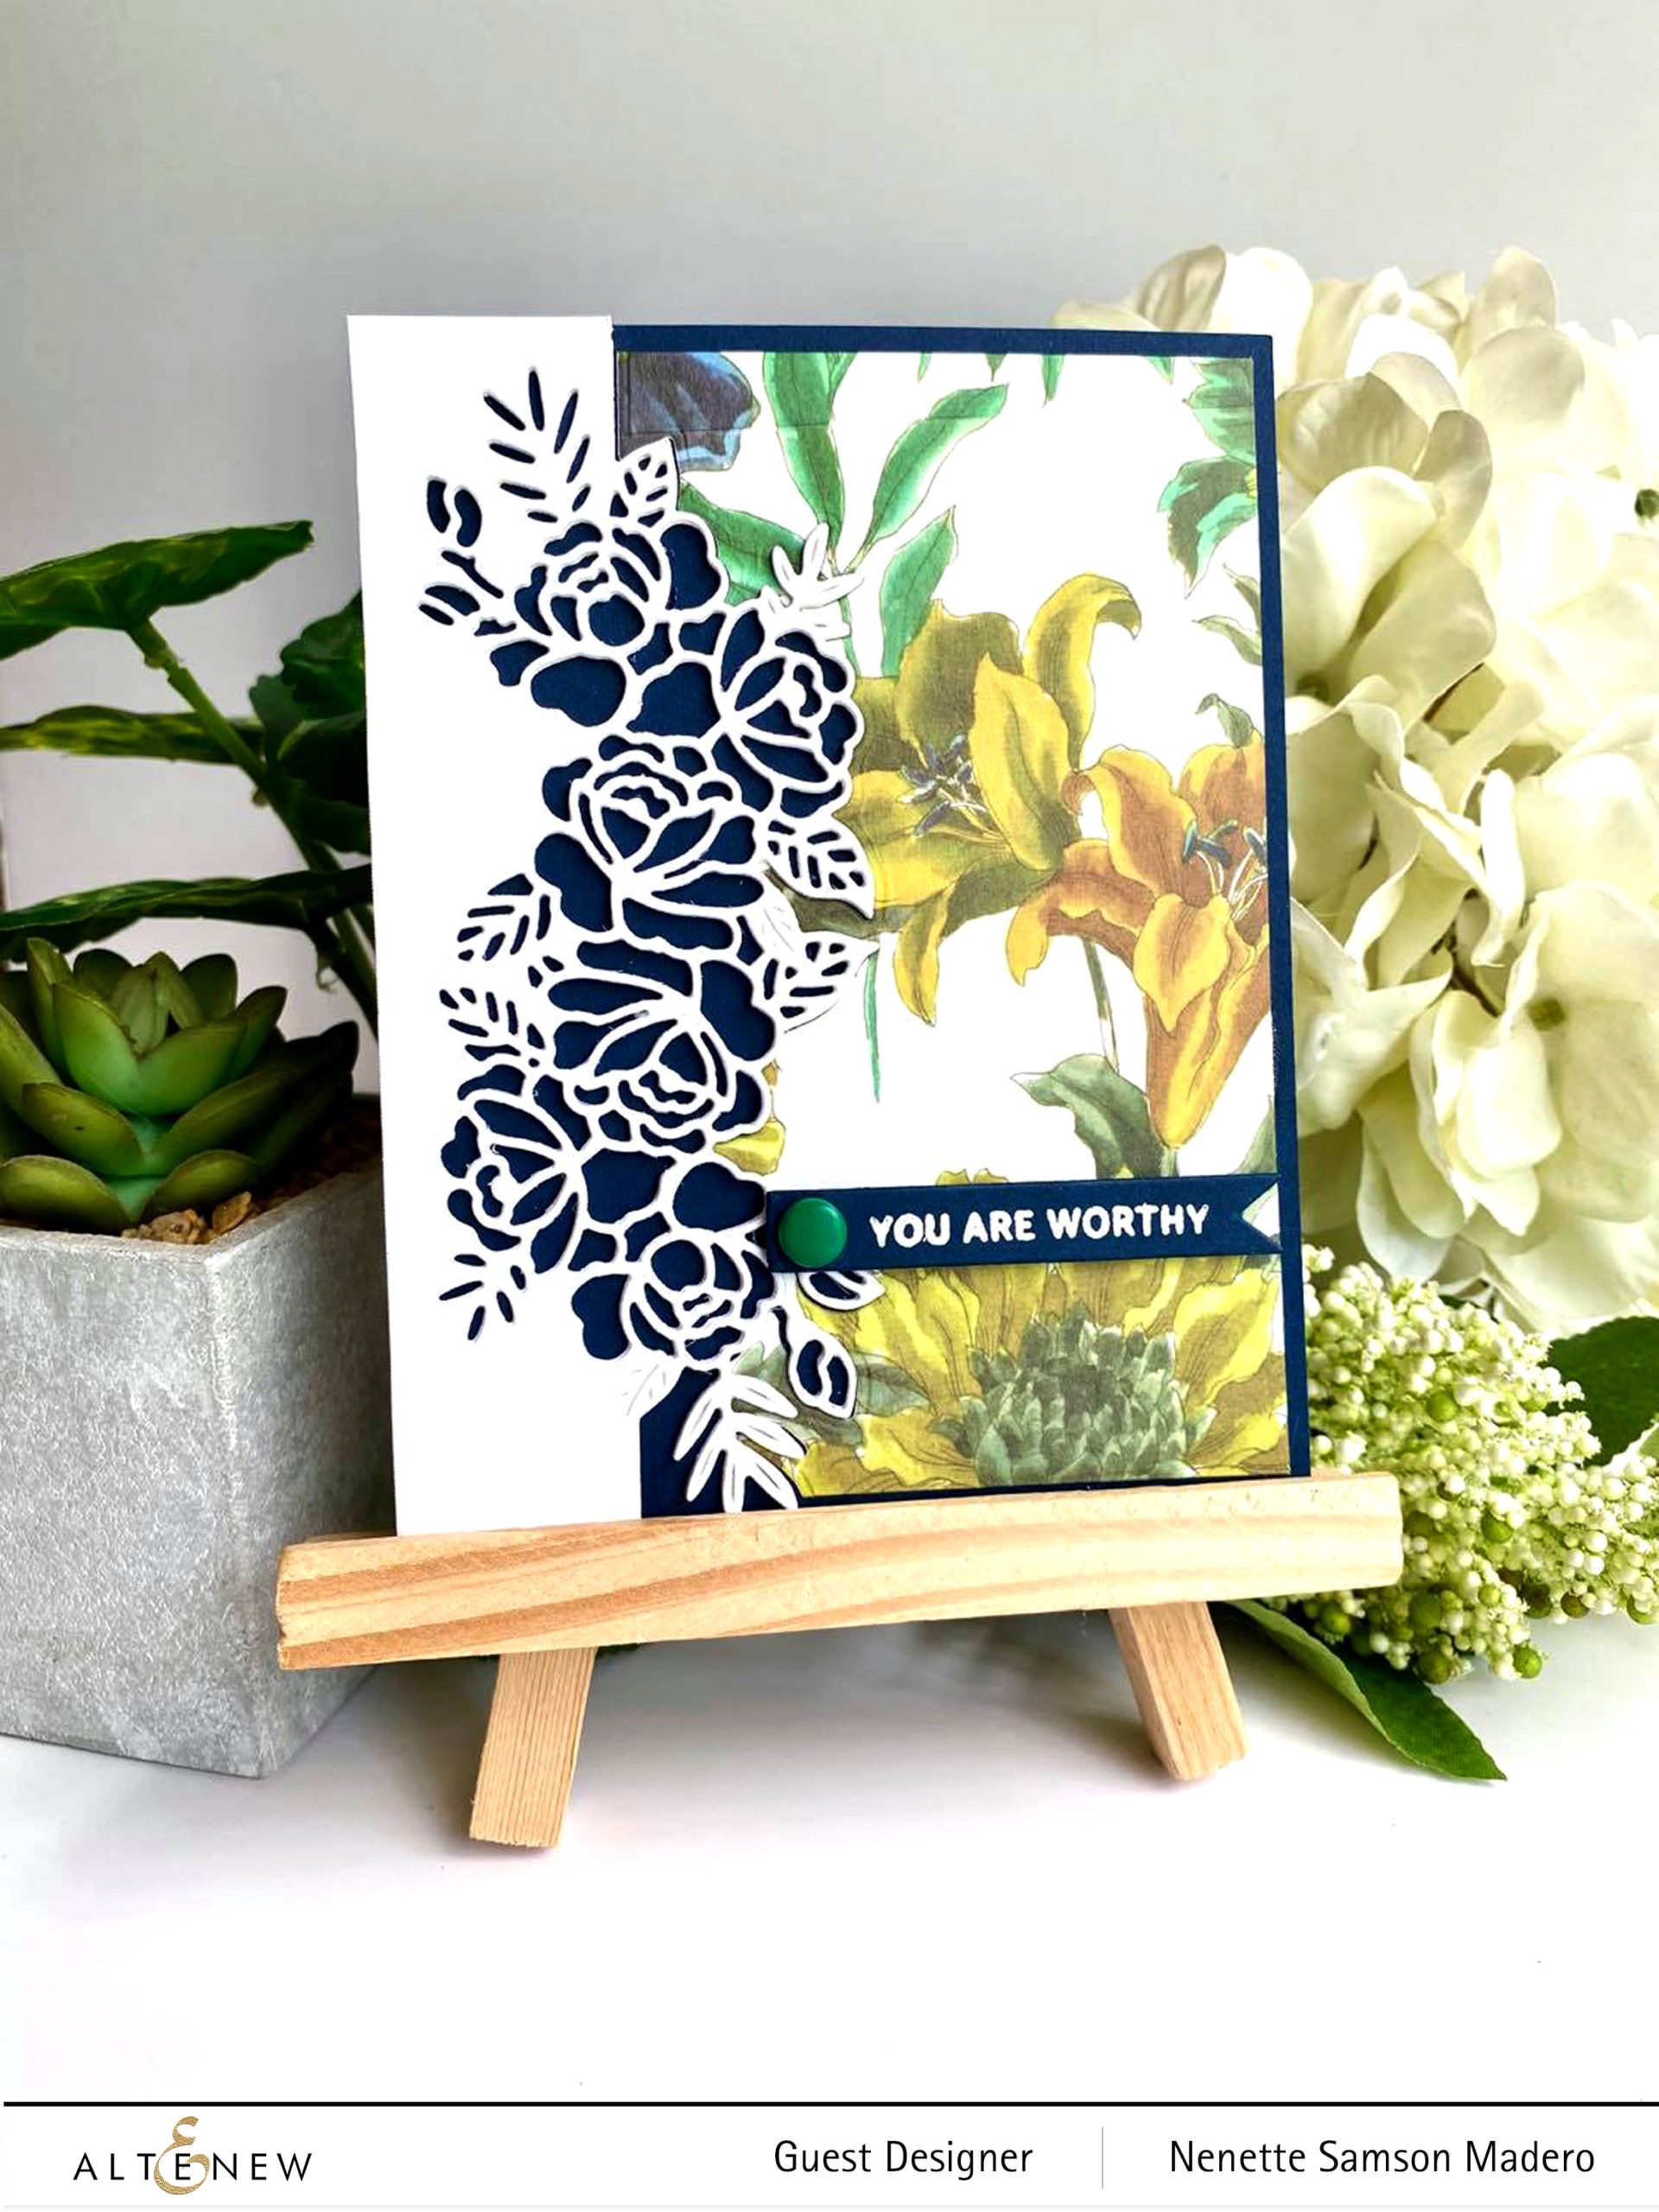
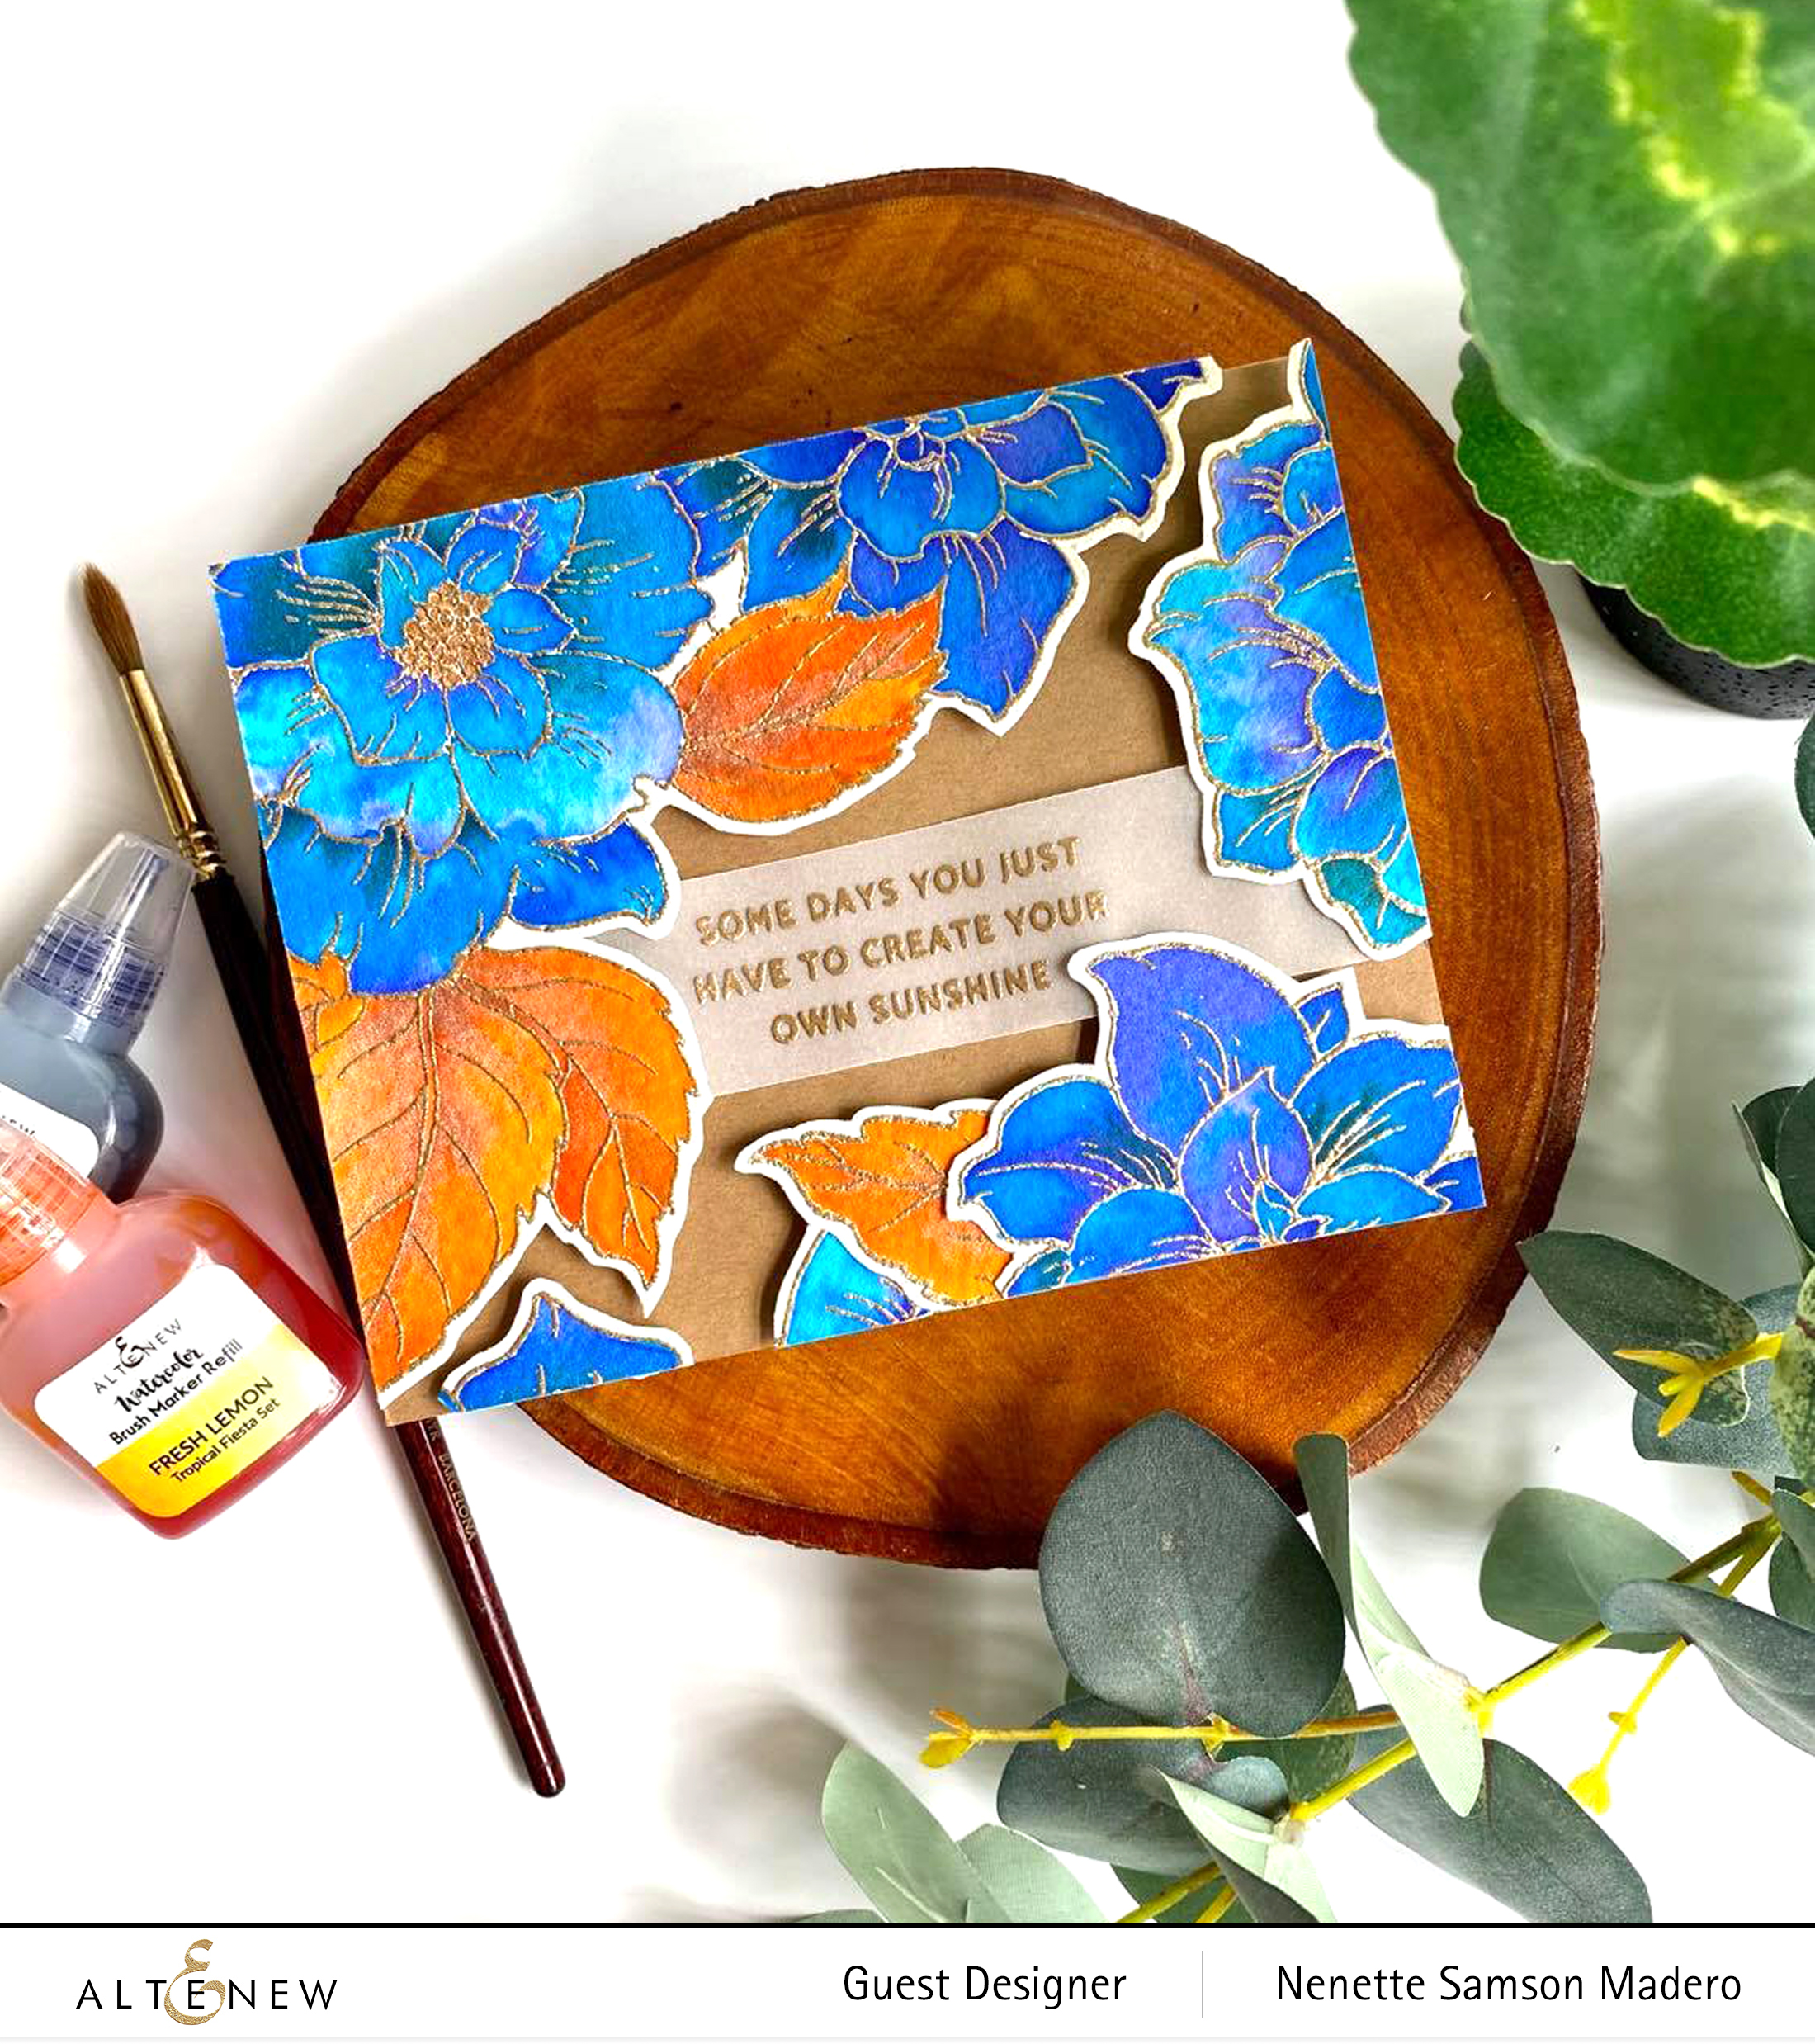
For the new stamp, I chose two of my favorites– the Courageous You Stamp set which was released sometime in July 2020. I love the huge image that can cover the whole card front! Another favorite of mine is the Essential Sentiment Strips die– the easiest way to add a dimensional sentiment to your card. <3


HAPPY BIRTHDAY


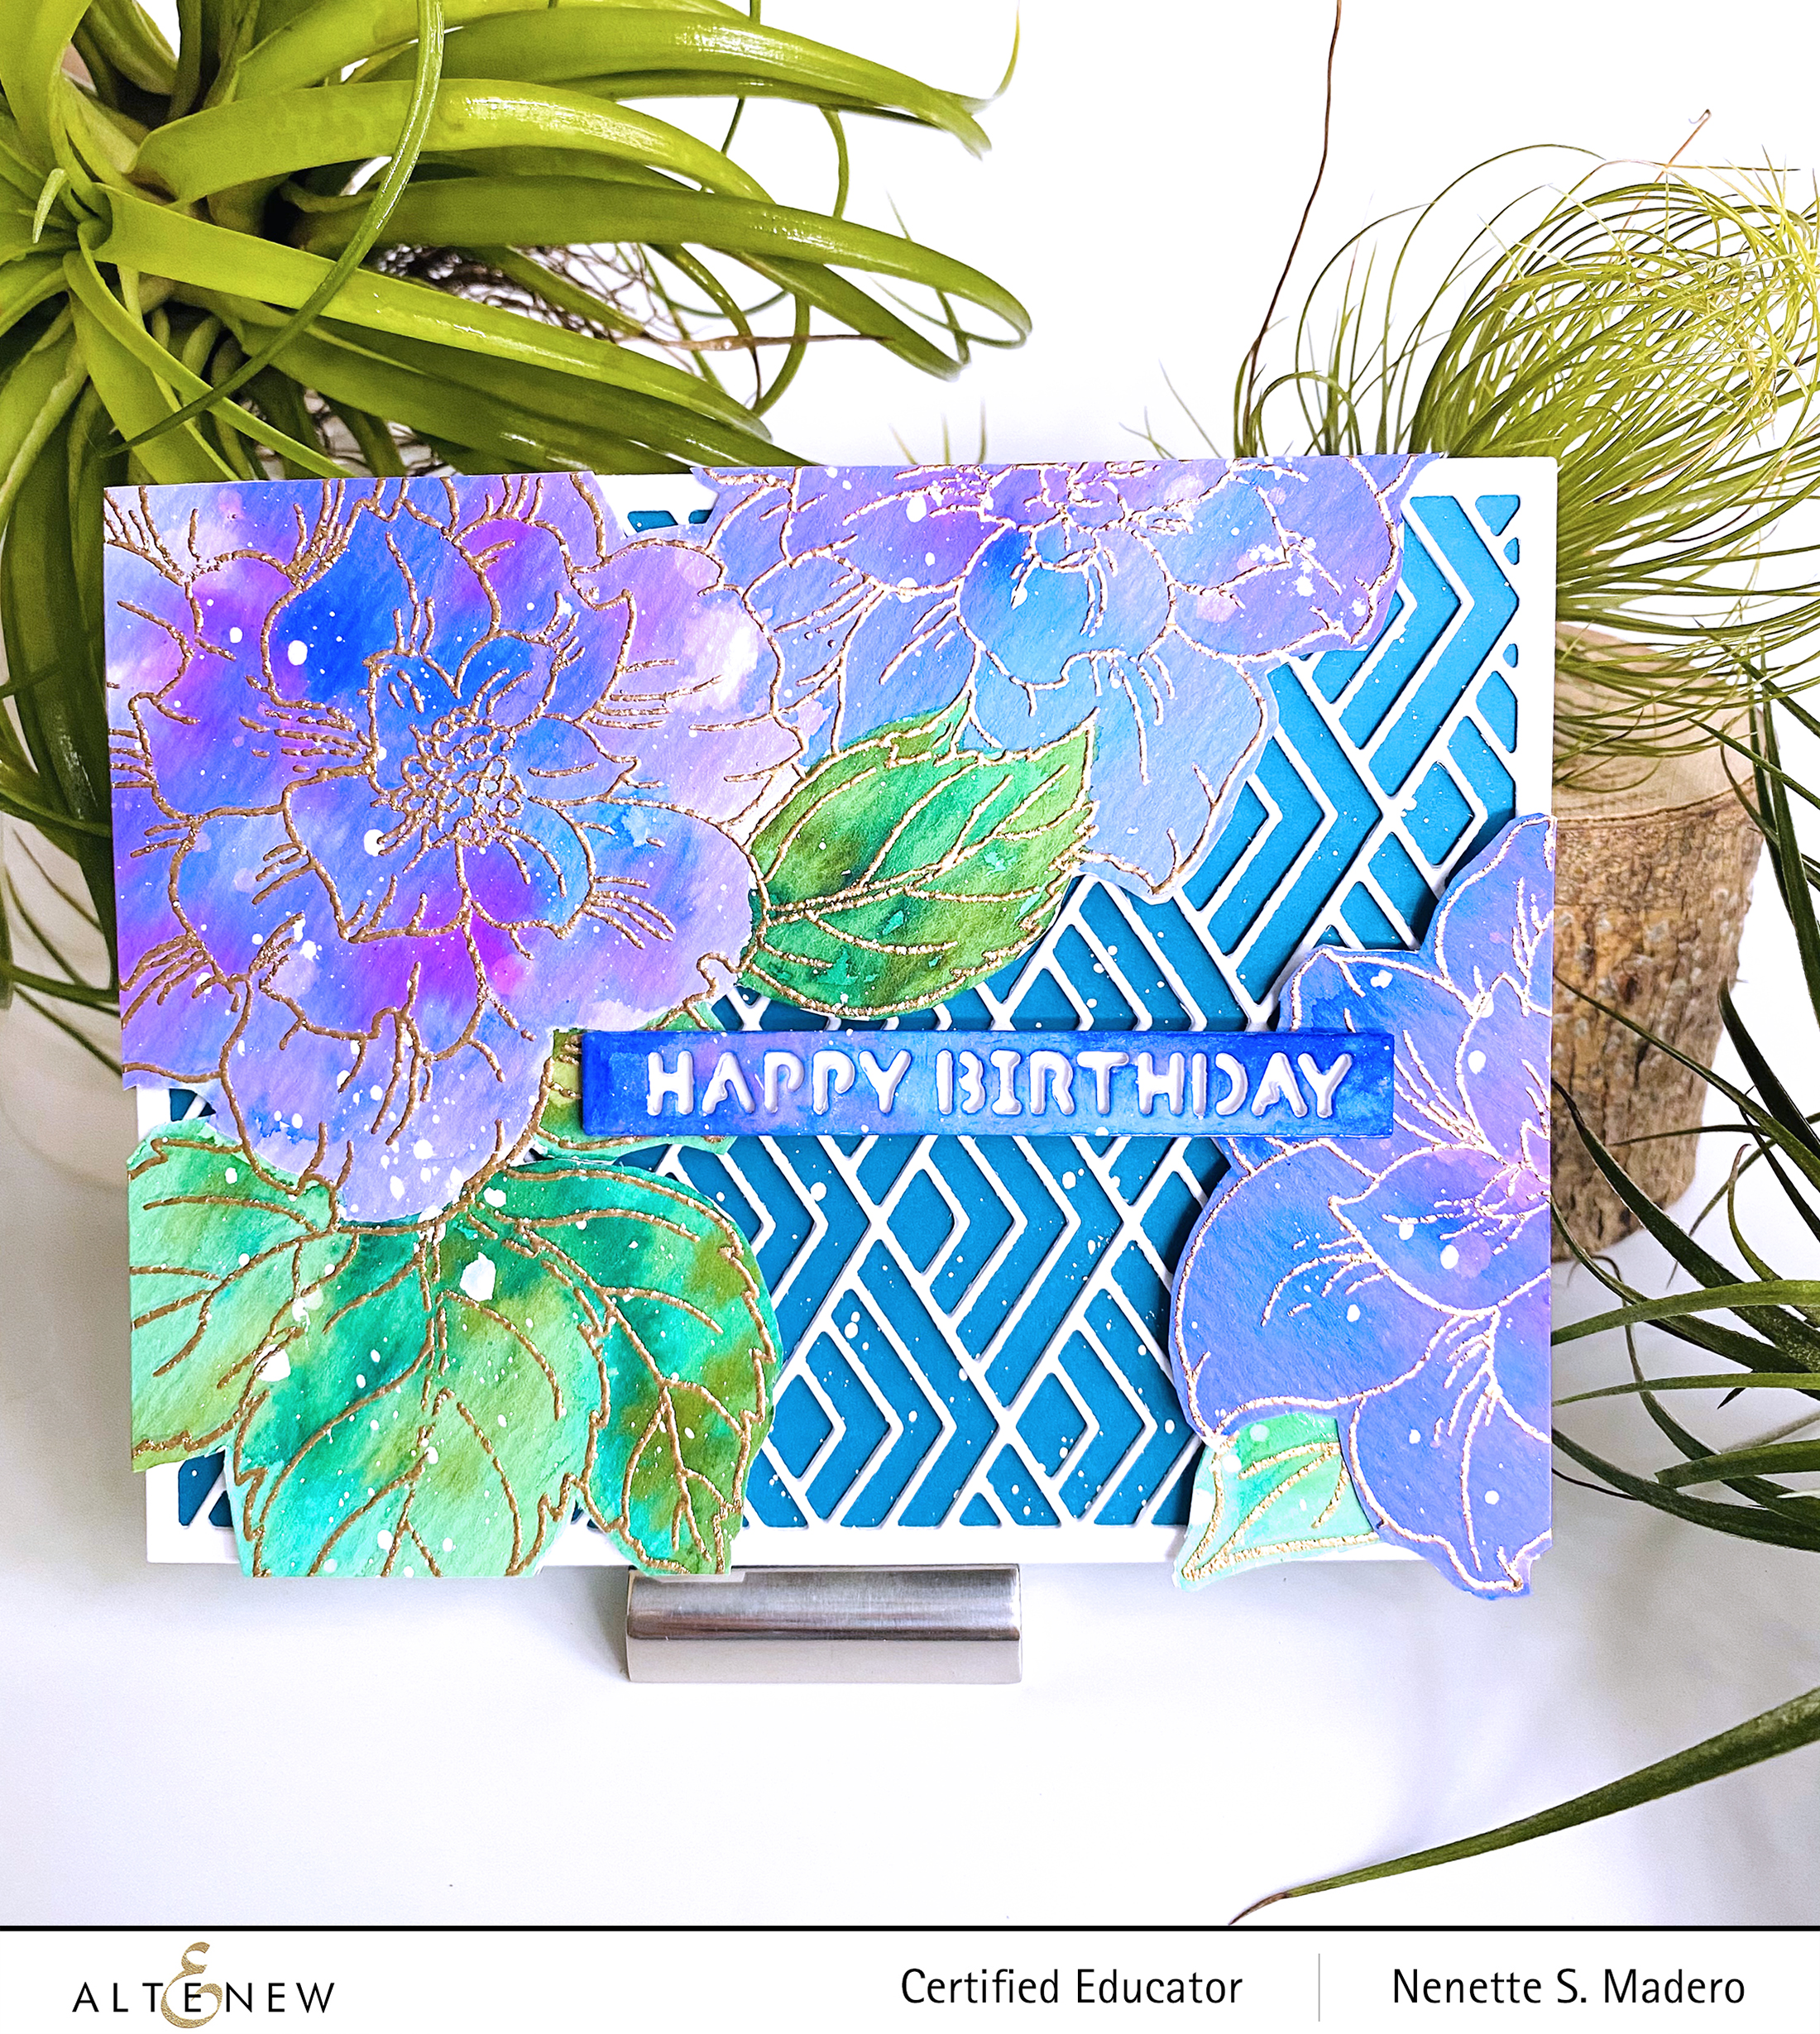
MATERIALS: COURAGEOUS YOU STAMP AND DIE SET, STACKED DIAMONDS COVER DIE, ESSENTIAL SENTIMENT STRIPS DIE, ROSE GOLD EMBOSSING POWDER, WATERCOLOR BRUSH MARKERS, WATERCOLOR PAPER, WHITE GOUACHE PAINT, VERSAMARK INK

STEPS:

  • Stamp the image onto watercolor paper using very light dye ink. (I used a Misti and didn’t move the watercolor paper after stamping.)
  • Loosely paint over the entire flowers going over the outlines using Turquoise, Ultraviolet, Midnight violet, Sea Breeze and Ultramarine for the flowers and Emerald, Sweet Leaf and Moss for the leaves.
  • After the watercolor dries, add spatters of water and allow to sit for 10 seconds. Dry with a paper towel to remove some ink to create texture.
  • When the image is dry, prep the paper with the antistatic tool then re-stamp again the outline image with Versamark Ink and emboss with Rose Gold embossing powder. (Remember, I left the image inside the Misti so that I can restamp again.)
  • Die-cut the image as well as the Stacked Diamonds cover die.
  • Die-cut the sentiment die 4 times and watercolor the 1st layer using the leftover inks.
  • Add white cardstock to the back of the sentiment strip die cut.
  • Adhere the cover die onto the card front and attach the flowers and sentiment with foam squares.
  • Add white gouache splatters.
  • Add the sentiment strip die cut using foam squares.

PRIZES


Altenew is giving away a $20 gift certificate to 5 lucky winners! Please leave a comment on the Altenew Card Blog by 4/4/2021 for a chance to win. 

Altenew will also draw a winner to receive a $15 Altenew gift certificate from the comments left on each designer’s blog on the blog hop list below. All winners will be announced on the Altenew Winners Page on 4/6/2021.

There’s MORE! What’s a hop without YOU?! We have included an Inlinkz at the Altenew blog for you to enter your gorgeous Altenew “Old/New Favorite Altenew Stamp” creations. Altenew will pick 2 of our favorite handmade creations from those who joined the linky party and they will each receive a $15 Altenew gift certificate!


HOP LIST

Altenew Card Blog

Bridget Casey

Colleen Balija 

Teresa Litchfield

Katrina Howe

Rosie Neustaedter

Terri Marie Koszler

Tenia Nelson

Pam Boedeker

Nandini Karmarkar

Amy Hill

Irina Fonina

Natasha Davies

Karen Brown

Helen Kalb

Patty Mello

Roteja Galvan

Eva Bussom

Fiona Duff

Jaycee Gaspar

Vicki Finger

Nenette S. Madero <– YOU ARE HERE

Teri Wilson

Rachael Shedeed

Neha Aggarwal

Kari VanNoy

Teri Stokes

Amber Rain Davis

Virginia Lu

Sandra Woodson

Next up is the amazing Teri Wilson. Hope you liked the cards I made using old and new stamp and die sets. I’m sure you have your own favorite Altenew stamps as well. I’d love to know which one is yours! Leave a comment below to get a chance to win some fabulous prizes from Altenew. Hope we can be friends on IG as well (@mylittleatticstudio). This is where I post my latest creations, too. Thank you so much for dropping by and stay safe always. Happy crafting!!


IG: @mylittleatticstudio | FB: My Little Attic Studio | nenette@mylittleattic.com | www.mylittleattic.com

Altenew Certified Educators For the Love of Altenew Instagram Blog Hop

Altenew Certified Educators For the Love of Altenew Instagram Blog Hop

Hello everybody!!!

I am joining a fun INSTA hop where all of us Educators will be sharing our love for Altenew through our handmade goodness/creations! The IG hop starts from @altenewllc so make sure you start from the beginning! I thought of creating a blog post as well for those of you who would like to know how I created the cards.

For this hop, I thought of creating 2 cards using the same inks, embossing folders and or stamps to make 1 easy to create card (CAS) and 1 intermediate card with more techniques involved. Let’s get started!


YOU ARE AMAZING/ SOMETIMES IN THE WINDS OF CHANGE…


MATERIALS:

STEPS:

  • Create a background to mimic the water by using different shades of blue and gold alcohol inks on Nara paper. Wet the surface of the paper with alcohol before dropping the alcohol inks. Move the colors using a hairdryer. The last step is to spray the background using a misting spray with alcohol to create the “bubbles”.
  • For the goldfish, stamp the images onto watercolor paper using Antique linen distress ink or any light colored ink. Color the images using watercolor and colored pencils.

  • Die-cut the images using the coordinating dies. Use a circle die for the card front to create windows.
  • Stamp the sentient using Versamark Ink and emboss using Rose Gold embossing powder.
  • Assemble the card using adhesive and foam squares.

Here’s a CAS card using the same basic materials as the first card.

ADDITIONAL MATERIALS:

STEPS:

  • Create the background using alcohol inks and the gold ink
  • Color the images using watercolor and colored pencils
  • Die-cut 2 circles as base for the fishes
  • Stamp the sentiment using Versamark Ink and Rose Gold embossing powder
  • Assemble the card with foam squares for added dimension.

HAPPY BIRTHDAY


Here’s another pair of cards using the same materials to create two totally different cards.

Again, I used alcohol inks to create this wonderful textured background as a base of my card. Below are the materials.

MATERIALS:

STEPS:

  • Add alcohol to Nara paper then drop of alcohol ink to create an ombre background. Add Pinata brass while the surface is still wet. Use a dryer to dry the surface.
  • Add droplets of diluted alcohol ink using the paintbrush to create added texture.
  • Dry emboss the background with the Angled Mosaic 3D embossing folder and add more alcohol inks to darken certain areas.
  • Stamp floral images on watercolor paper with Vesamark Ink and emboss using Rose Gold embossing powder.
  • Watercolor the images. Add salt while the petal is still wet to create some texture.
  • Assemble the card using foam squares and adhesive.

ADDITIONAL MATERIALS:

DIES: FINE ALPHABET DIE, ESSENTIAL SENTIMENT STRIPS DIE

STEPS:

  • Cut a strip of Nara paper and paint lines using a brush and alcohol inks. Dilute the inks if necessary to create an ombre effect.
  • Add drops of diluted inks and spray pure alcohol as well for added texture to the background.
  • Die cut the letters and sentiment several times and adhere on top of each other.
  • Emboss a plain white rectangular Cardstock using the Angled Mosaic 3D embossing folder leaving the center area flat.
  • Assemble the card using foam squares and adhesive.

SO GRATEFUL/THANKS


Here is the 3rd set of cards. I recently got the latest set of the Northern Shore mini dye inks and wanted to test the colors so I swiped the ink cube onto white cardstock. I loved the look so I went ahead and created these cards. 🙂 No colored cardstock to match the inks? No problem! Make your own colored cardstock using the ink cubes!

MATERIALS:

STEPS:

  • For the card base, swipe the mini ink cubes directly onto Neenah Solar white cardstock. Make sure they overlap and leave some white space.
  • Die cut the Morning Glory die using textured cardstock and color using the ink cubes to match the background.
  • Color the leaves using artist markers.
  • Assemble the card using foam squares and adhesive.

ADDITIONAL MATERIALS:

FANCY THANKS DIE, PAINT-A-FLOWER: CALLA LILY FOR THE SENTIMENT, ROSE GOLD EMBOSSING POWDER, VERSAMARK INK, VELLUM

STEPS:

  • Swipe the dye inks on Neenah Solar White cardstock to create some stripes. Leave about 1/4 of the bottom white.
  • Tear the edge and emboss using Rose Gold embossing powder and Versamark Ink.
  • Die cut the Thanks from the card front and from scrap paper then adhere on top of each other for added thickness to the diecut.
  • Ink the base of the word with Versamark Ink and emboss using Rose Gold embossing powder.
  • Stamp the sentiment on vellum using Versamark Ink and emboss with Rose Gold embossing powder.
  • Cut strips of white paper and adhere on top of each other to create a border.
  • Assemble the card.

Altenew is giving away a $20 gift certificate to 5 lucky winners! For a chance to win, please follow @altenewllc and @mylittleatticstudio and leave a comment on IG to get a chance to win!!!

Altenew will draw 5 random winners from the comments left on each stop of this Instagram hop and announce the winners on Altenew’s Educator Instagram hop post on 03/05/2021.

Head over to your NEXT STOP: Eva Bussom — @evabussom. Make sure you follow all the other educators’ IG to see the wonderful creations! Below is the complete list.

Hop List:

@altenewllc
@rotejas_magic
@kariavan
@taniaahmed
@crown_focus
@irishrosecreations
@treasuresinletters
@sandespoema
@_michelleomurray
@terismailbox
@channellingmarthaau
@yesvirginialu
@notableink
@teresakim16
@altenew_planner_girl
@craftylemur
@karens_mini
@handmadebytasha13
@everyday_expressions
@pixelmavensretreat
@handmadebyteris
@sevenscrafts
@bridgetcaseydesigns
@mylittleatticstudio <– YOU ARE HERE
@evabussom
@irenemcbeatle
@cardrefinery
@jaycee.gaspar
@mes_cartes_a_moi
@auzztrinkletsncrafts
@rosieneust
@paperaddictpam
@tenianelson

I hope you liked the cards I created for this IG hop. Thank you so much for dropping by!!! Please don’t forget to leave a comment in IG to get a chance to win a prize! Stay safe everyone and happy crafting! ❤️

P.S. I changed the format of my post. Please let me know if the bullet points for the steps are easier to follow than writing them in paragraph form. Thanks everyone <3

Build-A-Flower: Peony Release Blog Hop + Giveaway

Build-A-Flower: Peony Release Blog Hop + Giveaway
BUILD-A-FLOWER: PEONY

Hello everyone! Welcome to Altenew’s Build-a-Flower: Peony Release Blog Hop! Isn’t this flower just gorgeous?!! The Altenew Card Blog is hosting this hop so make sure to drop by there, too. If you just came from the talented Therese Calvird, then you’re on the right track.


WISHING YOU WERE HERE


MATERIALS: BAF PEONY, Circle Quilt Cover Die, Mixed Media Frosty Pink, Coral Berry, Ruby Red, Frayed Leaf, Forest Glades and Evergreen, Rose Gold Embossing powder, Versamark Ink, Gansai Tambi Watercolor, Foam Squares, Watercolor paper, Neenah Solar Cardstock

This was my first time to try the Altenew Mixed Media inks. Because these are pigment inks, the finely ground colored particles which are suspended in a medium actually sit on top of the paper. It stamped smoothly and beautifully!❤️Compared to dye inks wherein the inks are absorbed by the paper quickly, these pigment inks stay wet longer so you’ll have to heat set them.

Layering Guide

It is pretty easy to layer this stamp set as seen in the layering guide above. The lightest color was stamped first then layered with the next darker color until you end with the darkest. I stamped 3 sets of flowers and leaves. The card front was watercolored using a light wash then the Circle Quilt cover die was adhered on top of the watecolored panel. About an inch was cut off to reveal the darker watercolored panel underneath.

The flowers were layered at the edge of the card front leaving enough space to see the sentiment that was stamped using Rose Gold embossing powder.


BLESSINGS ALWAYS


MATERIALS: Build-a-Flower: Peony, Parlor Palm Die, Fine Frames Die, Holiday Tag Sentiments, Rose Gold Embossing Powder, Versamark Ink, Foam Squares Versa Color Hyacinth, Sky Blue and Laislazuli

I wanted to try stamping the set using cooler colors. For the flowers to stand out more, I chose a dark brownish-grey cardstock. To finish the card, I added a border using the Fine Frames die then embossed it with Rose Gold embossing powder then added some leaves from the Parlor Palm die.


GIVEAWAY PRIZES


To celebrate this release, Altenew is giving away a $30 gift certificate to 2 lucky winners! Please leave a comment on the Altenew Card Blog by 10/07/2020 for a chance to win. Altenew will also draw a winner to receive a $15 gift certificate from the comments left on each designer’s blog on the blog hop list below. All winners will be announced on the Altenew Winners Page on 10/07/2020.

Next stop is Nathalie DeSousa blog. Don’t forget to leave a comment below to get a chance to win some prizes. I always look forward to hearing from you. ❤️ Hope you can follow me on Instagram as well. I post all of my works there so make sure you follow me for my latest projects! Stay safe everyone and happy crafting!!!


IG: MYLITTLEATTICSTUDIO | FB: MY LITTLE ATTIC STUDIO


ALTENEW SEPT 2020 STAMPS/DIES/ EMBOSSING FOLDERS RELEASE BLOG HOP

ALTENEW SEPT 2020 STAMPS/DIES/ EMBOSSING FOLDERS RELEASE BLOG HOP

Hello everyone! I hope you are all safe and well. I’m thrilled to be a part of the September release from Altenew. If you just came from the blog of the talented Norine Borys, then you’re on the right track. This release is filled with beautiful stamps, dies and stencils that can be used for seasonal cards or everyday cards. Take a look at the September 2020 Beauty of the Season release!!!

I love that Altenew released some Christmas themed stamp sets this early!!! Year after year, I vowed to start my Christmas cards/tags early so that I won’t get stressed out come December so the timing of this release is perfect. ❤️ Below are some samples using the Merry Raindeer stamp and die. This is an adorable stamp set with lots of greetings that you can mix and match. Below are samples on how you can use it on a card or as a tag.


JUST FOR YOU/MAKE A WISH


I stamped the reindeer image twice using the Obsidian ink then embossed with clear embossing powder. The following colors were used to color the head, antlers and hooves–COPIC MARKERS E-53,33,13,18,17,47,29 AND RV 63. After coloring, the reindeer was masked so that the banner can be colored using Altenew inks and a blender brush.

For the background of the card, I used the Layered Floral cover die B. The edge of the tag was inked with Versamark ink then heat embossed using Rose Gold embossing powder.


JOY LOVE PEACE


The Holiday Flower stamp set was used to create the background for this card. I used Versamark ink to stamp the poinsettia clusters then heat embossed it using white embossing powder. The gem frame die fitted perfectly on top one of the soda top nesting dies.

I wanted some contrast so I inked up the gem frame die with Versamak Ink then embossed it using Rose Gold embossing powder. The sentiment from the Holiday Tag Sentiments stamp set was stamped and embossed then the gem frame was adhered using glue. Foam tape was used to adhere the sentiment to the card front for added dimension.


FROM OUR HOME TO YOURS


I love the look of sheer lace and stamping the image from the Holiday flowers stamp on vellum gives this effect. I stamped several images on vellum then heat embossed using Golden Peach embossing powder. These were then die cut using the coordinating die. A good way to adhere vellum onto cardstock is to use the Zyron sticker maker.

After embossing the image and die cutting the vellum, I ran them through the zyron machine and made the die cuts into stickers. This way, you don’t get to see the adhesive behind the vellum. I also used the Apothecary Labels stamp and die set for the tag and the Fine Frames Square die to add a frame around the tag. Versamark Ink was added to this thin frame then embossed with Golden Peach embossing powder to match the flowers. These were added to the card front using foam squares.


WE RISE BY LIFTING OTHERS


The Positive Vibes stamp is easy to align. The image was stamped then partially die cut. The Rounded rectangle die was used to cut the other side of the stamped image. The card front was embossed using We R Memory Keepers Quilted embossing folder for added texture. The sentiment was stamped and embossed using Rose Gold embossing powder.


THANK YOU


There are so many ways to use the Grape Leaves die set. For this card, I used all the elements of the die-cut. First, I watercolored a sheet of watercolor paper with different shades of orange using the wet on wet technique.

After drying, I used the solid die-cut to cut out the background of the leaf. Brown glitter paper was used for the vines and outline of the leaf. These were adhered to the card front using glue then the rest of the leaves were clustered together using both negative and positive parts of the leaf die-cut. Foam squares were used to adhere them to the card front for added dimension. The sentiment was heat embossed on vellum.


I’M HERE FOR YOU


MATERIALS: Positive Vibes Stamp and die set, Pure White Embossing Powder, Artist Watercolor Pan set, Nuvo Crackle Mousse, Strathmore Mixed Media paper

I did some no-line watercoloring with the Positive Vibes florals using the Artist Watercolor pan set. This was the first time for me to try this watercolor pan set and the pigments reacted differently compared to the watercolor brush markers. With the pan set, I noticed that the pigments didn’t flow as much as the brush markers did so there was more control. The colors were also muted and not as bright as the brush markers which I liked for this particular card.

I first applied the Nuvo crackle mousse on thick mixed media paper and allowed it to dry. I stamped the floral images from the Positive Vibes stamp set twice and watercolored them using the artist pan set. I started with a light wash of Lapis Lazuli mixed with Deep Blue Sea. While it was still wet, I mixed shades of purple and Starry Night.

For the leaves, I used a light wash of Green Hills mixed with Fall Harvest then I layered Green Meadows mixed with Tropical Forest, Rain Forest, Sea Shore, Delectable Delights and Coffee Break. I made sure to leave some parts white to act as highlights. I also stamped 2 images on vellum them embossed them with pure white embossing powder.


ASSORTED CHRISTMAS TAGS


I love the Holiday Tag Sentiments stamp and die set! It is loaded with a variety of sentiments with a mix of beautiful script and sans serif fonts. It’s also not limited to Christmas sentiments only — such a versatile set that can be used alone or in conjunction with other stamp sets.

For the background, I brought out my Gelli arts gel printing plate and some pastel colored acrylic paints.

Paints were added to the surface using a brayer than layers of stencils and stamps were used to add more layers for more texture. The whole gel plate was allowed to dry before adding a thin white coat of acrylic paint. A clean white cardstock was then placed on top to pick up all the layers of paint to create a monoprint.

The Holiday Tag Die was used to cut out the tags. Sentiments were stamped on vellum and embossed using Rose Gold Embossing powder. I love the translucency of vellum cause it allows the background to still be seen.

Here’s a time-saver tip–I partially die cut the tag on cardstock a few times so that I can die cut the different borders all at the same time.

Different colors of cardstocks were chosen to match the background. I really enjoyed making these tags. It’s a great feeling knowing that I already have tags made for this coming Christmas season. 😄


GIVEAWAY PRIZES


To celebrate this release, Altenew is giving away a $50 gift certificate to 3 lucky winners! Please leave a comment on the Altenew Card Blog by 9/15/2020 for a chance to win.

Altenew will also draw a winner to receive a $15 gift certificate from the comments left on each designer’s blog on the blog hop list below. All winners will be announced on the Altenew Winners Page on 09/18/2020.

I hope you liked the cards/tags I made for this release. Next stop is my uber-talented friend, Jaycee Gaspar. Make sure you check out his blog… for sure you will be blown away by his talent.

I always love hearing from you so please drop a line in the comment section. By doing so, you also get a chance to win some fab prizes from Altenew! For real-time updates, do follow me on IG @mylittleatticstudio. Thanks for dropping by. Please take care and be safe!

BLOG HOP ORDER: ALTENEW CARD BLOG | AMBER RAIN DAVIS | TERRI KOSZLER | THERESE CALVIRD | LAURA BASSEN | ERUM TASNEEM | TENIA NELSON | VIRGINIA LU | NATHALIE DESOUSA | LAURAJANE | SVITLANA SHAYEVICH | VICKY PAPAIOANNOU | NICOLE WATT | VICTORIA CALVIN | MARYAM PEREZ | TANIA AHMED | KEISHA CHARLES | KELLY GRIGLIONE | LILITH EECKELS | VICKI FINGER | NORINE BORYS | NENETTE S. MADERO | JAYCEE GASPAR


IG: MY LITTLE ATTIC STUDIO | FB: MY LITTLE ATTIC STUDIO | WWW.MYLITTLEATTIC.COM


Altenew July 2020 Stamps/ Dies/Stencils/ Inks Release

Altenew July 2020 Stamps/ Dies/Stencils/ Inks Release

Hello everyone!!! Altenew has a wonderful July release and I made a couple of cards to showcase this new release. Take a look at these gorgeous products!!!

https://altenew.com/collections/new/products/summer-fun-full-release-bundle

I read all your comments on my blog and truly appreciate your kind words. I’ve noticed that there are quite a number of people who are new to cardmaking so this blog post will be a mixture of simple, fun and easy to make cards/tags and some that need a little more time to create. Do let me know which one is your favorite in the comment section, ok? I really love hearing from all of you. <3


WHATEVER YOU ARE, BE A GOOD ONE | YOU ARE GREAT


Don’t you just adore the Courageous You stamp set!?!?! I love huge images that can be colored using different kinds of coloring mediums. For these cards though, I thought of stamping and embossing the image on vellum for a soft and dainty look. I used the Fine Frames cover die to add borders around the card front. Light colors were chosen to match the soft look of this card.

When embossing on thin papers like vellum, just make sure that you heat up your heat gun first. I also heat it from the back to prevent the paper from warping.


THINKING OF YOU | WITH GRATITUDE


Here’s another set of CAS cards using the Geometric Elements stamp. When I saw this stamp set, the first thing that came into my mind was the geometric terrariums that I used for my daughter’s party a few years ago. 🙂

I used the stems on the Fragile Foliage Stamp set as strings for these “terrariums”. My youngest daughter Andrea helped me with the drawings of the mini succulents ( I will need a magnifying glass in order to do that!!! Thanks so much, Dea! <3 ) The succulents were colored with the Altenew alcohol artist markers. Strips of papers from the Blushing Blooms paper pack were added to finish off these cute and simple cards. The card front was also mounted onto foam sheets for added dimension.


YOU ARE WORTHY


This next card was created using the Floral In and Out Border die, the Wild Flora washi tape, the Terrific Tags die and the sentiment from the Courageous You stamp set. I wrapped a panel with the washi tape then die cut the Floral in and out border die. I did the same to 4 layers of white cardstocks so that I can stack them up to create some dimension.

I just had to fit them like a jigsaw puzzle then added a sentiment stamped on one of the tags from the Terrific tags die. A green brad was added as an accent to this simple card. You really don’t have to do much because the washi tape is already so beautiful.


HUGS


Here’s another pair of quick cards to make. I got some paper scraps from the Shades of Purple gradient cardstock set and cut them into strips. My apologies if I can’t remember who I saw this technique from– must be from the amazing Laura Bassen or Jennifer Mcguire or maybe even from Kristina Werner or the wonderful Cathy Zielske. They are my go-to cardmakers where I get my inspirations from.

I covered the entire card front with double-sided tape then adhered the strips. Both positive and negative elements from the Circled Greetings: hugs die were used to create 2 cards so nothing went to waste.


SOME DAYS YOU JUST HAVE TO CREATE YOUR OWN SUNSHINE


Would you believe that this card was made using only 1 stamped image? 🙂 The sentiment was stamped and heat embossed on vellum. The floral image from the Courageous You stamp set was stamped on 140 lbs Arches watercolor paper using Versamark ink then heat embossed with Rose gold embossing powder. I used colors from the Altenew watercolor brush makers. I love how highly pigmented these watercolors are! A little goes a long way.

The image was placed in one corner and the excess was cut off. Foam tape was used to create dimension. The leftover pieces were also adhered to the card front to fill the other edges of the card.


THANKS


Here’s another set of CAS cards using bold colors. I die cut 3 different colored cardstocks using the Circled Greetings: thanks die. To vary the background, I placed the Feeling Dotty Stencil over the background then added Versamark ink over it.

White embossing ink was poured over it and heat embossed to create a dotted background. I also added a sentiment from the Hello and Hugs stamp set for variation. This is a quick way to create multiple cards with a single die– just vary the cardstocks and backgrounds.


THANK YOU TAG


Here’s another quick project using the masking technique. For these tags, I used the sentiments from the Geometric Elements and the Fragile Foliage image. The biggest tag from the Terrific Tags dies was perfect to make the packaging for the monogram cards I made for a friend look pretty. I love the simplicity of the image which ties up with the modernity of the font.

The sentiment and border were stamped and embossed first using rose gold embossing powder. Then I masked the area so that I can stamp the foliage image over it.

If you have been following my previous blog posts, you’ll notice that my style leans heavily towards layering and lots of embellishments. Restraining myself from adding more to a card is truly a struggle for me. I have a hard time creating clean and simple cards because I tend to cover up all of the white space. That being said, I’ve always been a huge fan of Cathy Zielske‘s CAS style ever since my scrapbooking days in the early 2000s. From her, I’ve learned the basics in design principles. She’s my rockstar when it comes to CAS layouts and cards. And just recently, she sent me a video message full of sound advice on how to deal with certain types of people. I am so humbled that she took time out of her busy schedule to personally send a message and make me feel better. So in honor of this amazing human being, this post showcases a number of CAS cards and from this post onwards, I will step out of my comfort zone and try to include a card that reflects her style. Thank you, Cathy! Truly appreciate what you did. ❤️ Below is a set of CAS cards inspired by her style using the Fragile Foliage stamp set.


I’VE BEEN THINKING OF YOU|THANKS FOR EVERYTHING


The image from the Fragile Foliage image was stamped on a rectangular die cut cardstock. This was adhered on the card front using a foam sheet. Golden peach and Caribbean sky embossing powders were used to emboss the sentiments from the Sentiment Strips stamp set.

Thank you so much for dropping by!!! As I’ve said earlier, I truly enjoy reading all your wonderful comments. Do say hi and let me know which card is your favorite! Would love to see you too in my other social media platforms. To see my latest projects, you can follow me on Instagram and Facebook . Thanks again for dropping by and keep on crafting!!!

“We rise by lifting others.” — Robert Ingersoll