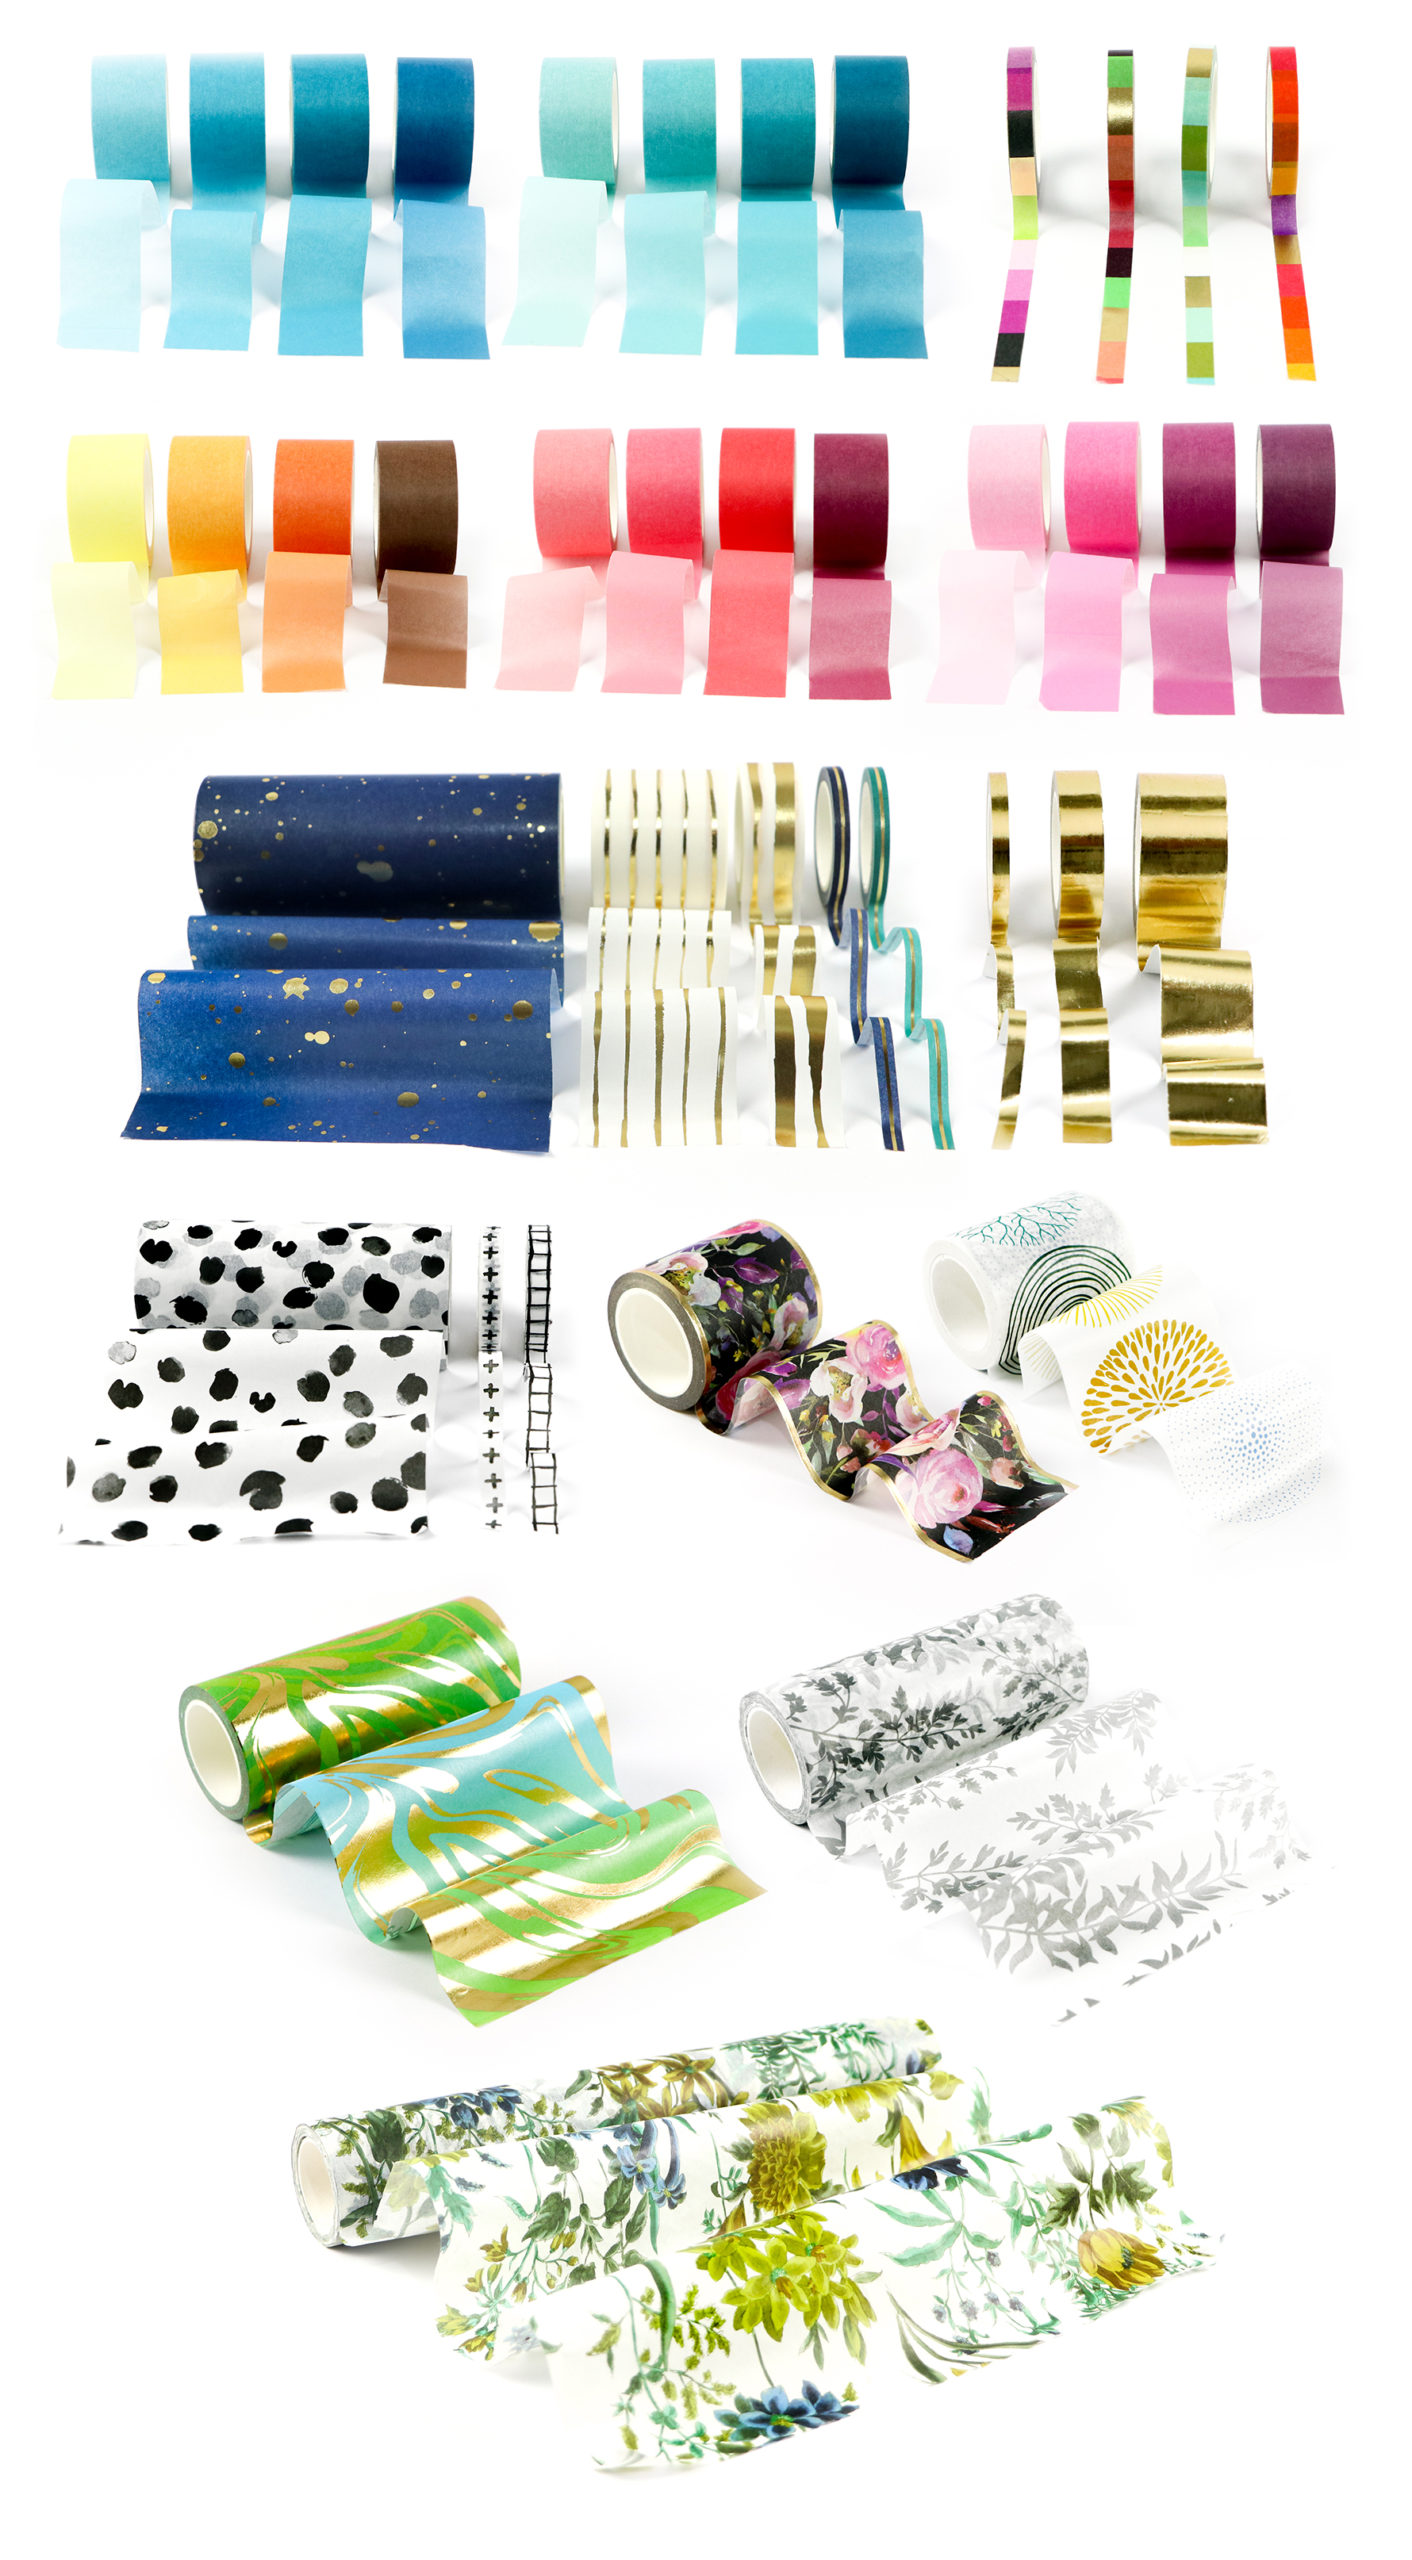
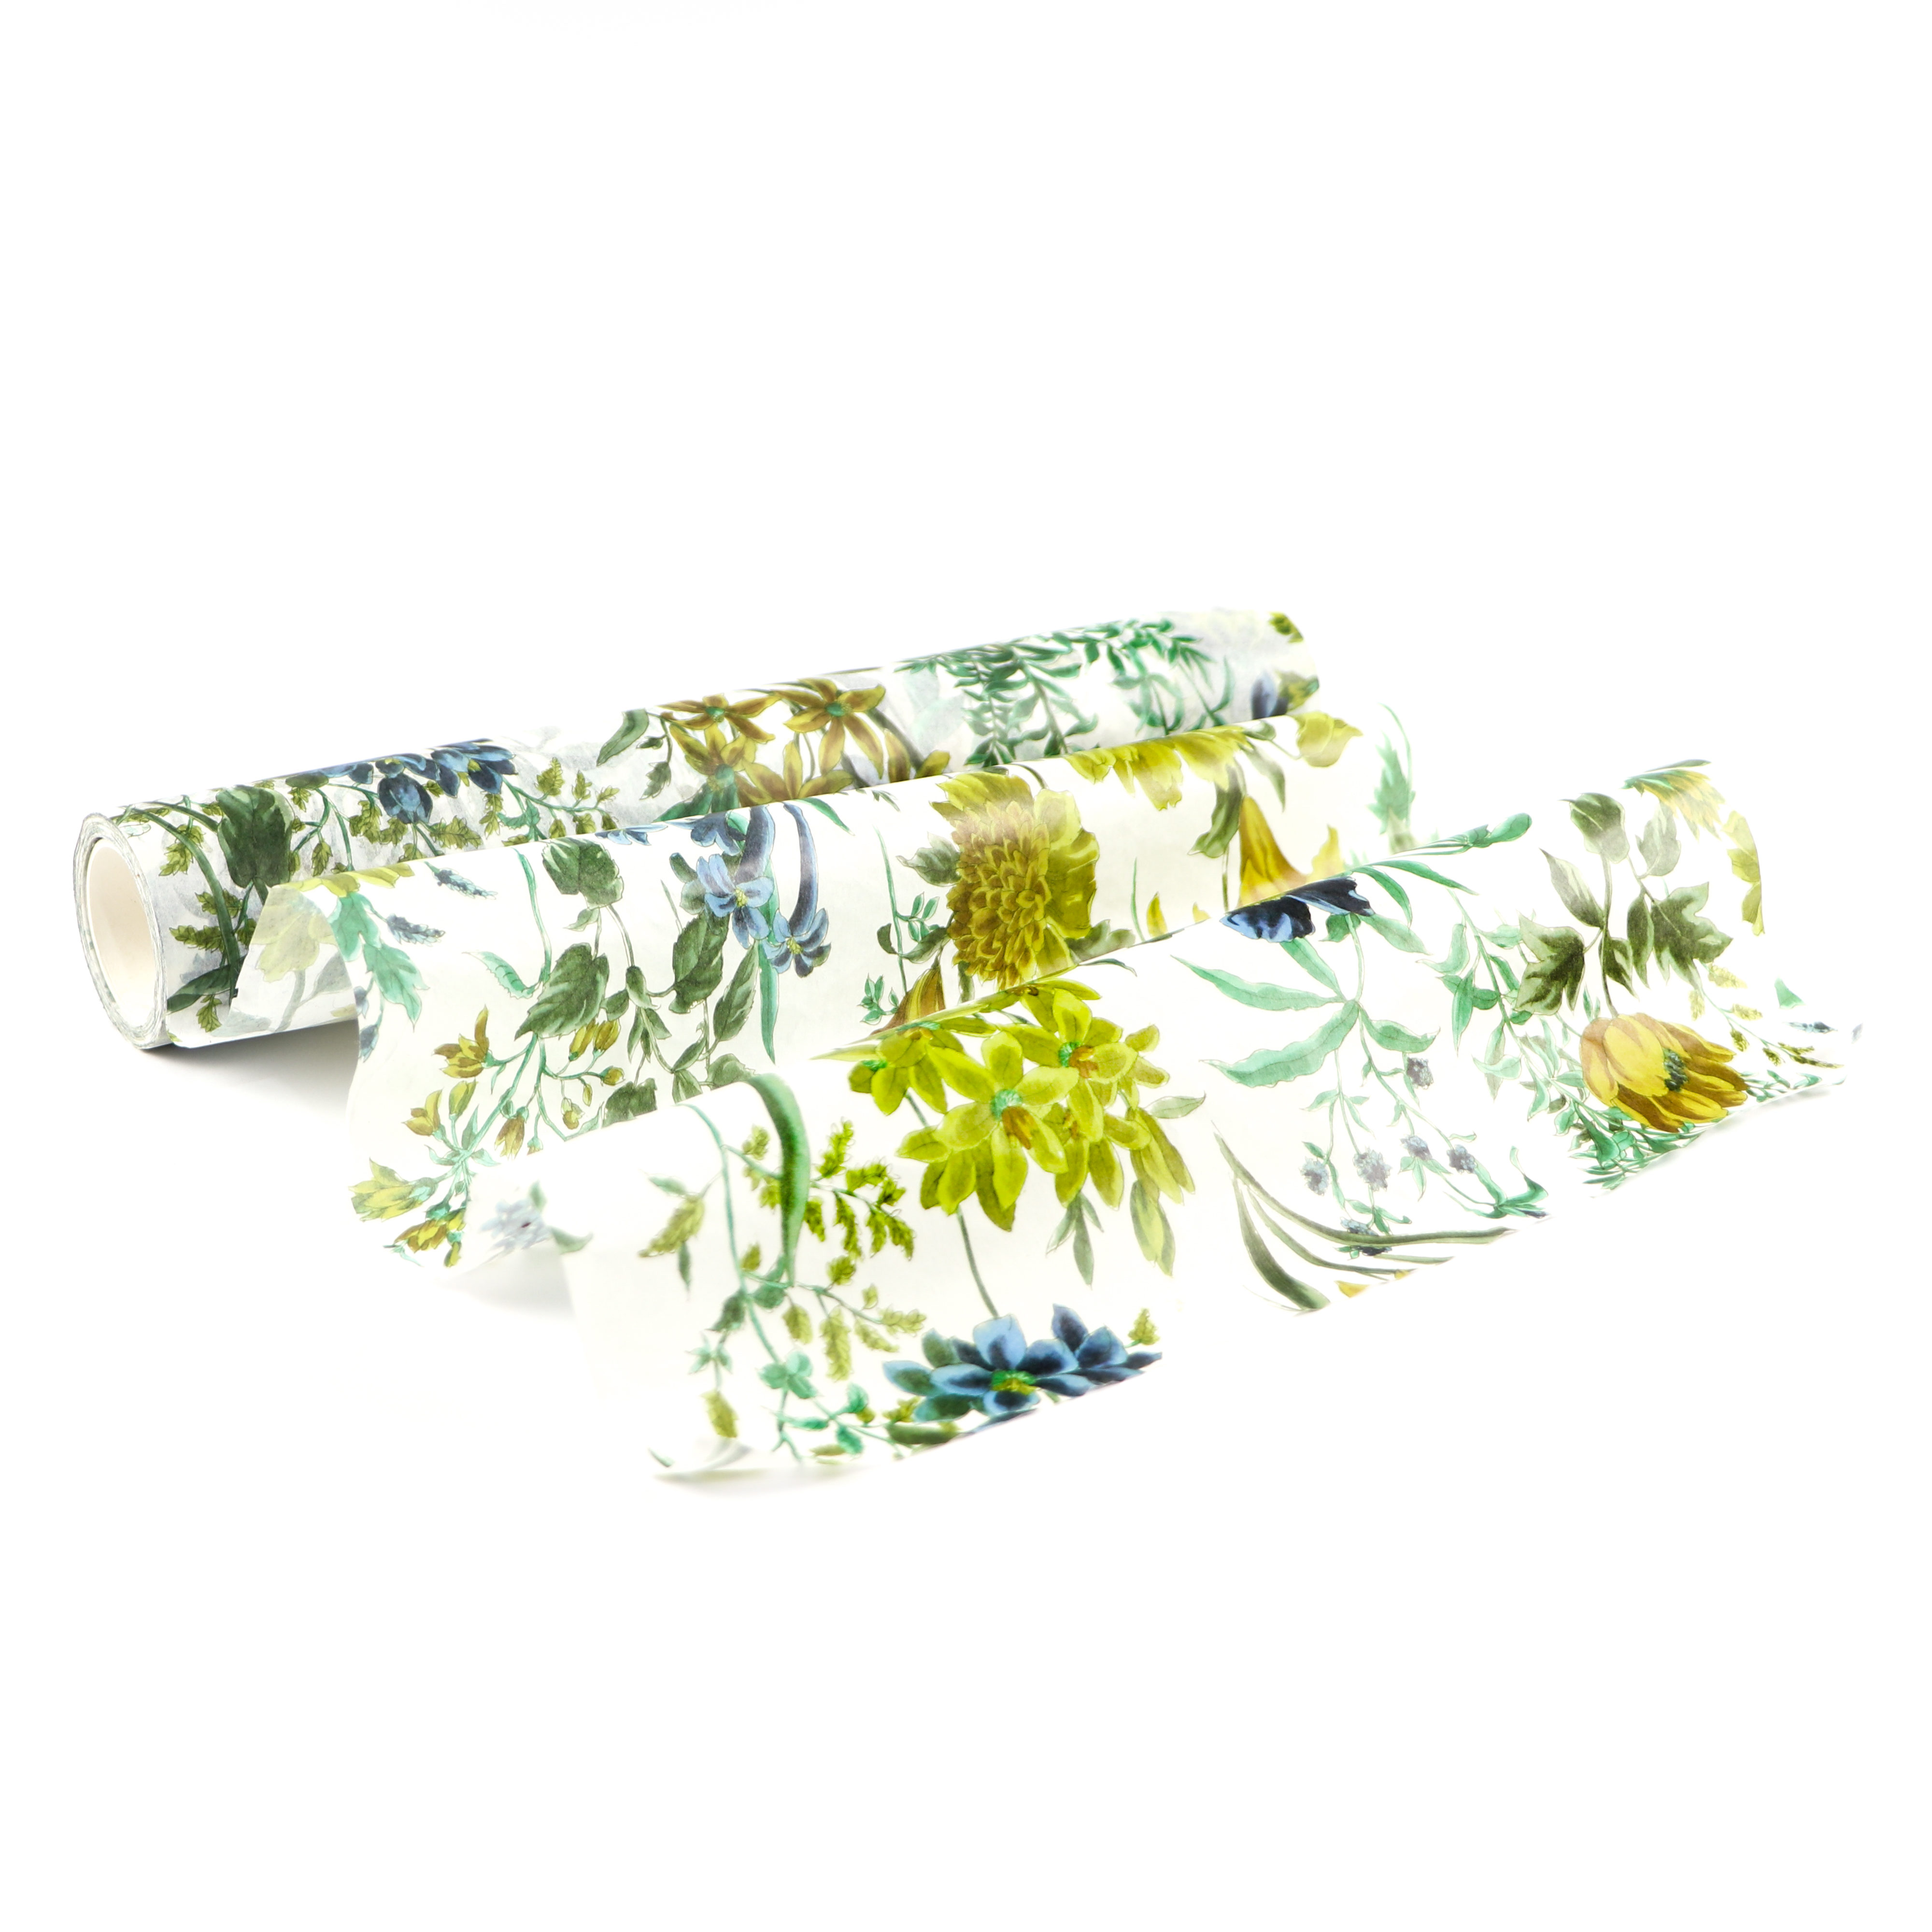
Hello everyone!!! I’d like to thank Sveta Fotinia from sending all of you over. I’m so thrilled to be a part of this blog hop because this release is just full of colors! I’m sure you will fall in love with them 😍 To view the entire collection, make sure you visit the Altenew Blog or you can check out their online store here. Take a look at these gorgeous summer washi tapes!!!
There are so many ways you can use these amazing washi tapes and below are some examples. I just love how you can create wonderful cards in no time at all just by using washi tapes.
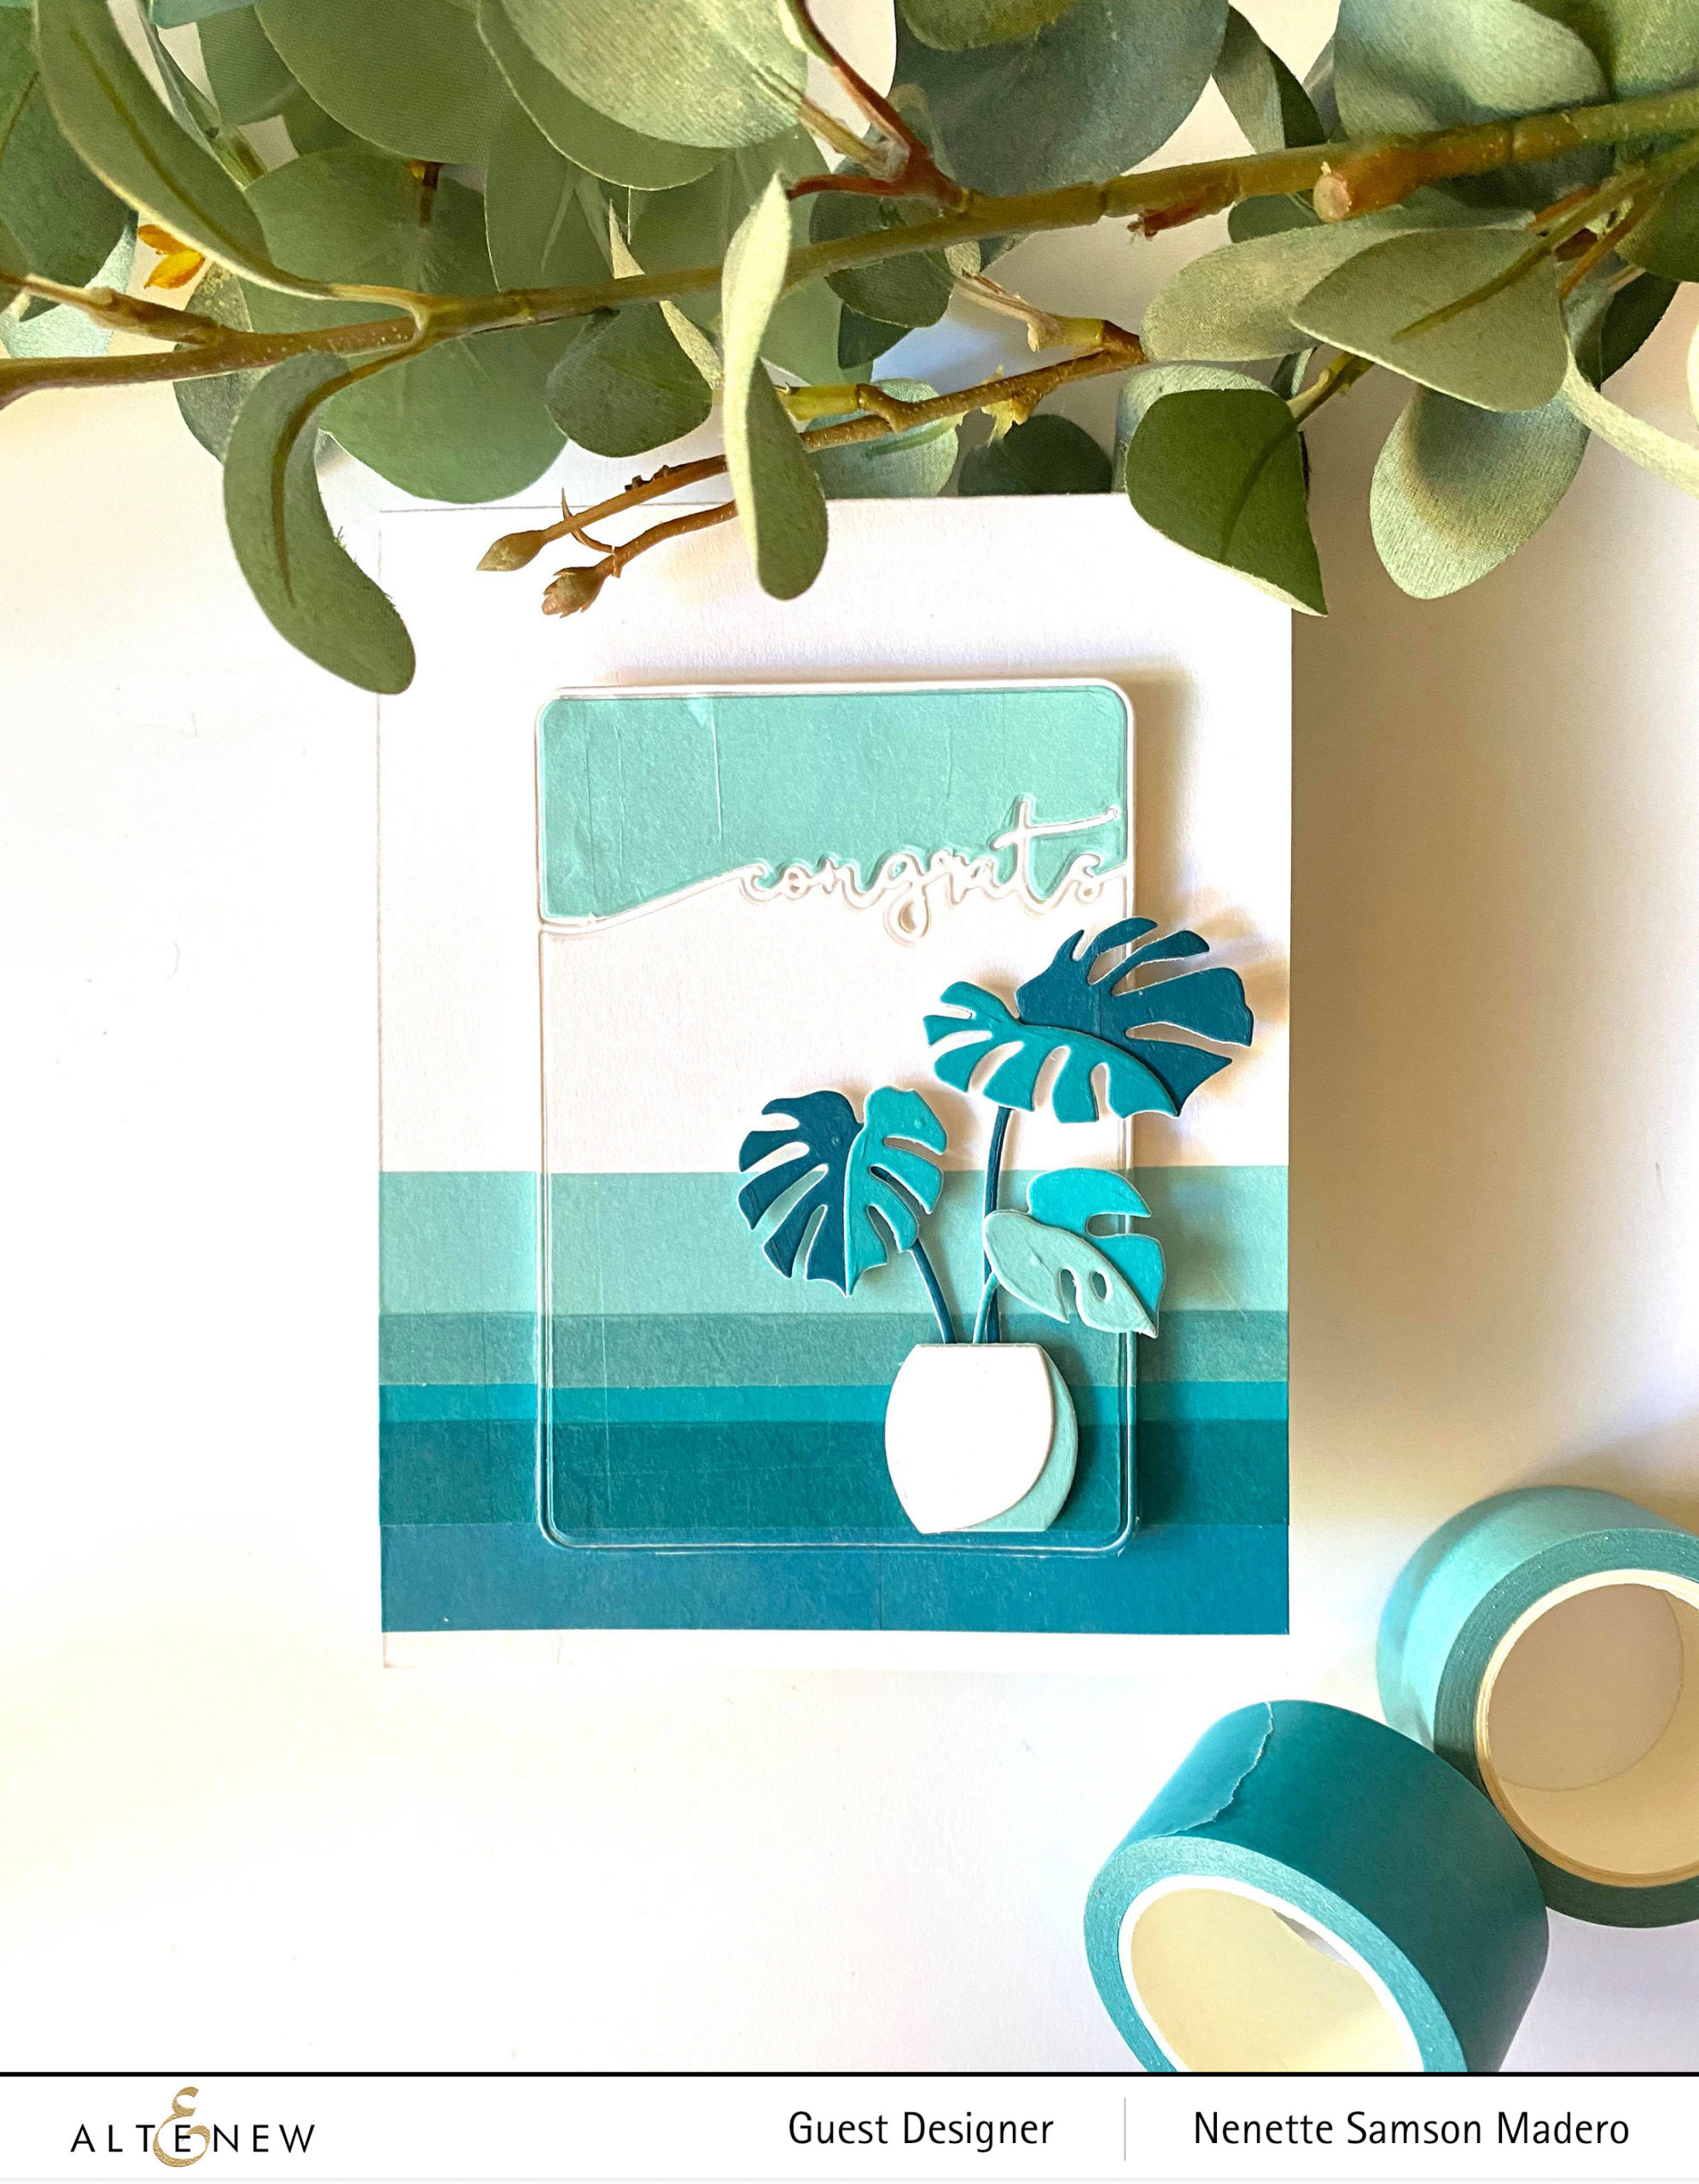
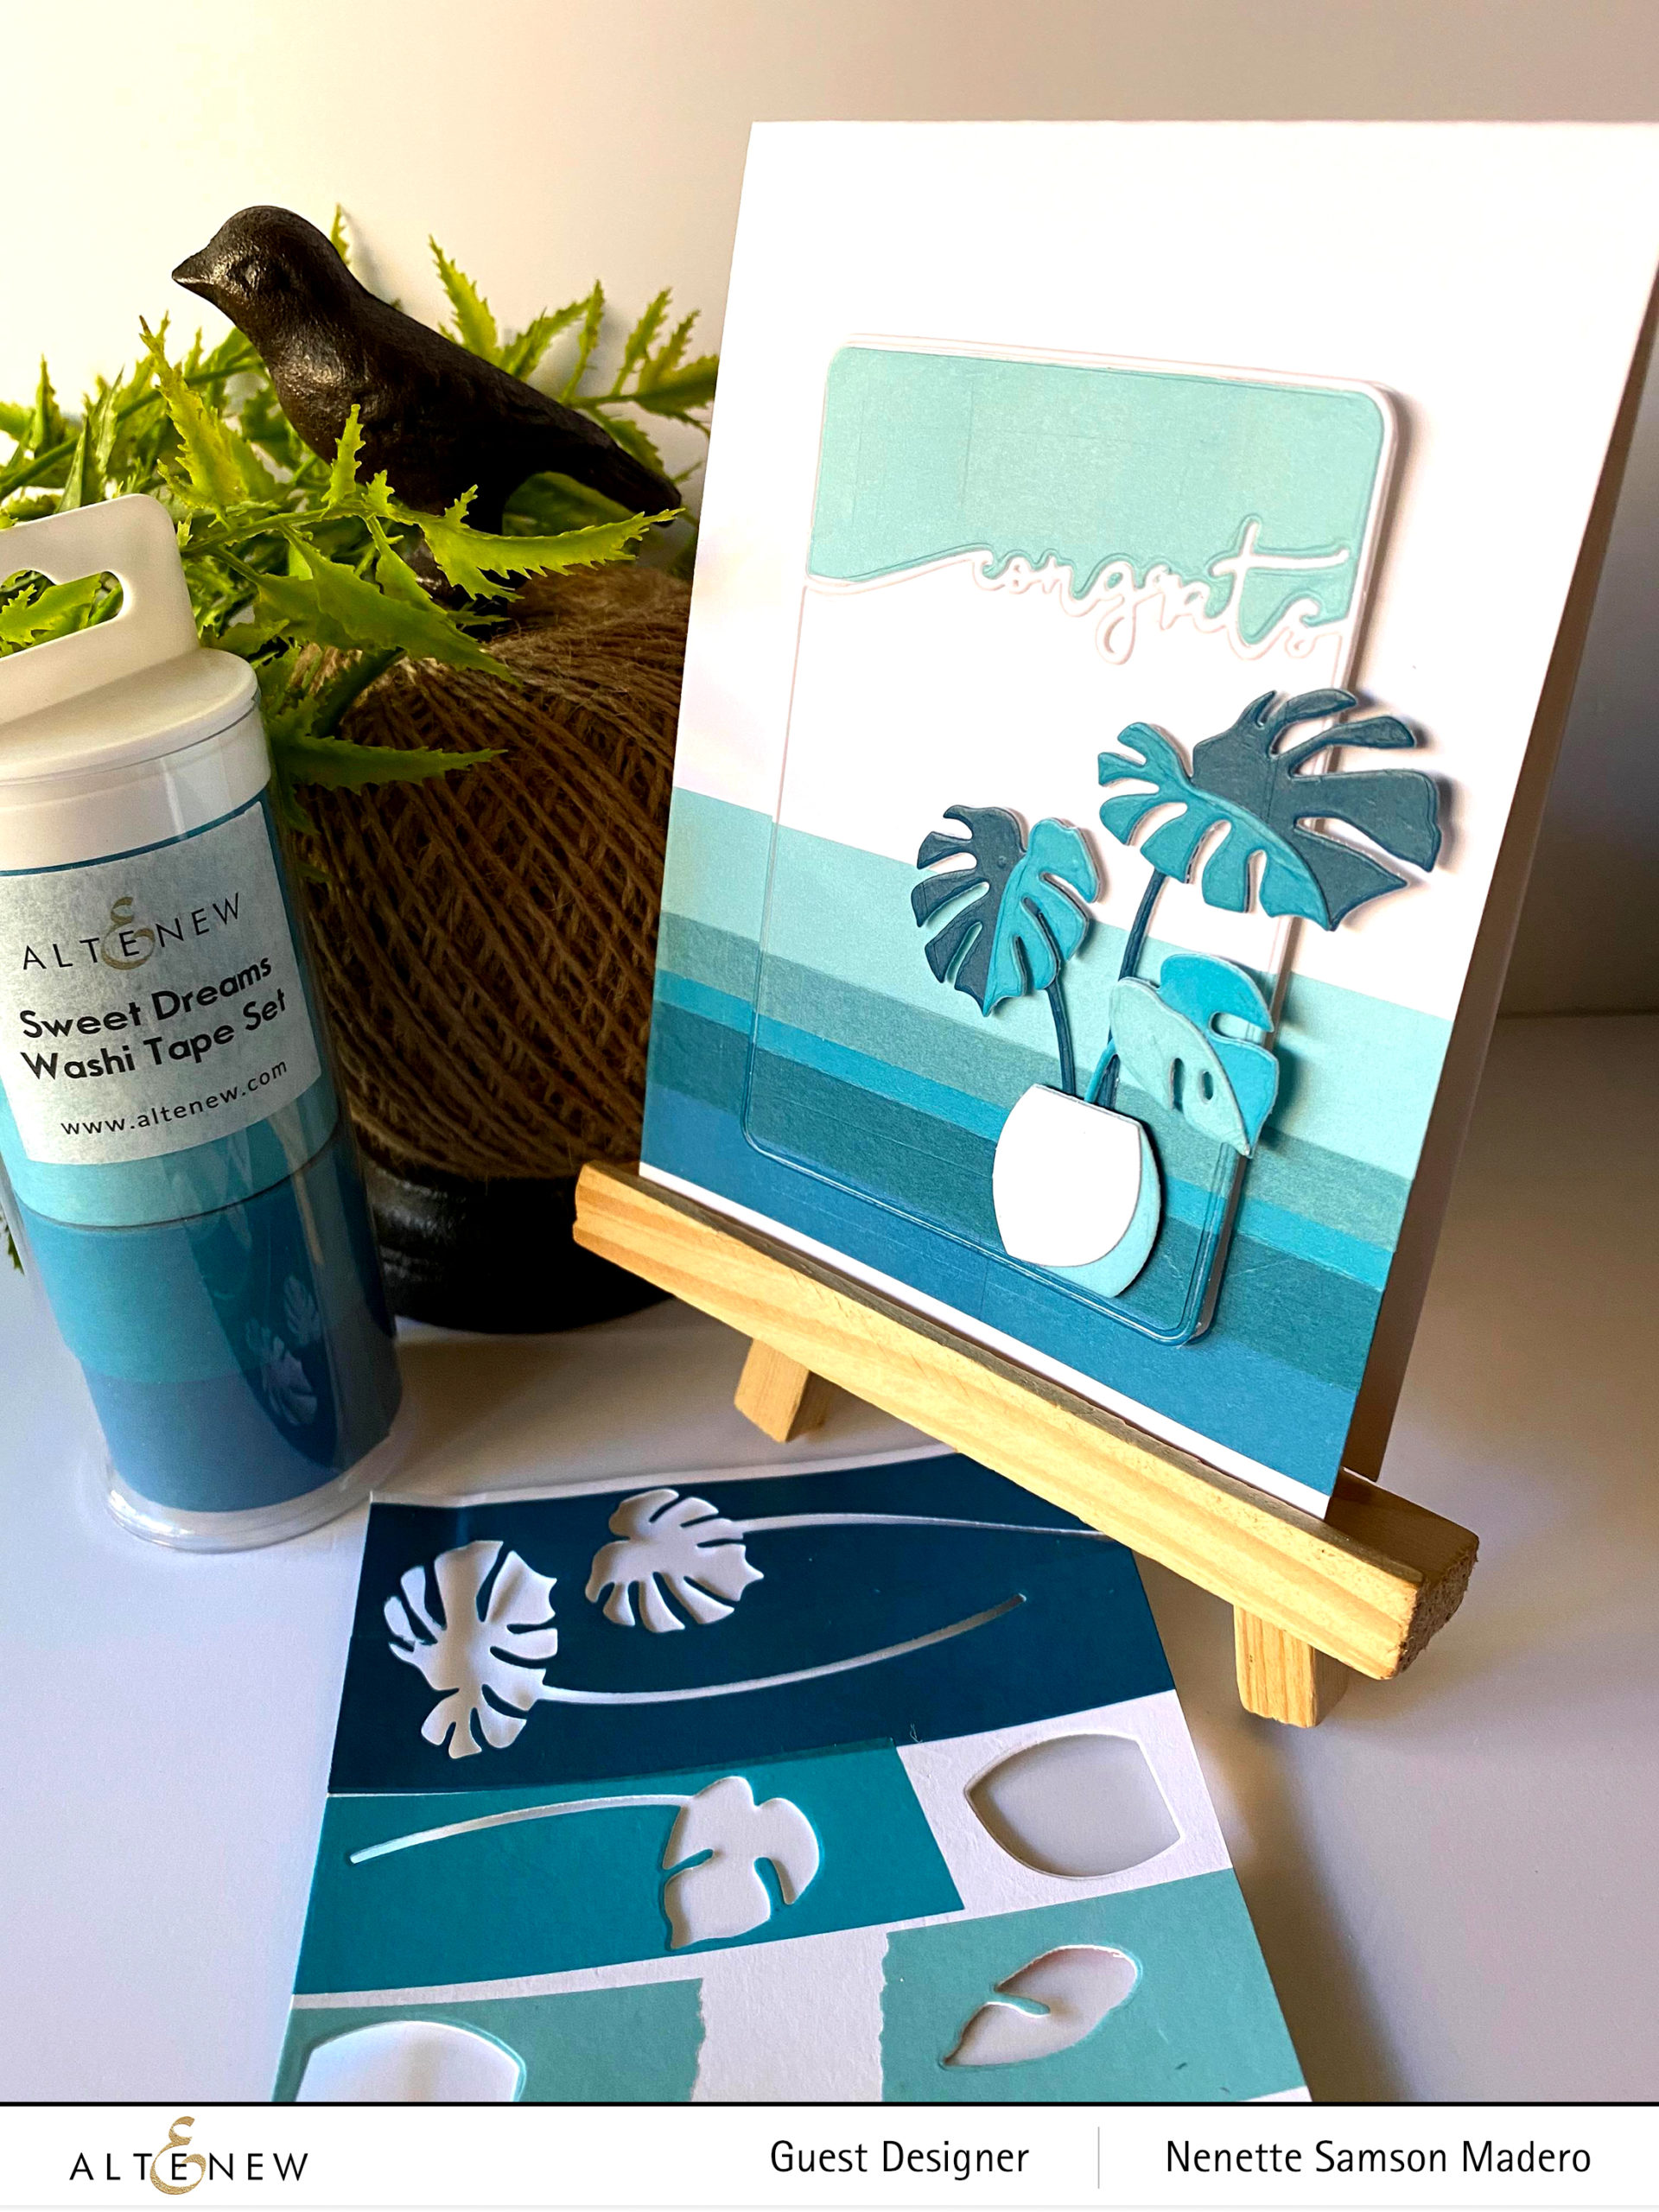
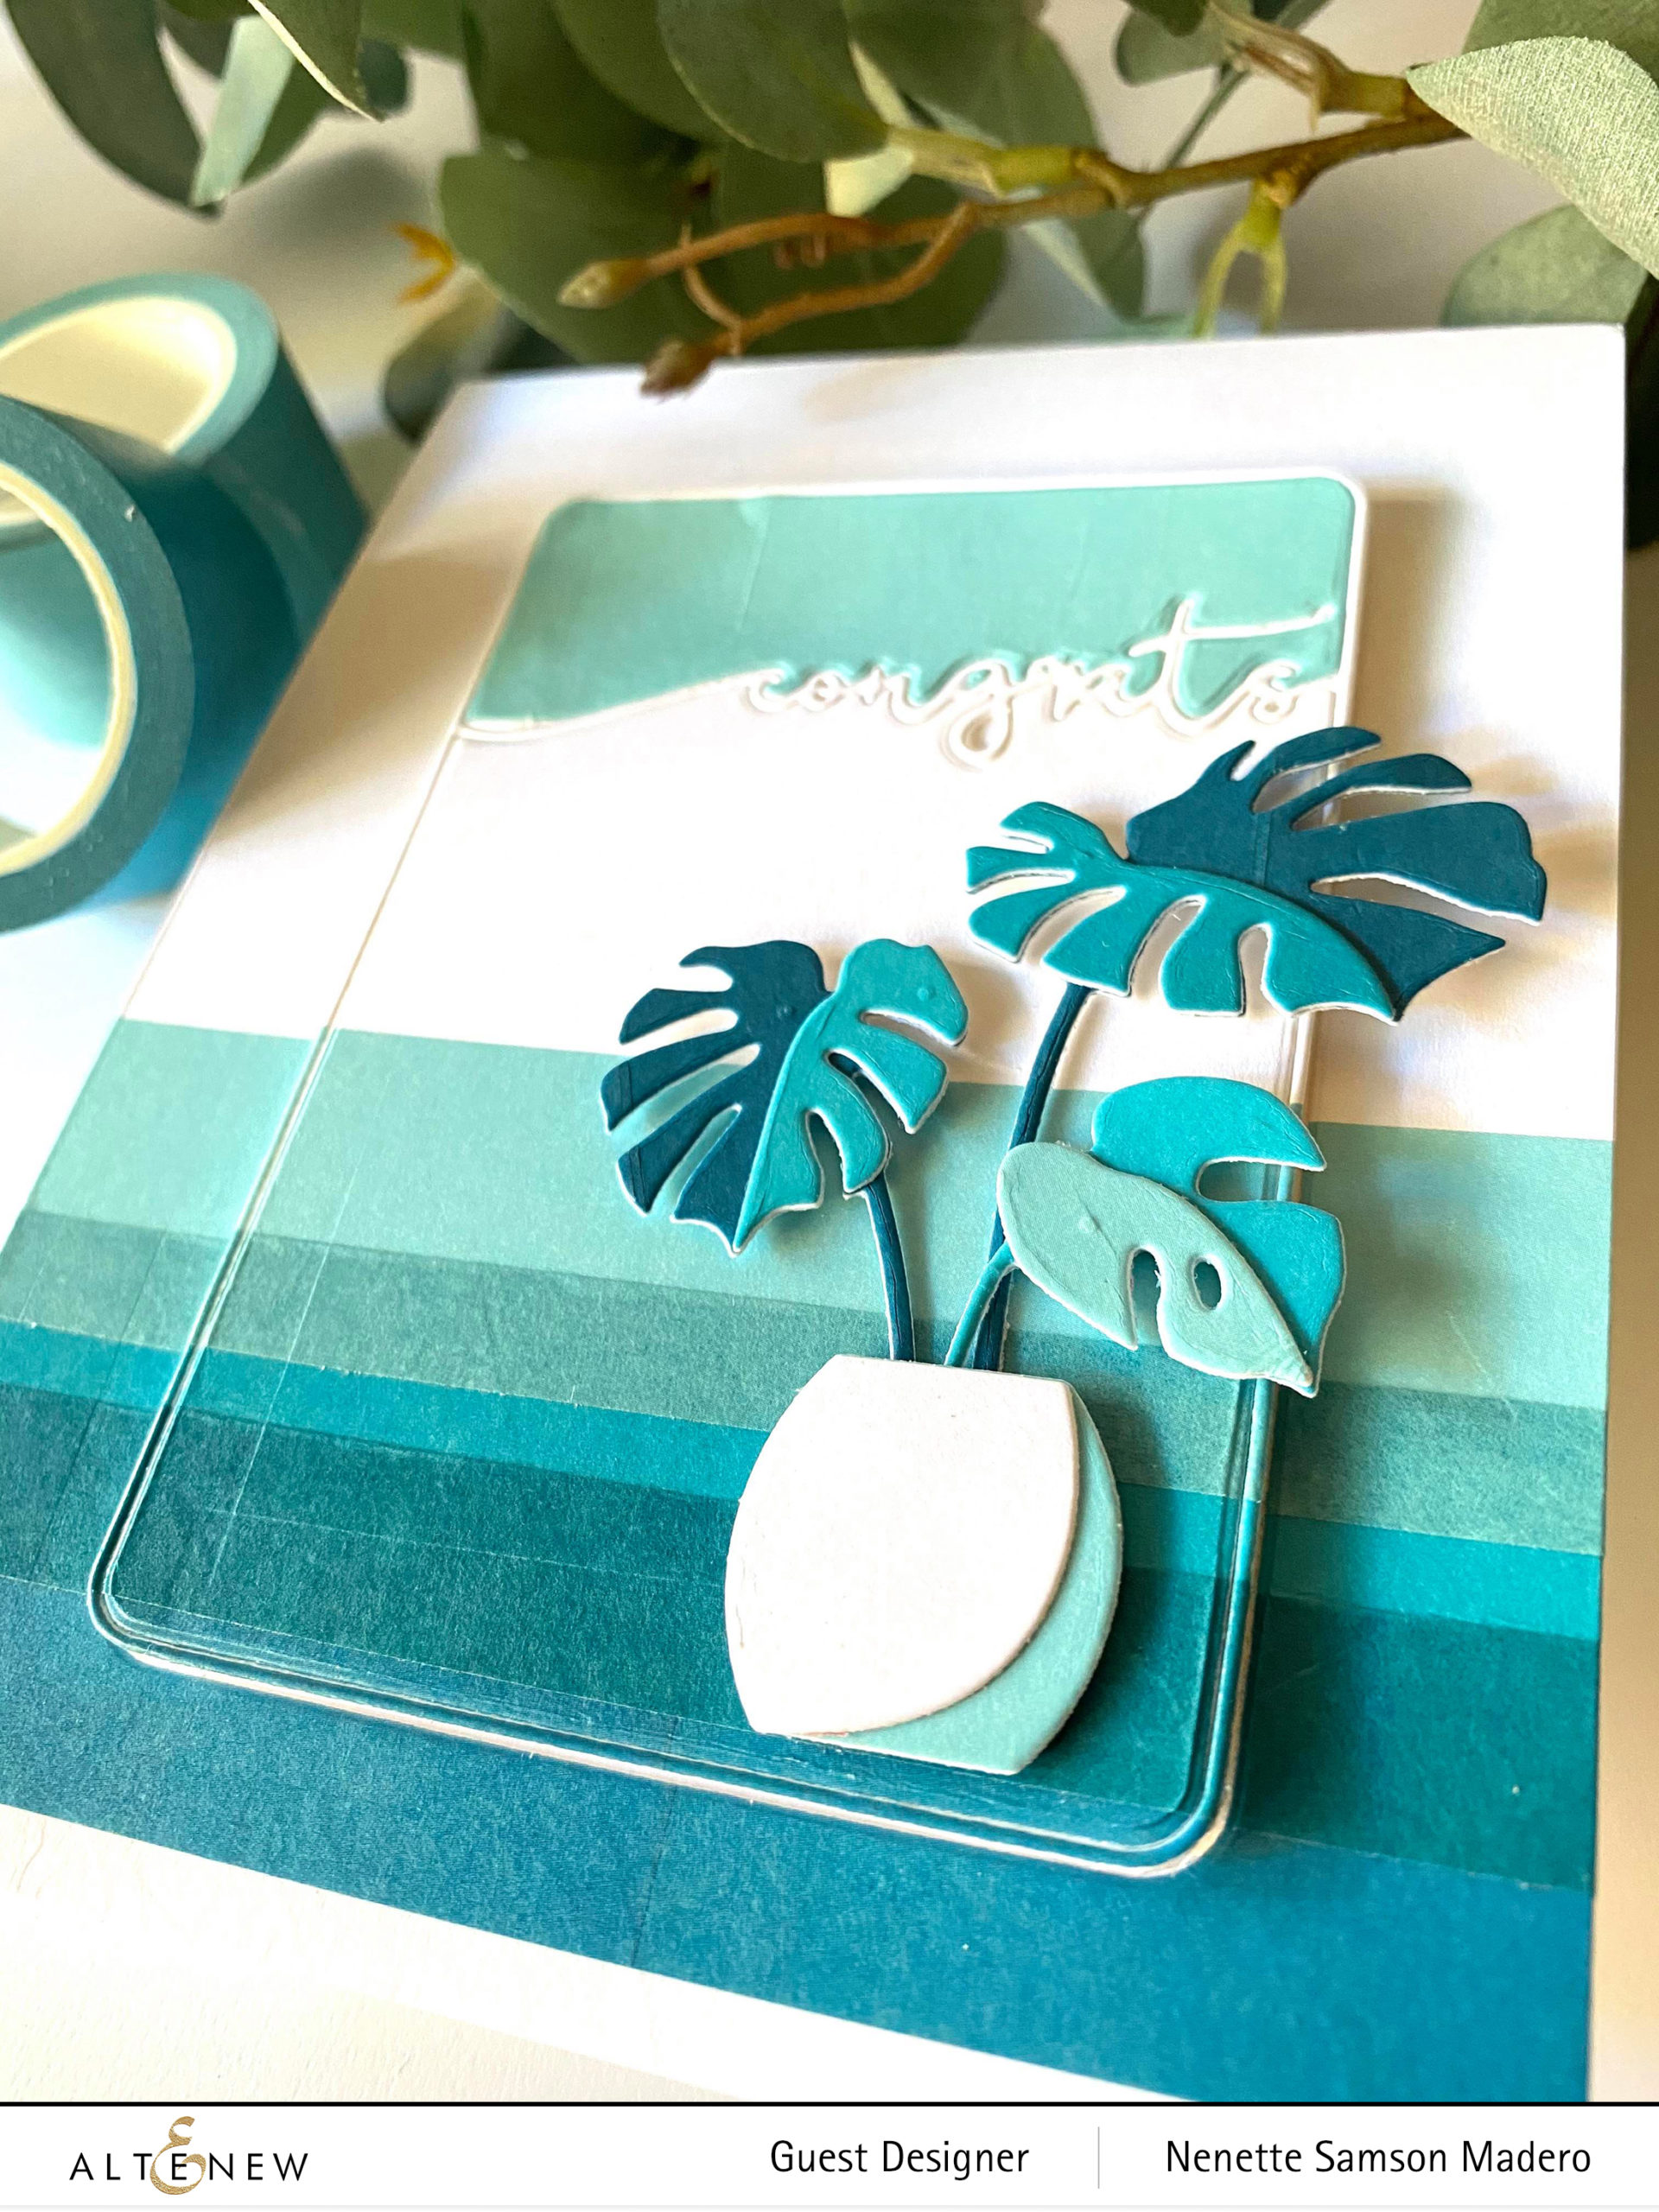
CONGRATS CARD
This card was inspired by the talented Norine Borys‘ card from last month’s stand-alone dies. I just loved how simple yet stunning the card was so I created a similar card using washi tape. Materials used for this card are the following: Framed Congrats die, Monstera 3D die and the Sweet Dreams Washi tape.
I love how easy it is to add color to a card front using washi tapes. For this card, I used the different shades of blues by sticking them onto Neenah solar white cardstock then die cutting the pieces using the Monstera 3d die. Next, I layered the different shades of washi, sometimes overlapping to create a new shade of blue. I left the upper portion of the card white for more contrast. I cut out the middle part using the Framed Congrats die then cut another 4 more to layer behind it to add some dimension then adhered the plant and pot.
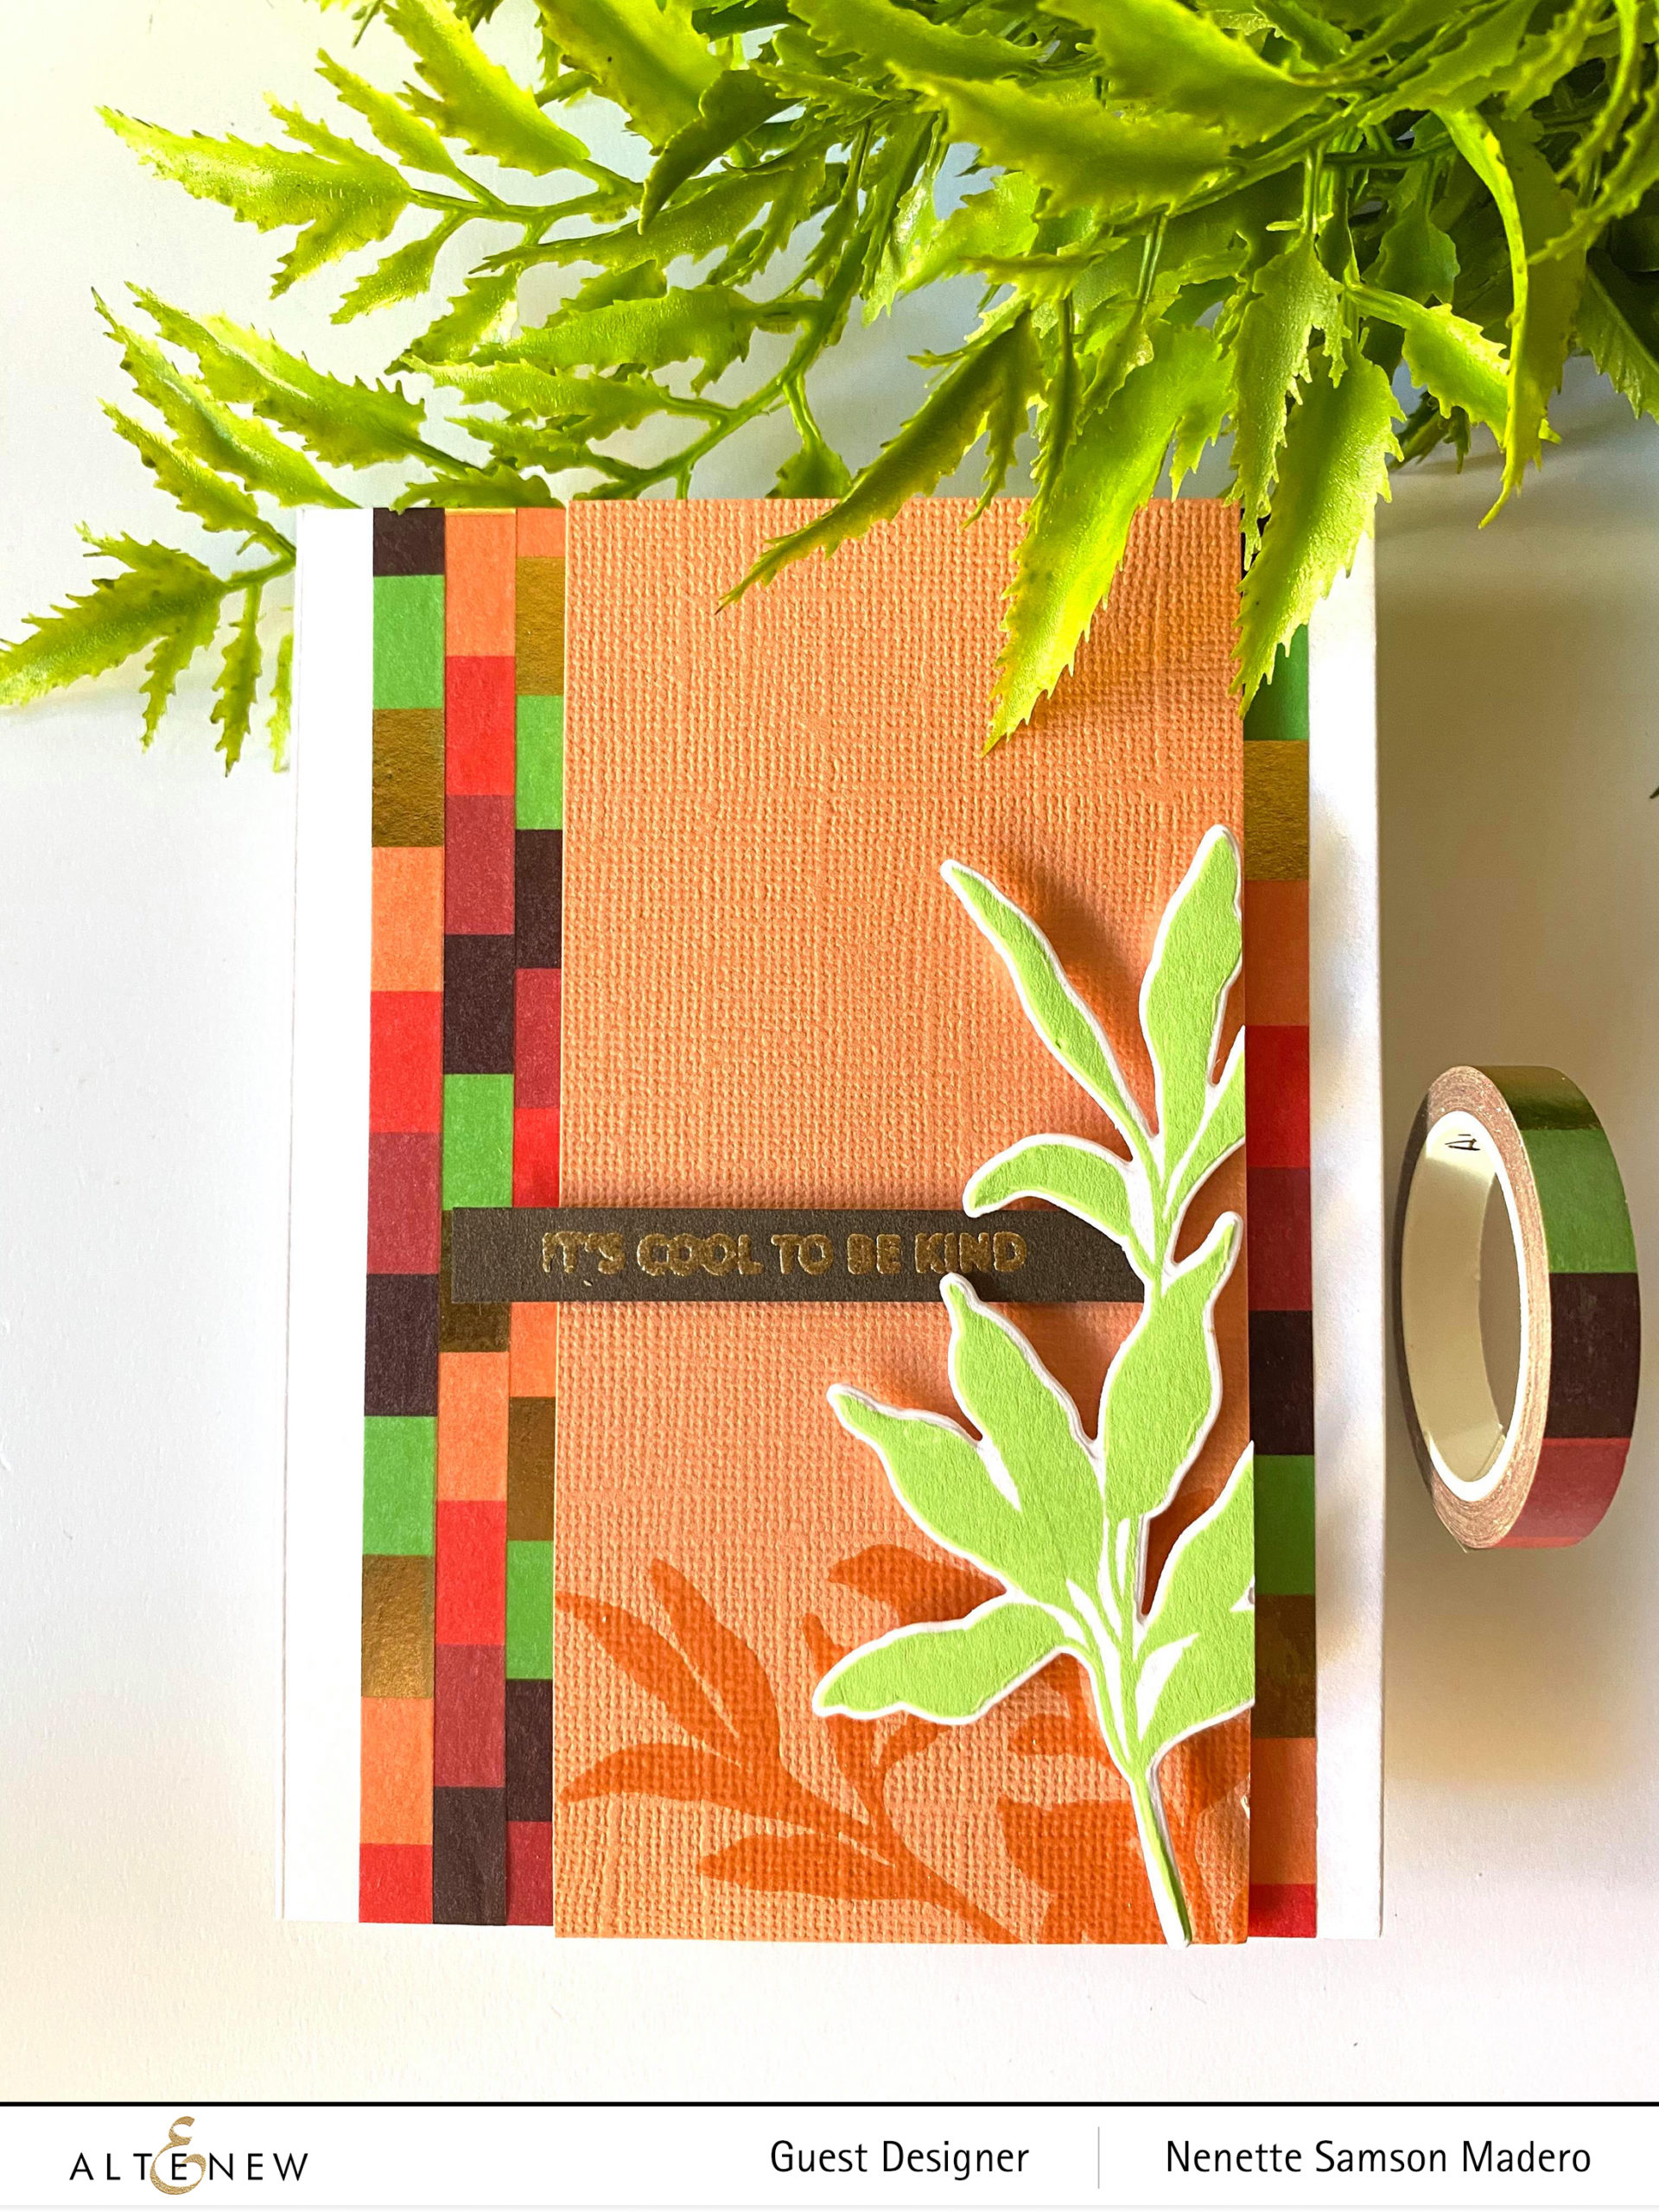
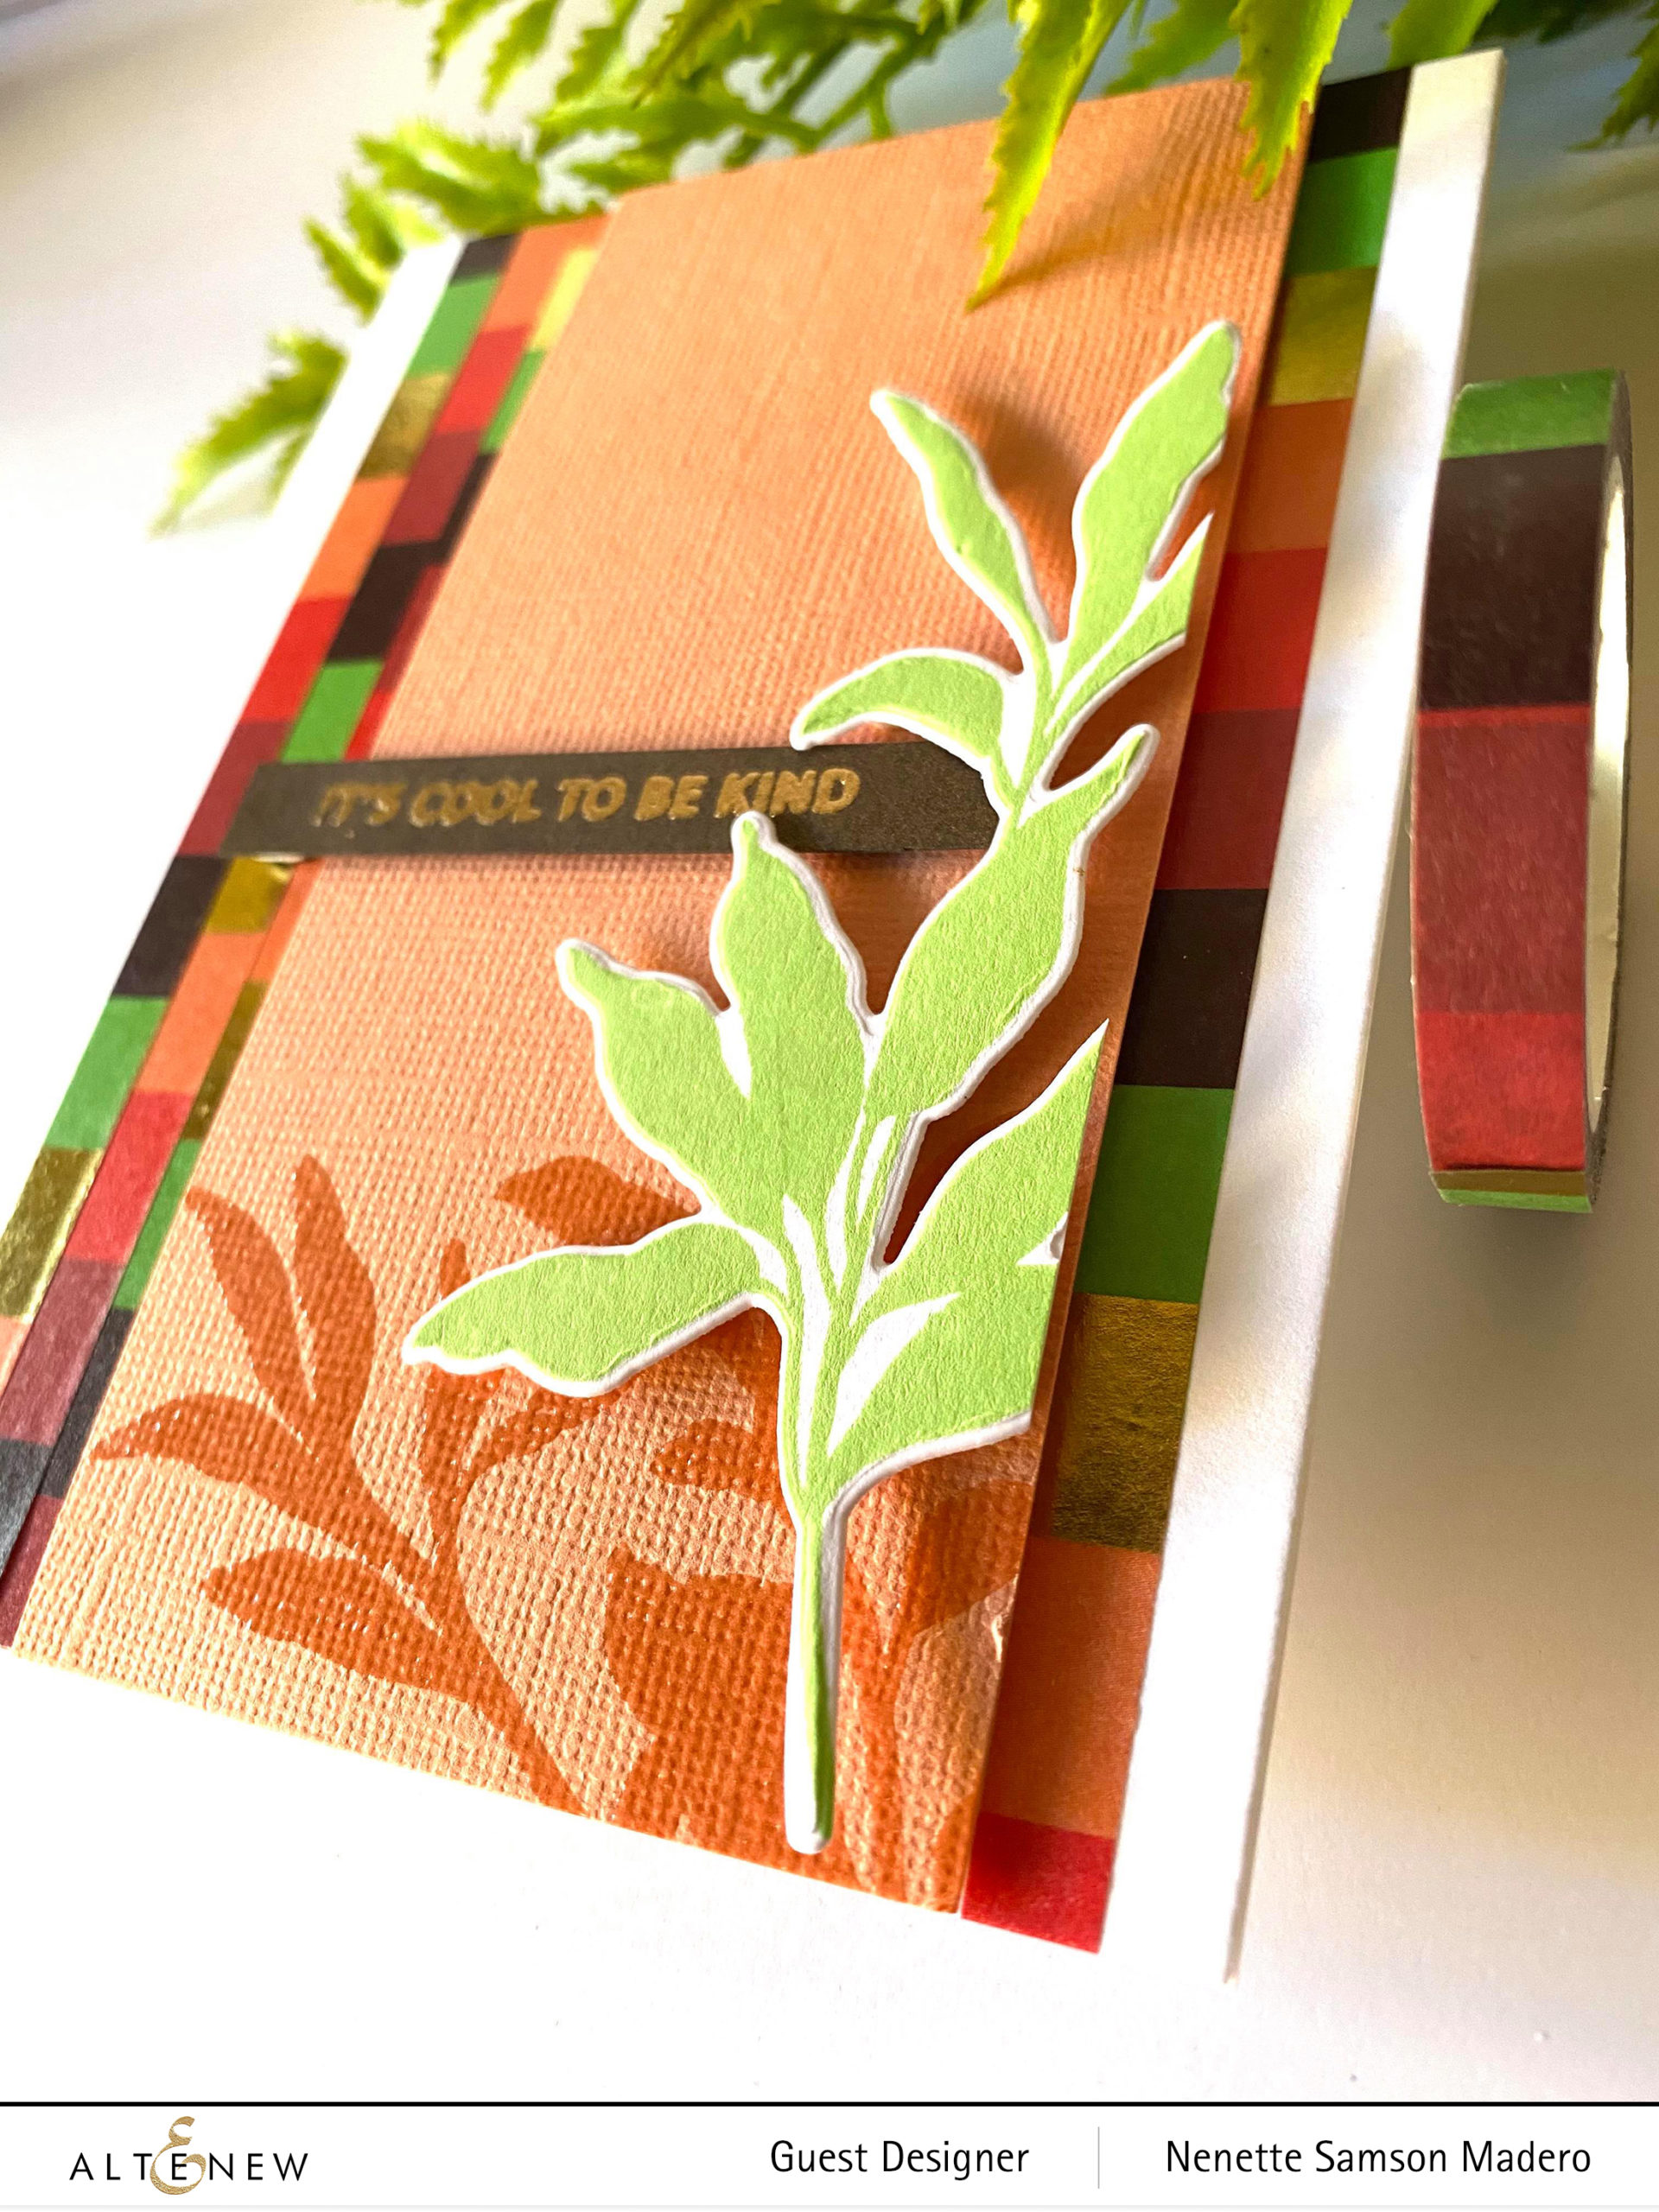
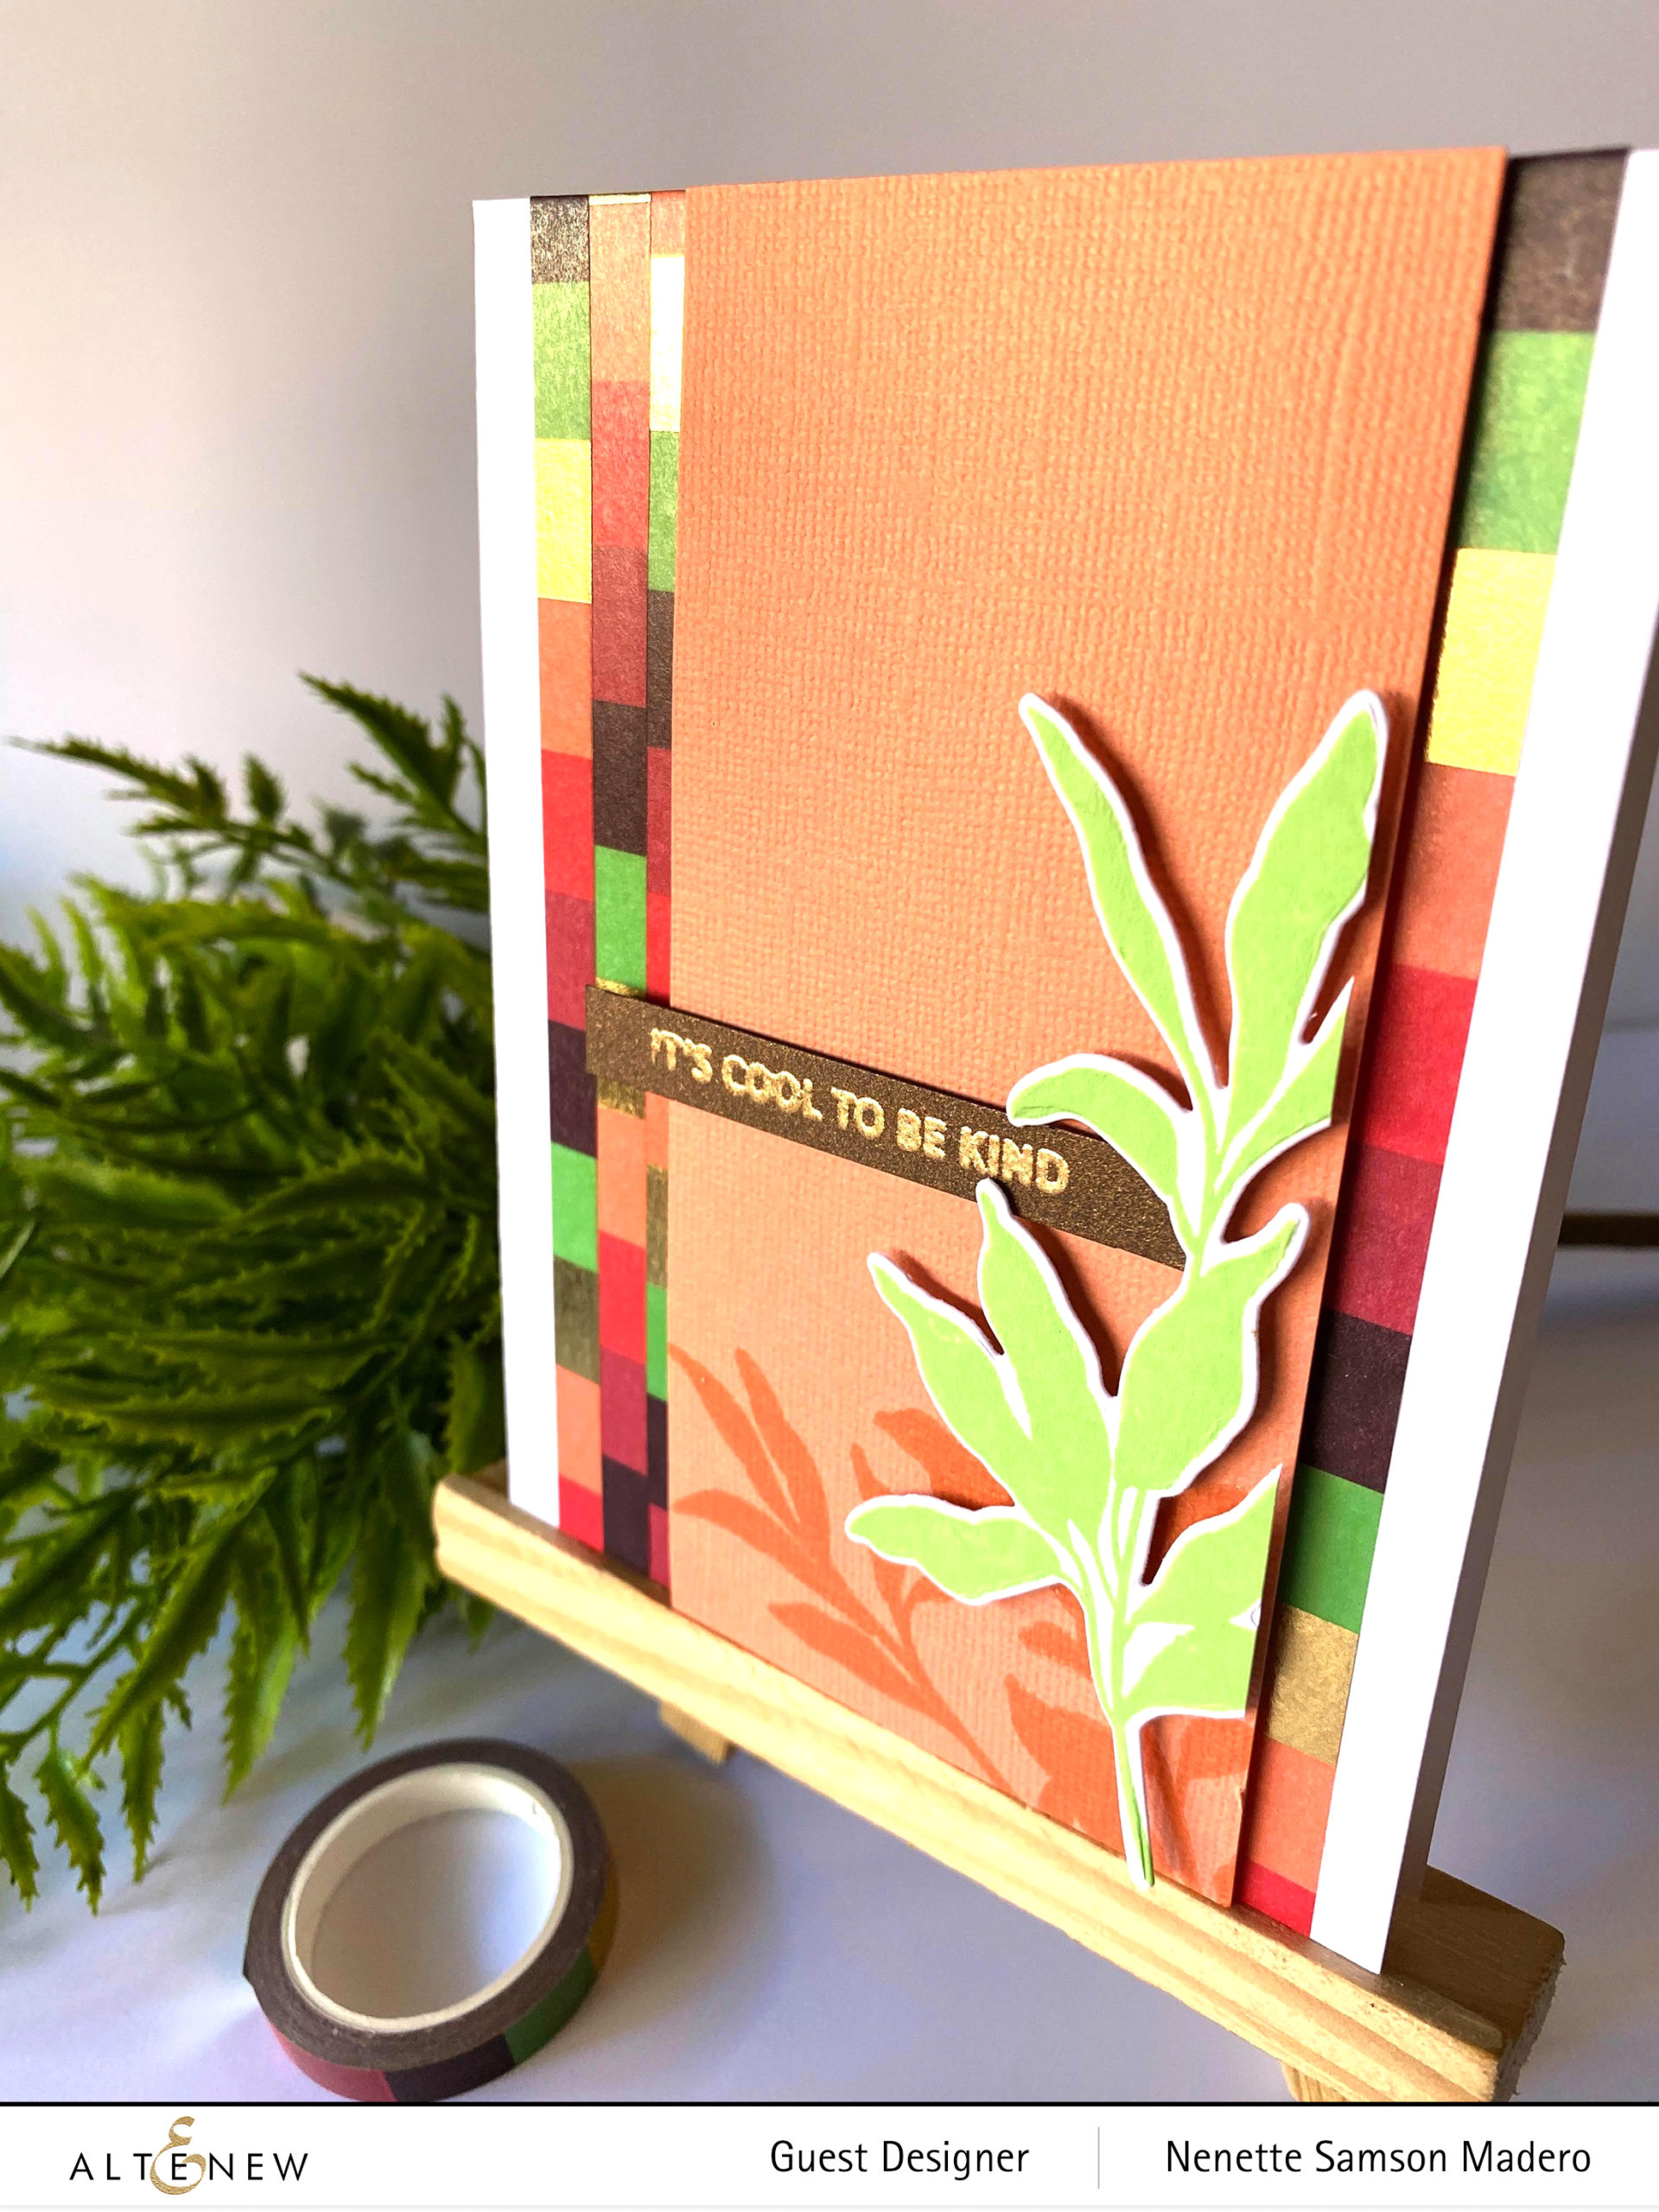
I stamped the leaves onto Neenah Solar White cardstock then die cut it. Another set of leaves was stamped onto the orange cardstock using Versamark ink then embossed with clear embossing powder. the panel was cut and the Allium Palette Washi tape was used to frame the panel on both sides for some accents. I love the color combo used in this tape.❤️ The panel was attached to the card front using foam tape.
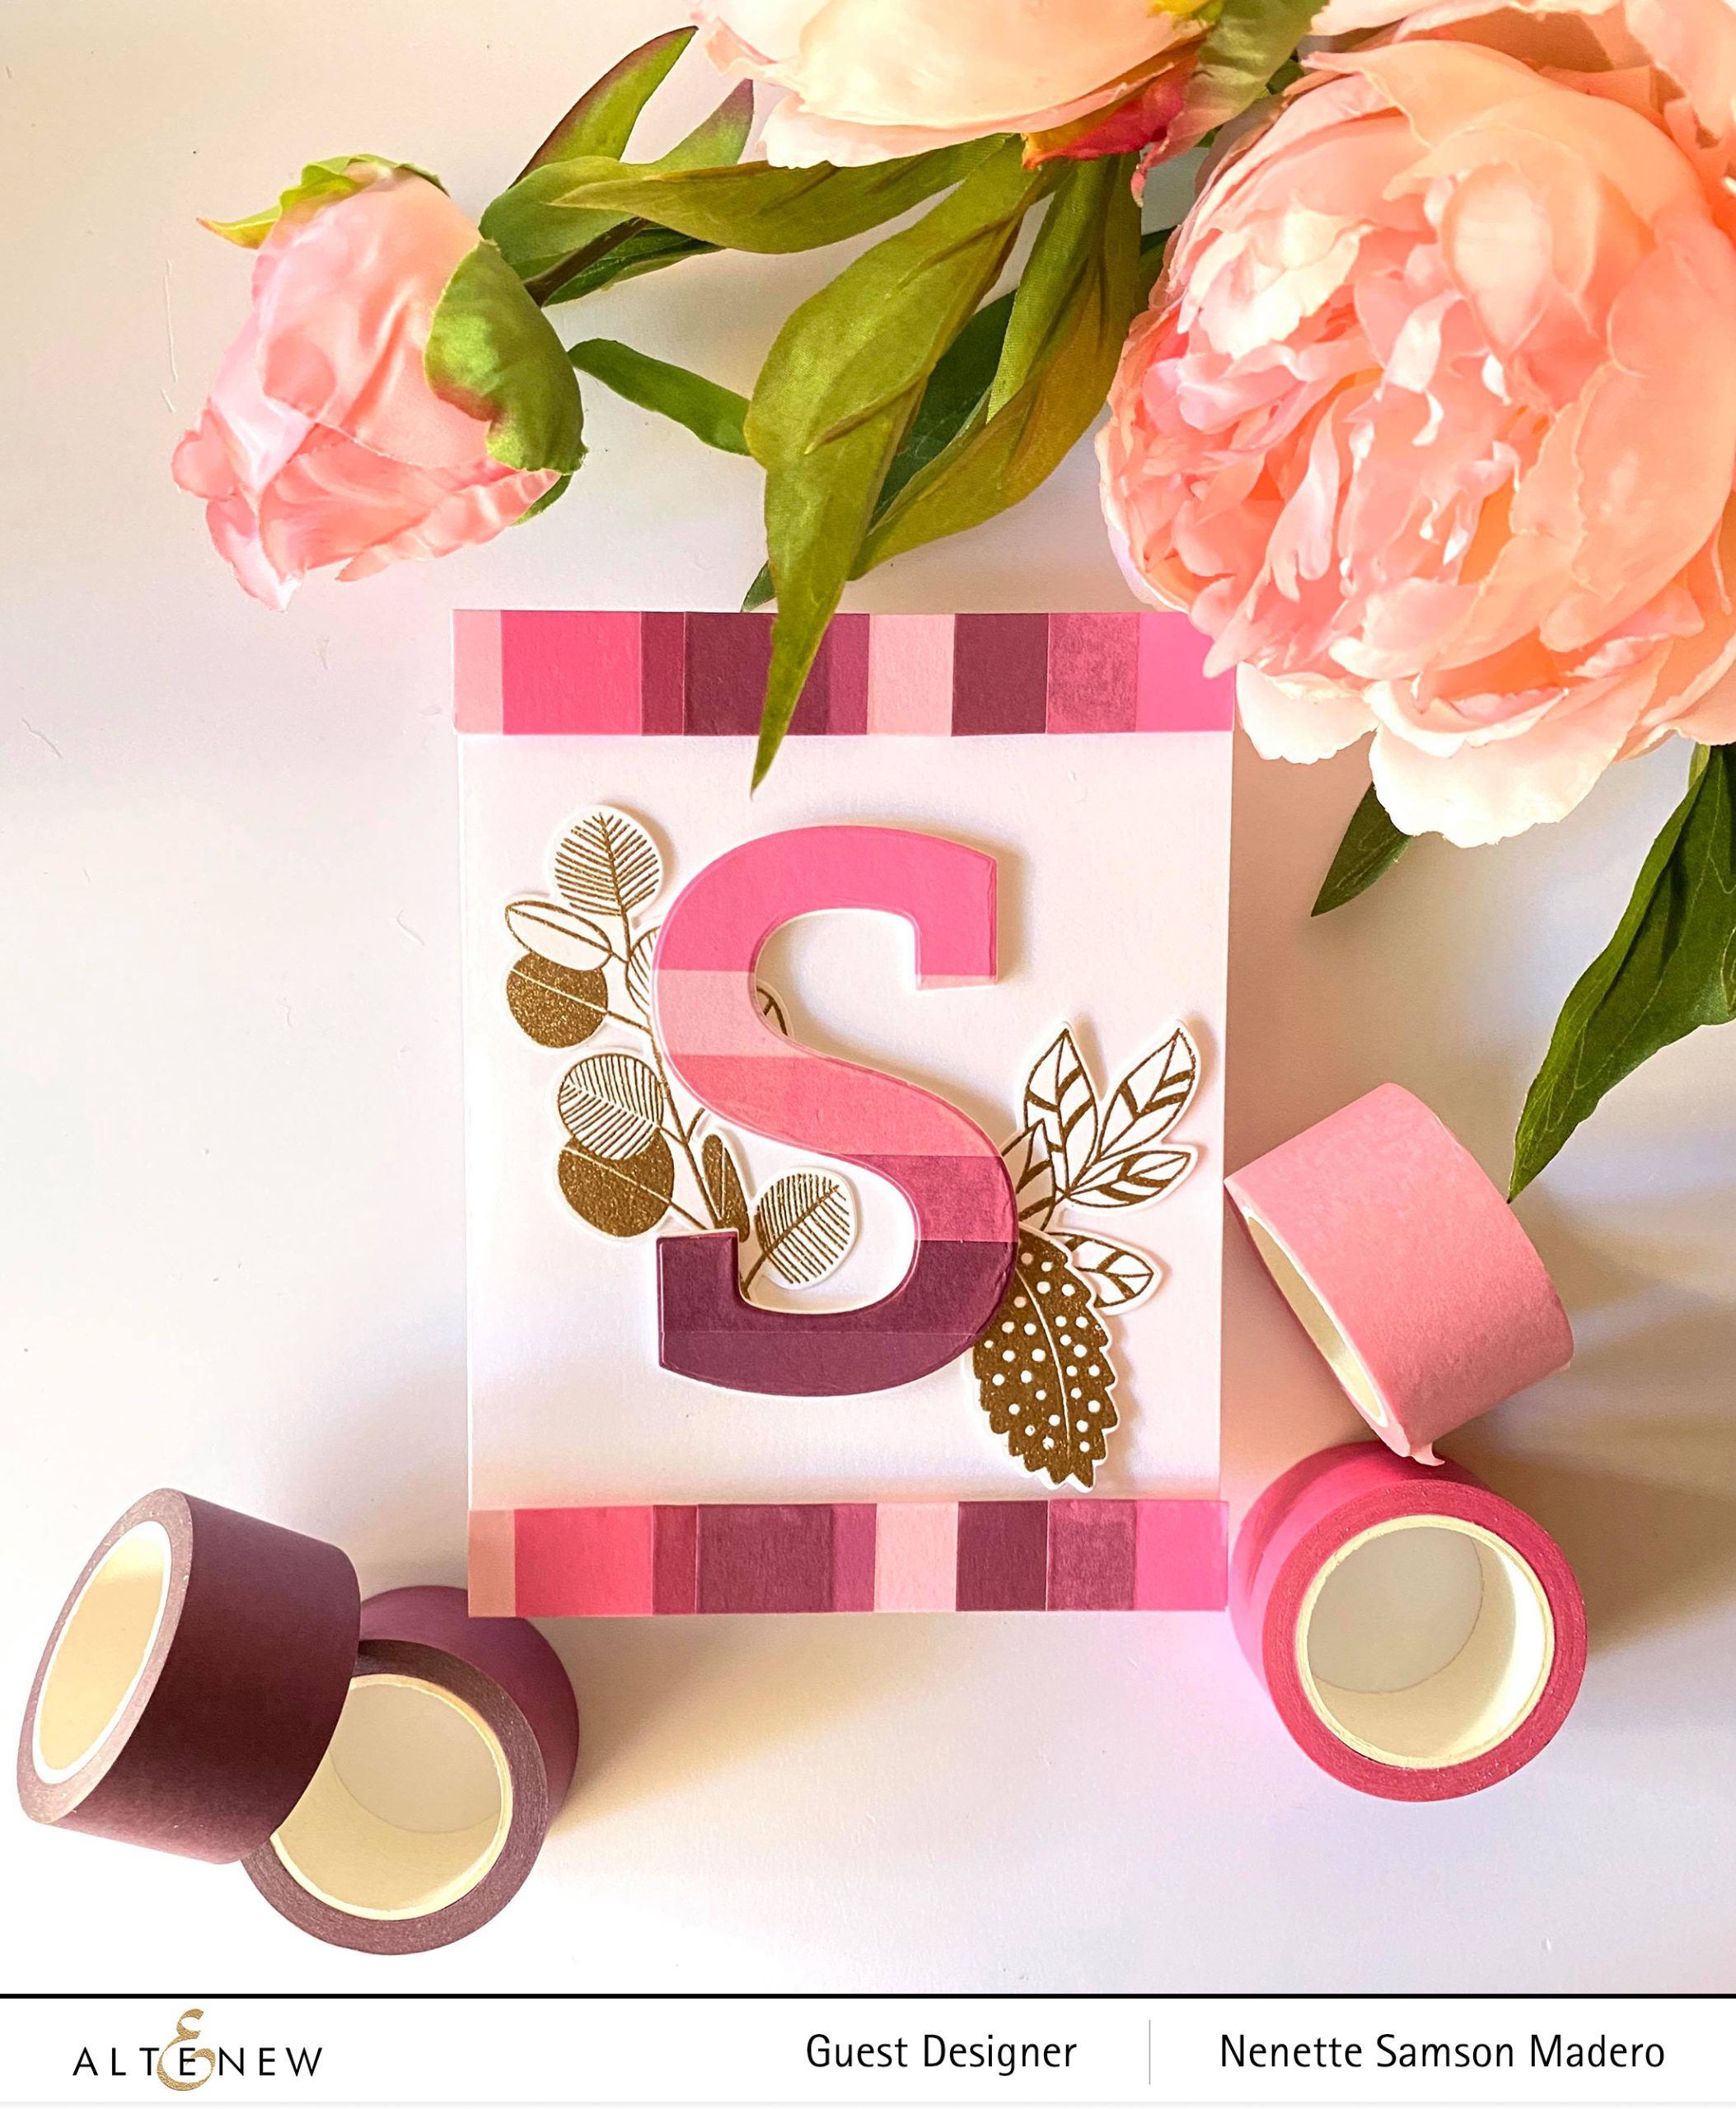
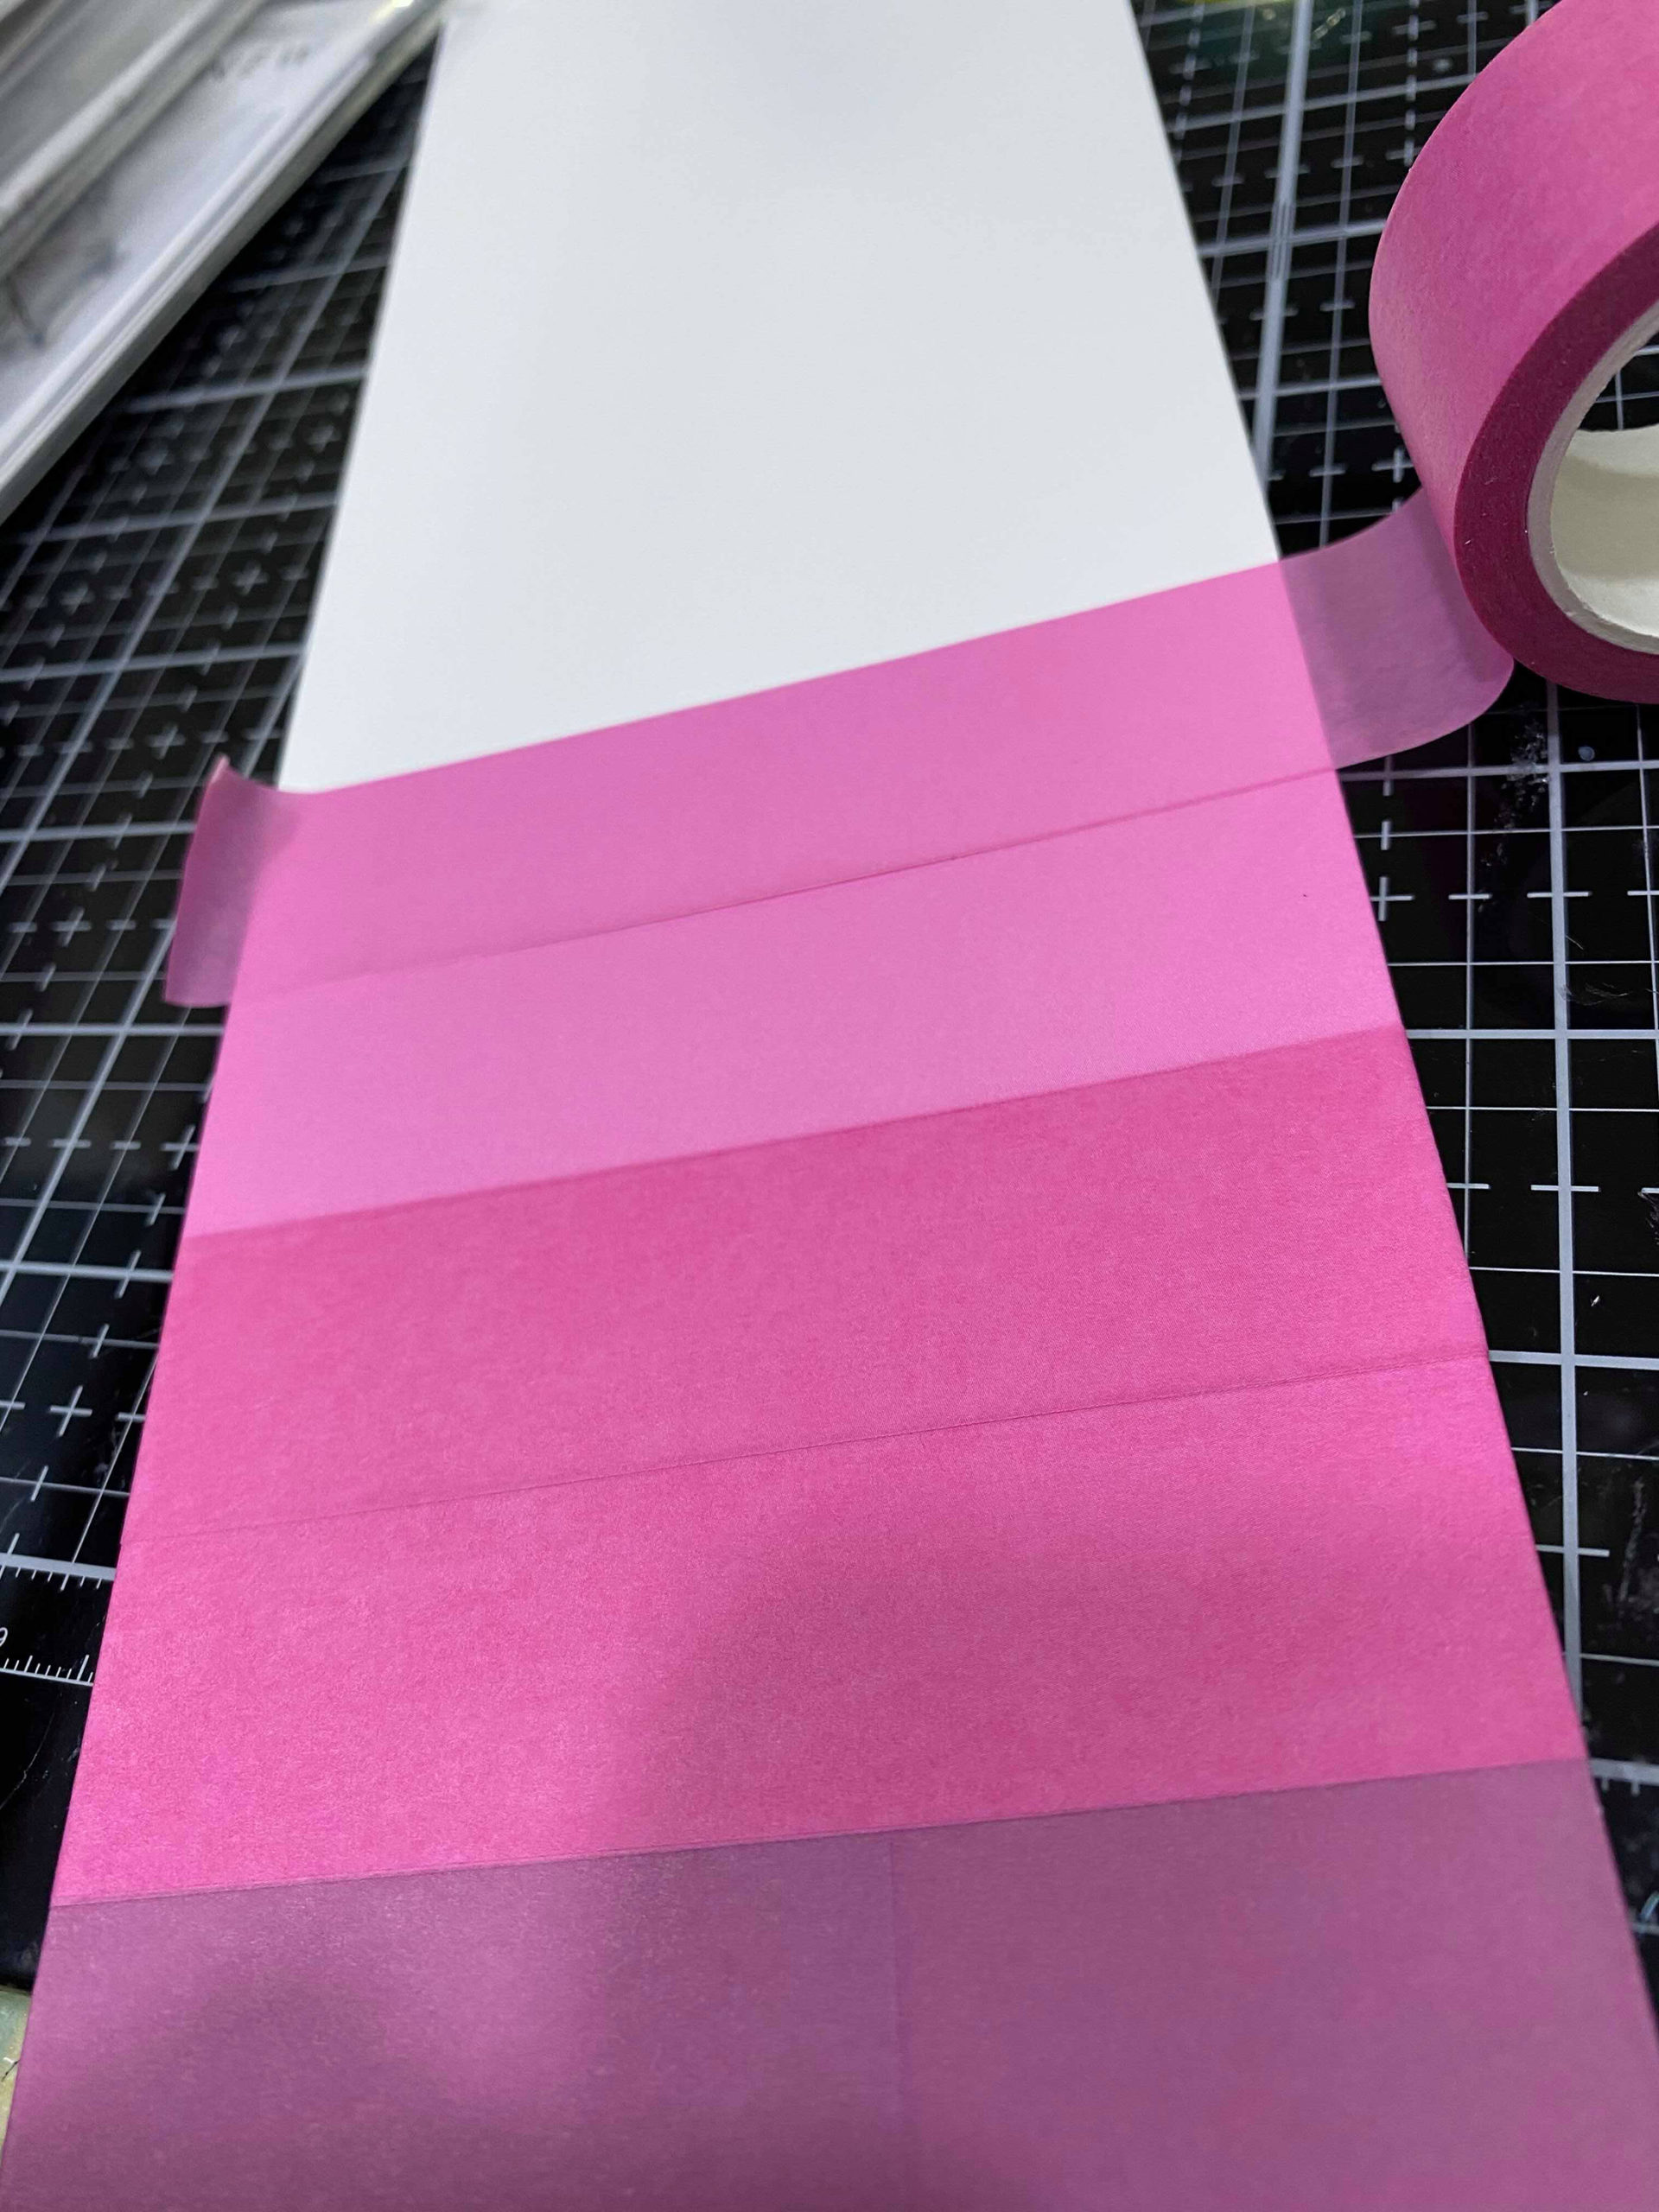
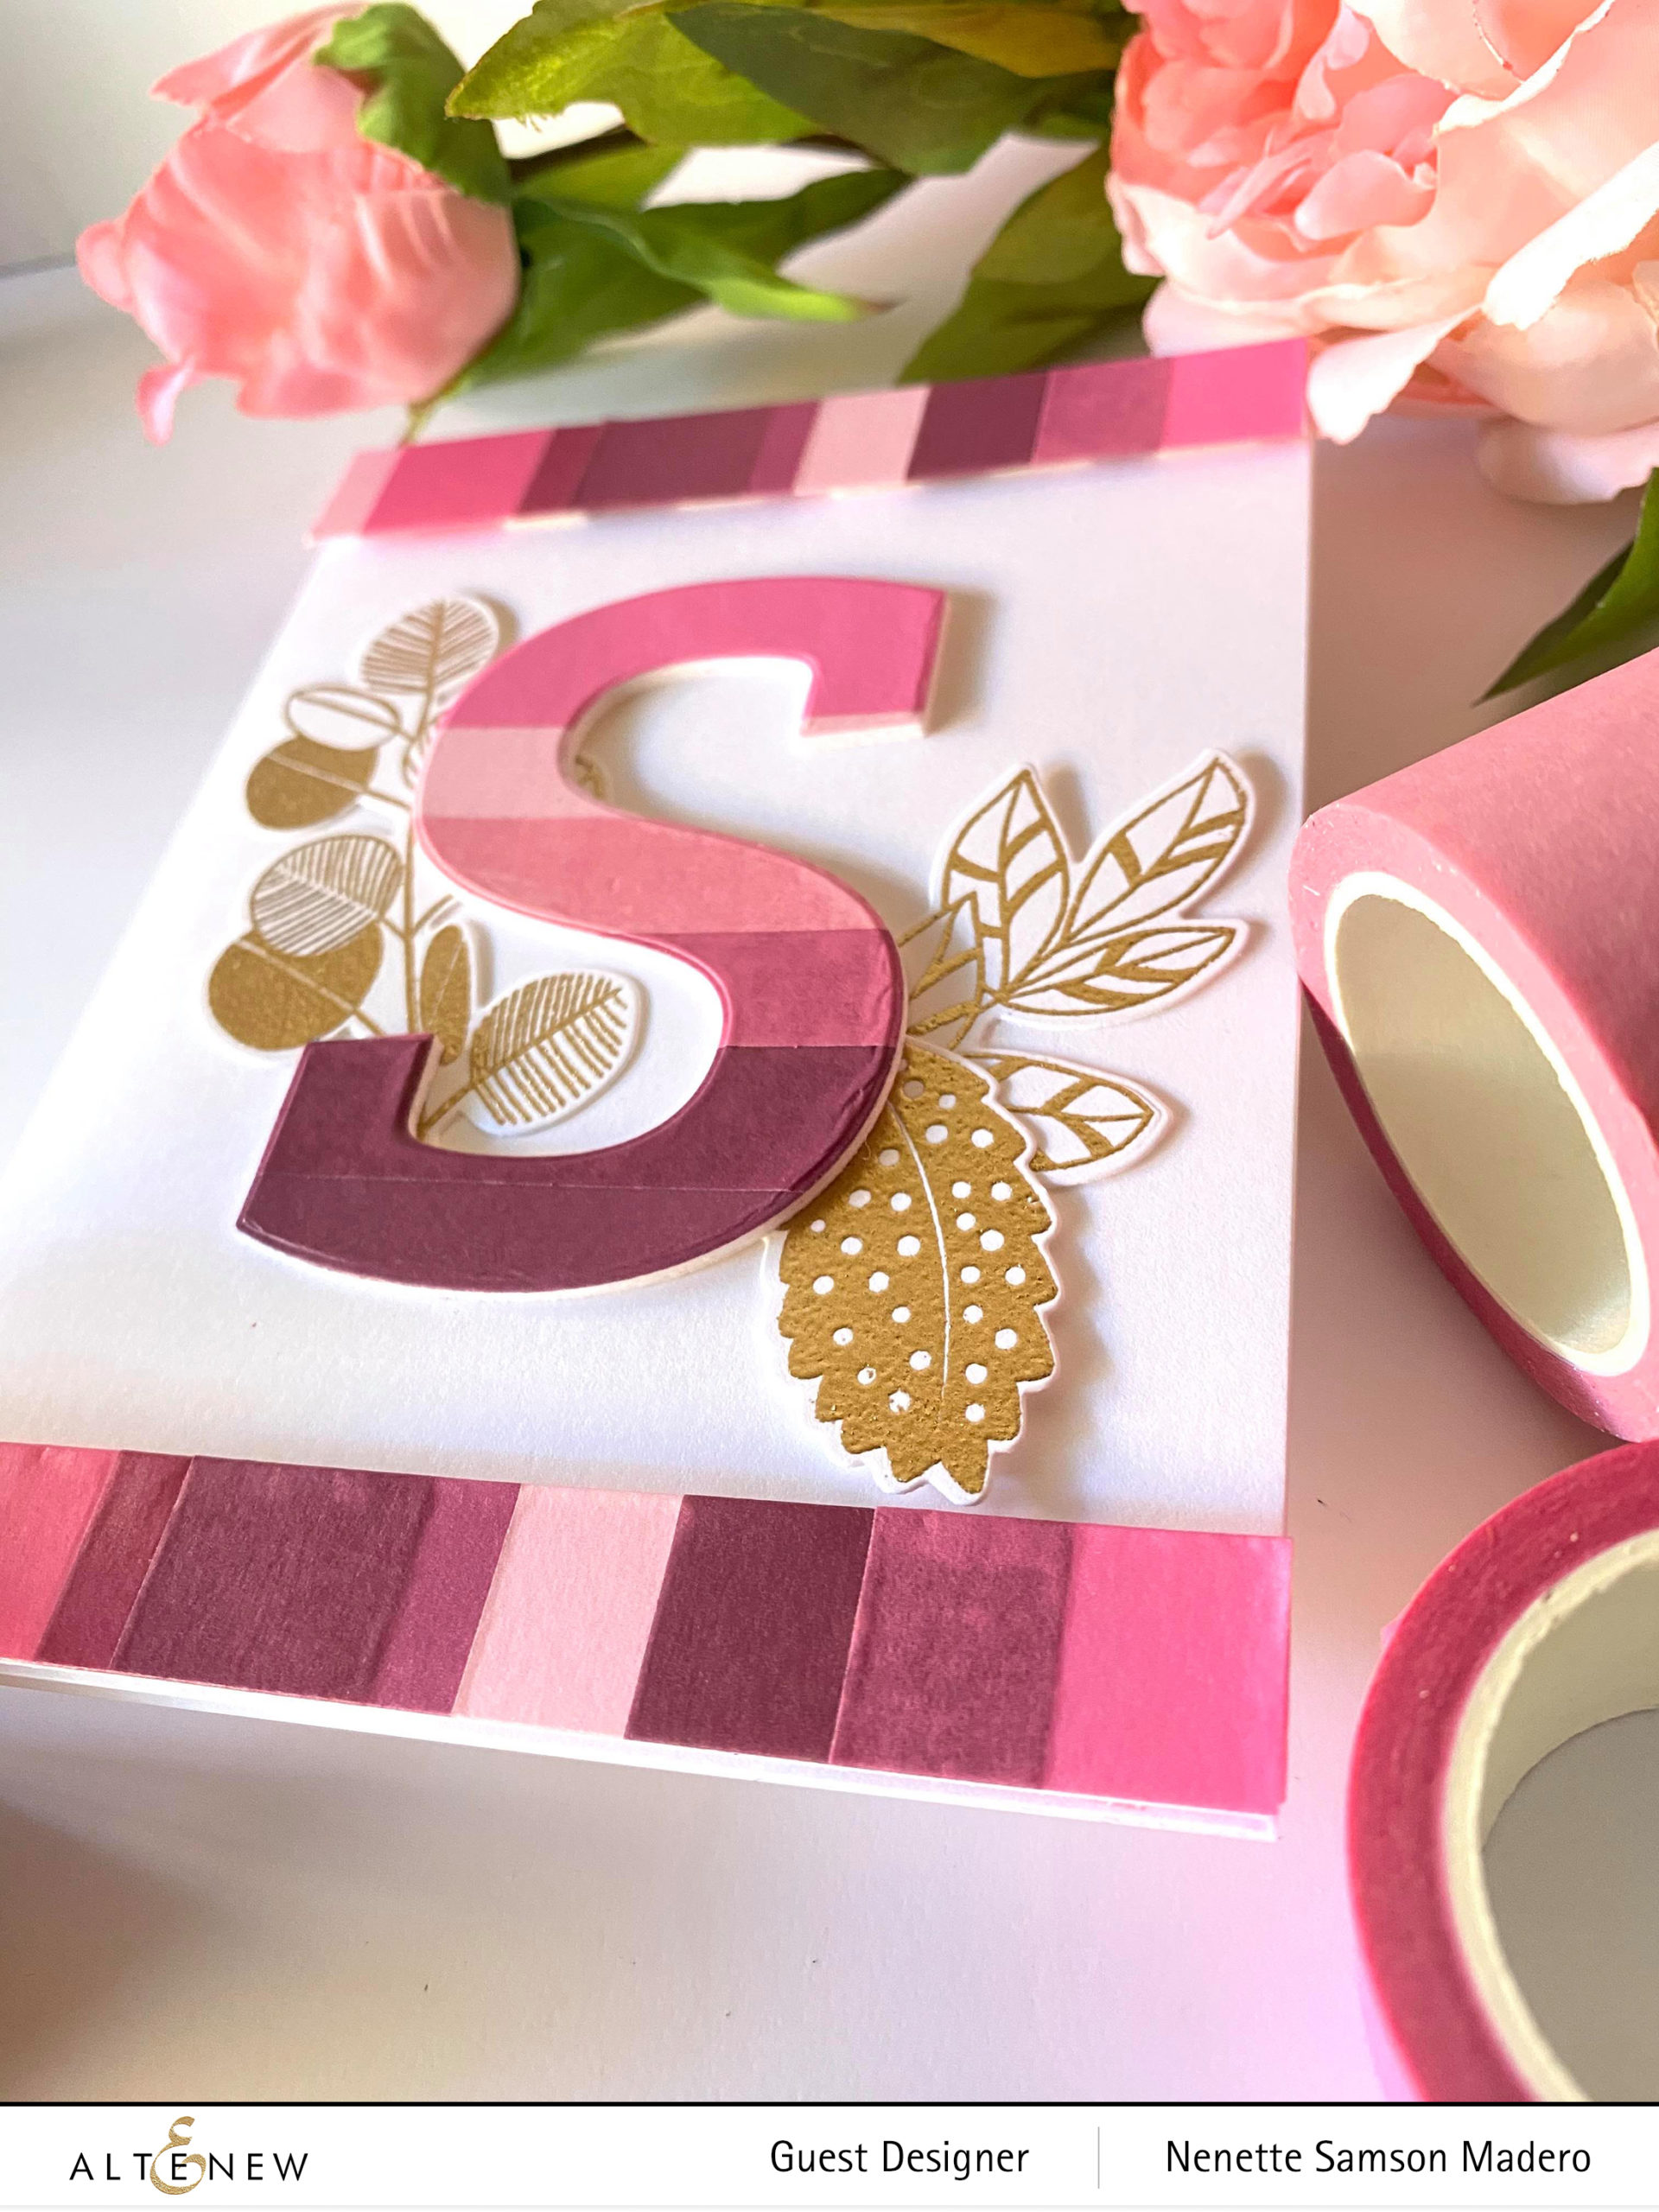
First, I covered a sheet of Neenah Solar White cardstock scrap with the different shades of pink to create an ombre effect. I die cut the letter S then added dimension by adhering 4 more other S die cuts. The leaves from the Retro Plantines stamp set were embossed using the rose gold embossing powder then die cut.
Another strip f cardstock was covered using the washi tape but I made sure to overlap the tapes to create more shades of pink. This was cut into two to create the top and bottom strips on the card. Foam tape was used to add dimension to these strips.
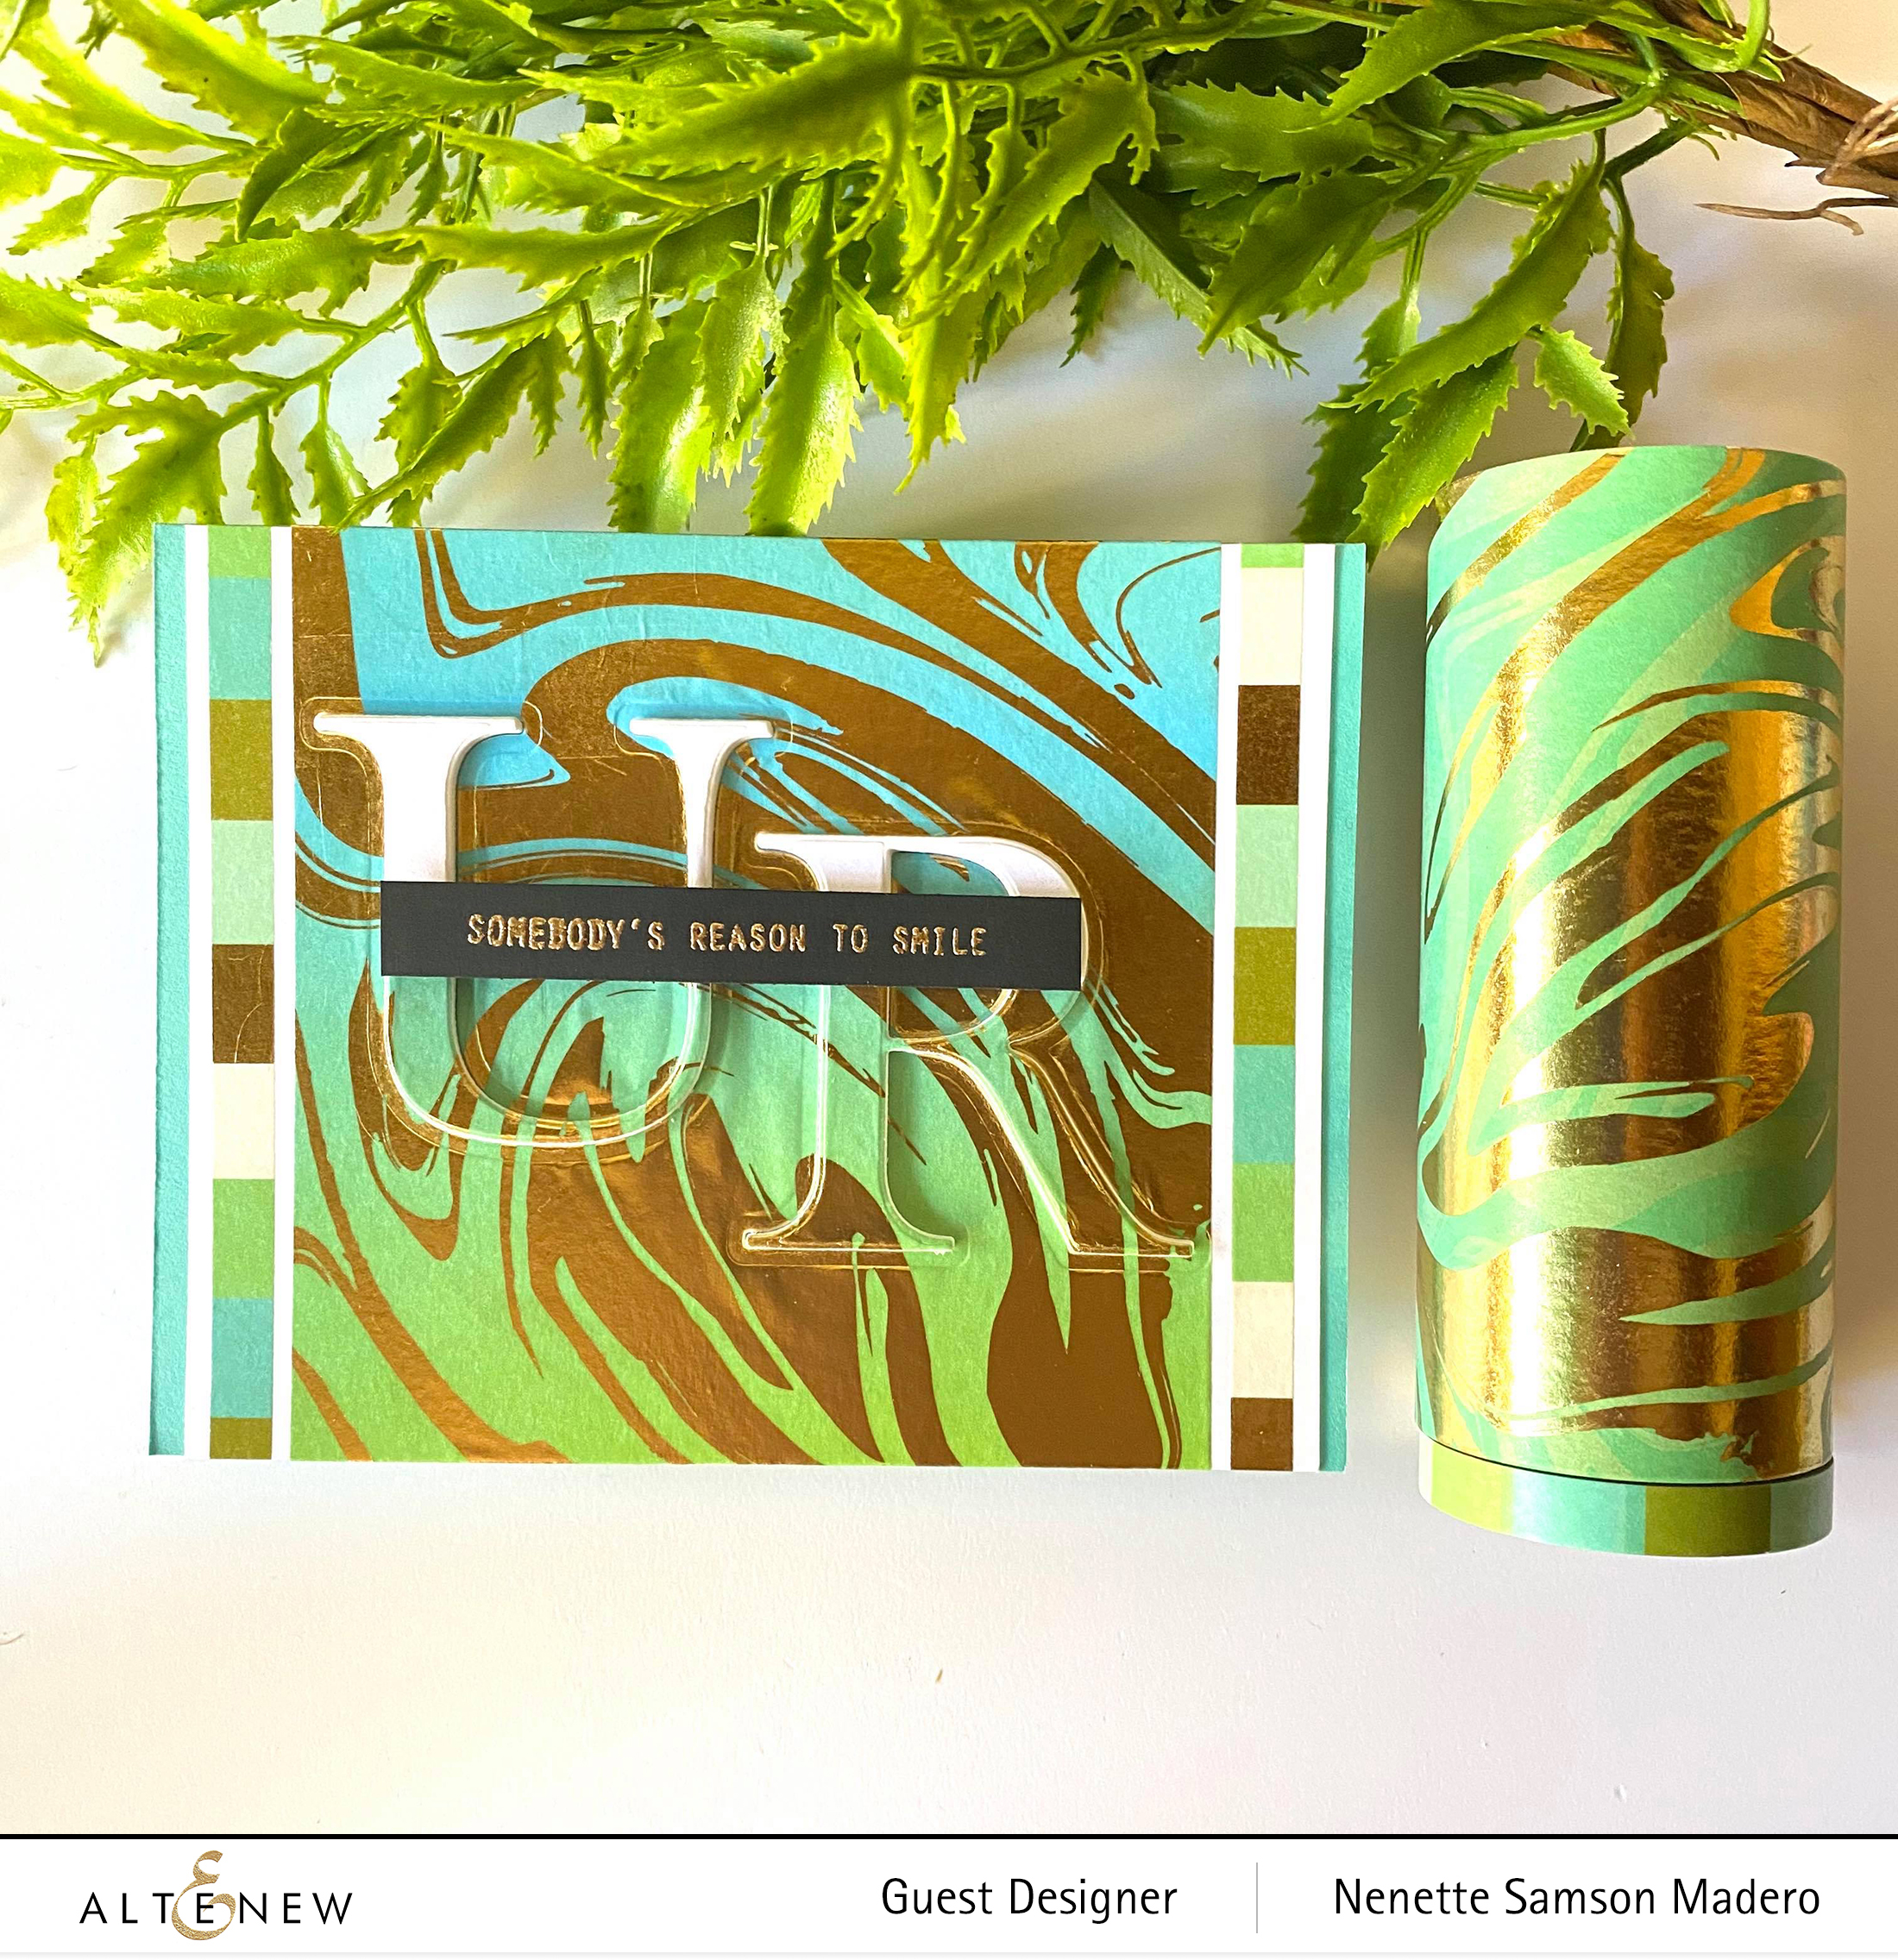
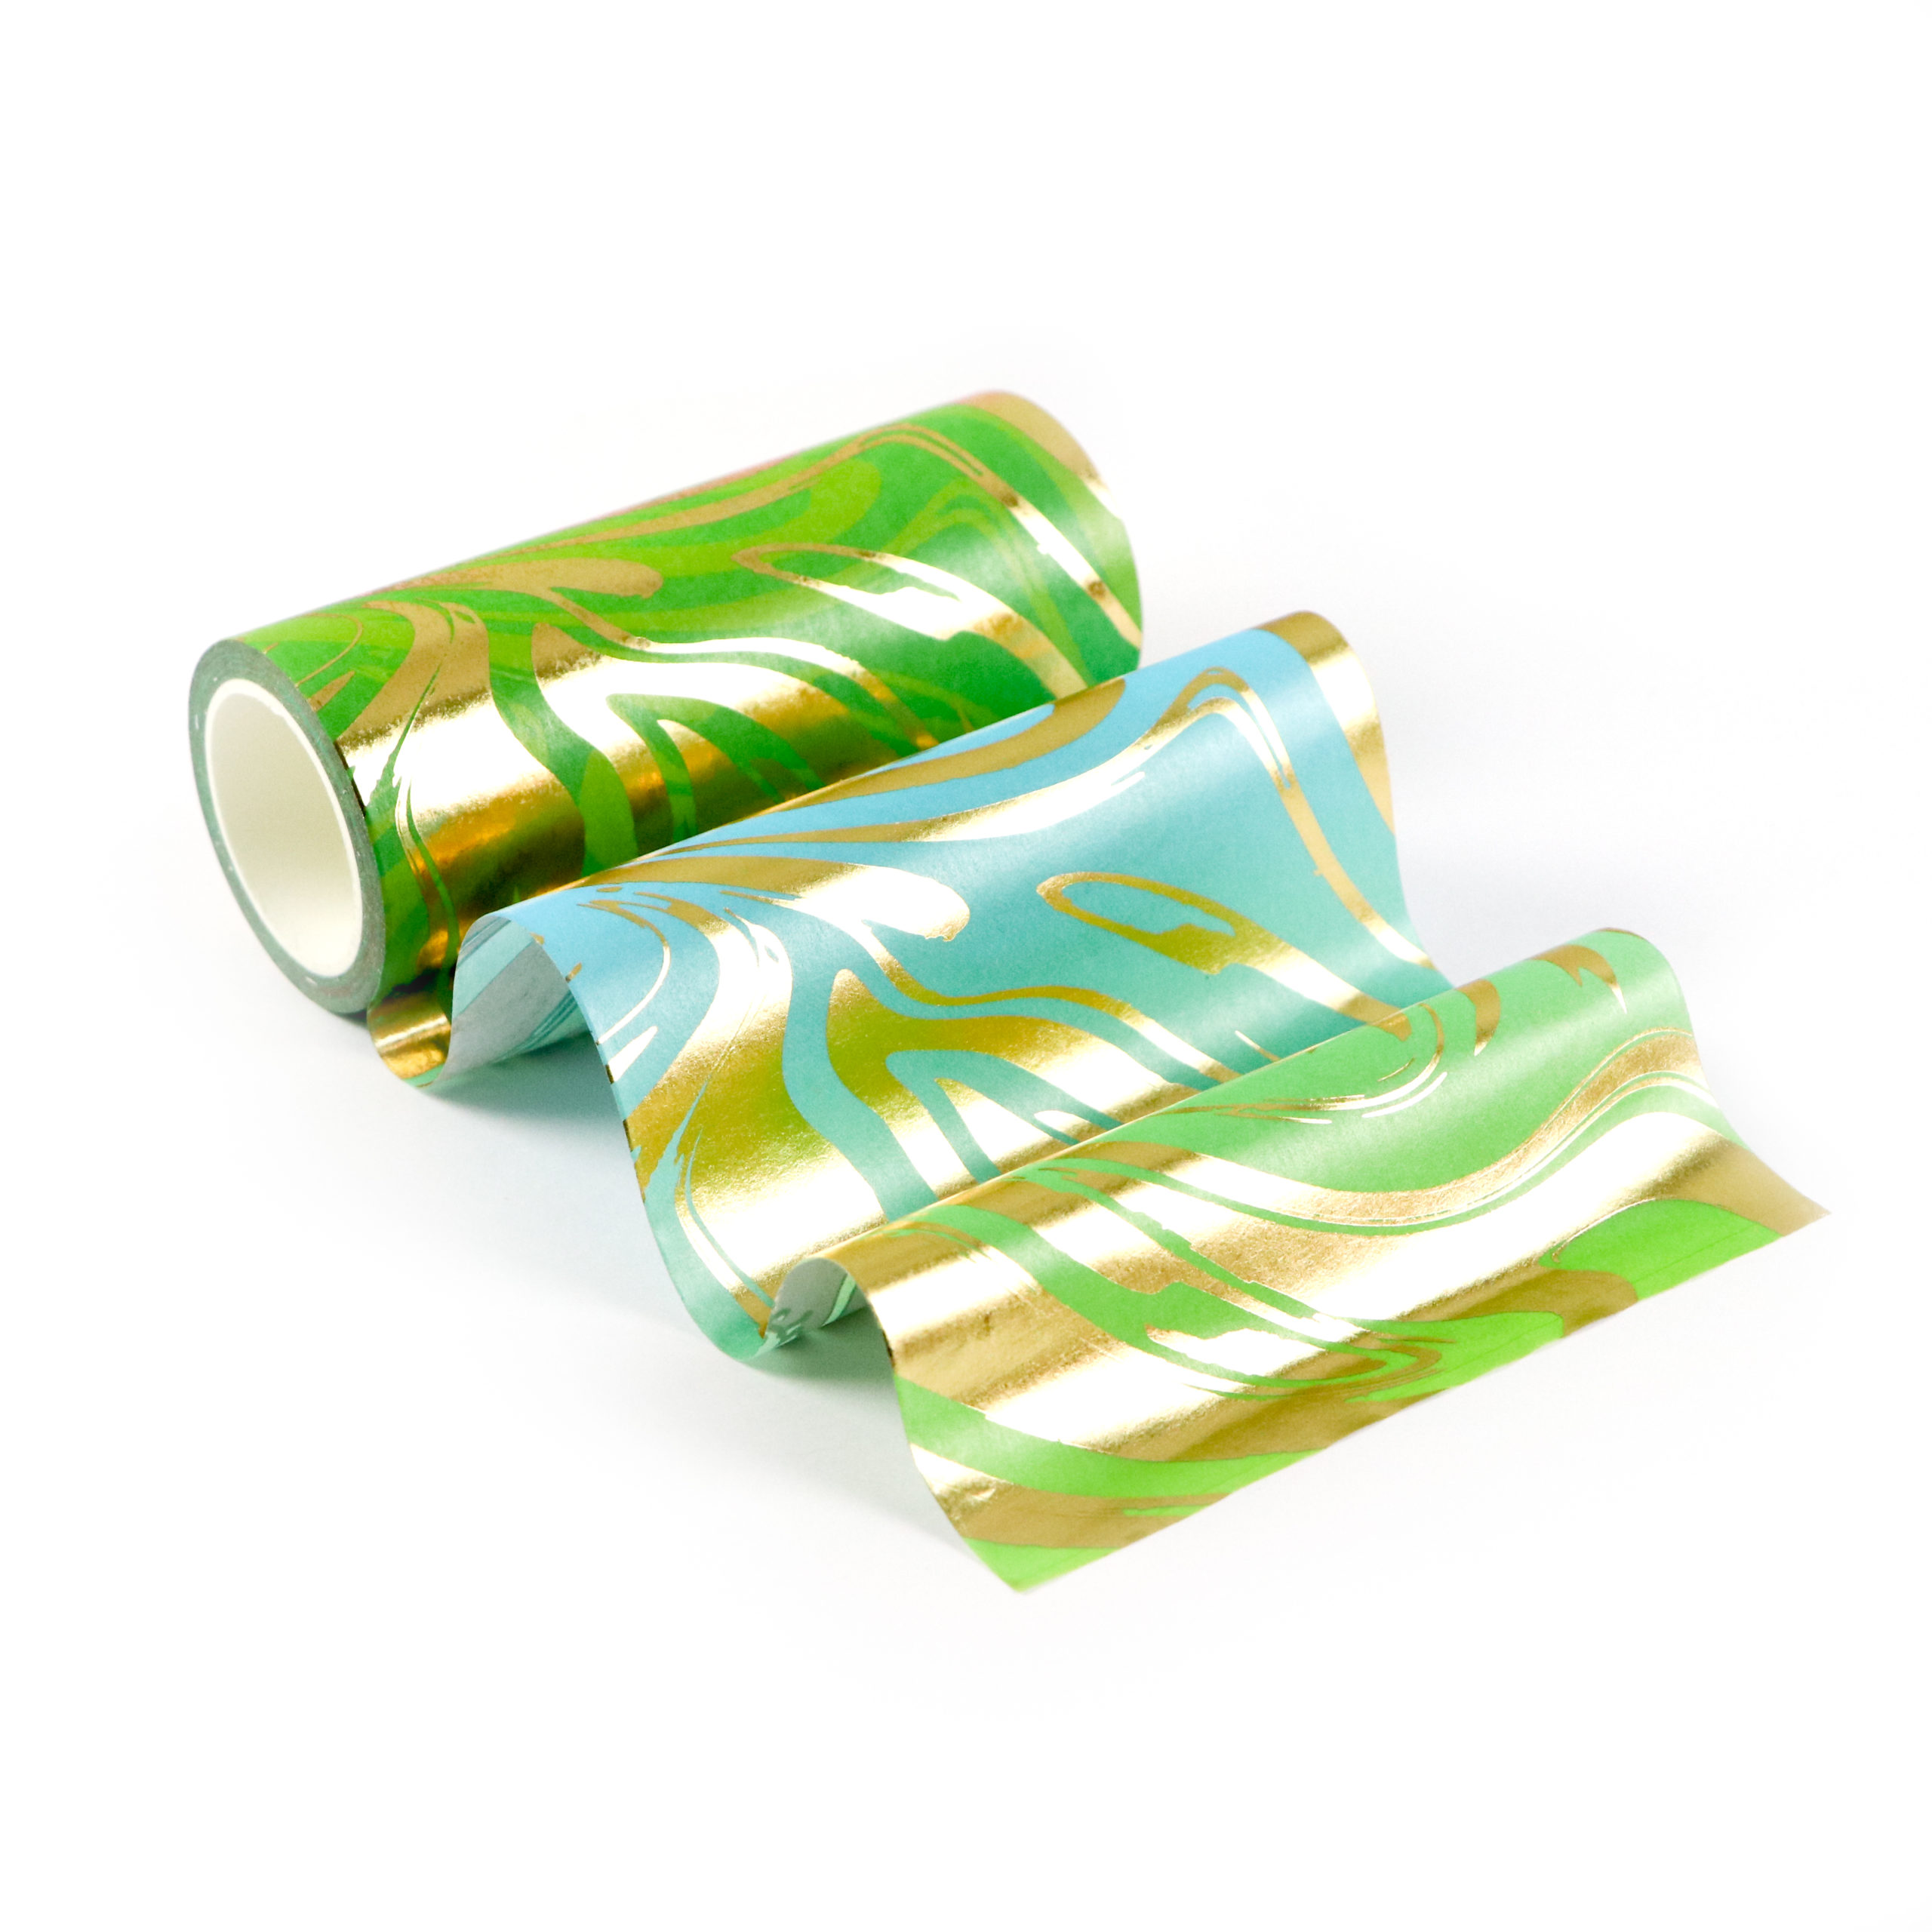
The other materials used for this card are the following: Morning Glory Palette Washi tape, Classic Alphabet die, Reason to Smile stamp set and cardstocks. I covered the center of the white cardstock panel with the Marbled Dream washi tape. The Morning glory palette washi tape was used to add a strip to the left and right of the card since it had similar colors to the Marbled dream. I die cut the letters U and R then added 4 more layers for dimension. The sentiment was stamped using Verasmark Ink and was embossed with Rose Gold embossing powder.
HELLO CARD
I’ve never seen a washi tape this big!!! The total length of this washi tape is 11.5 inches!!! The design is so beautiful that you just want to use it as is!
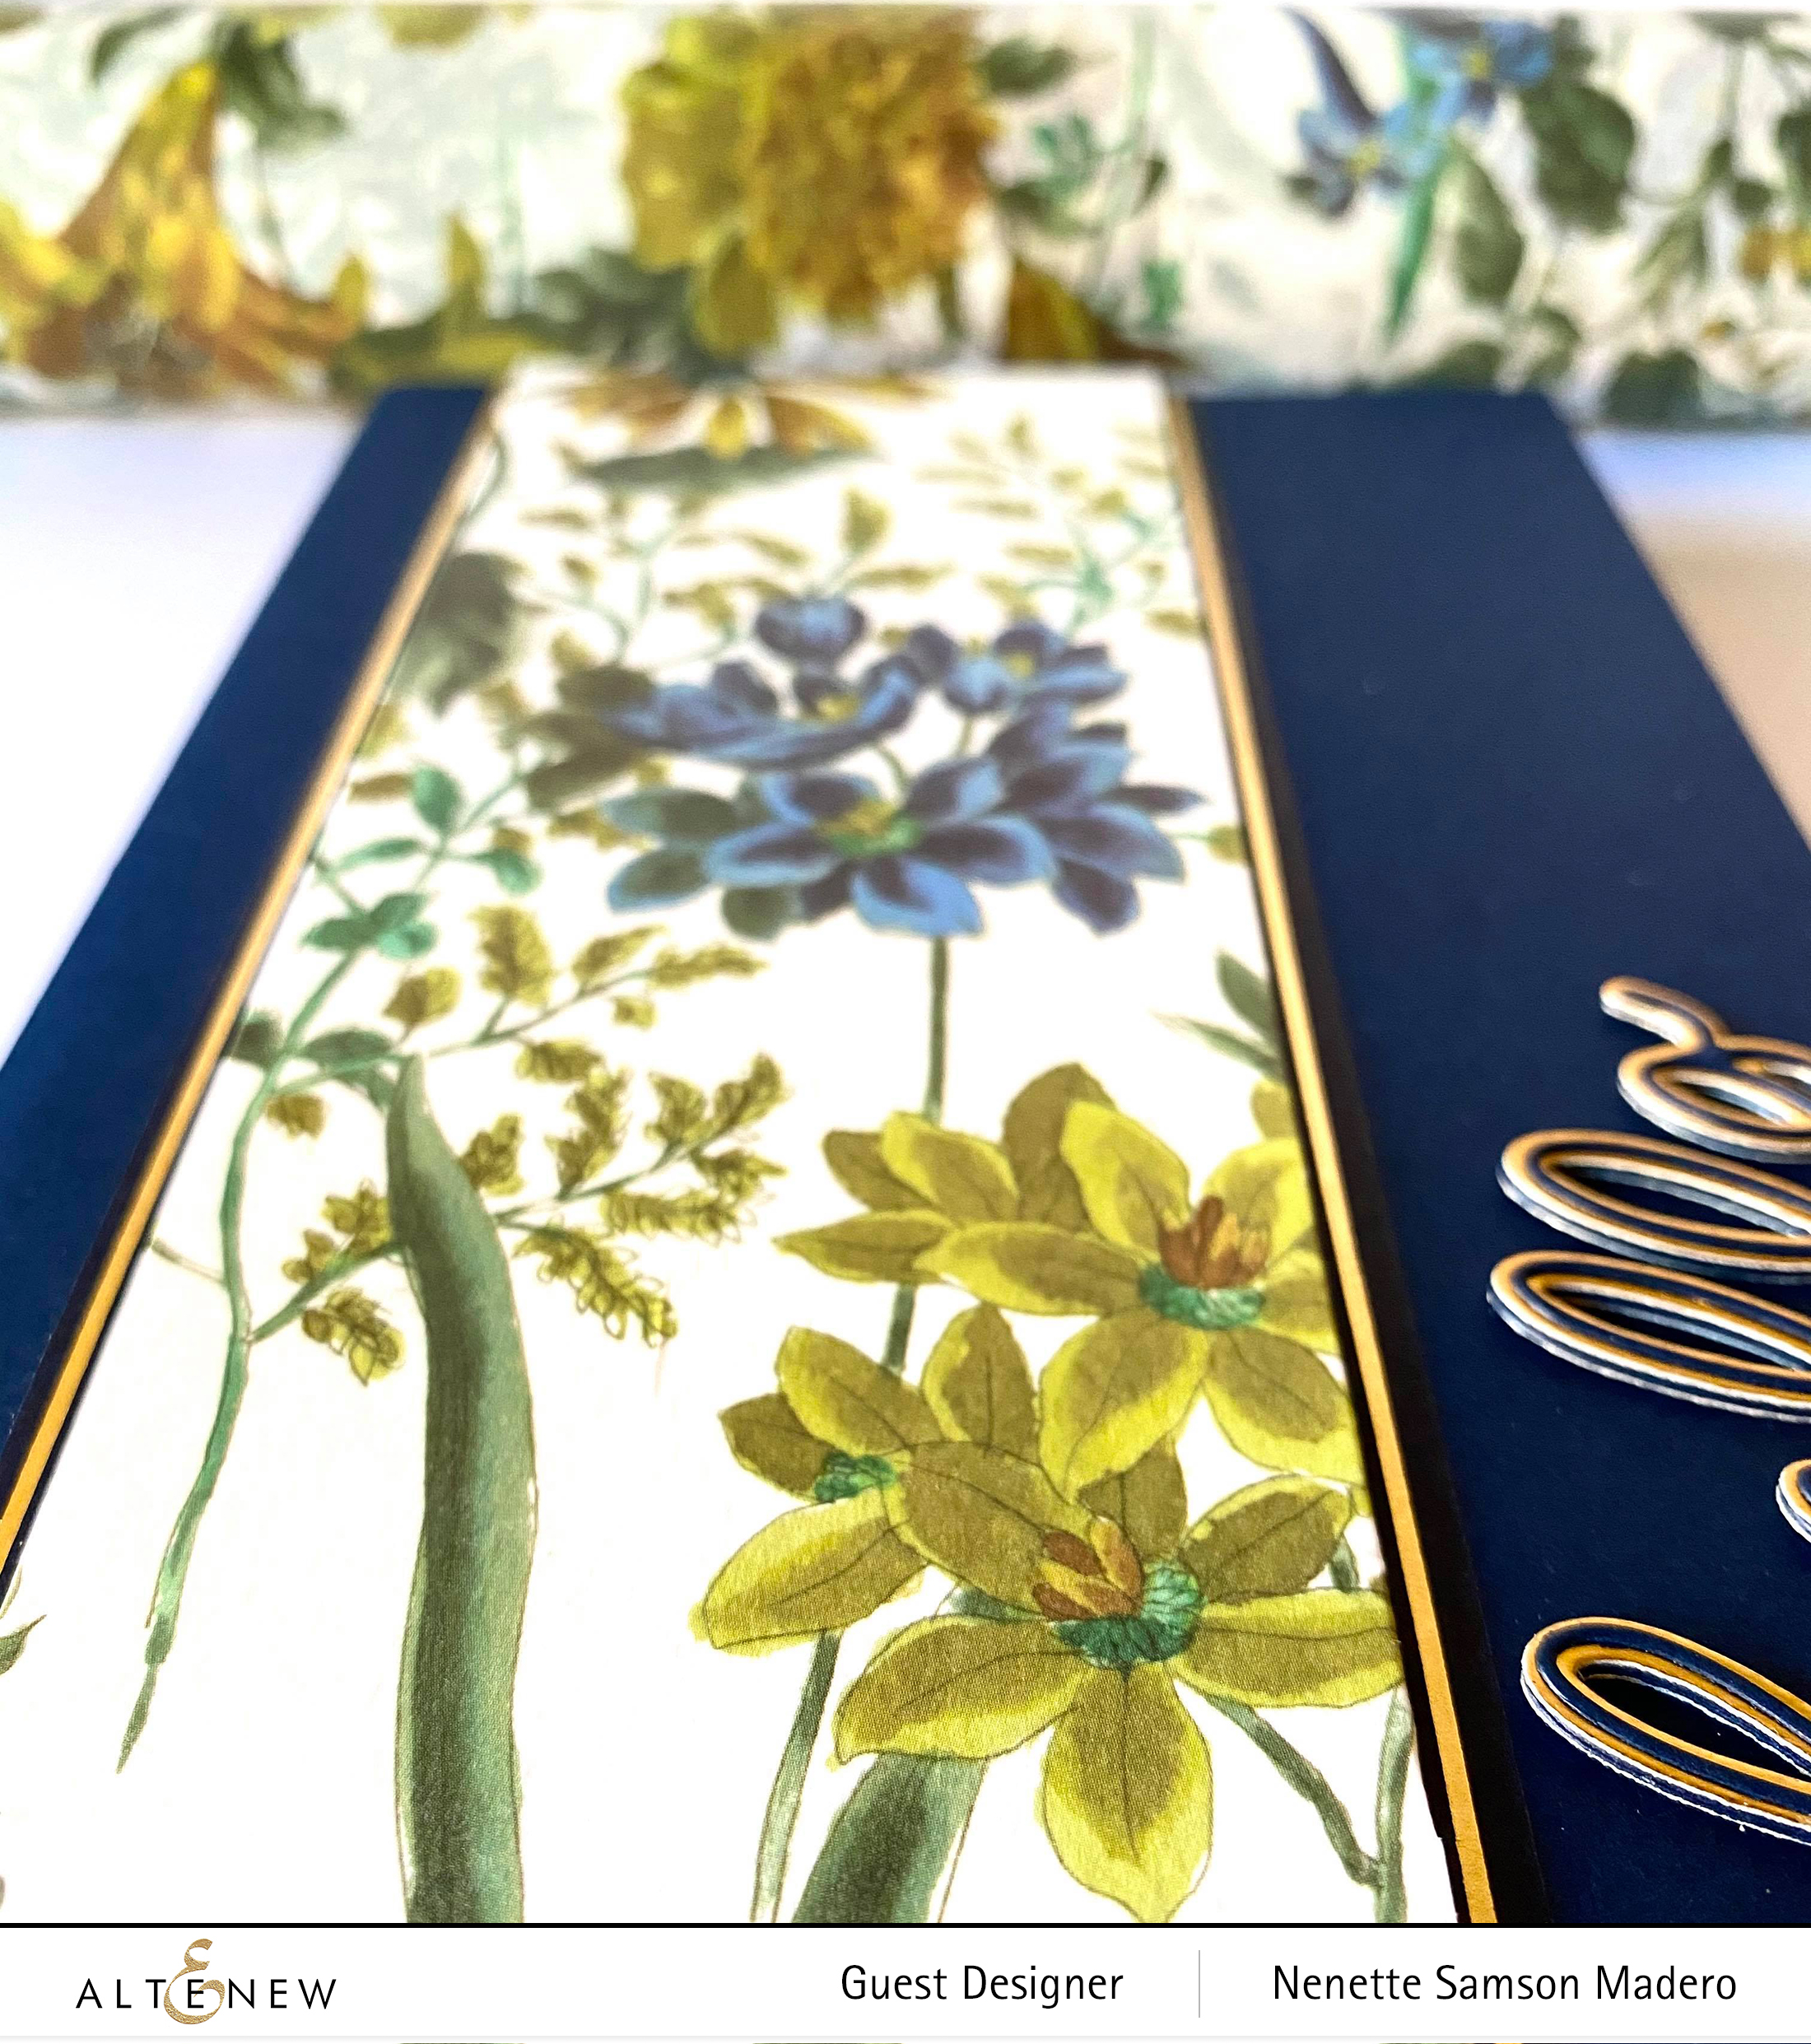
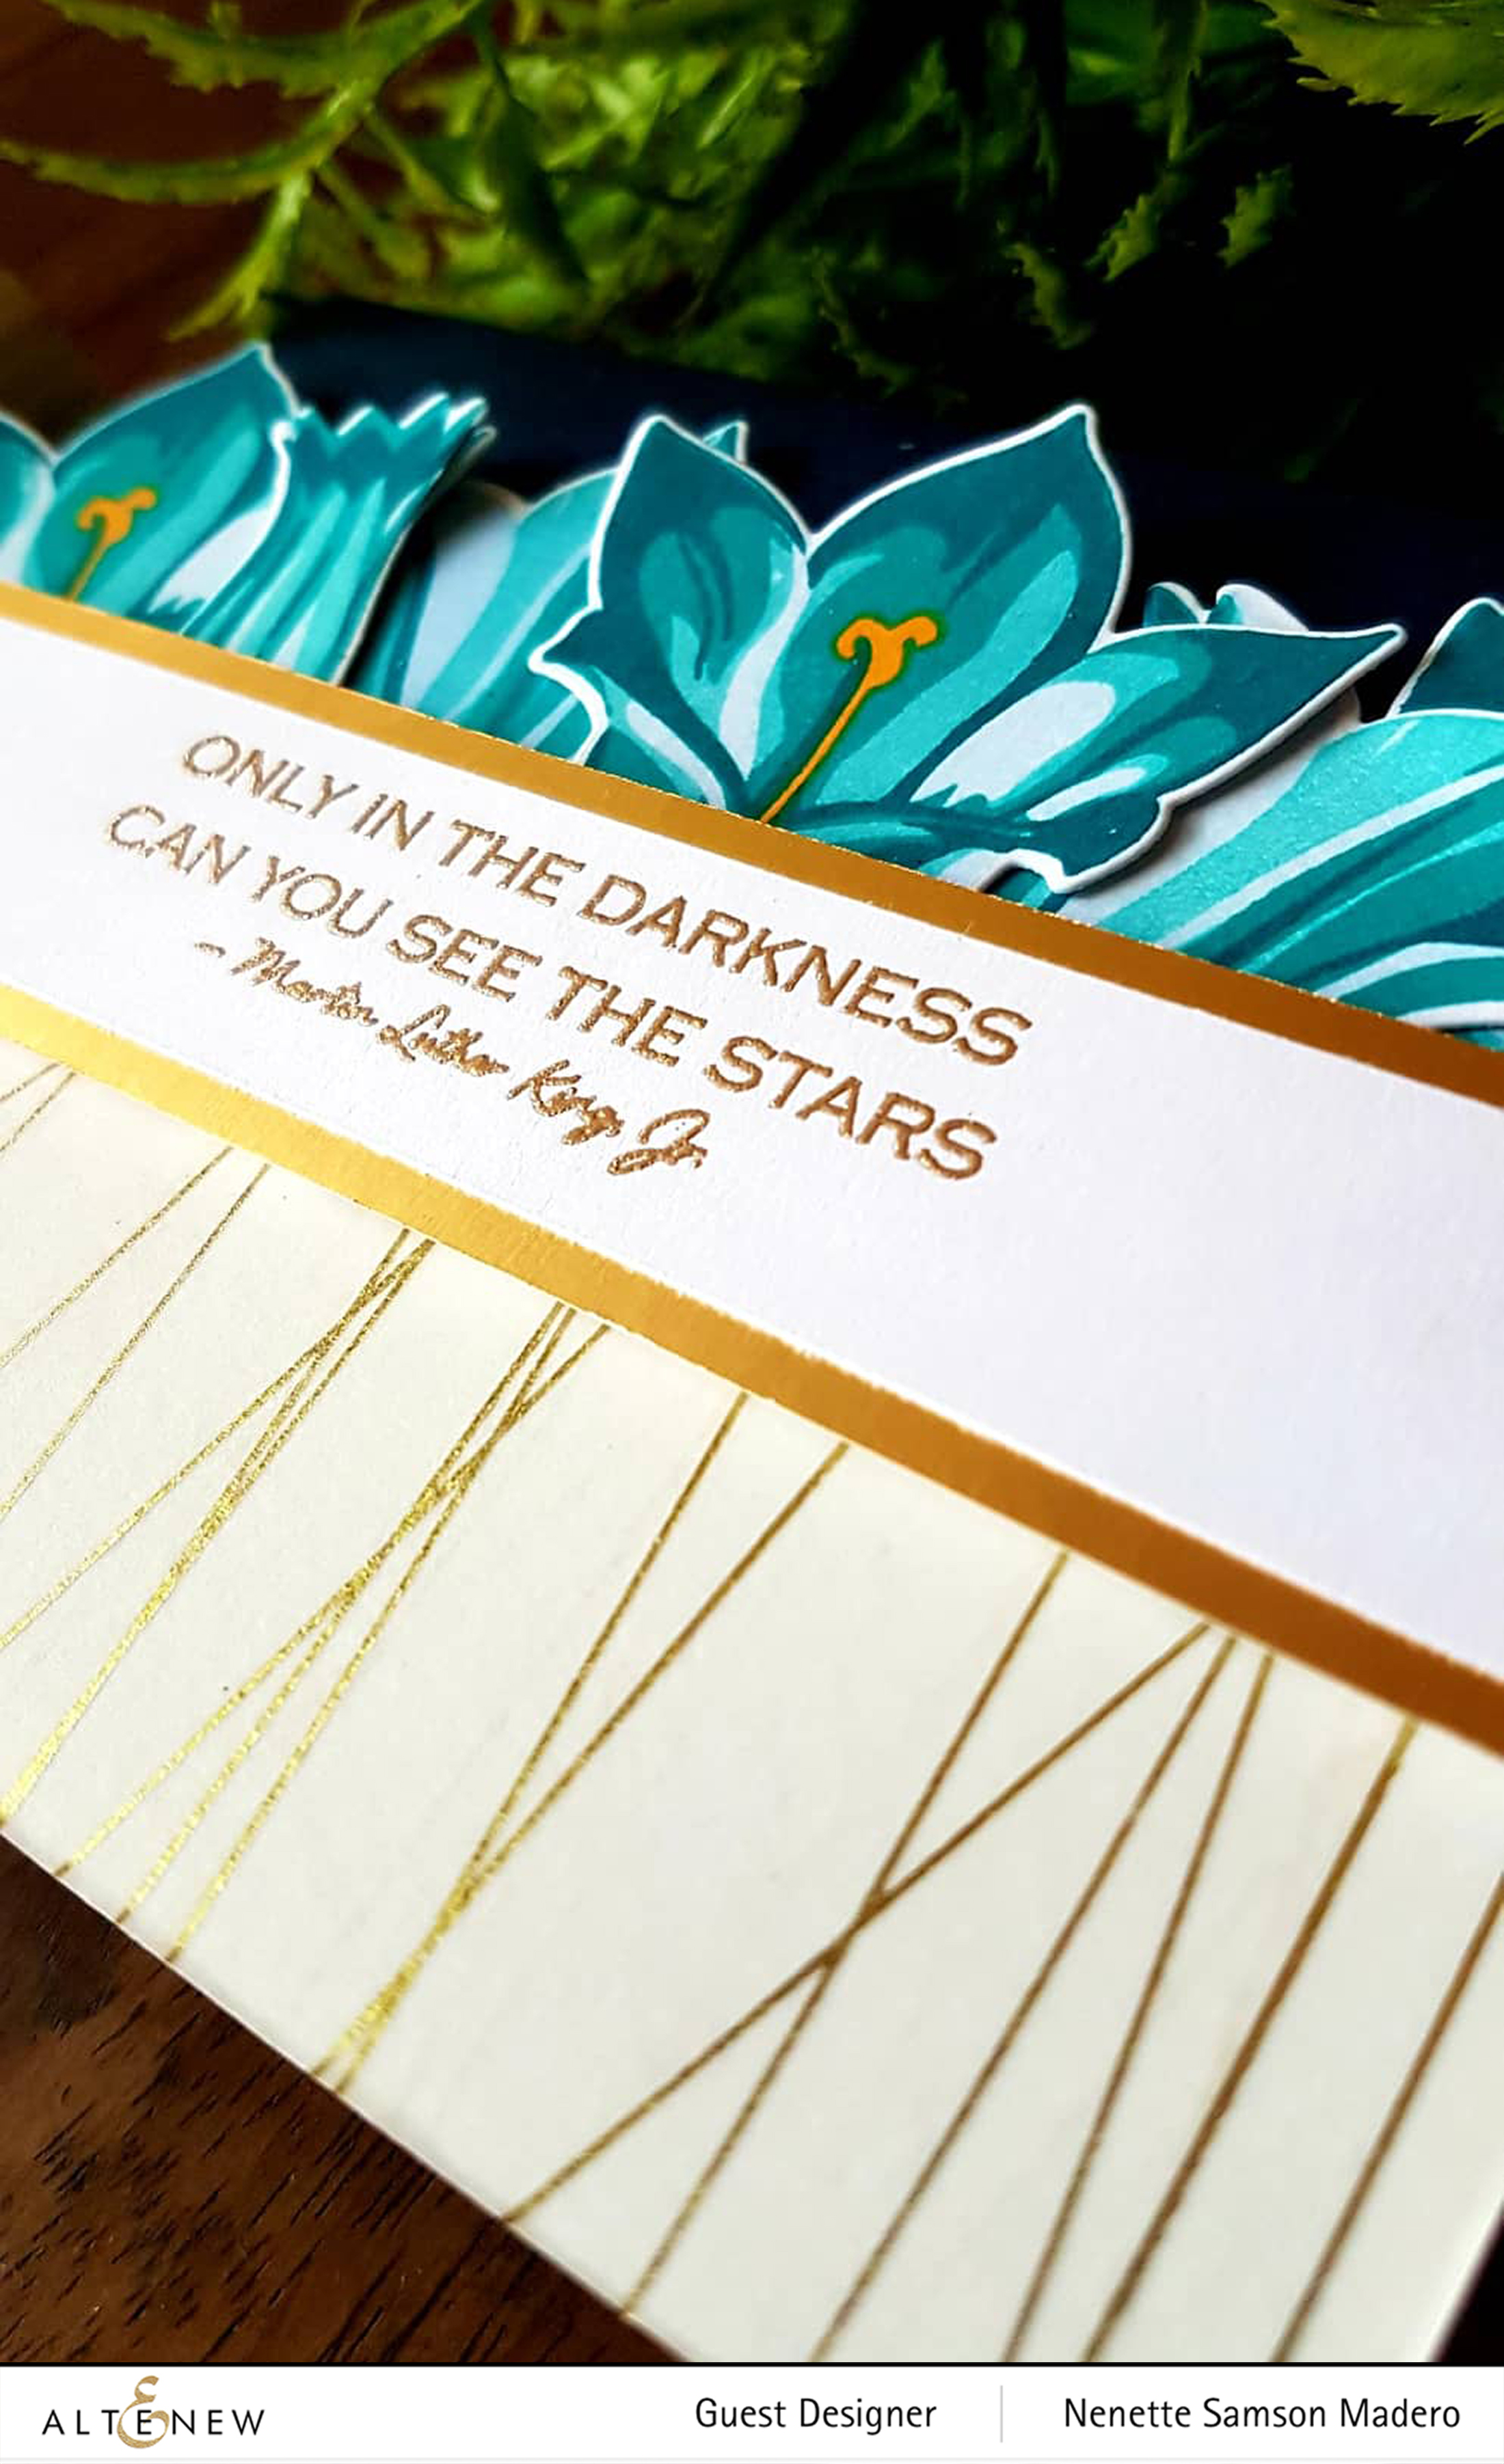
I also used the Navy gold trim washi tape and the handwritten hello die . This is a 5×7 card cause I wanted to maximize the washi tape. I adhered the tape onto white cardstock then trimmed it down to 3×7. I used the Navy Gold trim washi tape as an added accent to the floral panel. The hello was die cut using gold paper for the background and navy blue for the thinner portion of the die. I love how it matched the Navy gold trim washi tape. Super easy card to make!
PRIZES
To celebrate this release, Altenew is giving away a $30 gift certificate to 6 lucky winners! Please leave a comment on the Altenew Card Blog and/or Altenew Scrapbook Blog by 3/18/2020 for a chance to win.
We’ll also draw a winner to receive a $15 gift certificate from the comments left on each designer’s blog on the blog hop list below. All winners will be announced on the Altenew blogs on 3/21/2020.
Thank you so much for dropping by! I truly appreciate the time you take to go through my blog post. Next up is my idol, Erum Tasnim. Make sure to drop by her blog for more inspiration! If you haven’t yet, do follow me on IG or FB for announcements, giveaways and inspiration! Subscribe to this blog as well for the latest update. Until my next post. Happy crafting everyone!❤️
What a way to start the New Year!!! Welcome to 2020 everyone!!! I’m so excited to be a guest designer this time for the Altenew Scrapbook Blog. Drop by and take a look at how I created these two layouts of my daughters.
I’ve stopped scrapbooking for a couple of years and concentrated on card making but now I realize how much I’ve missed in documenting the lives of my children. Scrapbook layouts are my love letters to my children and I intend to create more layouts this year so that they can look back and remember all the wonderful memories they have as they grow up. Please drop by and say hello! More details and a video on the Altenew scrapbook blog. Happy crafting everyone!!!
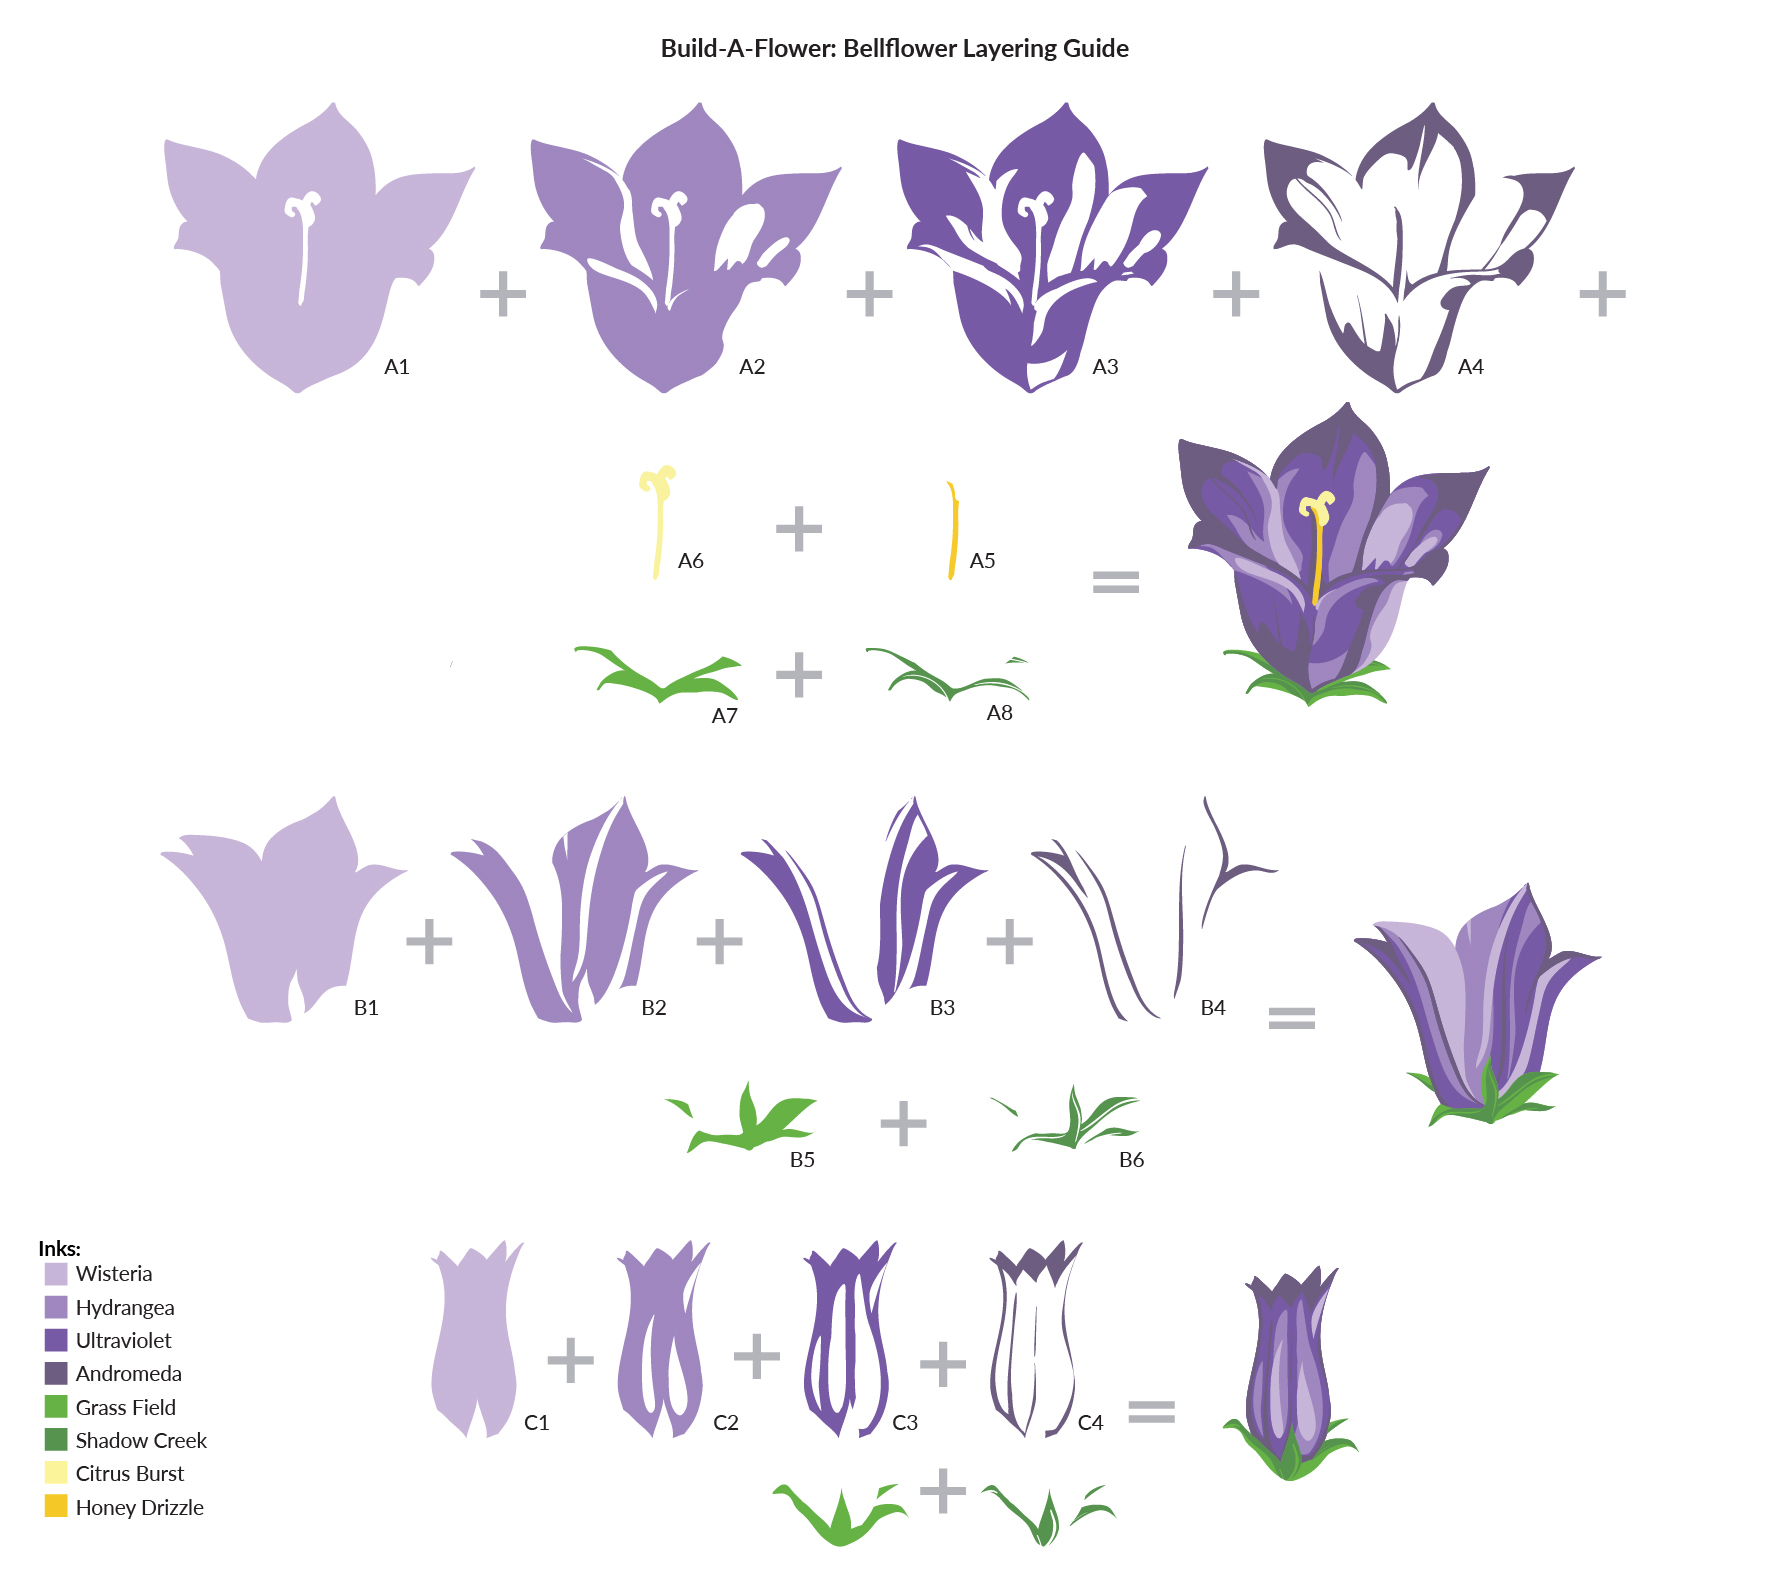
Hello everyone! Welcome to Altenew’s Build-a-flower: Bellflower release blog hop! I’d like to thank the amazing Mindy Eggen for sending you over here. In case you are lost, the complete list will be added at the end of the post. The Altenew Card Blog is hosting this blog hop so do drop by and check out all the wonderful cards created using this stamp set.
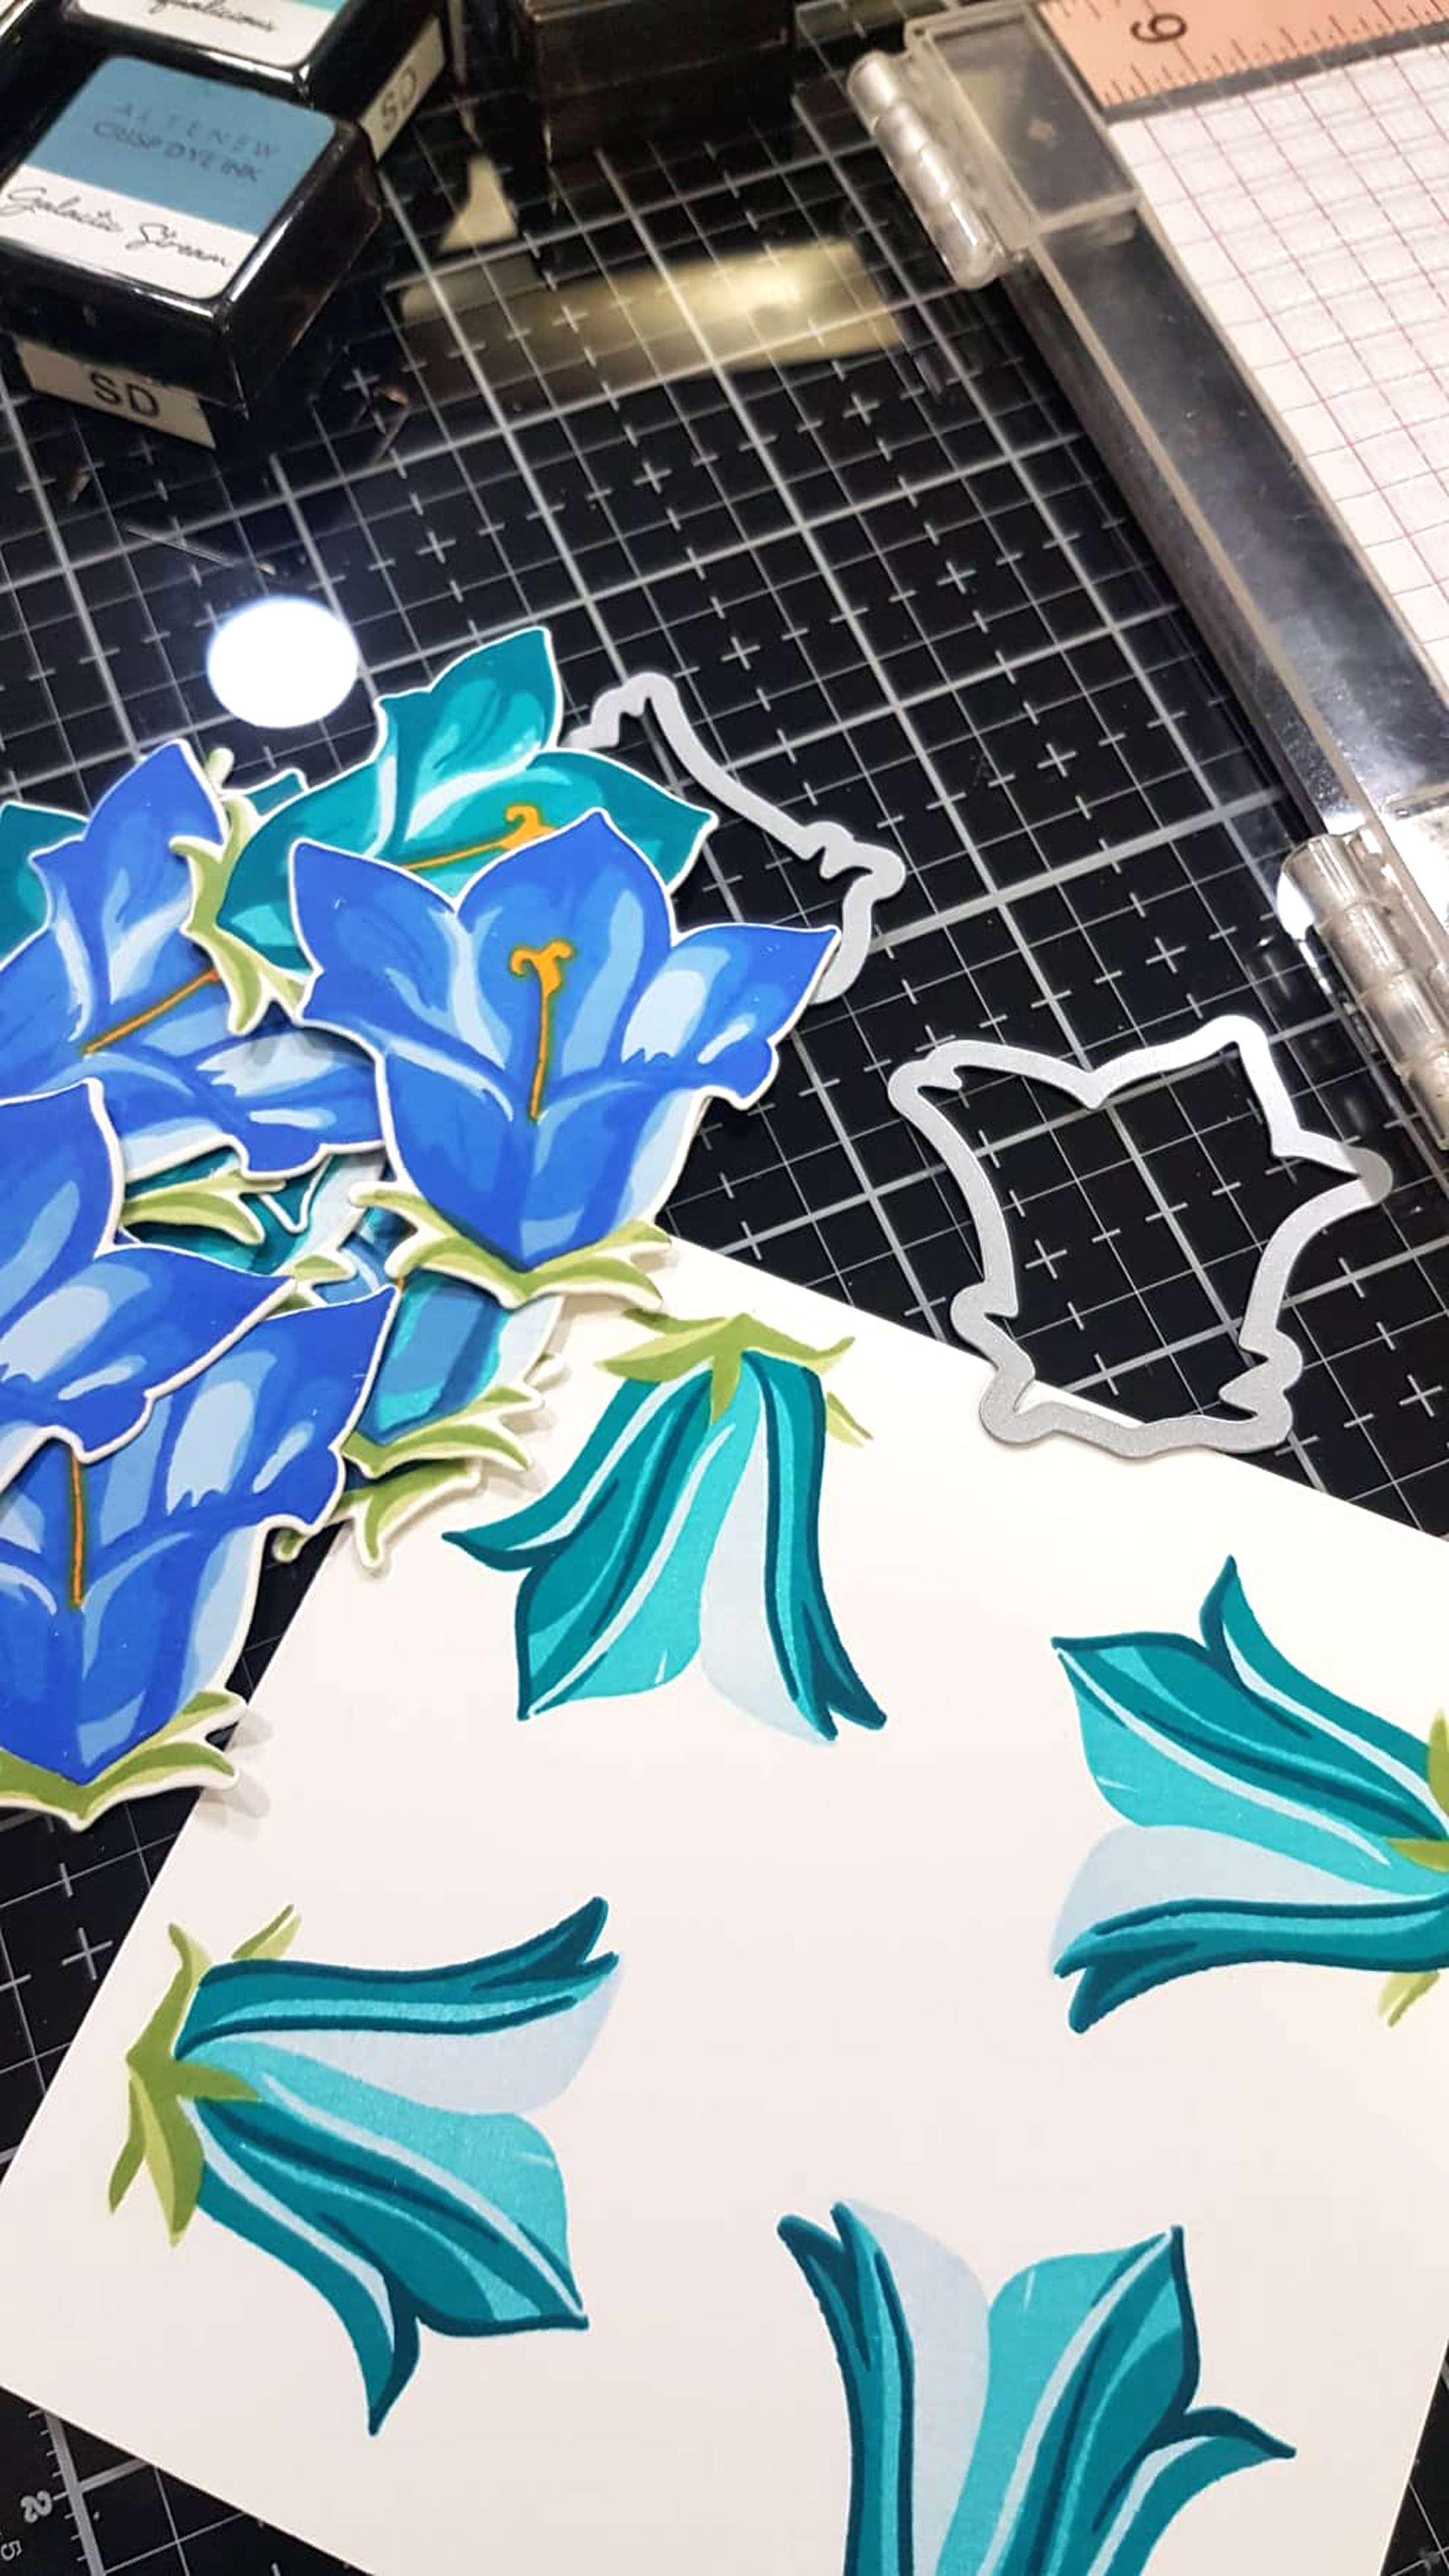
I’m a big fan of layered stamp sets. But I’d like to be honest… there are some sets that are more challenging for me to align than others. Fortunately, Altenew’s BAF Bellflower falls under the easy-to-align stamp sets! You can create a lot of flowers, stems, and sepals by systematic stamping. I learned this way of stamping from Jennifer Mcguire and it definitely saves so much time when making multiple images. Having a Misti stamping tool will be greatly helpful for this system of stamping.
First, cut out a square piece of paper big enough to stamp your 4 images in each corner. Stamp the first layer, rotate the paper 90 degrees making sure the corner and sides are flush to the edges of the Misti then stamp. Repeat until you stamp all 4 corners. Then get the second layer, position the stamp on top of the image and pick up the stamp with the Misti. Get your darker ink then stamp and just rotate the paper to stamp all of the 2nd layers. Continue in this manner until your image is complete. I stamped a lot of flowers so that I always have extras to create cards. Below is the layering guide.
BUILD A FLOWER: BELLFLOWER GUIDE
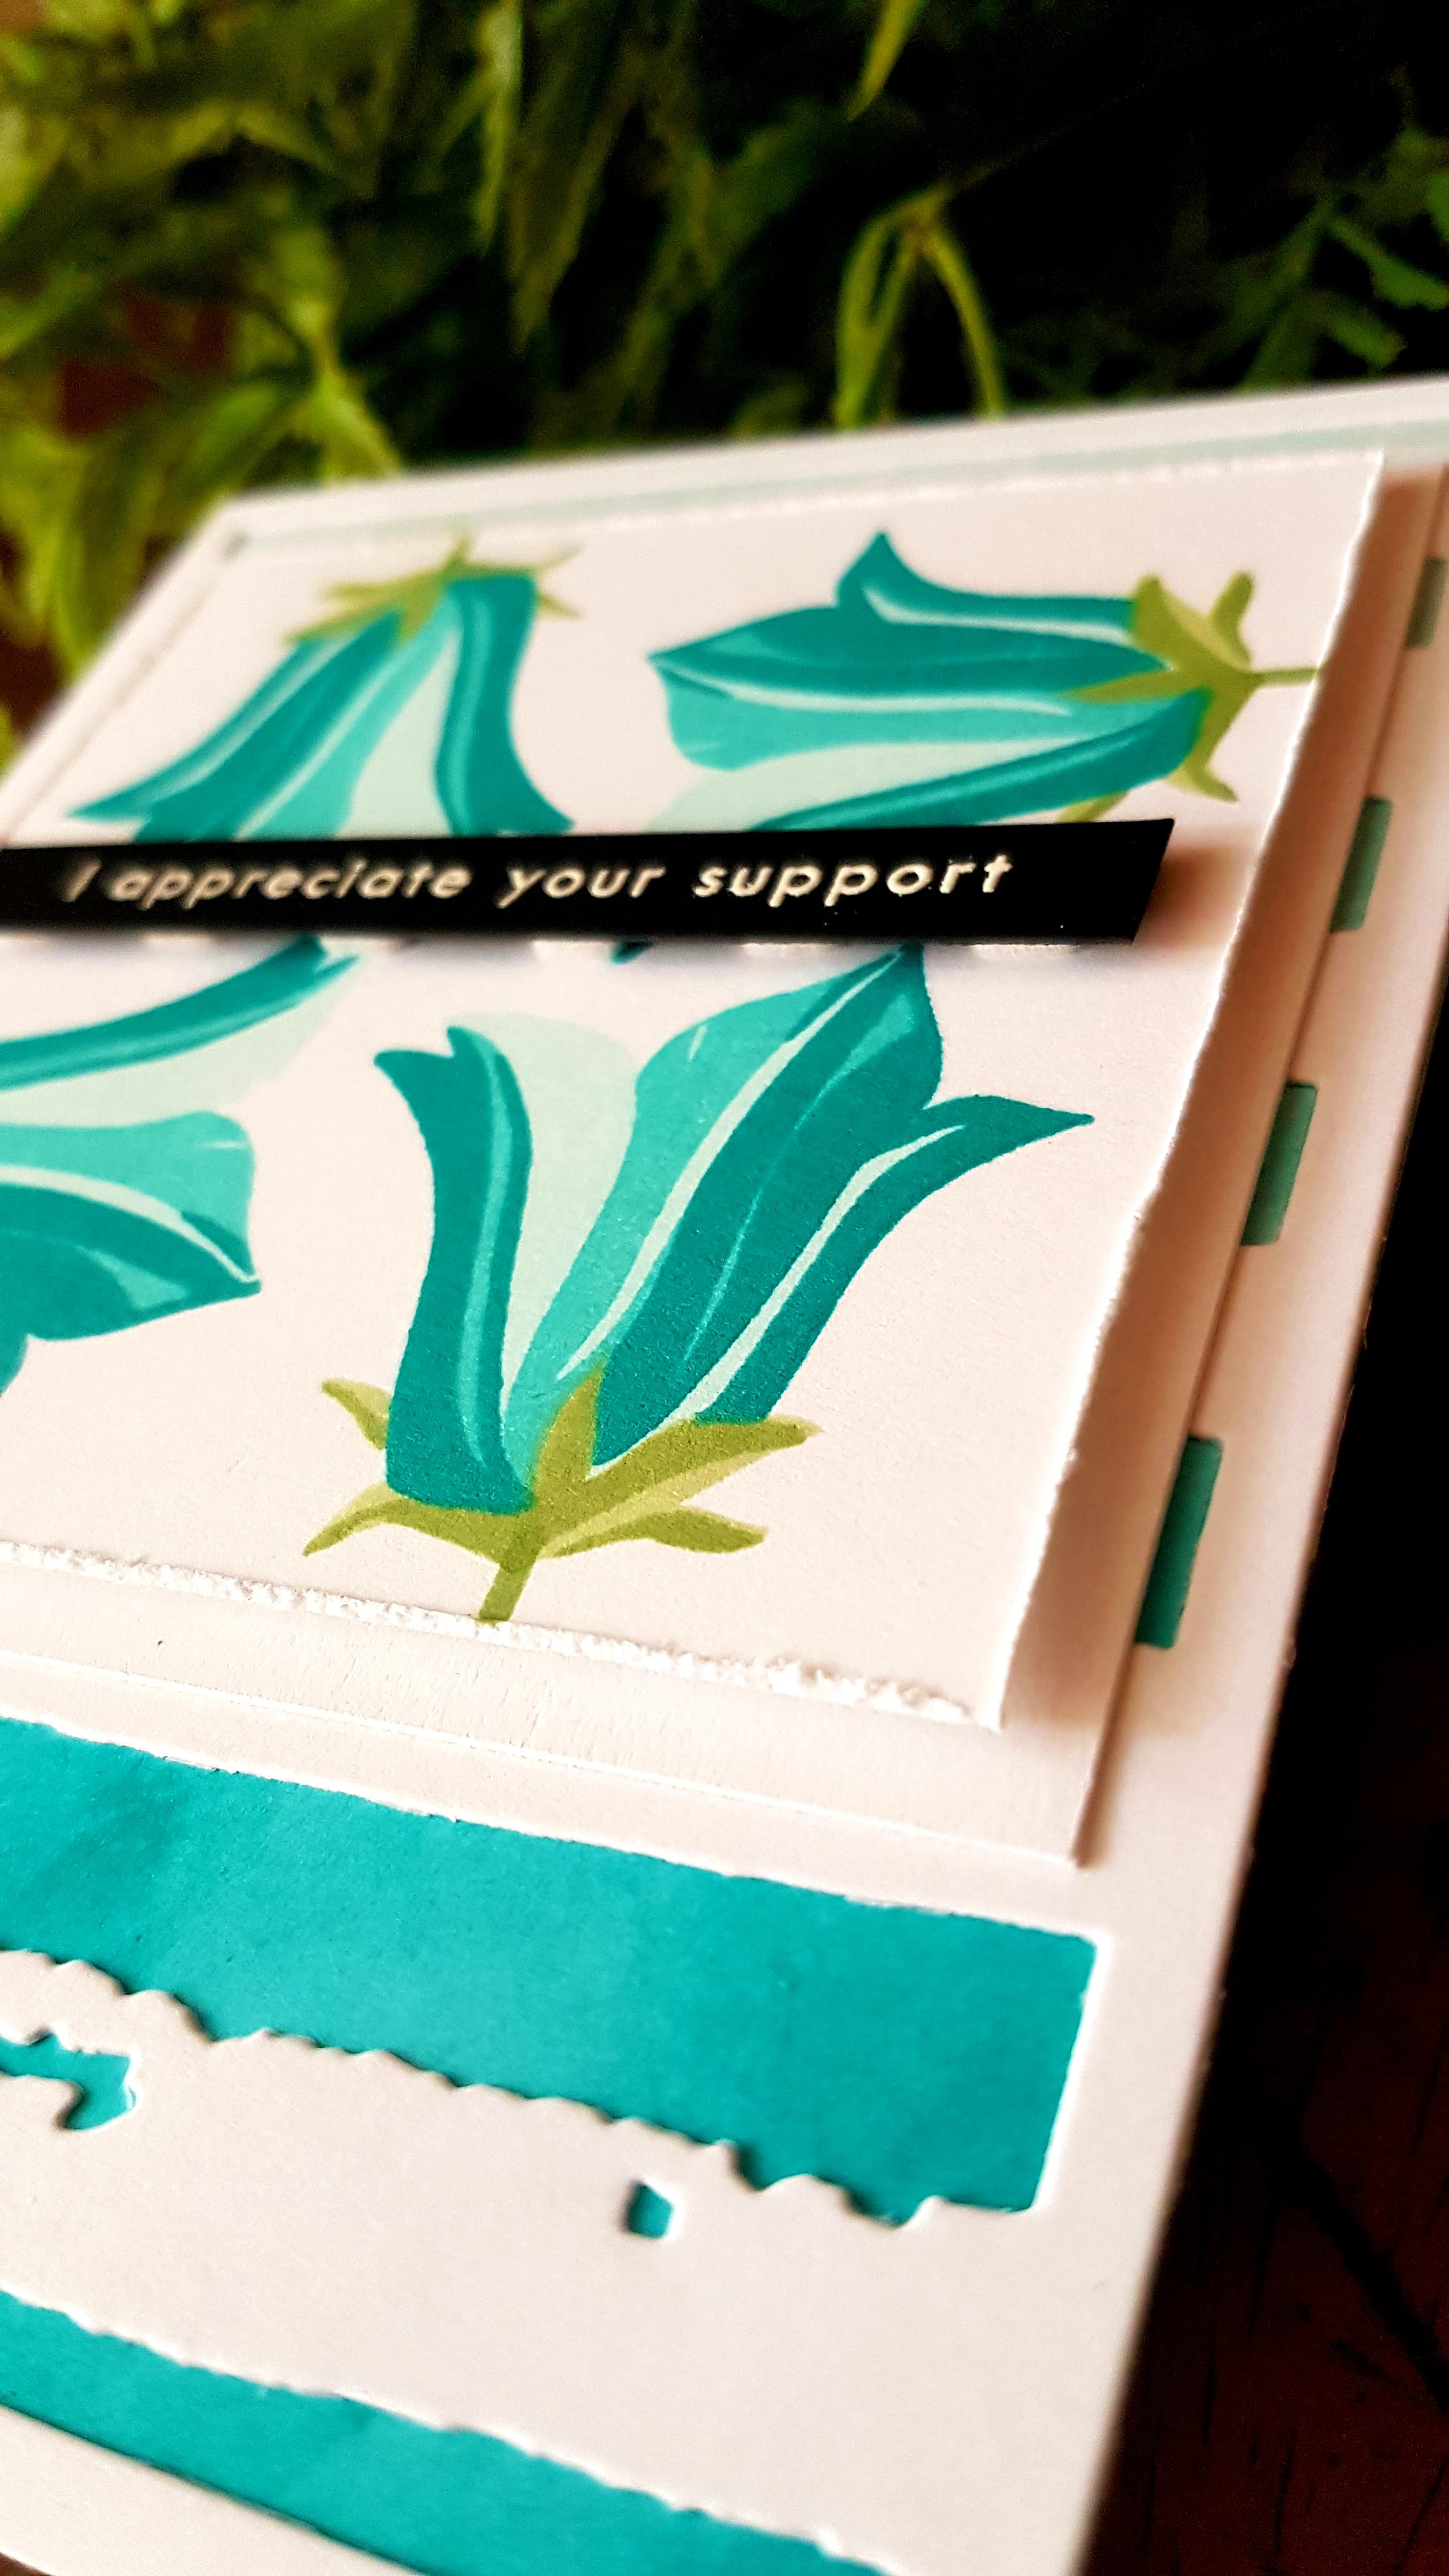
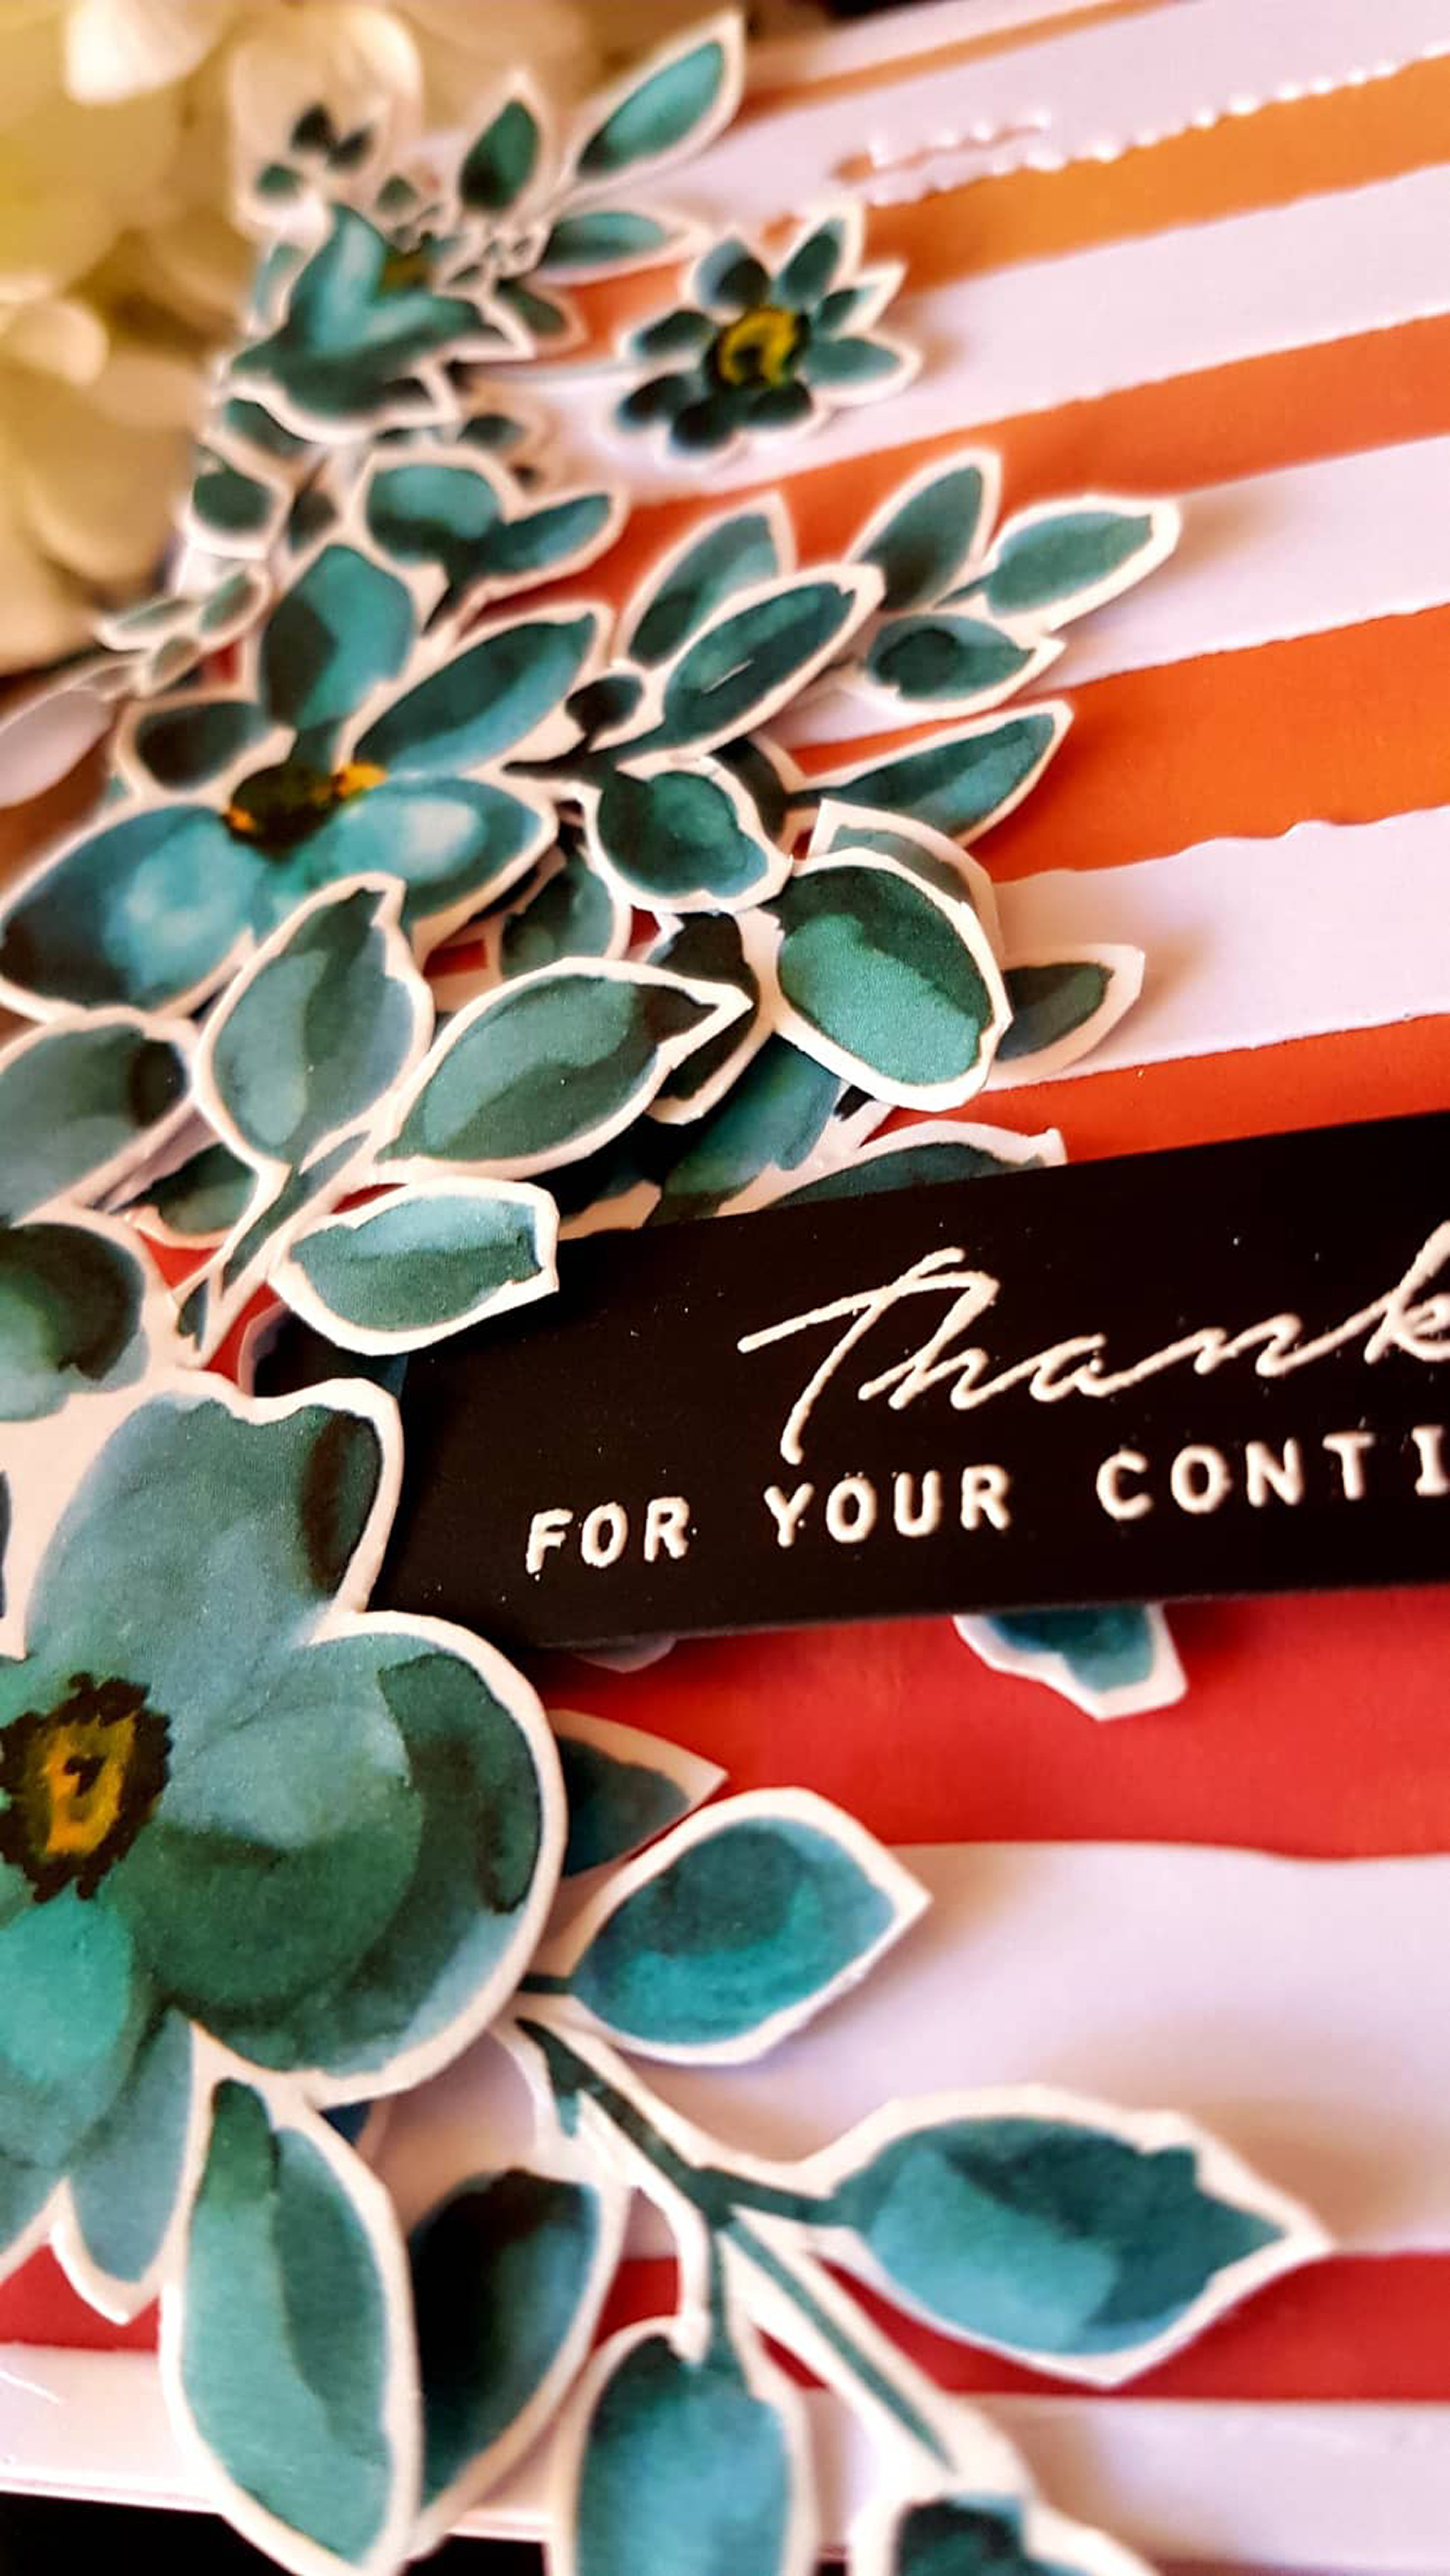
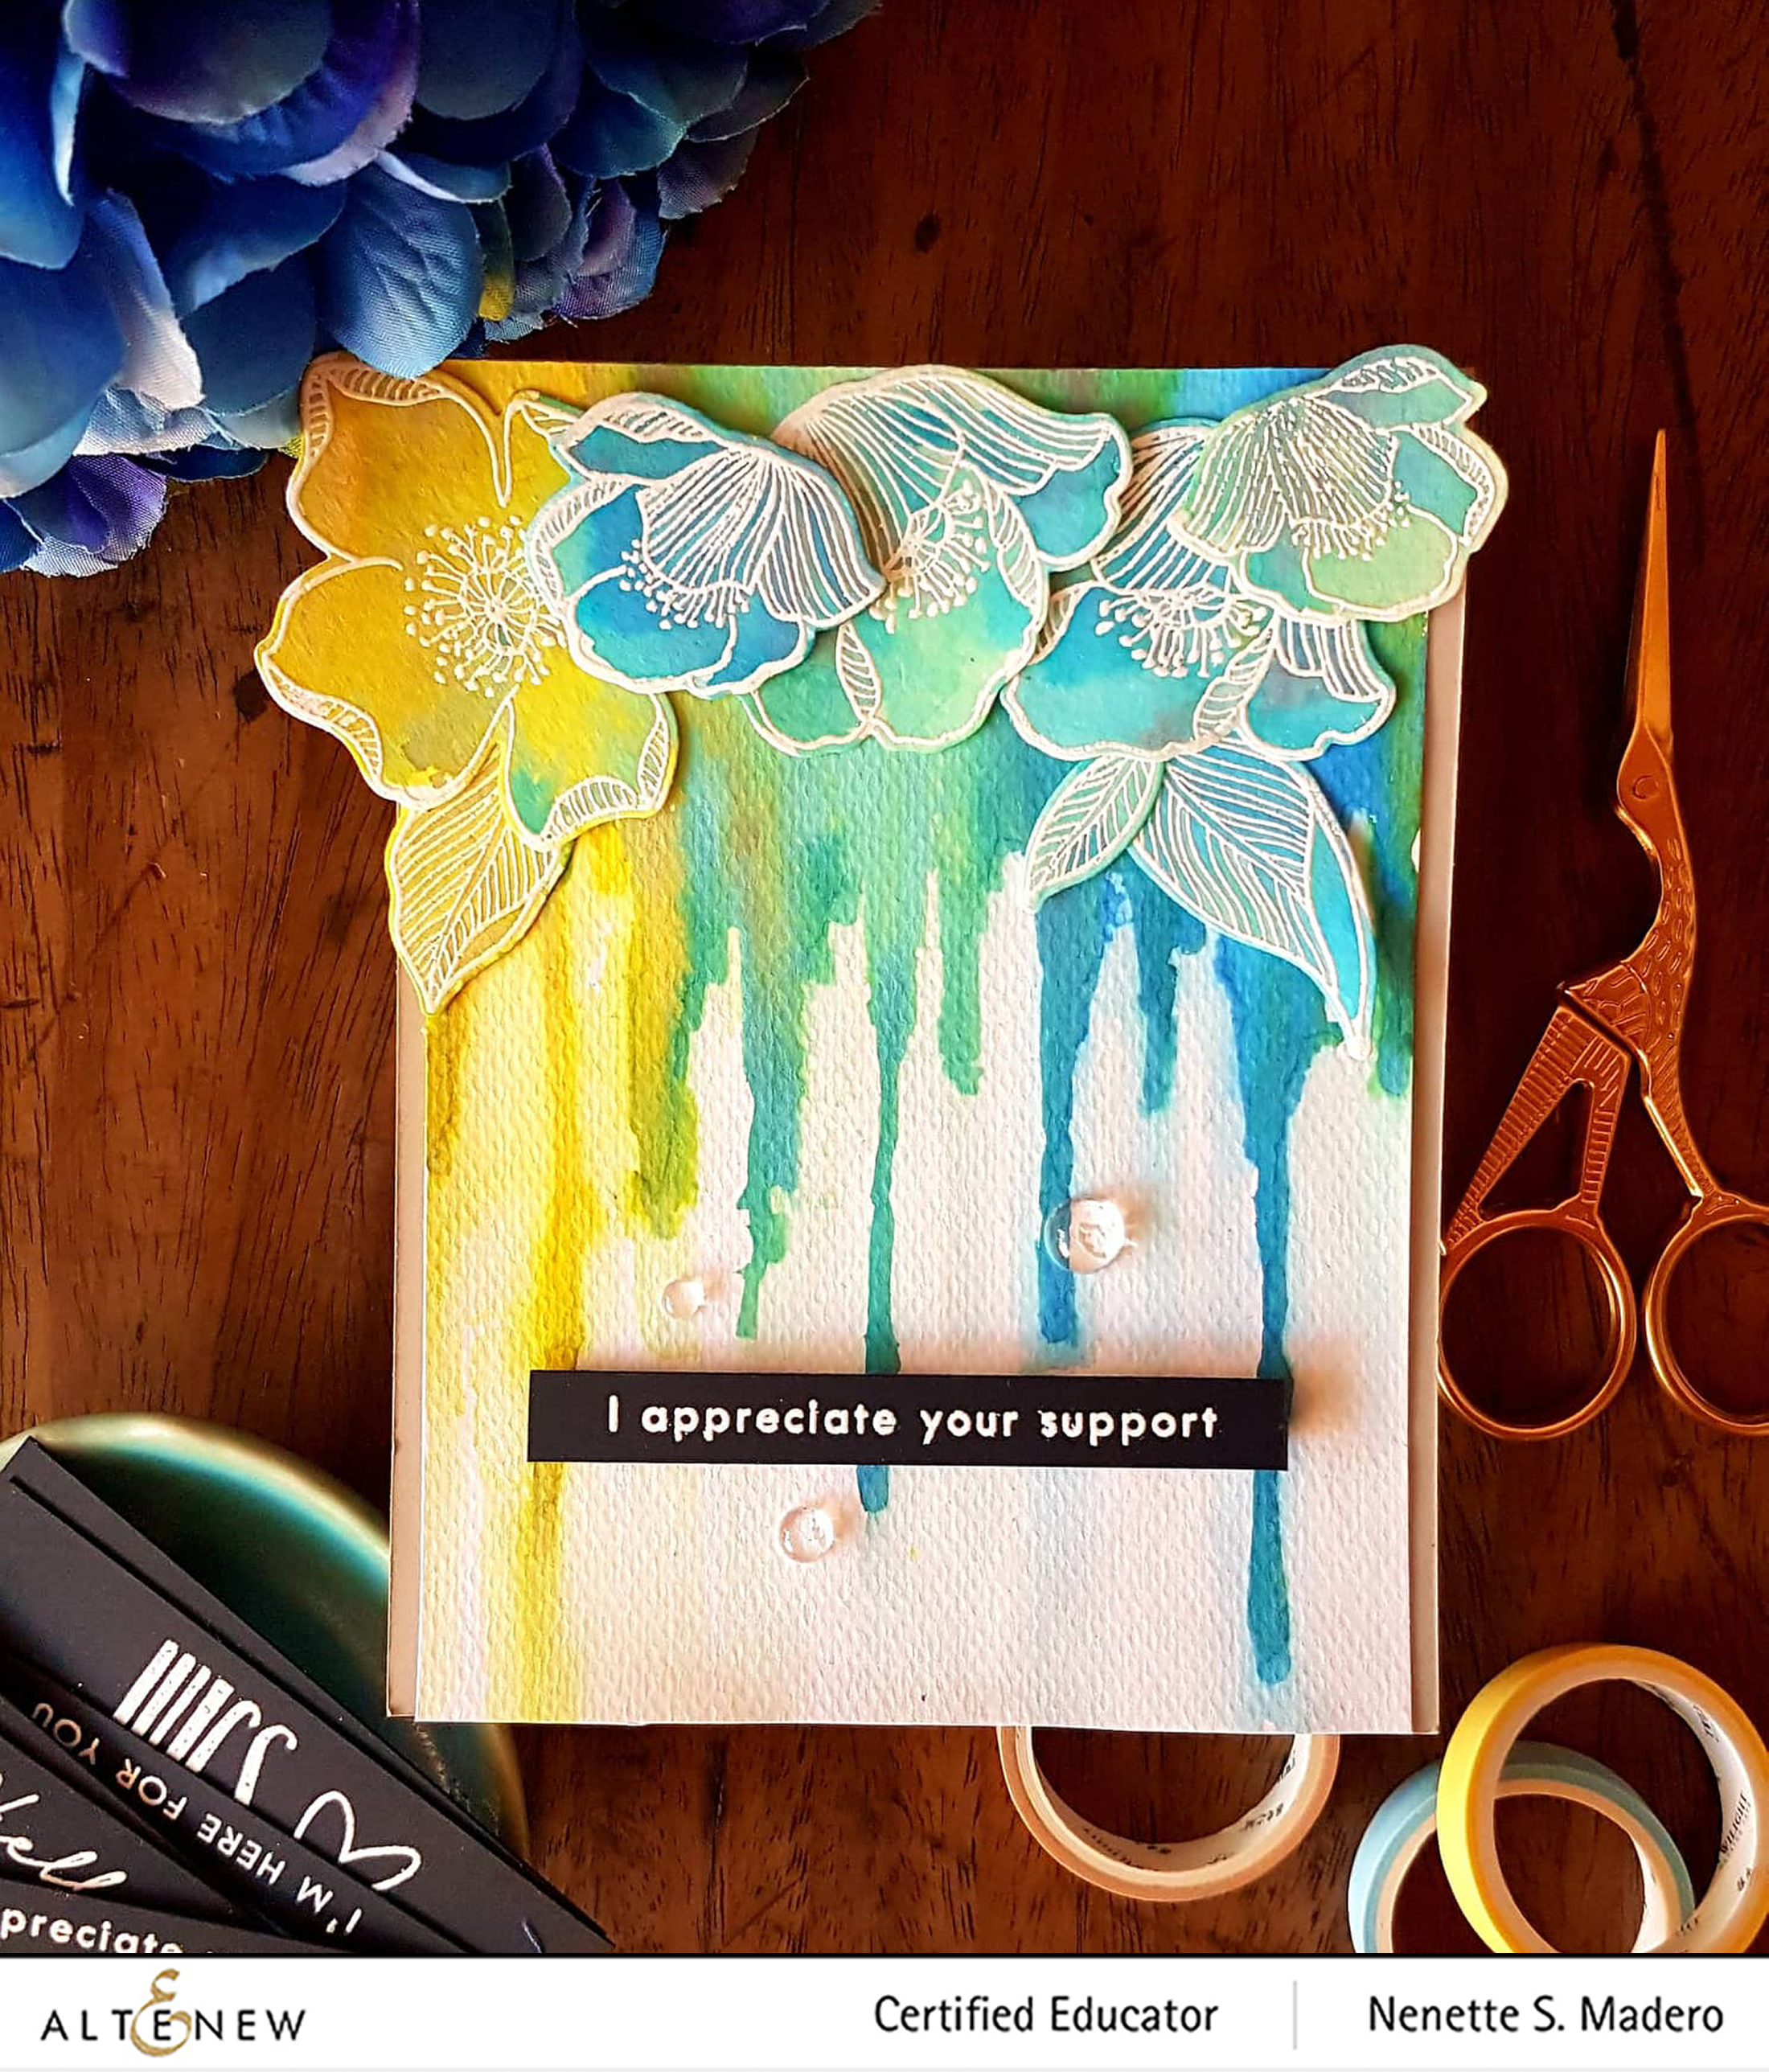
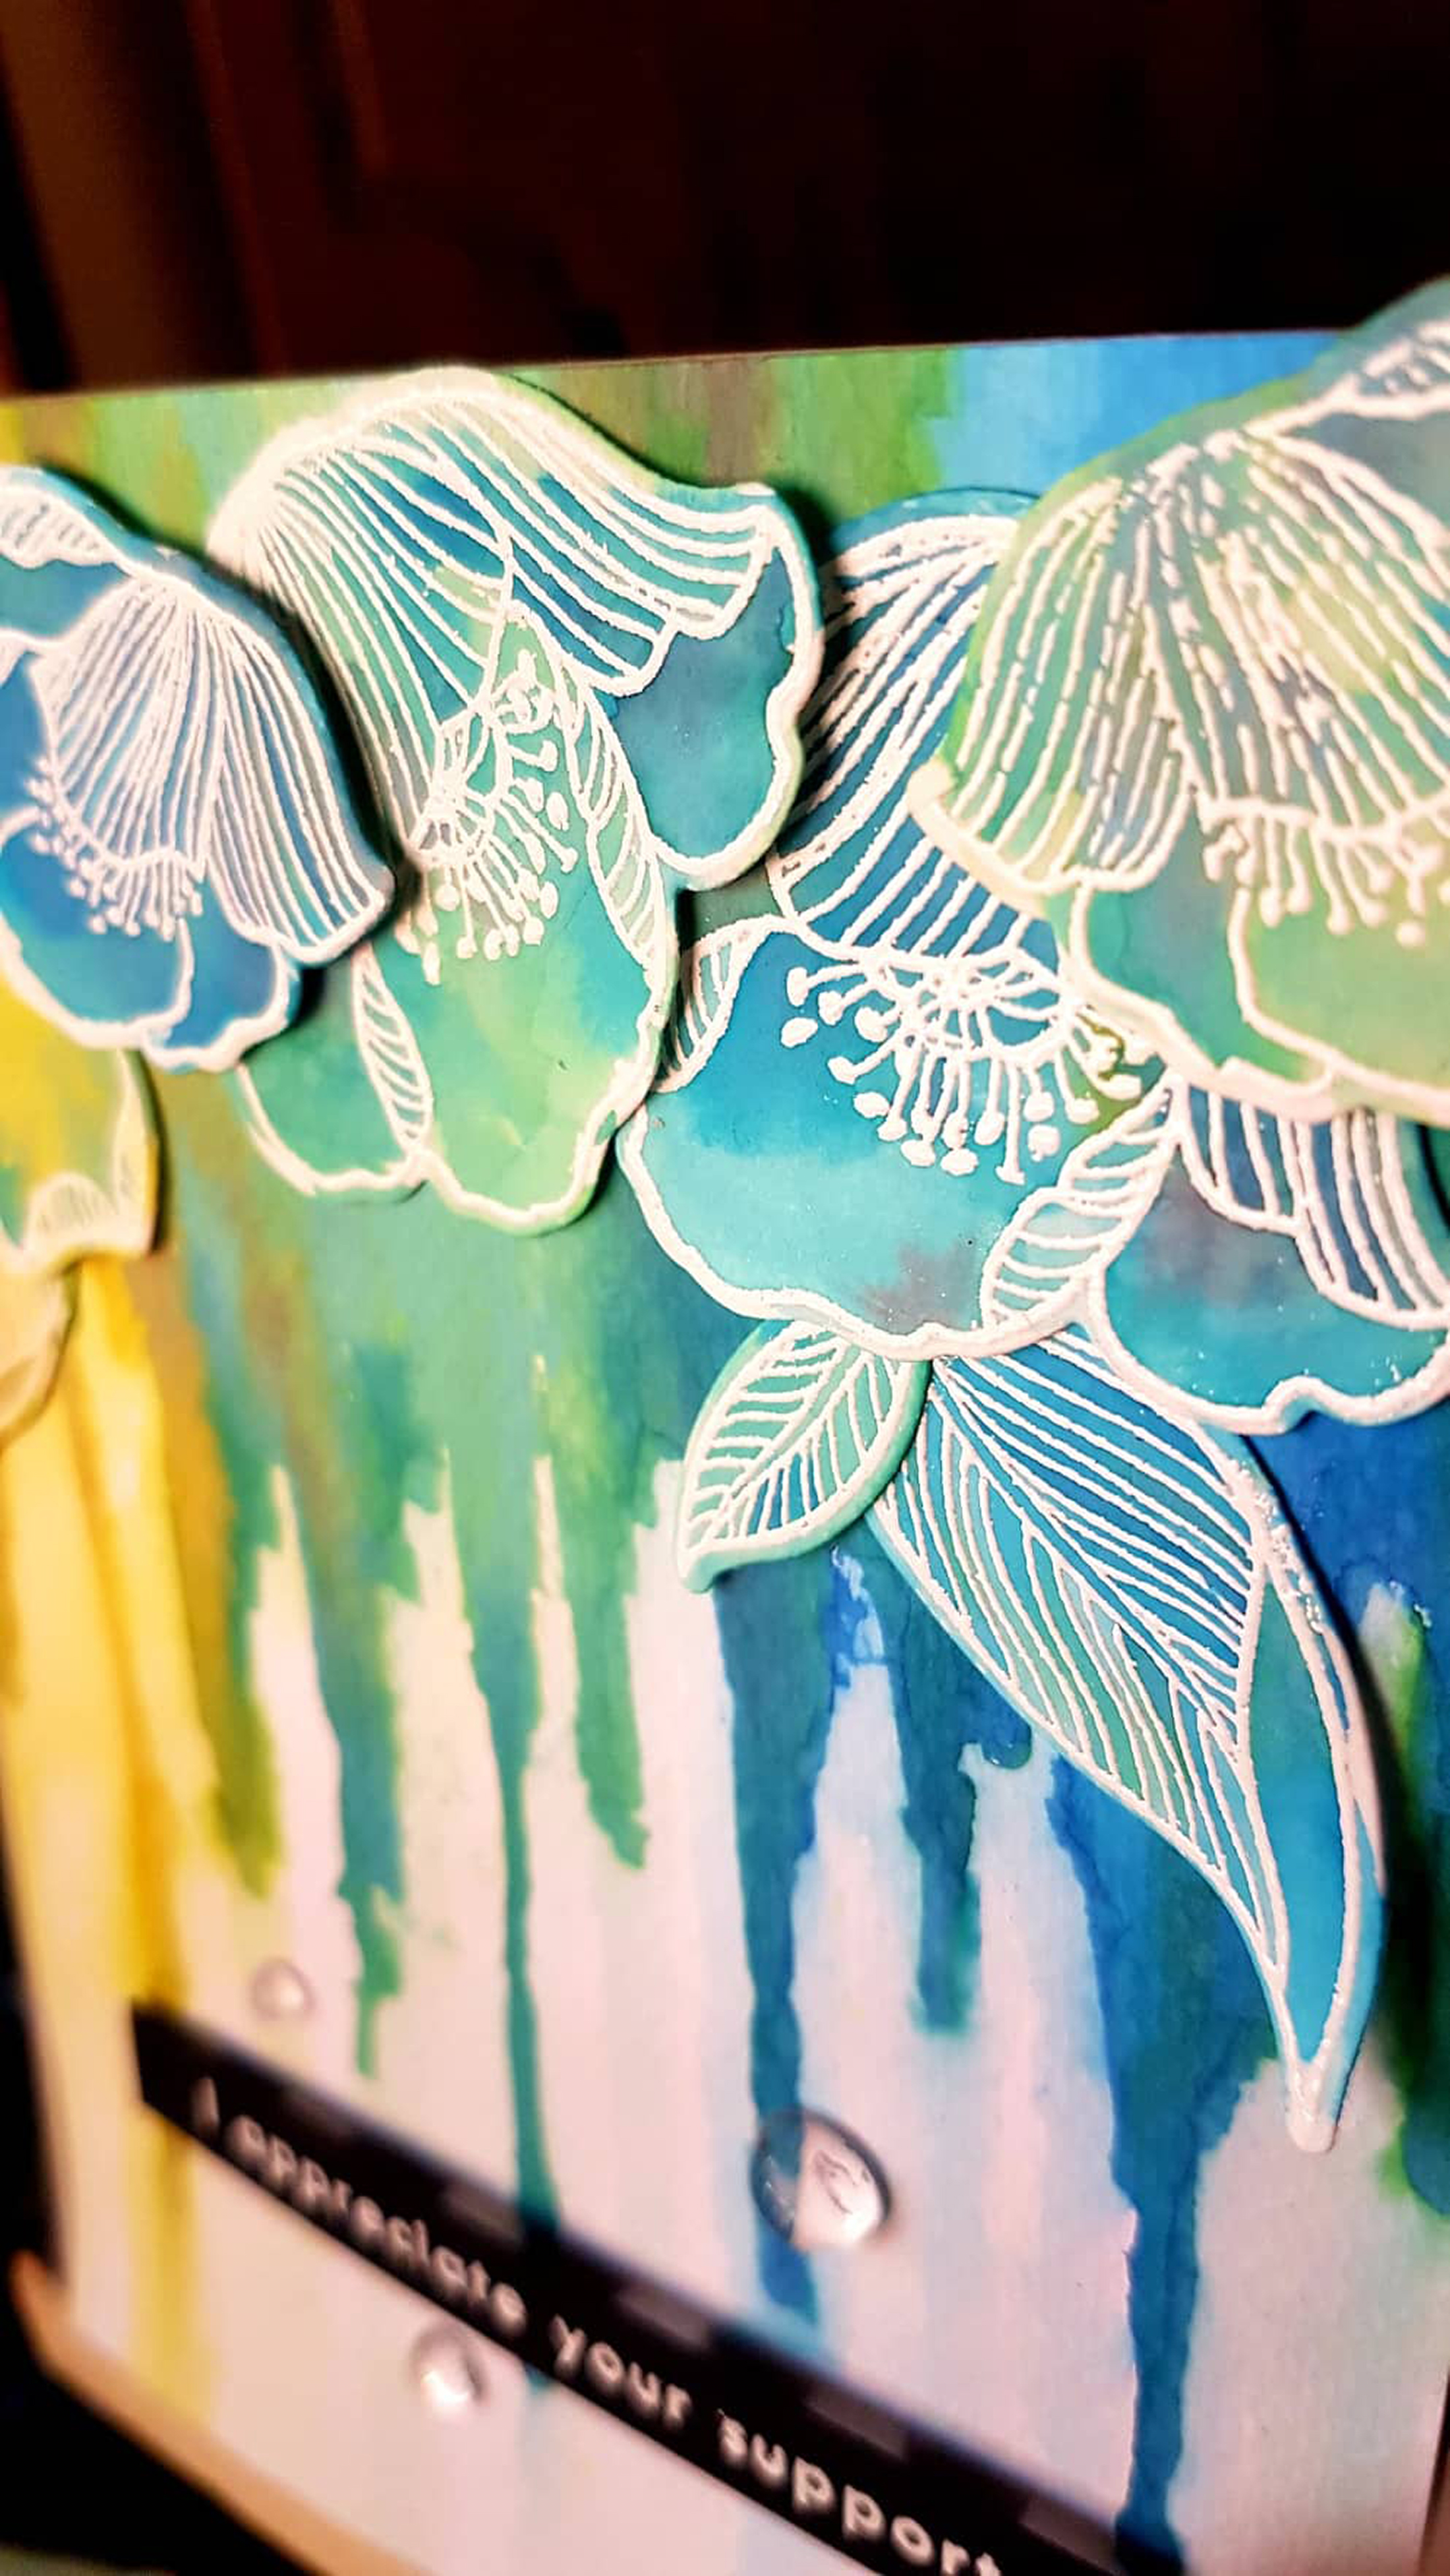
I APPRECIATE YOUR SUPPORT CARD
I loved how the images looked so I decided to use some of these stamped panels on cards instead of die-cutting them.
The front panel of an A2 card was colored using Altenew dye inks in shades of blue to create an ombre effect. The Watercolor stripes cover die cut was glued onto the card front. The stamped panel’s edges were distressed using the paper distresser tool then adhered onto a white mat then glued to the card front using foam squares. The sentiment was stamped on black cardstock using Versamark ink then embossed using white embossing powder.
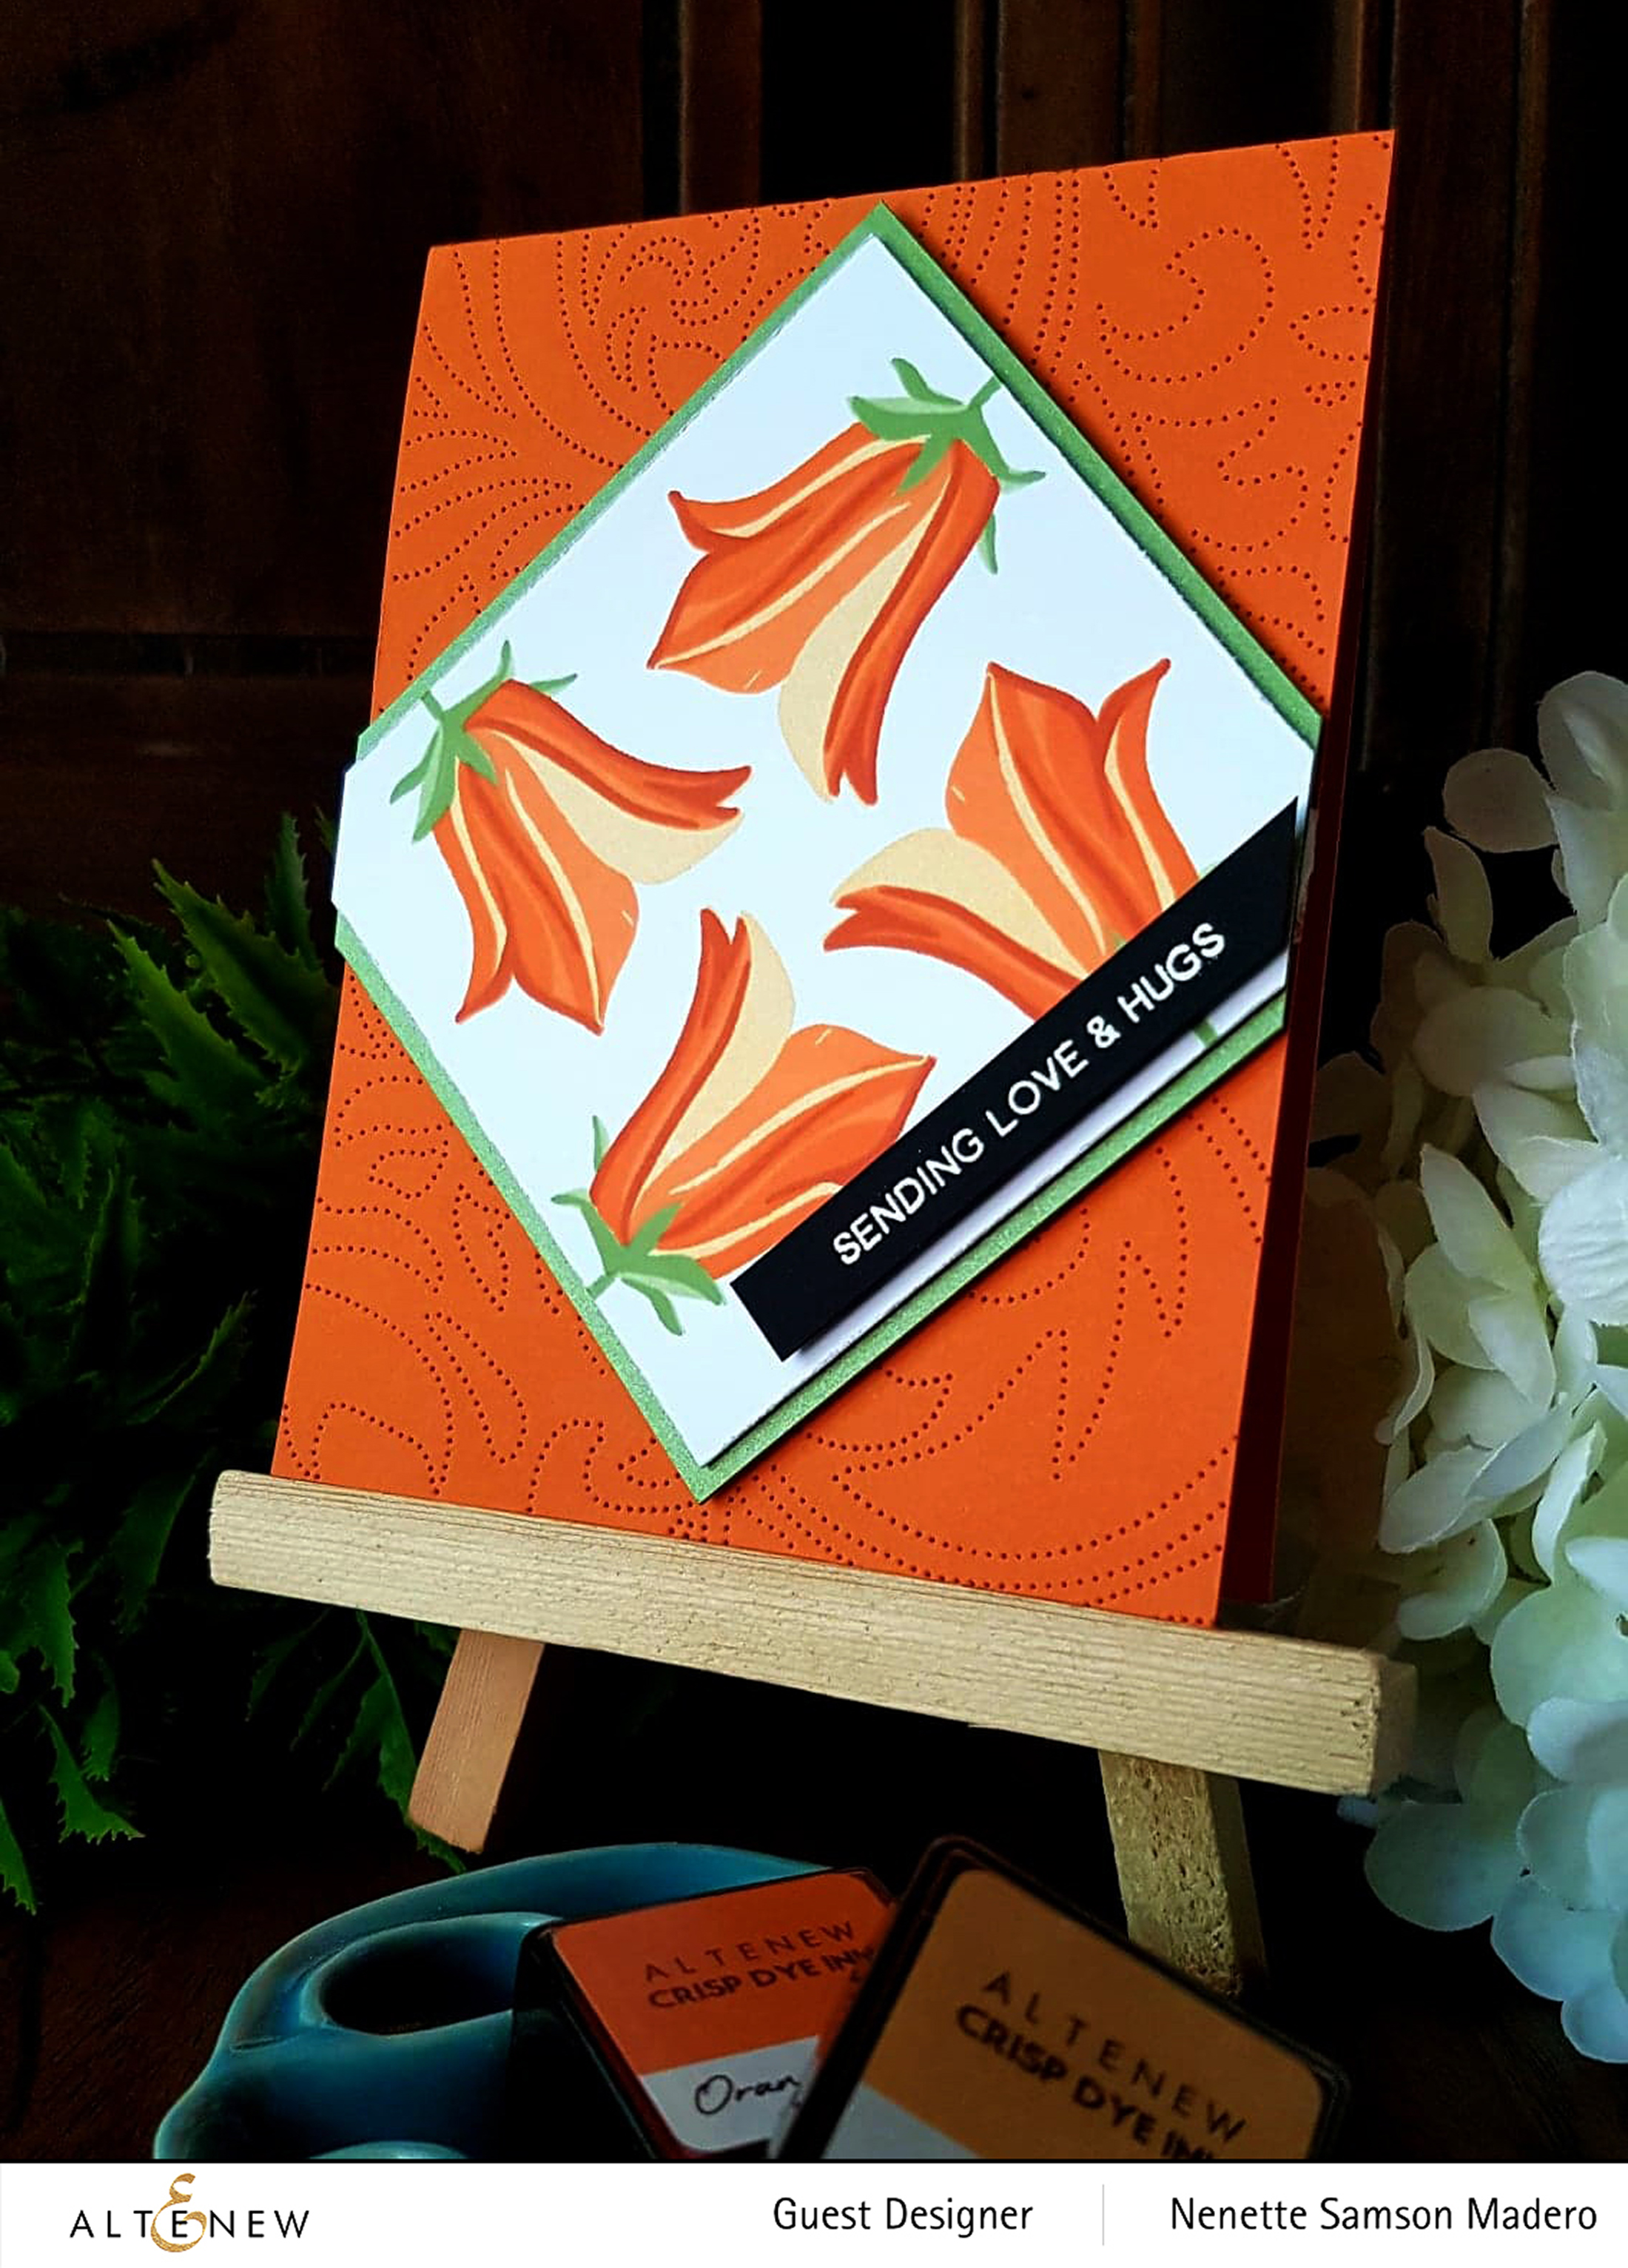
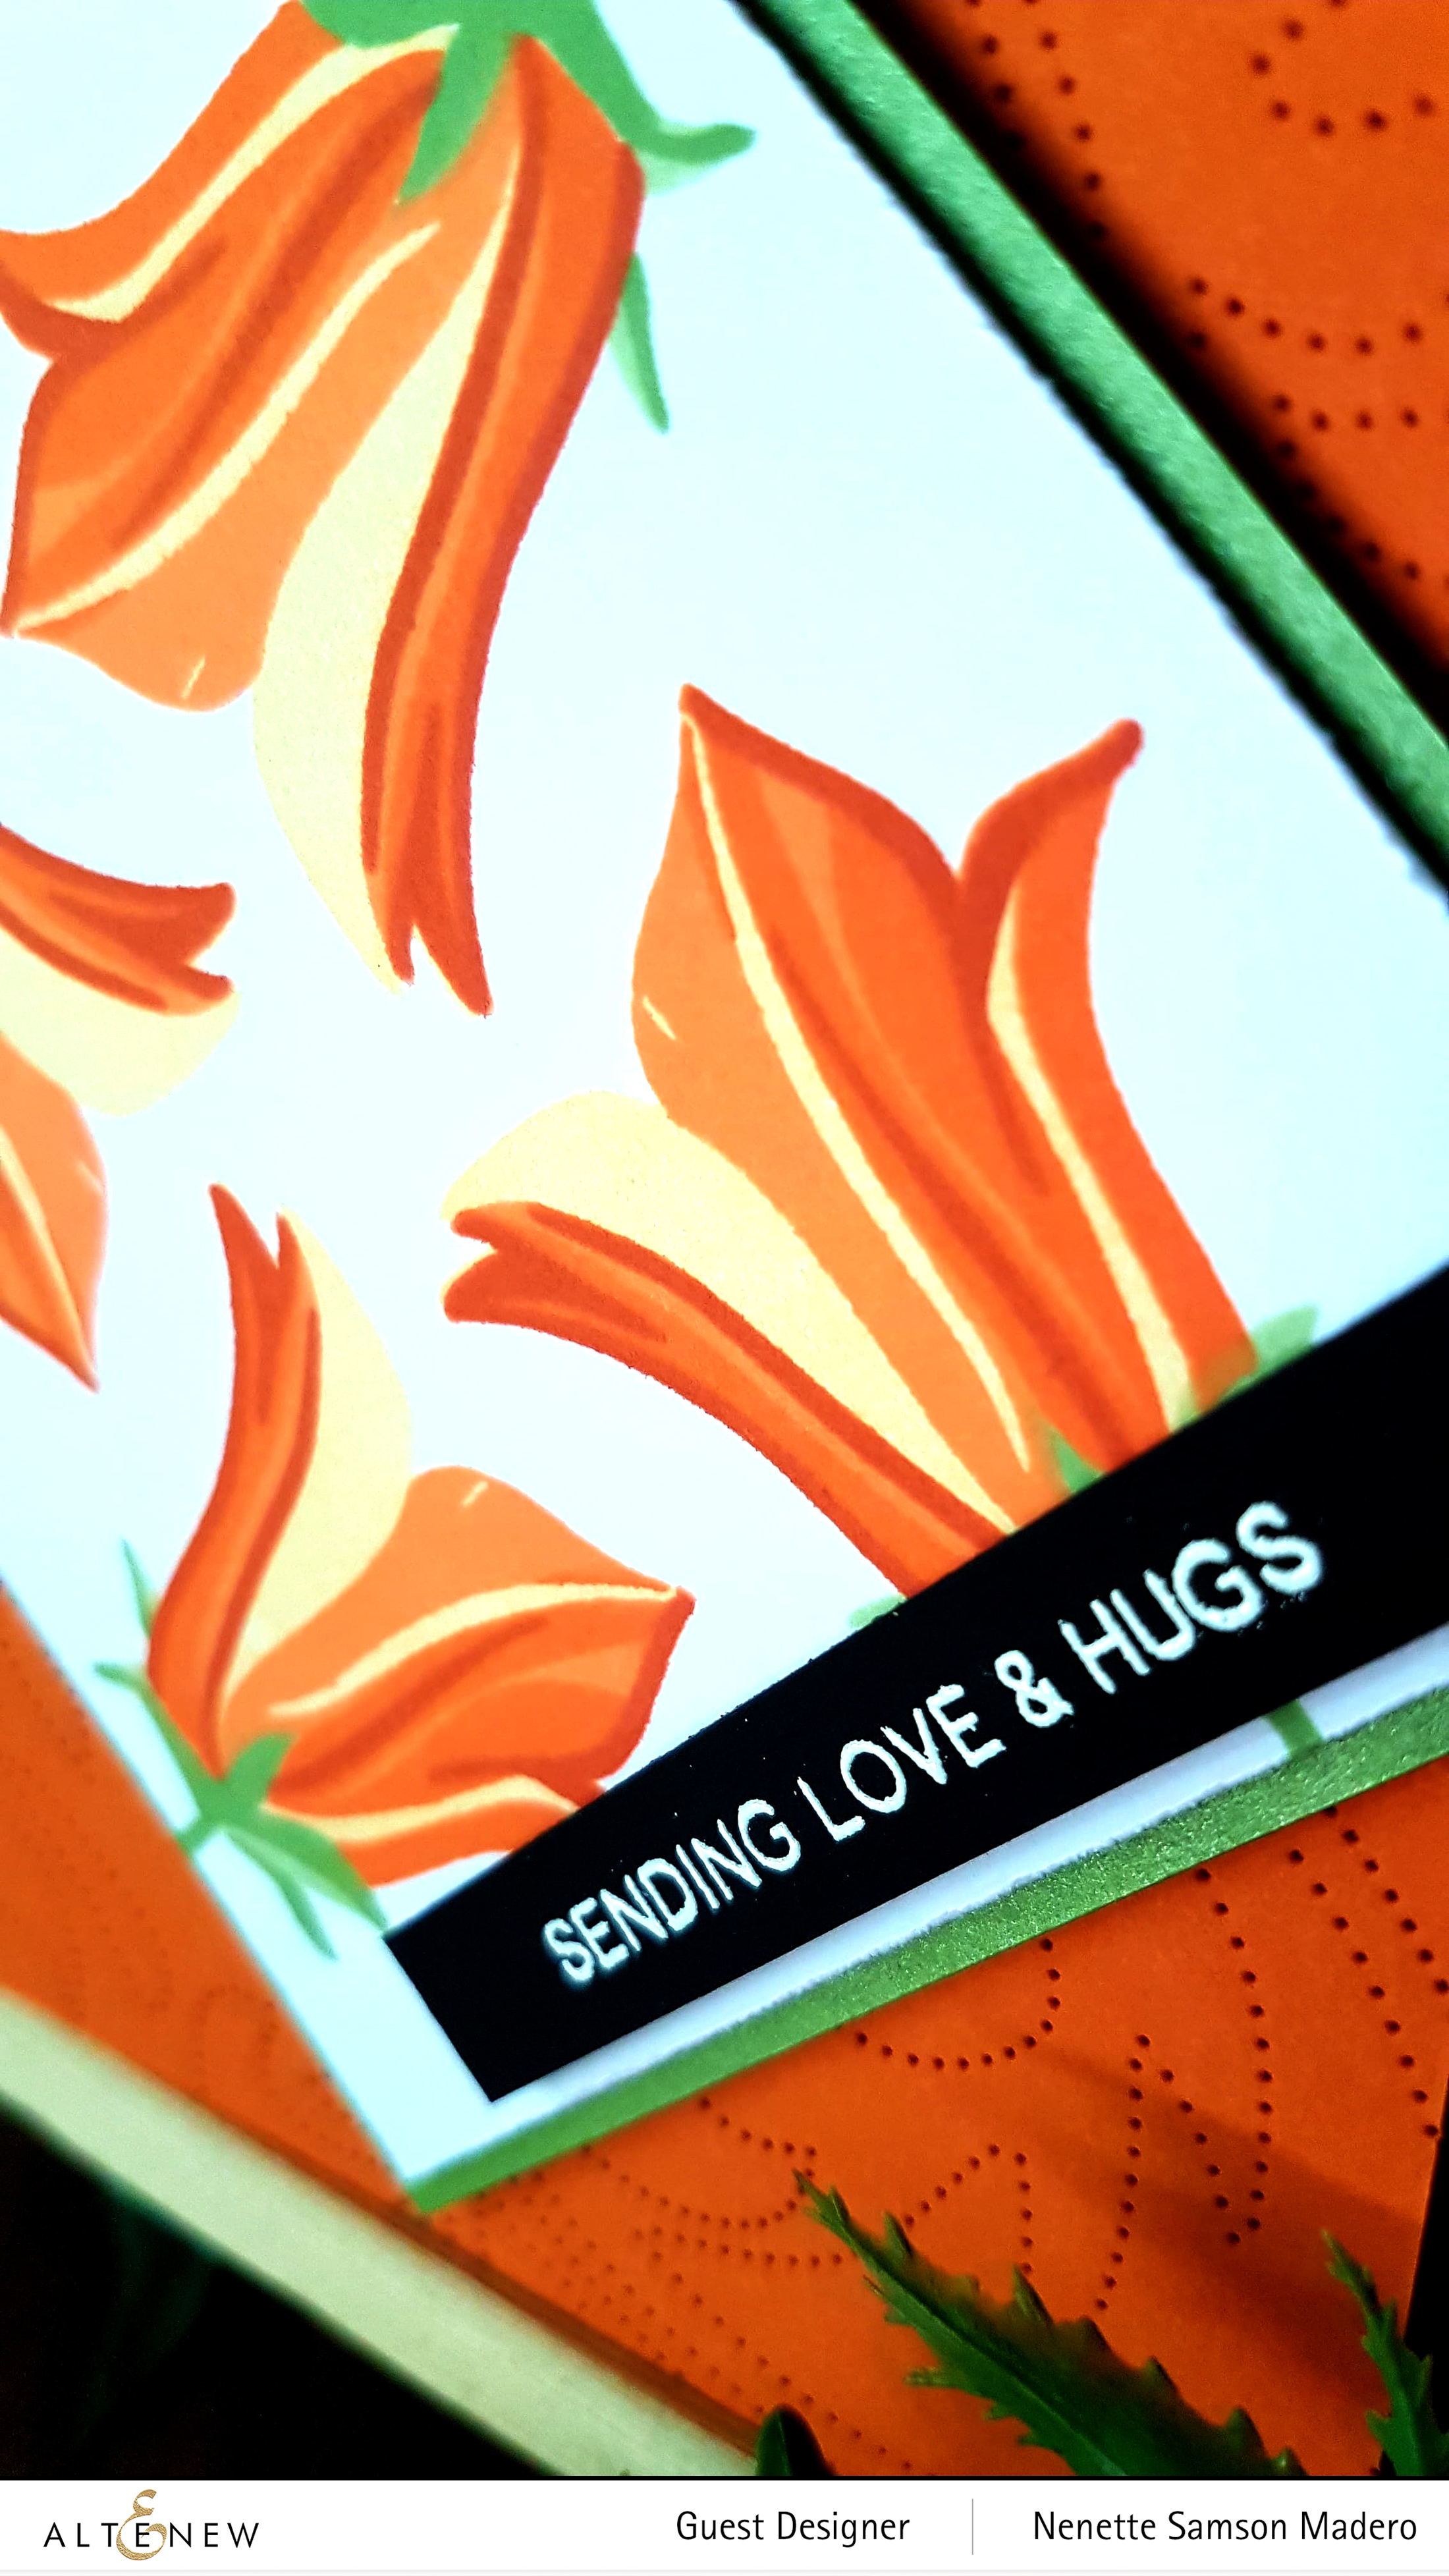
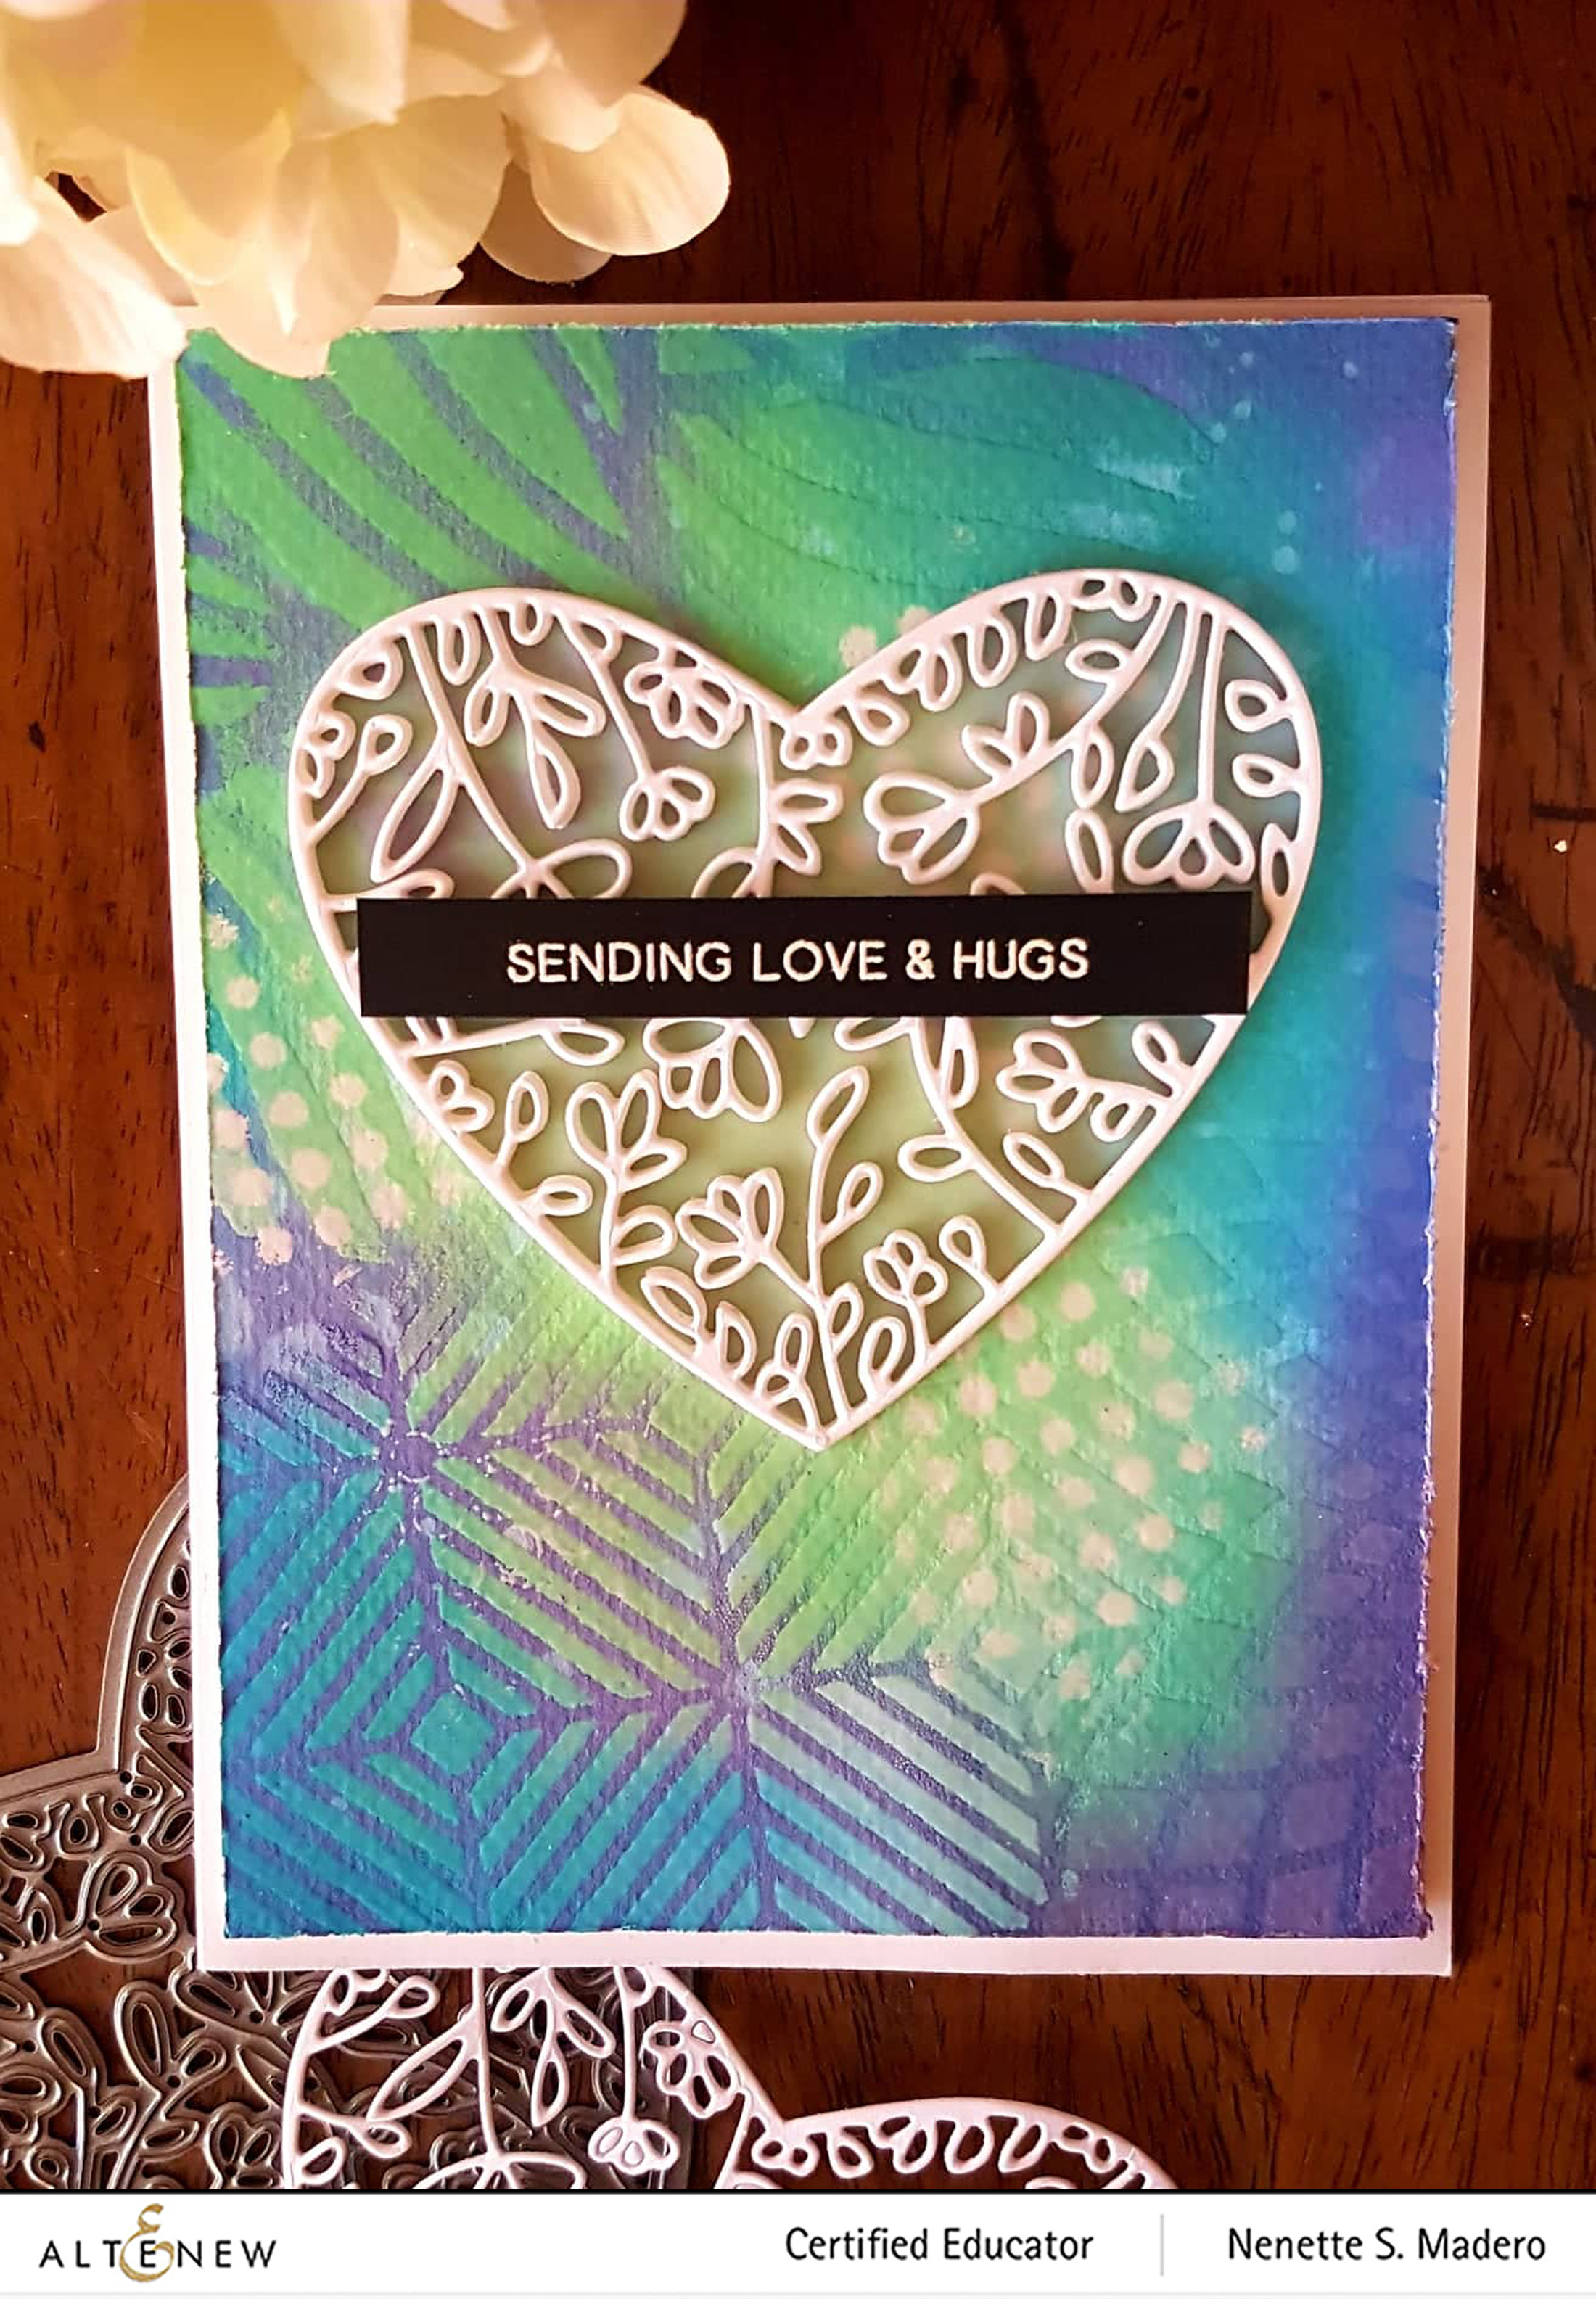
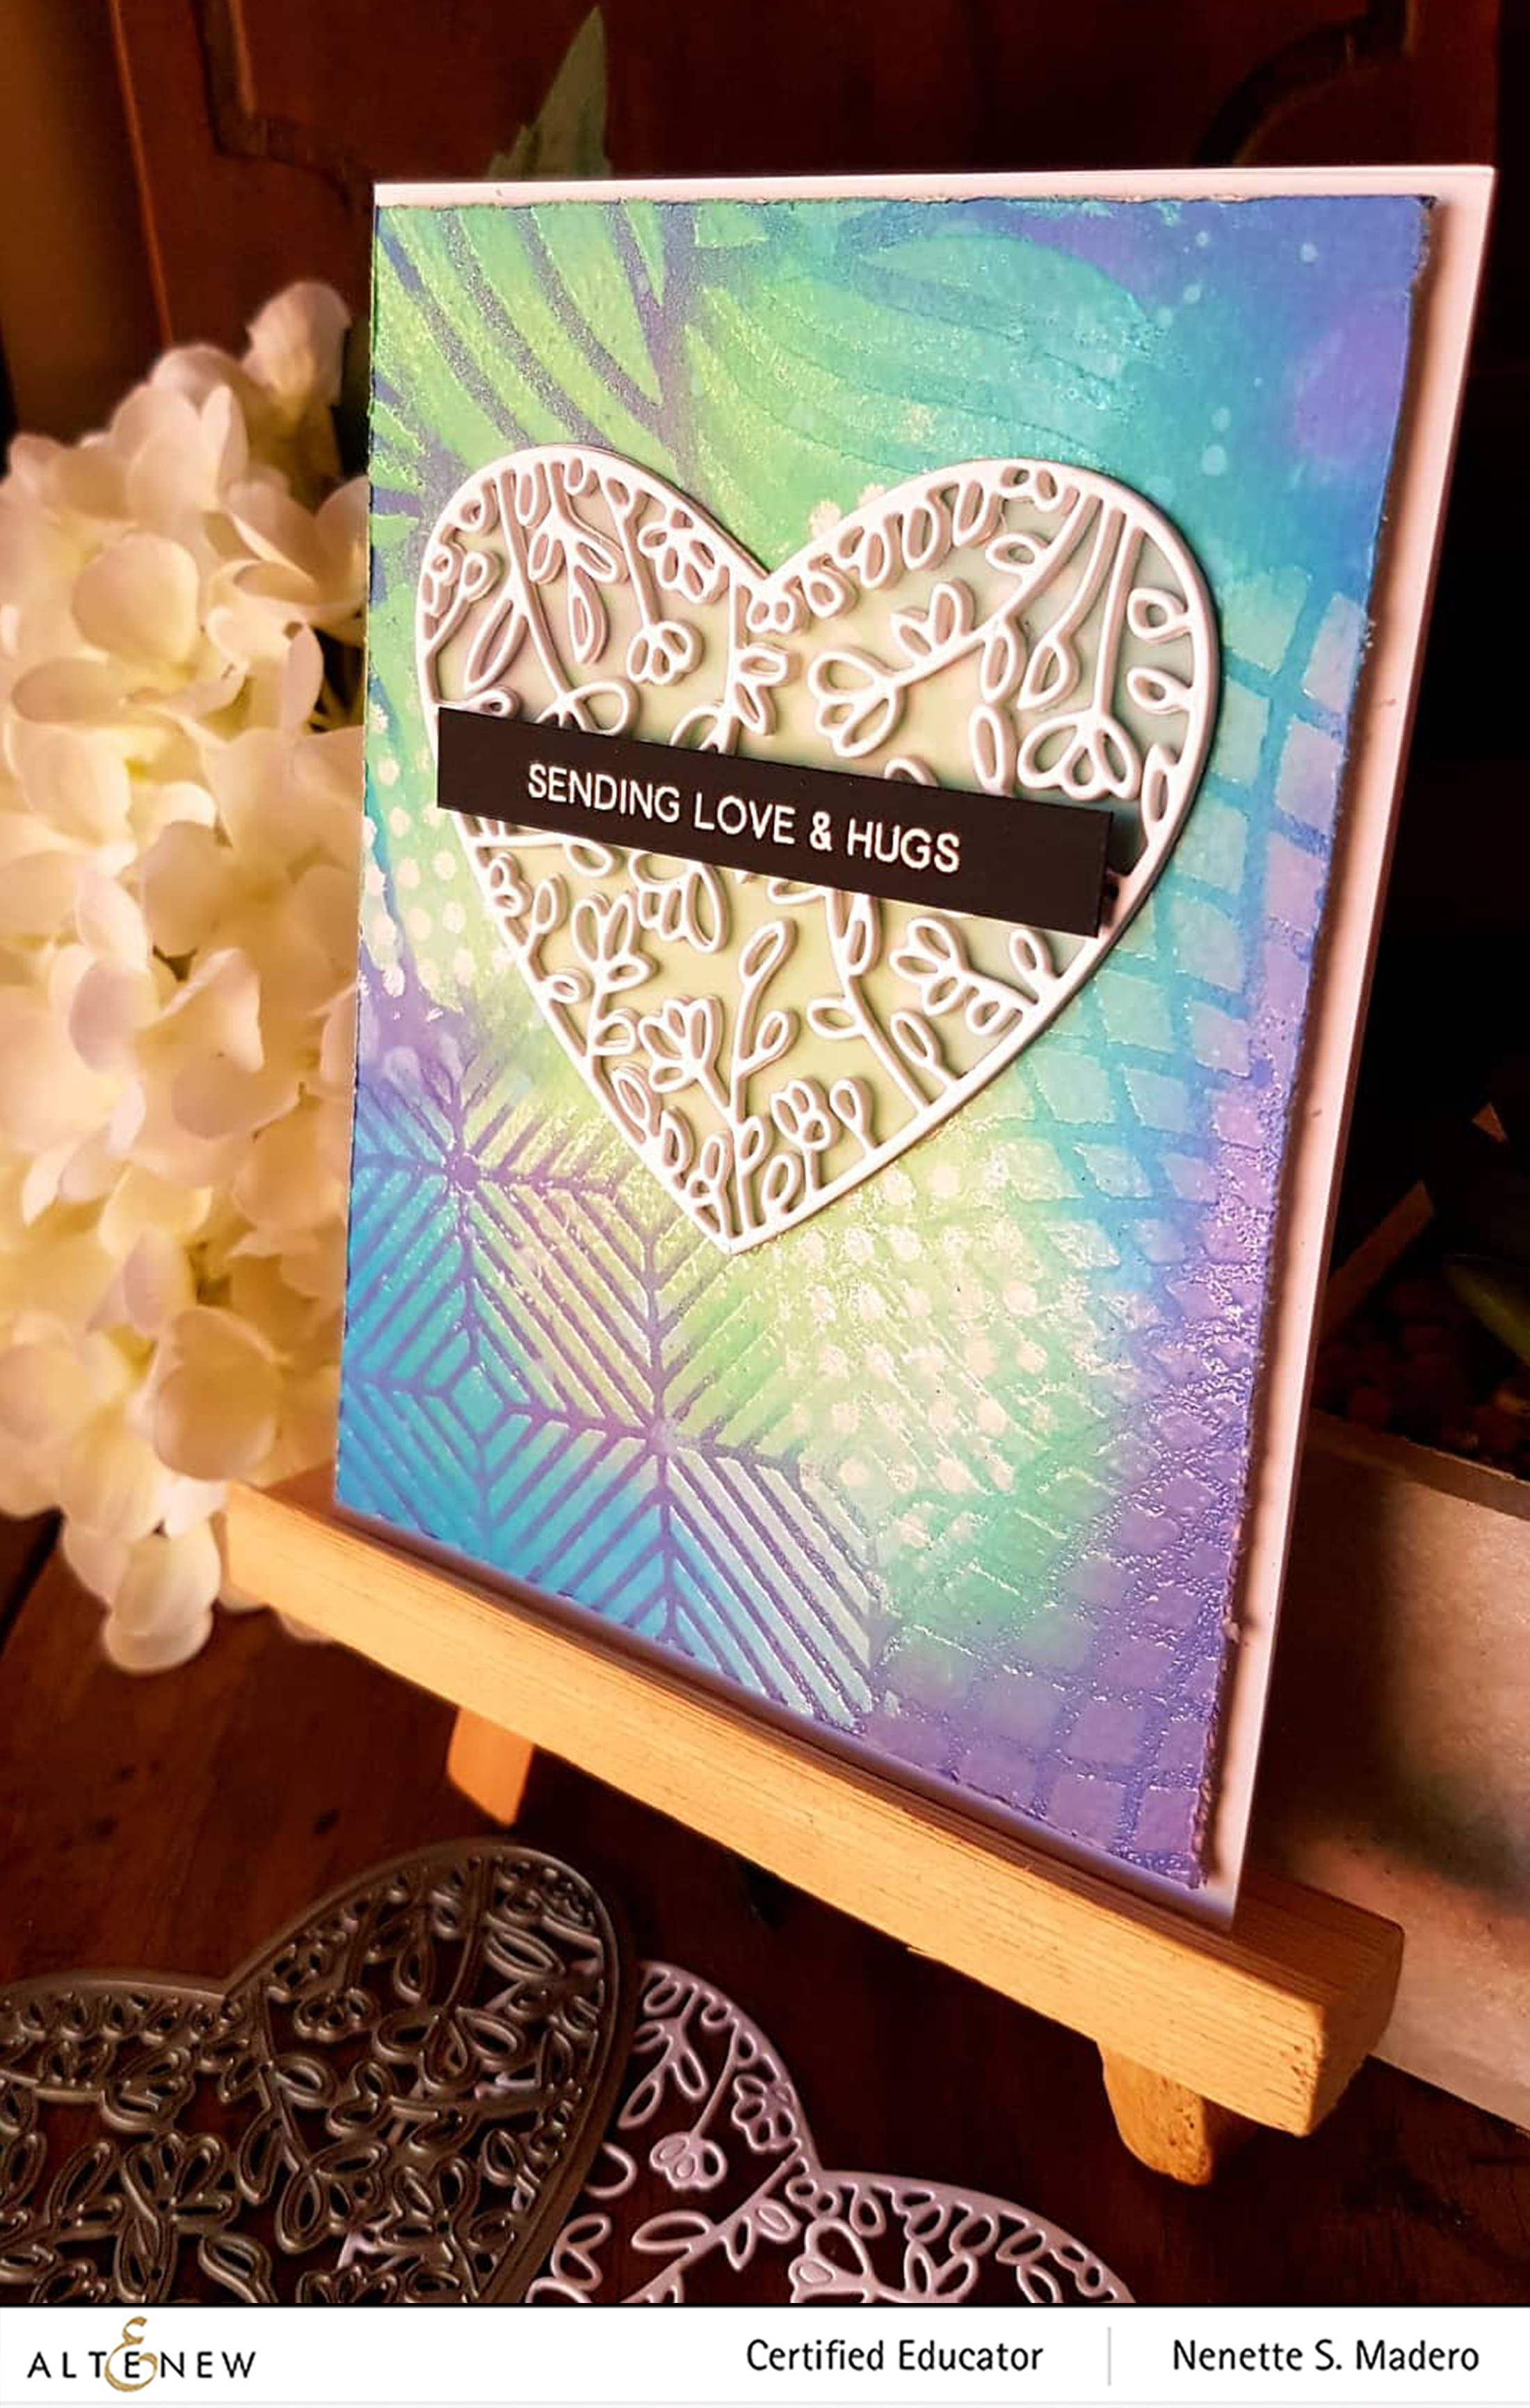
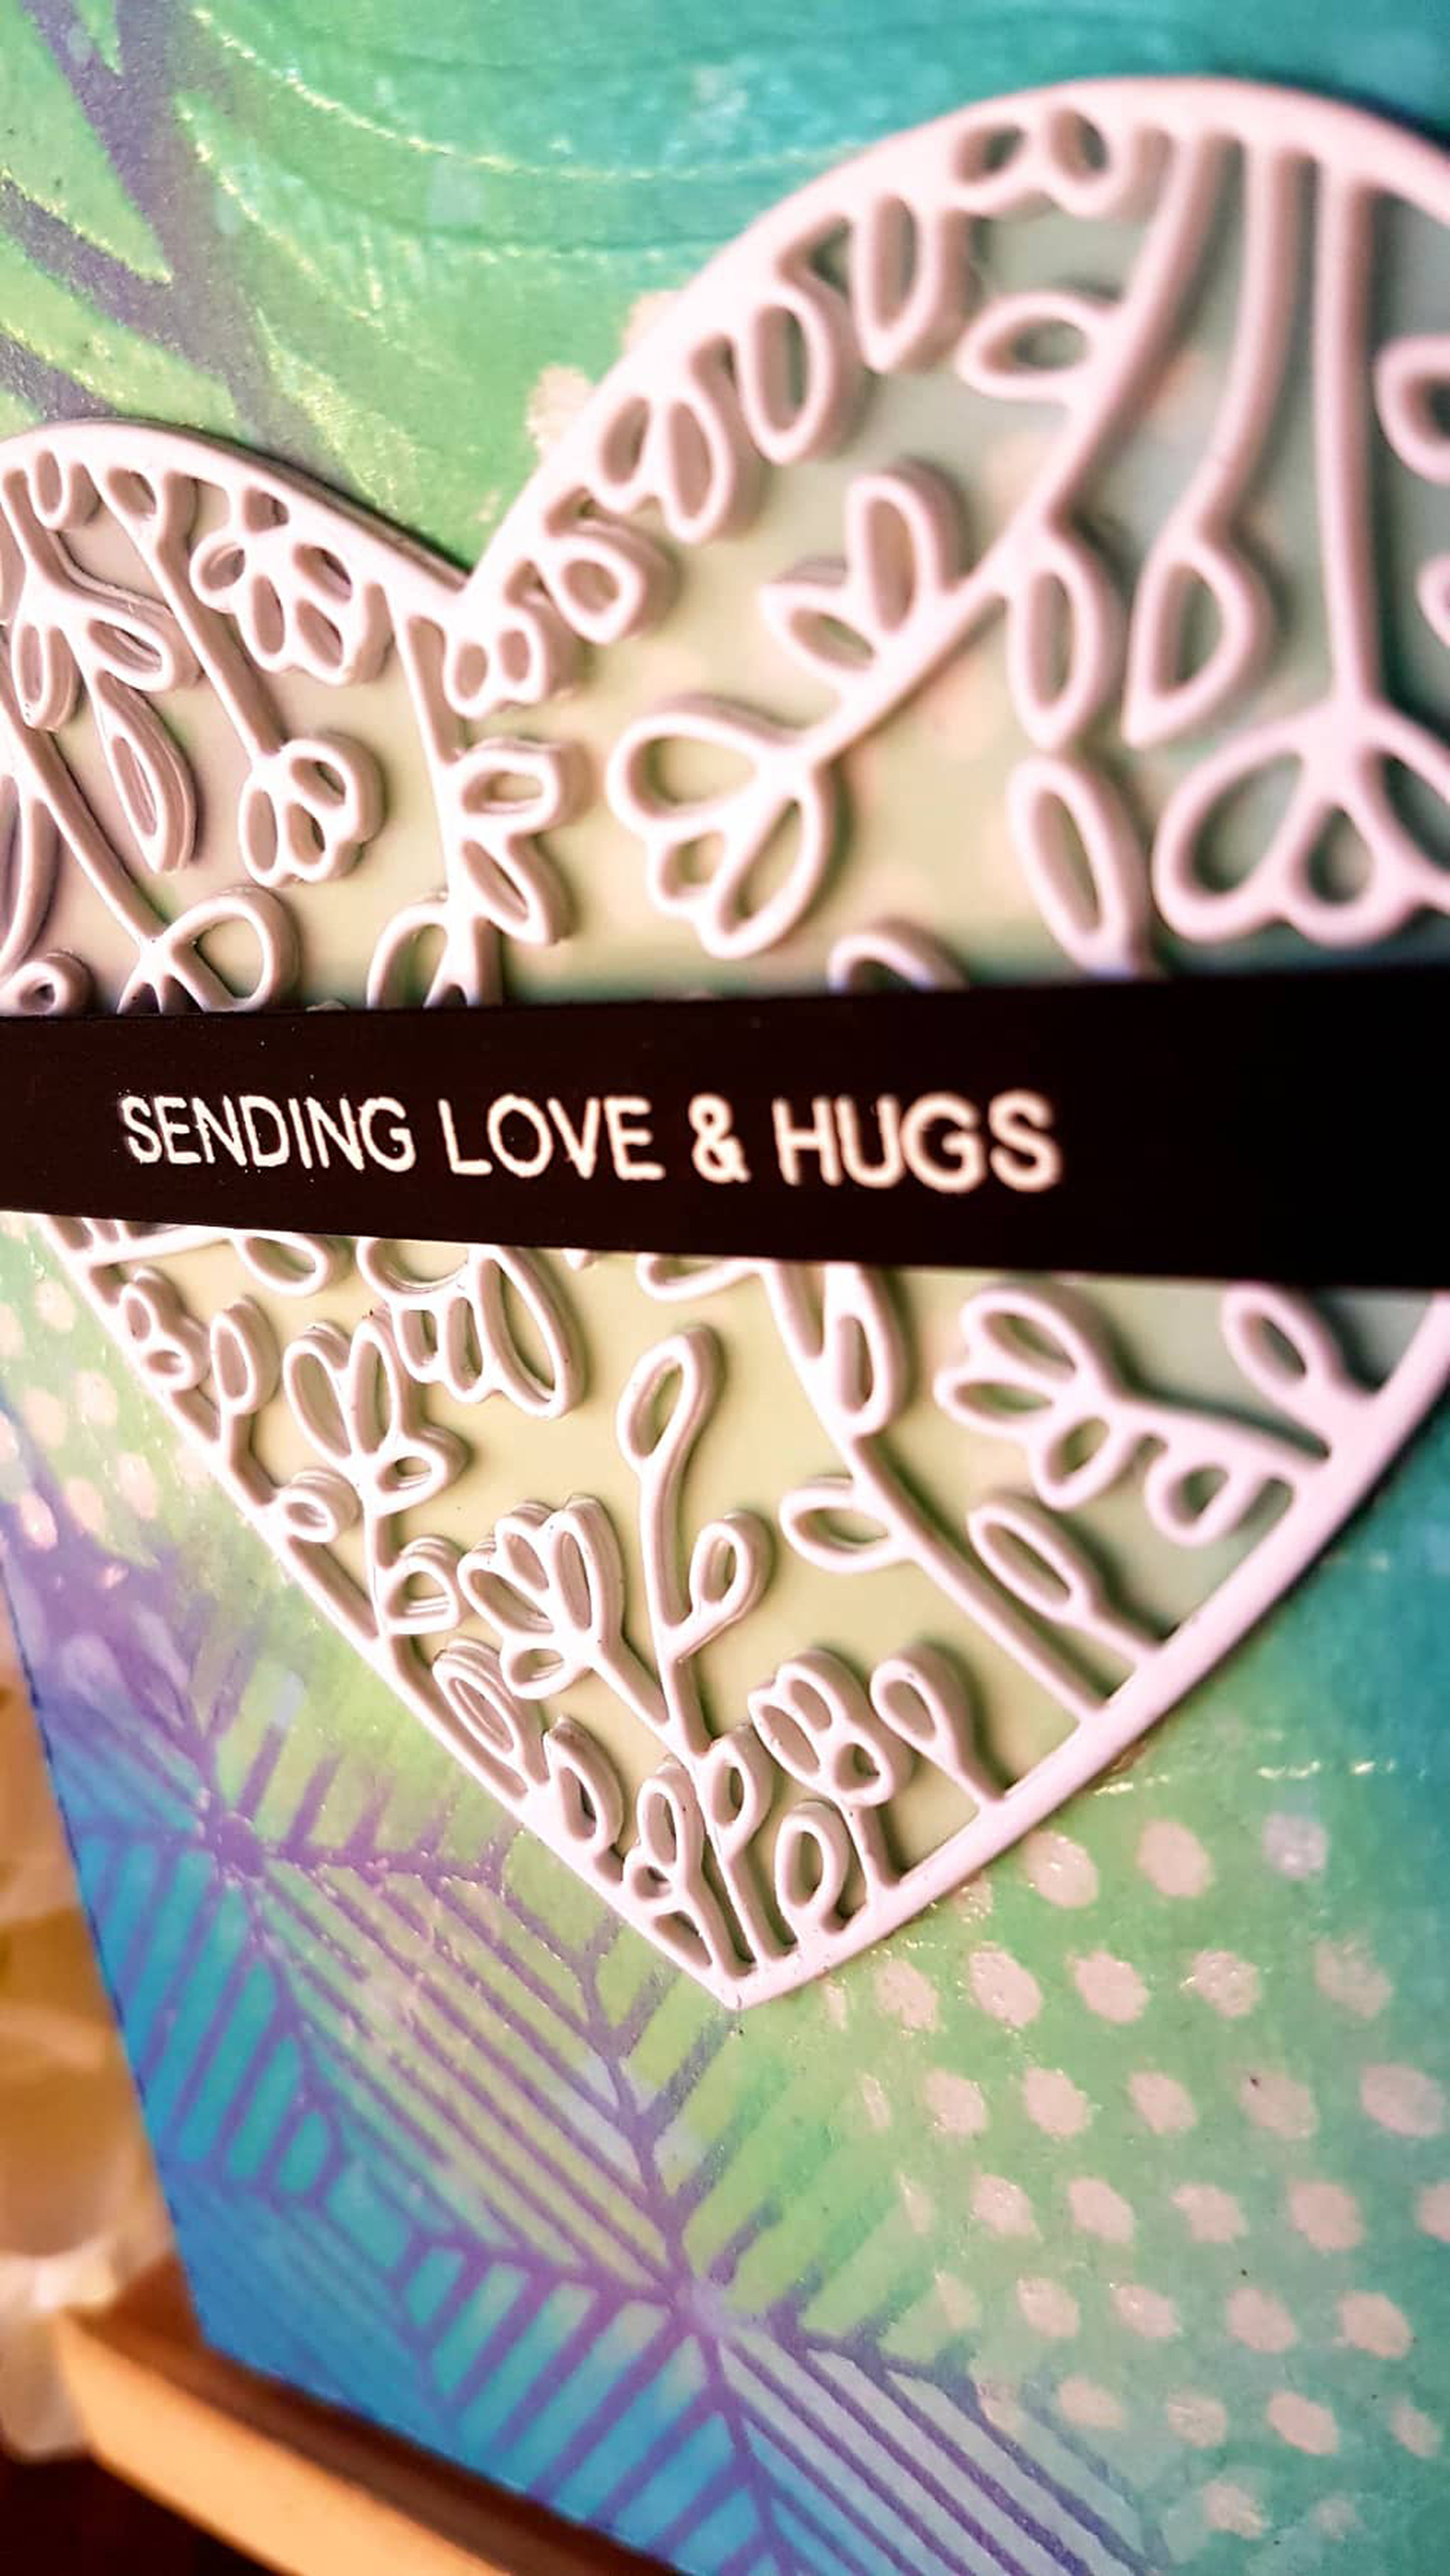
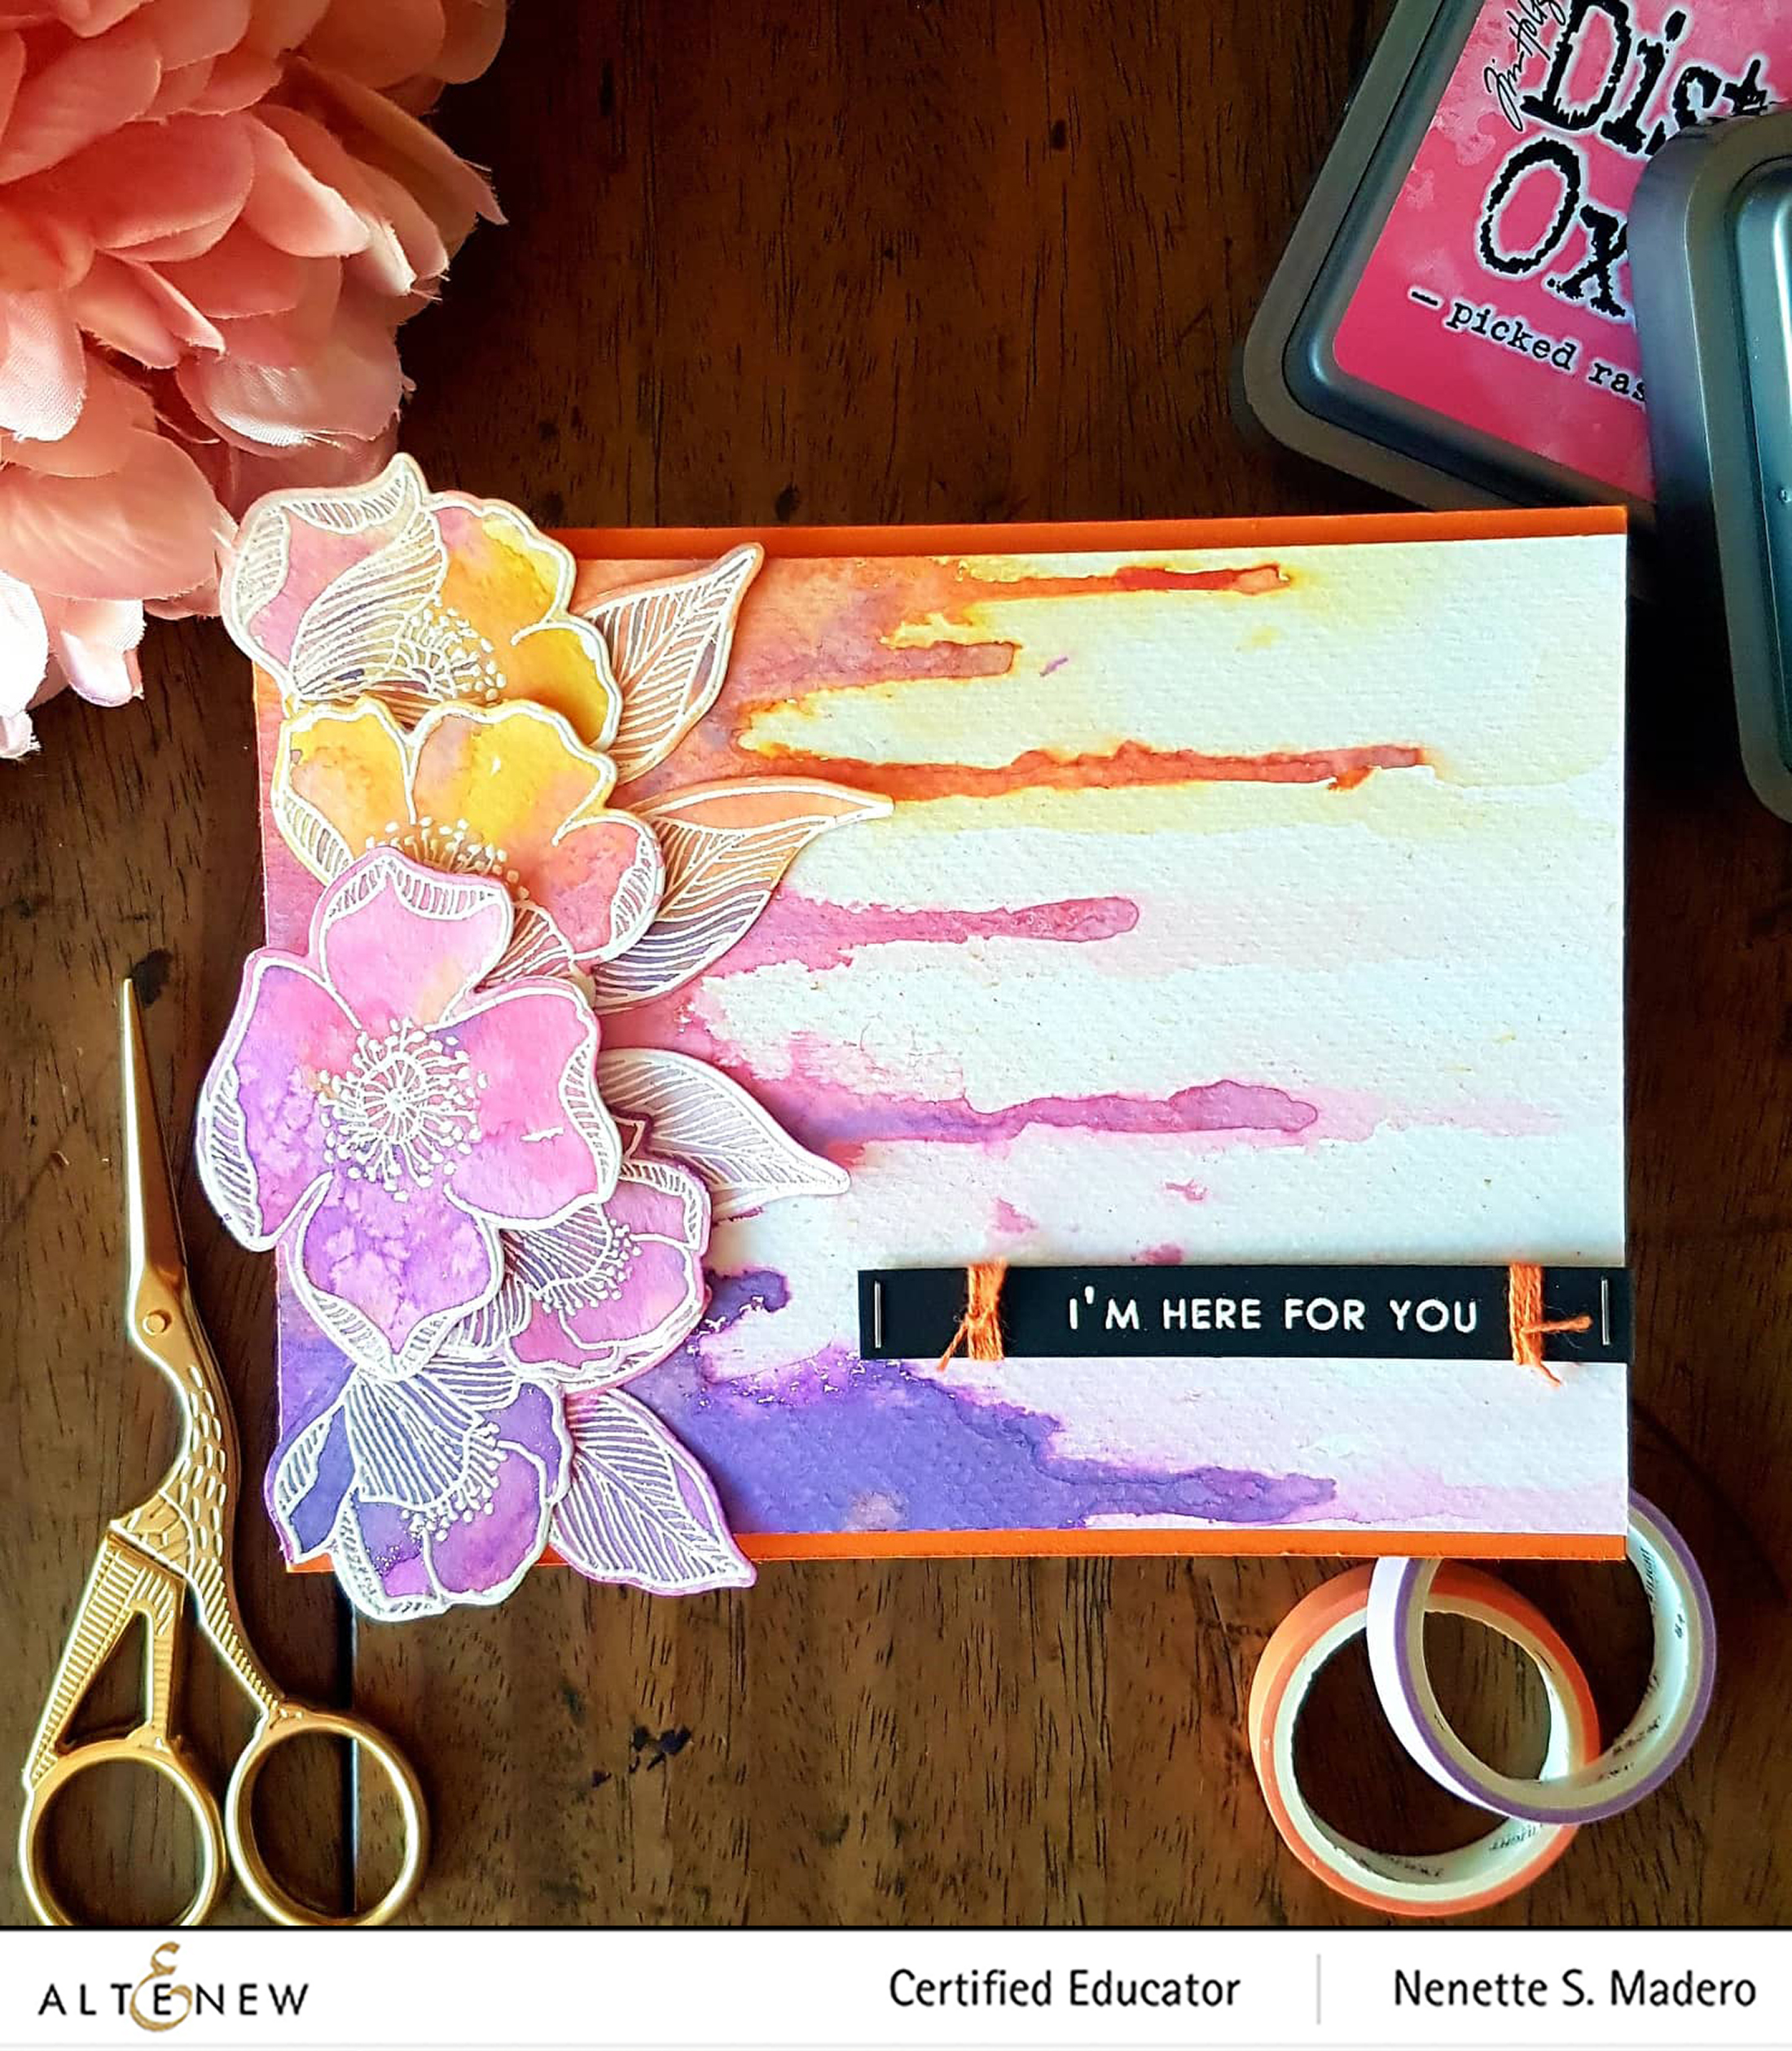
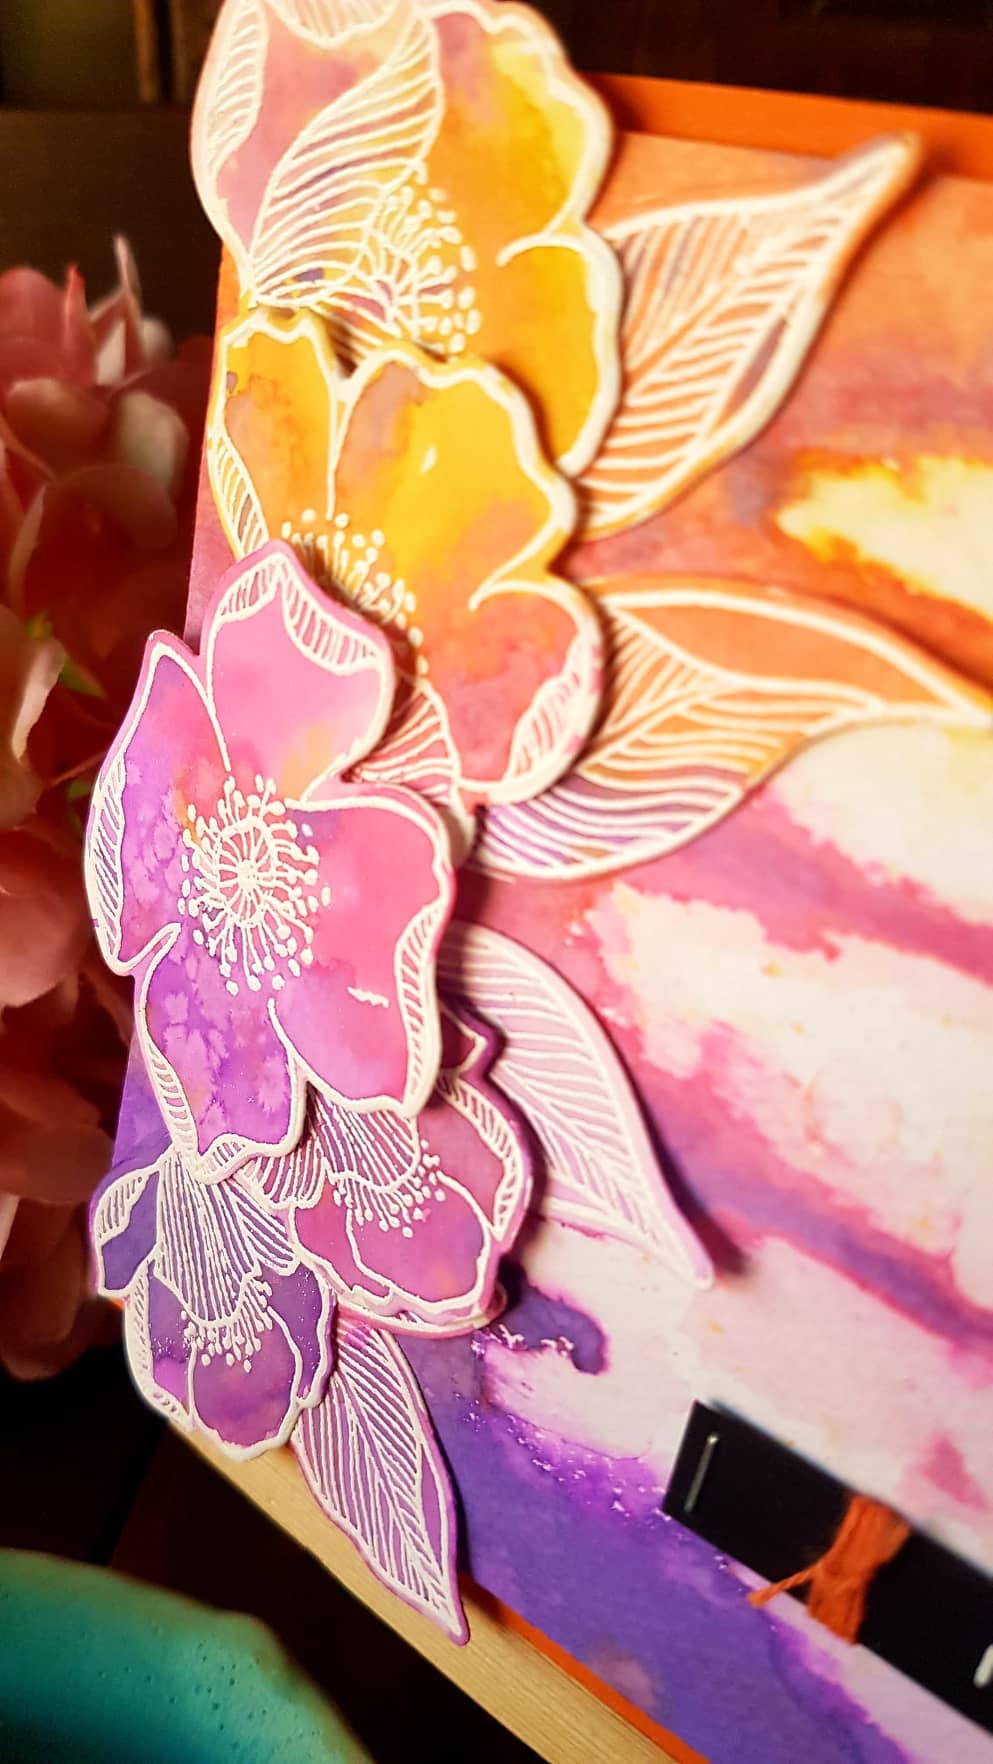
SENDING LOVE AND HUGS CARD
Another card was created using a different set of colors. By rotating the square panel, it somehow gives the card a more modern feel.
Orange cardstock was cut to 8.5″ x 4.25″ creating a top folding A2 card. The front panel was debossed using the beautiful Dotted Swirls Debossing cover die. I just love how it creates this subtle design on the paper! I will definitely be using this again soon. The flowers, sepals, and stems were stamped on a 3.5″ x 3.5″ Neenah Solar White Cardstock using the same procedure as previously discussed.
The stamped panel was mounted on a 3.75″ x 3.75″ green cardstock with some foam tape then mounted diagonally on the card front. The sentiment was stamped on back cardstock using Versamark Ink then embossed with Altenew Pure white crisp embossing powder. This was then adhered to the front panel using foam tape.
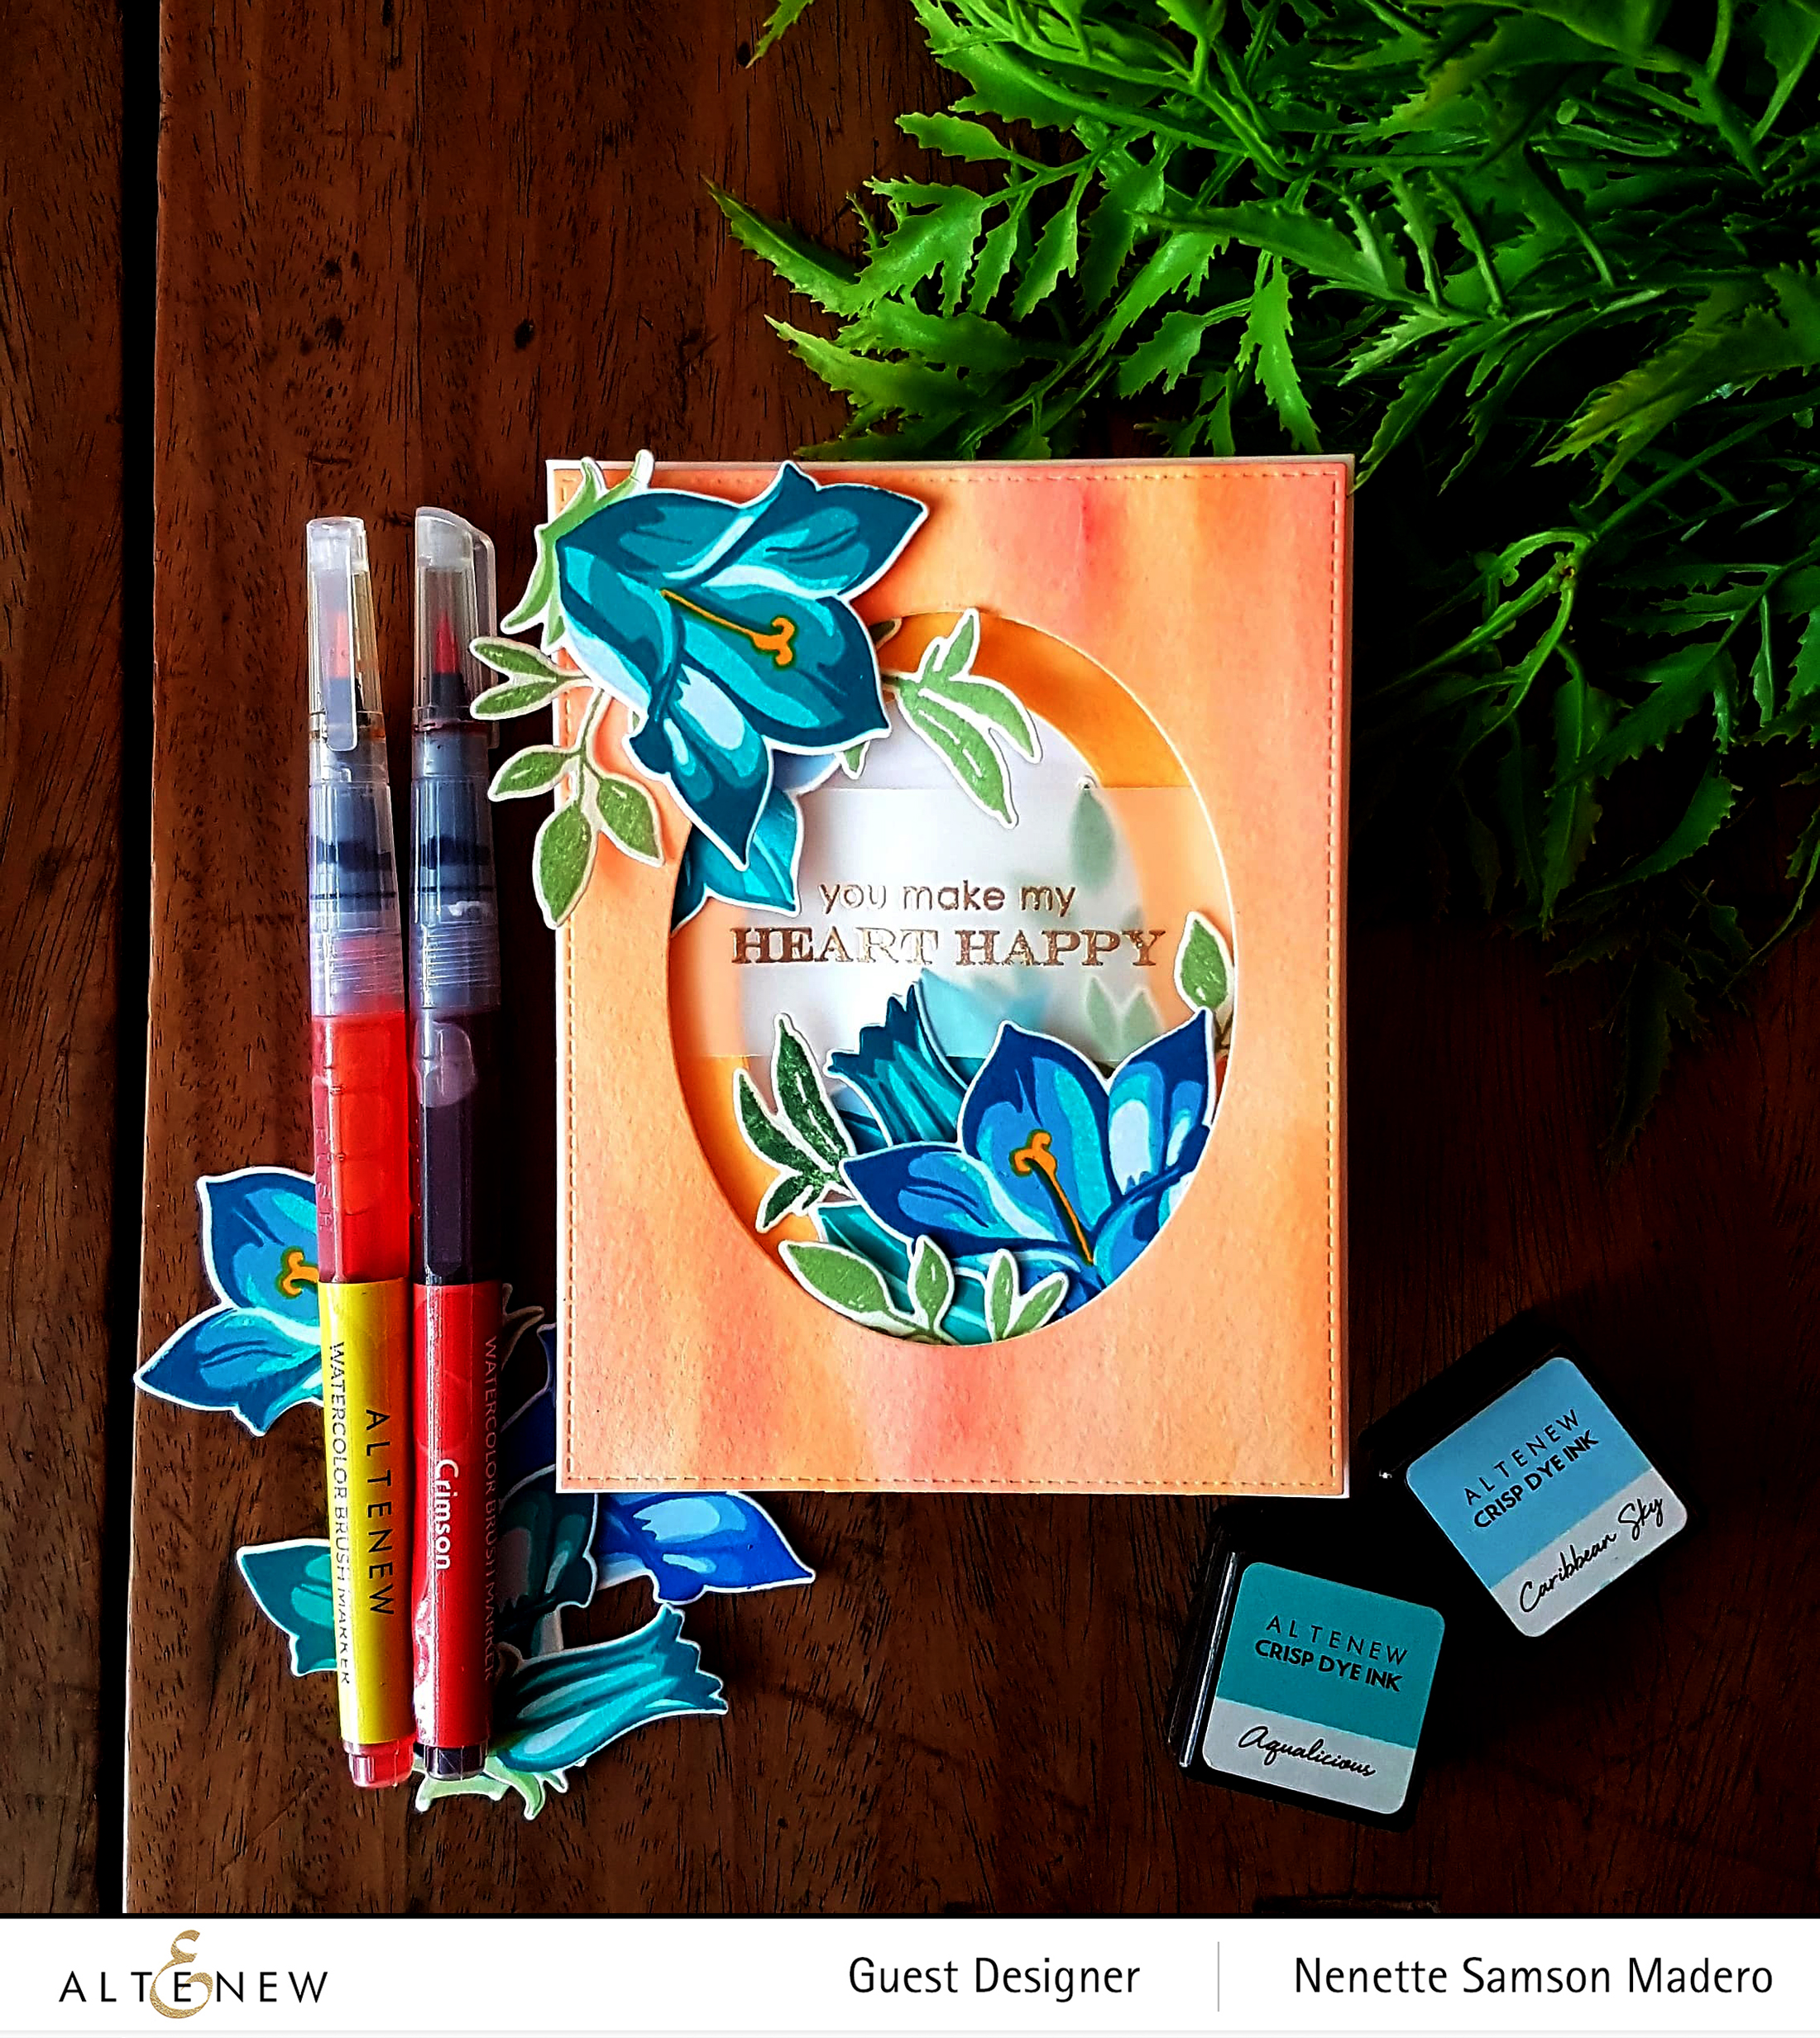
I wanted to create layers for this card so I watercolored 2 sheets of 5.5″ x 4.25″ watercolor paper using Altenew’s watercolor brush markers. When the papers were dry, I used the Feeling Dotty Stencil with Versamark Ink to create some dot patterns on the watercolored paper then poured clear embossing powder and heat set it. This added some subtle texture. I used 2 different sizes of oval dies to cut windows. The smaller oval widow was stuck to the card front of an A2 side folding card using foam squares. The stamped flowers and leaves were arranged at the back of this panel. Next, I used foam squares again to adhere the 2nd bigger oval window to the first window. Flowers and leaves were arranged on the upper left and lower right side of the oval. The sentiment was stamped on vellum using Versamark ink and was embossed using Rose Gold Embossing powder This was then adhered to the 1st oval window. Lastly, the biggest flower image and some die cut leaves were glued to the front of the card.
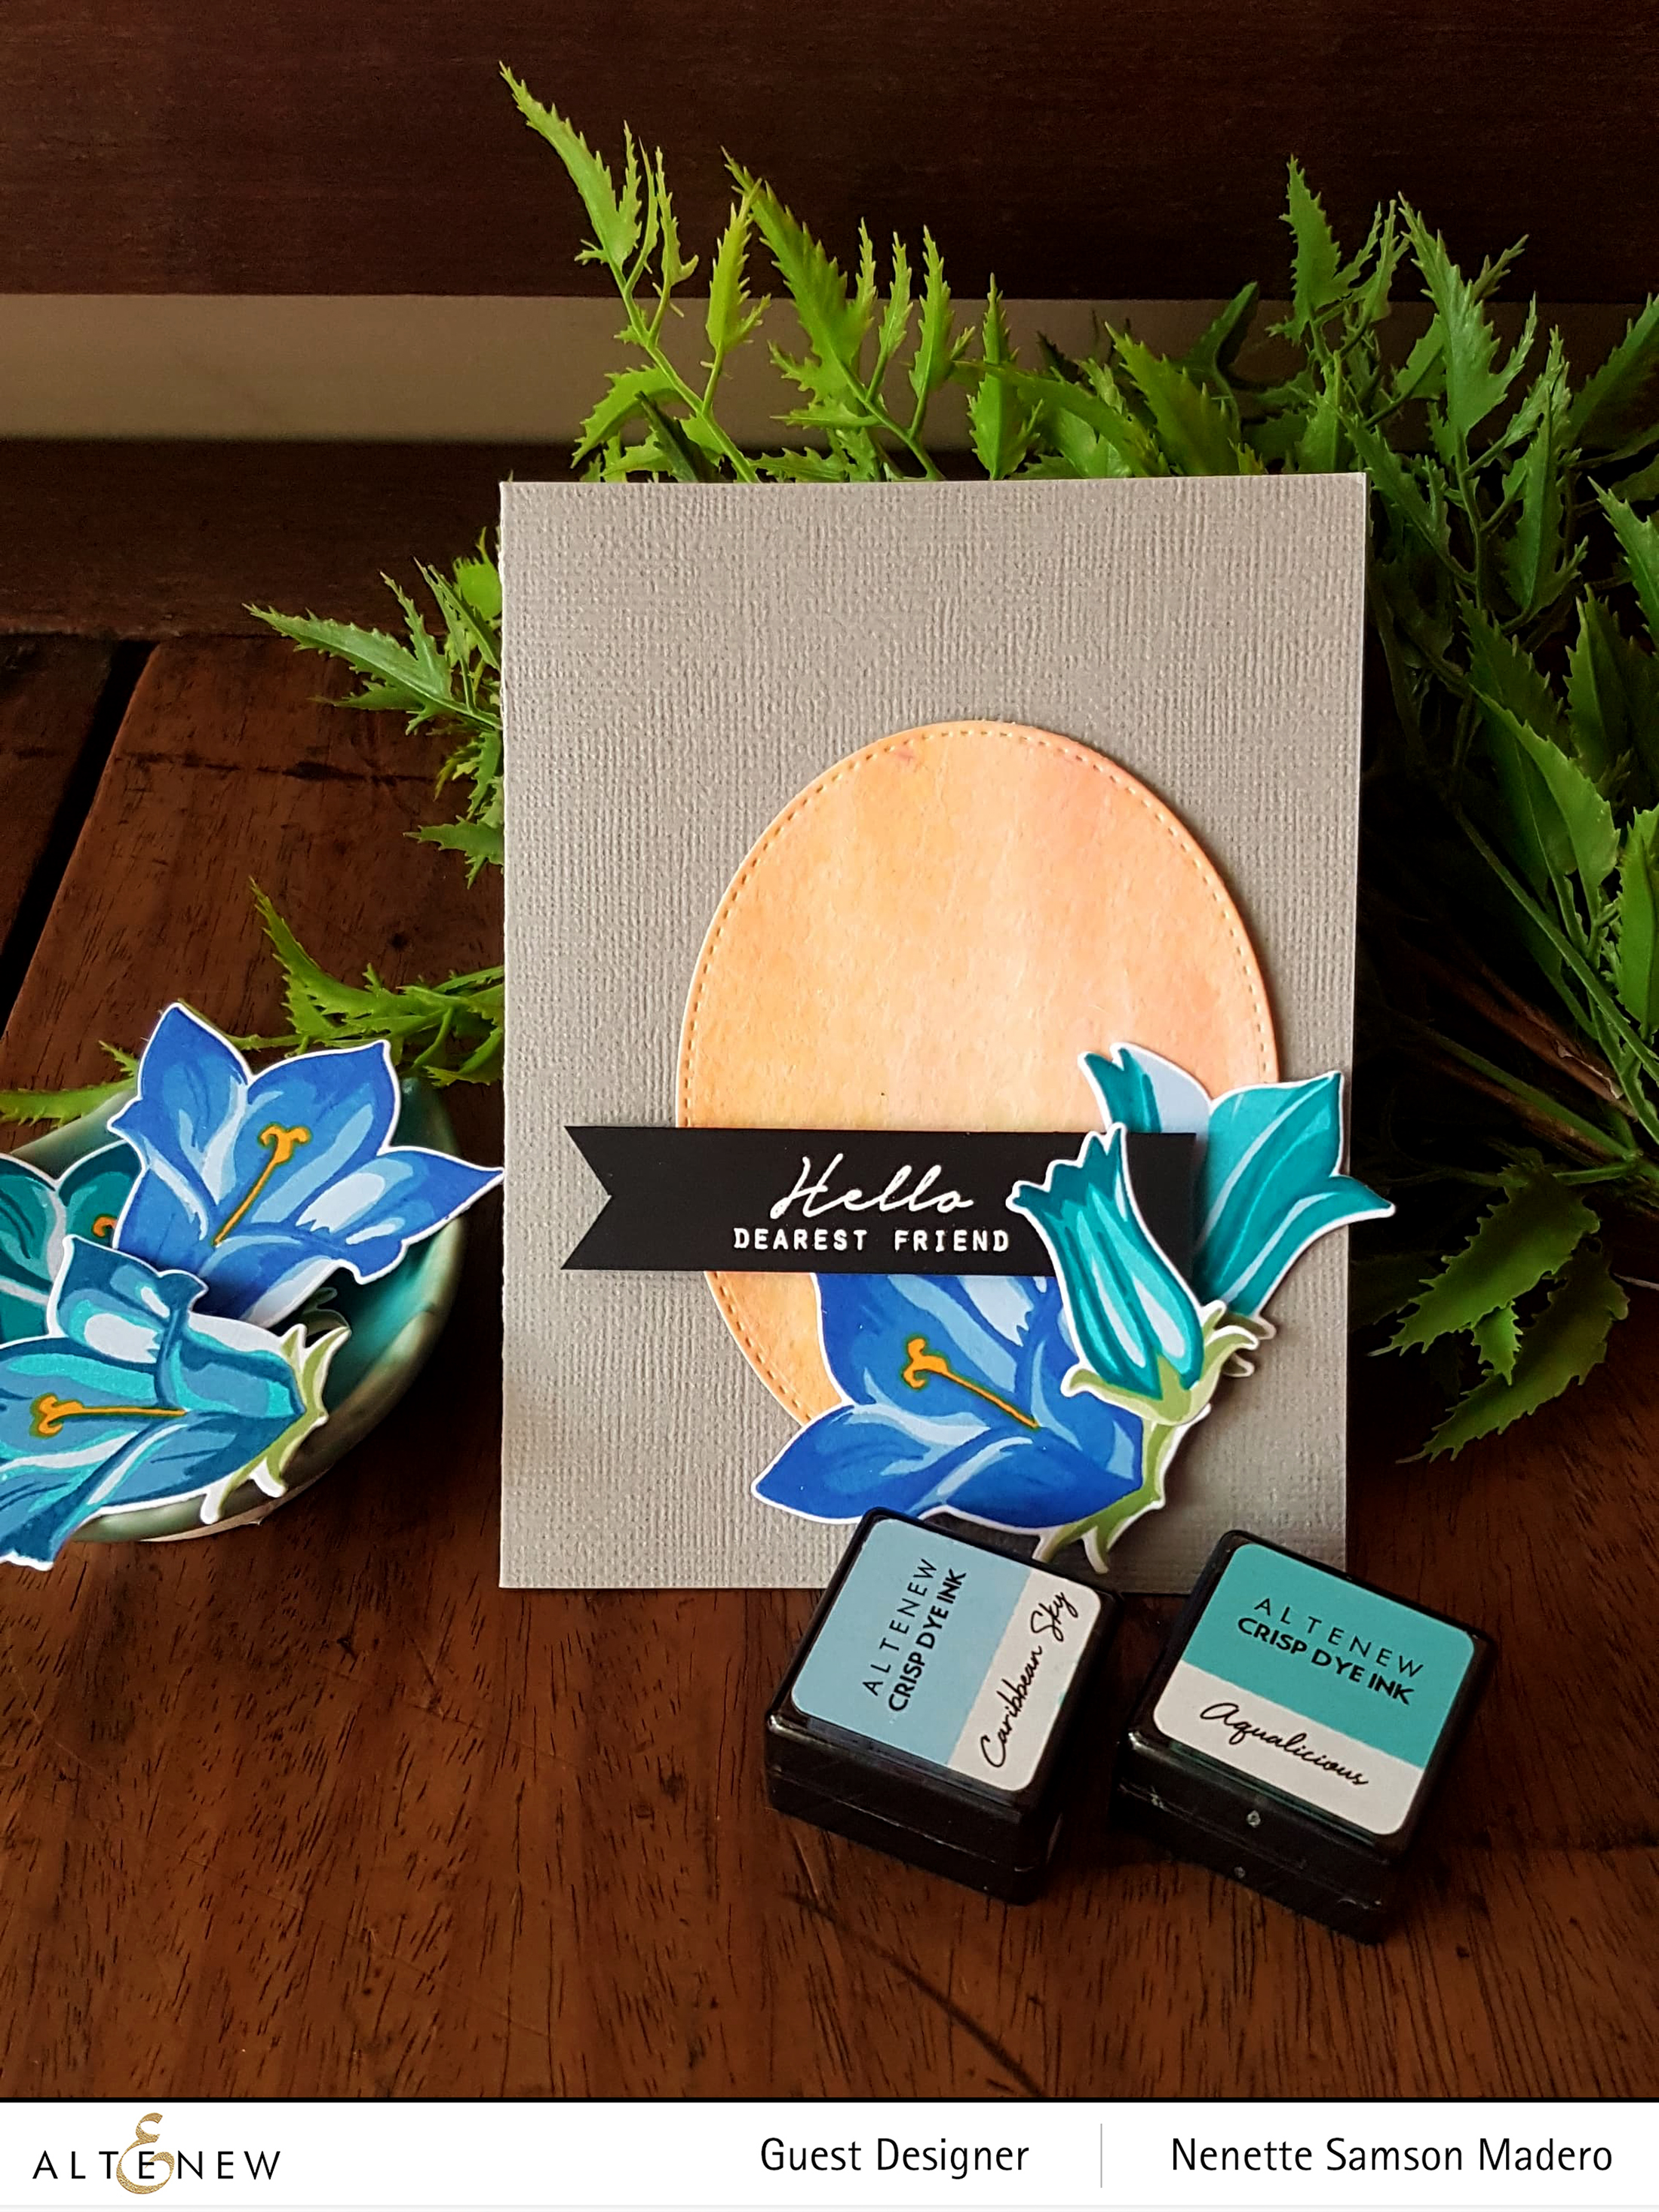
I always try to find use for the leftovers of my cards. I wanted to create a quick and simple card using the oval die cut that came from the previous card.
The oval piece was adhered using adhesive and 3 flowers and the sentiment were layered using foam tape to create dimension. This CAS card only took a minute to create using leftover die cut pieces. 🙂
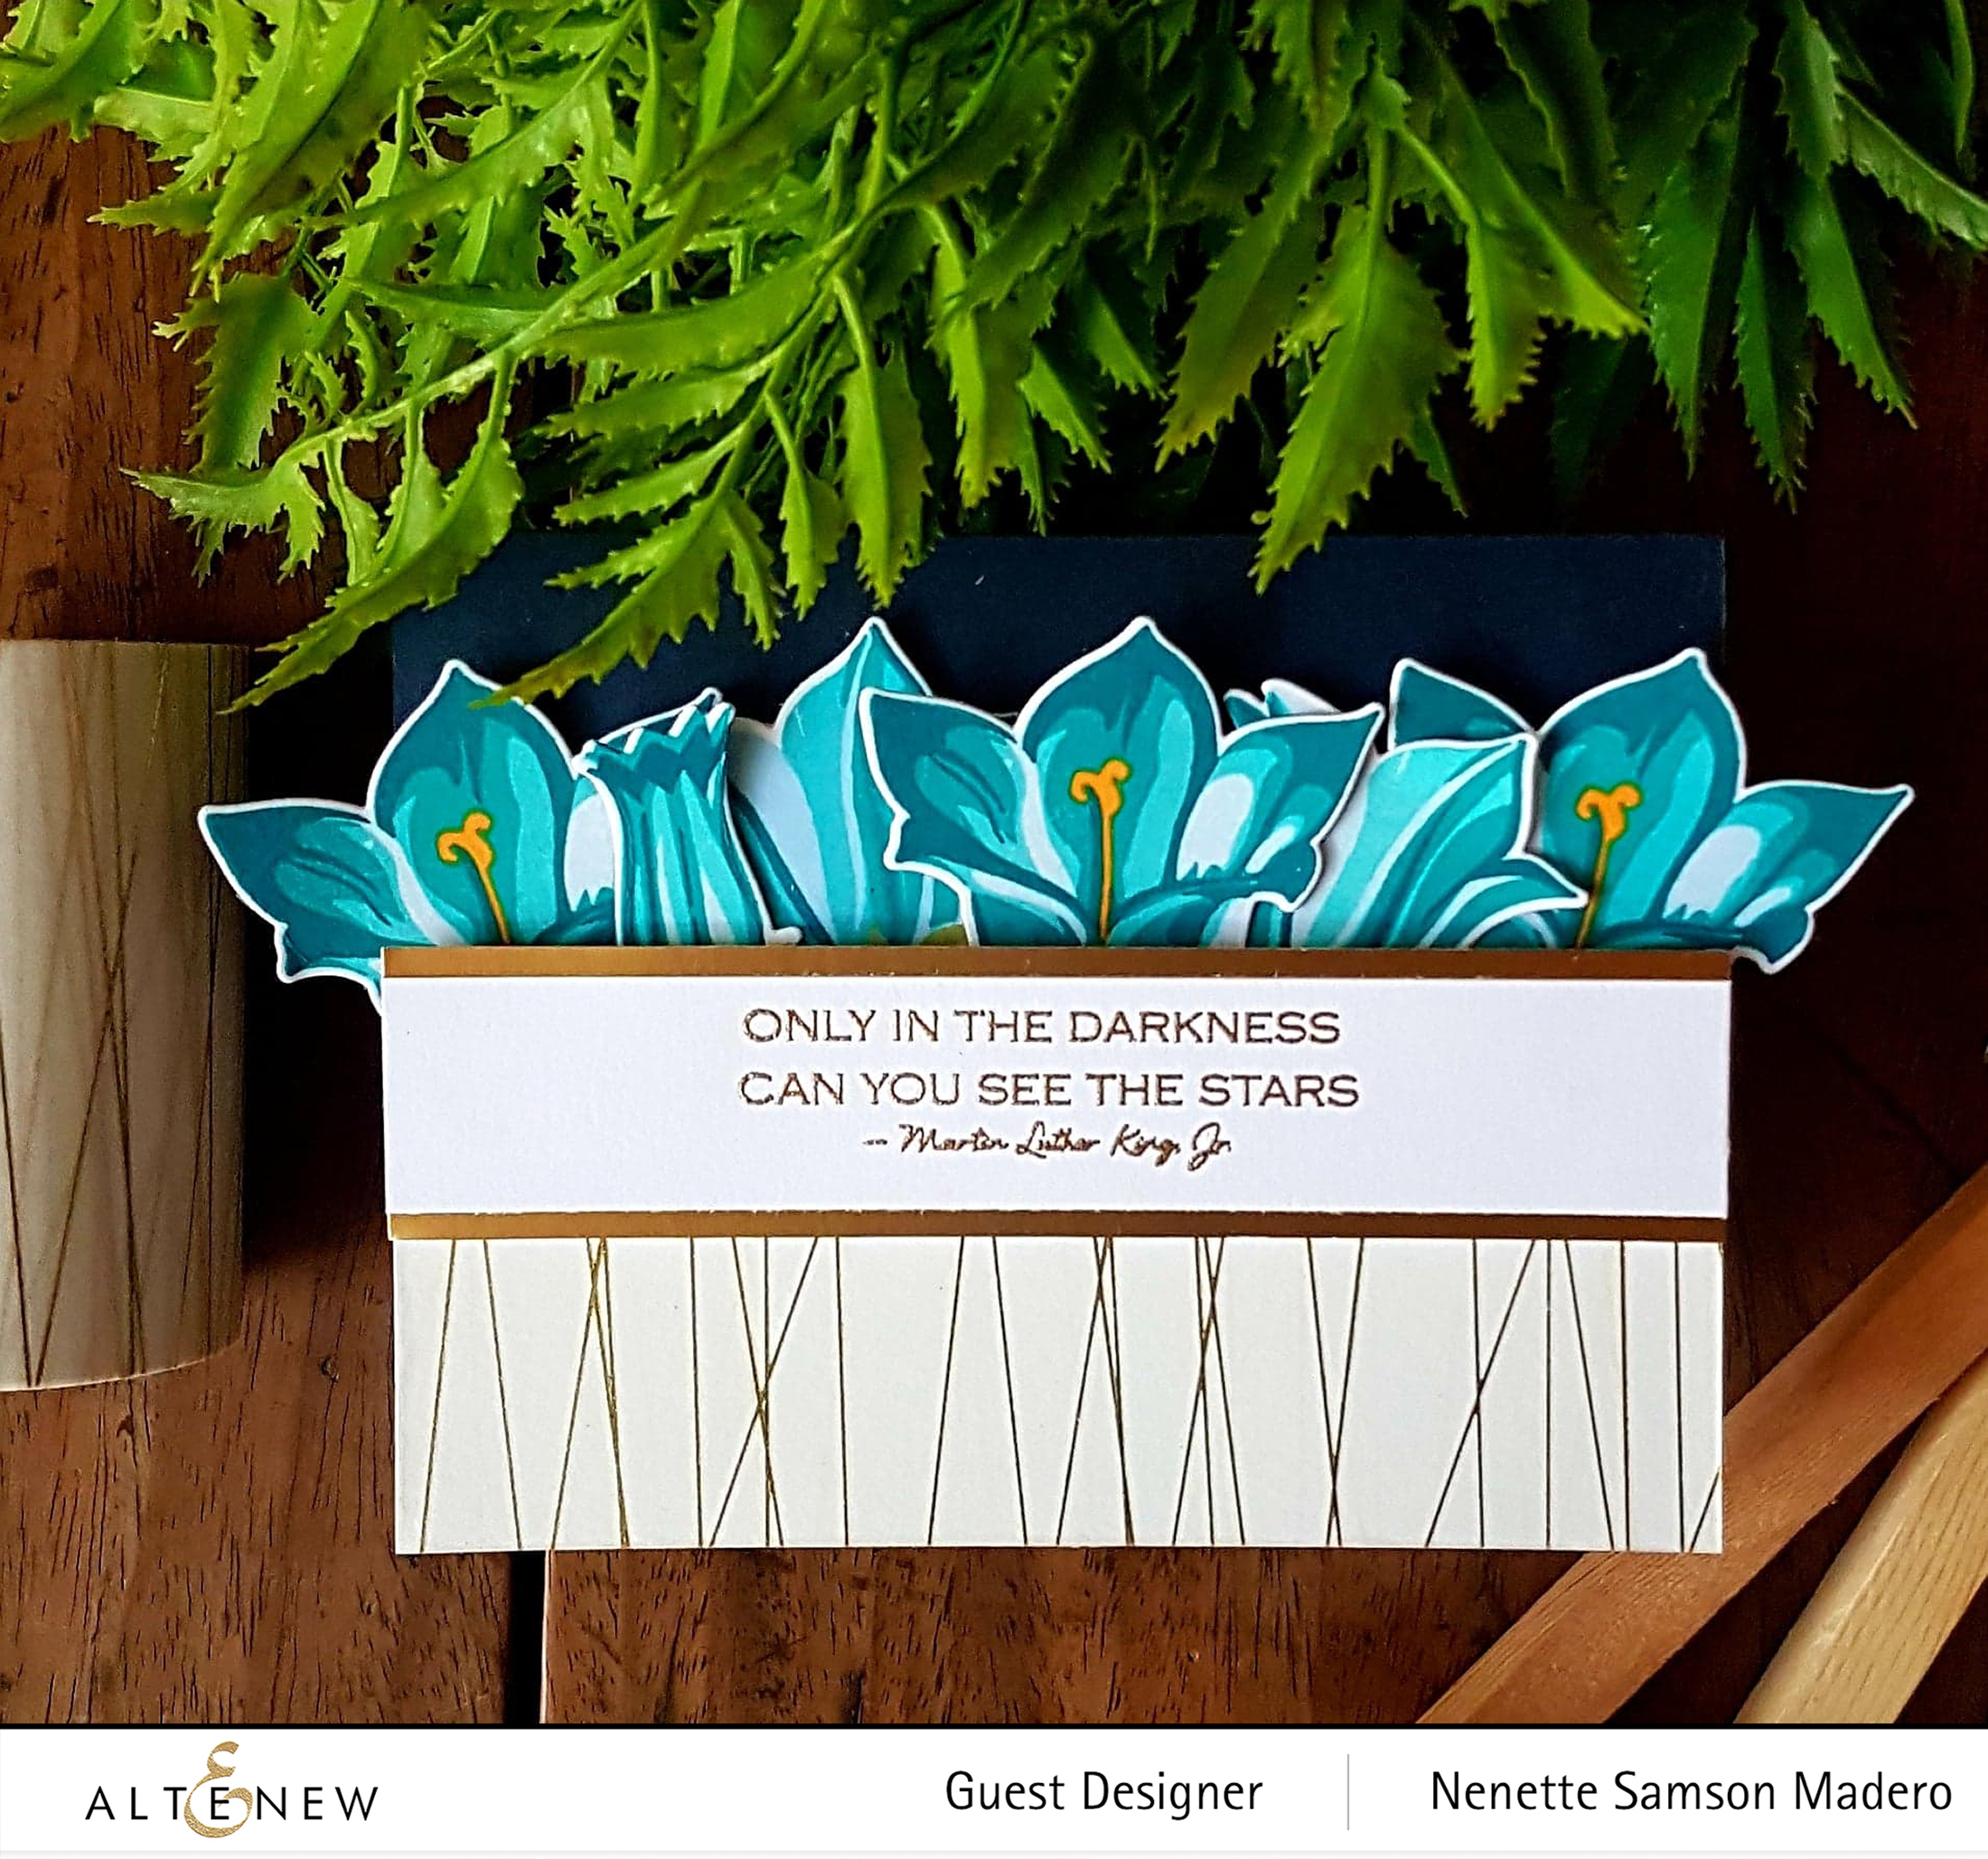
I wanted this card to have high contrast so I matched the navy blue with white and gold. The stamped flowers were arranged in a row overlapping each other. The sentiment from Kind Words was stamped on white CS using Versamark Ink and embossed with Rose Gold embossing powder. Gold matting was added to give emphasis to the sentiment. White cardstock was covered with the gold string washi tape and this was then adhered to the lower portion the card front. The sentiment was added using foam squares to add dimension.
PRIZES
To celebrate this release, Altenew is giving away a $30 gift certificate to 6 lucky winners! Please leave a comment on the Altenew Card Blog and/or Altenew Scrapbook Blog for a chance to win. Altenew will also draw a winner to receive a $15 gift certificate from the comments left on each designer’s blog on the blog hop list below so make sure to leave a comment below! All winners will be announced on the Altenew blogs on 8/10/2019.
Thank you so much for dropping by! Your wonderful comments truly warm my heart. If you like what you see, I’d appreciate if you can follow me on IG @mylittleatticstudio. Next stop is the uber-talented Jaycee Gaspar. His creations are just stunningly beautiful so make sure to hop over to his blog. Below is the complete list of amazing card designers. Until my next post! ❤️
Hi everyone! I’m so honored to be joining the 2nd Altenew Educators’ blog hop and this time it’s all about love and friendship. If you are following the hop, then you should have arrived here from the talented Patty Melo. The Altenew Card Blog is hosting this hop so make sure to drop by there as well.
I finished the Altenew Educator’s Certificate Program (AECP) in November of 2018 and it has been one of the most inspiring and fulfilling programs I’ve ever joined. There were quite a number of wonderful classes to choose from. Even if I knew some basic techniques, the talented instructors have shown me other ways to improve and enhance my skills. Their tips and tricks are invaluable. Virginia Lu and Nicole Picadura‘s support and encouragement throughout the course have made the experience very inspiring and memorable. AECP has made me realize that I find so much joy in teaching others! It has also been a wonderful source of new friendships– the Altenew family, the Educator’s group, the students I teach locally, and my online friends from all over the world. Through this program, I’ve been inspired countless times by the creativity of the participants and the generosity of the instructors in sharing their knowledge. I truly believe that crafters are the most generous people on earth!!! 🙂
“Many people will walk in and out of your life, but only true friends will leave footprints in your heart.” Eleanor Roosevelt
I love the theme for this blog hop. I treasure the new friends that I’ve made thru AECP and look forward to meeting more people through this wonderful crafting community. My lifelong friends are kind, sincere and most importantly, genuine people. I’ve learned so many life lessons through their experiences and always find comfort and support in their presence.
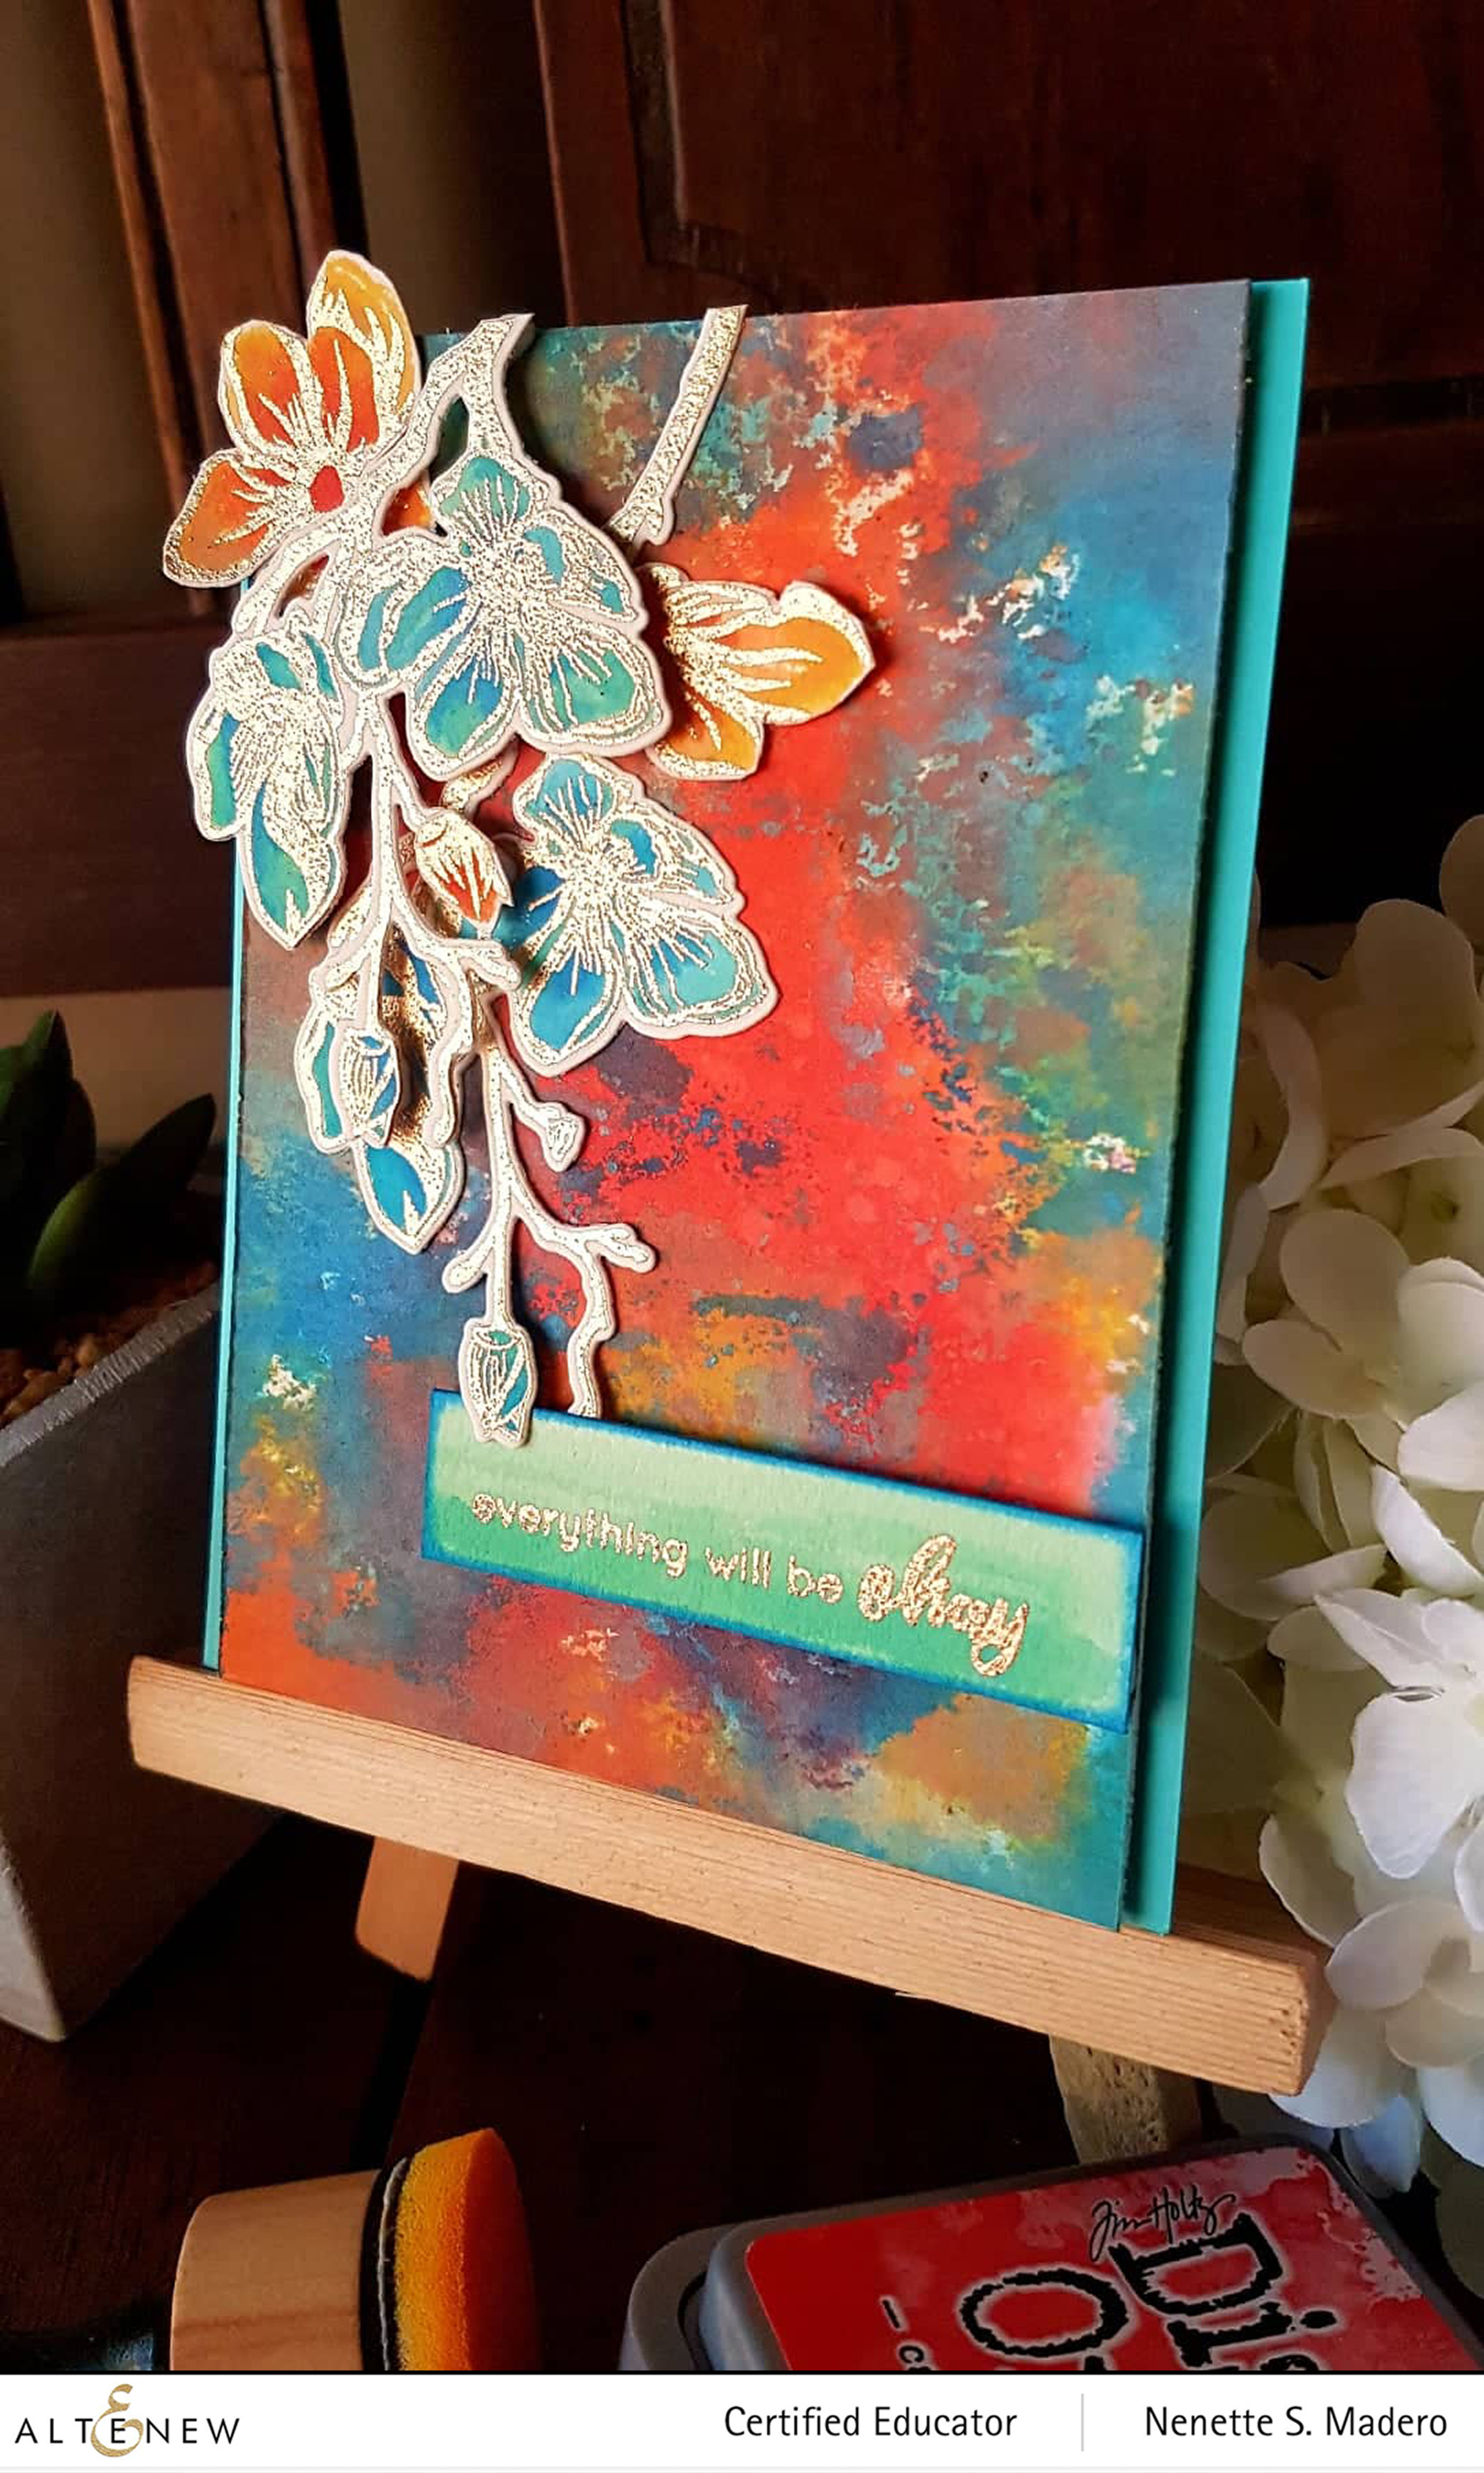
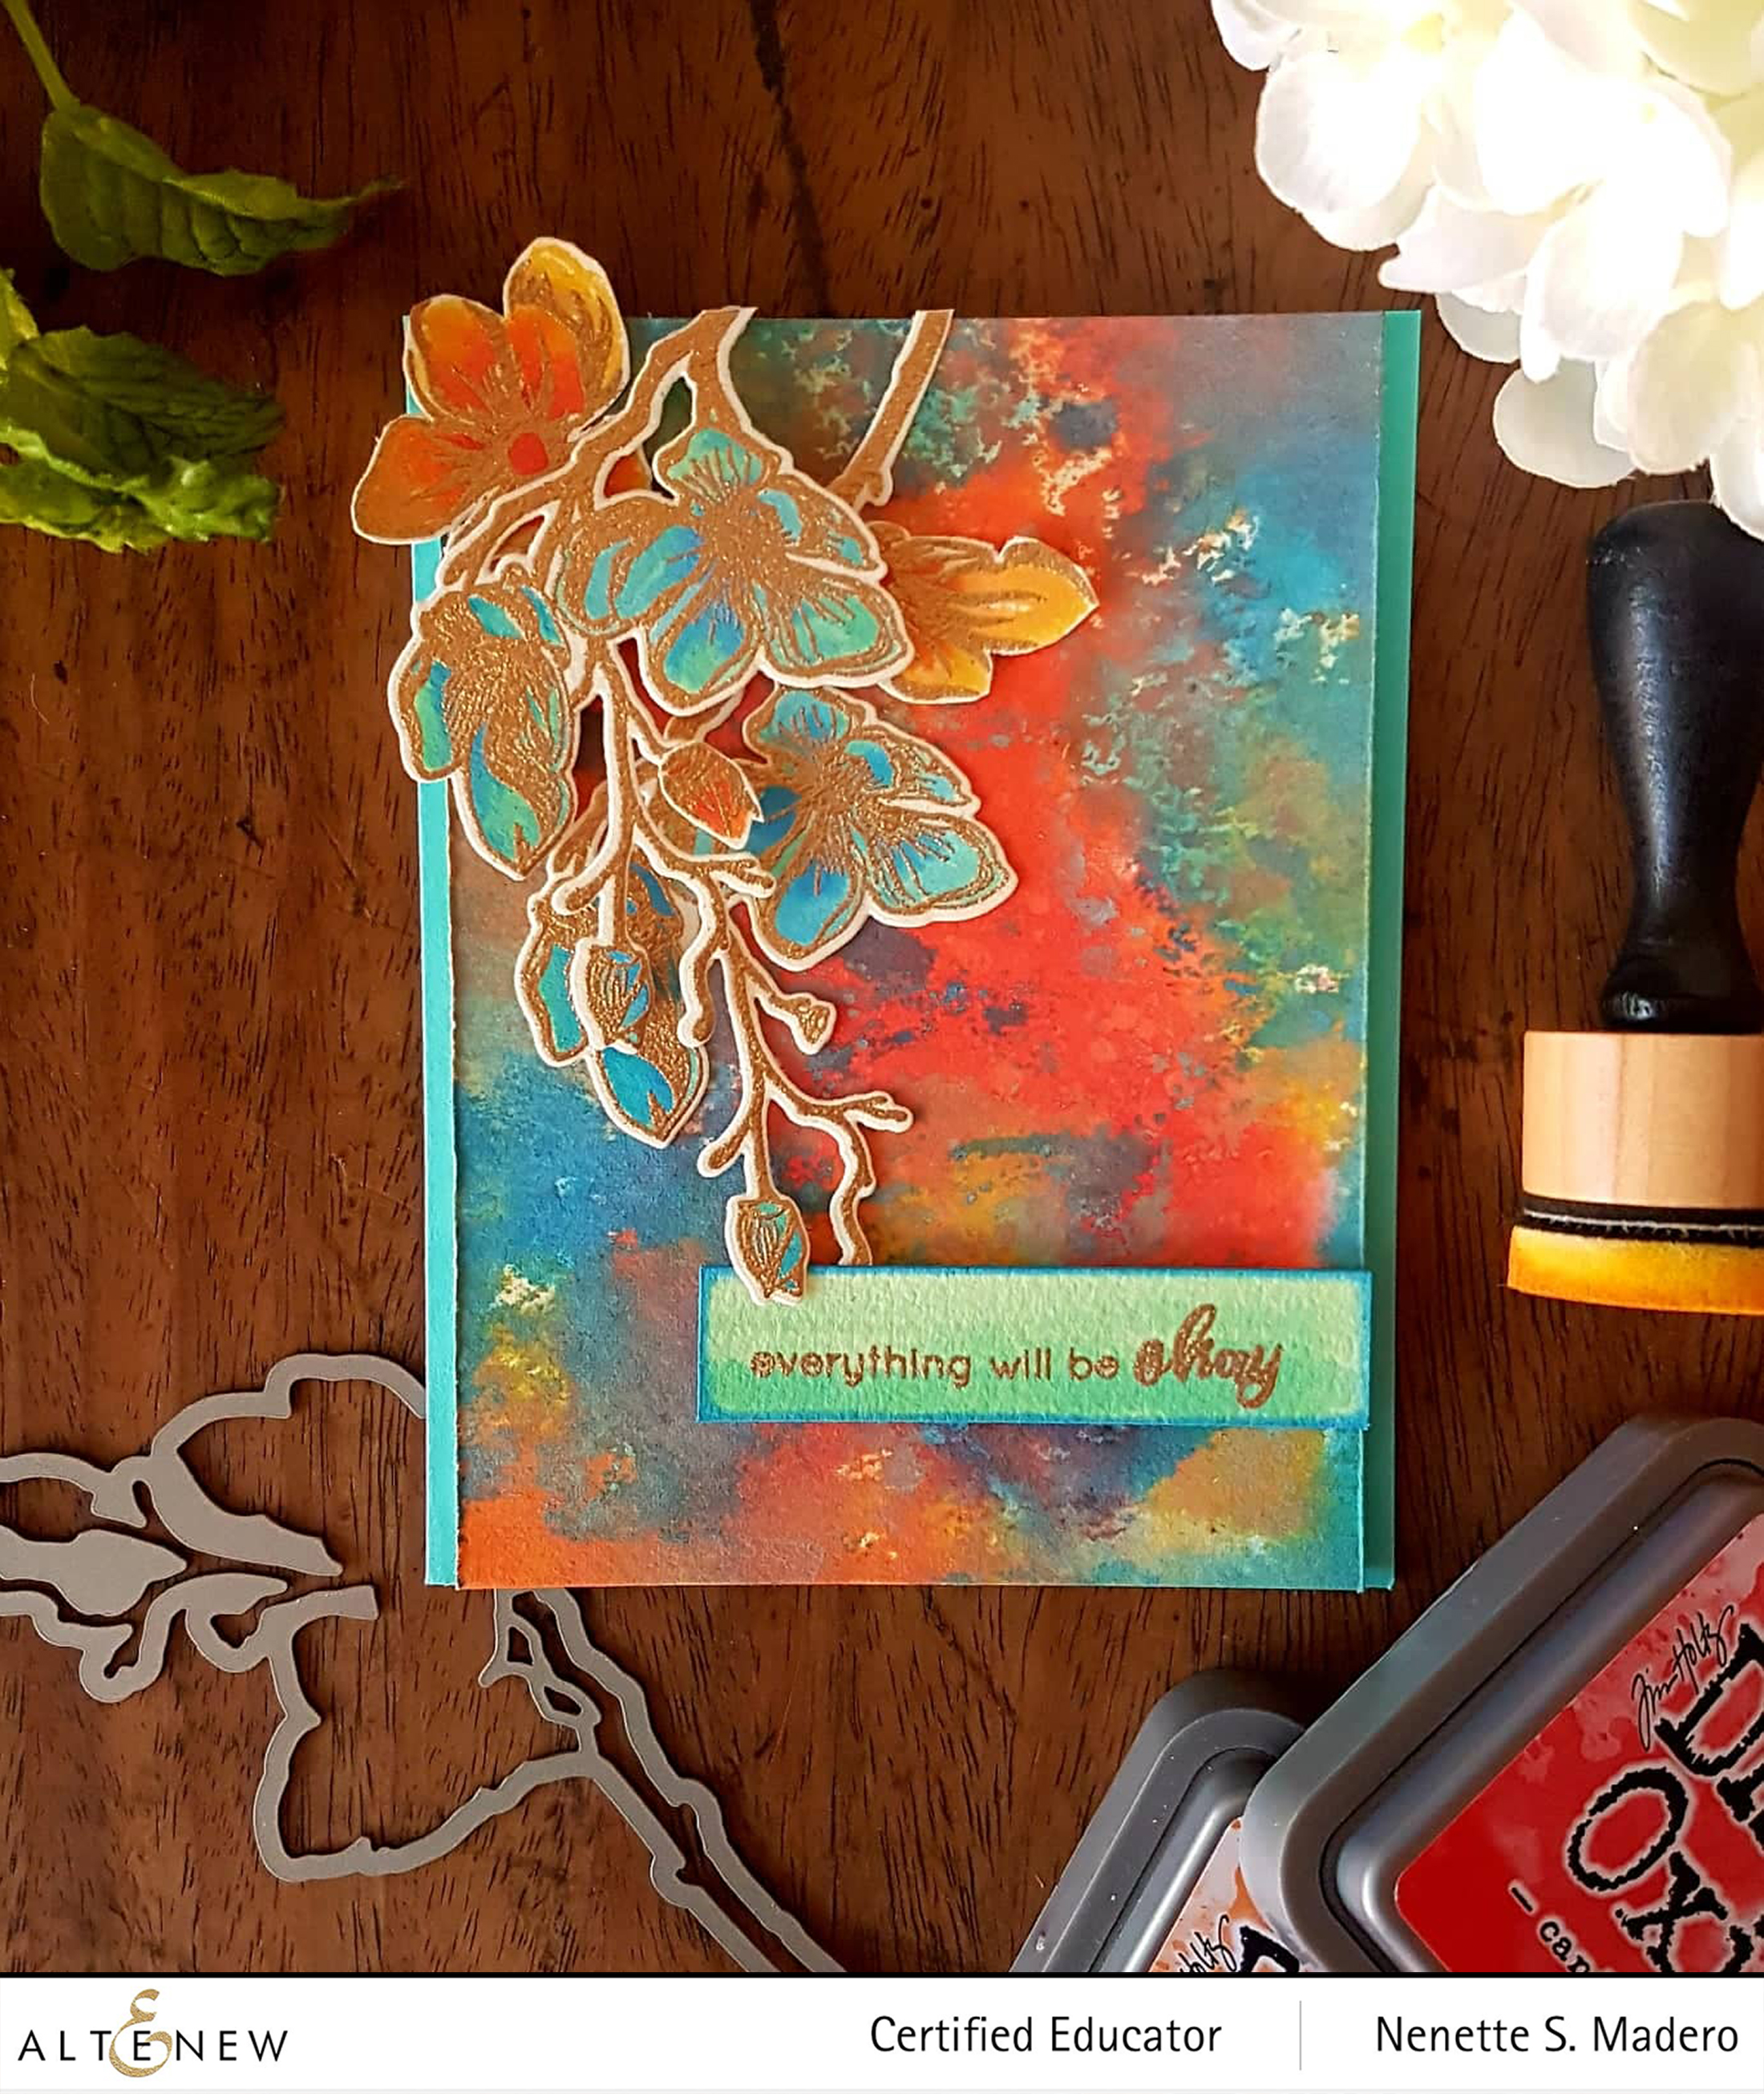
For this blog hop, I was so inspired to create backgrounds using distress oxide inks and Altenew watercolor brush markers. I suggest you make several backgrounds using the same coloring mediums. Just change the color combination. It’s best to choose analogous colors or colors next to each other on the color wheel. But if you want high contrast, then choose complementary colors (colors opposite each other on the color wheel). Just take note that if these colors mix, you will end up with “mud” which I also love. Below are some of the cards I made for friends and loved ones.
I wanted this card to look like an abstract painting. Arches watercolor paper was cut to 5.5” x 4”. Distress oxide Candied Apple, Ripe Persimmon and Fossilized Amber inks were pressed onto a craft mat and water was spritzed for the colors to react. The paper was then dabbed onto the colors then dried. I went back to add cool colors but making sure that the first layer of colors was dry before adding the next.
The flower image from the Dotted Blooms stamp set was stamped using Versamark Ink then heat embossed using Rose Gold embossing powder. Notice that I used the other second layers of the stamps separately thus creating more flowers that I can paint and use on my card. The sentiment was stamped on watercolor paper then distress oxide pistachio was added heavily at the bottom of the strip then blended upwards to create an ombre effect. One of the main flower images was mounted using foam tape to add dimension. The sides of the card panel was distressed using the Tonic paper distresser.
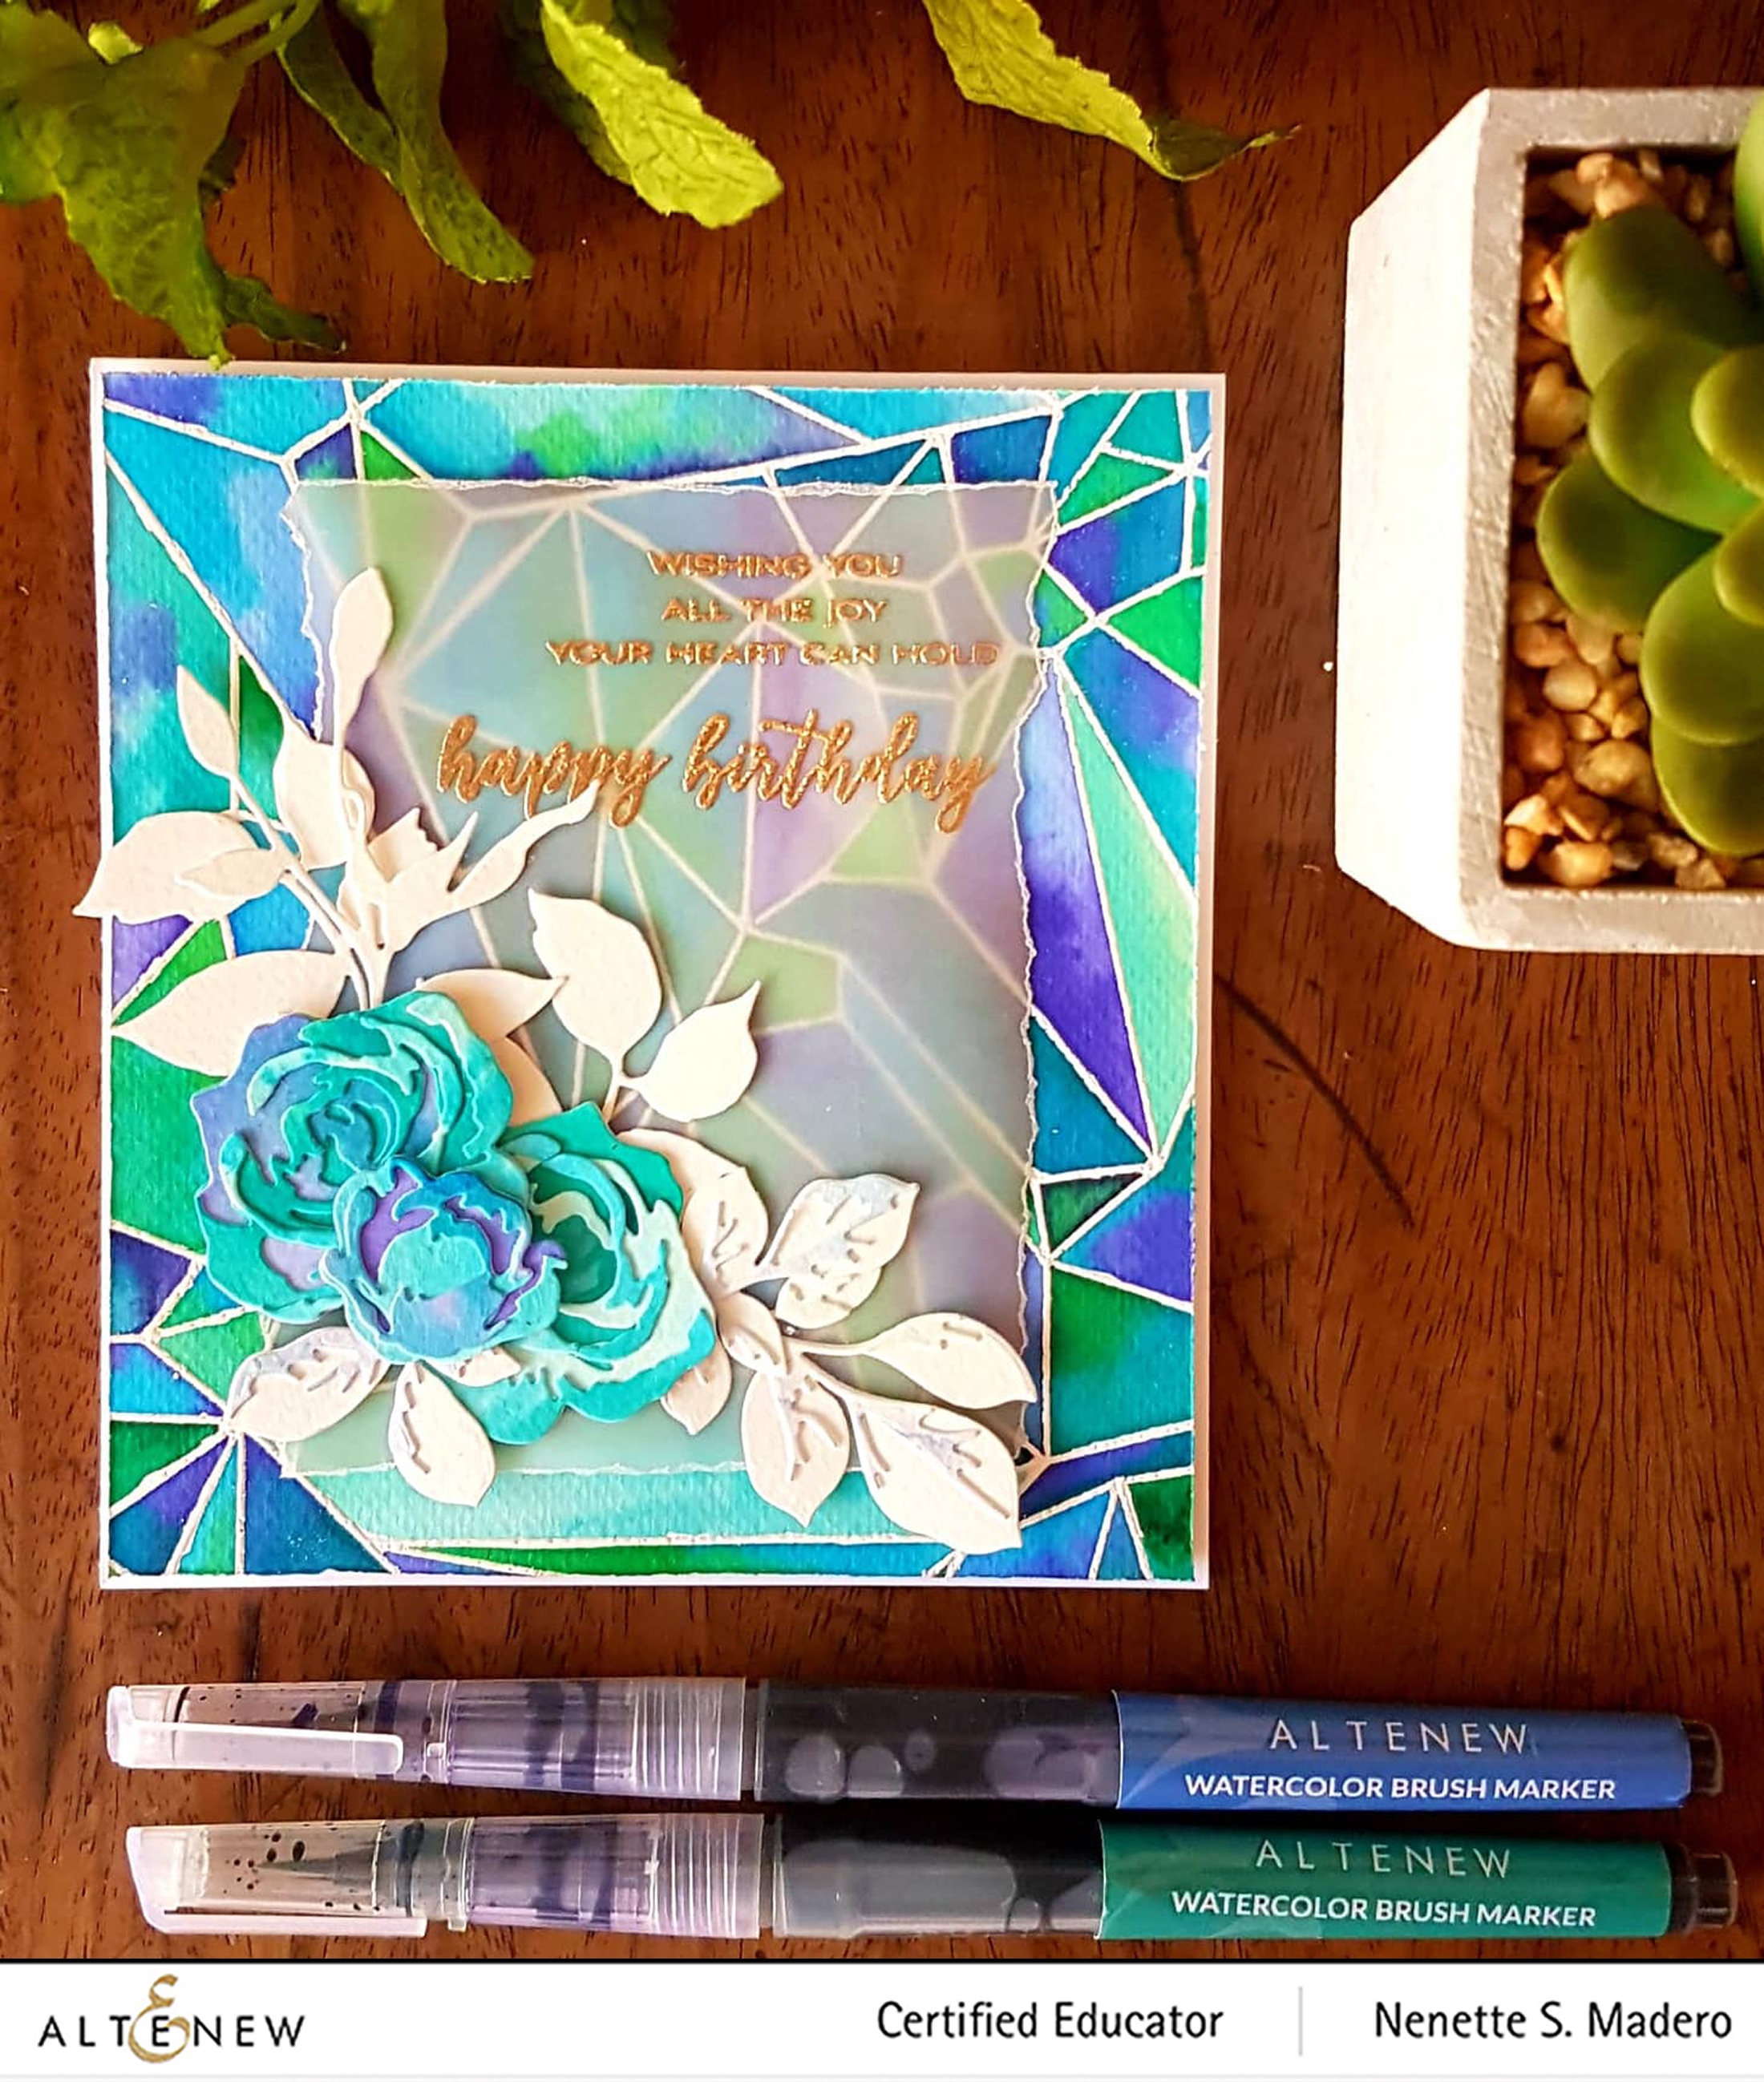
WISHING YOU ALL THE JOY YOUR HEART CAN HOLD HAPPY BIRTHDAY CARD
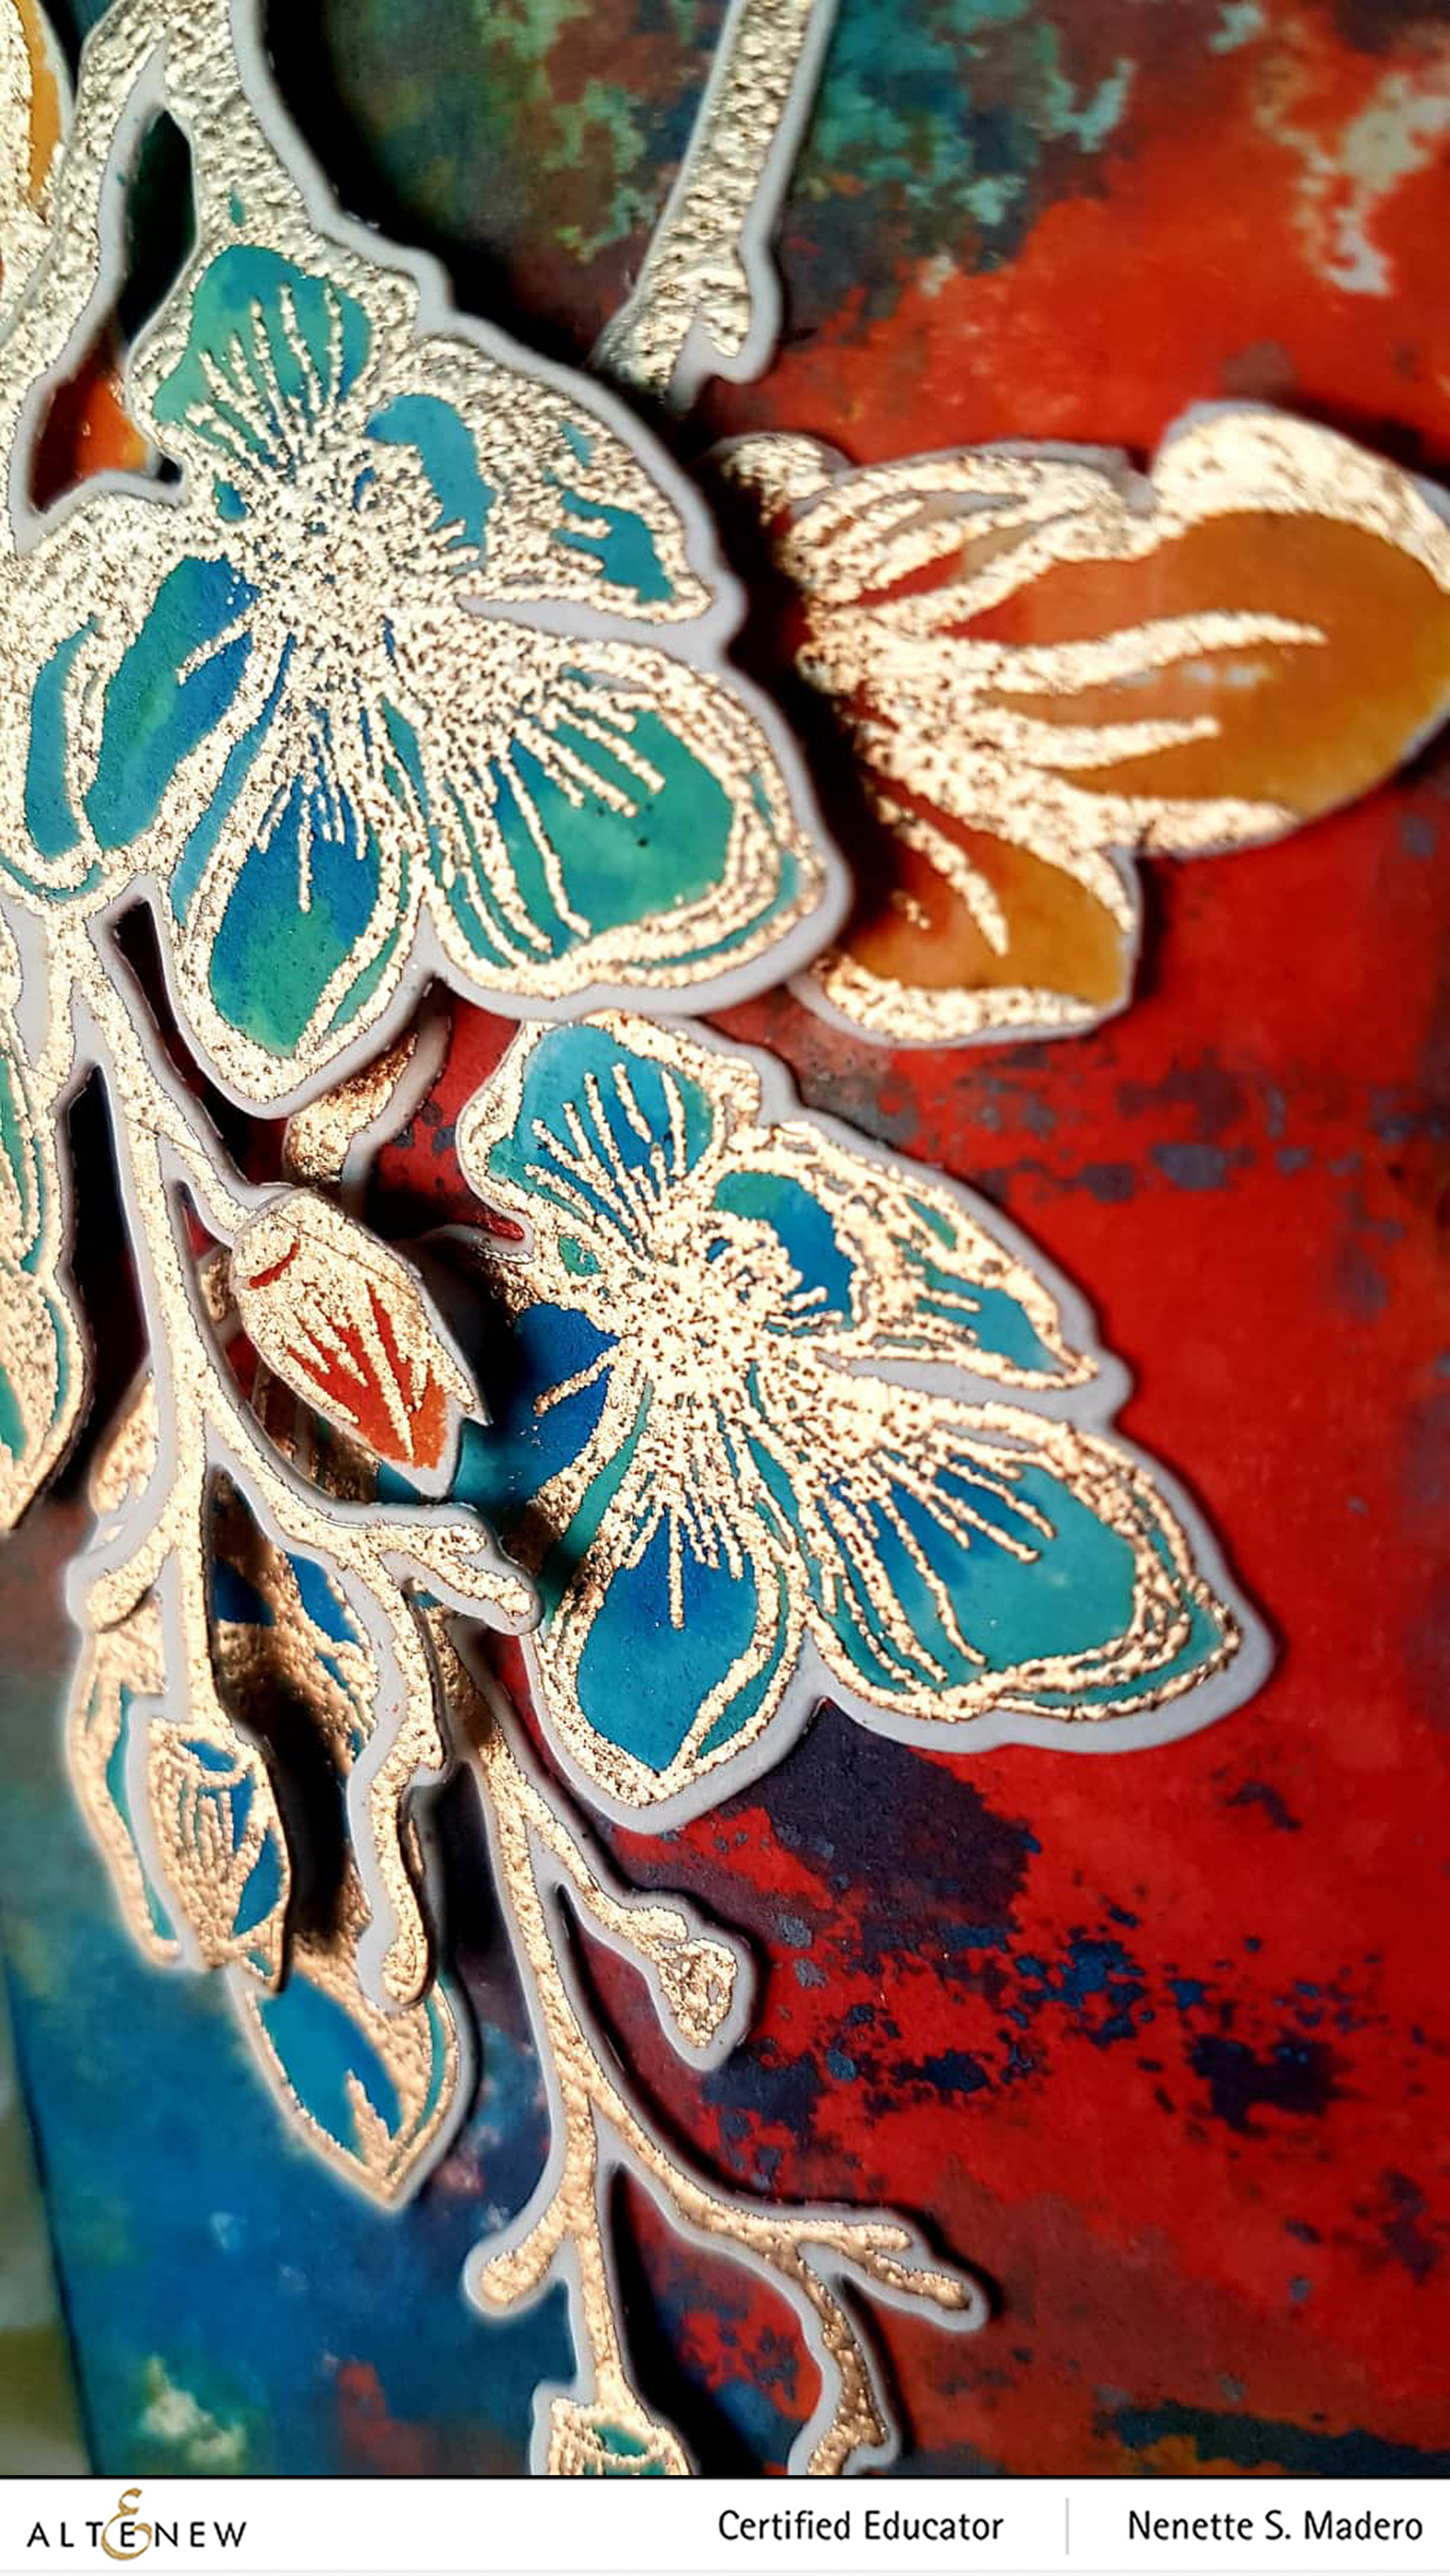
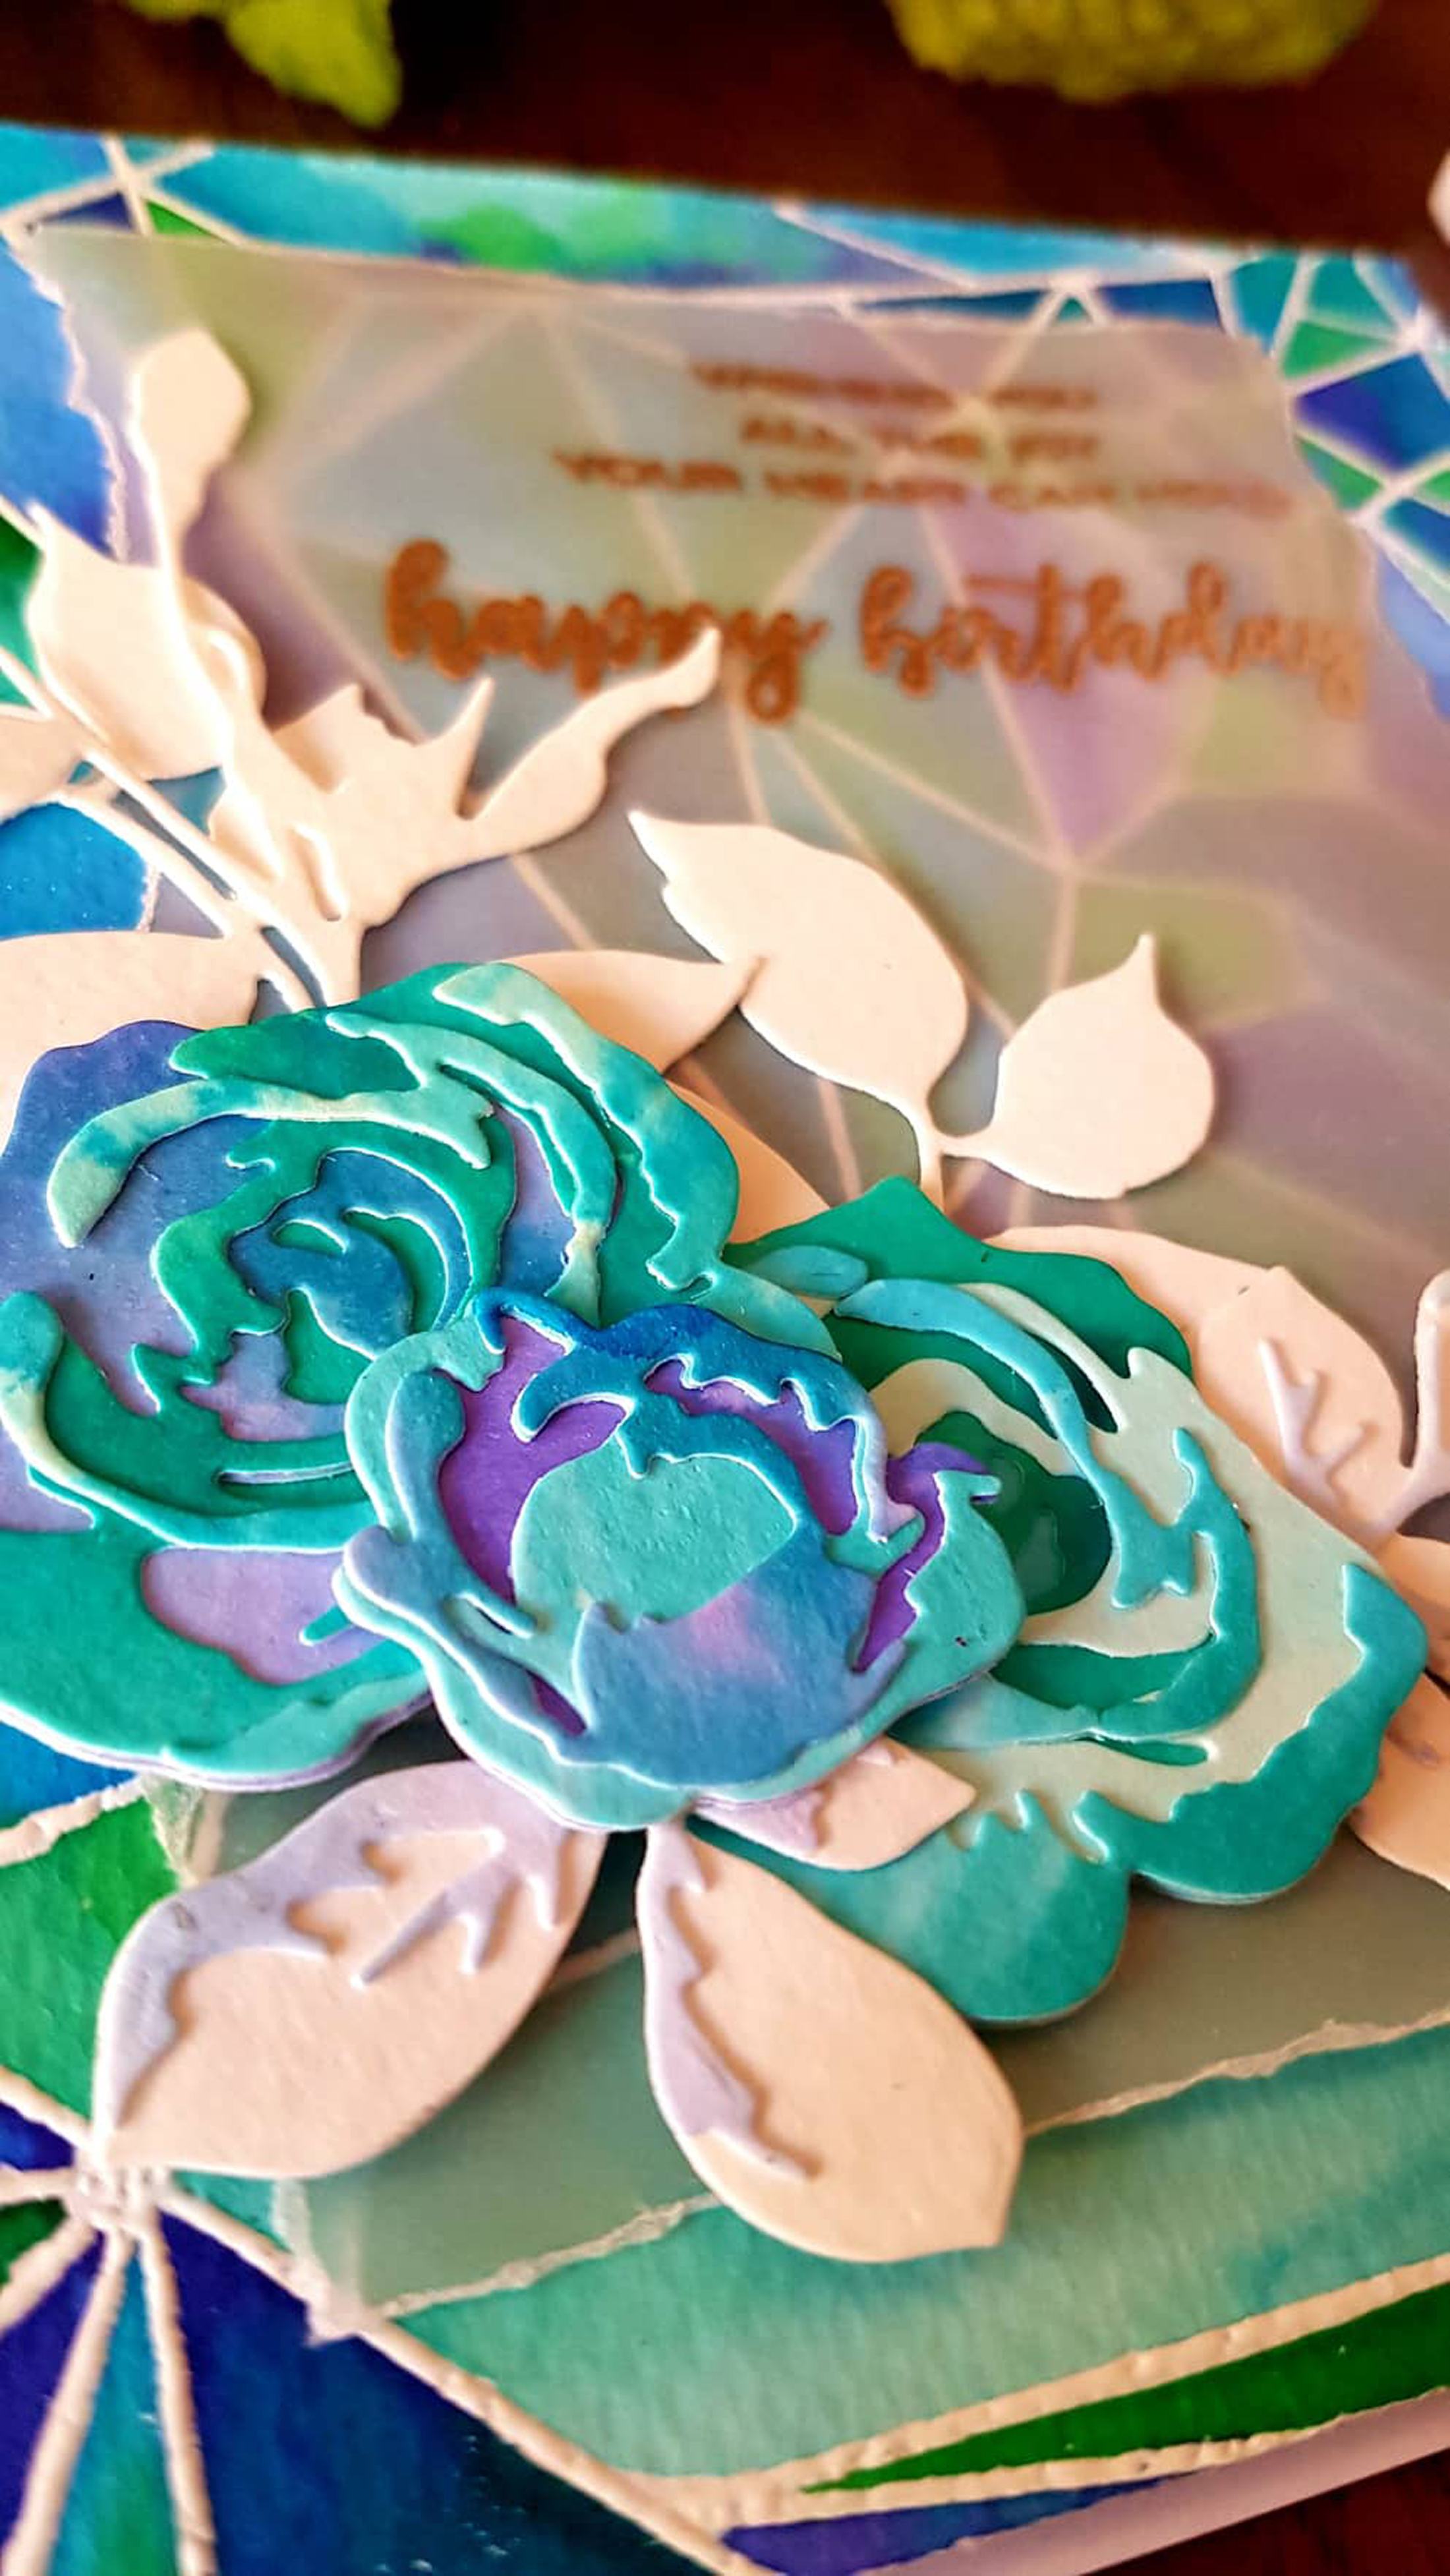
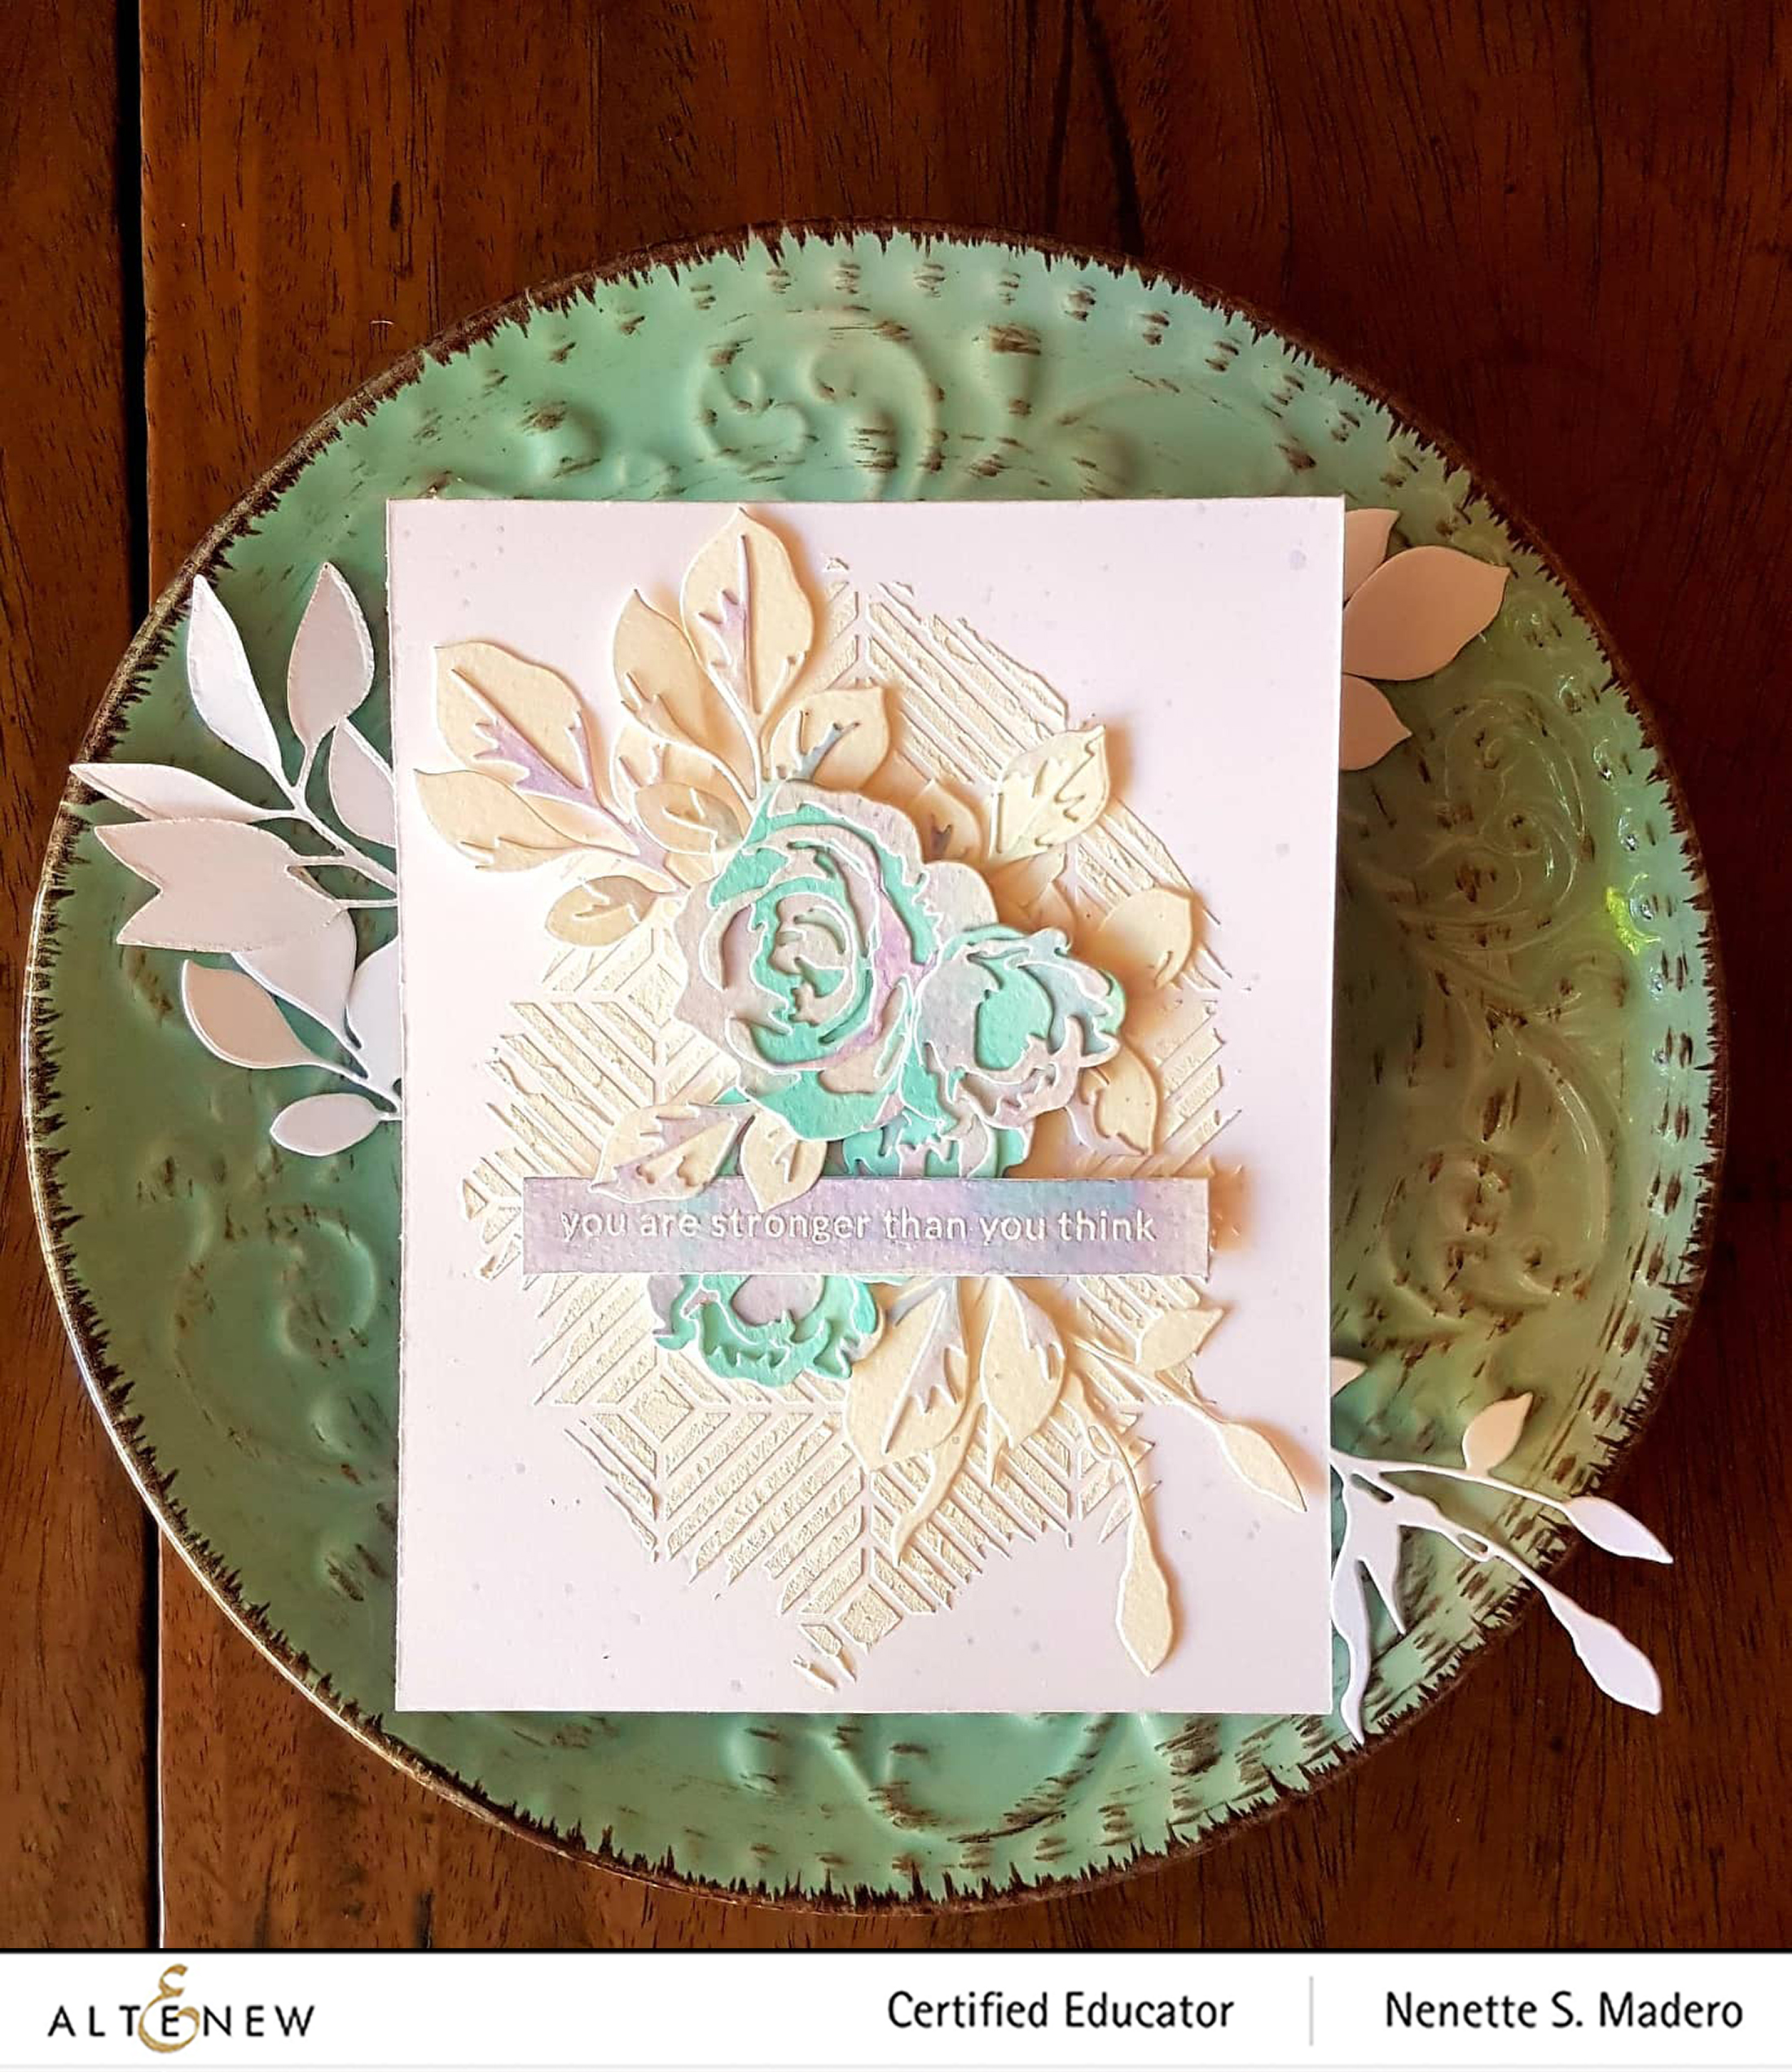
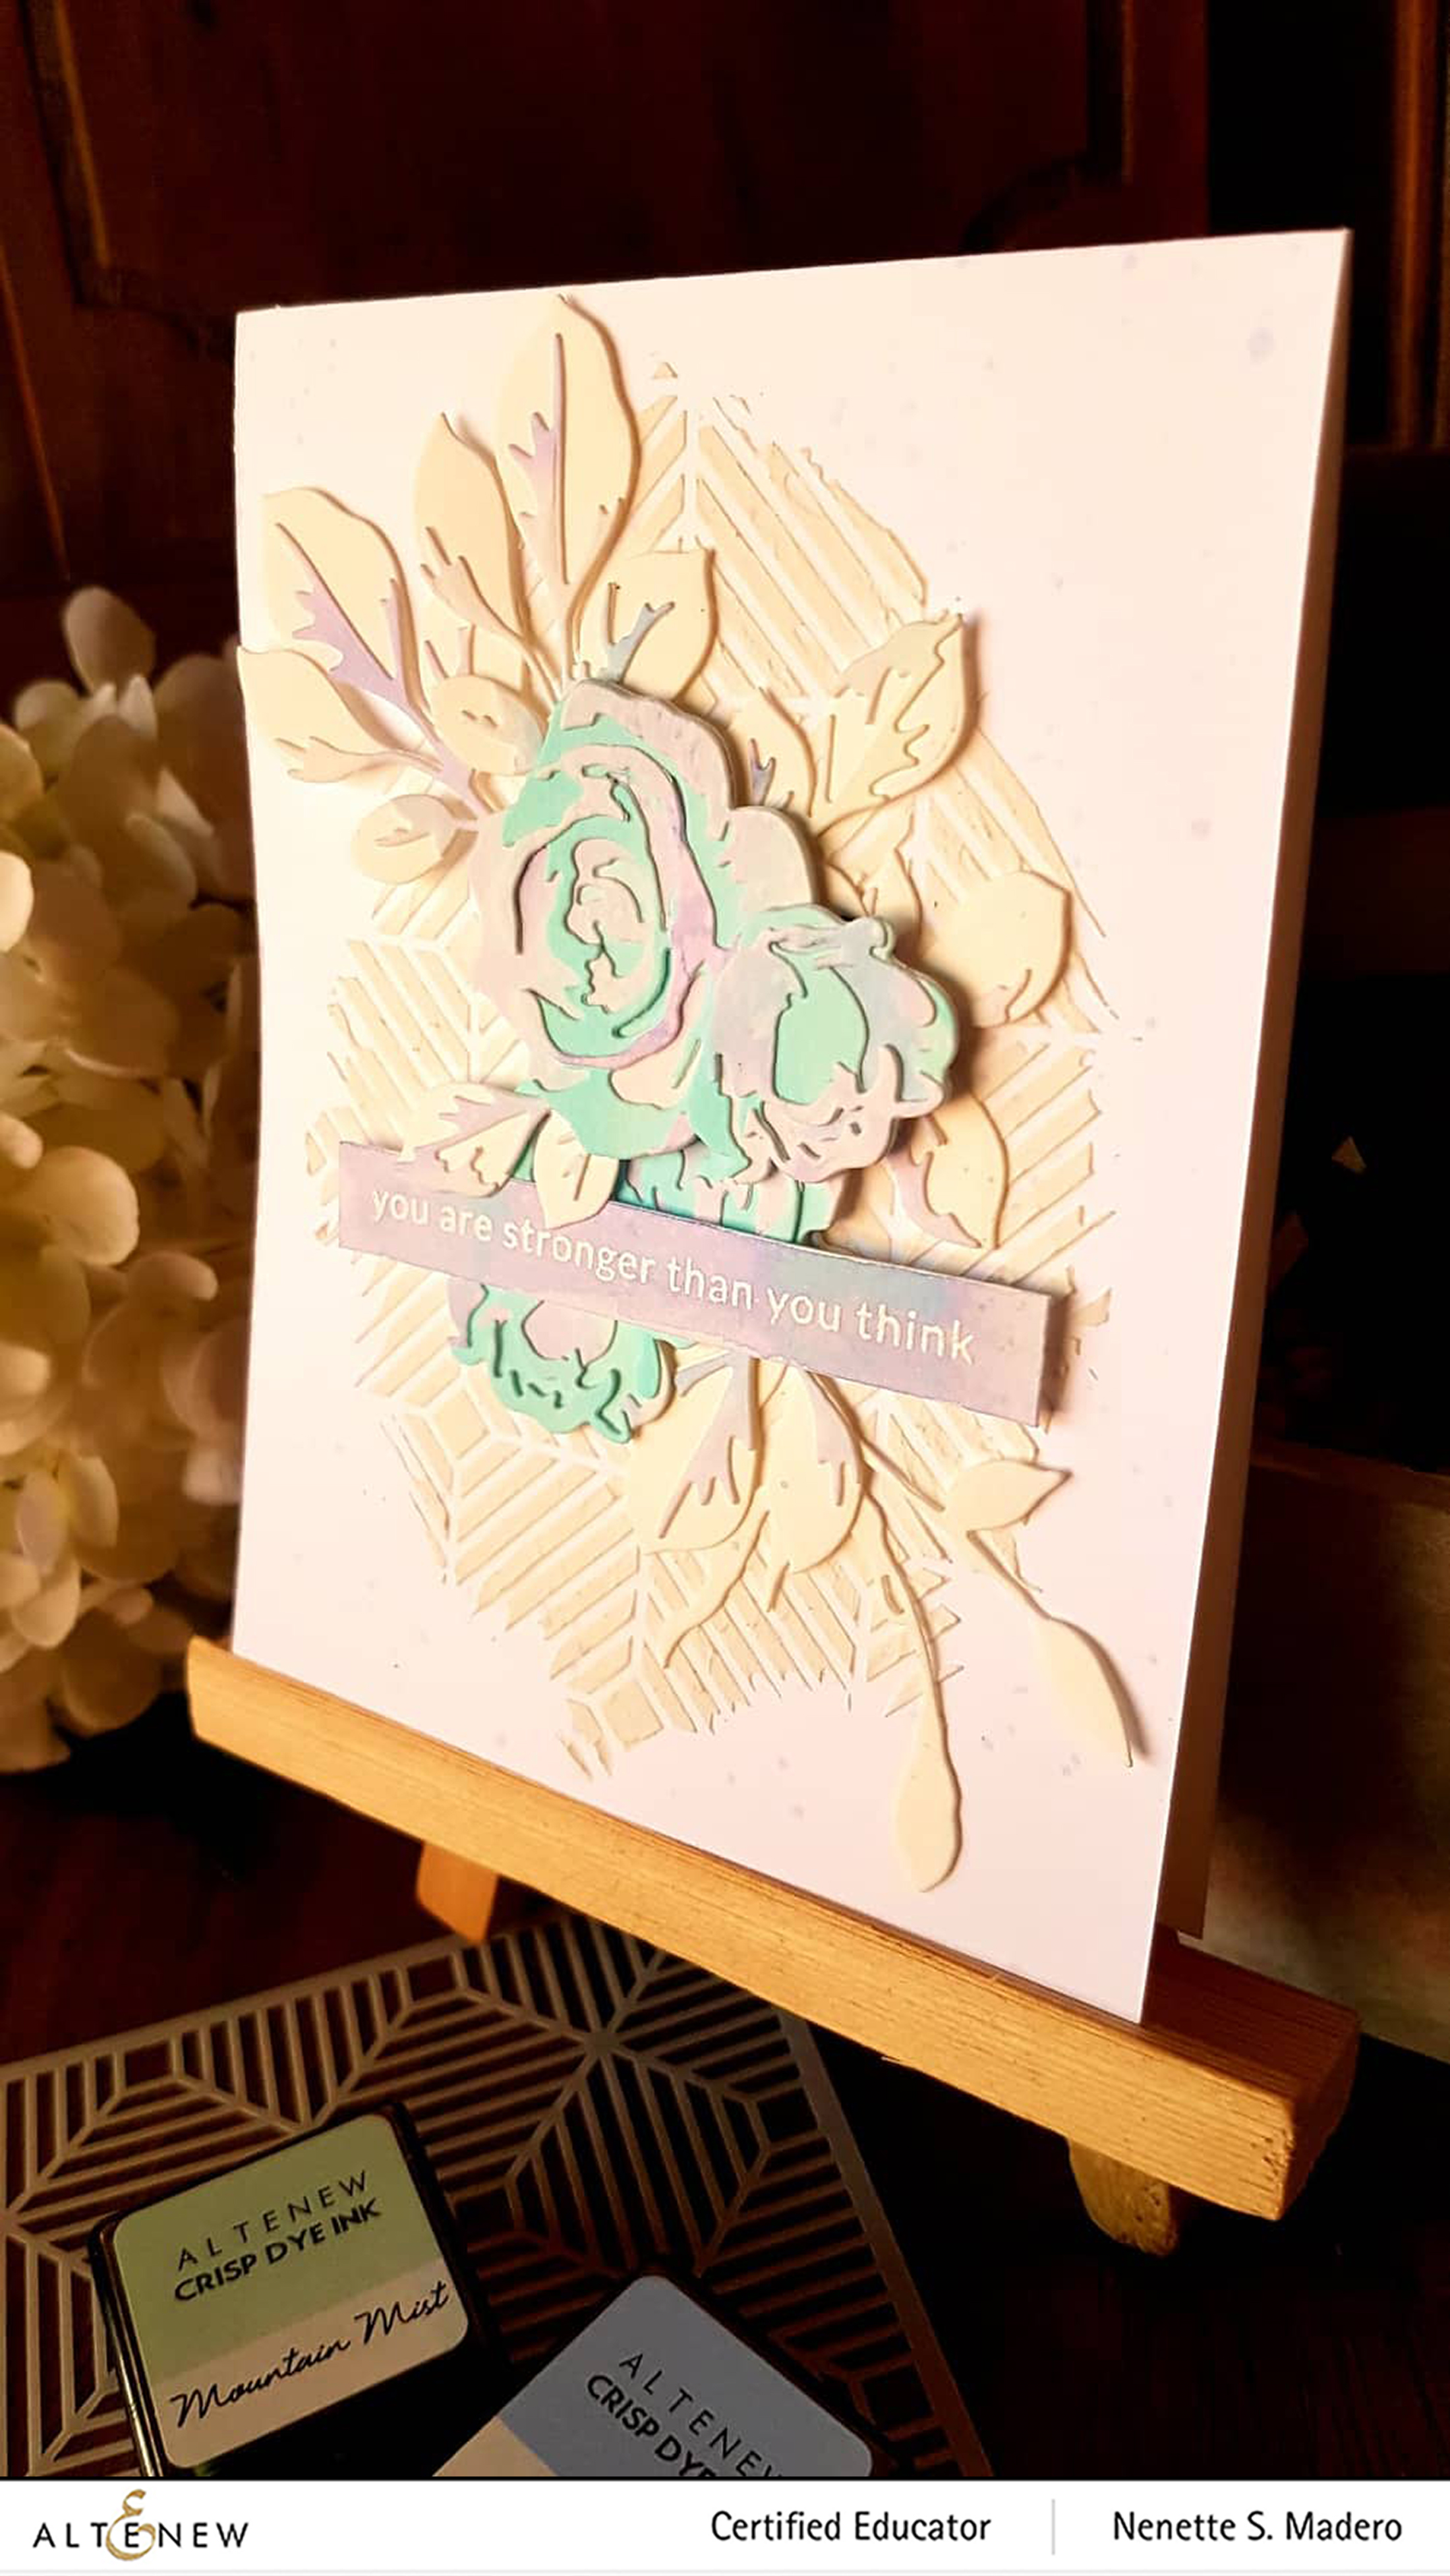
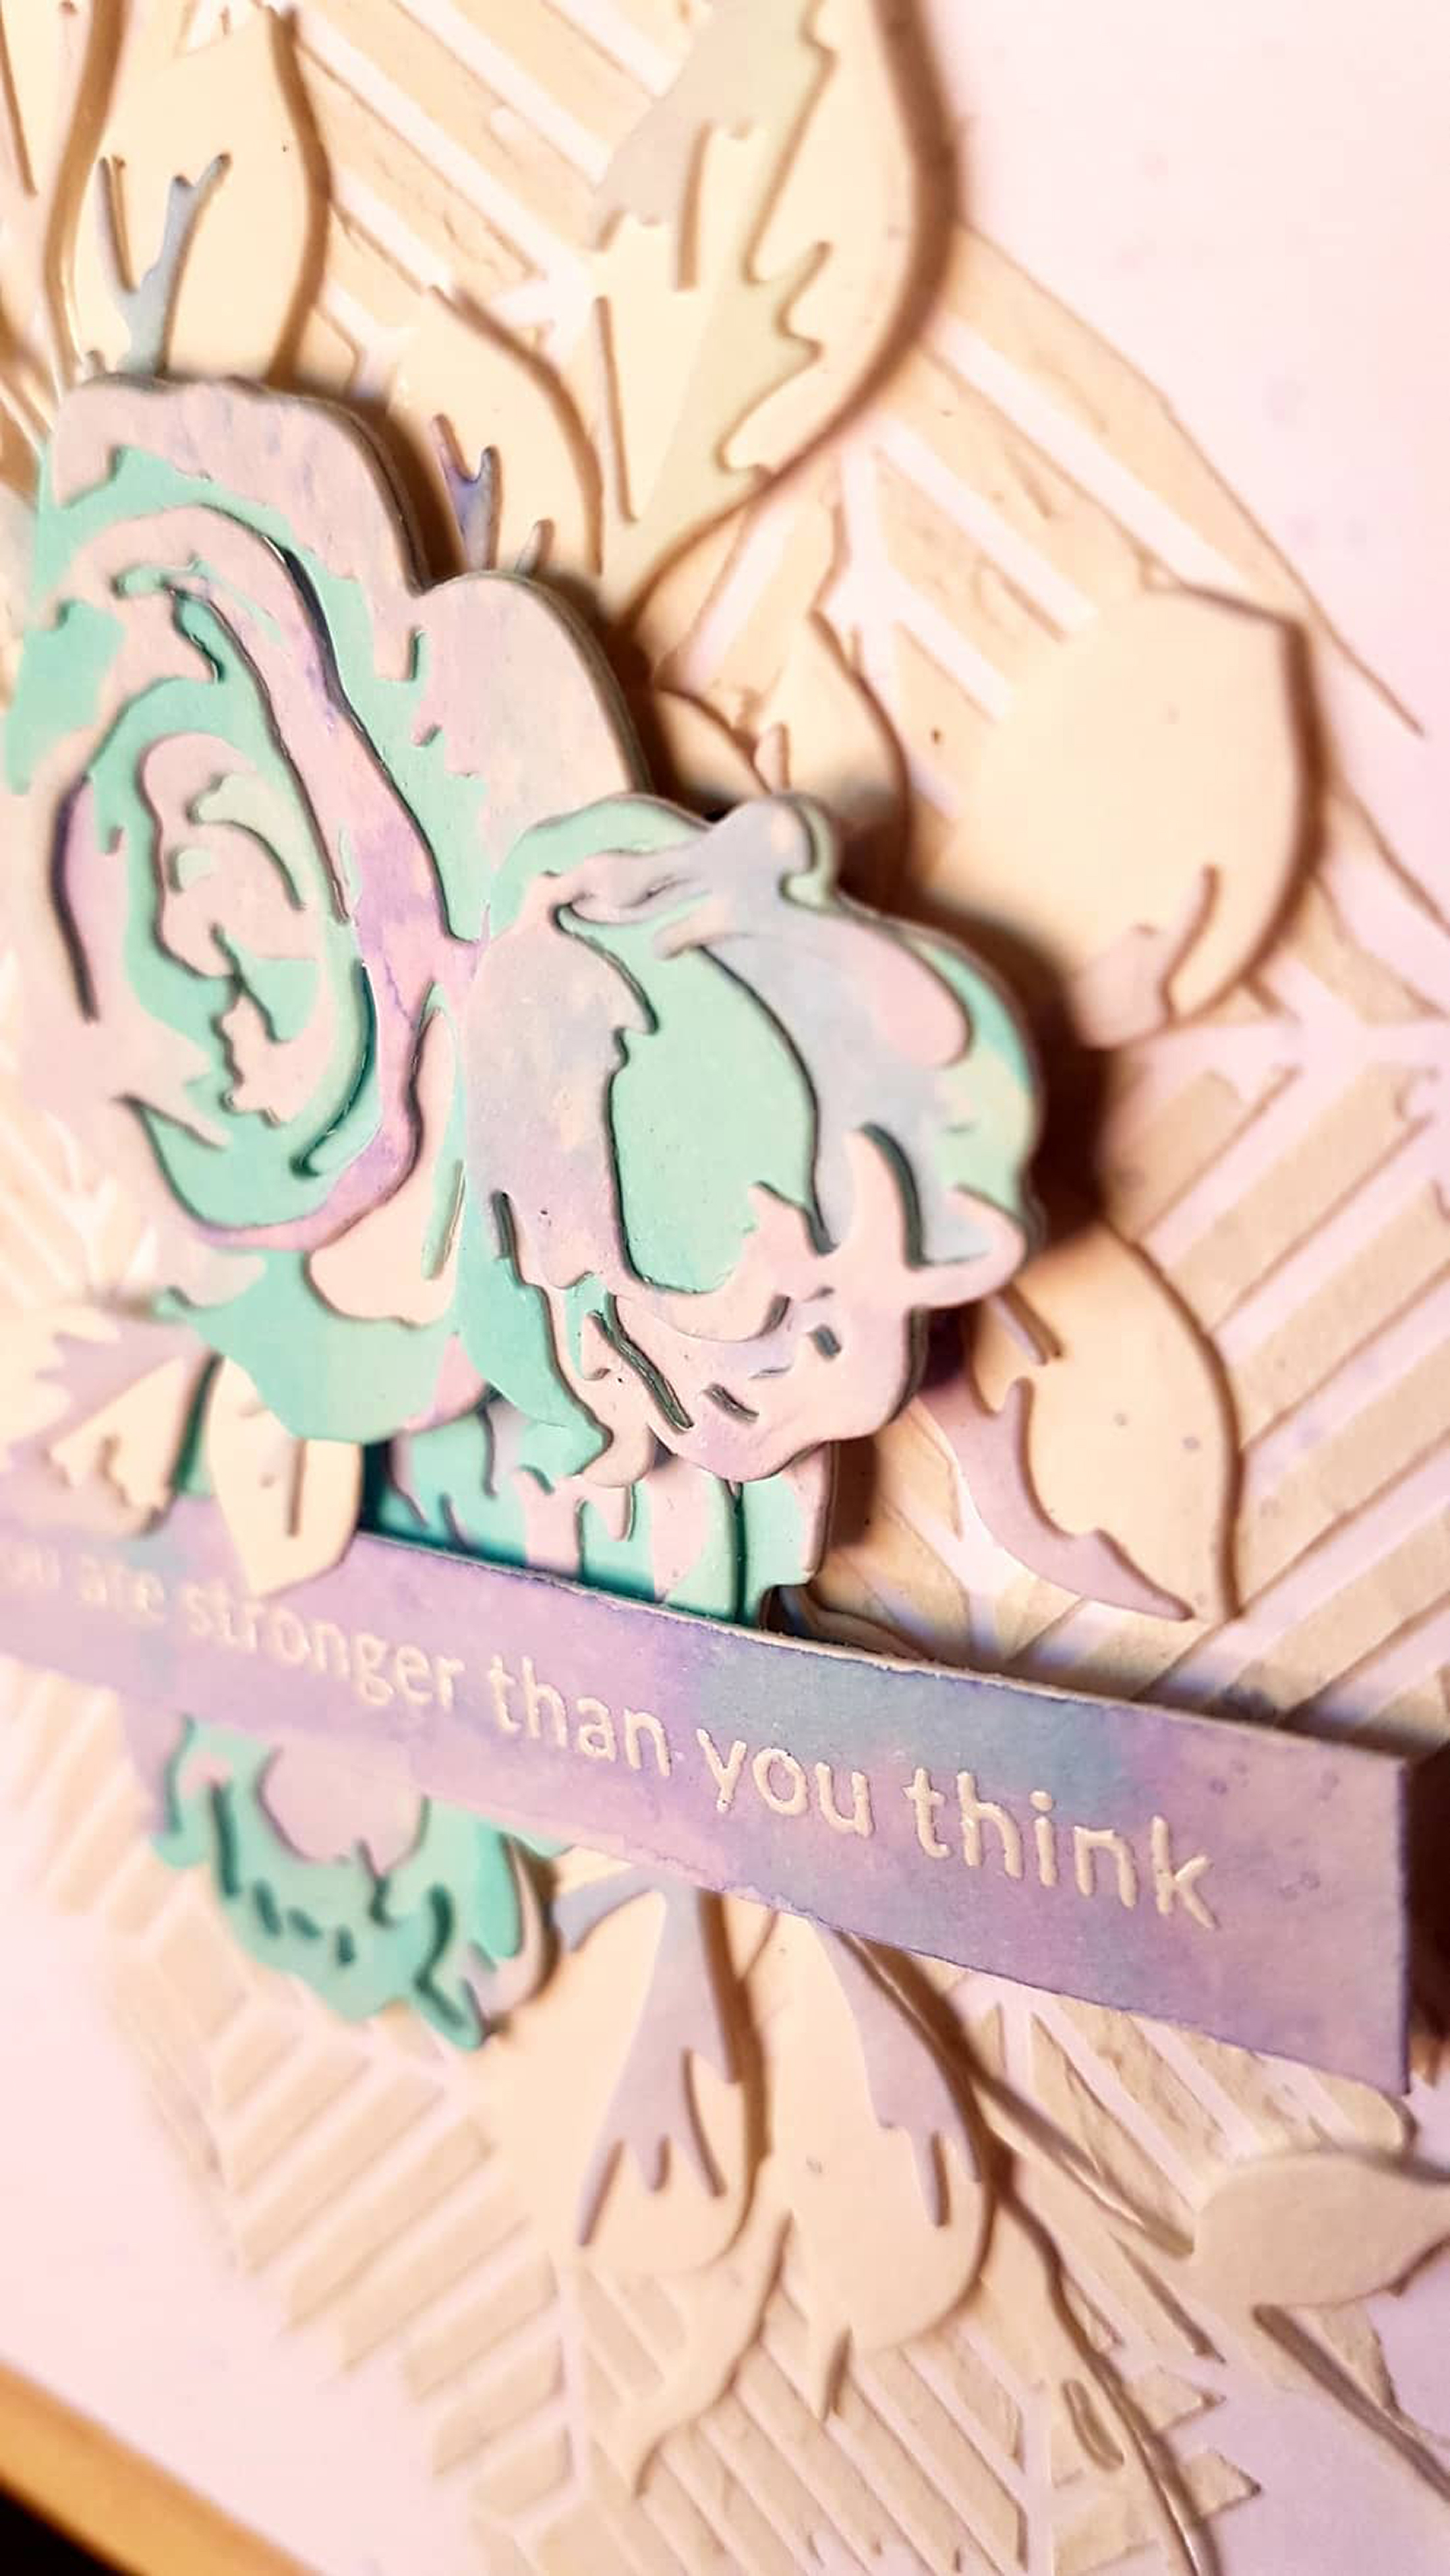
I stamped the image from the Geometric Landscape using Versa Mark onto a 5″ x 5.5″ watercolor paper and heat embossed using Altenew pure white crisp embossing powder. Using the wet on wet technique, I colored in the shapes using Lagoon, Turquoise, Sweet Leaf, Persian Blue and Mountain Mist watercolor brush markers. The edges were distressed using Tim Holtz paper distresser. Velum sheet was torn to create a frame and the sentiment from Sincere greetings sentiment was stamped using Versamark and embossed using Rose gold embossing powder. I chose vellum as a frame/mat for the sentiment so that the background can still be seen.
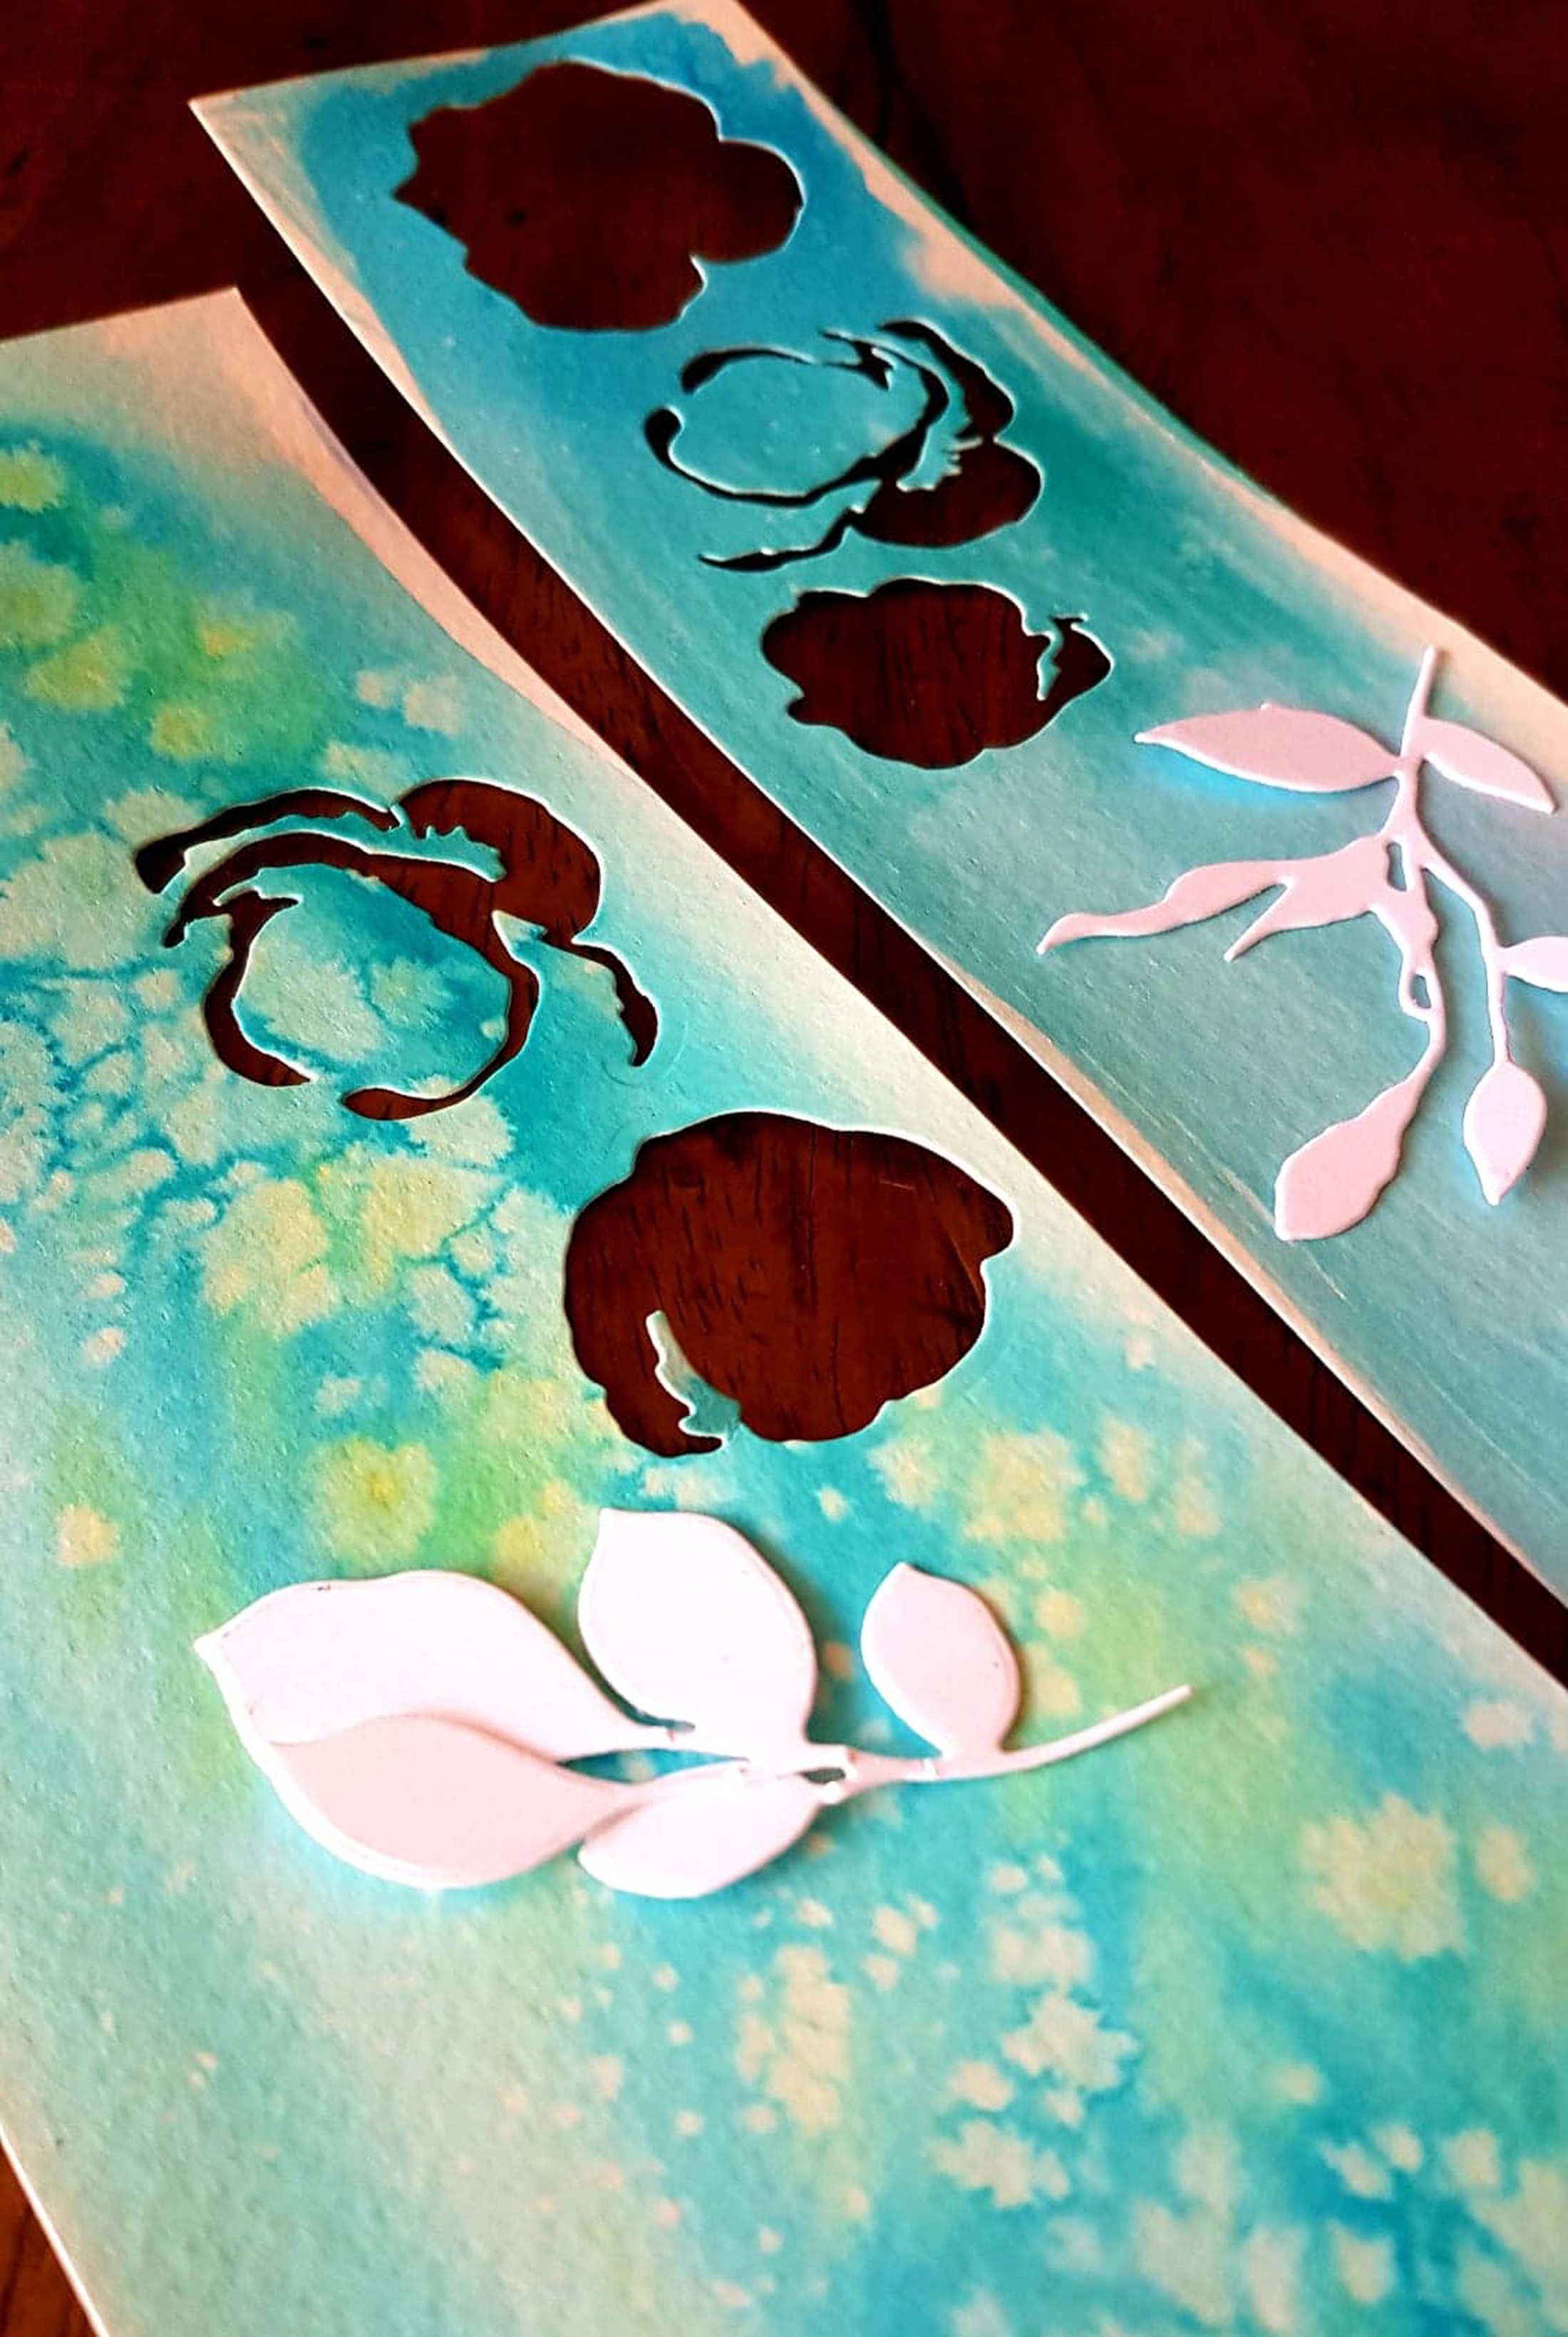
I painted a light wash using the same colors I used for the background and sprinkled salt to create these wonderful “blooms” and used the 3D dies to create the flowers and vines of the leaves. The leaves remained white so that the flowers will stand out more. The die cuts were arranged in one corner and adhered using glue and foam squares. The whole panel was adhered to a top folding Neenah Solar white CS with foam tape for added dimension.
I wanted to make a card that has a lot of white space this time. Neenah Solar White CS was cut down to 4.25” x 11” and scored at 5.5” to create a top-folding card. The Beveled Square stencil was placed on top of the card front and Altenew embossing paste was spread using a spatula. While allowing it to dry, wet on wet technique was used to add some color washes of blues and purples on watercolor paper. Salt was sprinkled while the paper was wet to create some effects.
The Rose Flurries 3D leaves and the Garden Picks 3D flowers and leaves were used to die cut the watercolor papers. A strip was also colored and the sentiment from the Delicate Flower Bed stamp set was embossed using Versamark Ink and Altenew Pure White Crisp embossing powder. The flowers and leaves were assembled and adhered with glue and foam squares.
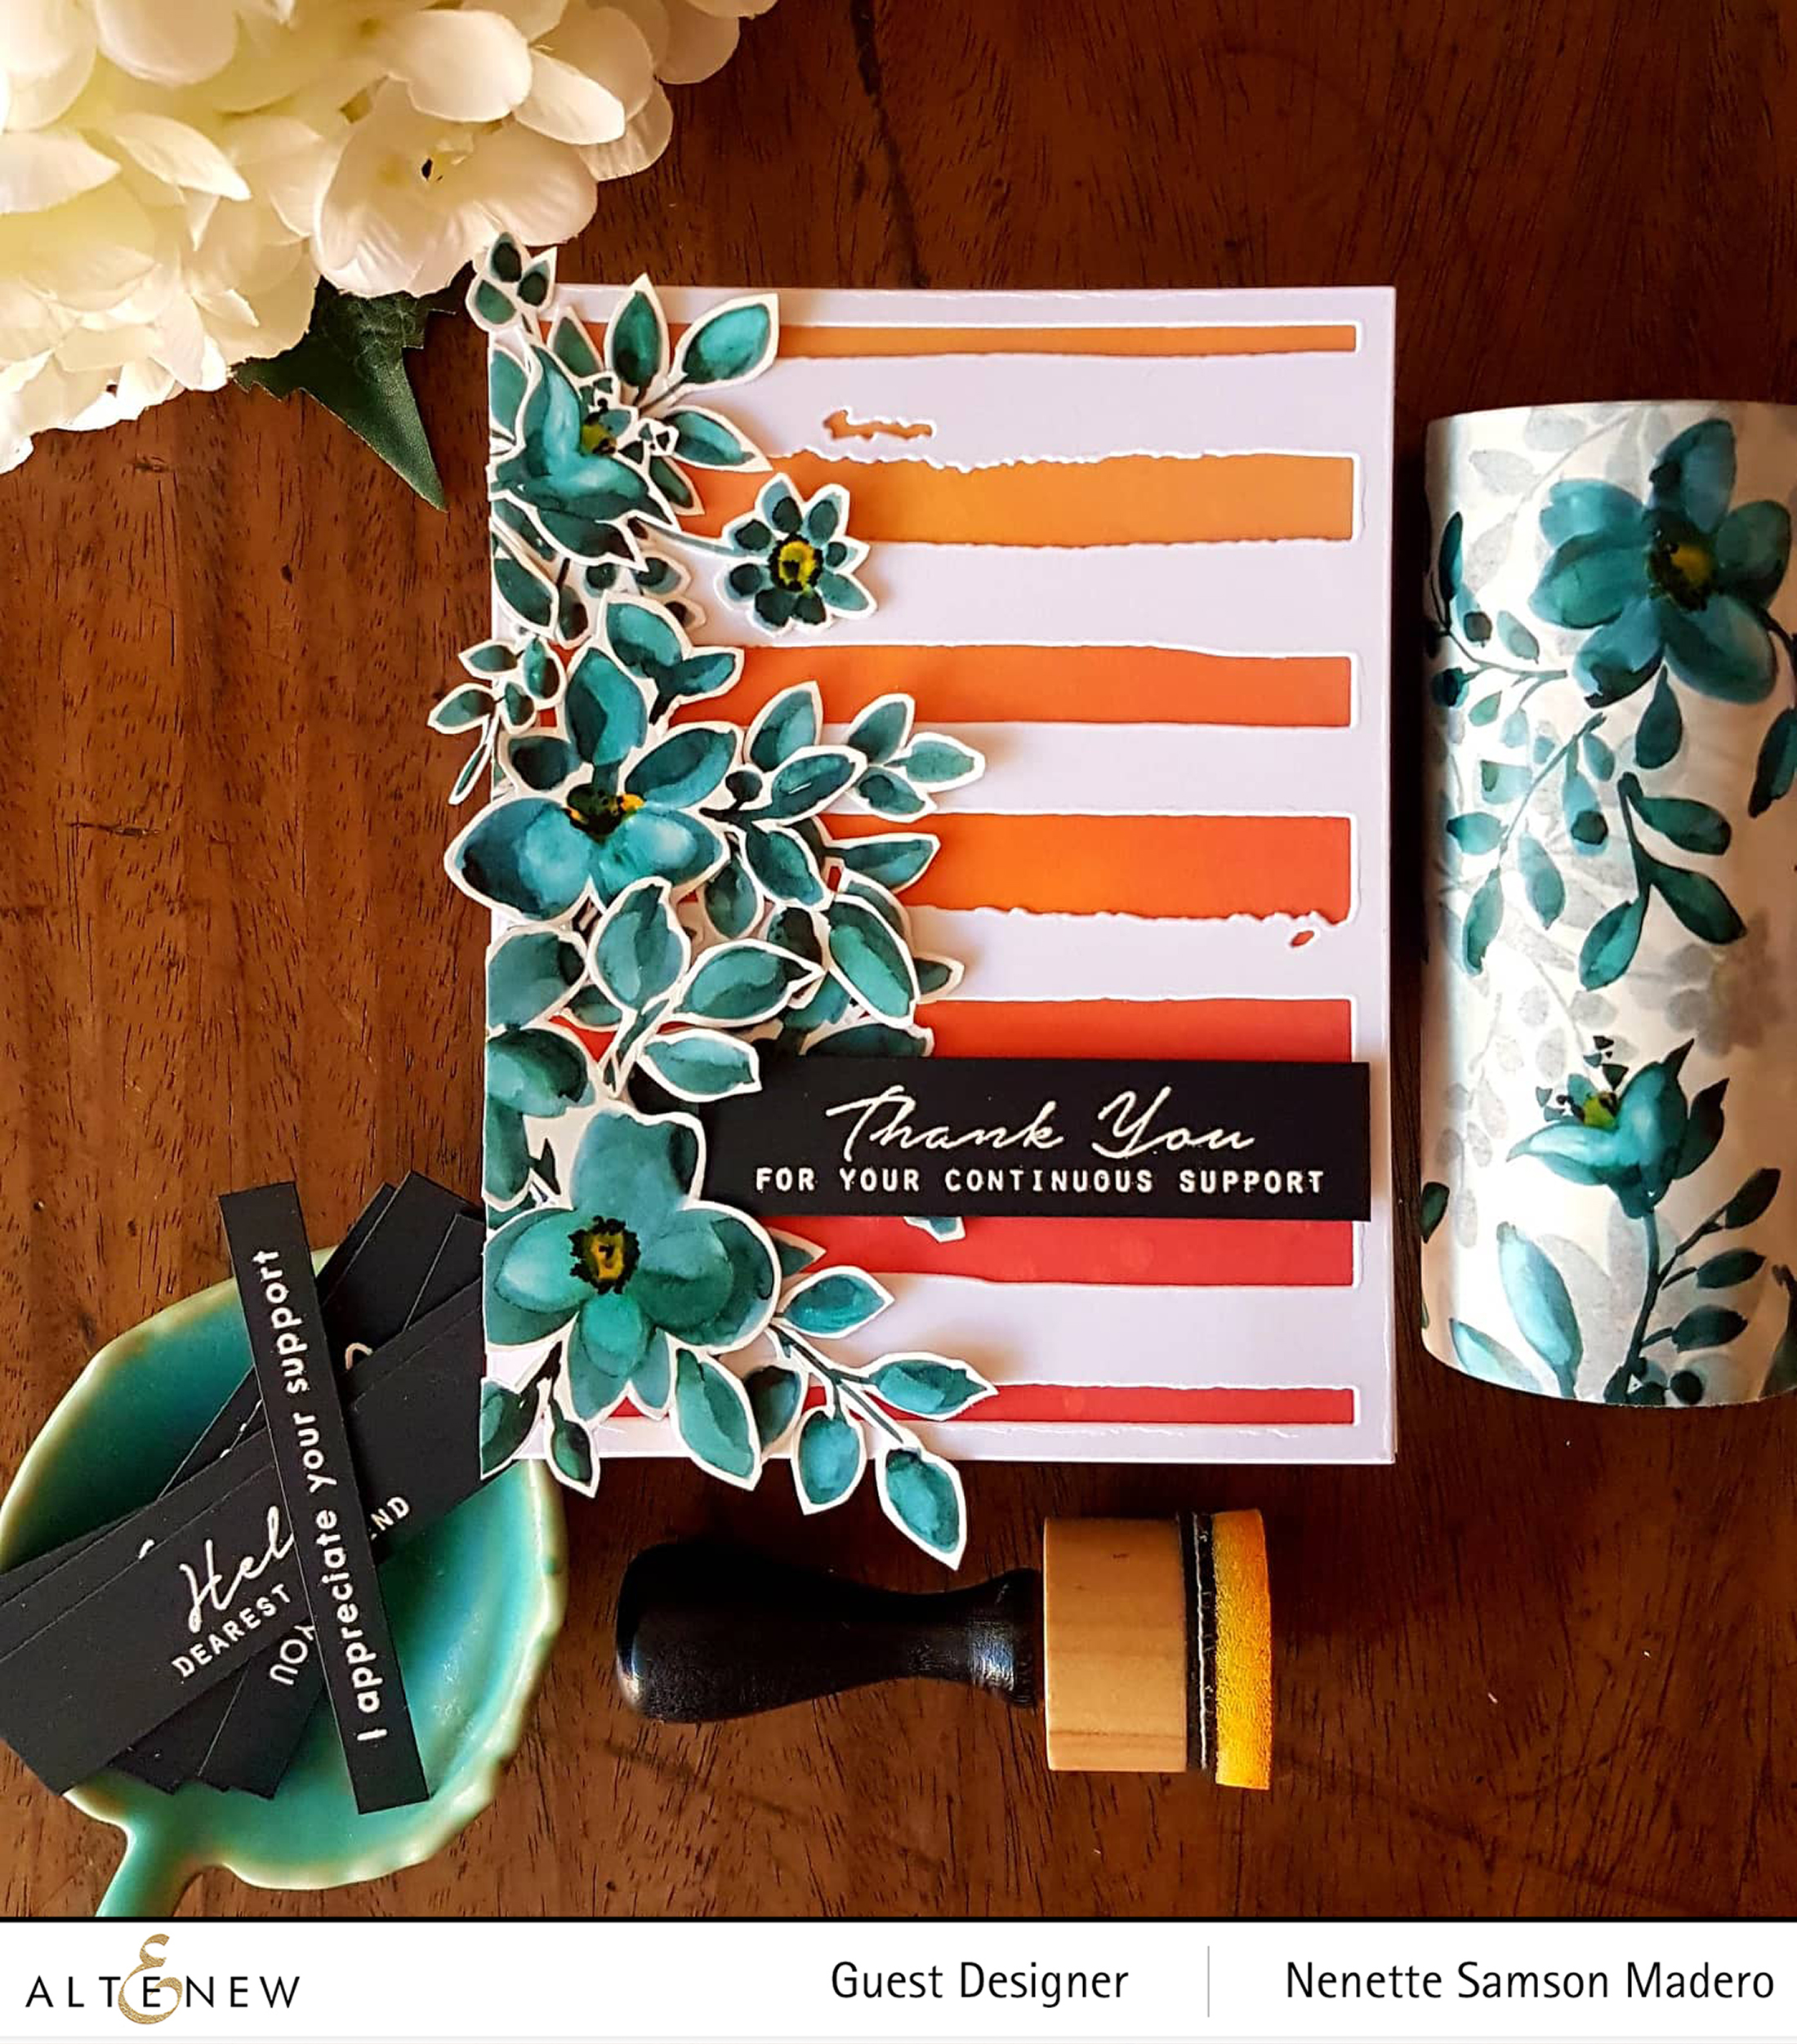
I just love the Teal Shadow Washi Tape because you already have watercolored flowers and leaves instantly!!! <3 This card was pretty simple to create. Fabriano watercolor paper was cut down to 5.5” x 4.25”. With a blending tool, the background was colored using Fossilized Amber, Spiced Marmalade and Abandoned Coral. Water was sprayed to create droplets. The Watercolor Stripes cover die was used to cut out the stripes from Neenah Solar White CS. I stuck the beautiful Teal shadow washi tape on white CS as well then fussy cut the images. (this washi tape comes with a coordinating die set) These images were then arranged on the left side of a side folding card and adhered using Glossy accents.
Different thickness of foam tape was also used to create dimension. The sentiment from the Handpicked Bouquet was stamped using Versamark Ink then embossed using Altenew pure white crisp embossing powder. Tuck in the sentiment strip under the leaves for added interest.
Feeling Dotty stencil was placed on the watercolor paper and Versamark Ink was added to certain areas then embossed with clear embossing powder. Next, Peacock Feathers and Cracked Pistachio Distress Oxide inks were added to the watercolor paper using a distress tool. Versamark Ink was again added to certain areas of the watercolor paper using the Feathered Leaves and Beveled Square Stencils then heat embossed using clear embossing powder. Just make sure that the first layer of inks is completely dry. It helps to use an antistatic tool before applying the Versamark ink over the stencils. Water droplets were also added to create more contrast. Lastly, Wilted Violet was added on top revealing the stencil patterns using the emboss resist technique.
The intricate Altenew Flora Frame Die was die cut 4 times then adhered on top of each other. This was then pasted on vellum sheet to make it more sturdy. The vellum was cut out to follow the shape of the heart using scissors. The sentiment from the Adore You stamp set was stamped on black cardstock using Versamark Ink then heat embossed using Pure White Embossing Powder. The edges of the card front were distressed using the Tonic paper distresser then mounted on a top folding A2 card with foam sheet.
I’ve been seeing layouts and card designs with watercolor drippings and have been inspired by Erum Tasnim andMay Sukyong Park’s beautiful cards so I thought of trying out the technique.
I started out by choosing 3 colors that will blend well together. I don’t mind seeing touches of “mud”. This happens when 2 complimentary colors mix. In fact, for the cool colored card, I purposely mixed blue and orange to get a brownish color to add to the mix. The 3 Distress Ink Pads were directly swiped onto the watercolor paper. The colors were sprayed with water and allowed to drip. The paper was held perpendicularly to the table and a watercolor brush was used to help move the pigments downwards. When this was dry, flower and leaf images from the Adore You stamp set were stamped on watercolor paper and embossed using Pure White Embossing powder. The coordinating die cuts were used to cut out the stamped images. The flowers and leaves were arranged temporarily so that I could color them according to the color drippings. Salt was added while the images were wet for added texture.
The images were then adhered using glue or foam squares. The sentiment was stamped using Versamark Ink and embossed using Pure White Embossing powder. Clear Round Drop embellishments were added to the cool colored card while staples and thread were added to the sentiment for the warm colored card to finish them off. These were then adhered to A2 top and side folding cardstocks.
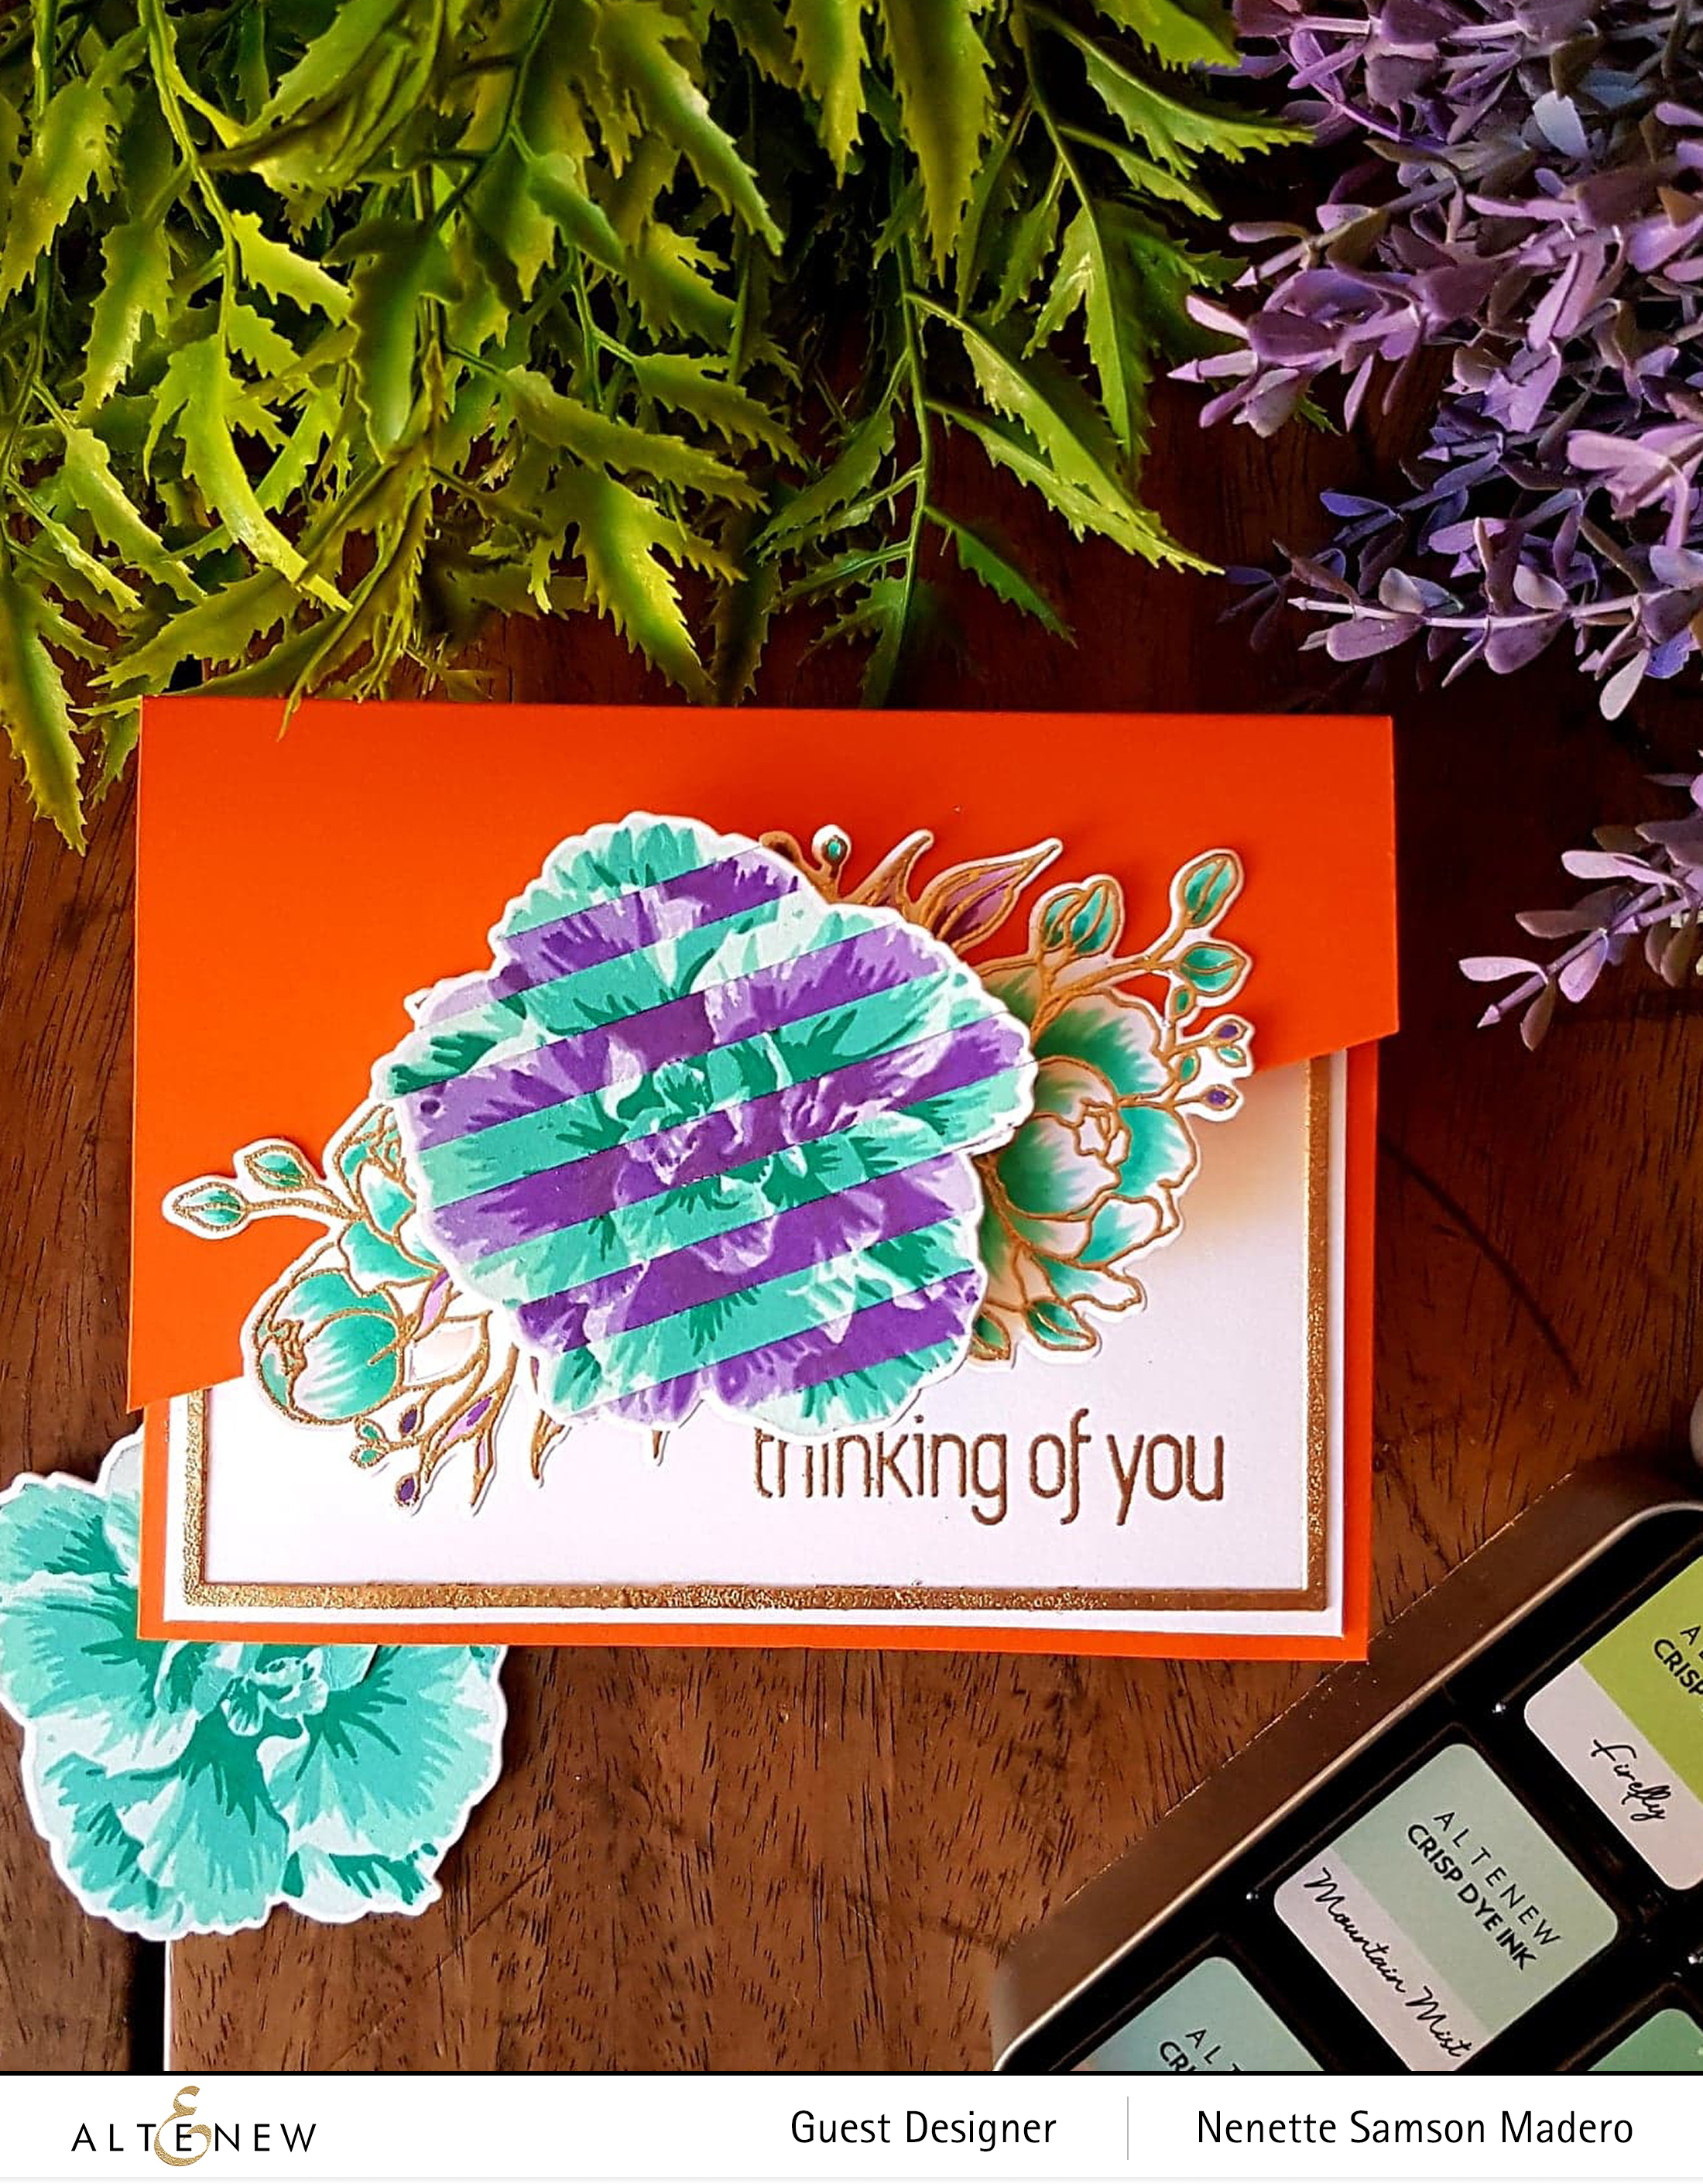
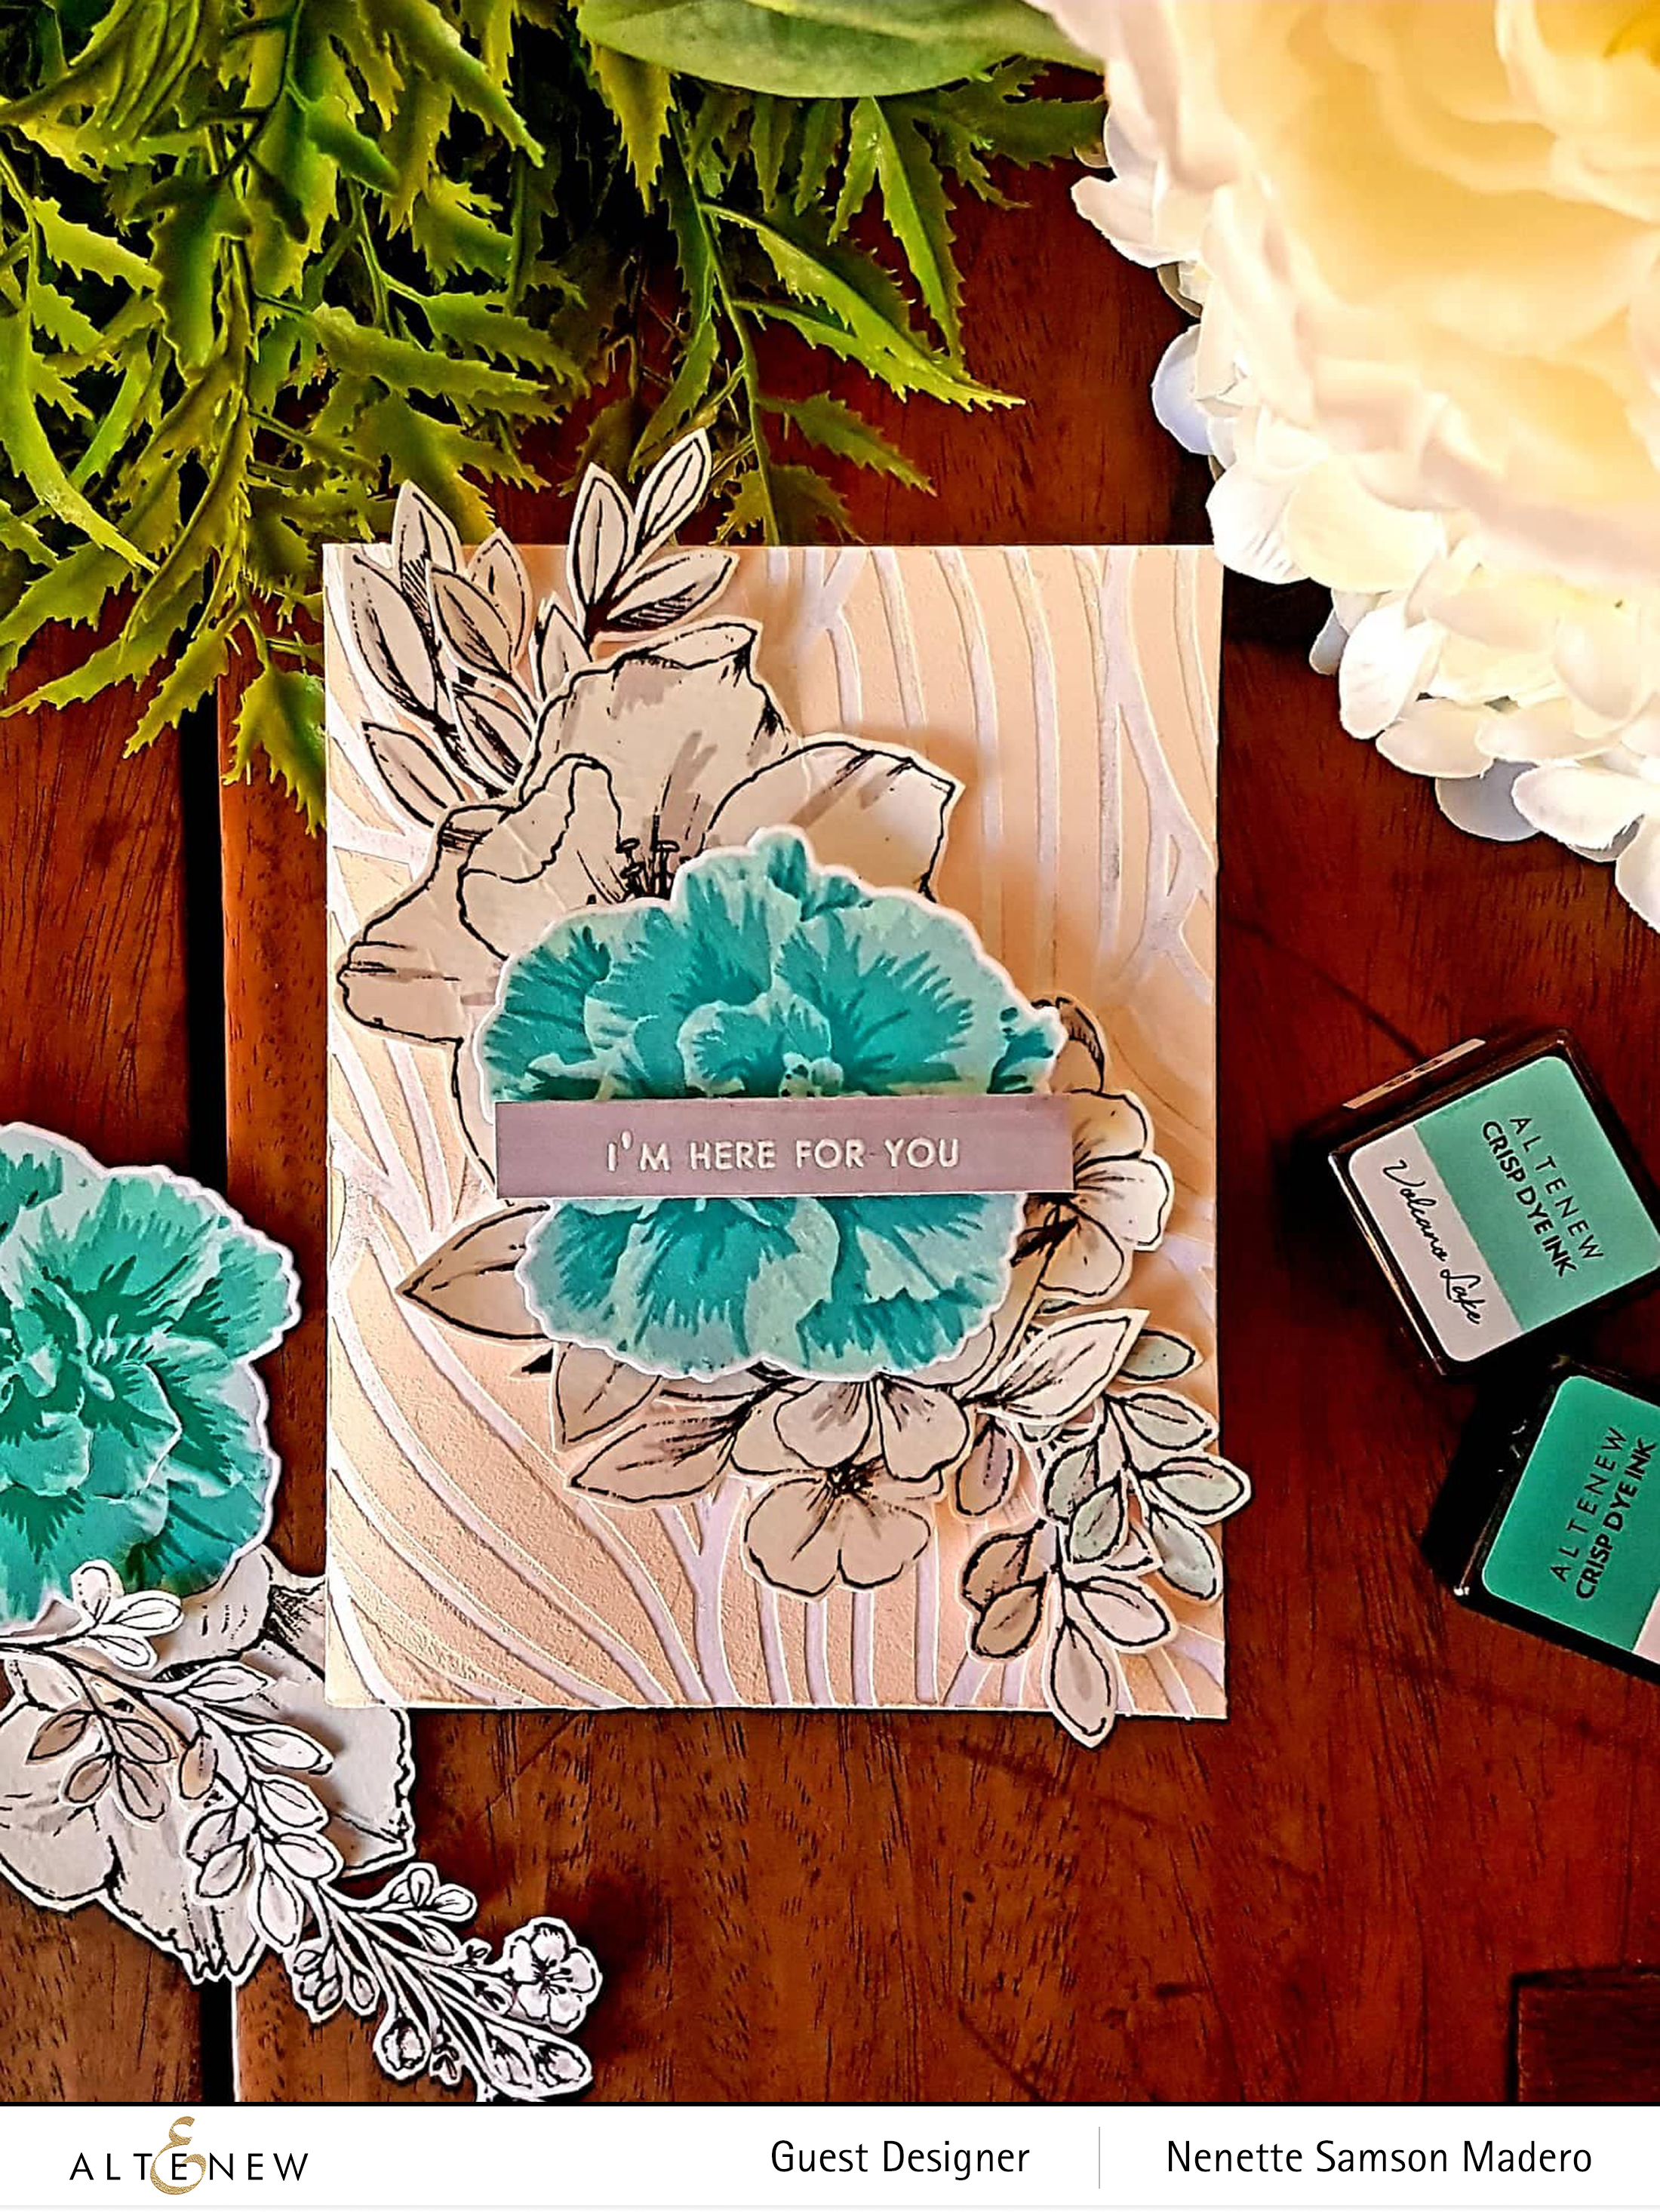
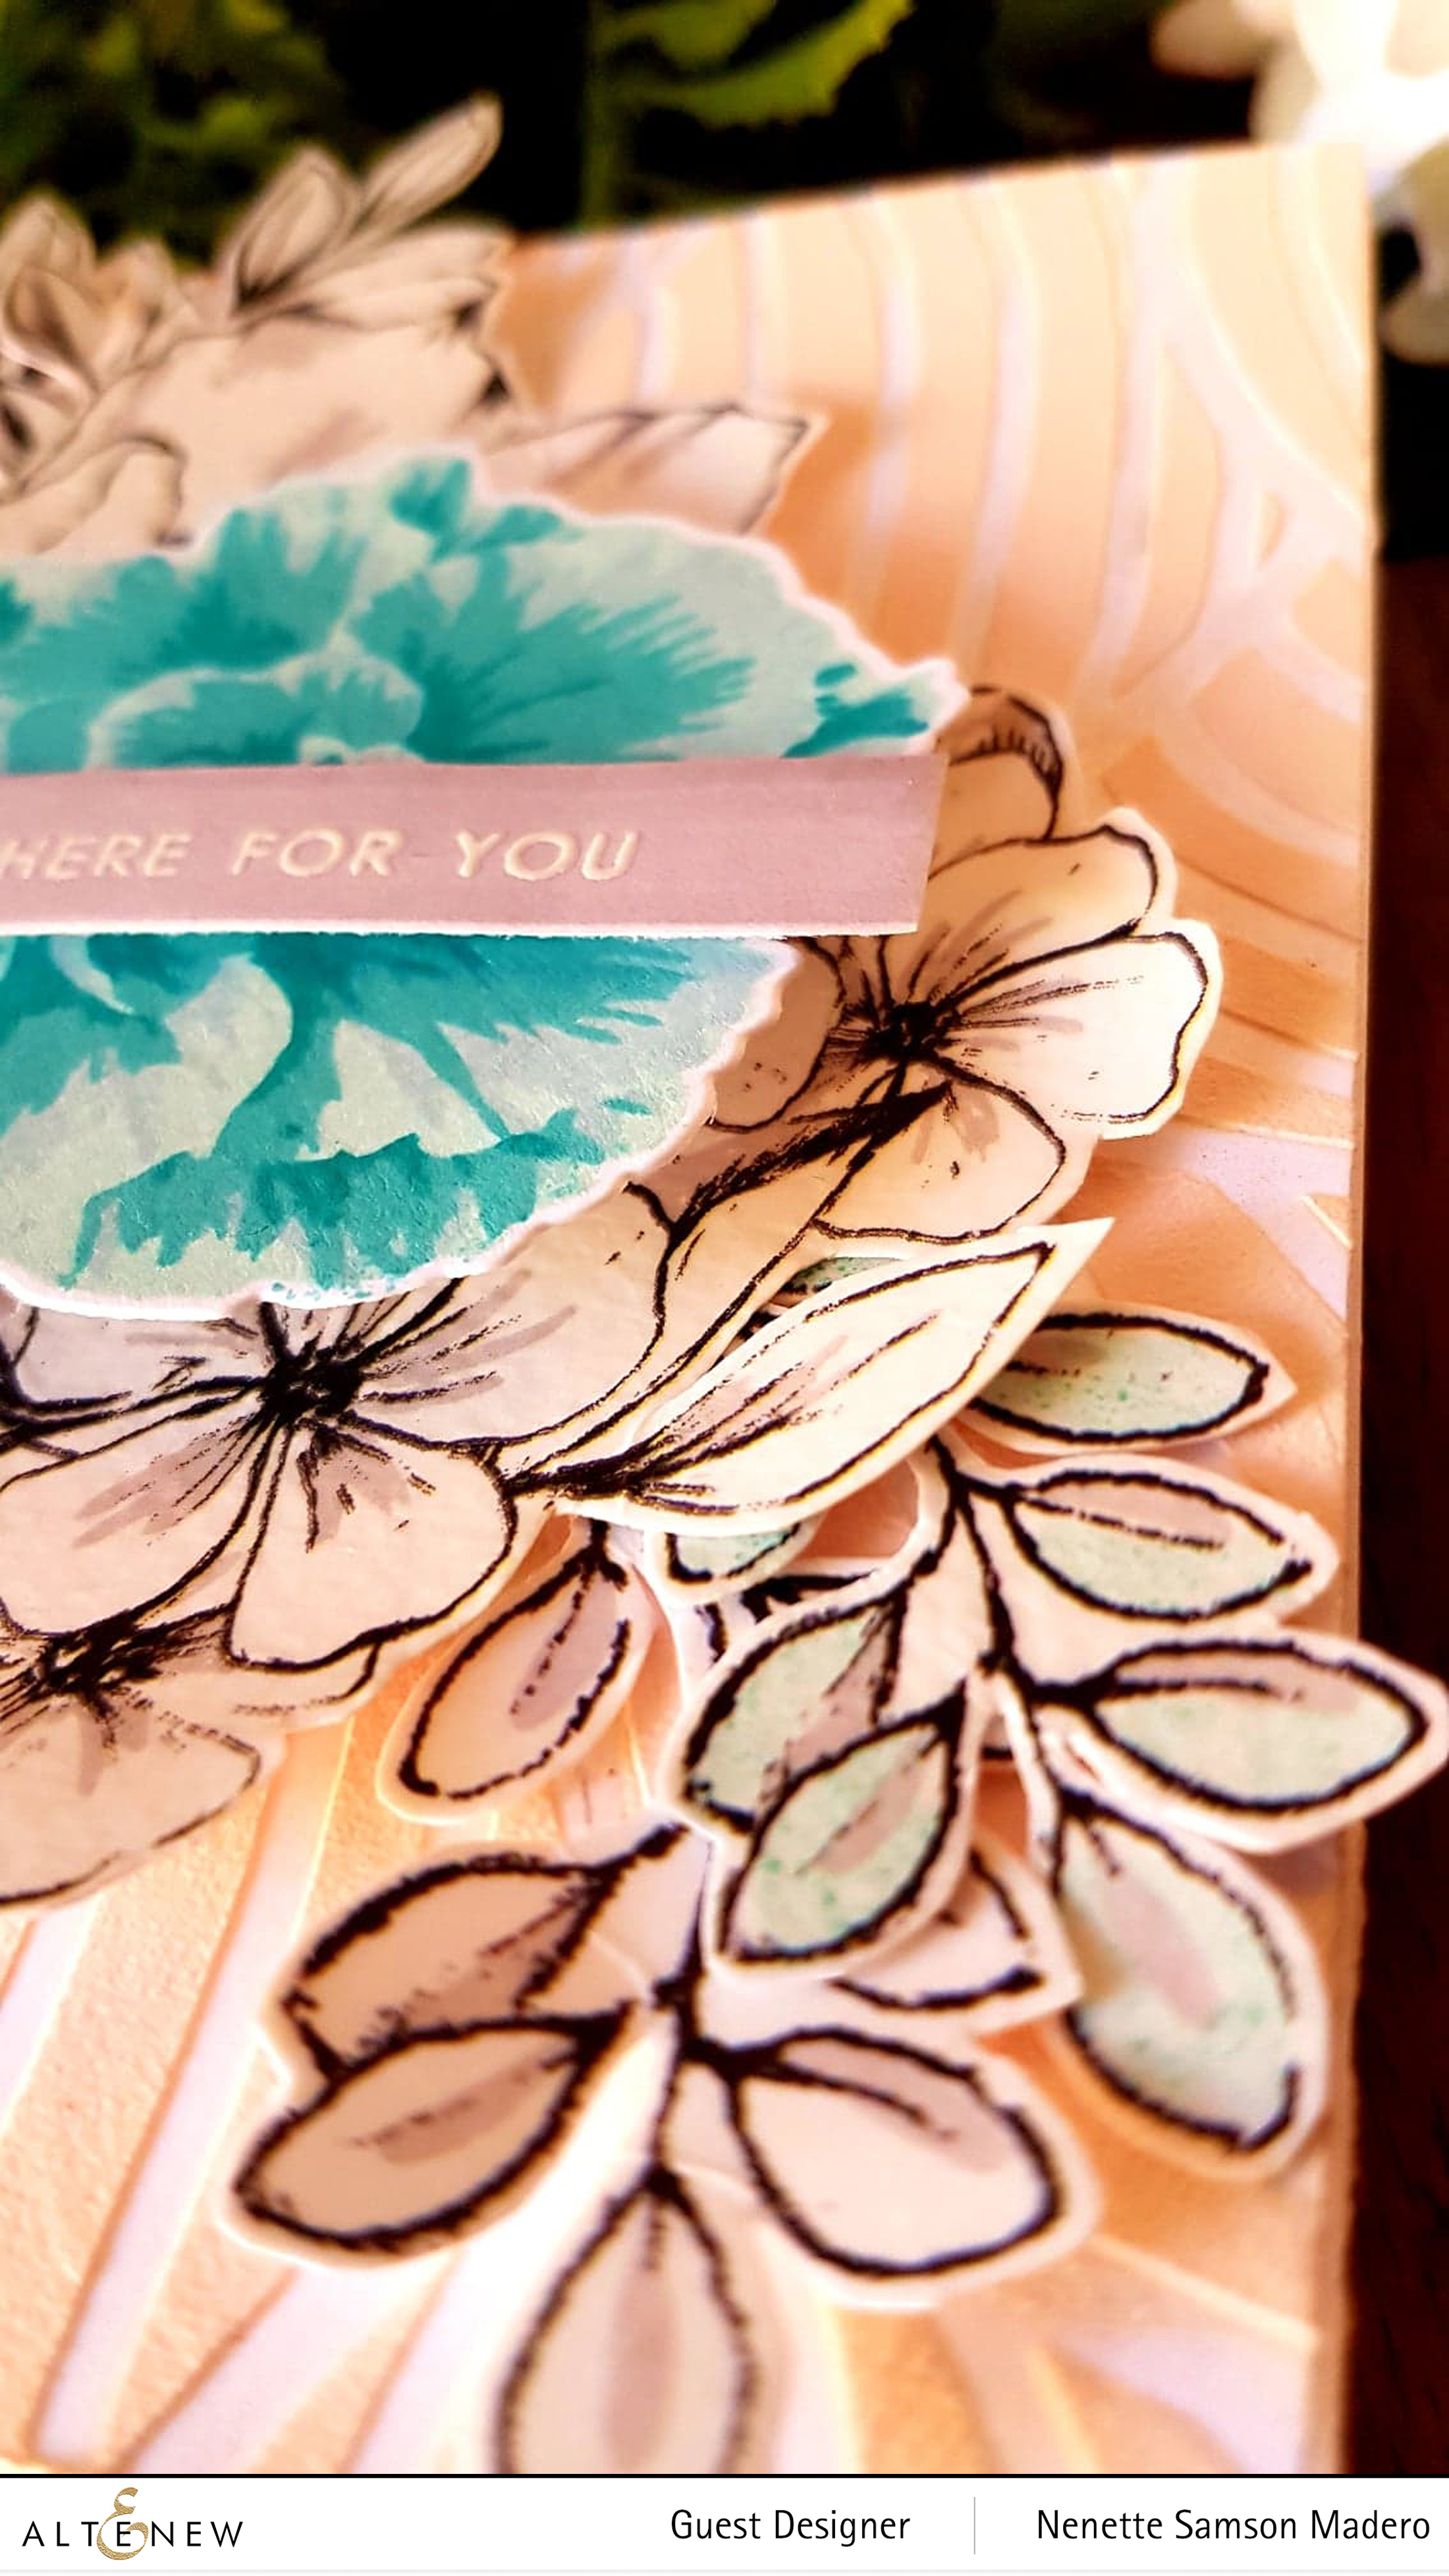
This is another quick and easy card to create. I first created a background. This stamp set is so dainty and soft so I wanted to create a card that represents this stamp set. The images were stamped to cover the entire cardstock. For the shadow stamp, Limestone dye ink was used to keep it soft. The Mountain Mist and Volcano Lake were layered using the leaves and stem stamp sets then the Iceberg and Eastern Sky dye inks were used for the flowers.
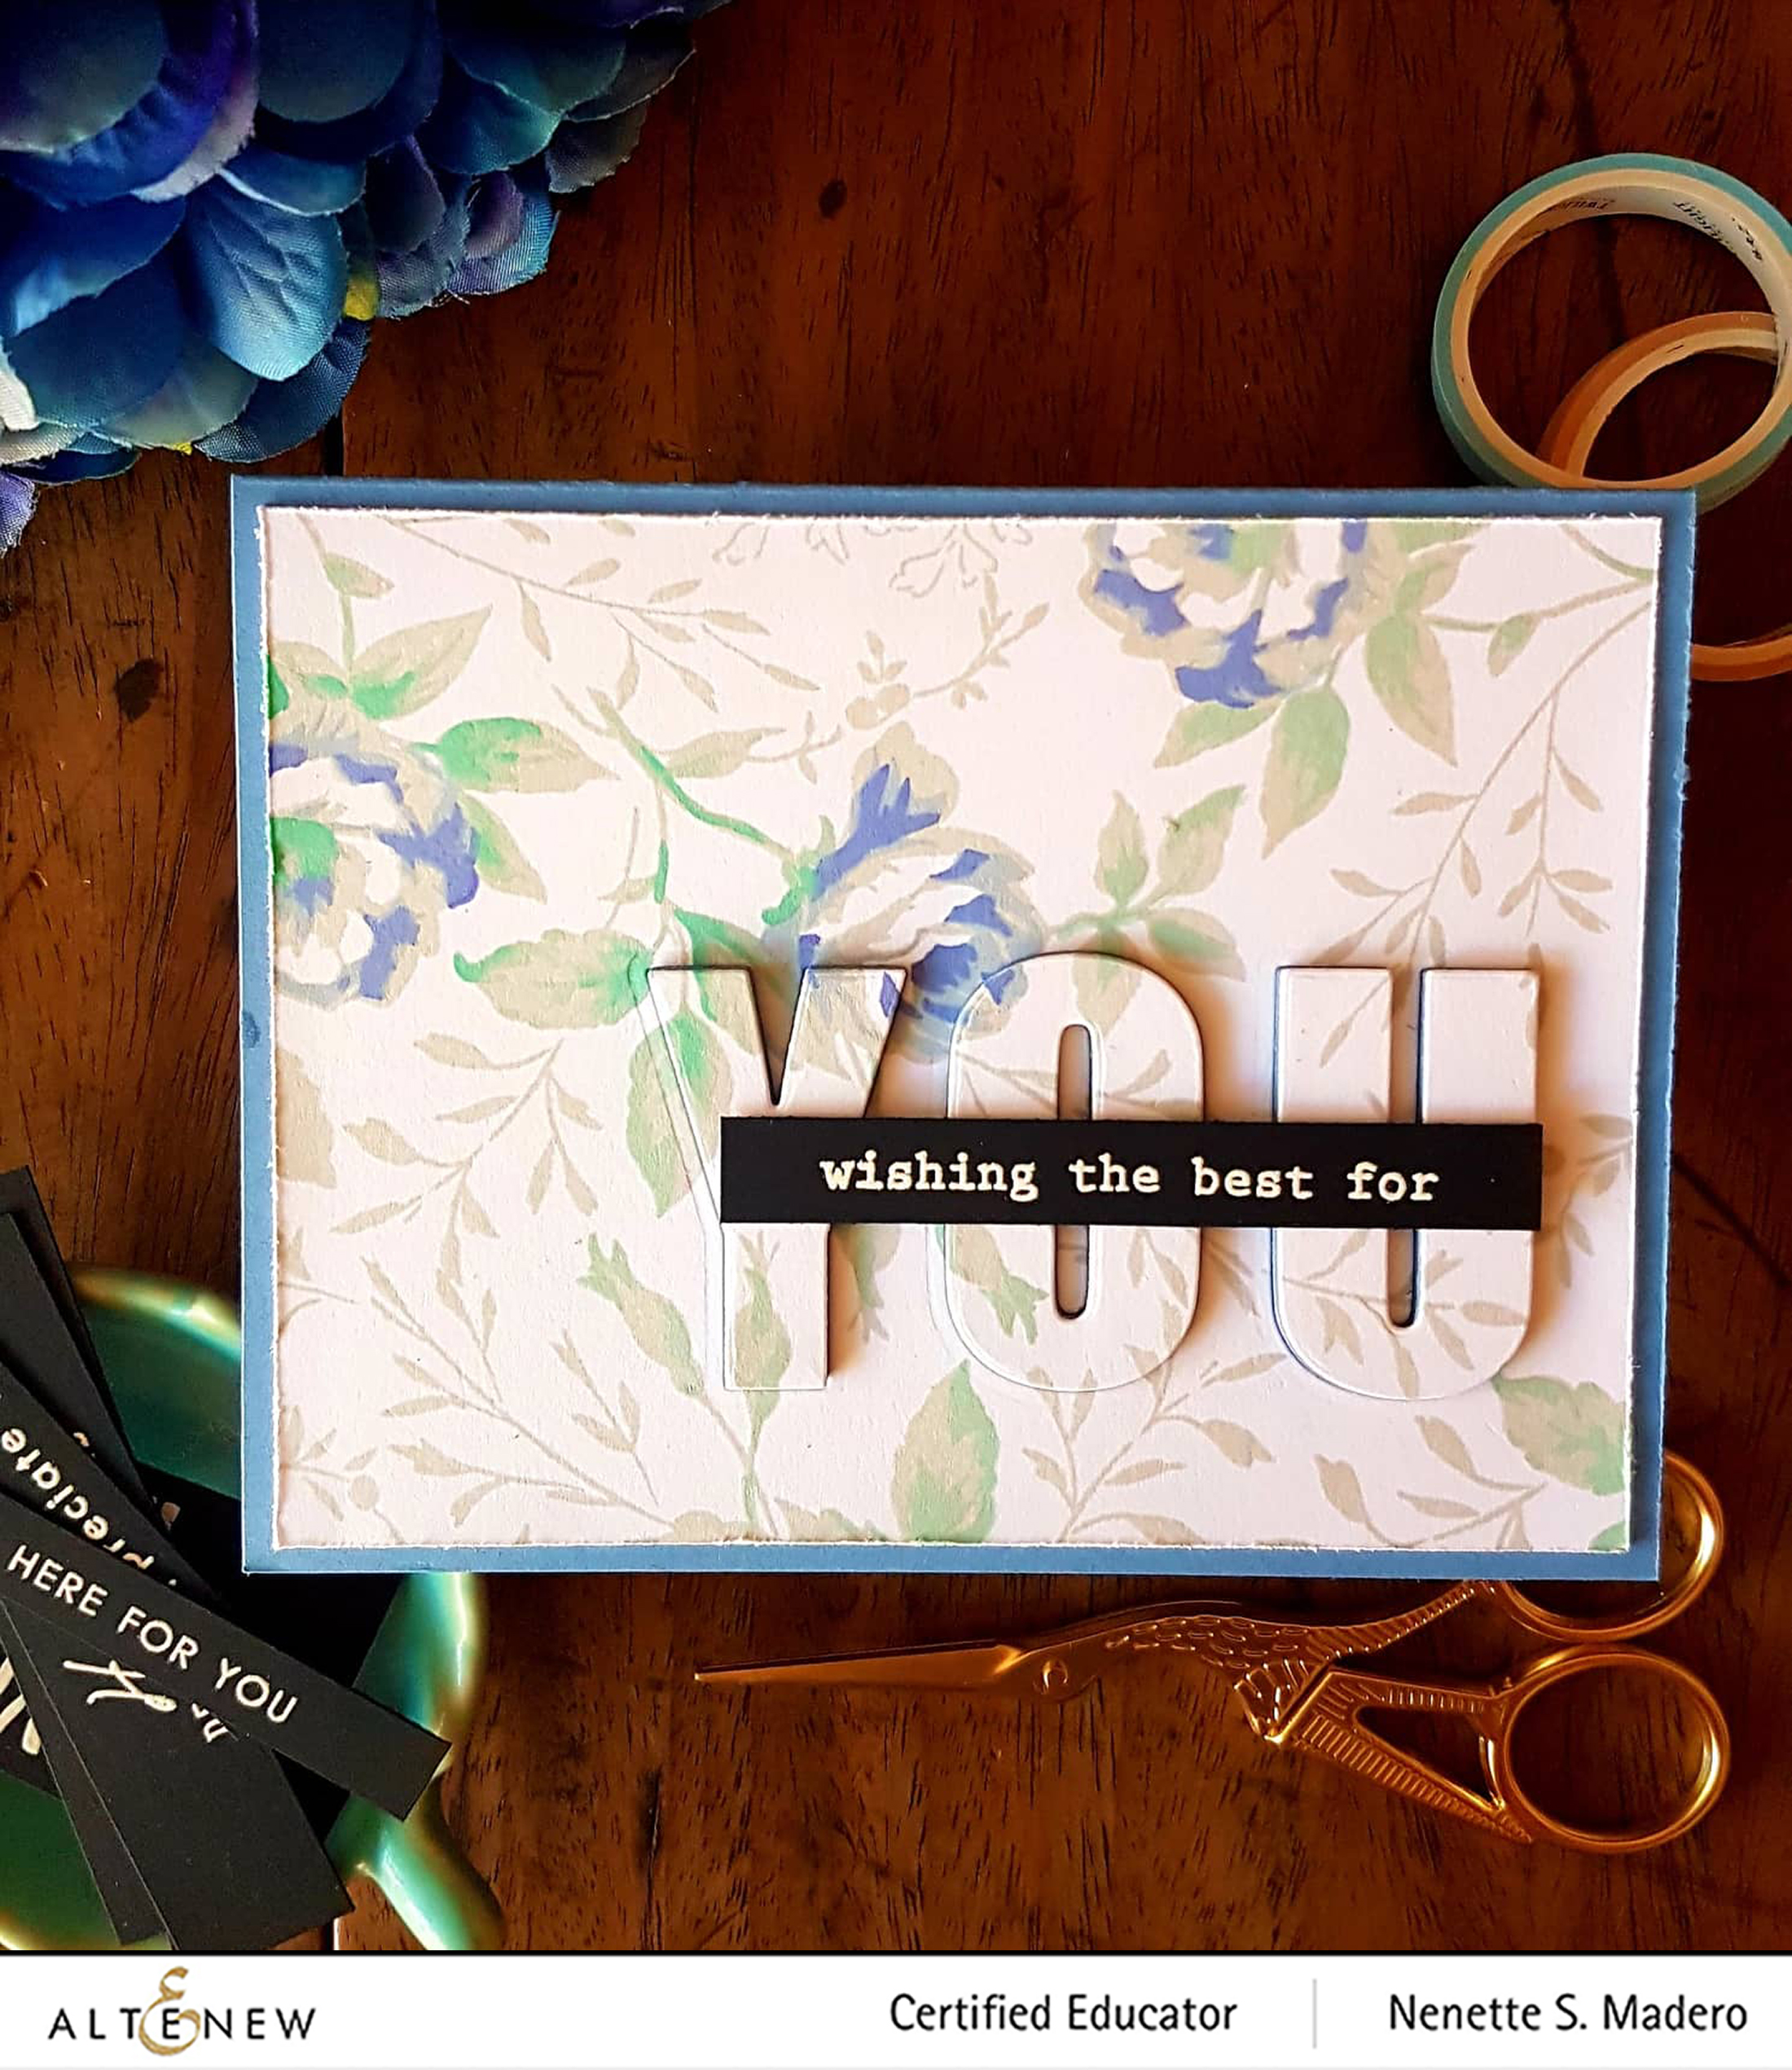
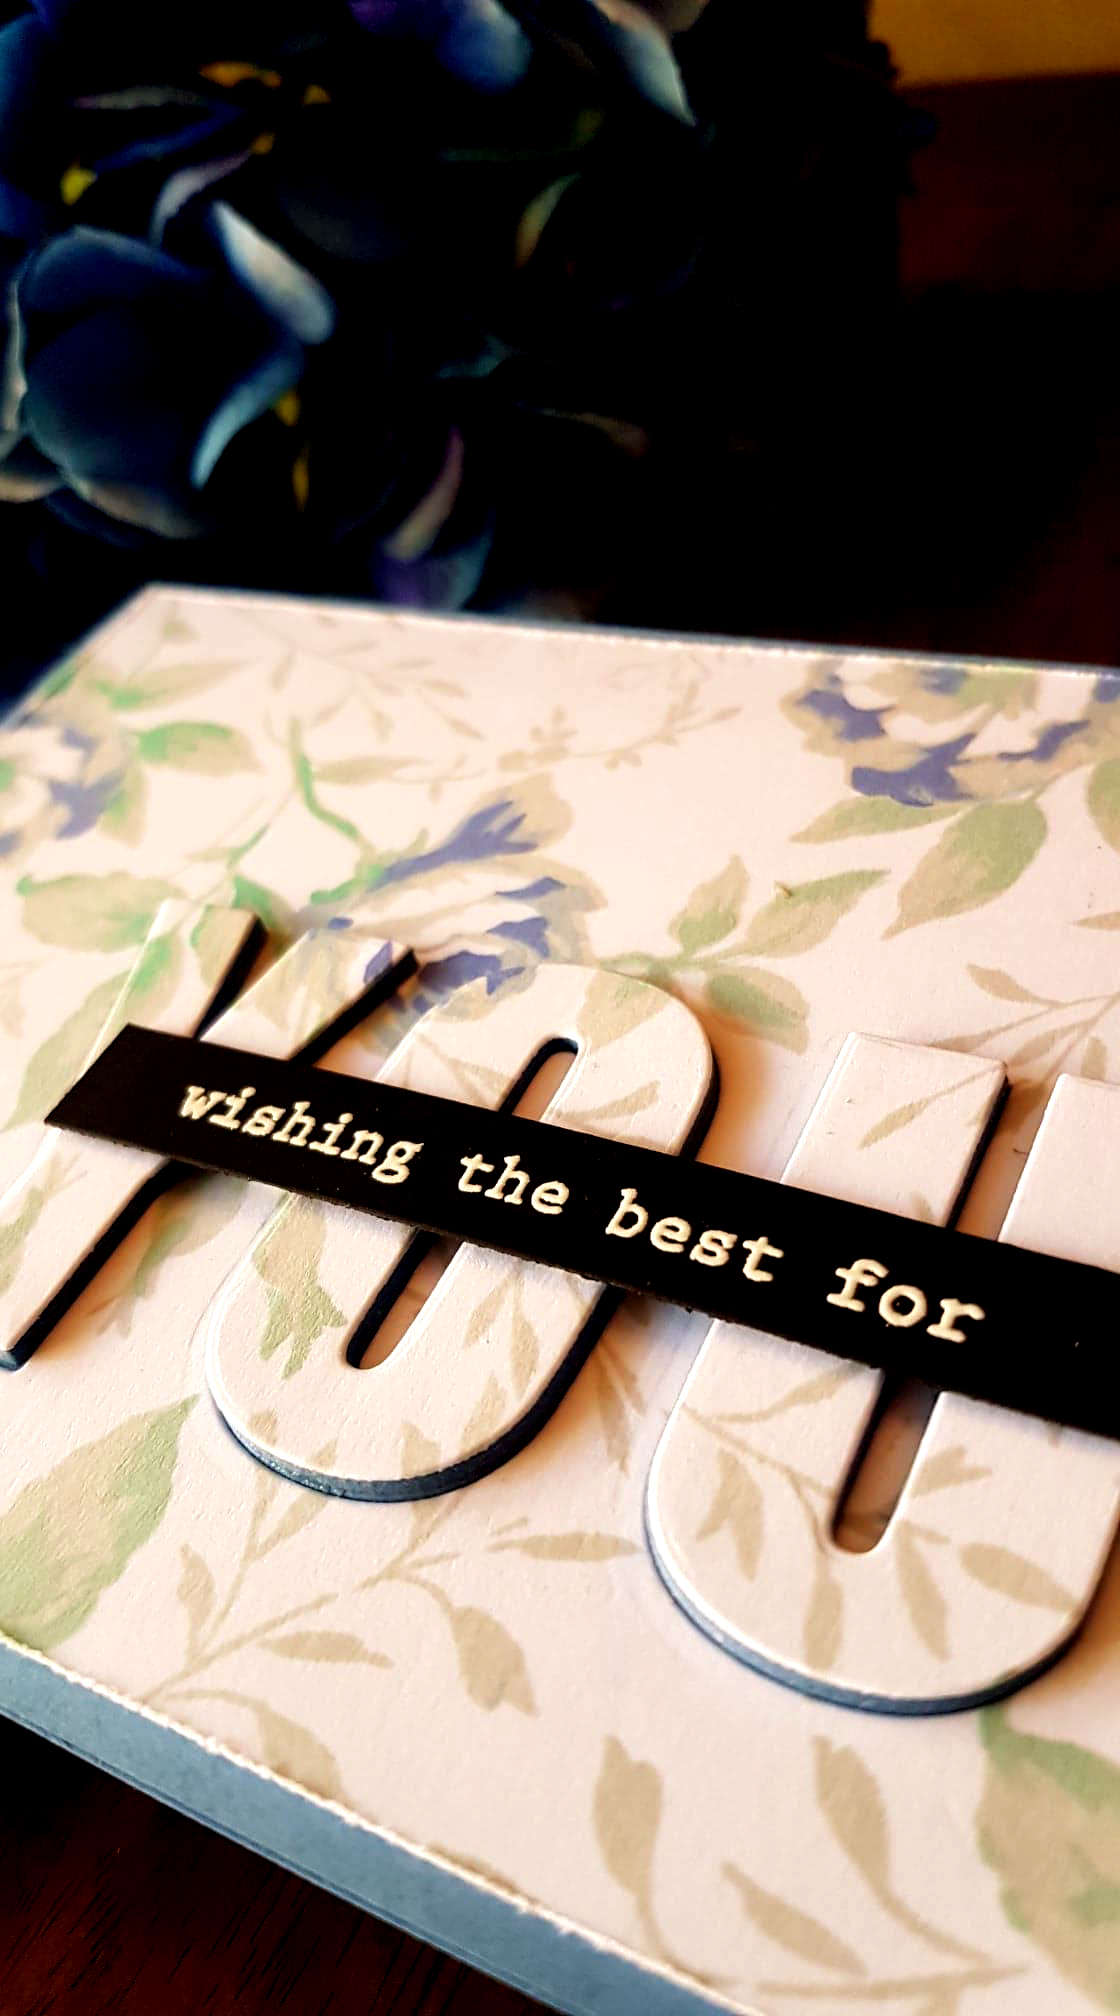
The letters Y, O and U from the Caps Bold Alpha was used to die cut the word on the lower right side of the card. Additional letters were die cut on plain CS and layered to add dimension. The sentiment from the You Are stamp set was stamped on black cardstock using Versamark ink then heat embossed using Pure White Crisp embossing powder. The strip was adhered on to the YOU using foam squares. Paper distresser was used on all sides of the panel and this was then glued onto a top folding A2 card base.
DISCOUNTS AND PRIZES
To celebrate this blog hop and to encourage more people to join, Altenew is giving away 20% discount on the following bundles from 7/19 – 7/21: LEVEL 1 CLASS BUNDLE and LEVEL 2 CLASS BUNDLE. This is your chance to take advantage of this great deal!!
Altenew is giving away a $30 gift certificate to 3 lucky winners! Please leave a comment on the Altenew Blog by 7/26/2019 for a chance to win. We’ll also draw a winner to receive a $15 gift certificate from the comments left on each designer’s blog on the blog hop list below. All winners will be announced on the Altenew blogs on 7/30/2019.
If you liked these cards, I would appreciate it if you can subscribe to my blog and follow me on Instagram @mylittleatticstudio. <3 Do leave a comment below and get a chance to win some giveaway prizes!
Next stop is the talented Vicki Finger! Thanks again for dropping by! ❤️
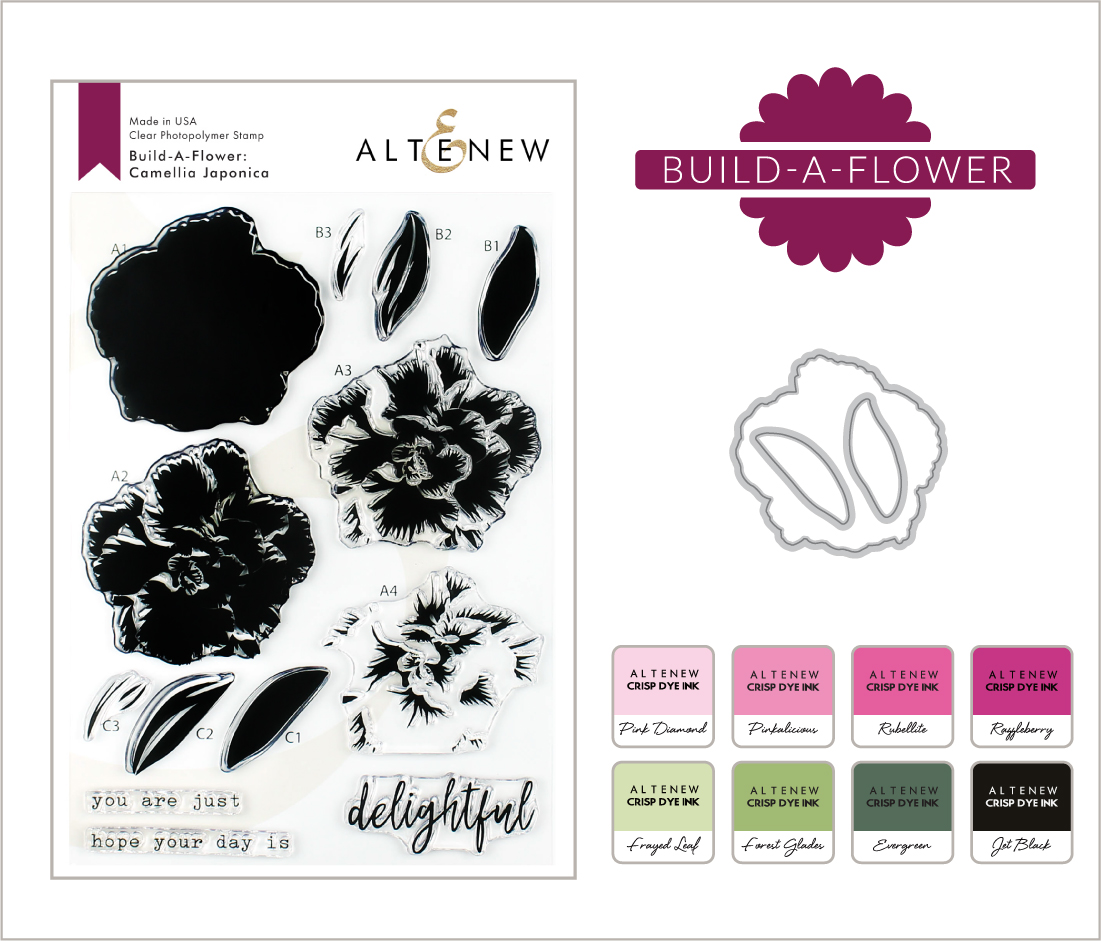
Hello everyone!!! I am so excited to be a part of this Altenew blog hop featuring the beautiful Altenew Build-A-Flower: Camellia Japonica. Thank you so much to the uber-talented Jaycee Gaspar for leading all of you to my blog. If you somehow get lost, the entire blog hop list can be found at the end of this post.
The flower image is pretty huge… approximately 2.75″ x 2.5″ so it’s prefect as a focal point in any card design. Below you will find 5 ways on how to use this stamp set.
For this first card, I wanted to create a shadow box card. I fussy cut the flowers and leaves of the Botanical Rhapsody washi tape that was stuck to white CS for easy cutting. I stamped 3 Build a Flower Japonica images using Mountain Mist, Volcano Lake, Aqualicious and Lagoon crisp dye inks. I arranged the 3 flowers (always choose odd numbers when placing the focal images on a card—a design principle I learned during my scrapbooking days 🙂 ) then I covered up the space with the cut out washi images. I made sure not to adhere the tips of the leaves to give it a more natural feel.
I just love the sentiments from the One Day At A Time stamp set… such uplifting messages!!! The sentiment was stamped on vellum using Versamark Ink and Rose Gold Embossing powder. 2 stitched rectangle scallop frames were die cut from teal cardstock and the following were stuck to each other: frame, transparency, vellum, frame. These served as the cover of the shadow box. Foam tape was placed on the edges of the frame and adhered to the floral panel then was adhered to a side folding A2 card front.
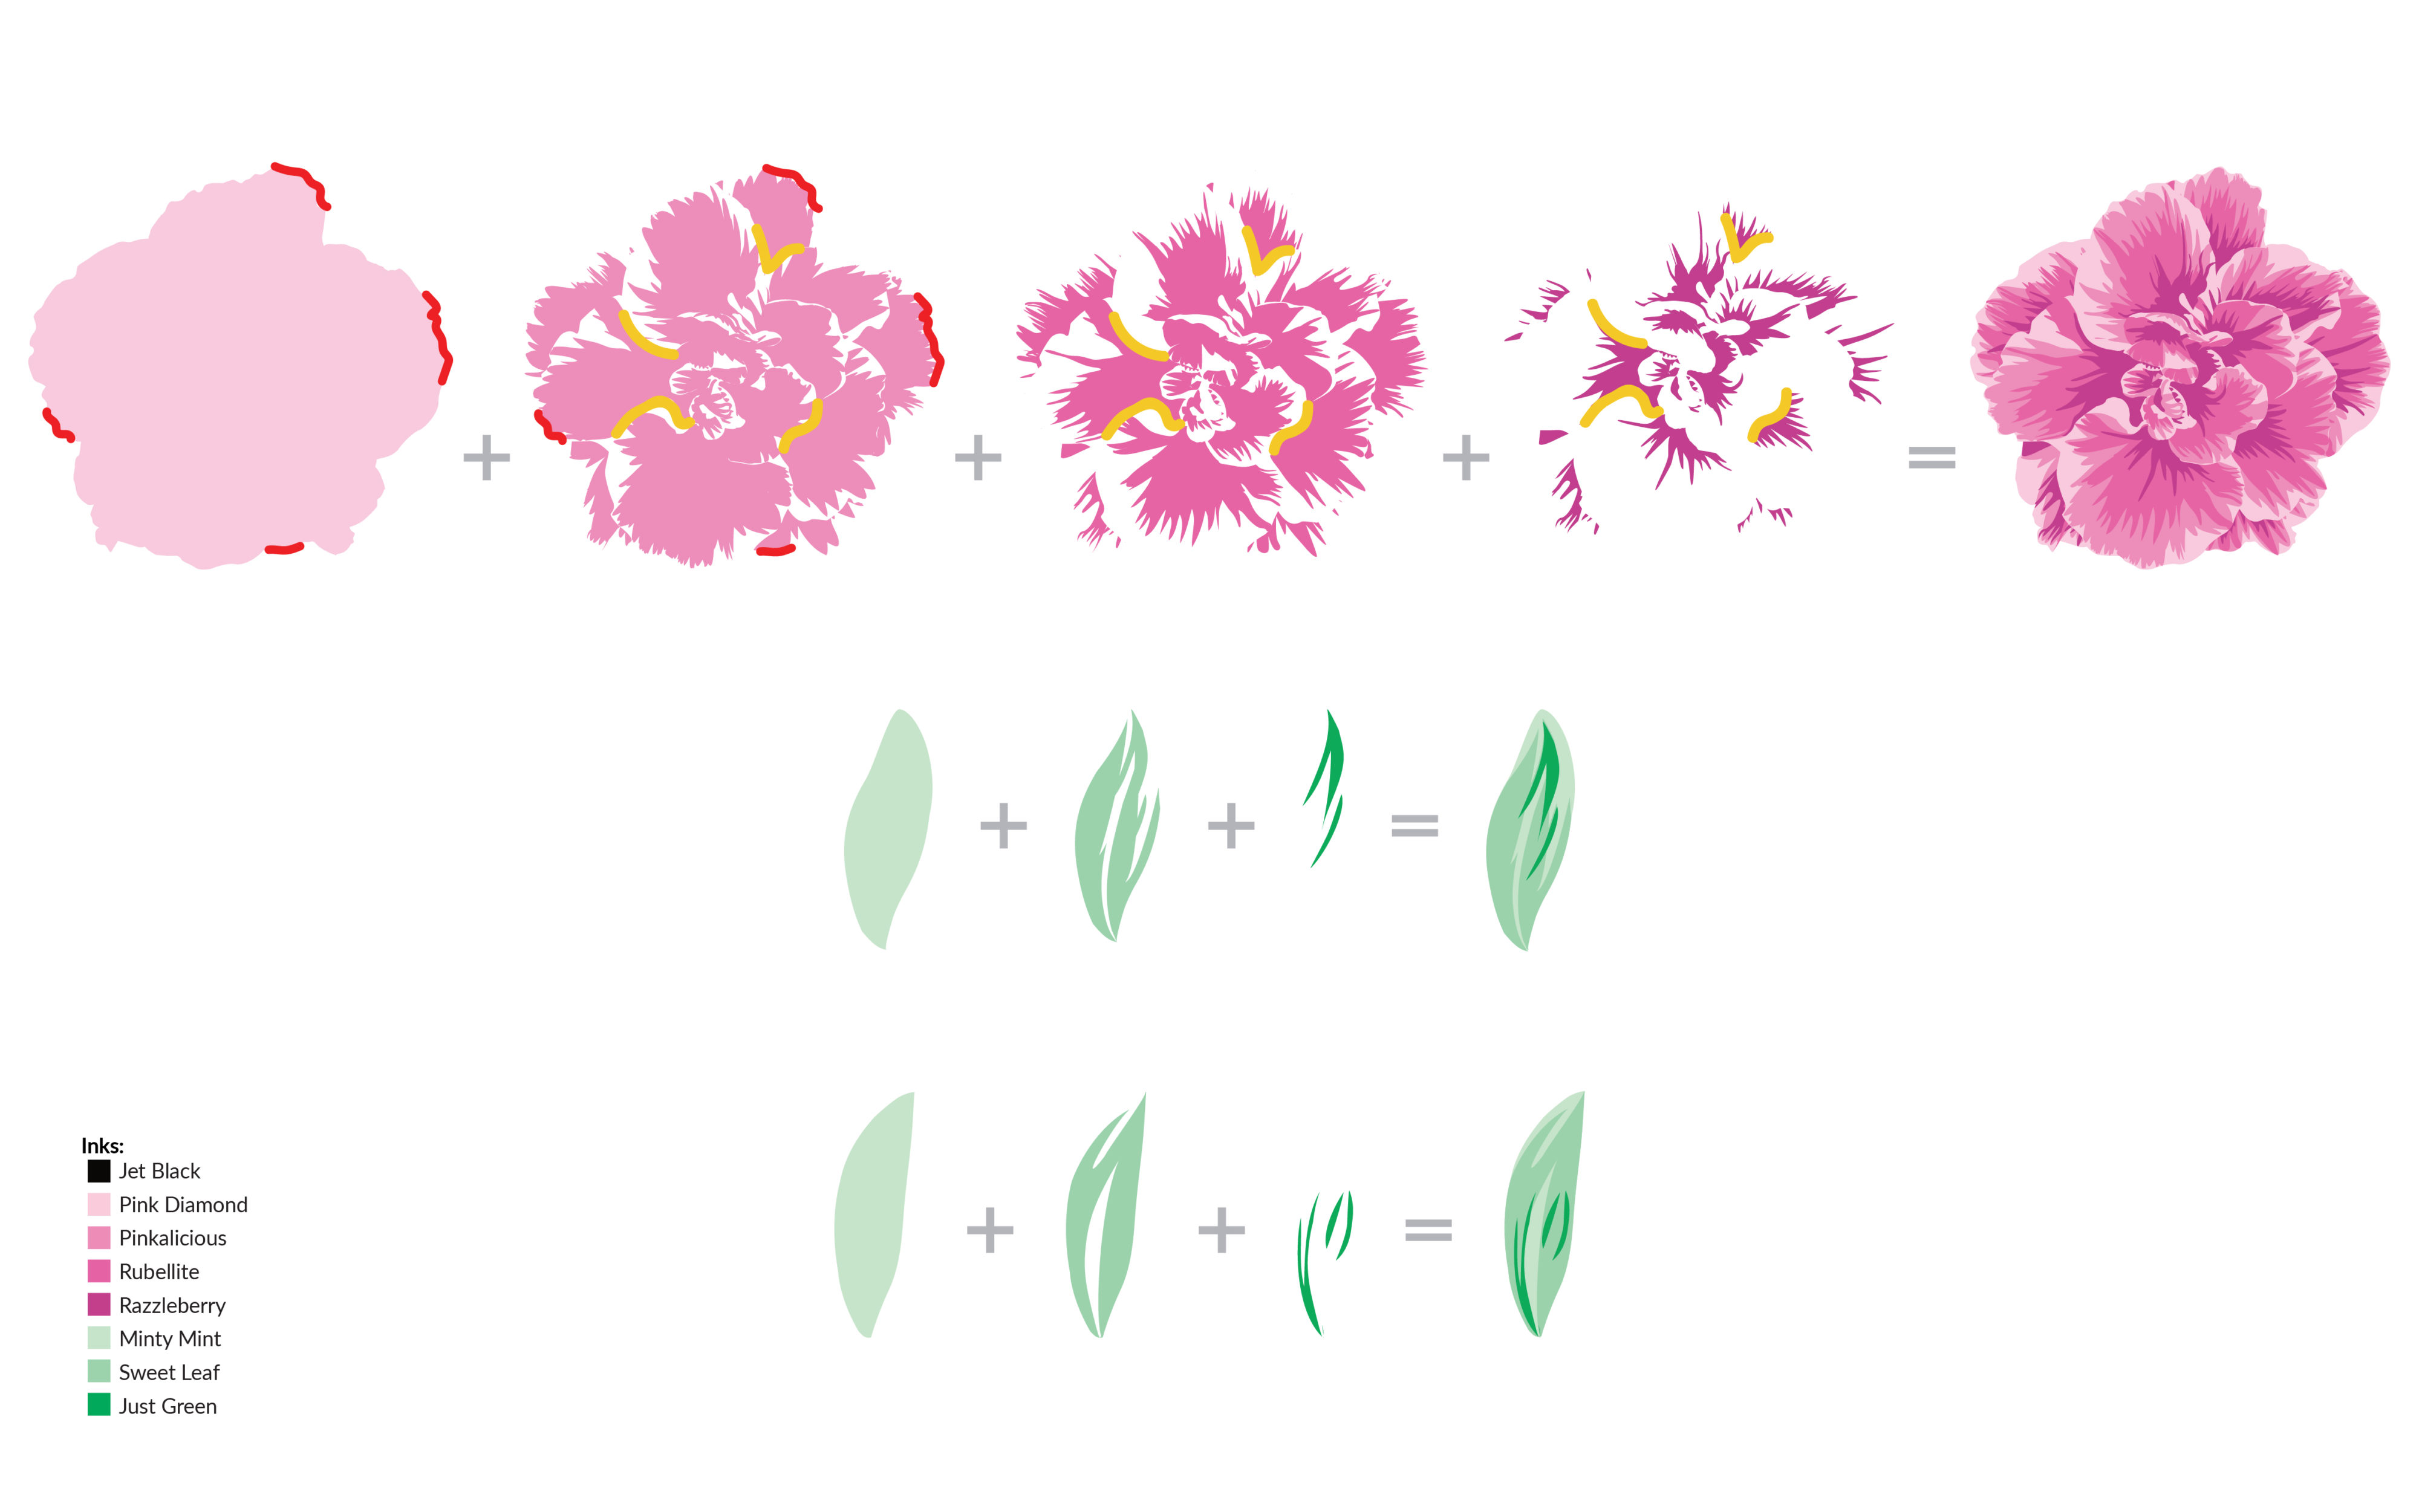
This see-through card was inspired by the amazing Jennifer Mcguire. You can check out her tutorial for this type of card here. I went ahead and stamped several of the BAF Camelia Japonica flower image with the Lapis Lazuli crip dye ink set ( Iceberg, Eastern Sky, Ultramarine and Azurite) and the leaves using Bamboo, Parrot and Olive crisp dye inks from the Tropical Forest set. Use the coordinating die cuts for the images. Below you will find the layering guide for this stamp set.
BUILD-A-FLOWER: CAMELLIA JAPONICA LAYERING GUIDE
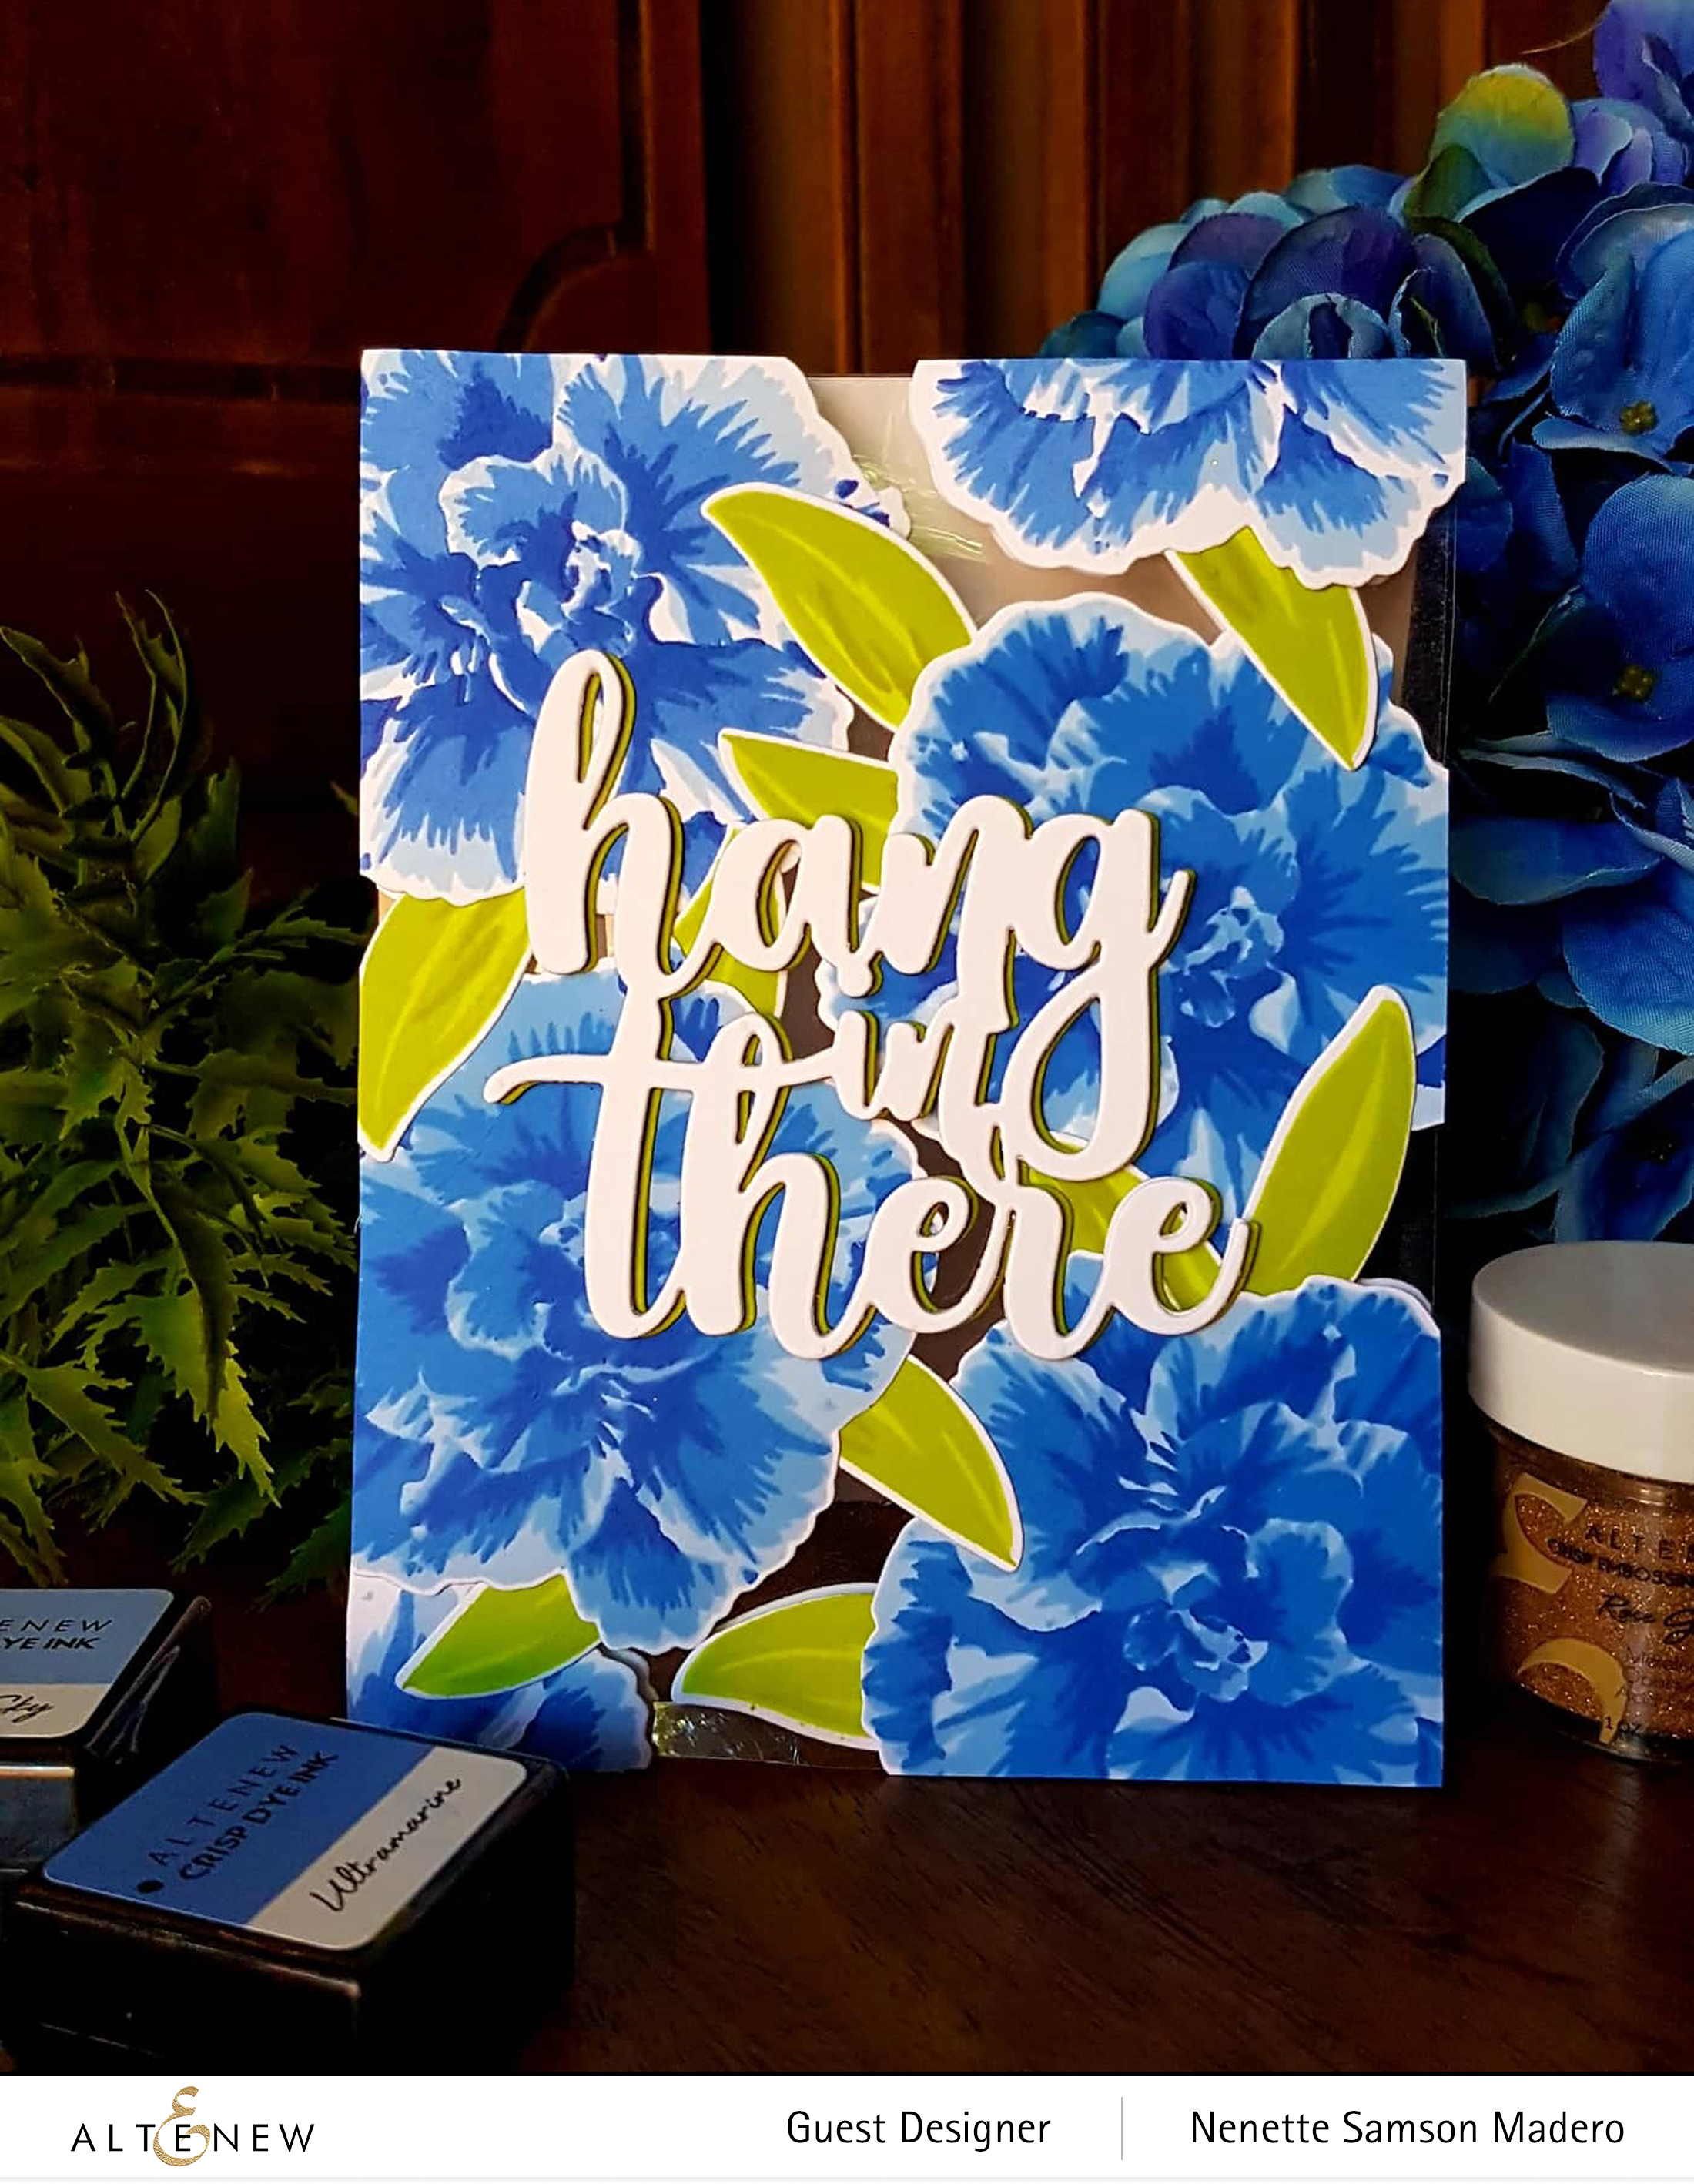
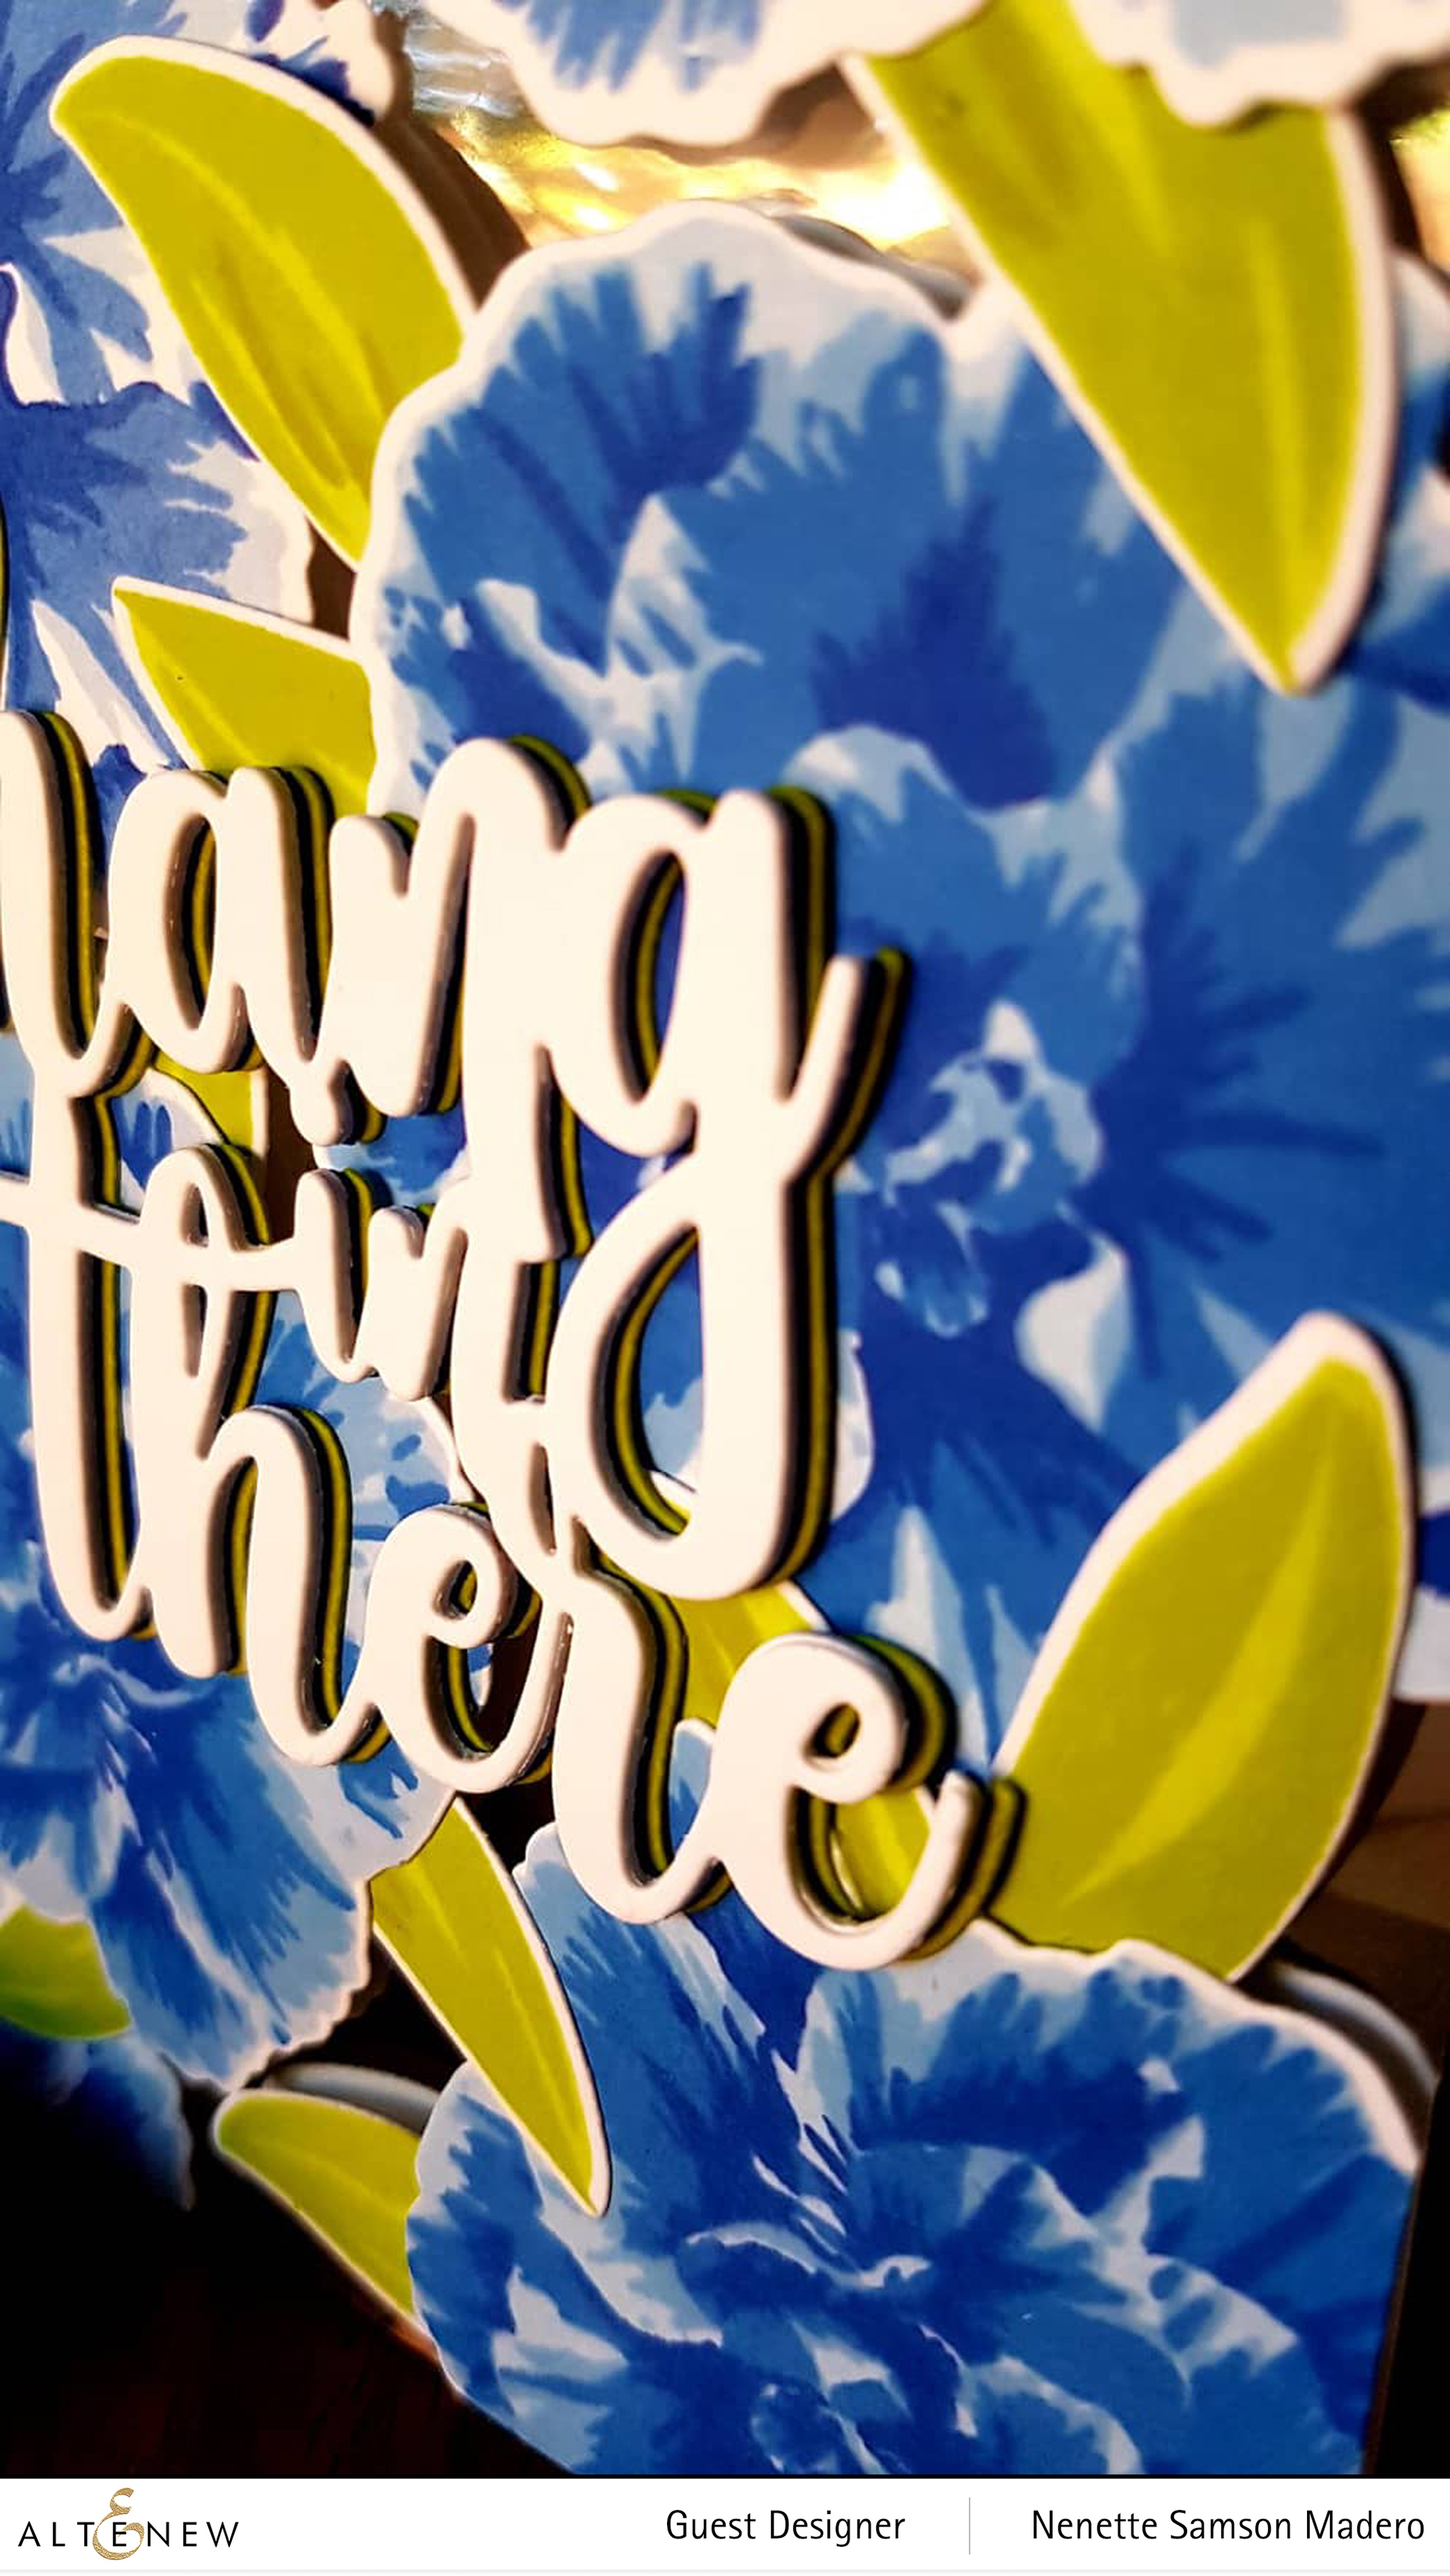
The images were arranged to cover a 5.5” x 4.25” cardstock. I made sure that the flowers and leaves were somehow connected to each other. When I was happy with the arrangement, I used Press’n Seal to pick up all the flowers and leaves together. I carefully glued to leaves to the flowers then added foam tape. Cut a transparency at 4.25” x 11” and score at 5.5”. Lay the floral card front on top of the transparency. In order to hide the foam tape, I die cut the leaves and flowers on white cardstock and glued them to the inside of the card. This way, all the foam tapes will be hidden. The excess leaves and flowers were then cut. I added a 4.25” x 5.5” cardstock on the transparency to create the inside of the card. The hang in there die was used to cut 5 pieces of cardstock. One was colored with the Parrot crisp dye ink using a blender brush. All 4 pieces were adhered to each other using adhesive and the colored layer was slightly shifted to the right to create a shadow.
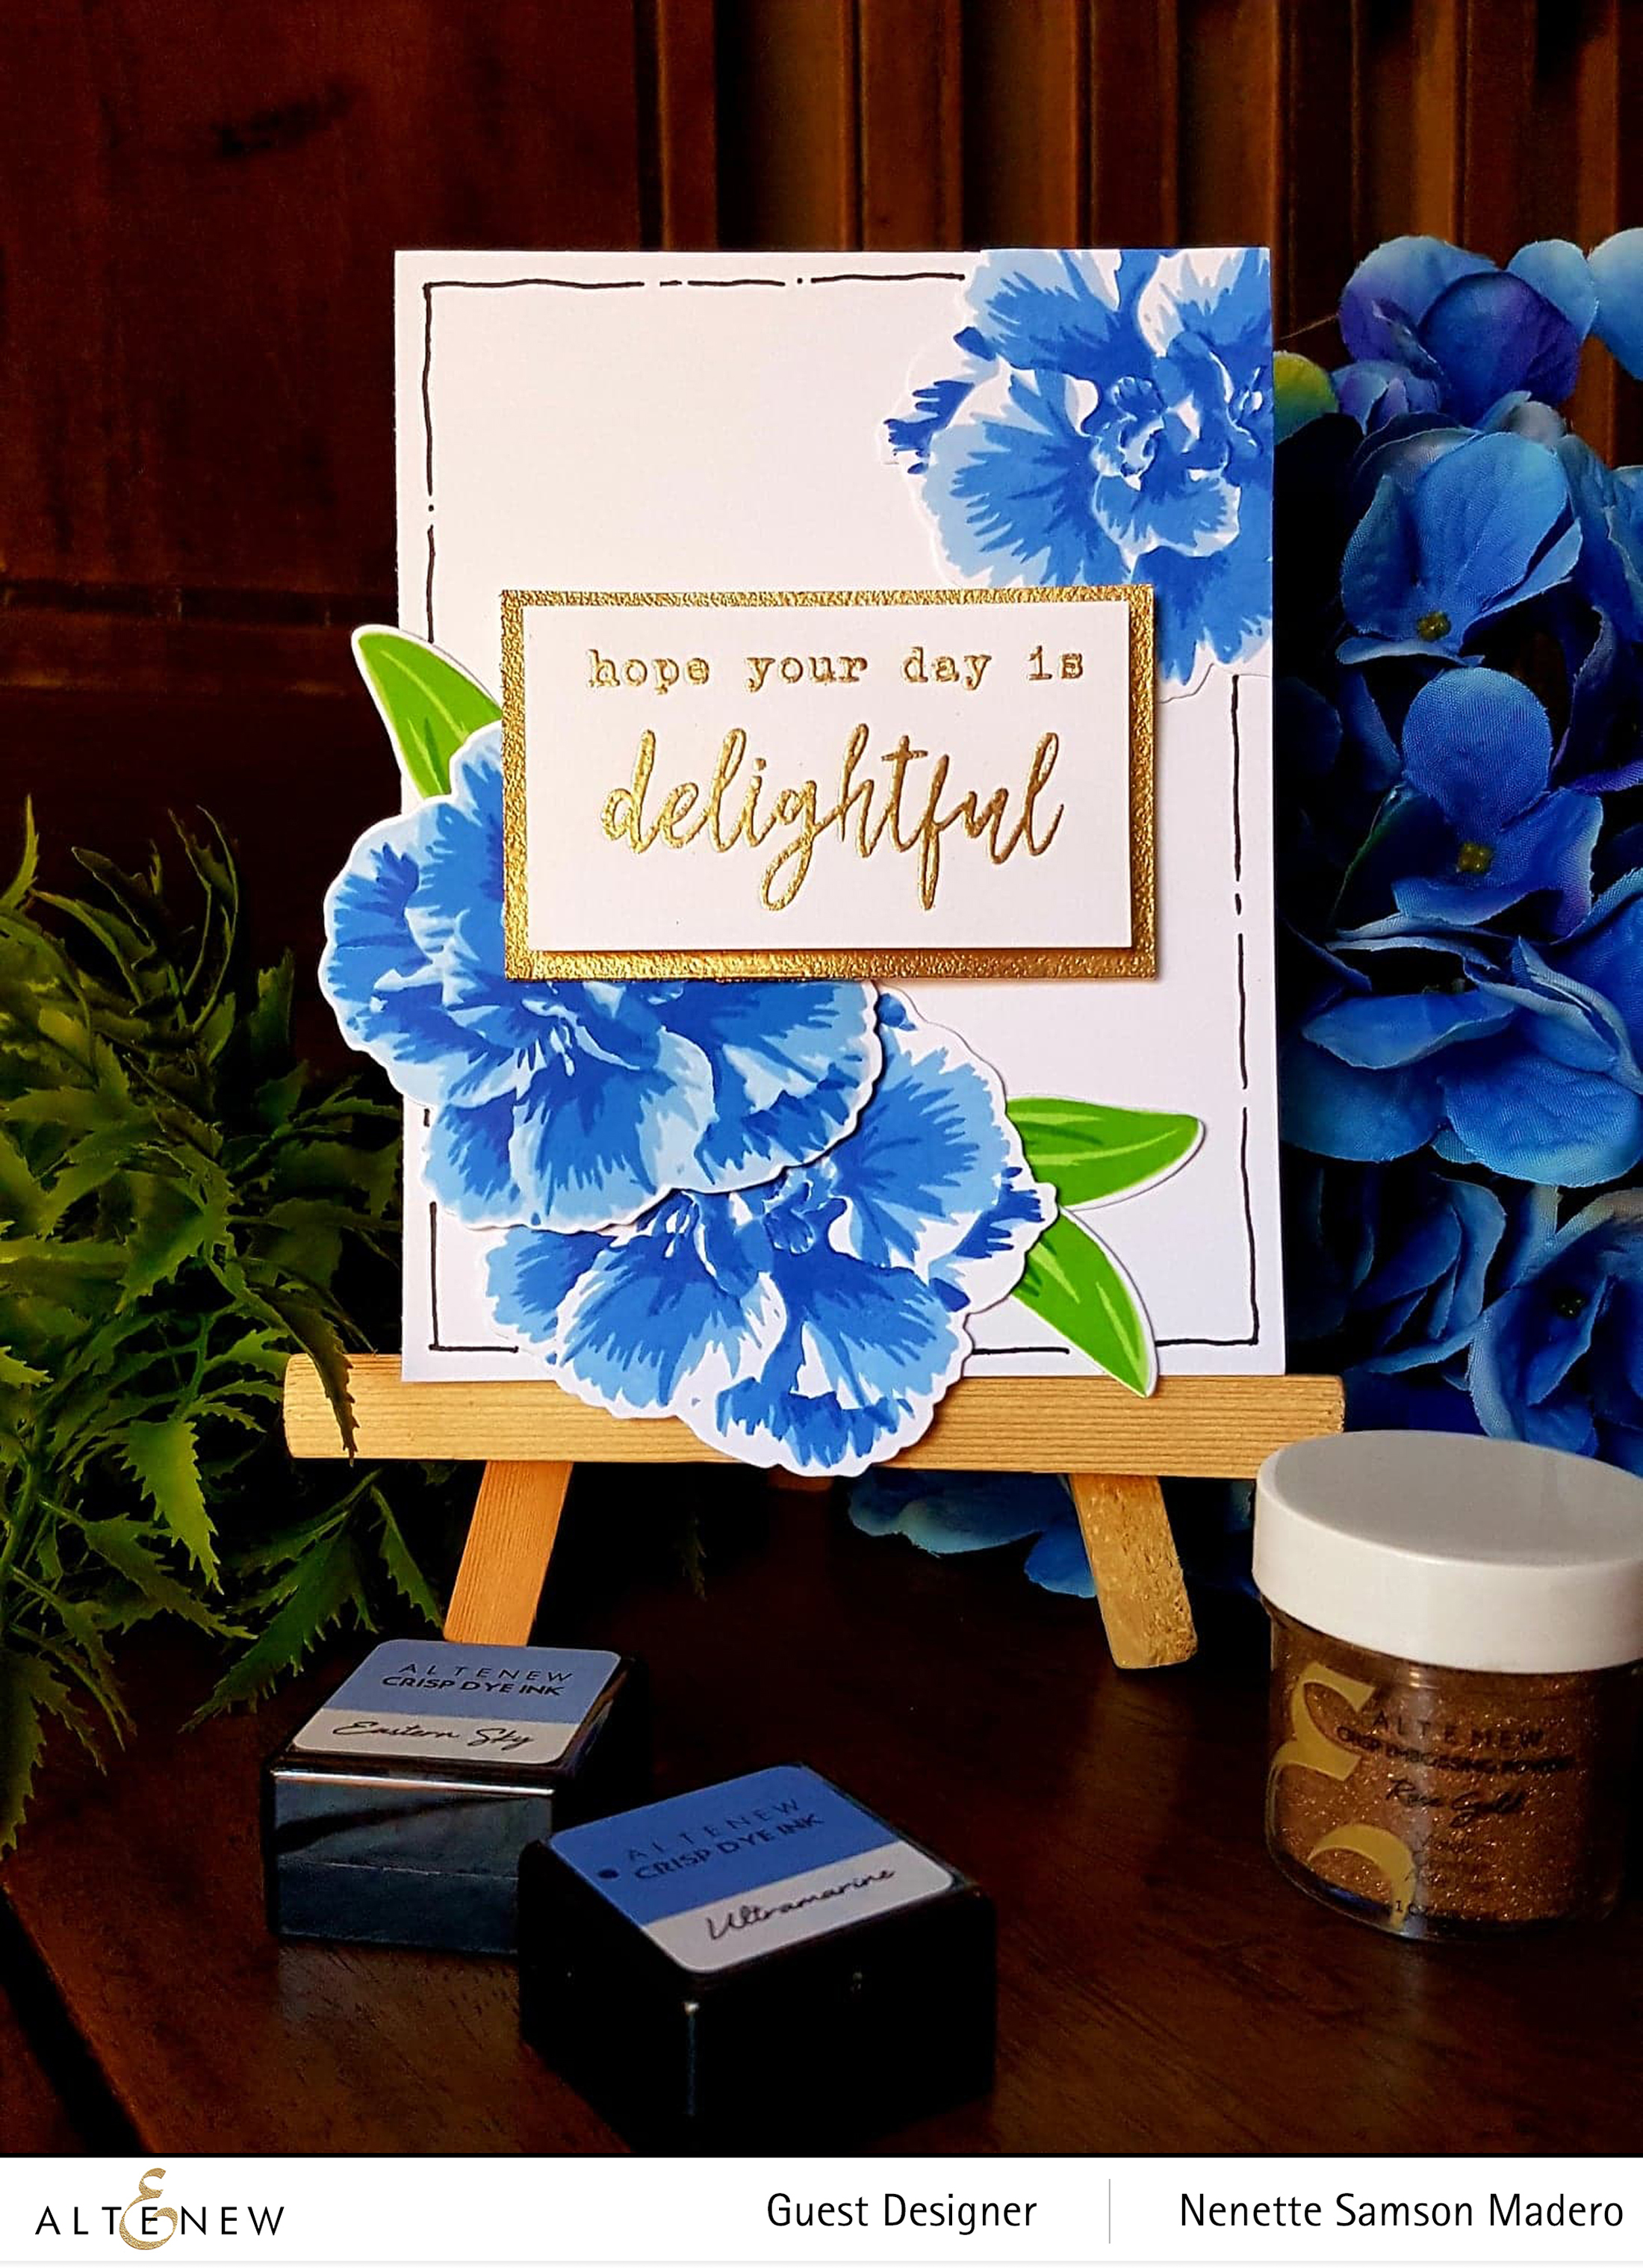
HOPE YOUR DAY IS DELIGHTFUL CARD
MATERIALS:
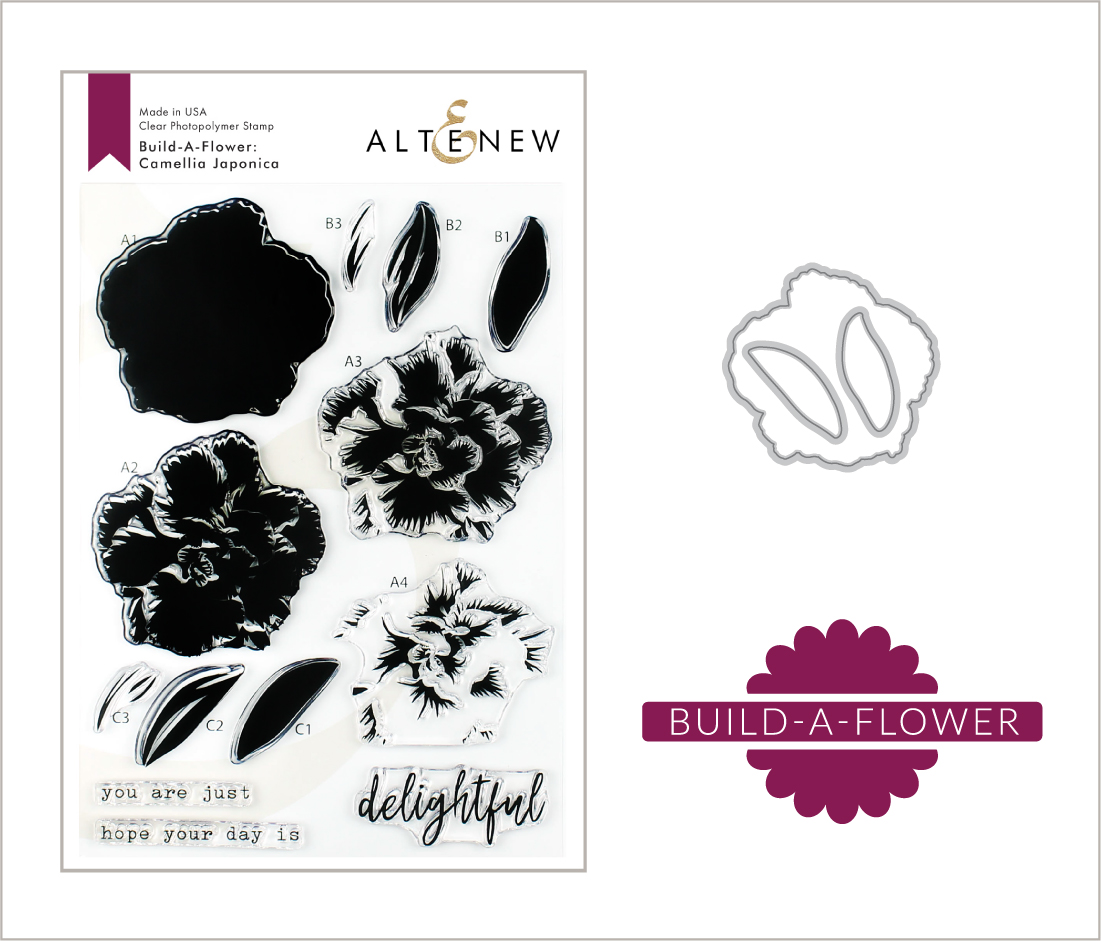
STAMP AND DIE: Build-A-Flower: Camellia Japonica Stamp and Die set
I wanted to make a card that was easy to assemble. Since I already had extra stamped flowers, this card was finished in 5 minutes. The 3 flowers were arranged on opposite corners of the A2 top folding card front. The sentiment from the same stamp set was embossed using Rose Gold embossing powder. A gold mat was created by inking the paper with Versamark Ink then embossing it with the same embossing powder. The sentiment and flowers were adhered to the card front using foam tape. A black border was hand-drawn to frame the card. Such a quick and easy card to create!
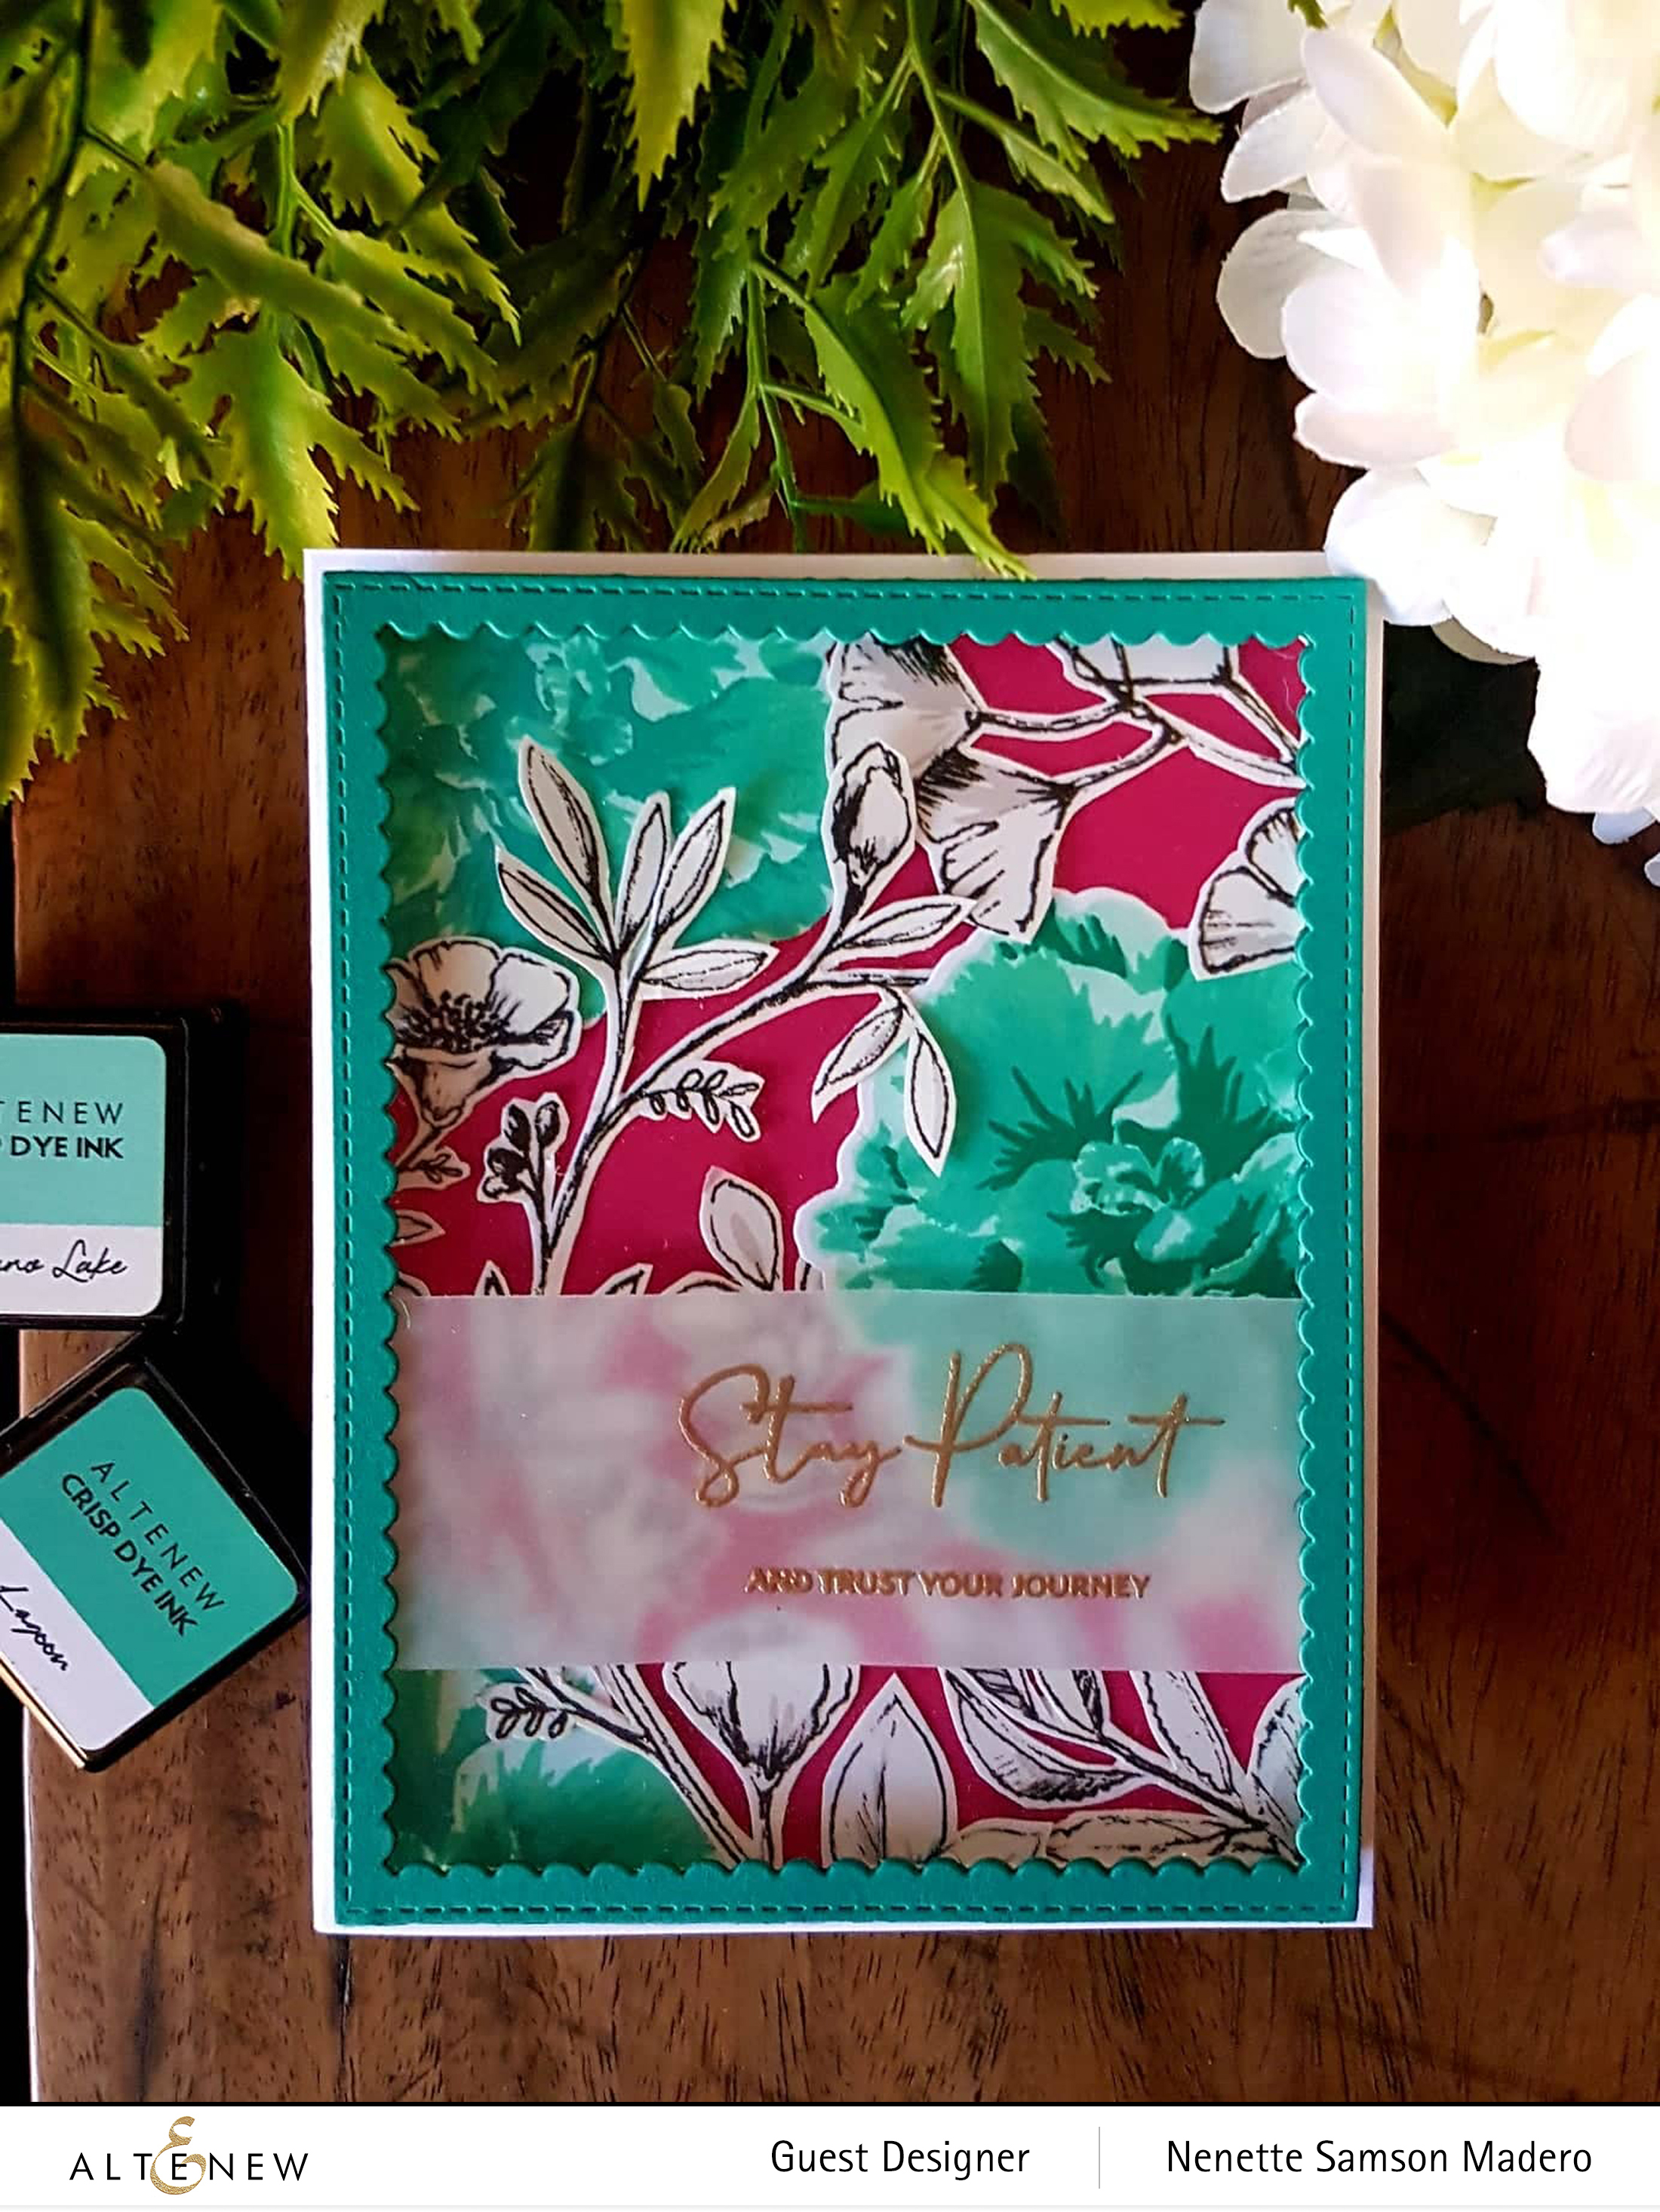
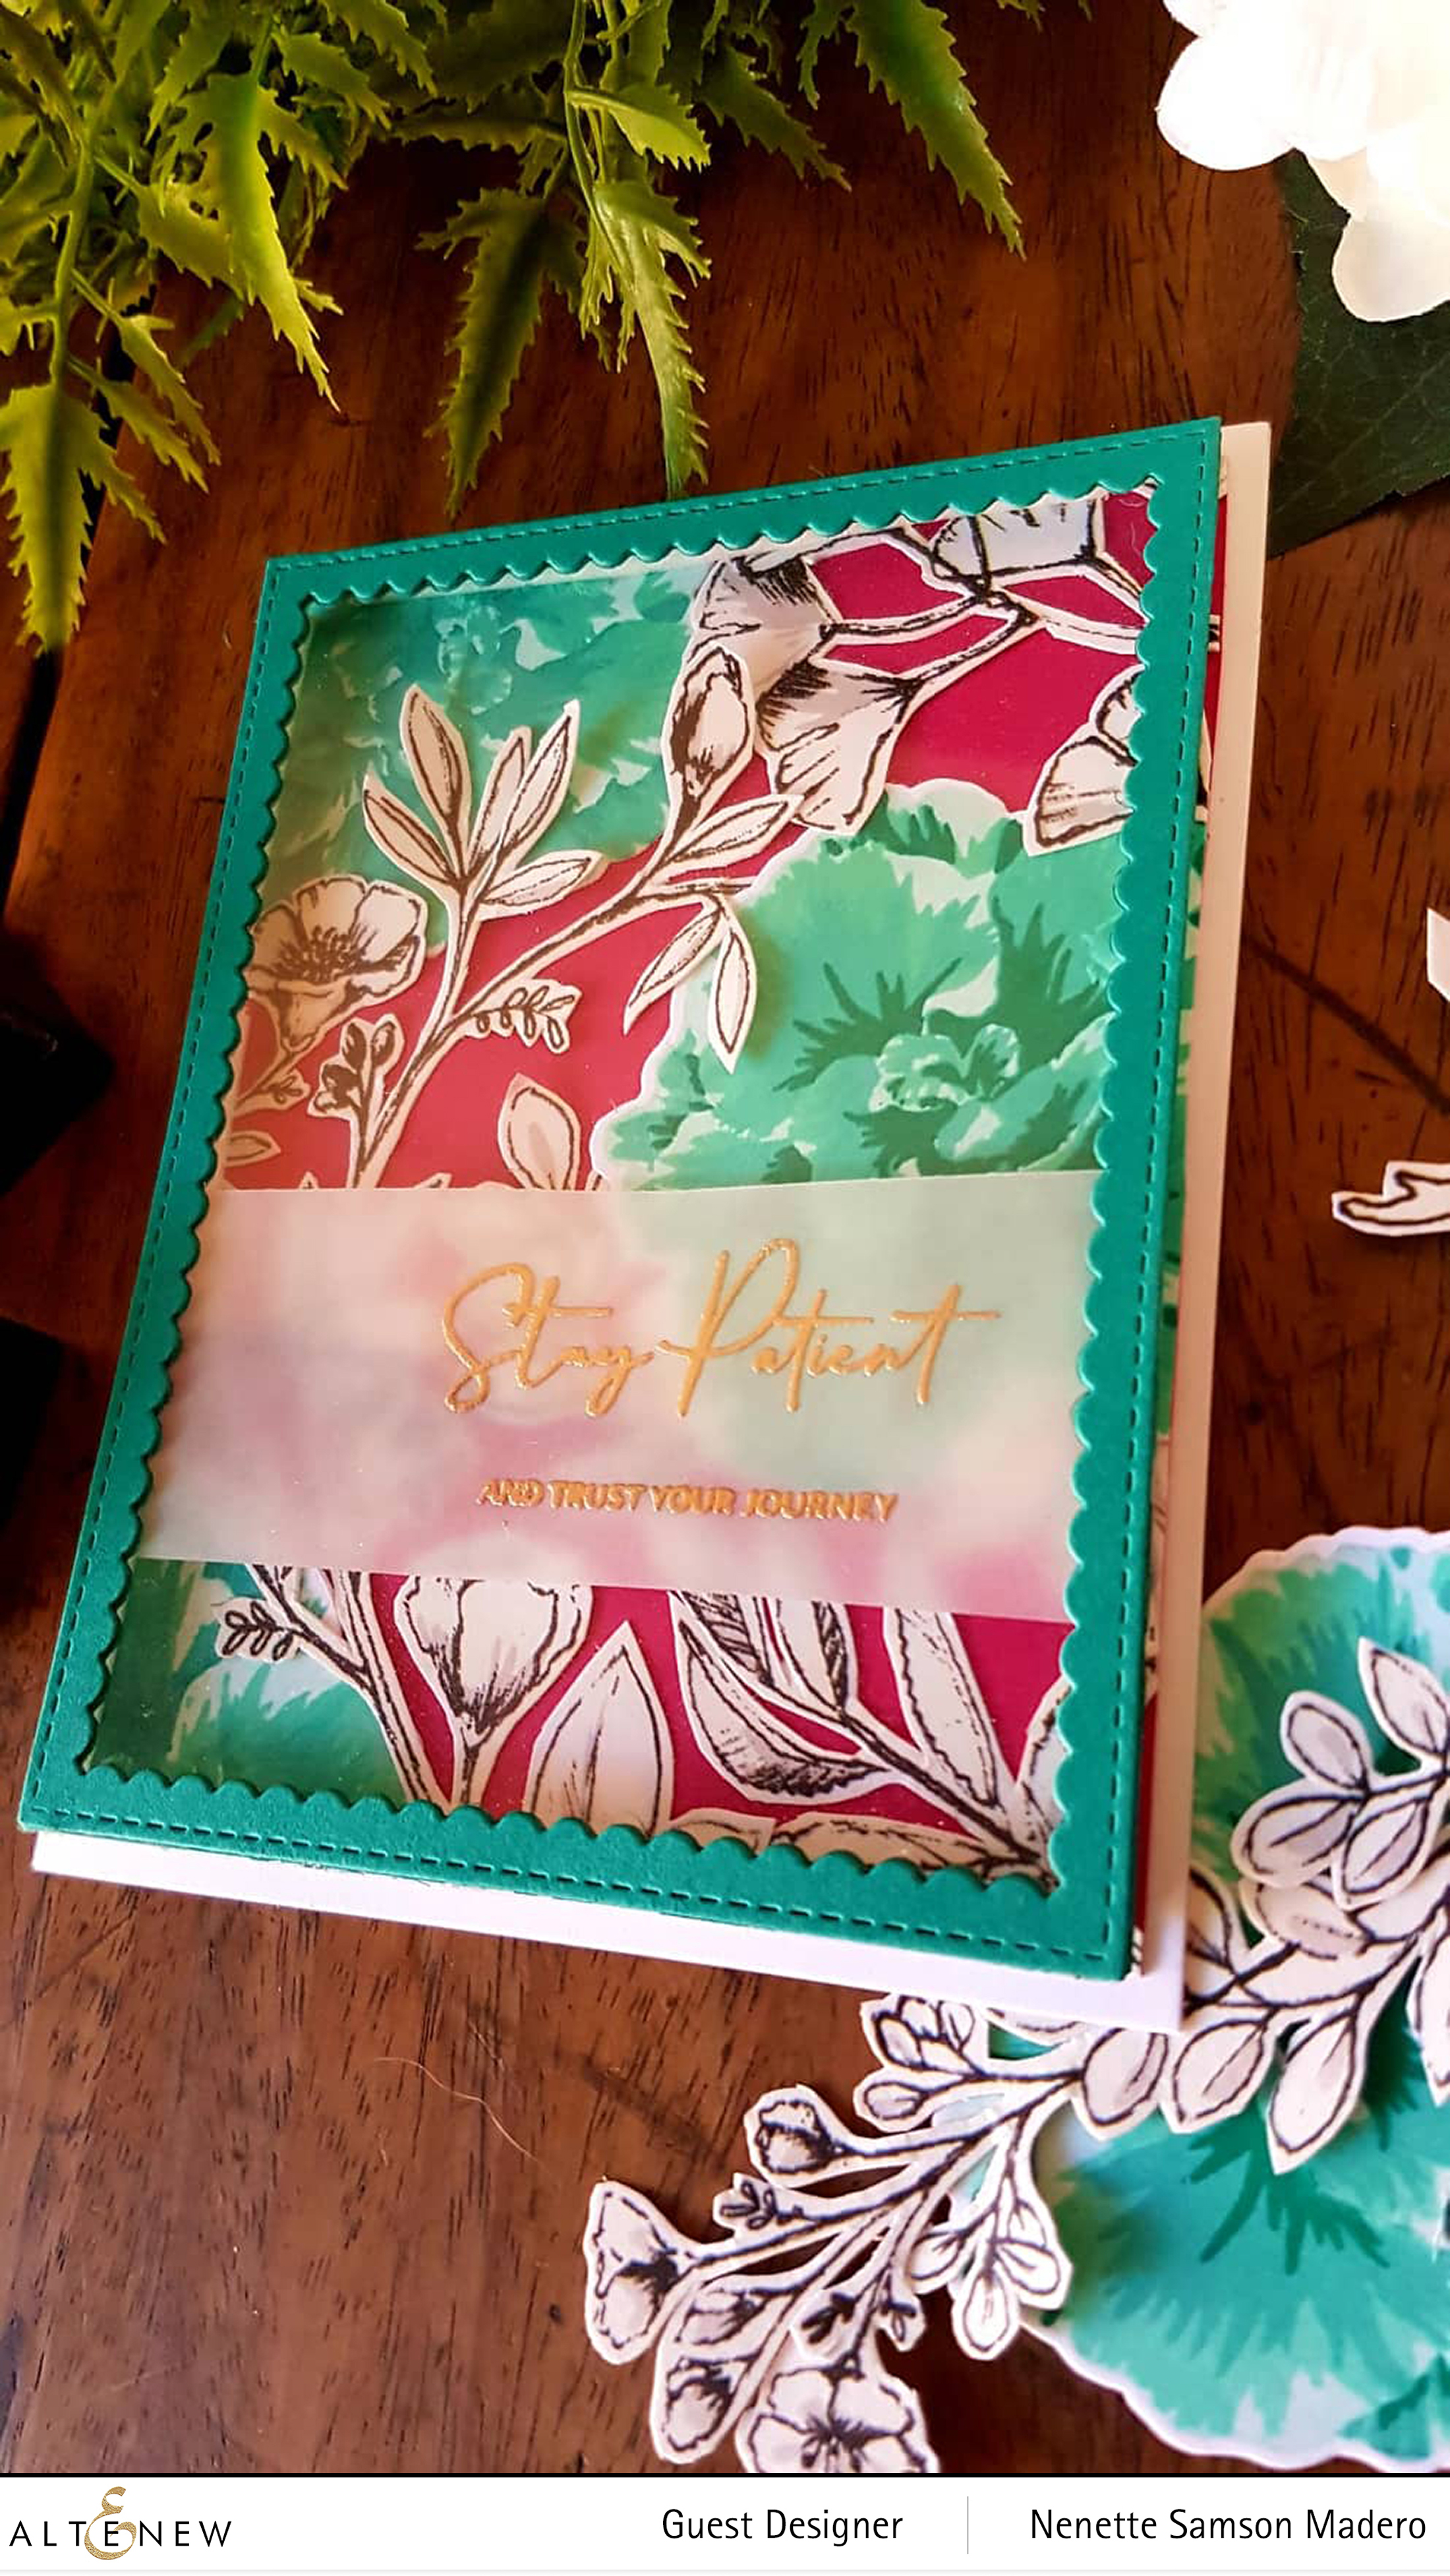
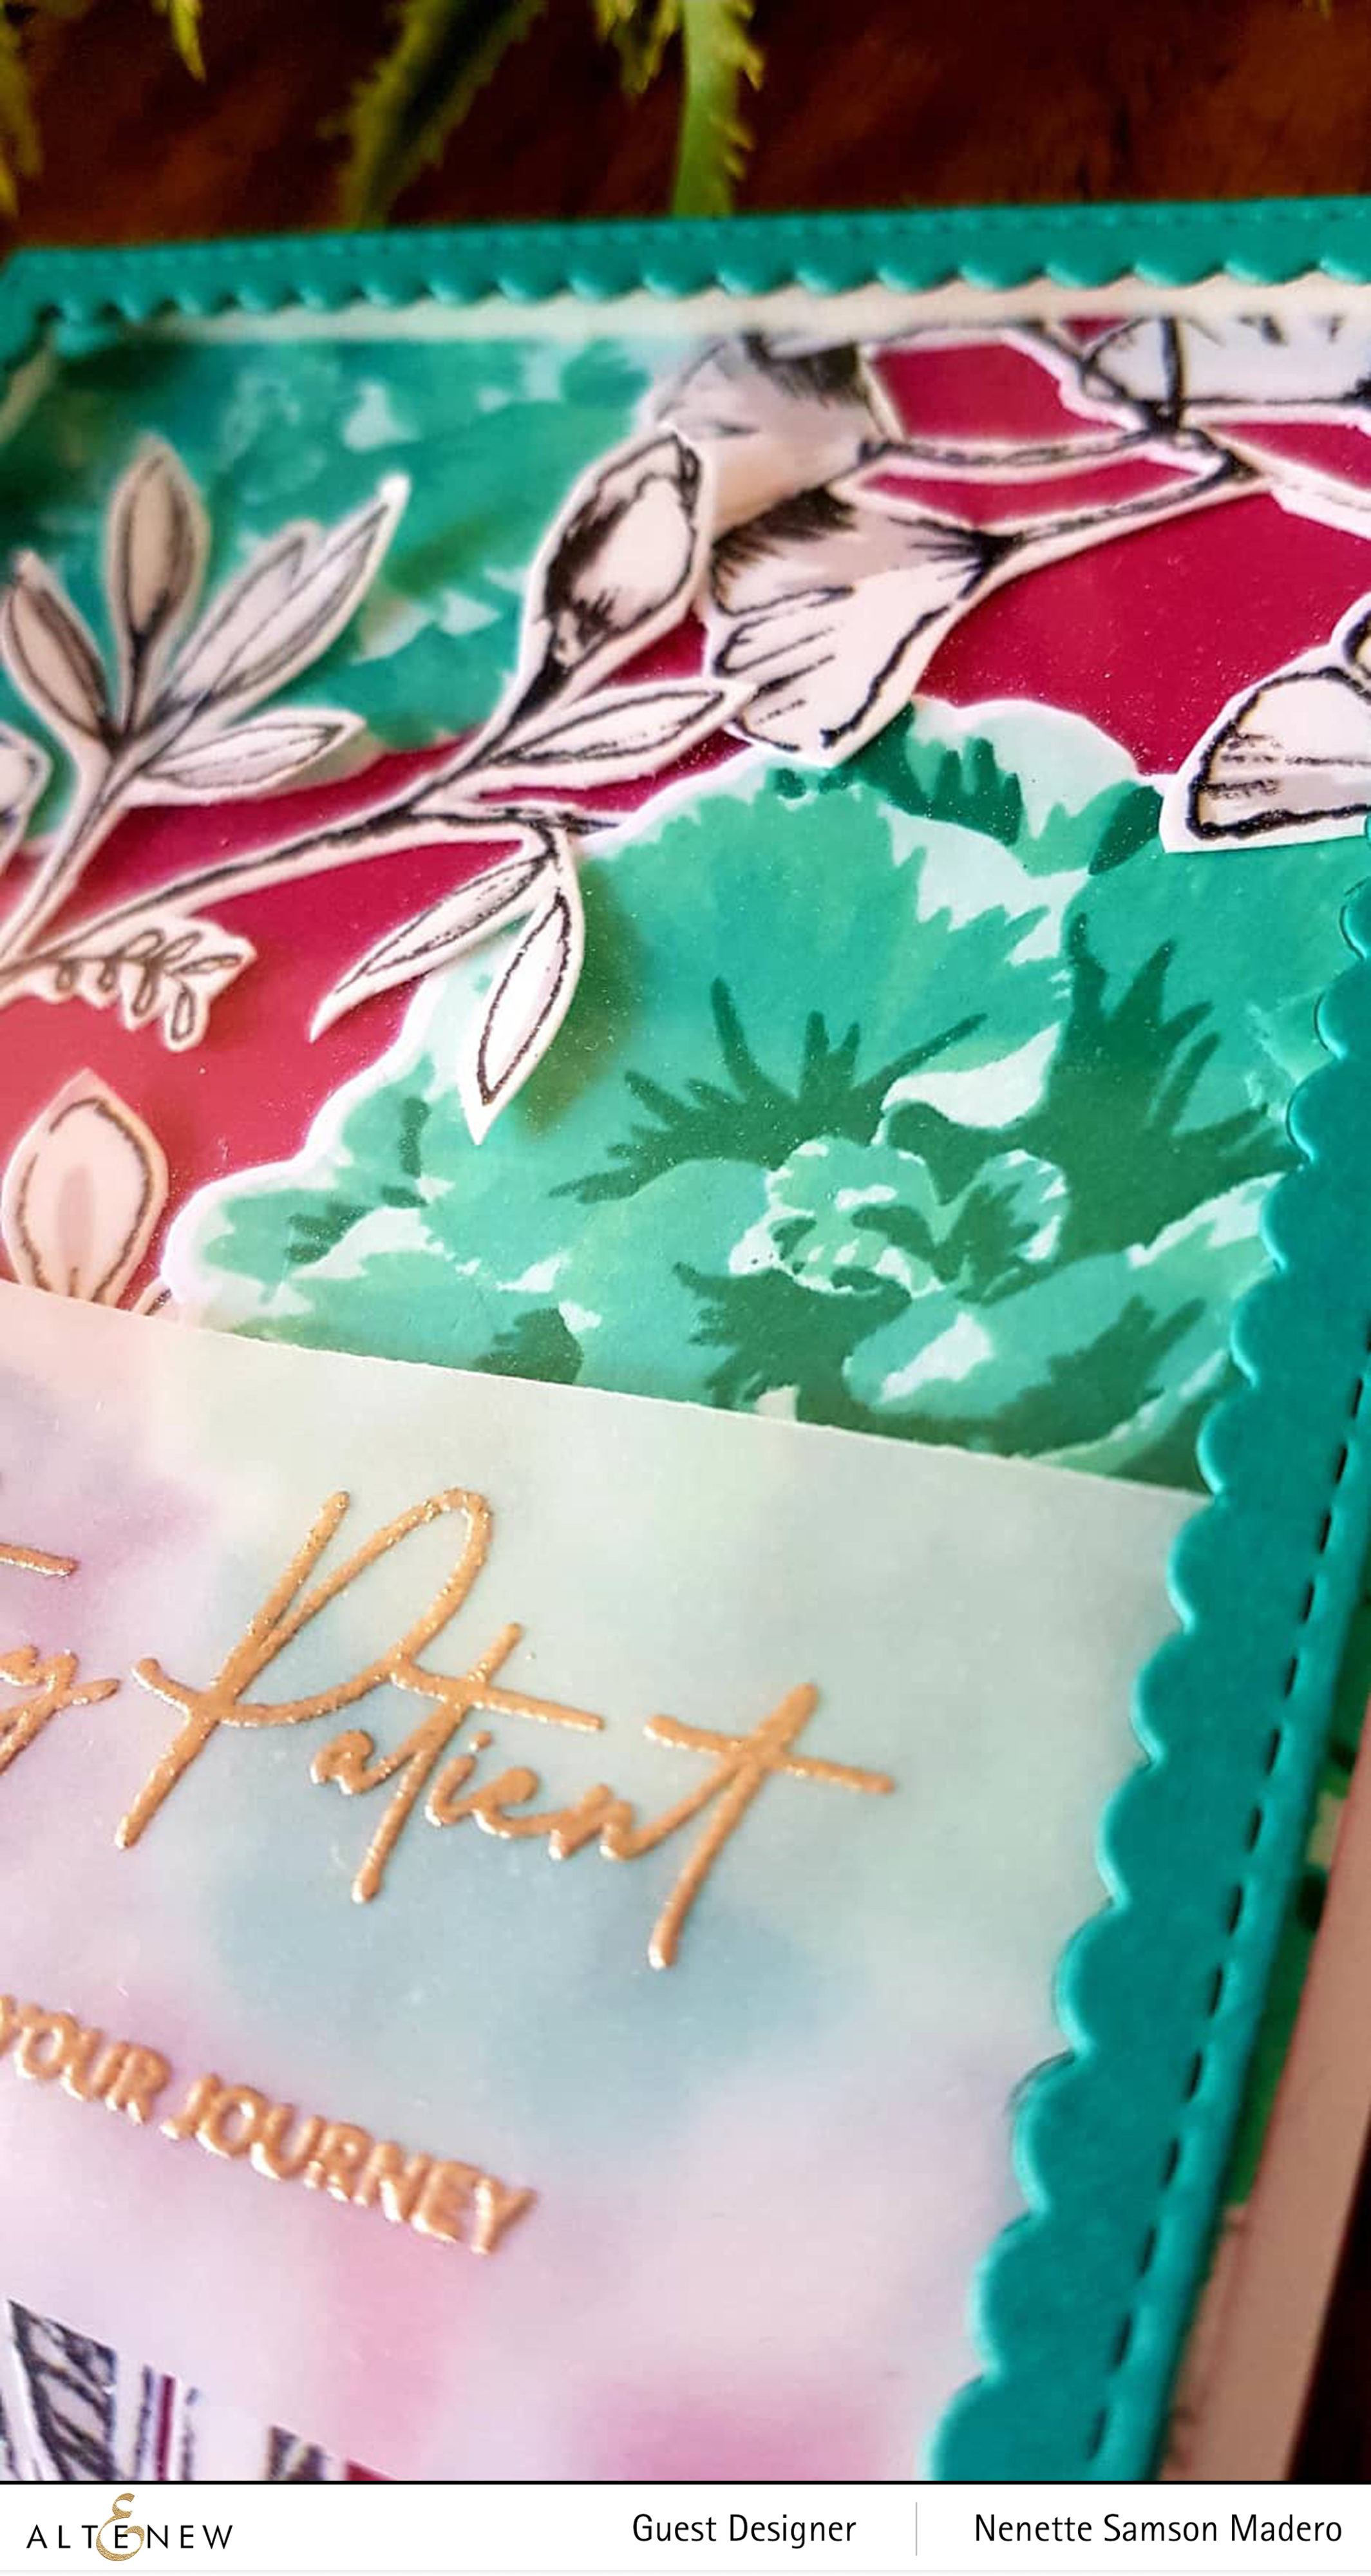
For this card, I wanted to change up the flower a little bit. I stamped the flower image twice using the Enchanted Garden and the Sea Shore Crips Dye Ink sets following the layering guide. After this, I layered them on top of each other and secured both with a post-it tape so that the layers won’t move when I simultaneously trim them into strips. Once the strips were cut, I used the die cut of the flower as a base to assemble the alternate strips of the flower. I don’t know why but it somehow makes the flower look 3D. 🙂
Next, the image from the Book
Club stamp set was embossed using Versamark Ink and Rose Gold embossing powder.
The following artist makers from set D
were used to color the flowers using the flicking technique: B802, B714 and
B815. The leaves were colored with Artist markers set B:R702, R823. The card
front of an orange A2 card base was cut diagonally. Both die cuts where
attached diagonally as well. I framed the white cardstock with the Fine Frames Die Set which was heat embossed with
Rose Gold Embossing powder to match the other floral image. Finally, the sentiment from the Swiss Dots
was also stamped and embossed.
For this last card, I wanted the flower to be the star in this card so I left the Botanical Rhapsody washi tape uncolored and the background muted. The background was done by using the Feathered Leaves Stencil with some Altenew Embossing Paste mixed with some Orange Cream Crisp Dye Ink. The stencil was placed on the front cover of an A2 card and the tinted embossing paste was evenly spread using a spatula. The stencil was carefully removed and the card was allowed to dry.
The white areas were then colored using Wink of Stella clear just to add some shimmer. To make it easier to cut, the Botanical Rhapsody Washi Tape was stuck to a white cardstock then fussy cut. I used the Artist Marker WG03 from Set B to color a piece of cardstock to match the Botanical Rhapsody washi flowers/leaves then I heat embossed the sentiment from Forever and Always using Versamark Ink with Pure White Embossing Powder. Flowers and foliage were arranged and glued down using adhesive and foam squares.
I hope you liked the cards I created for this release. Make sure to drop by the Altenew Card Blog and check out the other creative ways this stamp set can be used. It may also be a good idea to sign up for the Build-A-Flower Monthly subscription plan. When you are signed up, you are guaranteed a spot in the monthly BAF releases and will receive a set each month – at a specially discounted price! ($35.00 →$29.99).
To celebrate this release, Altenew is giving away a $30 gift certificate to 6 lucky winners! Please leave a comment on the Altenew Card Blog and/or Altenew Scrapbook Blog for a chance to win.
Altenew will also draw a winner to receive a $15 gift certificate from the comments left on each designer’s blog on the blog hop list below. All winners will be announced on the Altenew blogs on 7/7/2019.
Next up is the talented Irna Fonina. In case you are lost, below you will find the entire blog hop order. Make sure to leave a comment below to get a chance to win, ok? I truly appreciate you stopping by. If you liked my projects, it would be wonderful if you can follow me on Instagram (@mylittleatticstudio) and Facebook at My Little Attic Studio<3 Thank you so much for dropping by! Till my next post <3