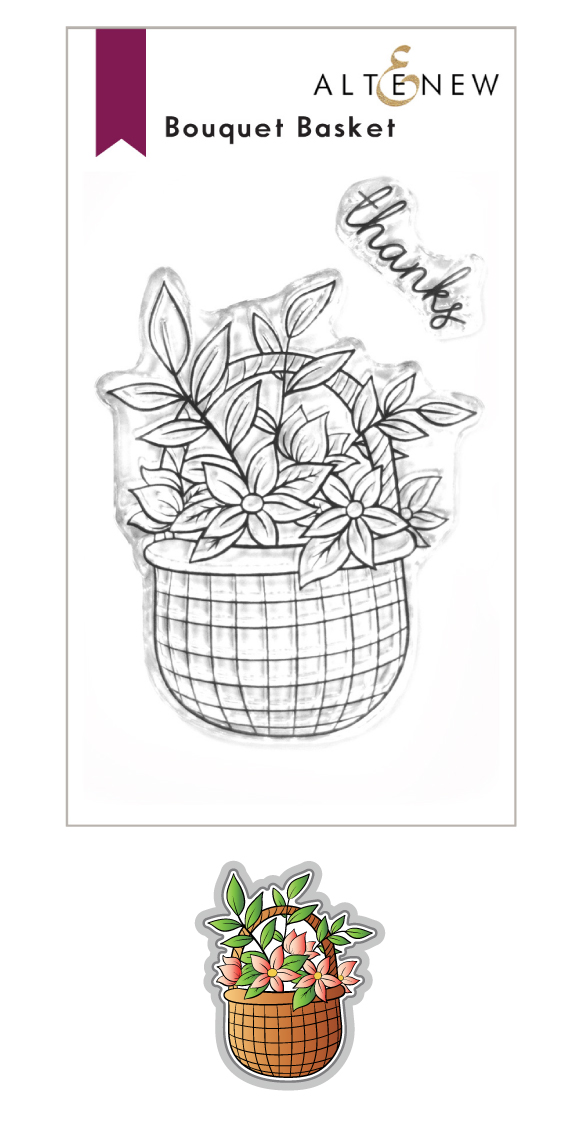
Hello, everyone! Sharing with you this super cute mini stamp set from Altenew called the Bouquet Stamp and die set. Below is a card I made using this adorable set.
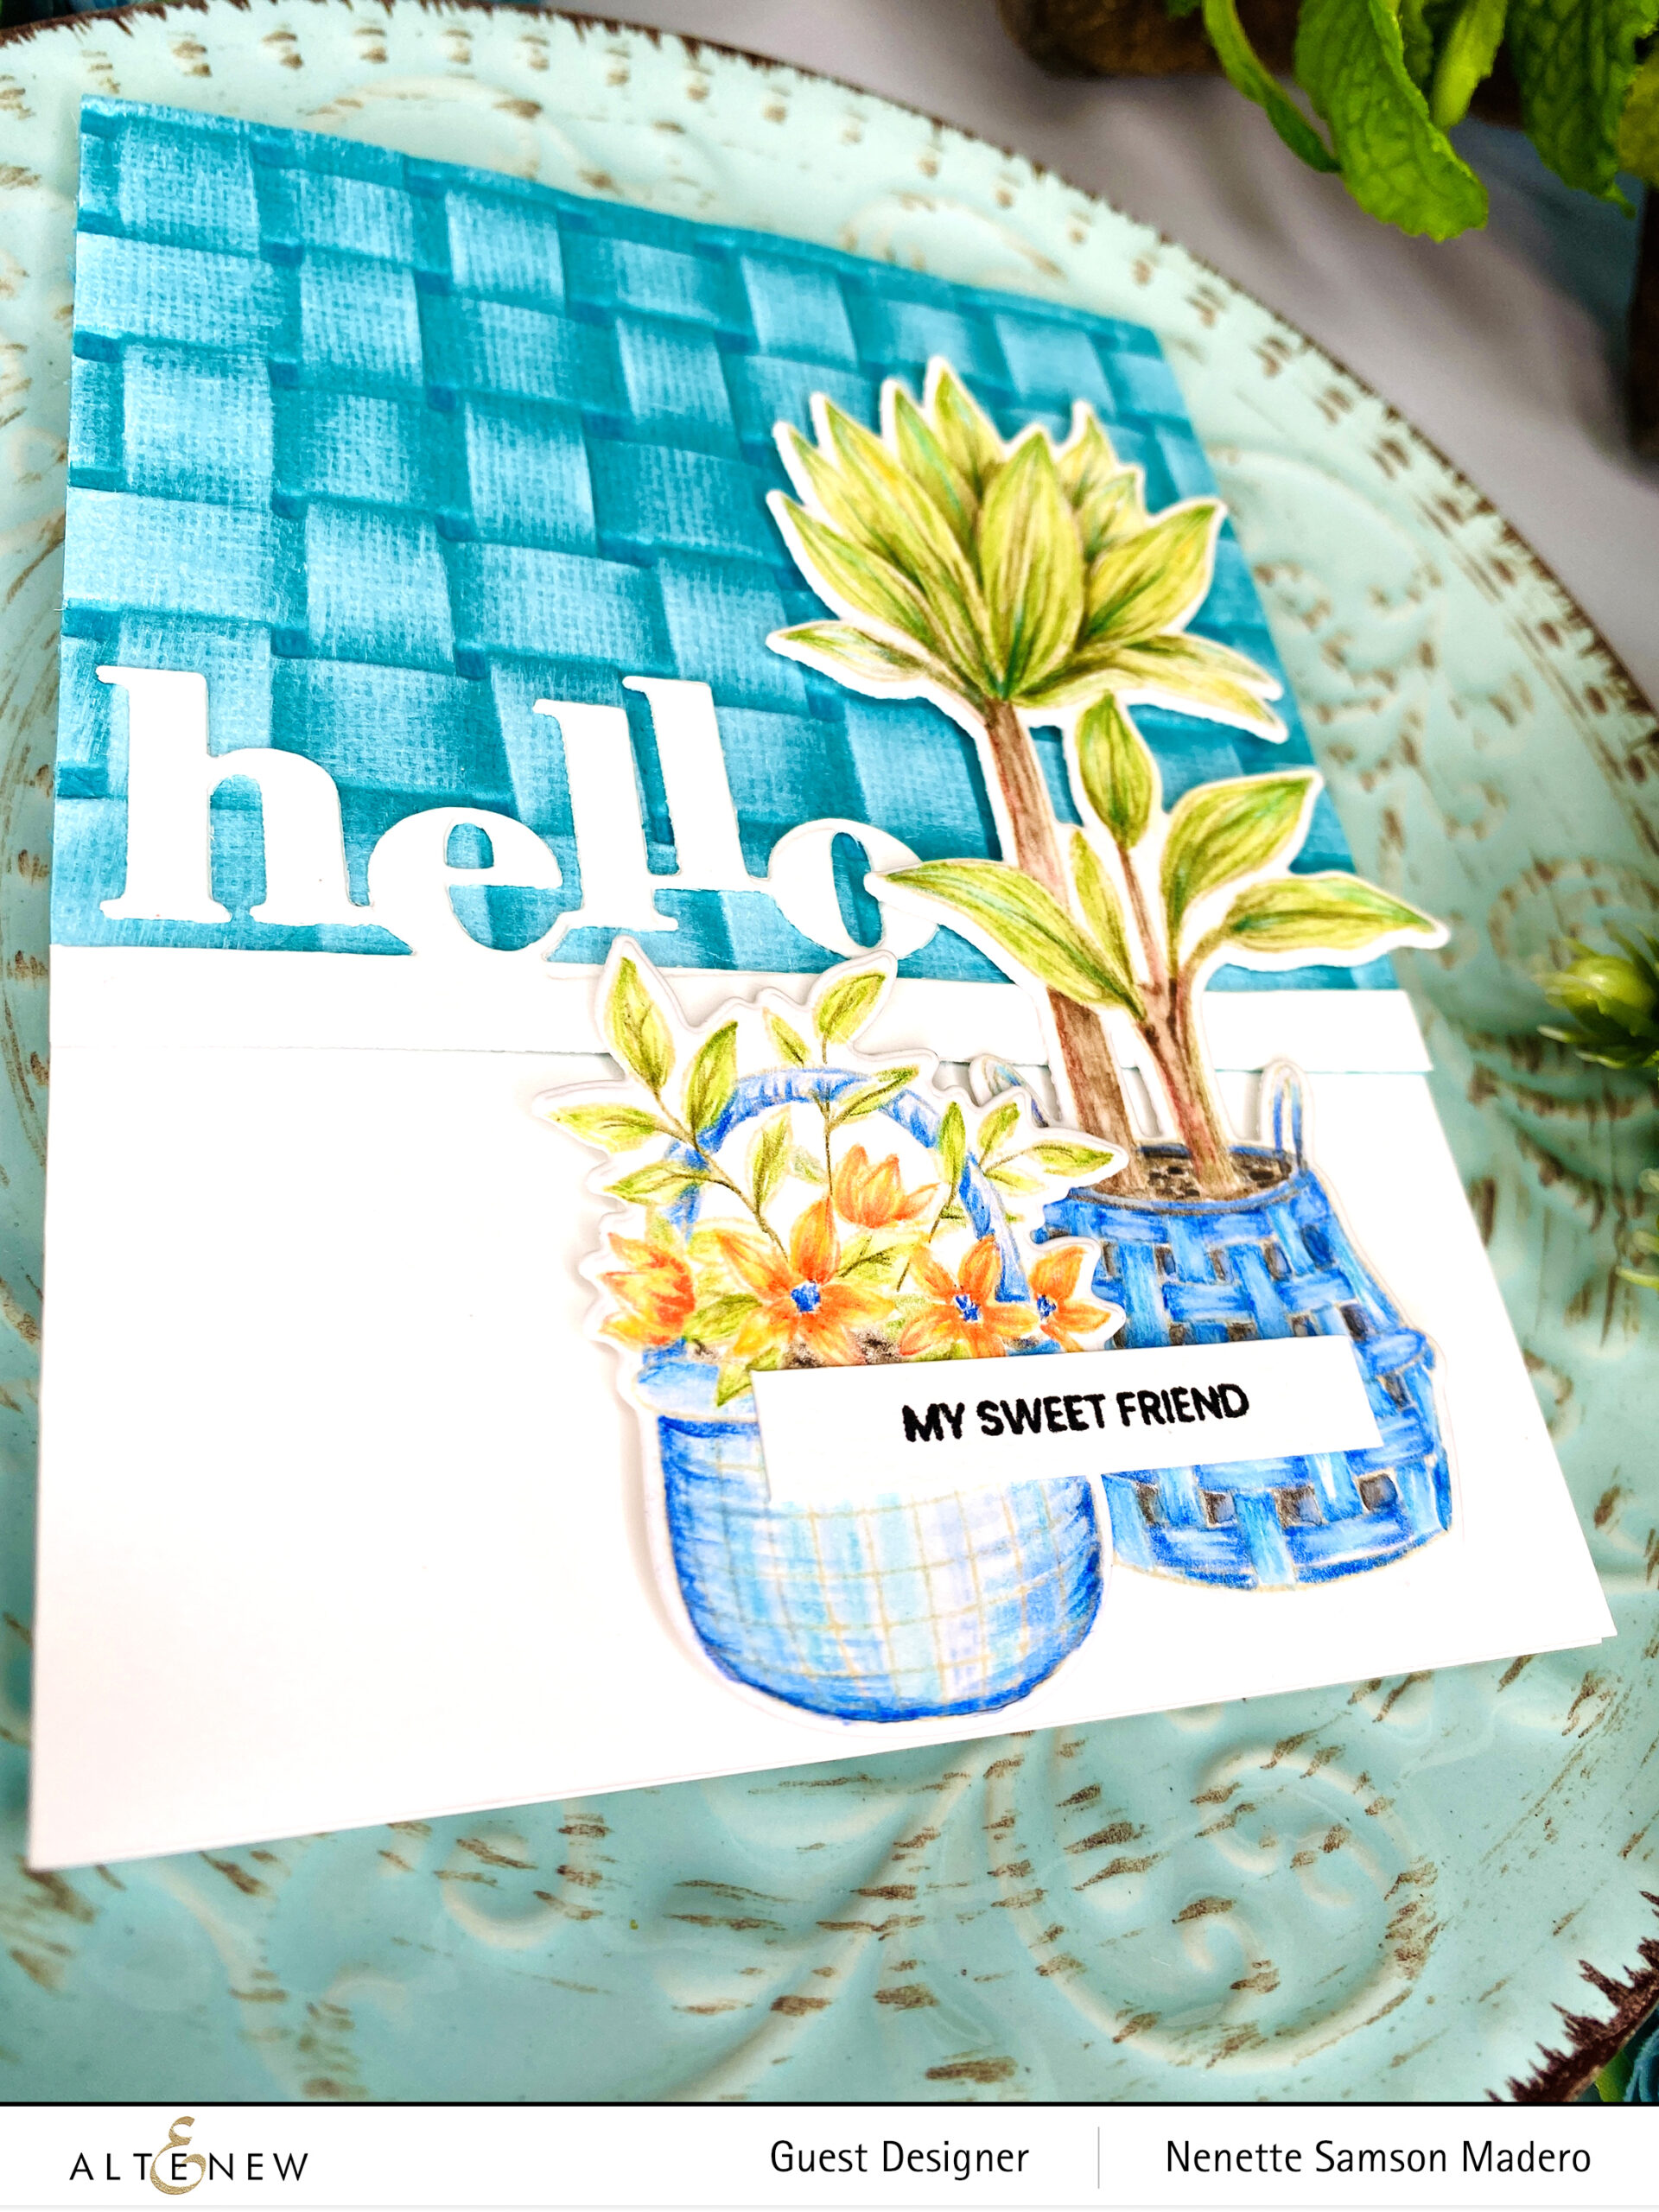
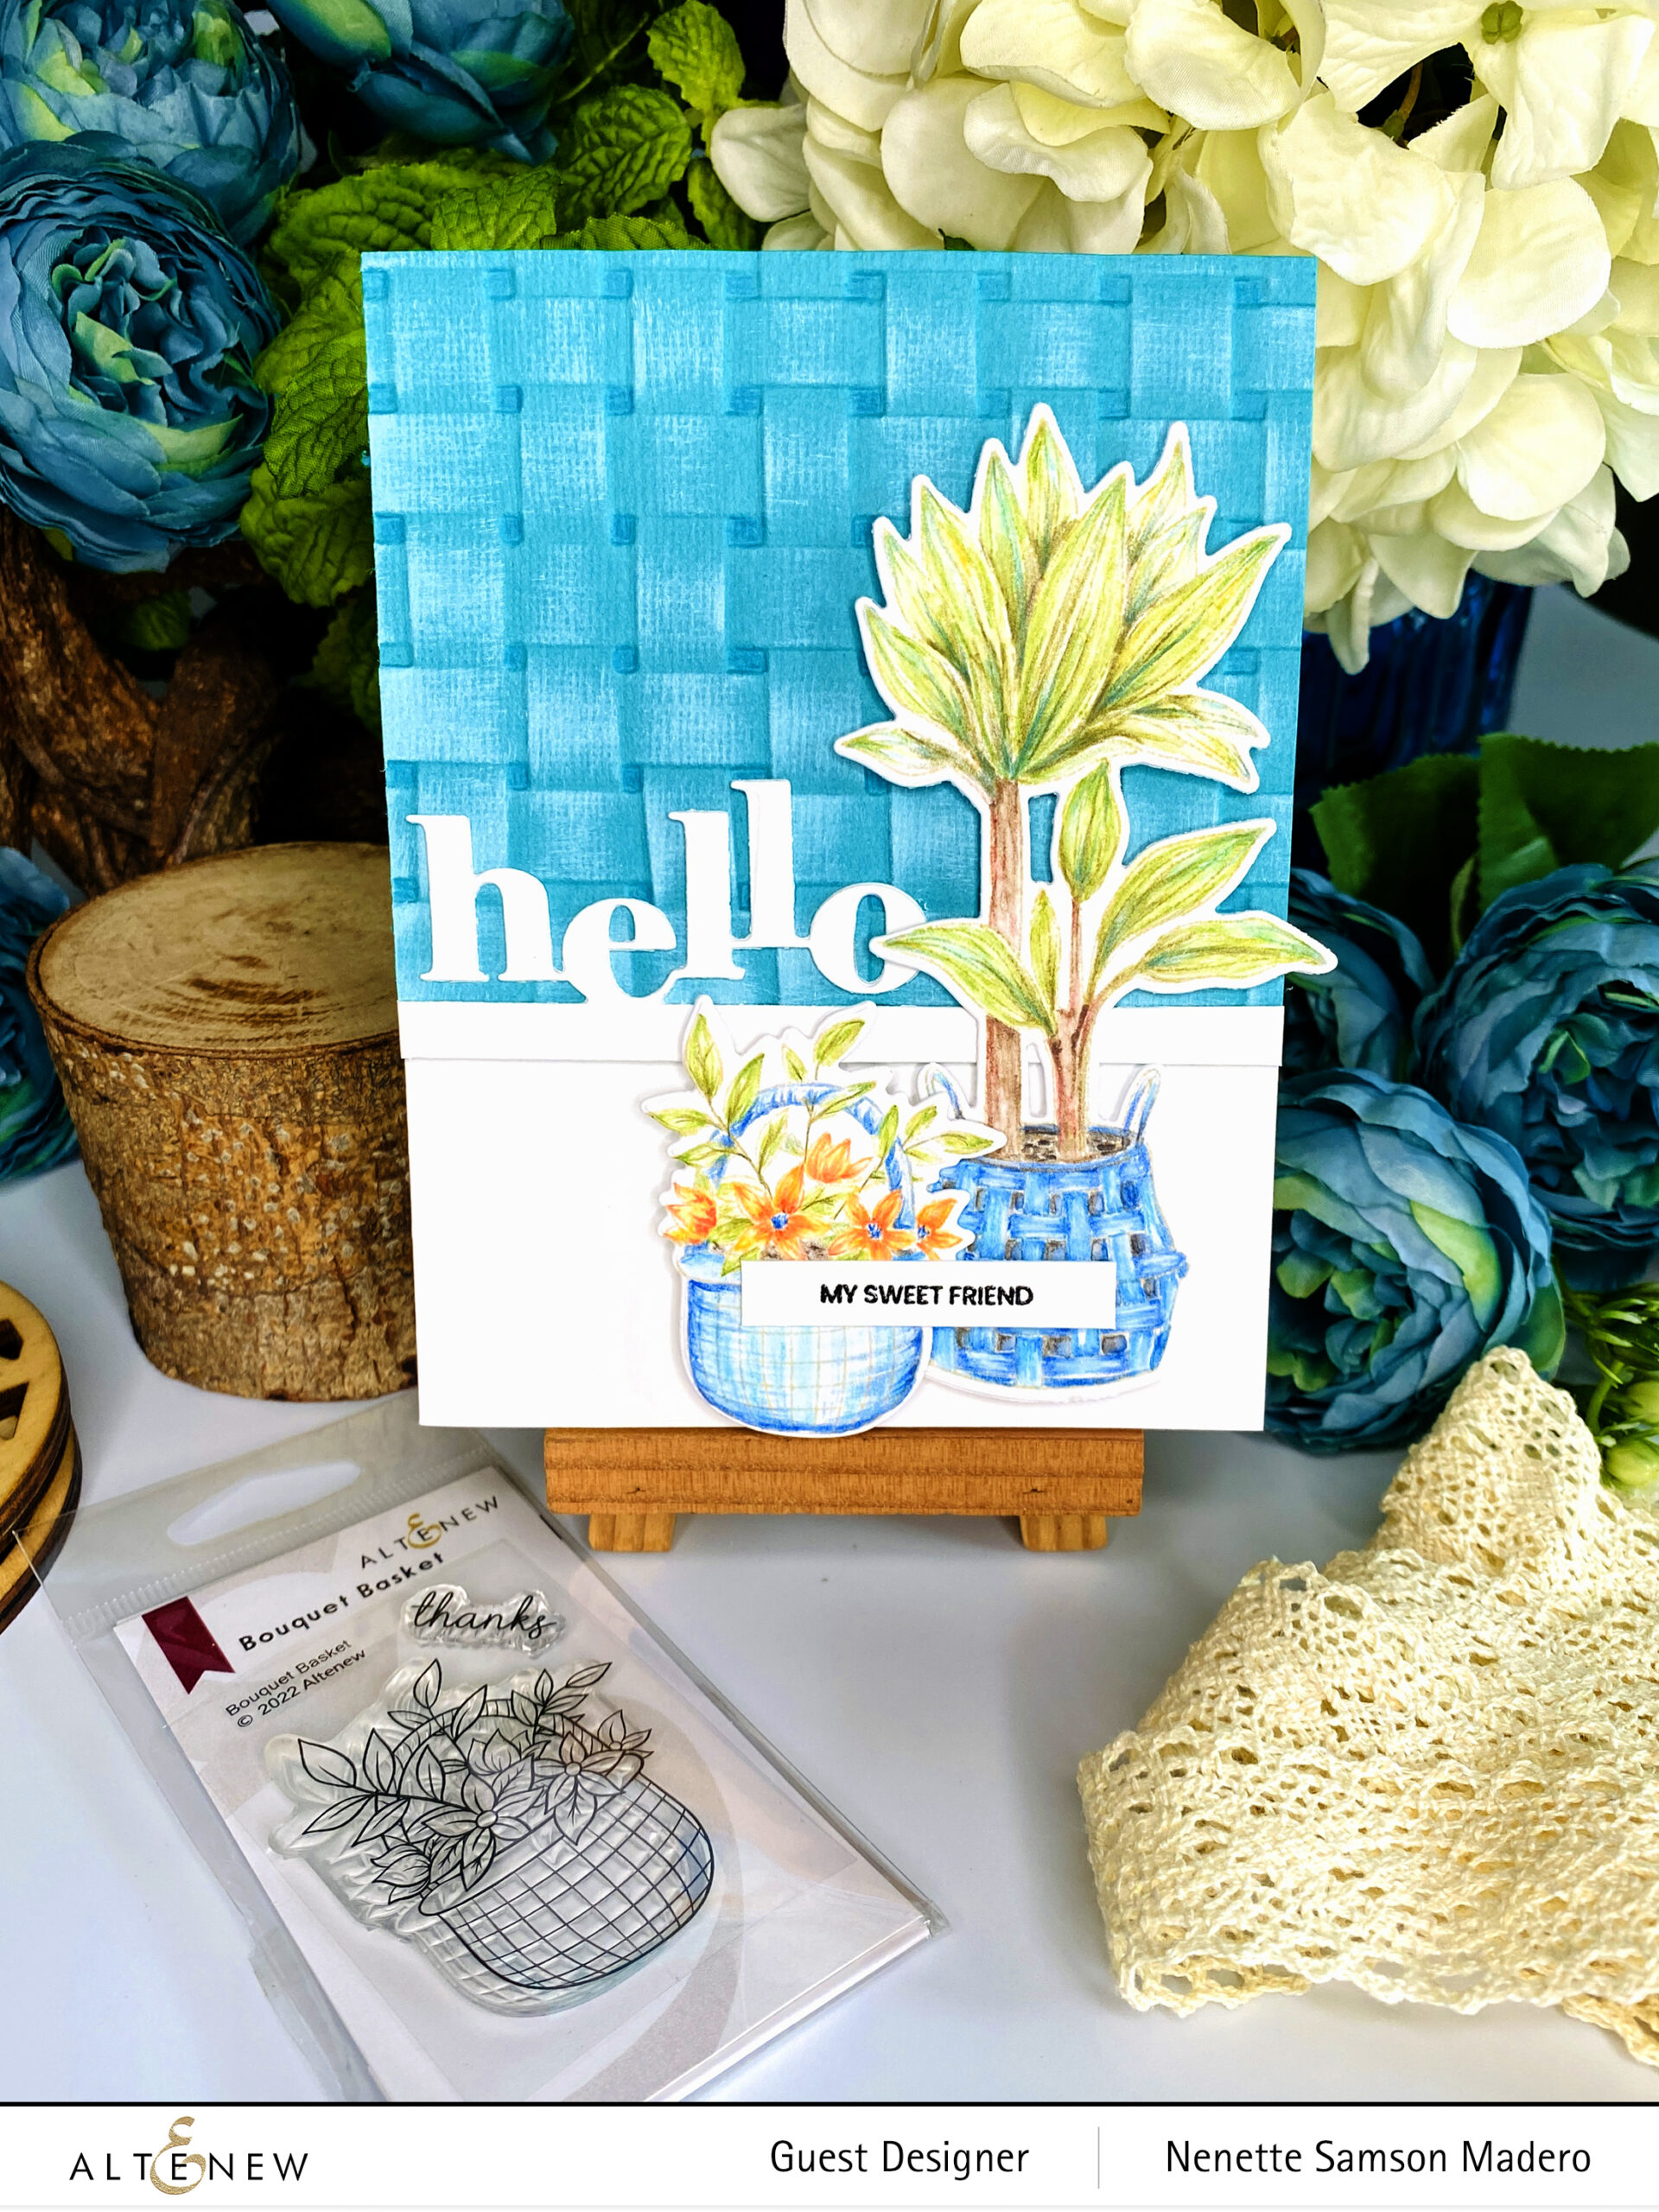
I paired this up with the other gorgeous Pots and Plants stamp and die and the Woven Basket 3d embossing folder. The plants and basket were colored using watercolored pencils. In order to emphasize the weaving, I colored the recessed parts with a darker shade of alcohol ink marker and used a white pigment ink to brush the embossed surface. I used the Tiny Sentiments: Hello die as well.
I hope you liked this card I made using the Bouquet Basket Stamp and die set. Make sure to check out the Altenew blog for more cards created by the other designers! Thanks for dropping by and happy crafting! <3
Hello, everyone! Welcome to my blog! If you just came from Lilith Eeckels, then you’re on the right track. For the complete information about this release, please visit the Altenew blog. I’m so excited to share with you what I created because there were many beautiful products from the NEW RELEASE to work with!!! I made a number of cards and I hope you will like them.
Assemble the card using foam squares and adhesive.
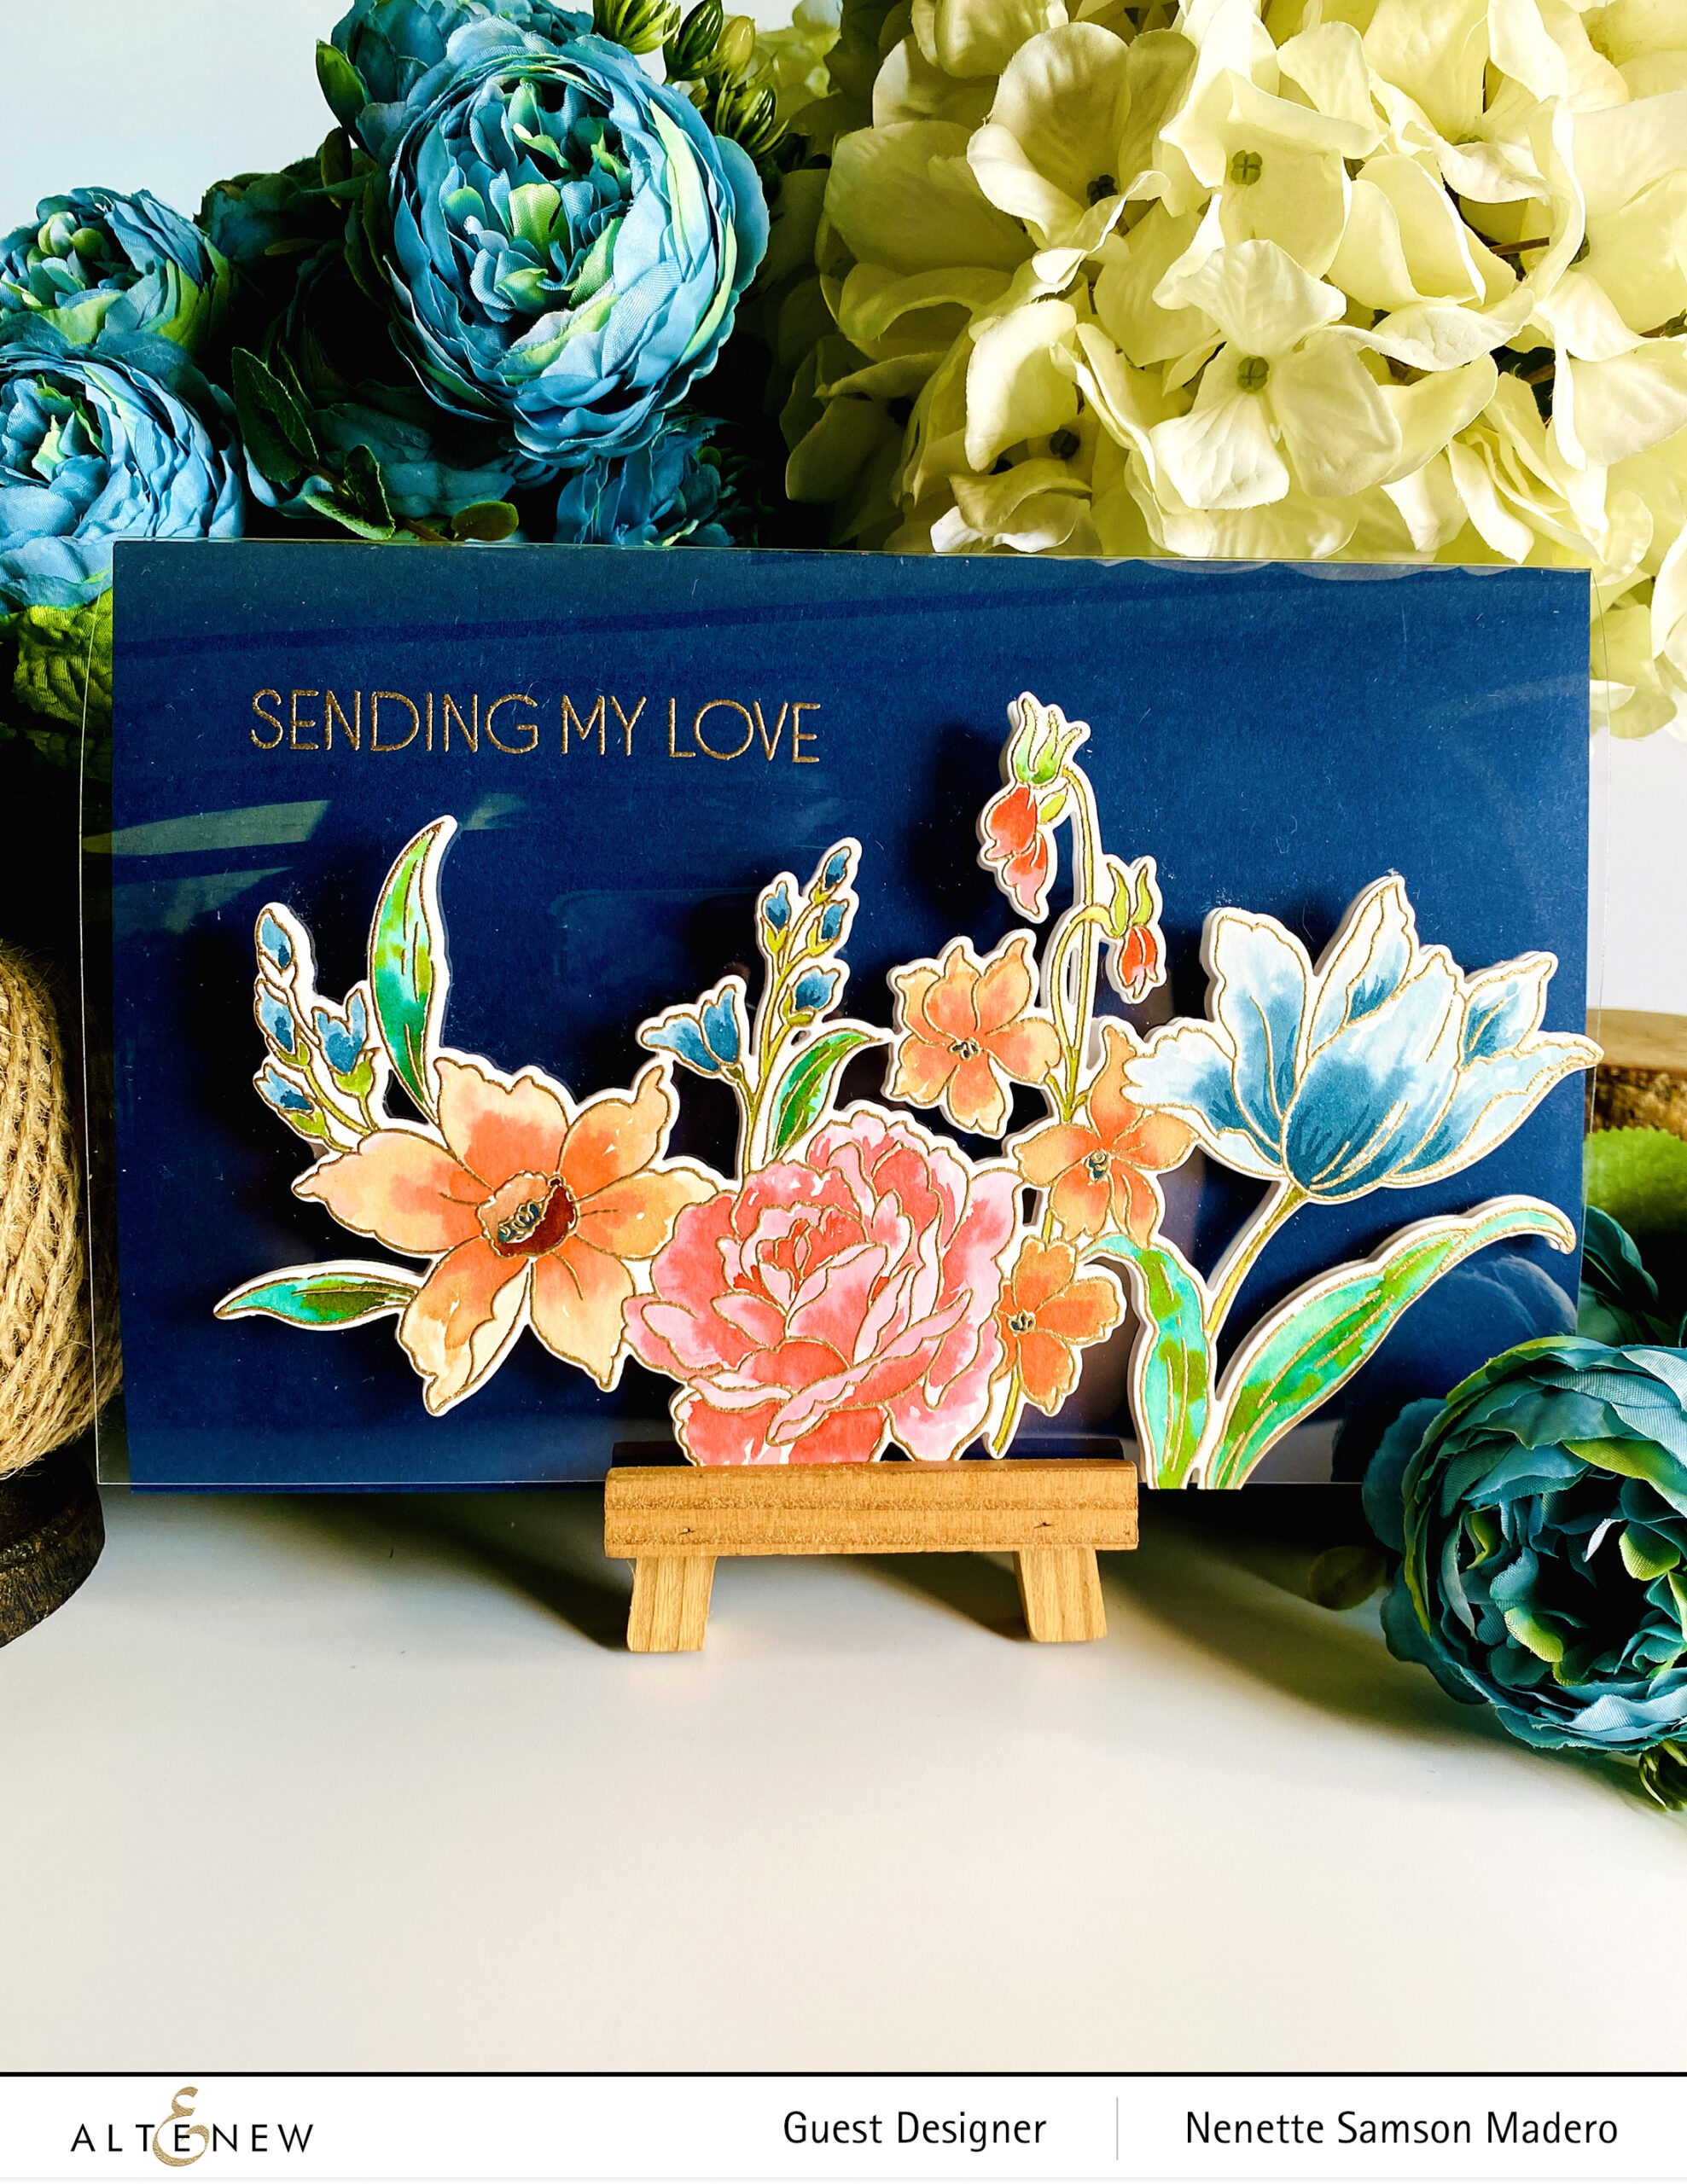
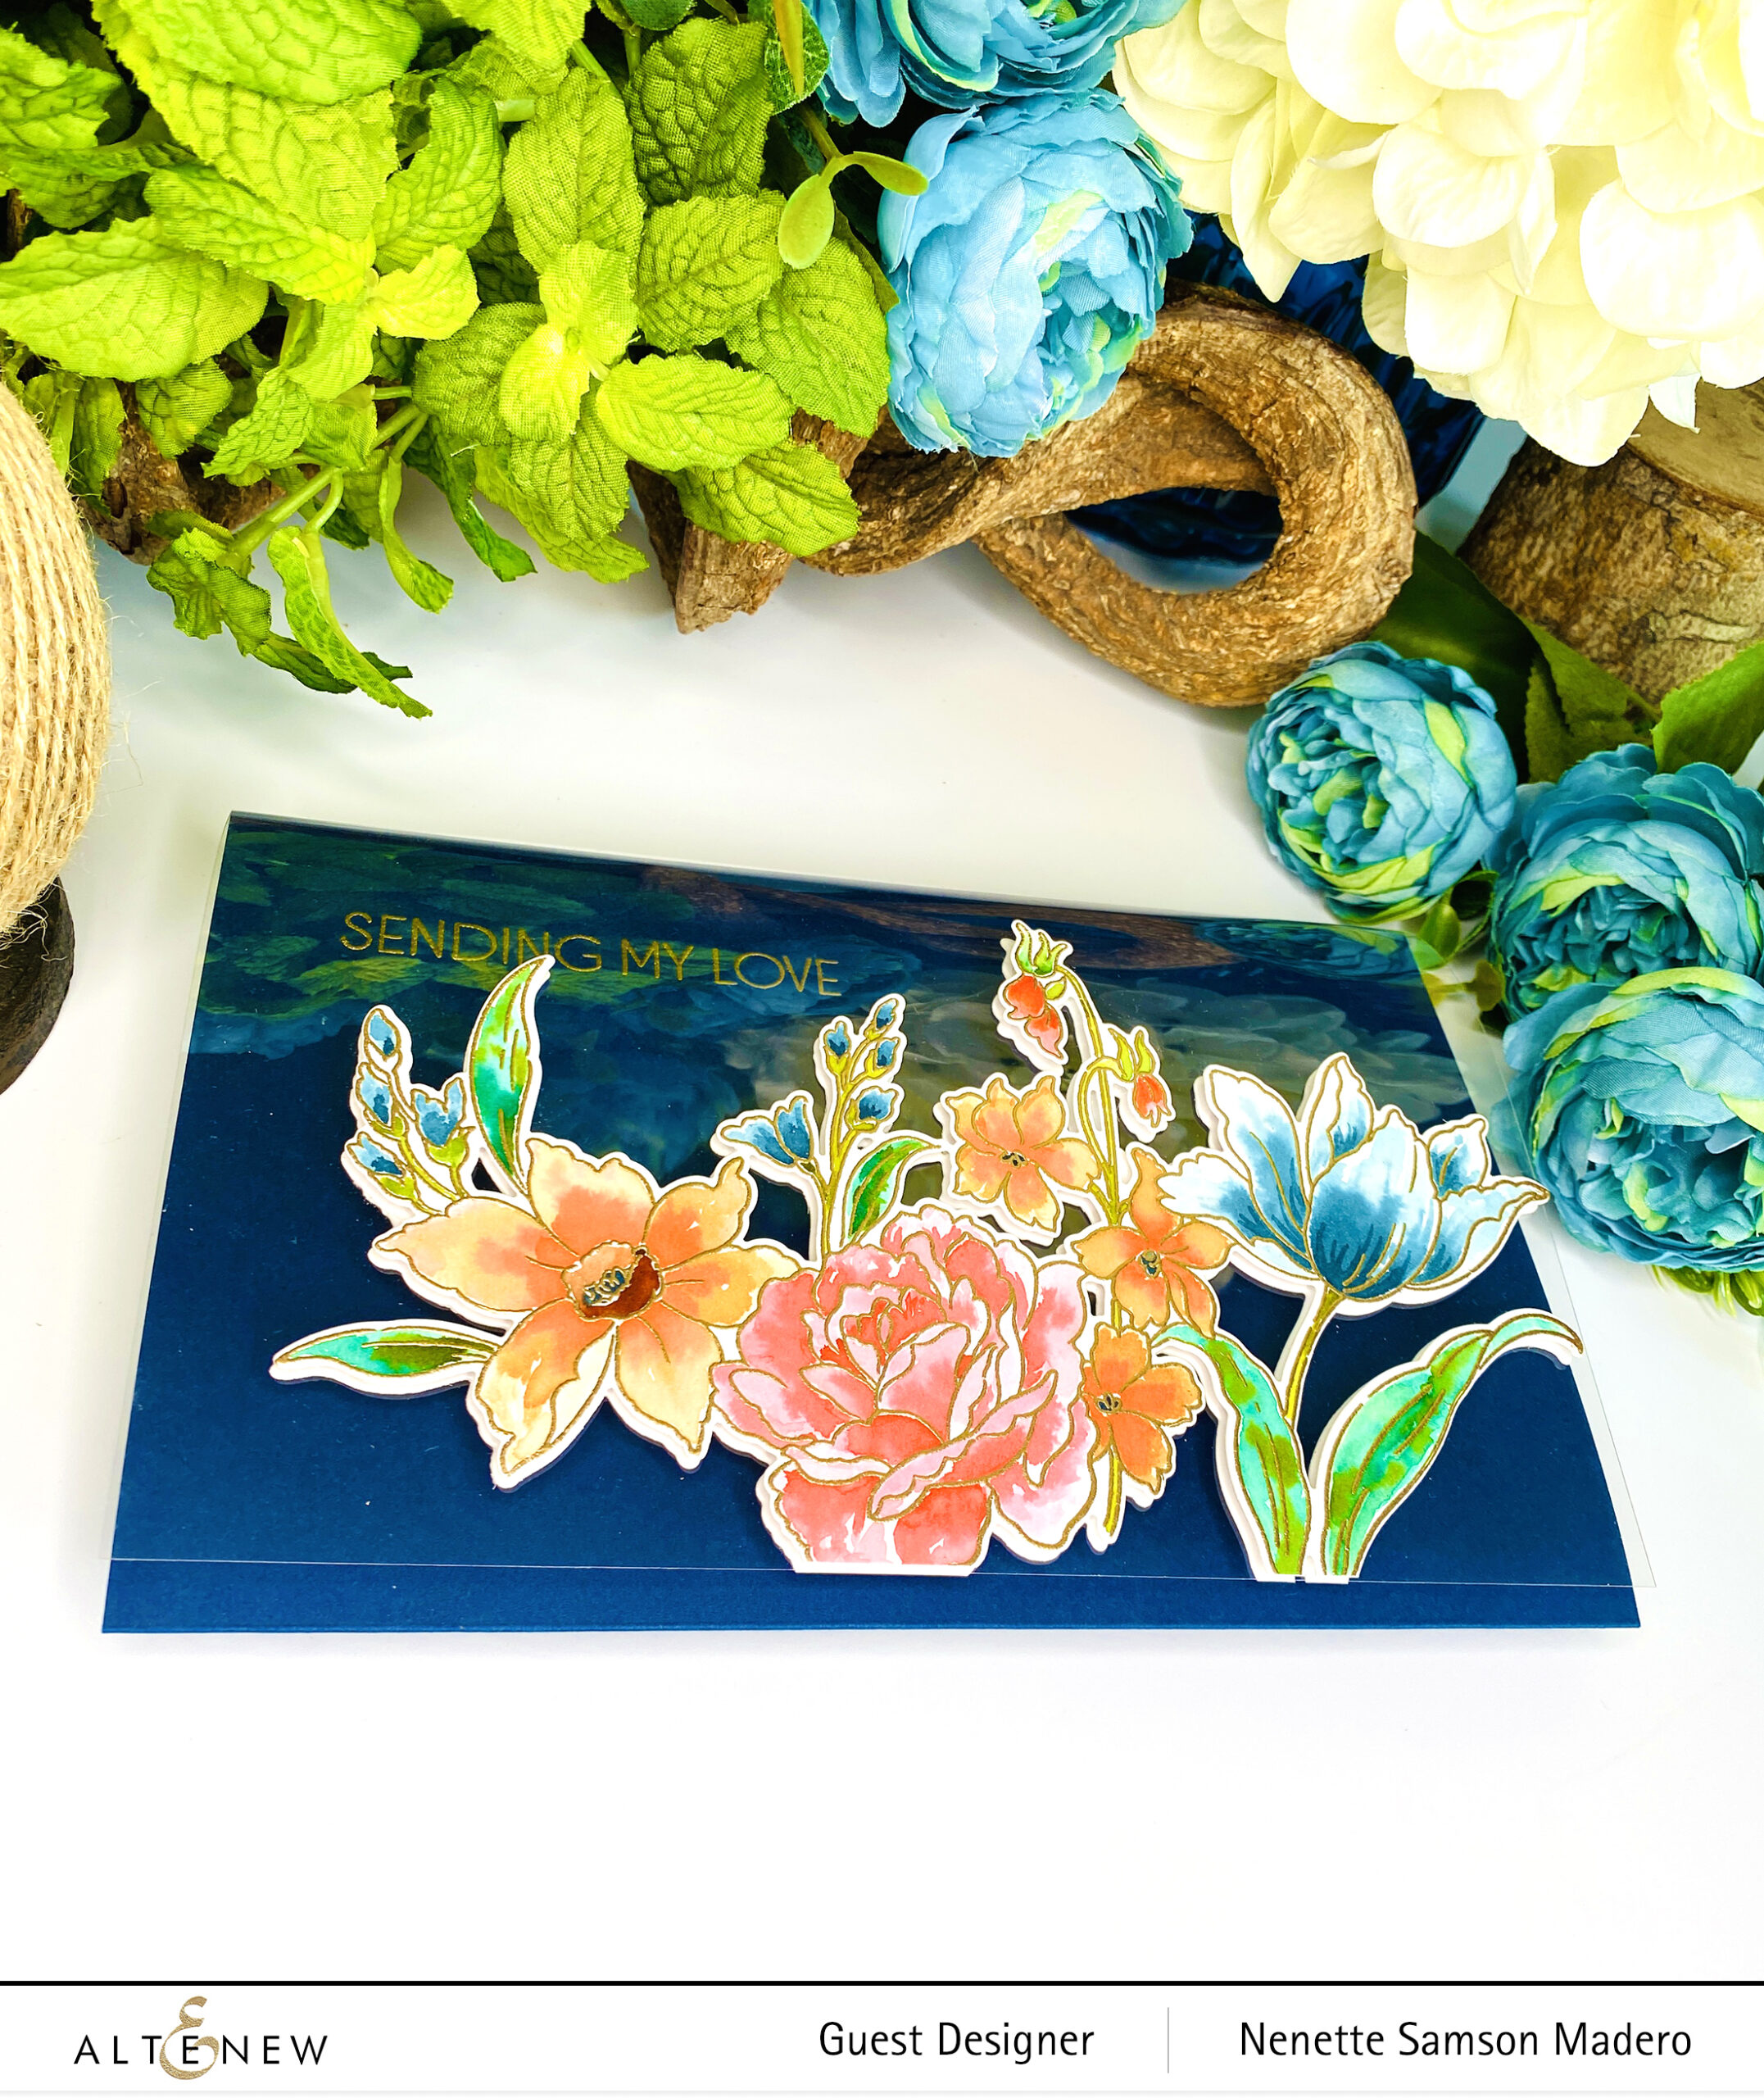
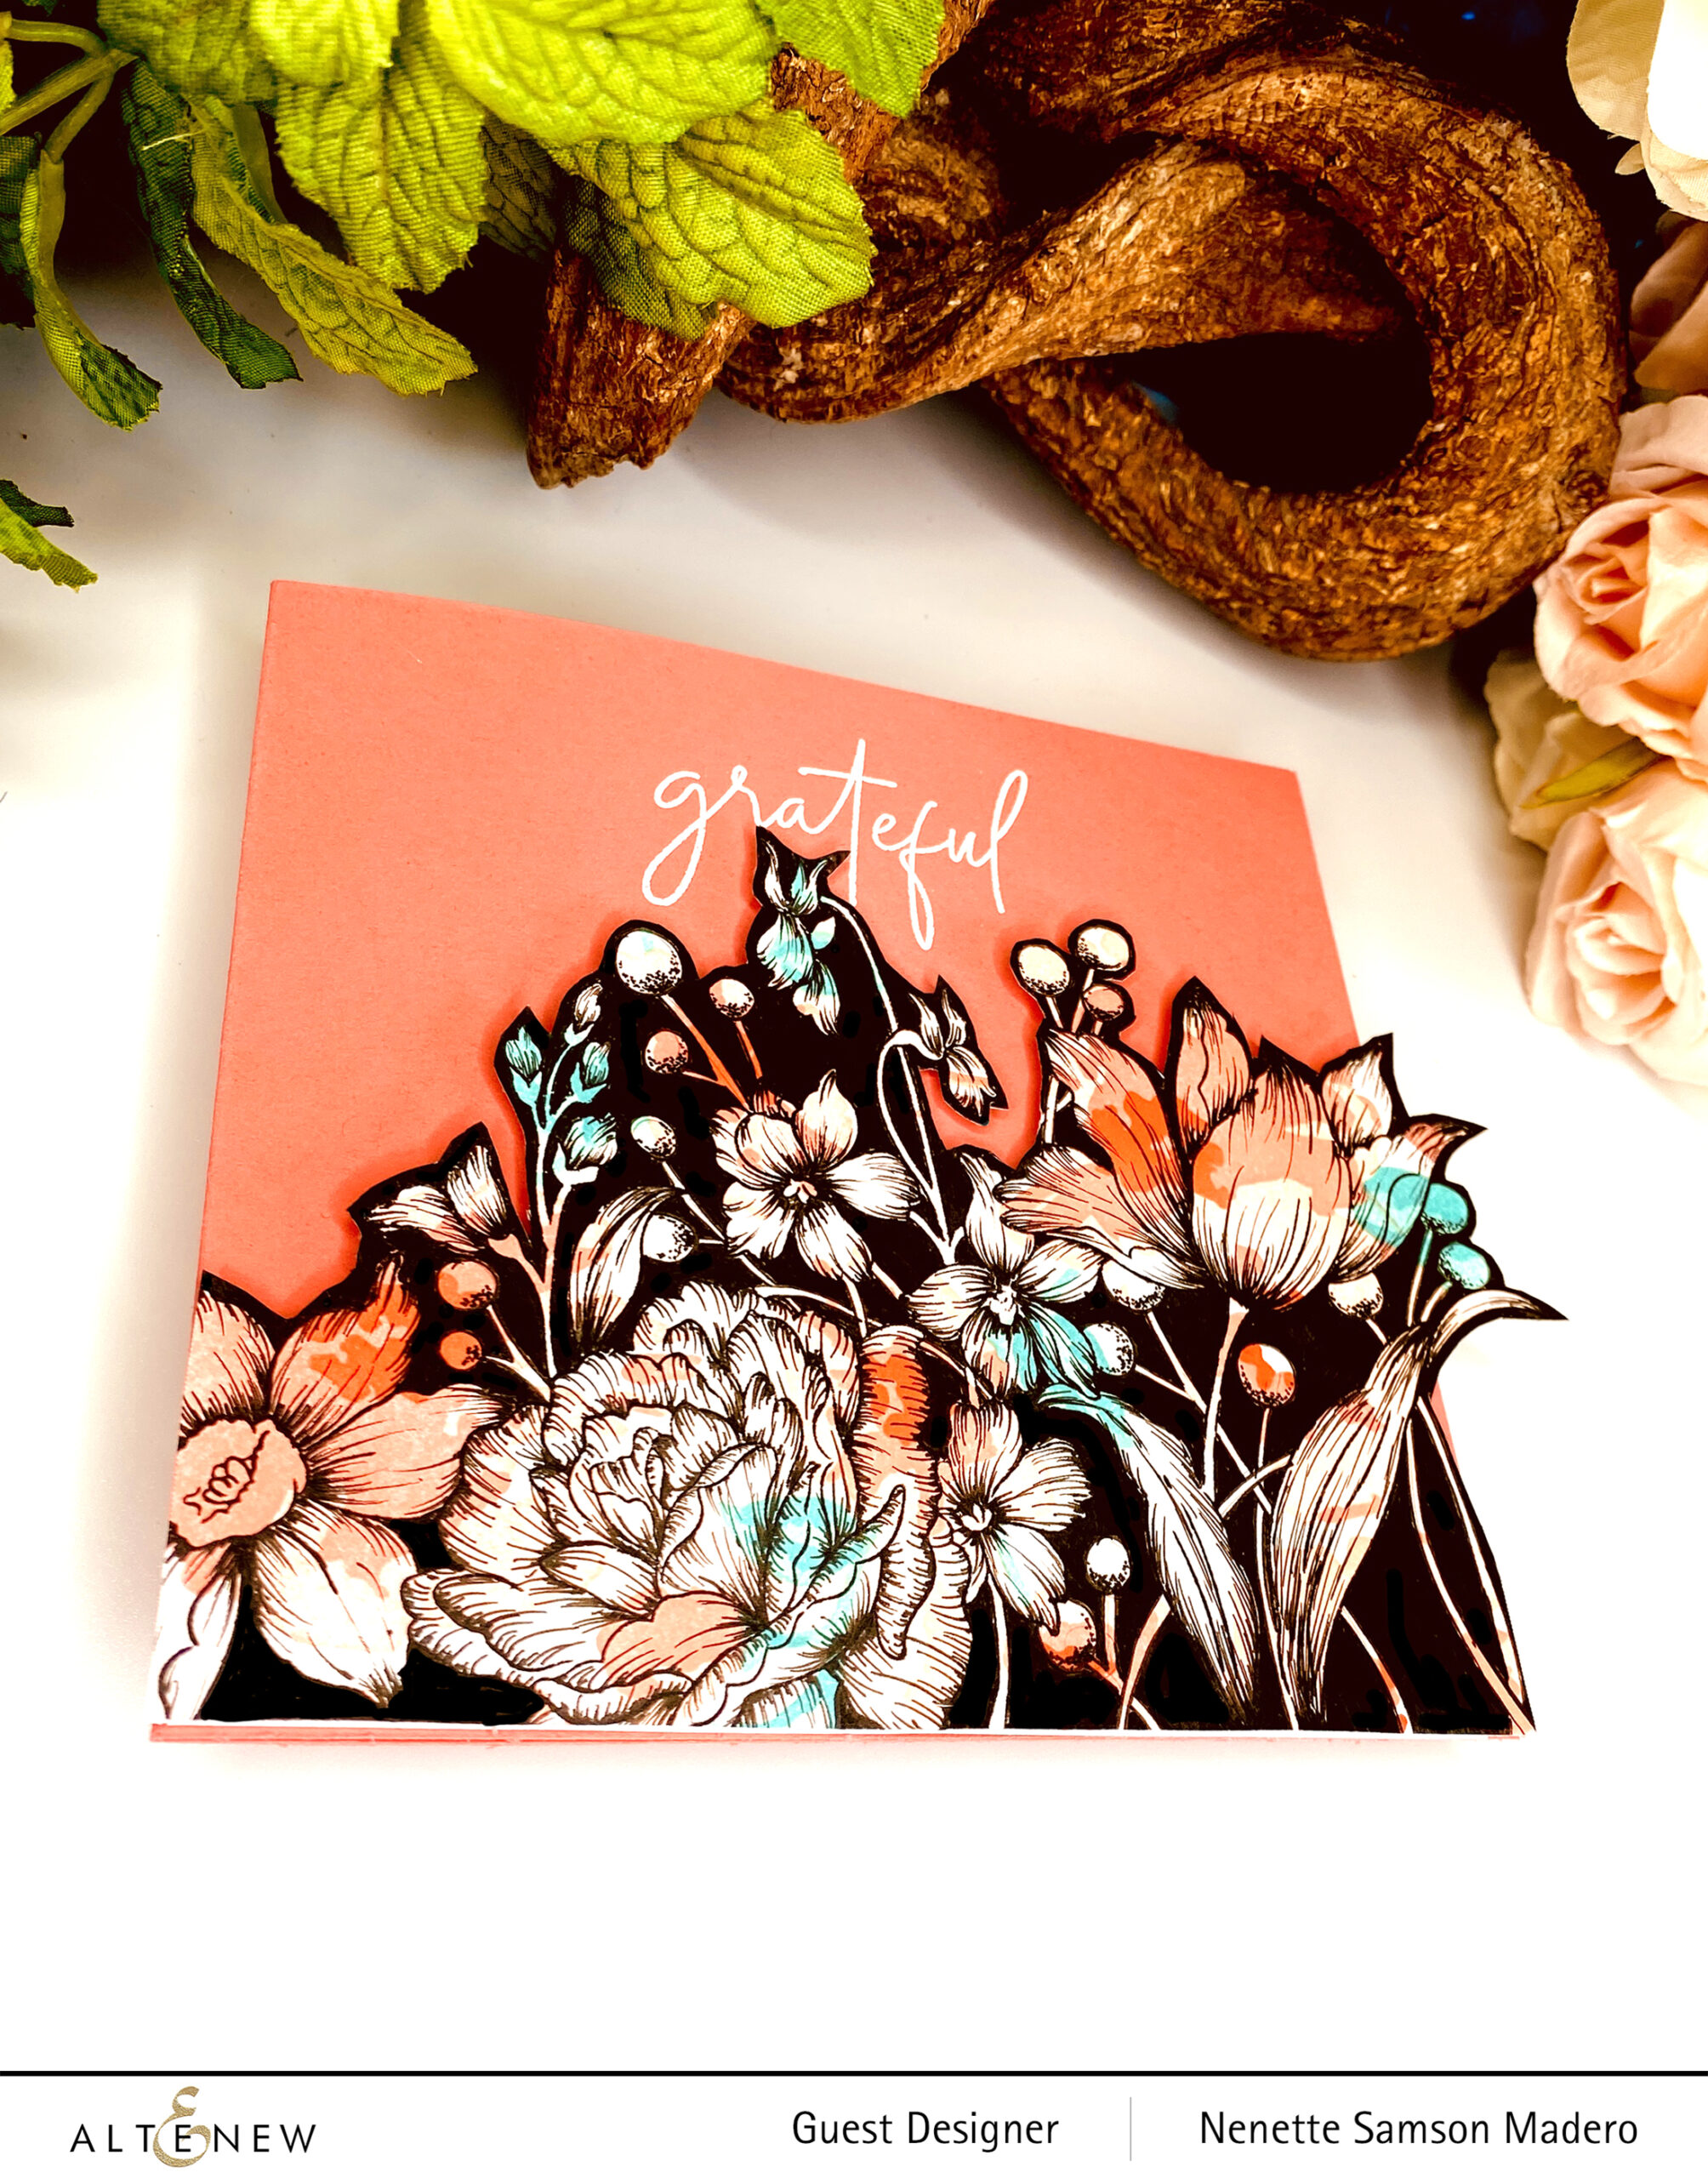
I love how this card turned out. It is a huge image and I didn’t want to cut it so I just made a 5×7 card. I also added a second image inside the card for an added surprise to the recipient.
TIP: When doing loose water-coloring, intentionally do not color some areas of the petals (leaving them white) to mimic highlights.
Add a plain die cut cardstock to the back of the clear cover panel to hide the glue/foam squares. I added another watercolored image inside the card to make it a little more special when the recipient opens it. <3
GOOD THINGS COME TO THOSE WHO READ and THE WORLD BELONGS TO THOSE WHO READ
For the blue card, die cut Happy Birthday from the Essential Sentiment Strips die 5 times. Color plain white paper using one of the blue alcohol ink markers and add to the back of the sentiment.
Assemble the cards using foam squares and adhesive.
TIP: The easiest way to color a background with lots of shapes is to use a monochromatic color scheme. Color all of the same shape at once them move on to the next shape using a different color.
YAY! AND THANKS
STEPS:
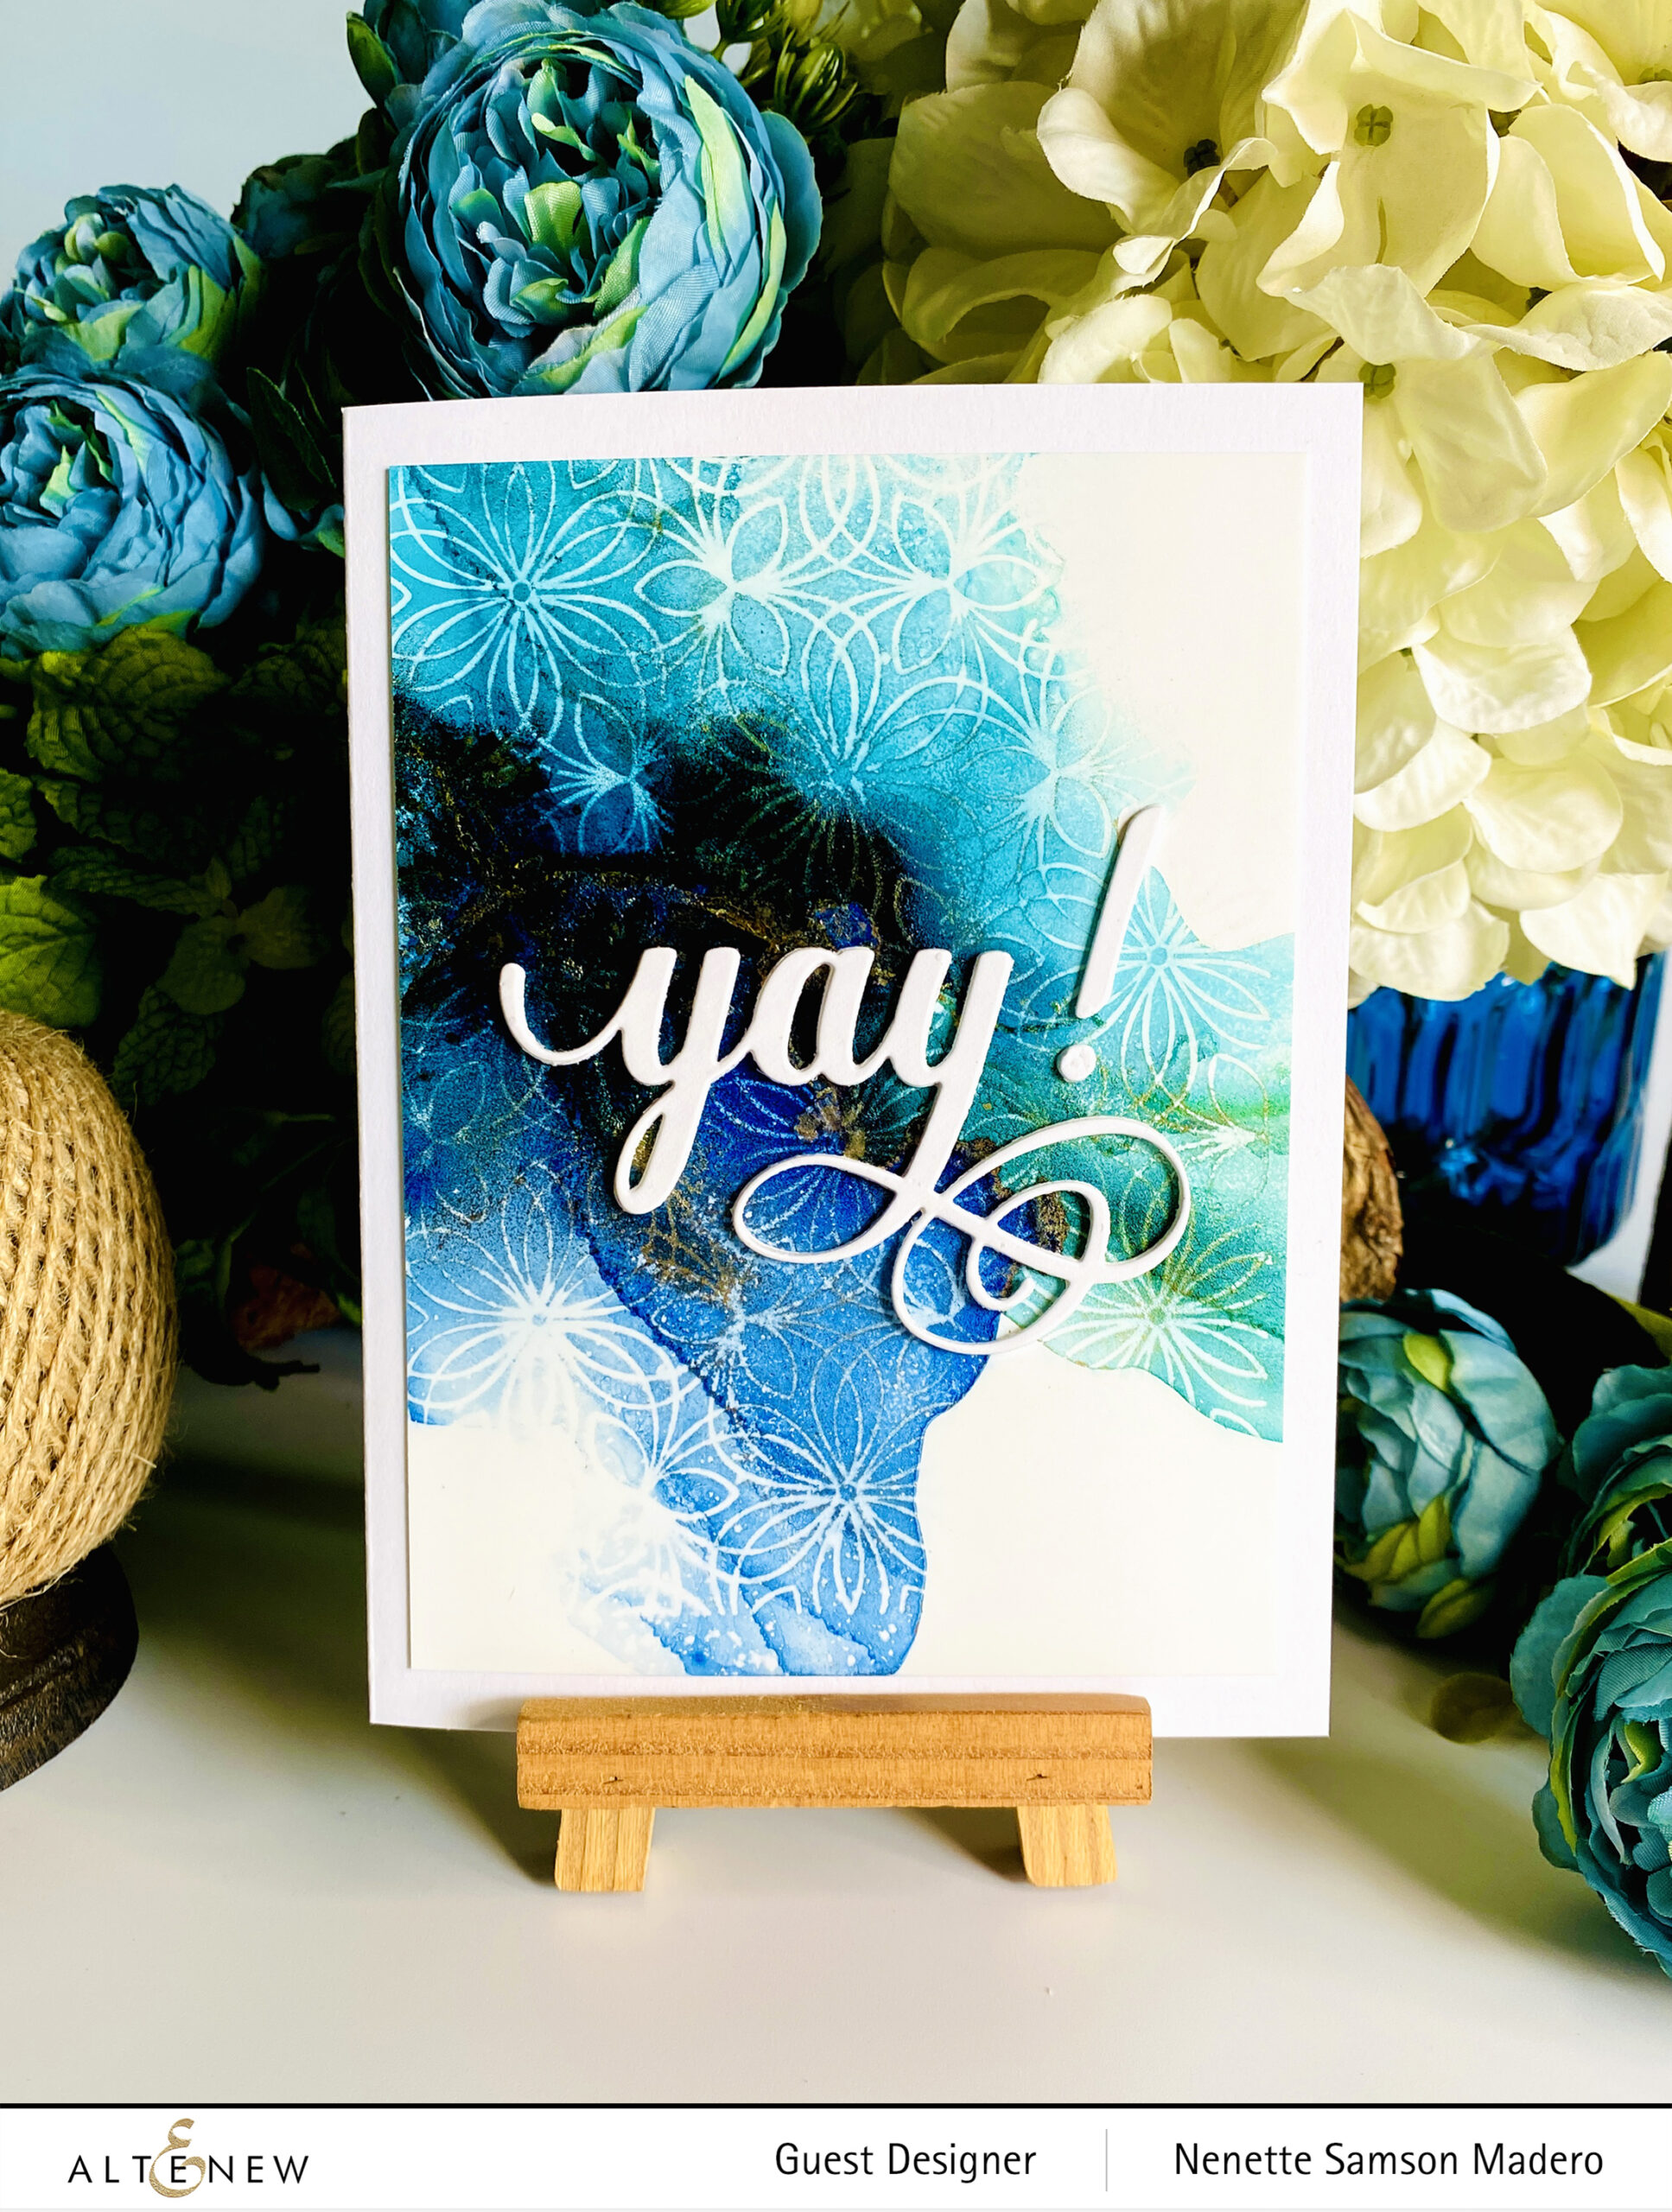
Create a background using the following alcohol inks: Galactic Stream, Teal Cave, Dusk, and Piñata Gold on Nara Paper. Use 90% isopropyl alcohol to dilute the inks. Allow to dry.
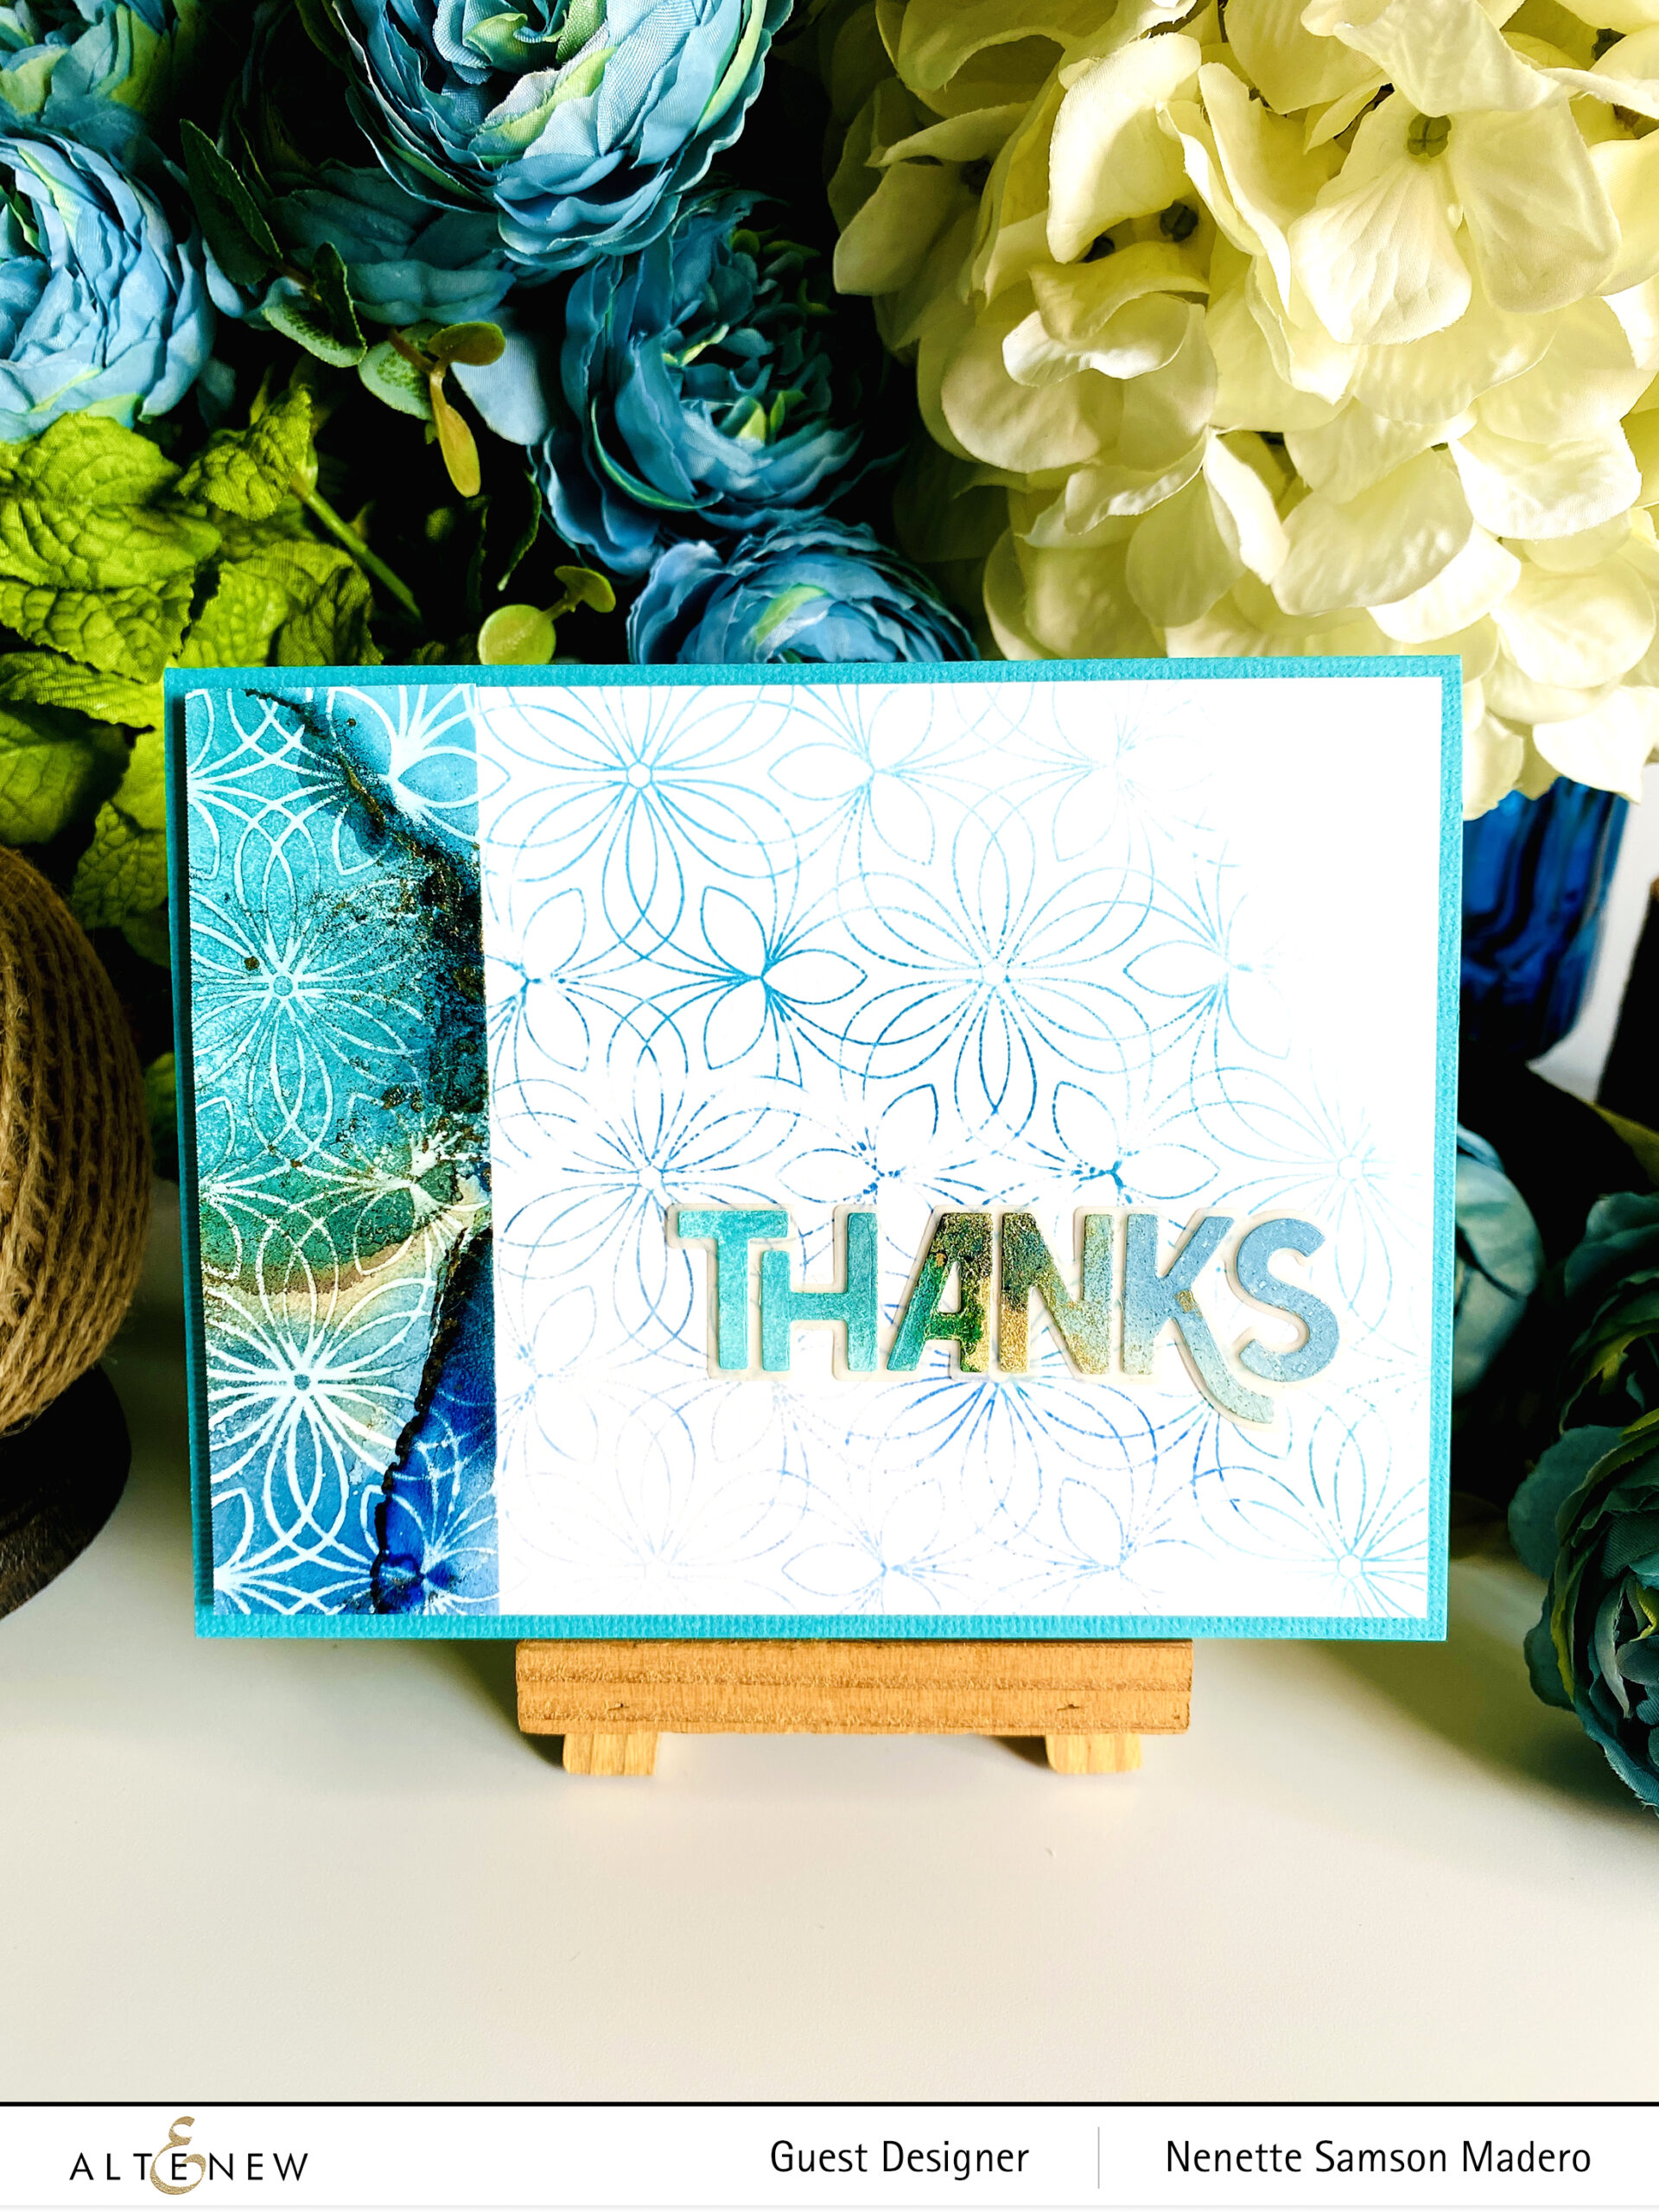
Stamp the image from the Geometric Botany background stamp set using Alcohol Lift Ink.
While the ink is still wet, stamp the image on another plain white cardstock to create a second card front.
Die cut the Fancy Yay! 5 times on white cardstock and adhere on top of each other.
Cut the alcohol inked background and adhere to a white card front. Adhere the Yay die cut.
Use the excess alcohol inked background as a border and a die cut sentiment for the 2nd card.
TIP: Dab the excess alcohol lift ink with a paper towel– remember to use a clean part of the towel every time you dab. When it’s dry, buff the surface and the image will magically become crisper. (I got this tip from everyone’s idol– Jennifer Mcguire).
TIP: Do not throw away your scraps! You can always use them as a border or for word dies like the Thanks card I made using scraps.
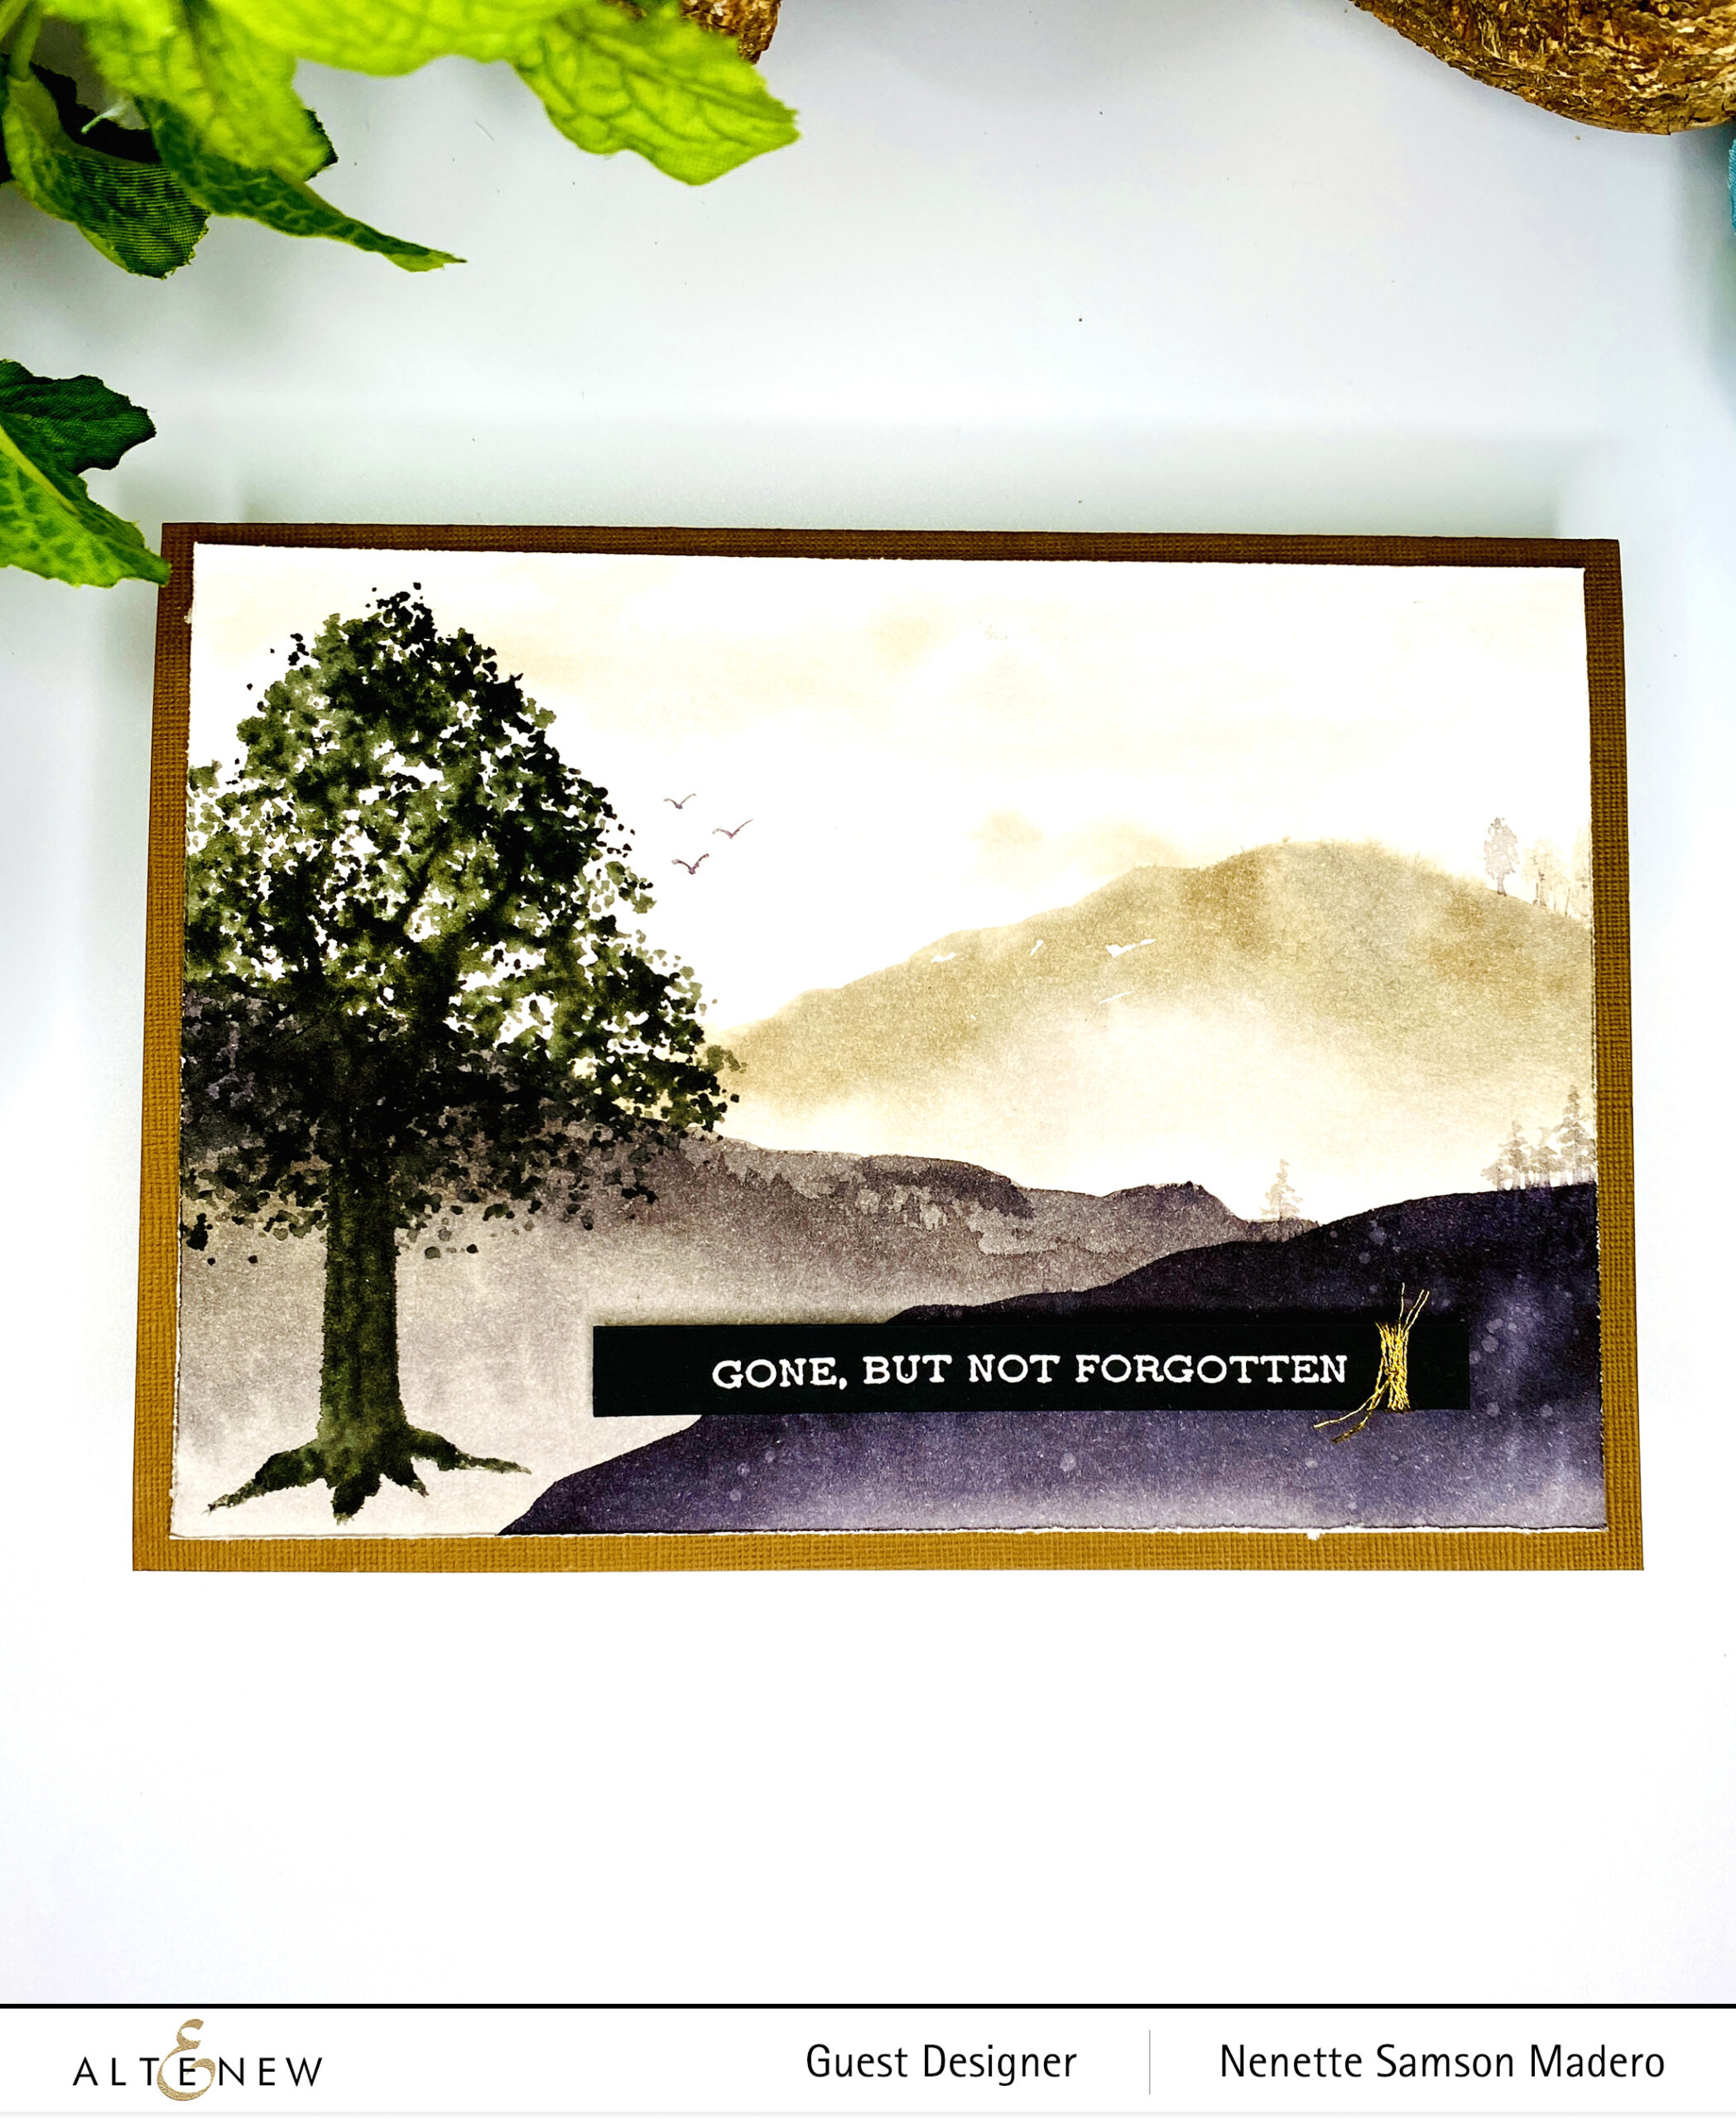
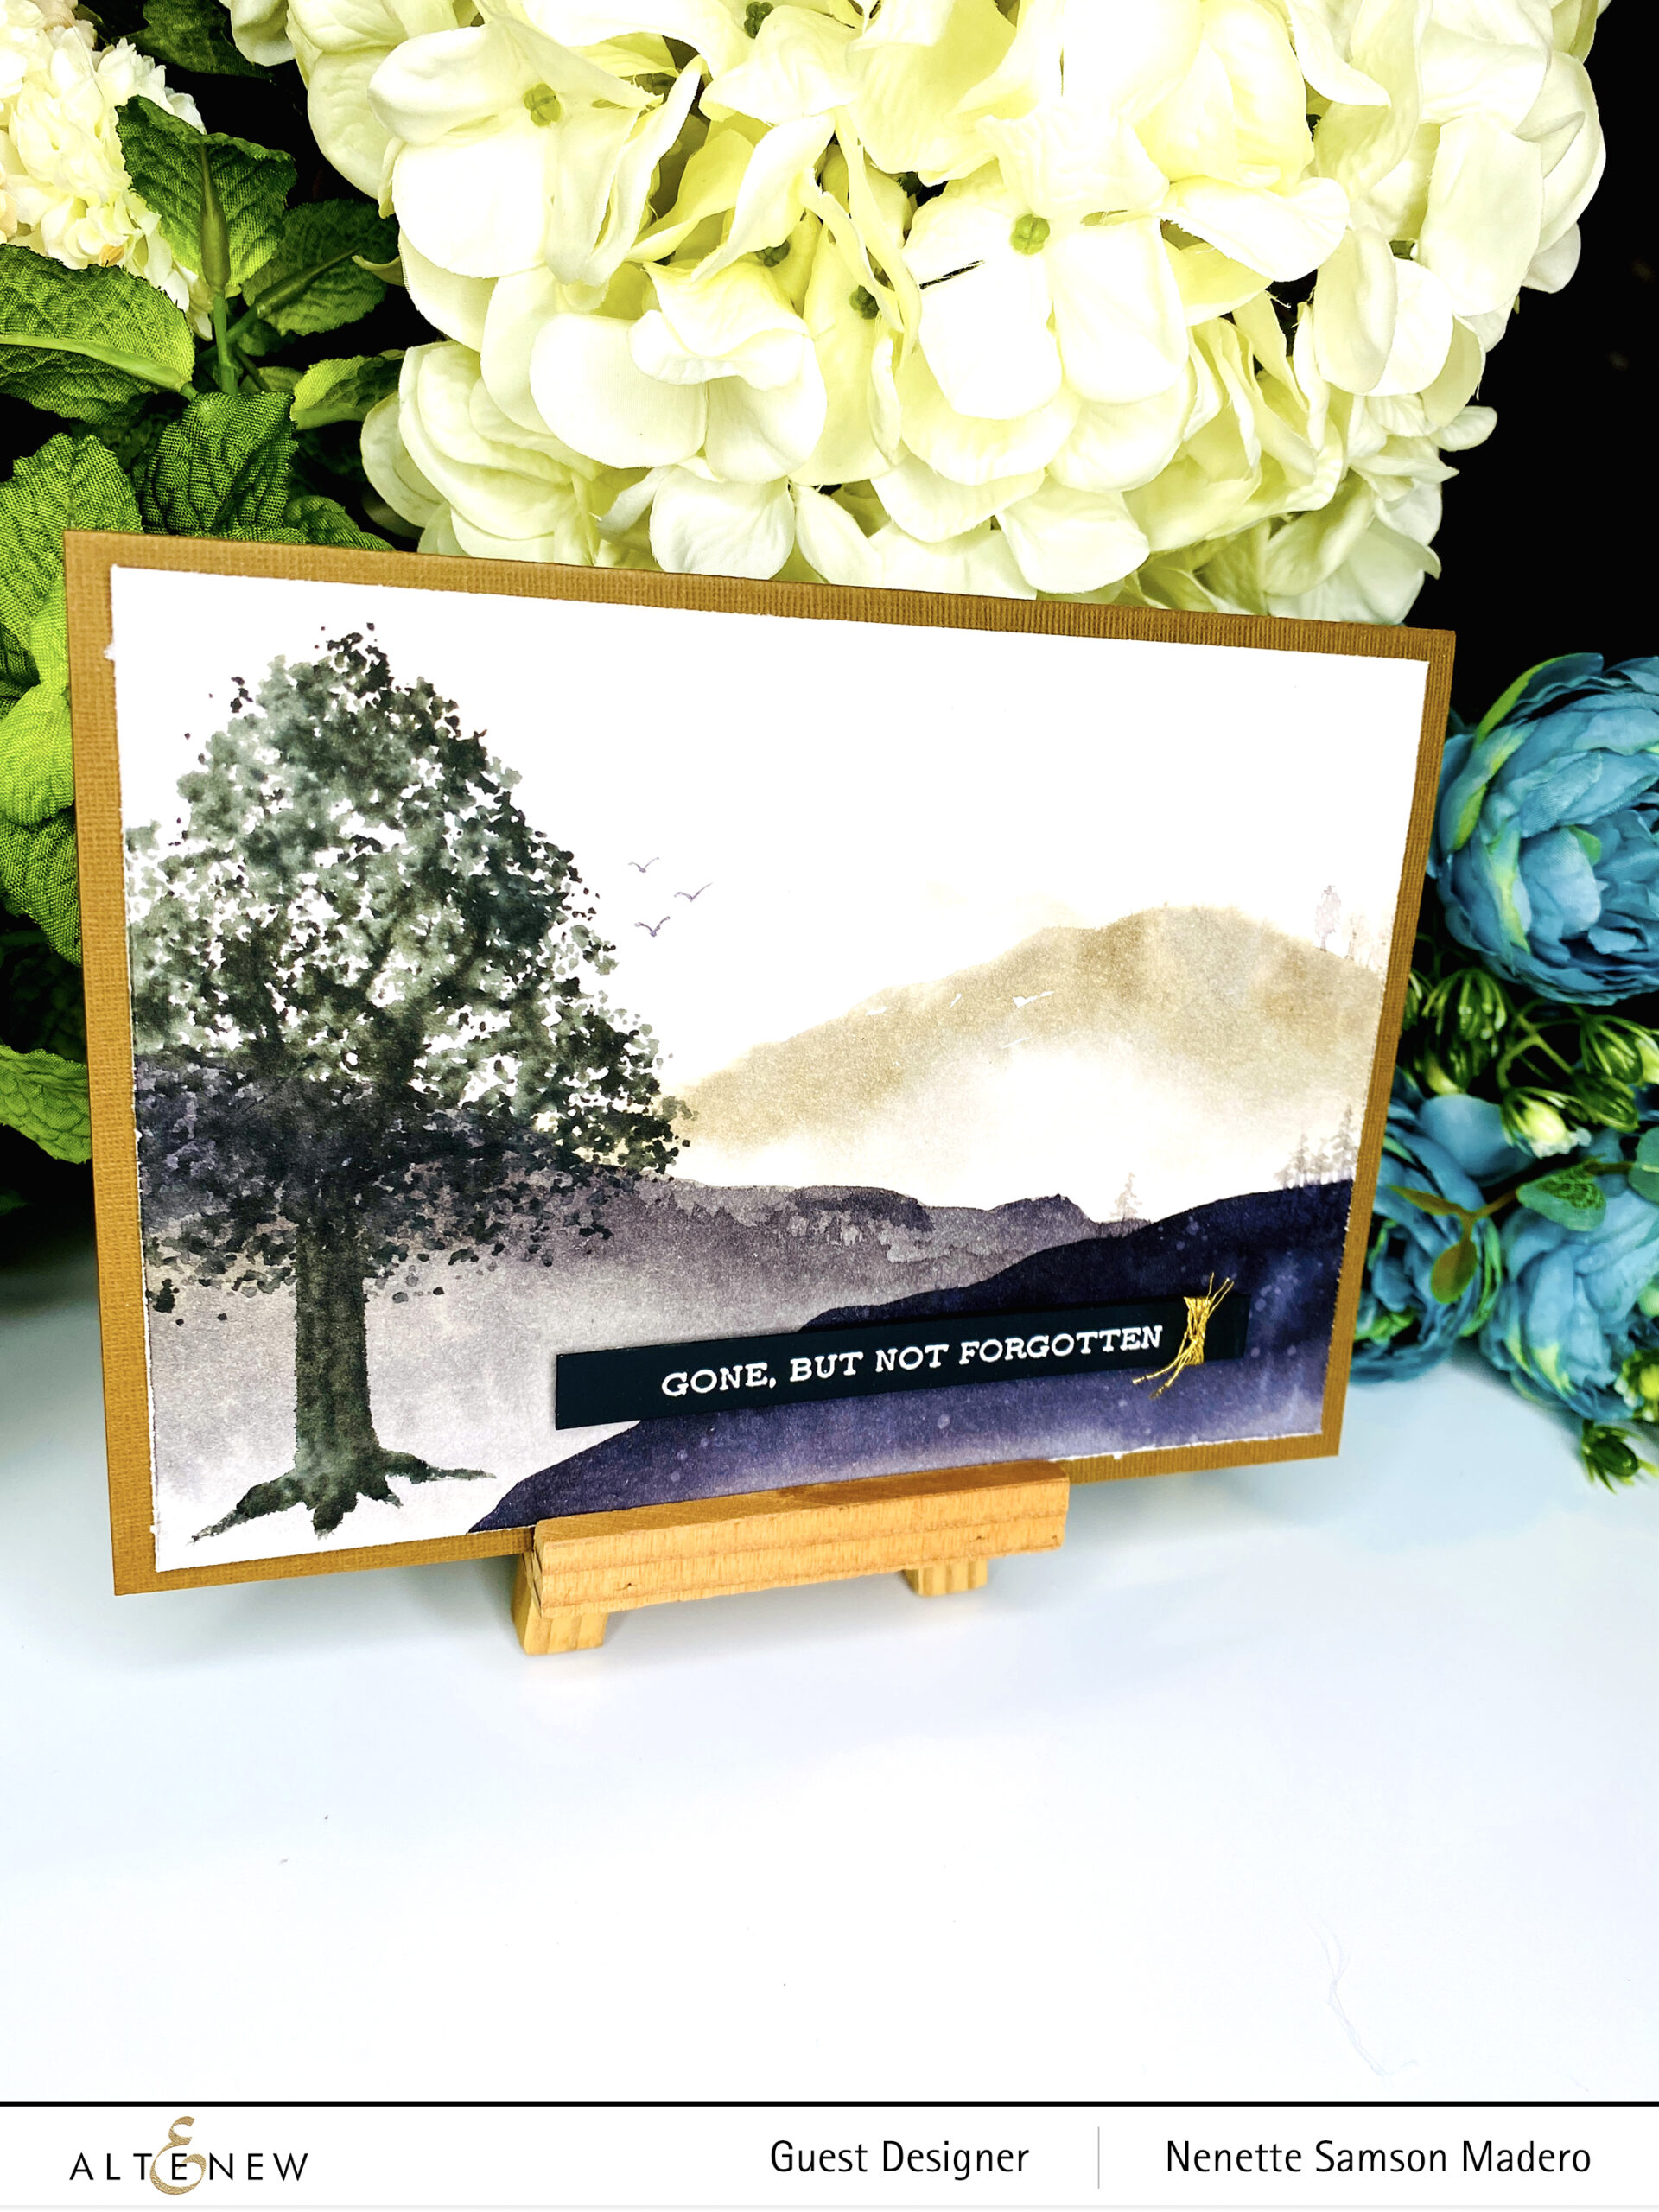
GONE BUT NOT FORGOTTEN
STEPS:
Create a watercolored background using Watercolor brush markers. Add water for the pigments to bleed.
Stamp the image from the Tree of Fantasy Stamp using dye inks and sprits water on the stamp before stamping. Add additional defined branches with watercolor.
Add small trees on the hills with diluted watercolor.
Stamp the sentiment from the Sentiment Strips 3 set and emboss using Pure White Embossing powder. Tie the Metallic Thread for added accent on the card.
I wanted to keep this card simple and the colors subdued since it’s a sympathy card. It’s sad that I need to create more of these cards lately. Hopefully, this card will make my friend feel how much I also hurt for the loss of his Mom.
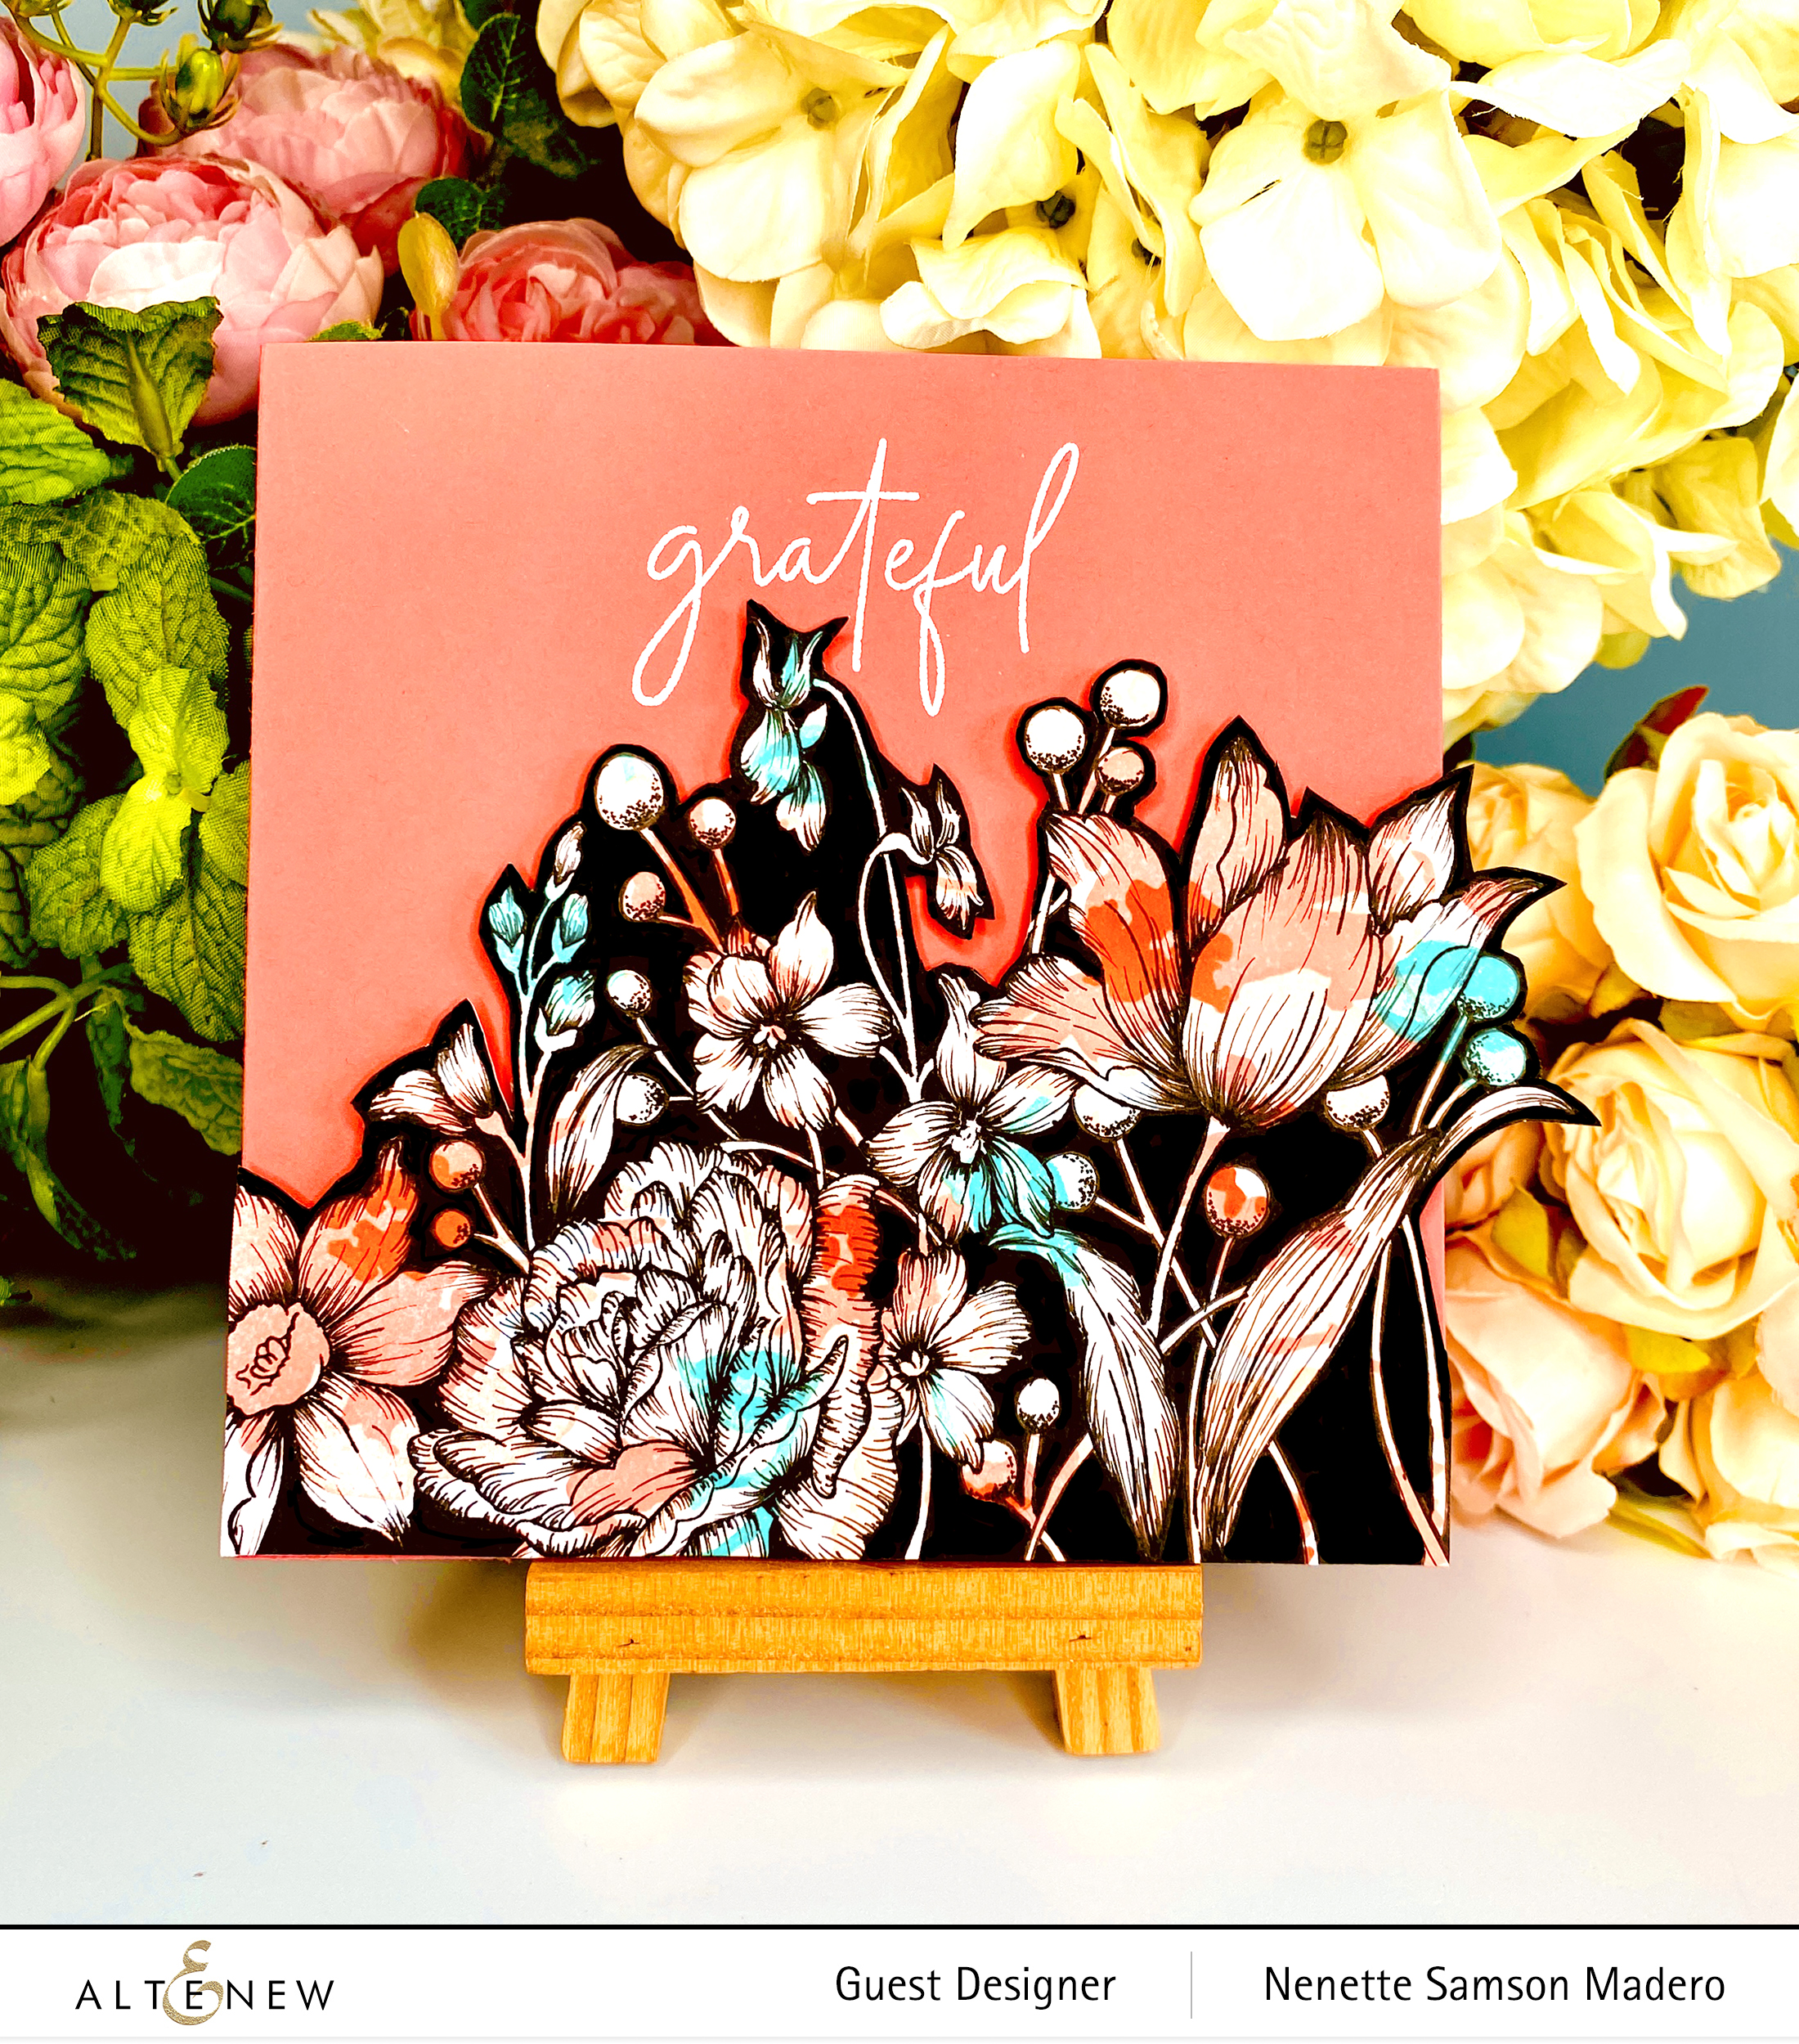
Stamp the image from the Endless Florescence Stamp Set on top of the stamped background and add botanical lines on the leaves and stems using Tombow drawing pens 0.1, 0.3 and 0.5. Add additional berries and branches in certain spaces then color the background black. Stamp the sentiment on the front cover using the Inside and Out: Thanks Stamp set.
TIP: I recently took a Botanical Line Drawing Workshop with Thea Po and I got so excited thinking of all the stamp sets I can use this technique with!!! The key here is to follow the curvature of the petal, leaf or bud so that it will not look stiff. Add different lengths of lines, too!
GIVEAWAYS
$300 in total prizes! To celebrate this release, Altenew is giving away a $50 gift certificate to 2 lucky winners and a $25 gift certificate to 8 winners! Please leave a comment on the Altenew Card Blog and/or each designer’s blog post on the blog hop list below by 03/10/2022 for a chance to win.
Altenew will draw 10 random winners from the comments left on each stop of this blog hop and announce the winners on the Altenew Winners Page on 03/12/2022.
Next up: Laurie Willison. Thank you so much for dropping by! I hope you liked the cards I created for this release. Would love to hear what your favorite is. If you have any questions, just let me know and if you like what you see, I hope you can follow me on IG as well (@mylittleatticstudio) Don’t forget to leave a comment below to get a chance to win a prize from Altenew! Until my next post– stay safe and happy crafting!
P.S. I hope, as a crafting community, we can all be together in prayer for Ukraine and that the world leaders will always choose peace over war and aggression. 🙏🏼🙏🏼🙏🏼
Welcome to my blog, everyone! If you just came from Carol Hintermeier‘s blog, then you’re on the right track. For the complete details of this hop, please visit the Altenew blog here. If you’d like to purchase this beautiful Build-a-Flower: Giant Bellflower stamp set, you can find it here.
Cut the embossed paper to create a curved opening.
Stamp the sentiment on black cardstock.
Assemble the card with foam squares.
TIP: Create the curved white space to draw the eyes to the sentiment.
Be part of the monthly subscription plan here and get 14% off! Aside from the discount, you won’t be missing any of the floral stamps featured in this series.
GIVEAWAYS
$200 in total prizes! To celebrate this release, Altenew is giving away a $50 gift certificate to 2 lucky winners and a $20 gift certificate to 5 winners! Please leave a comment on the Altenew Card Blog and/or each designer’s blog post on the blog hop list below by 03/06/2022 for a chance to win. Altenew will draw 7 random winners from the comments left on each stop of this blog hop and announce the winners on the Altenew Winners Page on 03/09/2022.
Next up: Keren Baker. Thank you so much for dropping by. I’d love to hear which card is your favorite and why. Your comments mean so much to me! For my latest creations and other interests, hope you can drop by and say hello on my IG account ( @mylittleatticstudio). Stay safe and happy crafting!
Hello, everyone! Welcome to Altenew’s Dreamy Bouquet Fabric Release blog hop!!! If you just came from Sande Woodson’s blog, then you’re on the right track. For the full details, make sure to visit the Altenew blog here. If you want to see the whole collection, here’s the link.
I was sooooo excited when I heard about this latest and newest product category!!! My mind started working way before the package arrived. I wanted to think of different ways to use these gorgeous fabrics. Full disclosure here– I don’t know how to use a sewing machine! 🙂 That being said, I nervously learned how to thread the machine and sew simple stitches for one of the projects below. The rest were only hand-stiched or glued. I have a number of projects to share with you so lets get started.
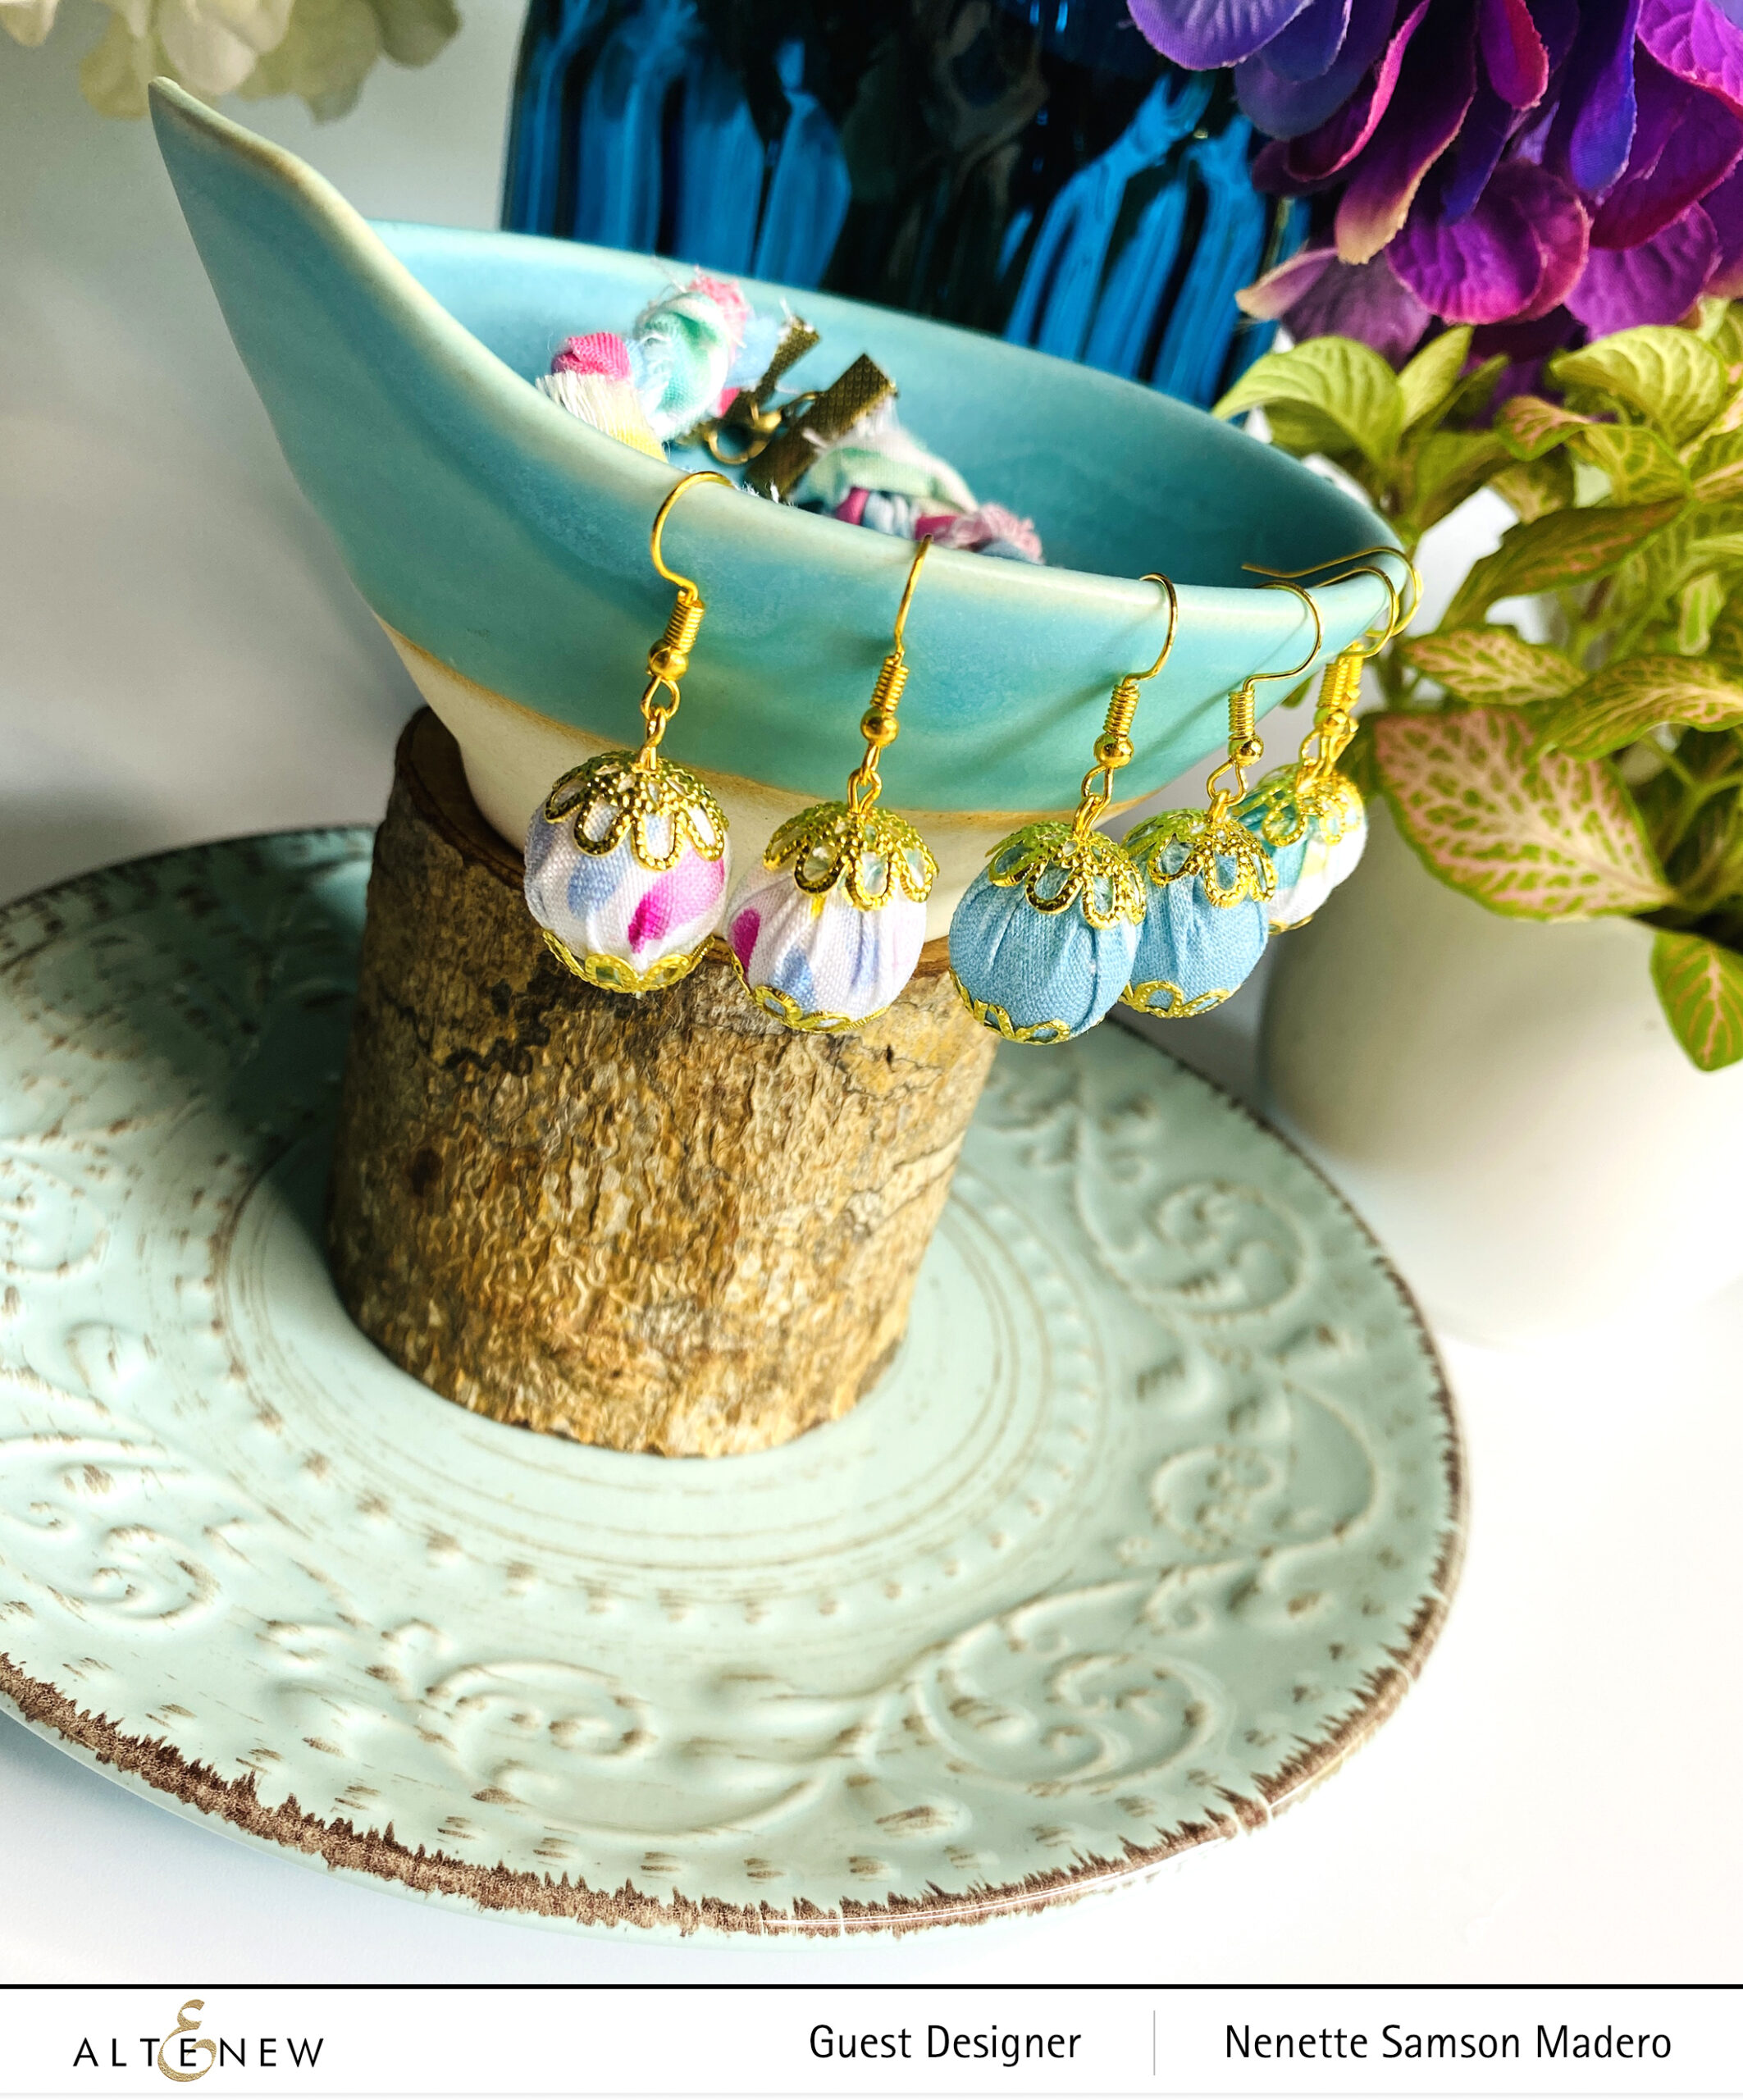
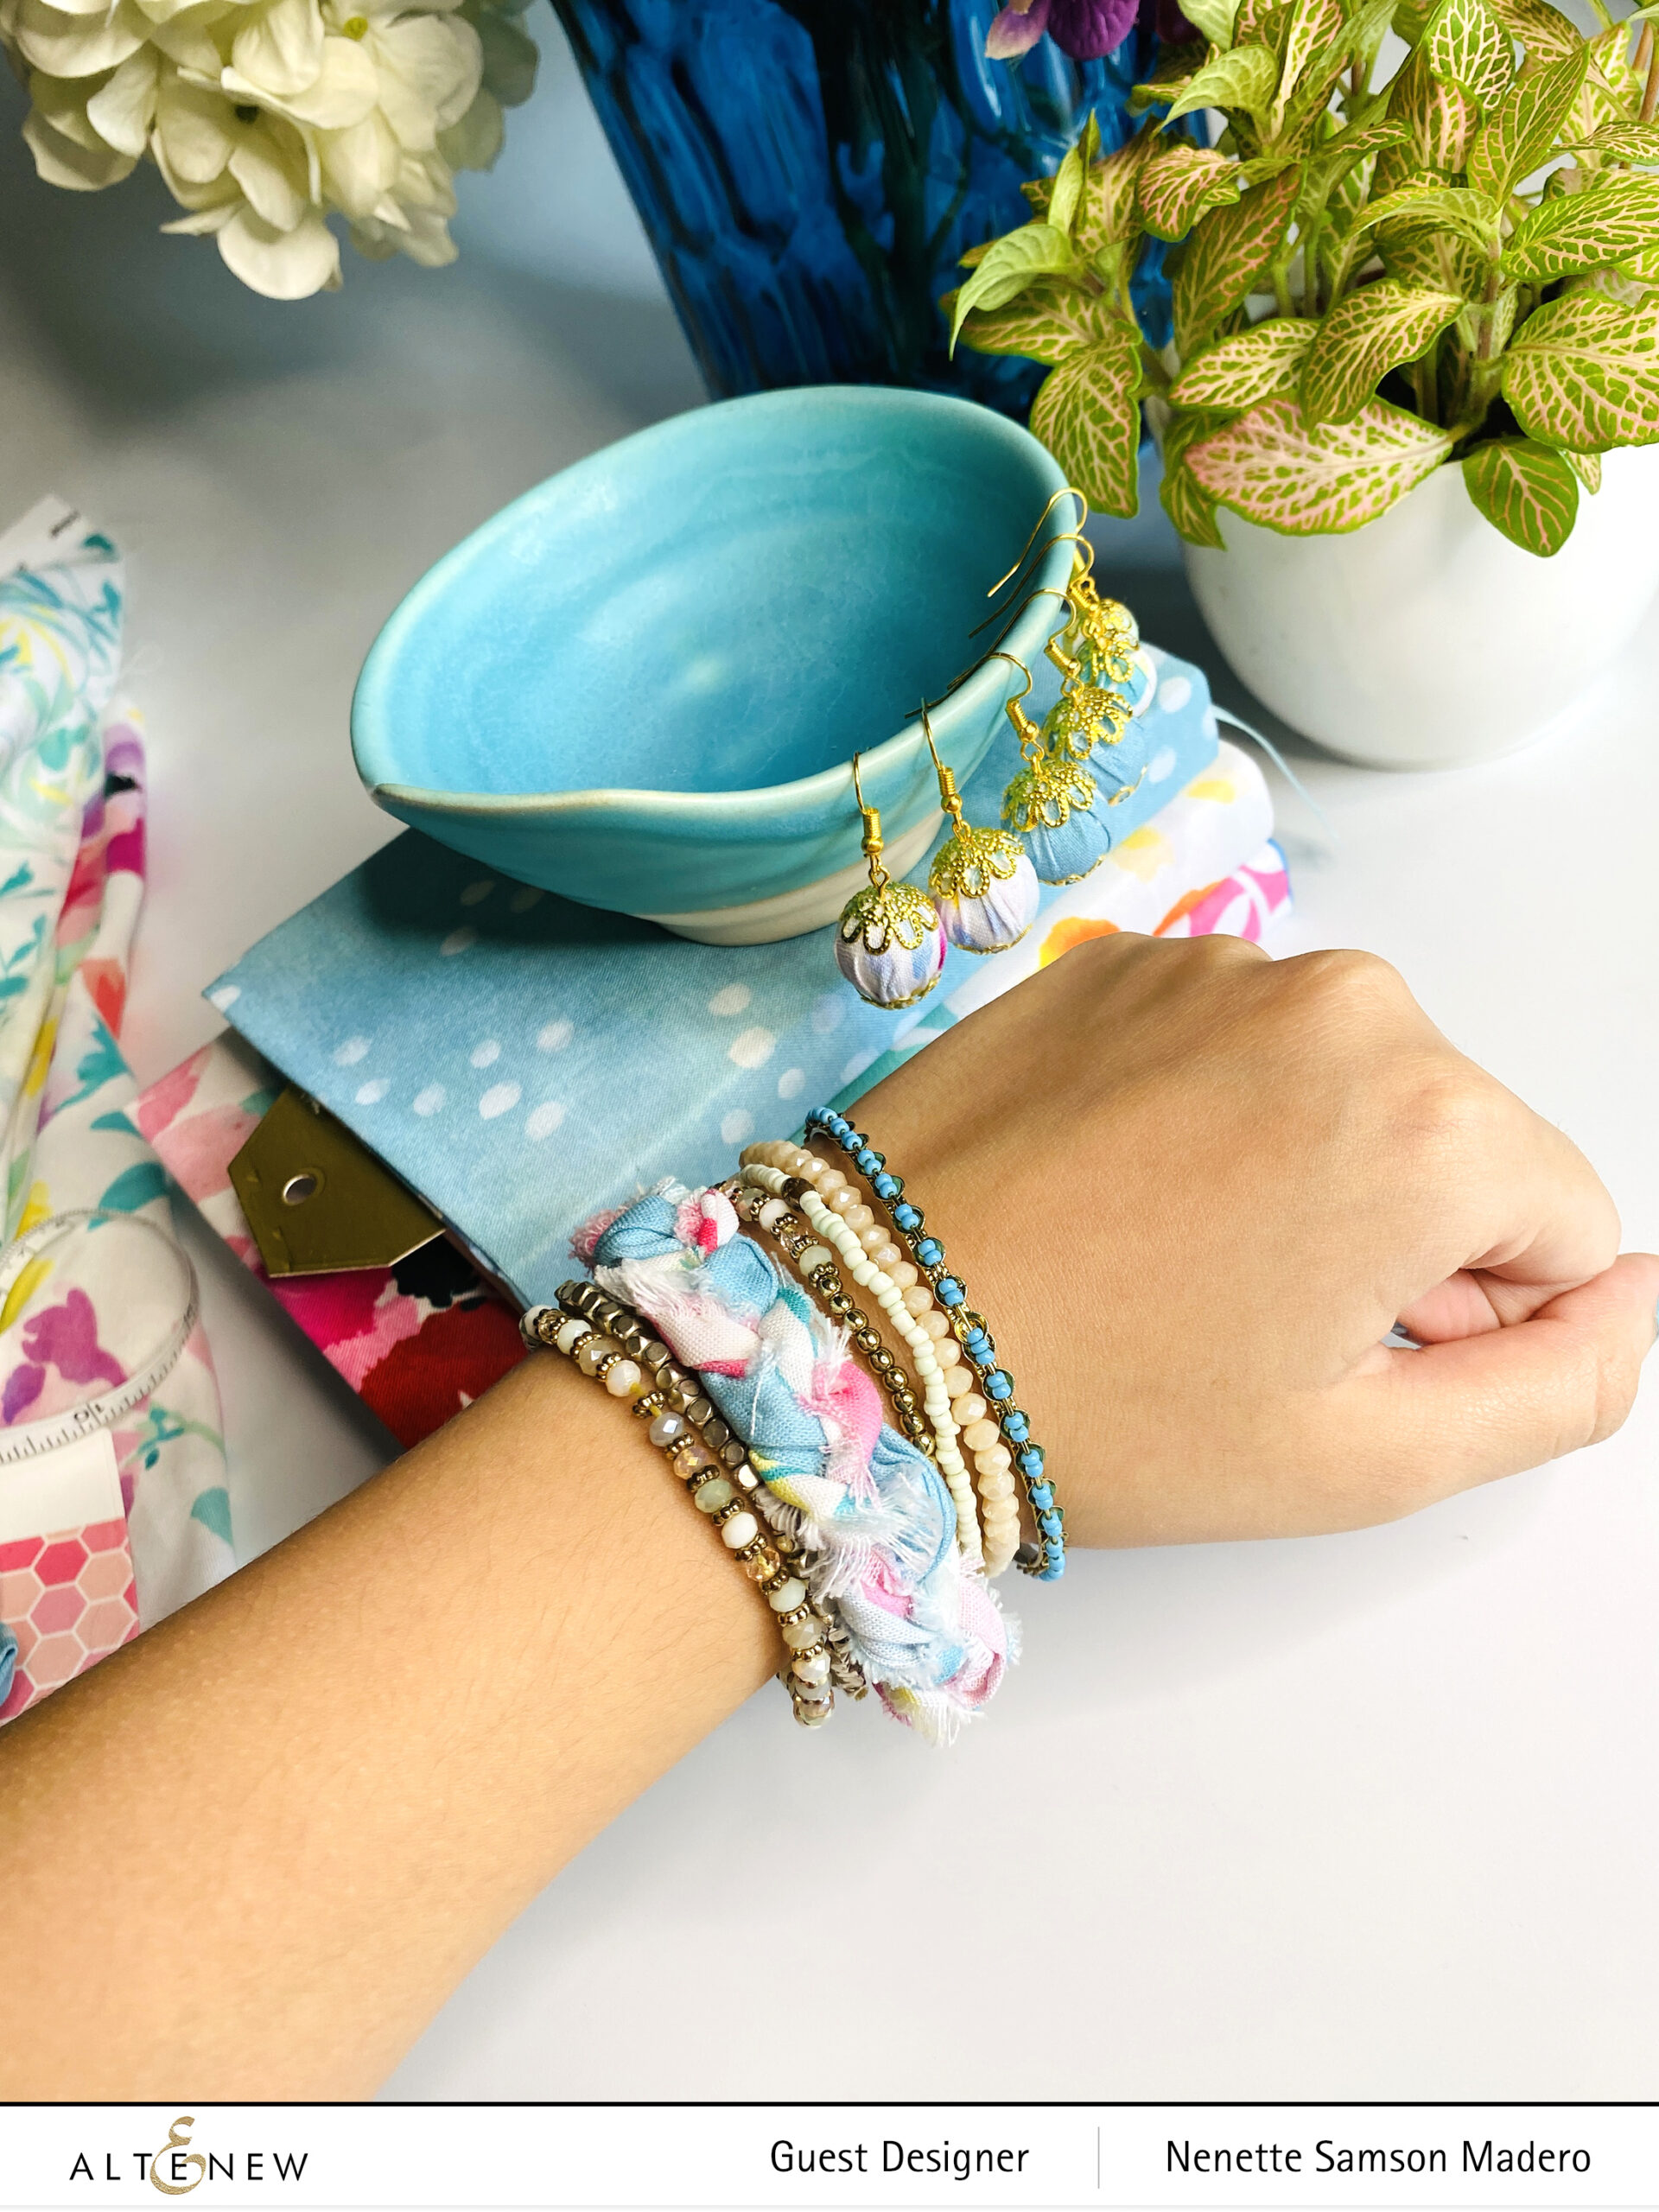
Look at the amazing colors and patterns of these fabrics!! As you can see, I made hair accessories, bracelets, earrings and book covers. Let’s go through them one by one.
FABRIC EARRINGS
STEPS:
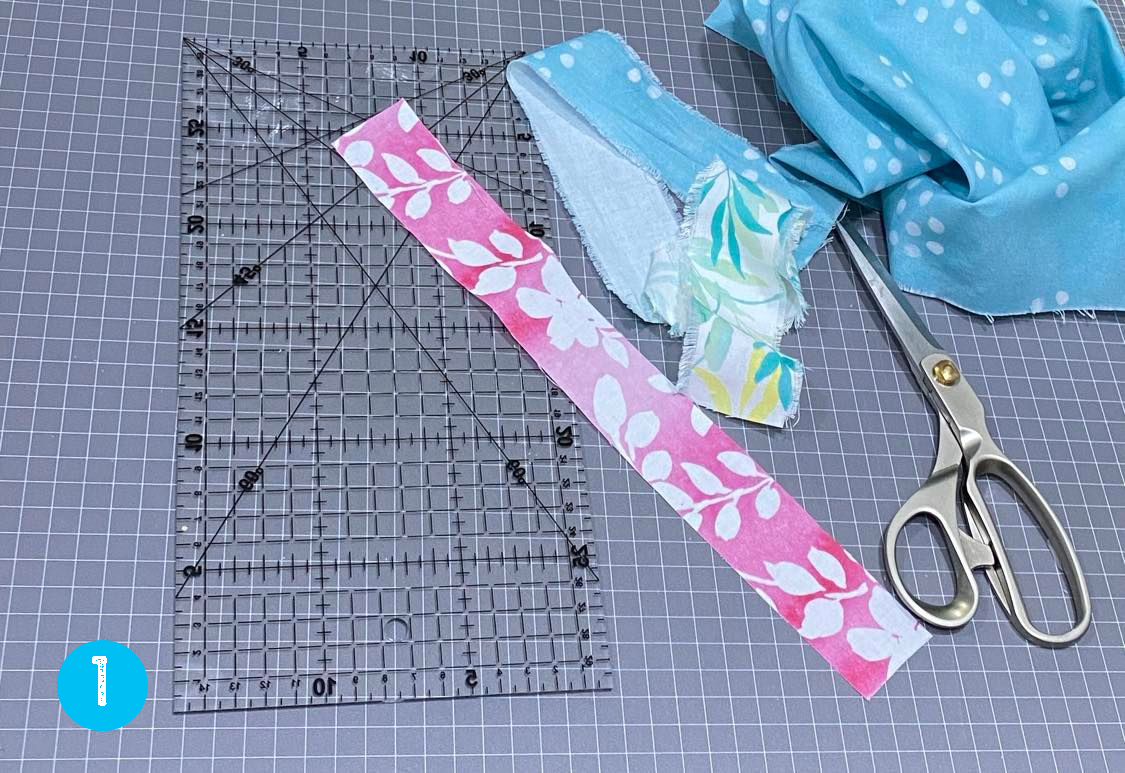
Cut out the fabric into squares measuring 2.5″ x 2.5 “.
Wrap the round bead with fabric making sure the hole of the bead is centered at the base.
Twist the end tightly and start sewing around the fabric to hold it in place.
Cut the excess fabric as close to the sewn thread as possible.
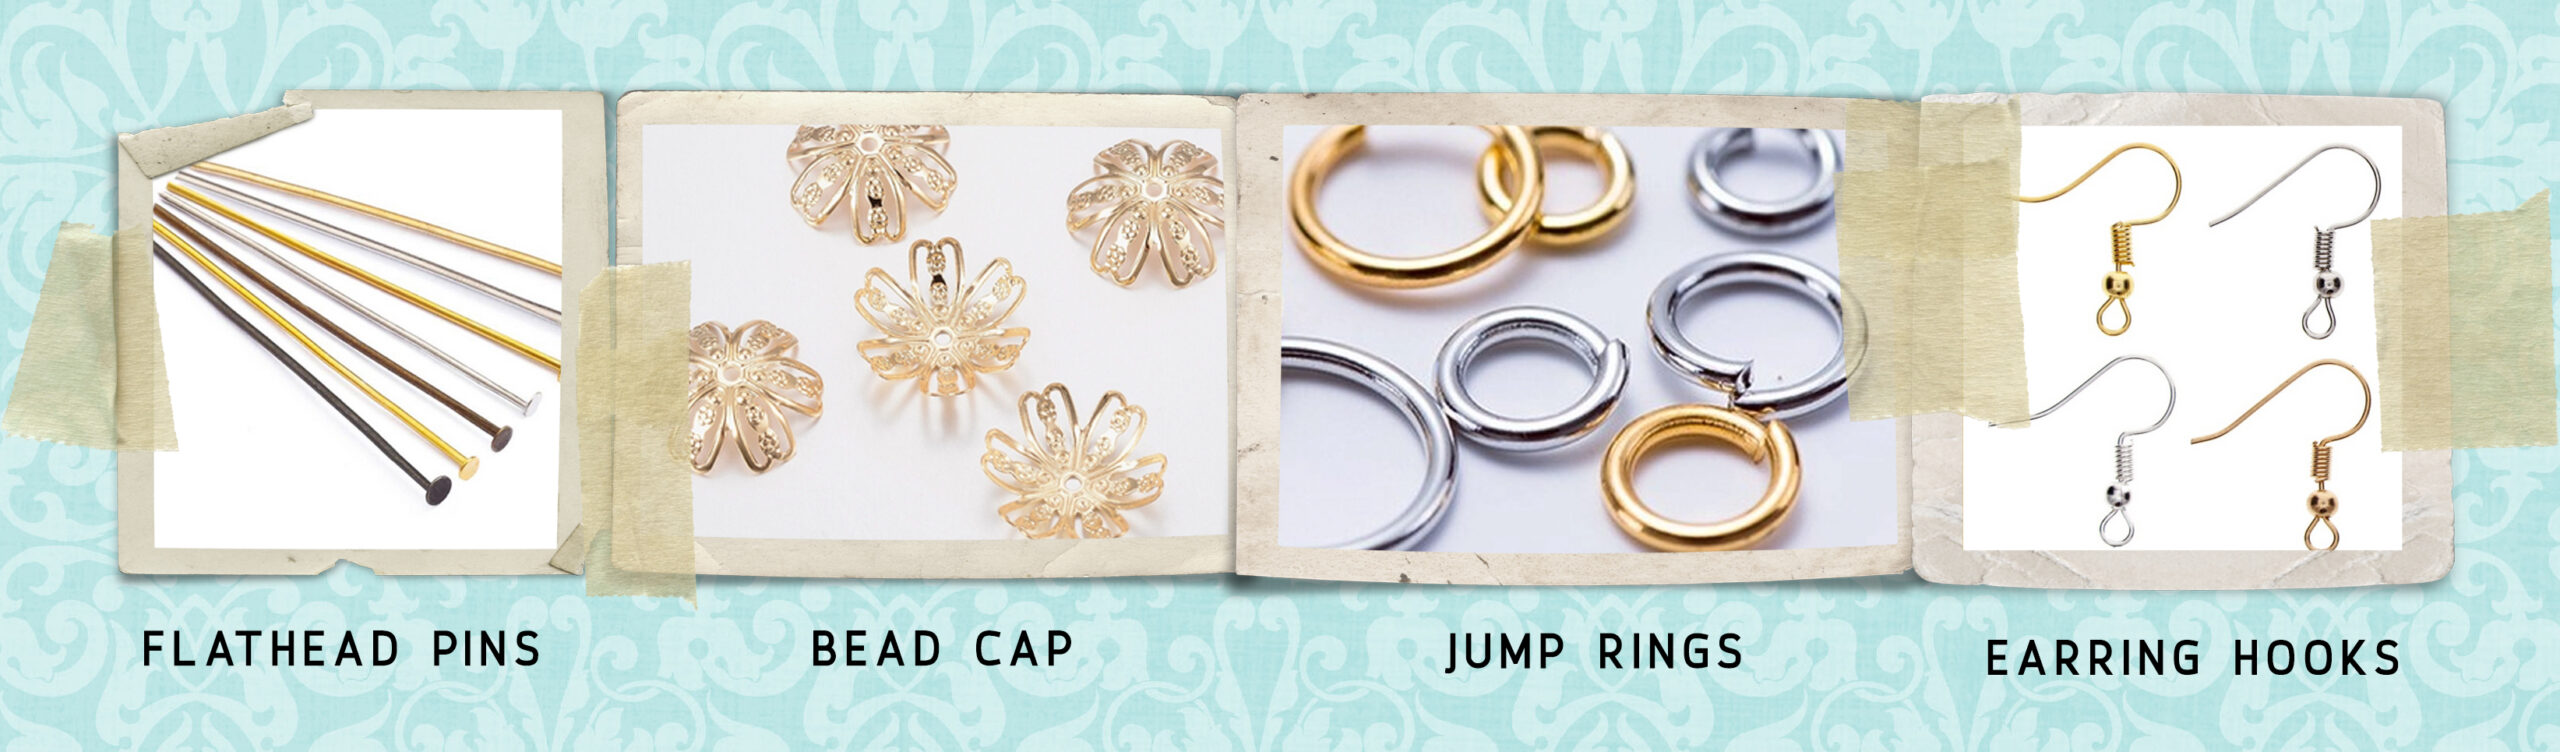
Insert a flathead pin into the bead cap then insert it through the hole of the fabric-wrapped bead.
Cover the other end with another bead cap and create a loop using a round pliers.
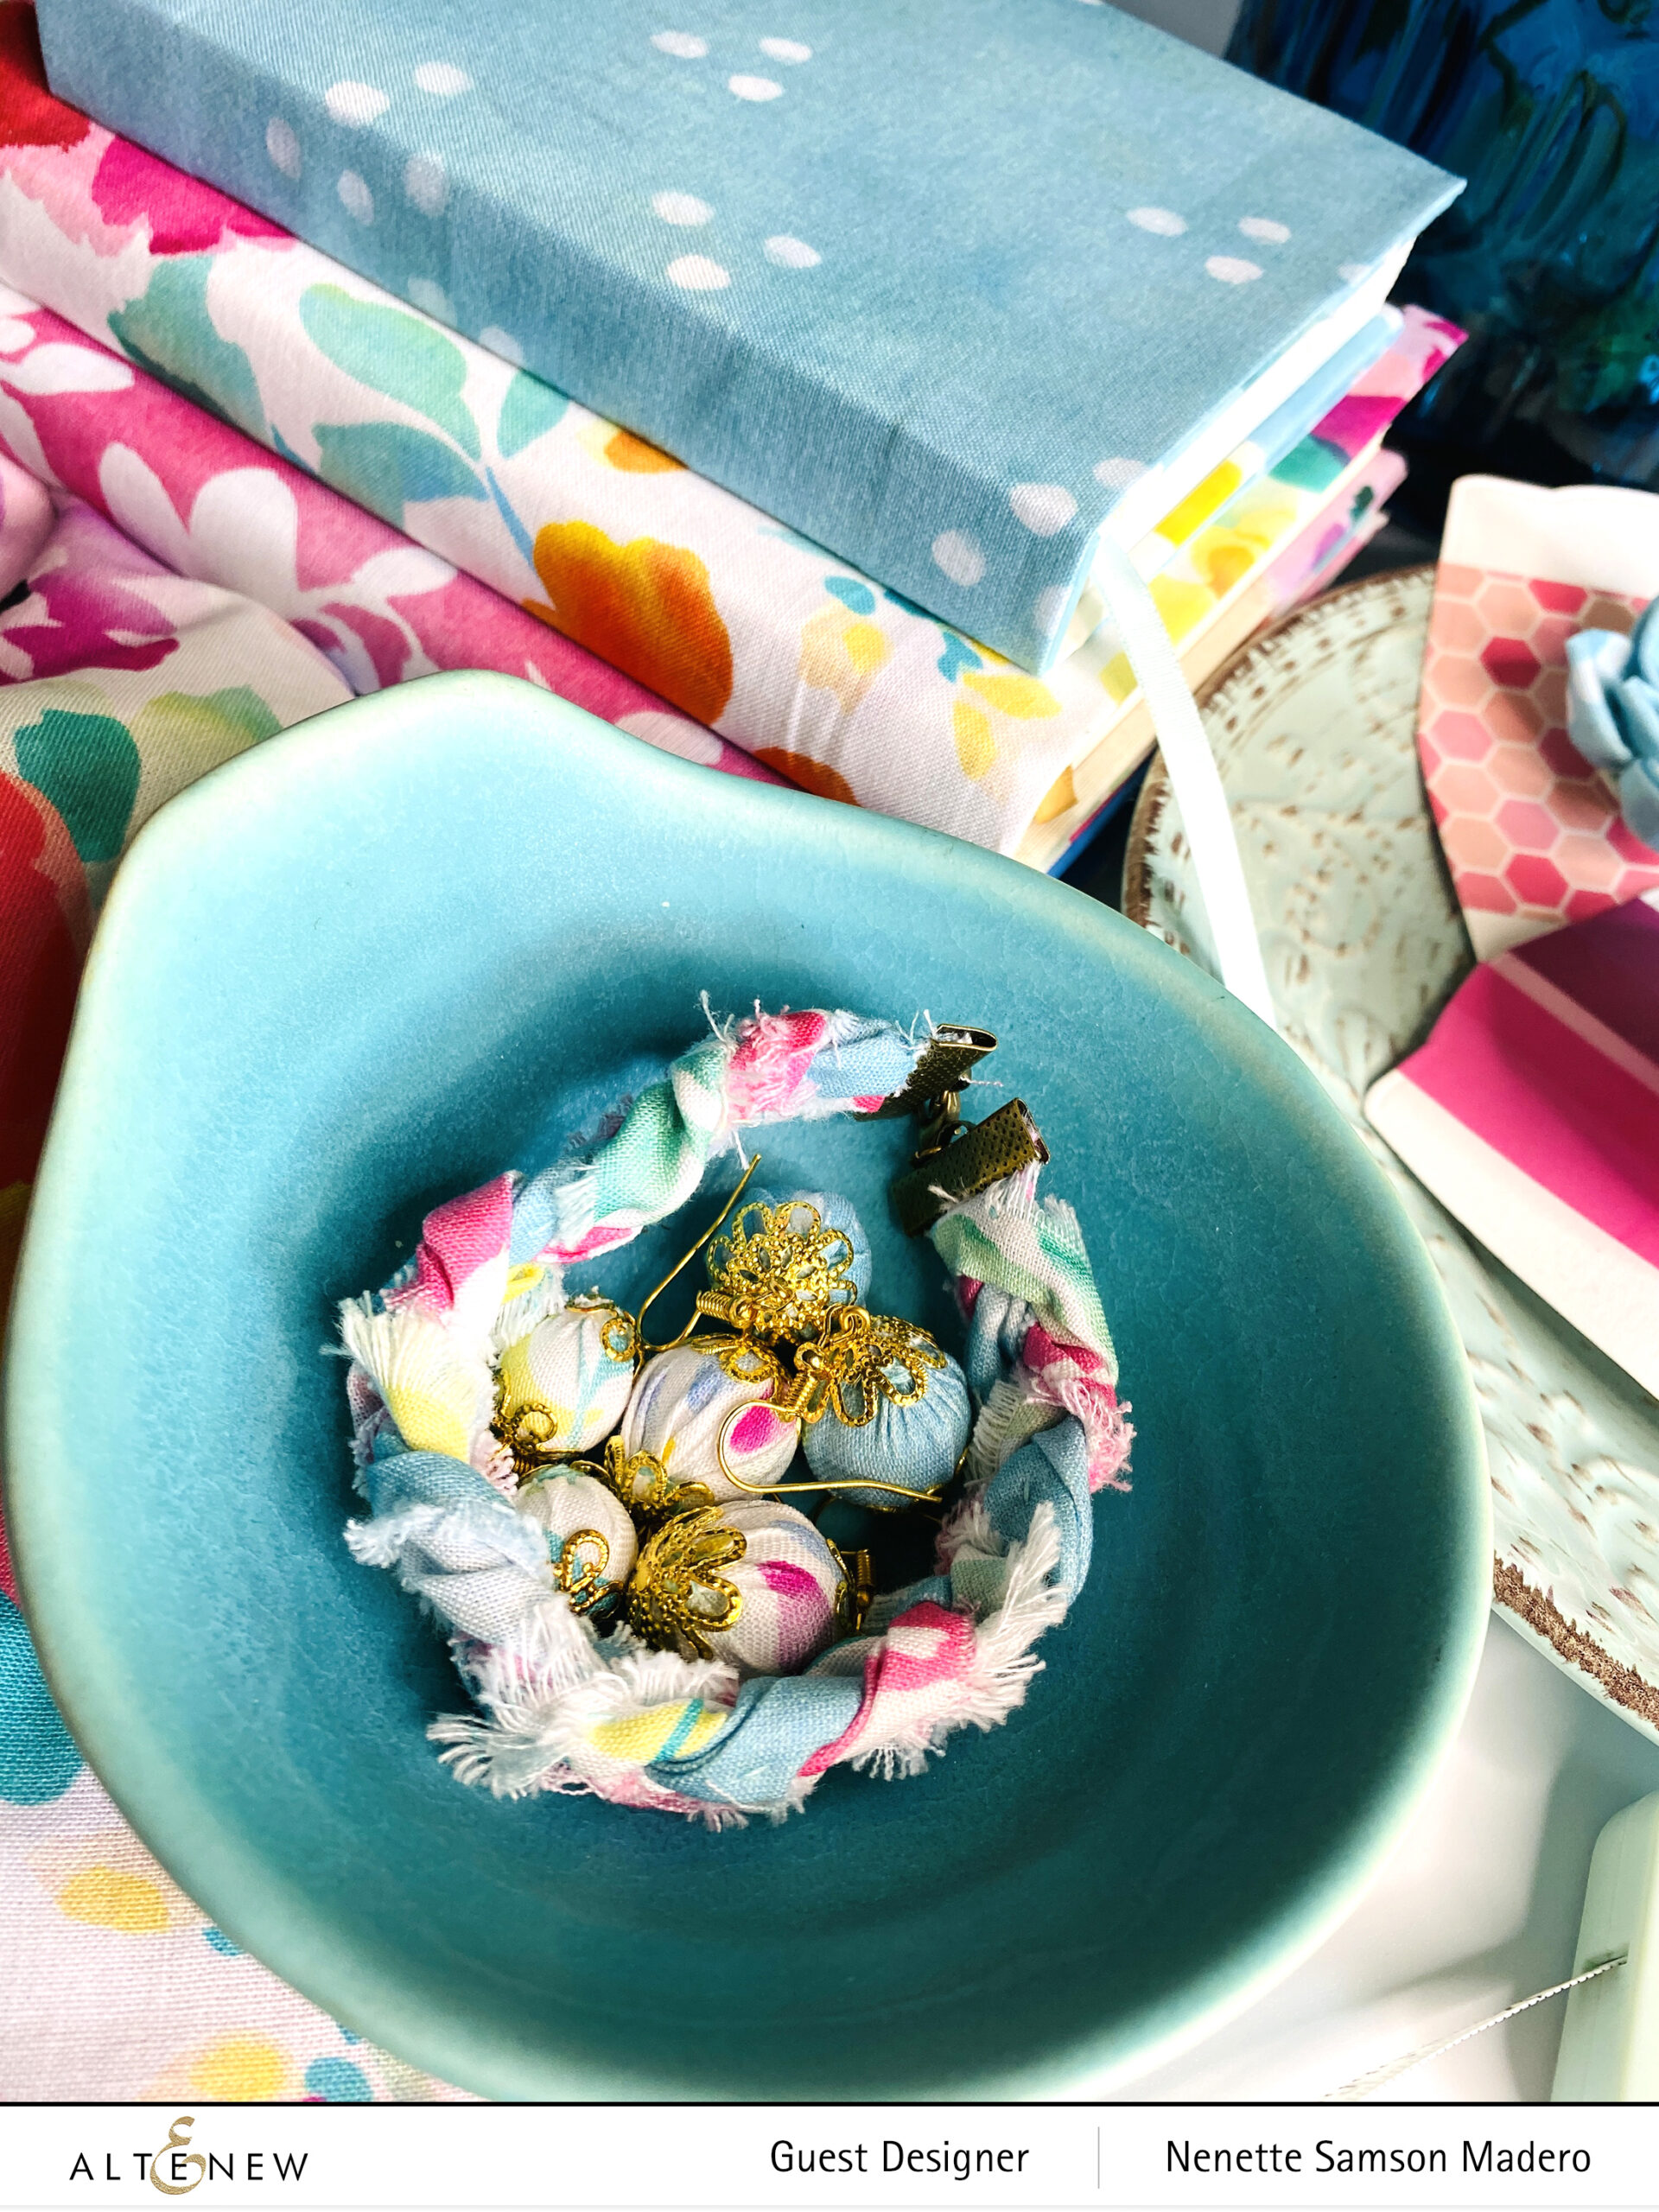
Attach a jump ring then an earring hook to create the earring. Create another one to form a pair.
TIP: After you trim off the excess fabric, rub the end on a smooth table to round it off so that the end cap will fit nicely.
FABRIC BRACELETS
I created 2 types of bracelets– the first one did not require the sewing machine. Here’s how it’s done.
STEPS:
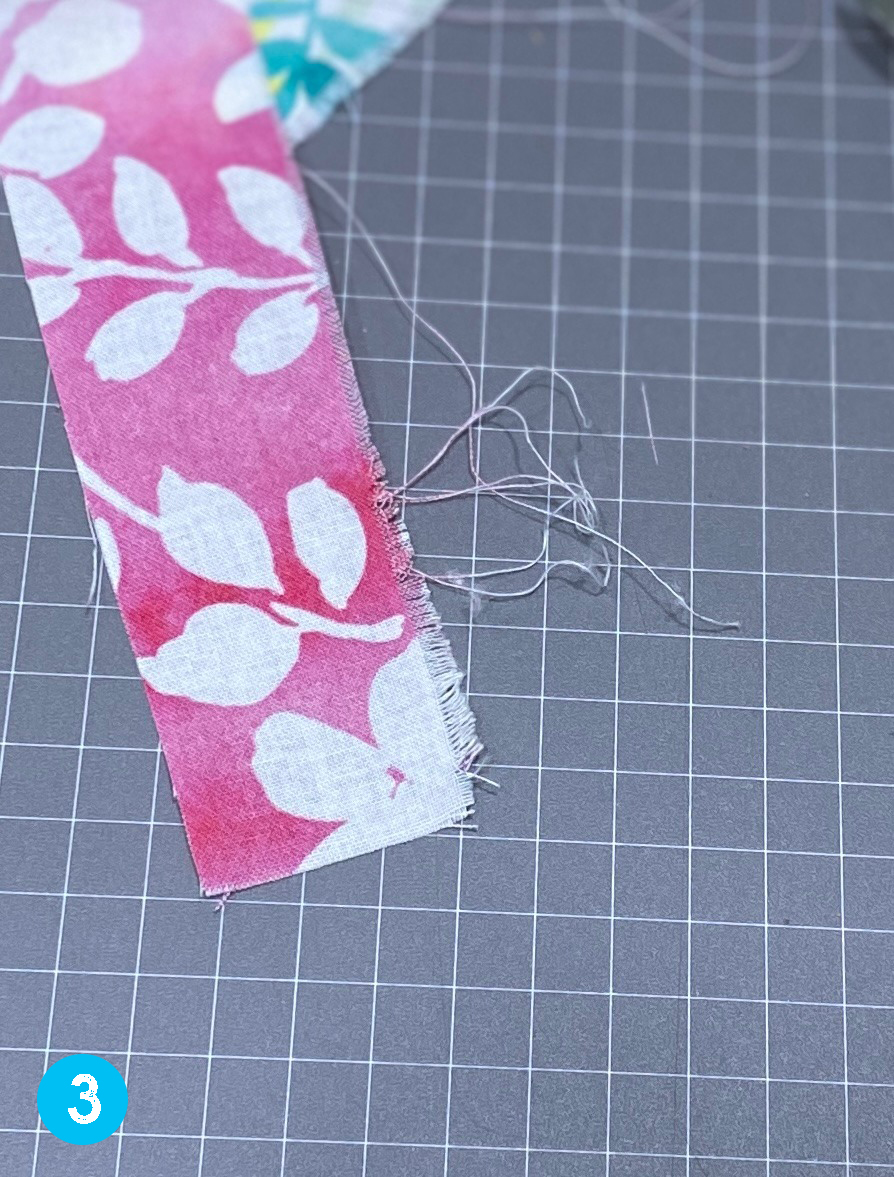
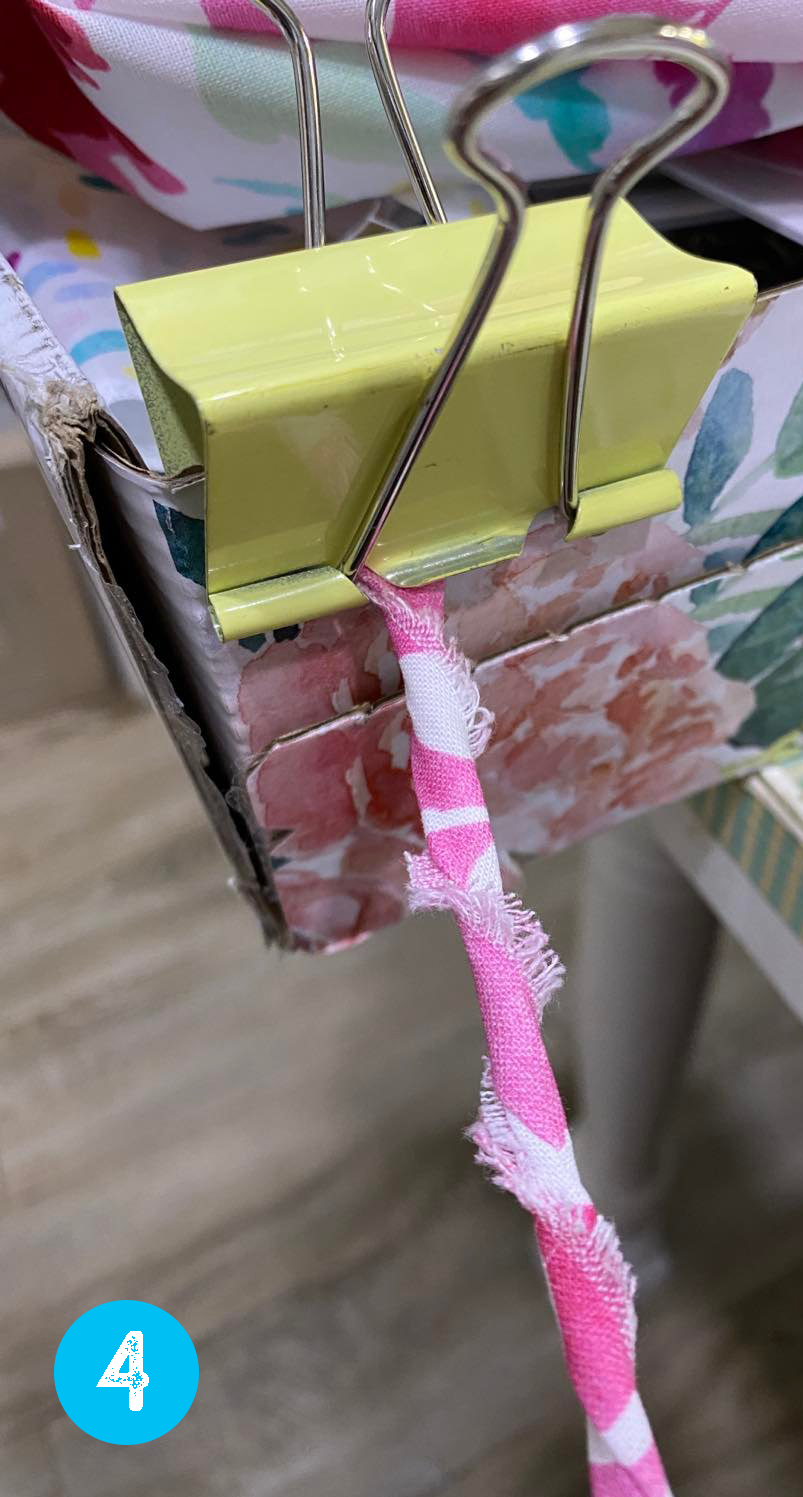
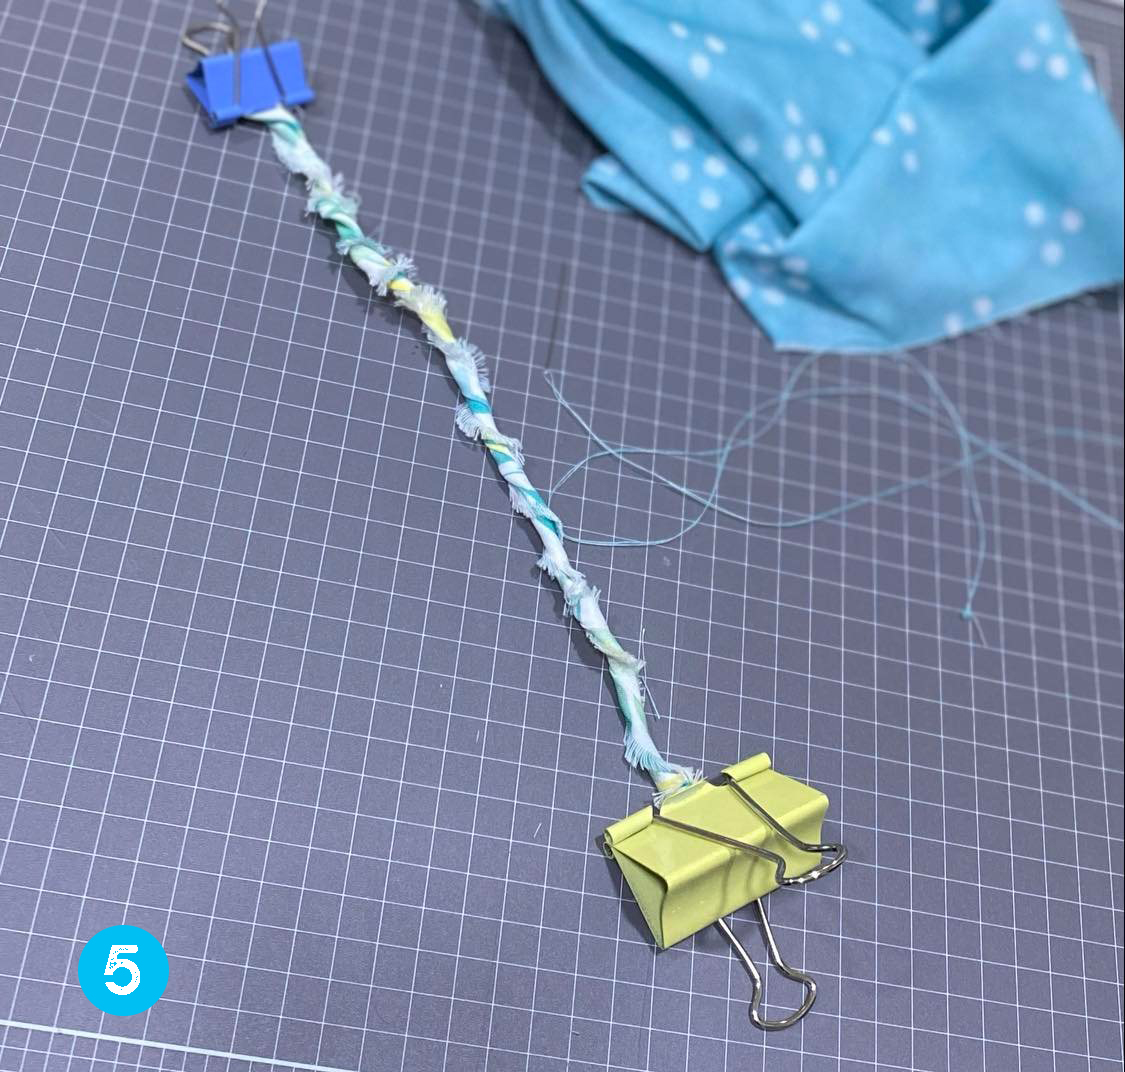
Cut out 3 strips of fabric measuring 2″ x 10″Fray the edges by removing some fabric threadsClip one end of the strip using a binder clip and start twisting the fabric making sure the right side of the fabric is seen. When you reach the end, clip the end and add a running stitch from end to end to hold the position of the fabric. Repeat for the other two strips of fabric. Braid the 3 twisted fabrics. Stitch the ends together. Add a ribbon clasp on both ends and finish with jump rings an a lobster clasp.
For this kind of bracelet, here are the steps.
STEPS:
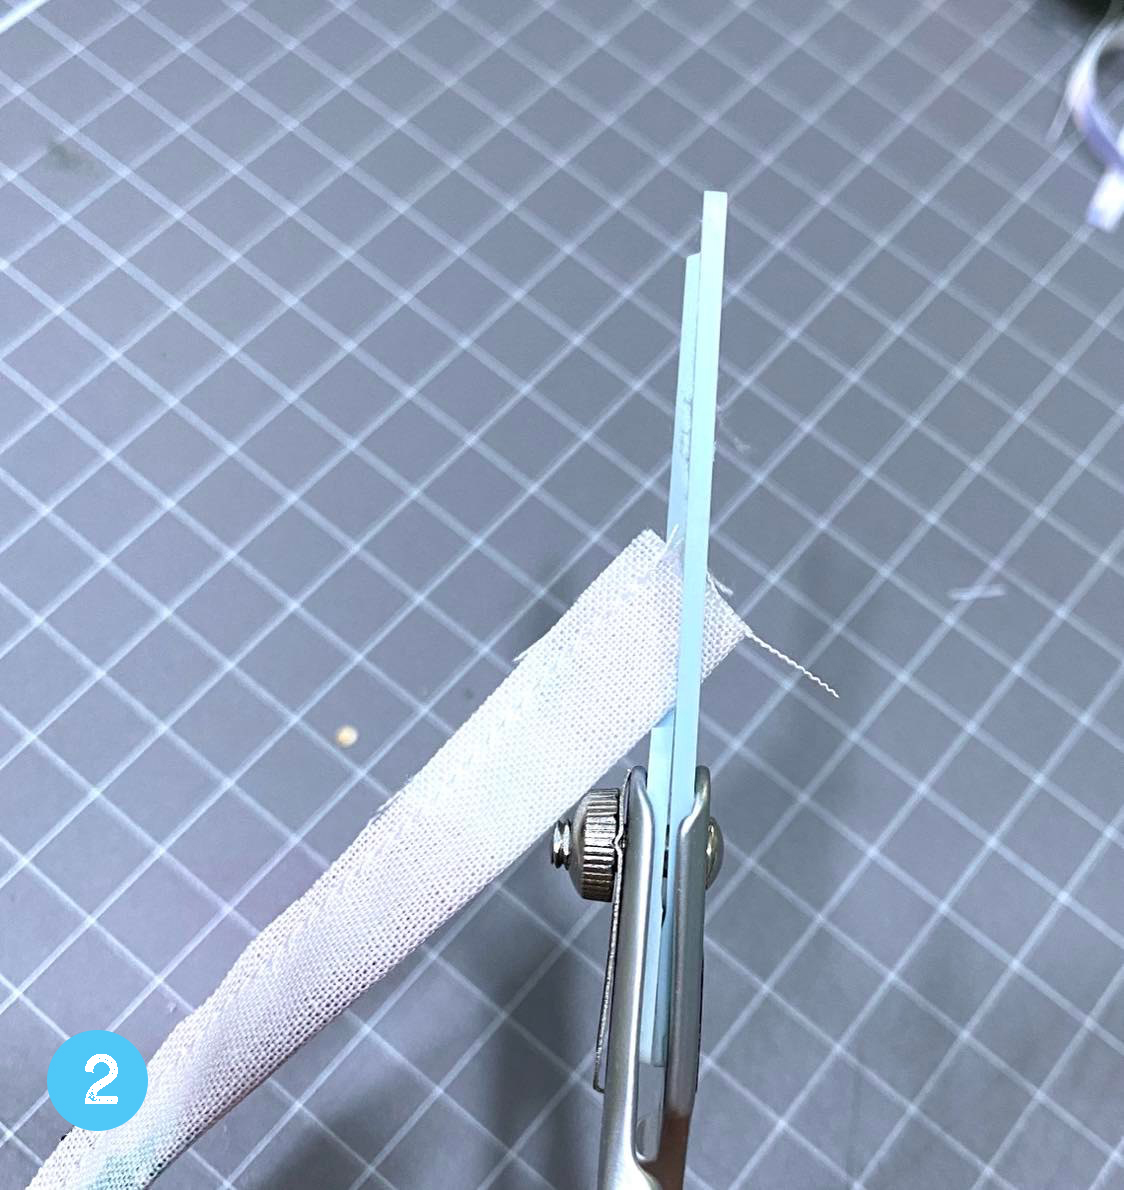
Cut 6 strips of fabric measuring 3/4 inch x 12 inches.
Fold the fabric lengthwise with the wrong side out and sew the edges together leaving approximately a 5mm seam allowance.
3. Trim off excess fabric so that it will be easier to reverse.
4. Cut an angled slit.
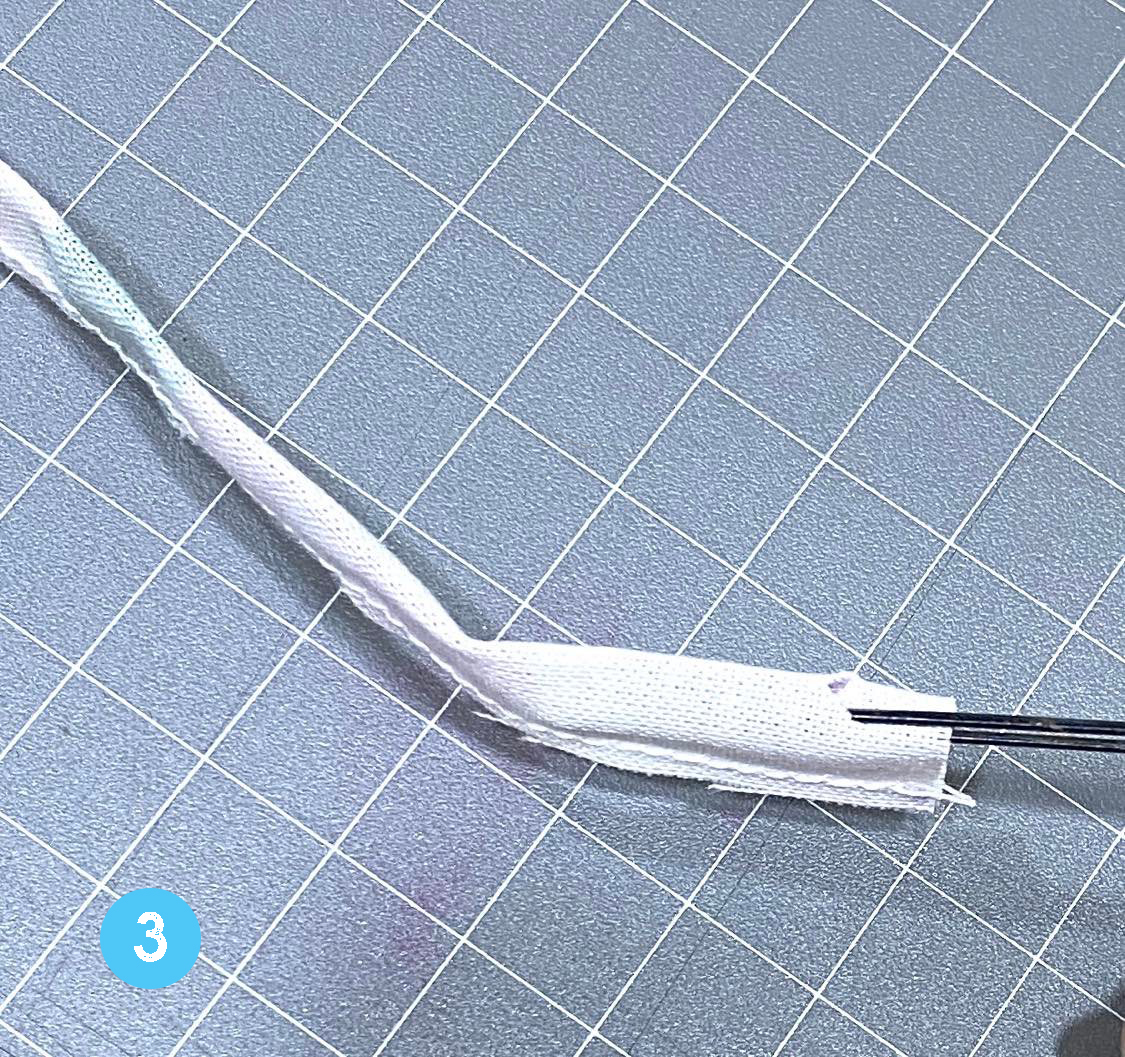
5. Insert the bottom part of the bobby pin inside the main tube and insert the top of the bobby pin into the slit. Gently pull the bobby pin through the tube to flip the fabric inside out.
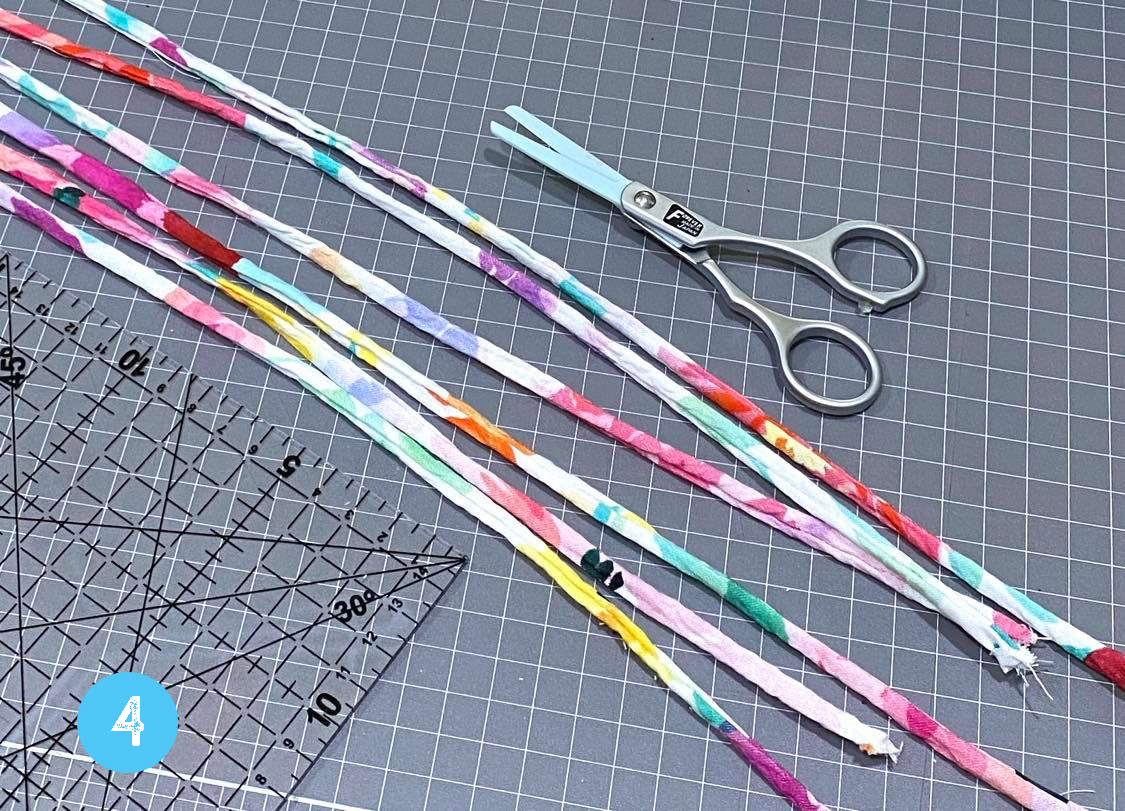
Here are all 6 fabric tubes ready to be filled up with yarn.Insert 4 strands of yarn using a bobby pin.
6. Insert 4 strands of yarn using a bobby pin.
7. Clip the ends and create a 3 strand braid.
8. Measure the wrist. Mark the braided fabric and sew the strands together where the markings are.
9. Cut the excess fabric.
10. Attach a ribbon clasp on both ends and add jump rings and a lobster clasp.
The earrings and the bracelets were inspired by Red Blossoms Designs. They have amazing ideas on how to use fabric so do check them out.
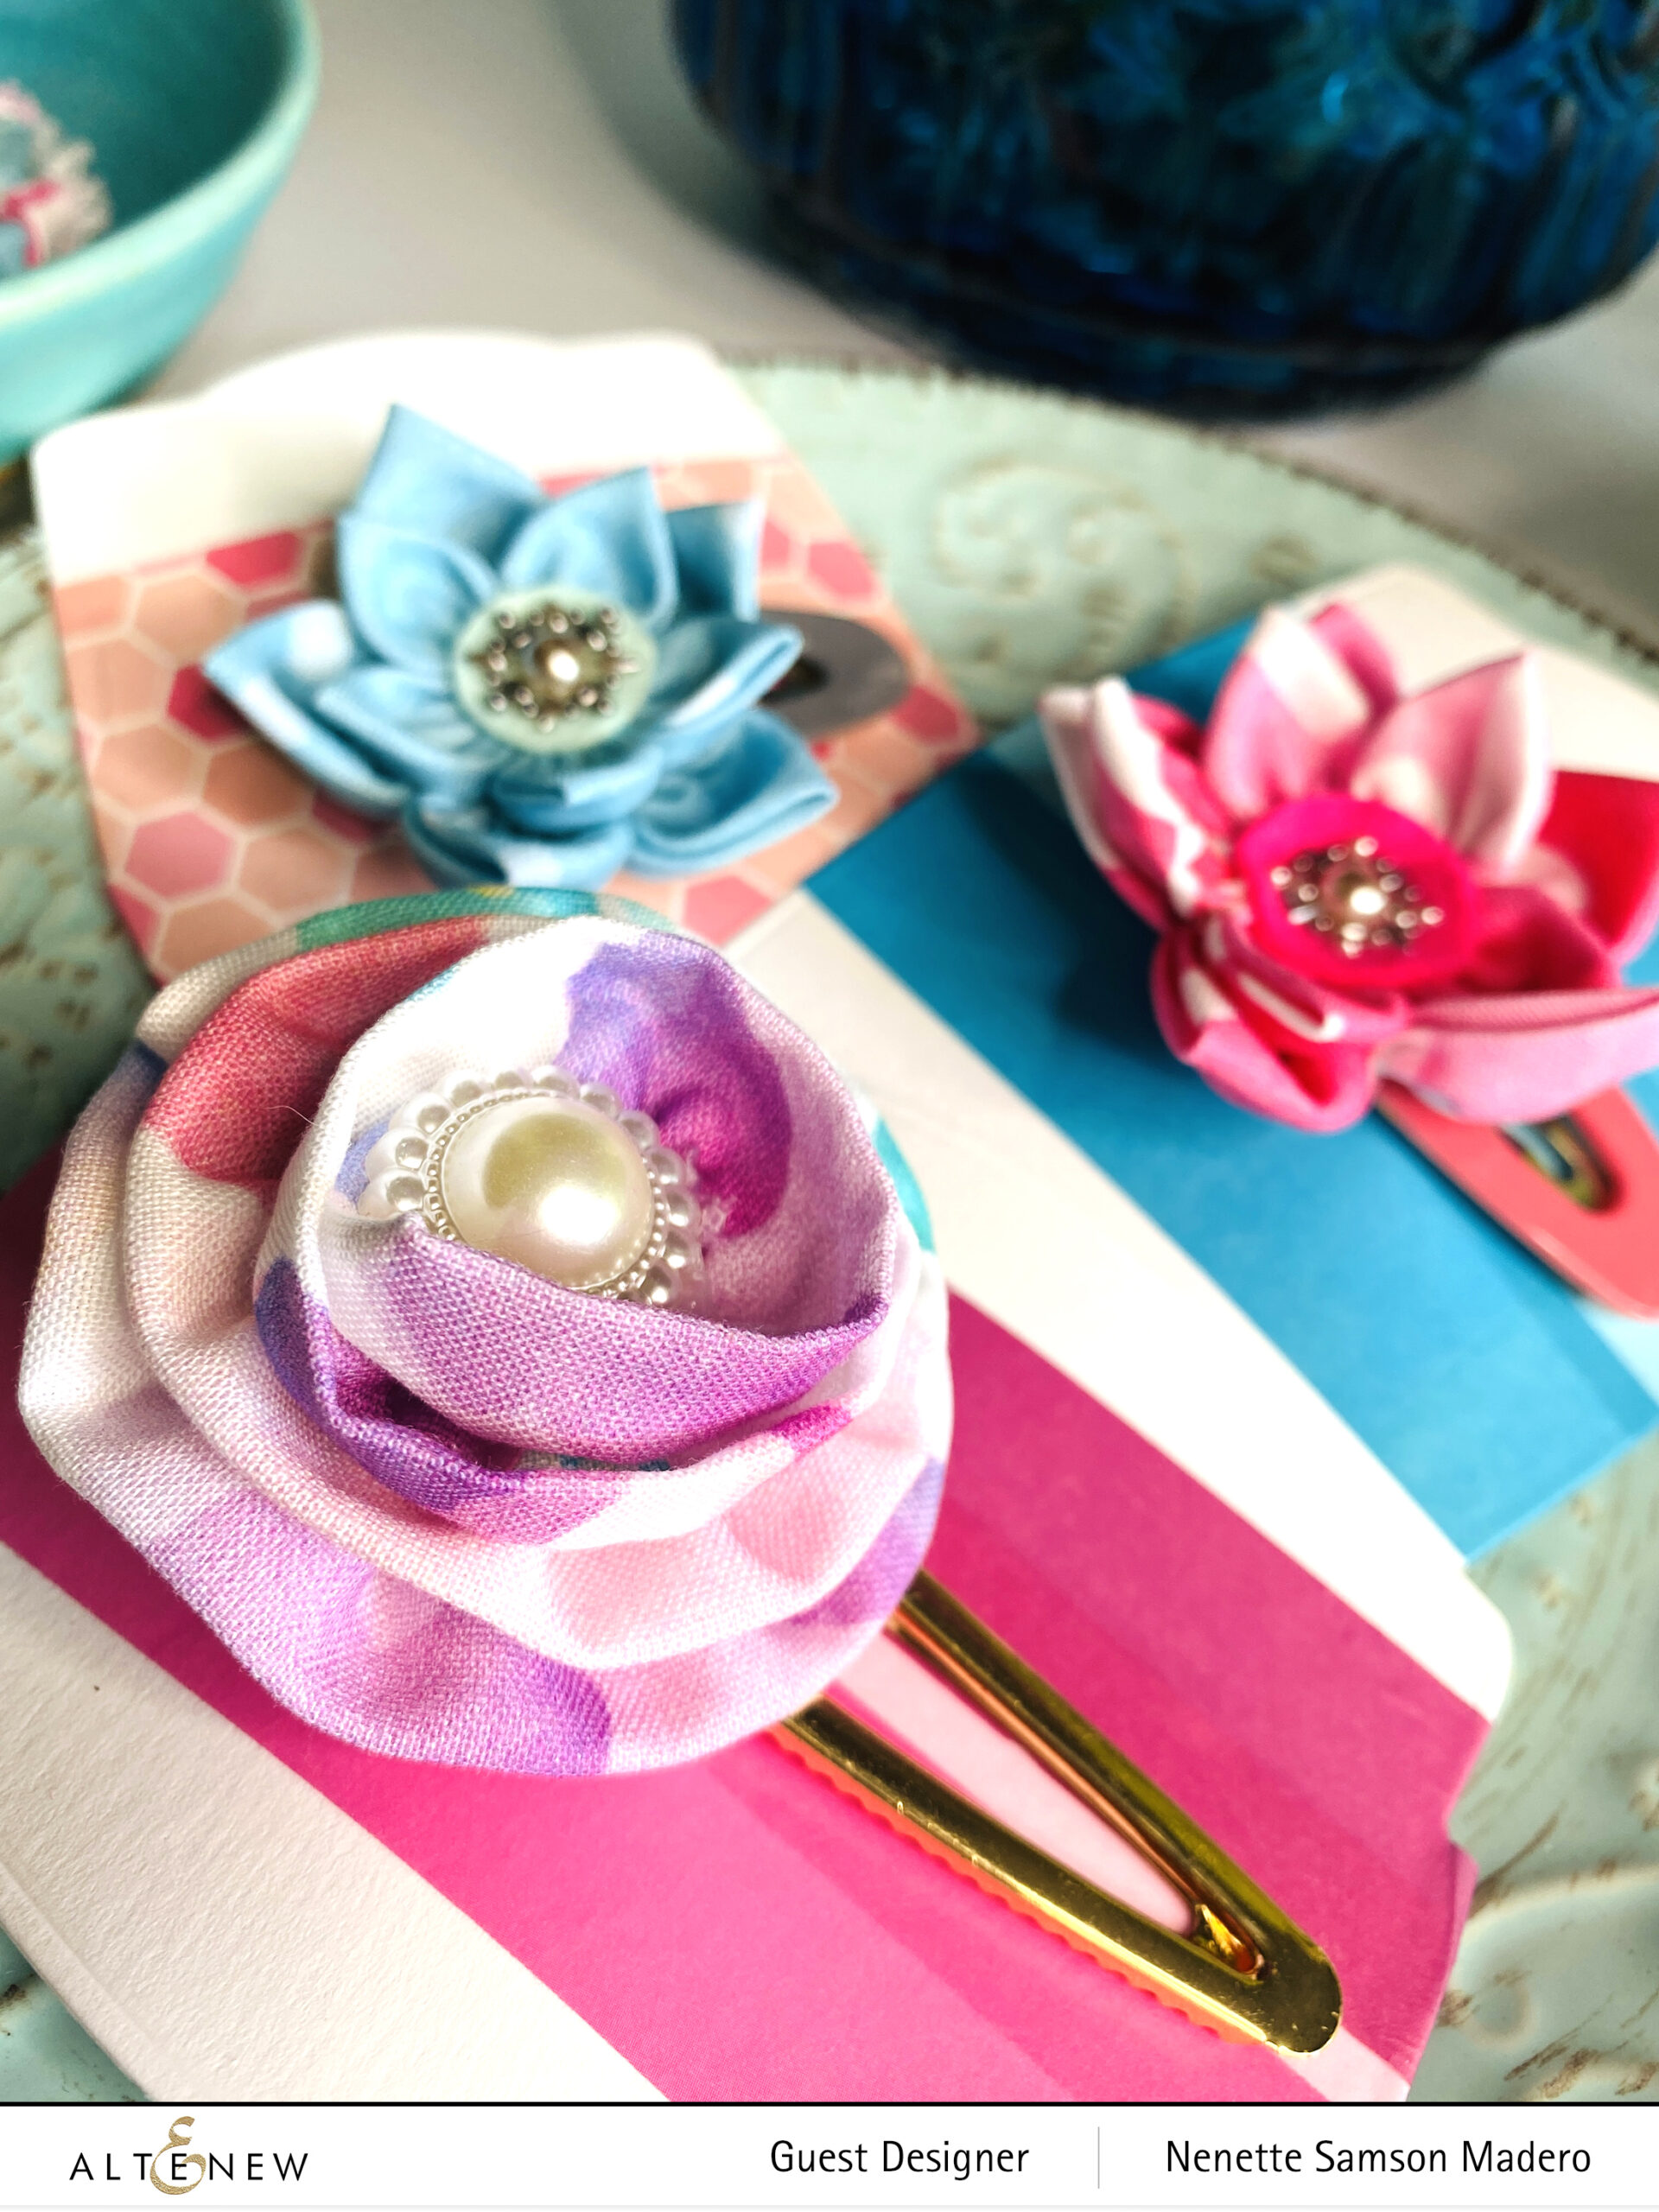
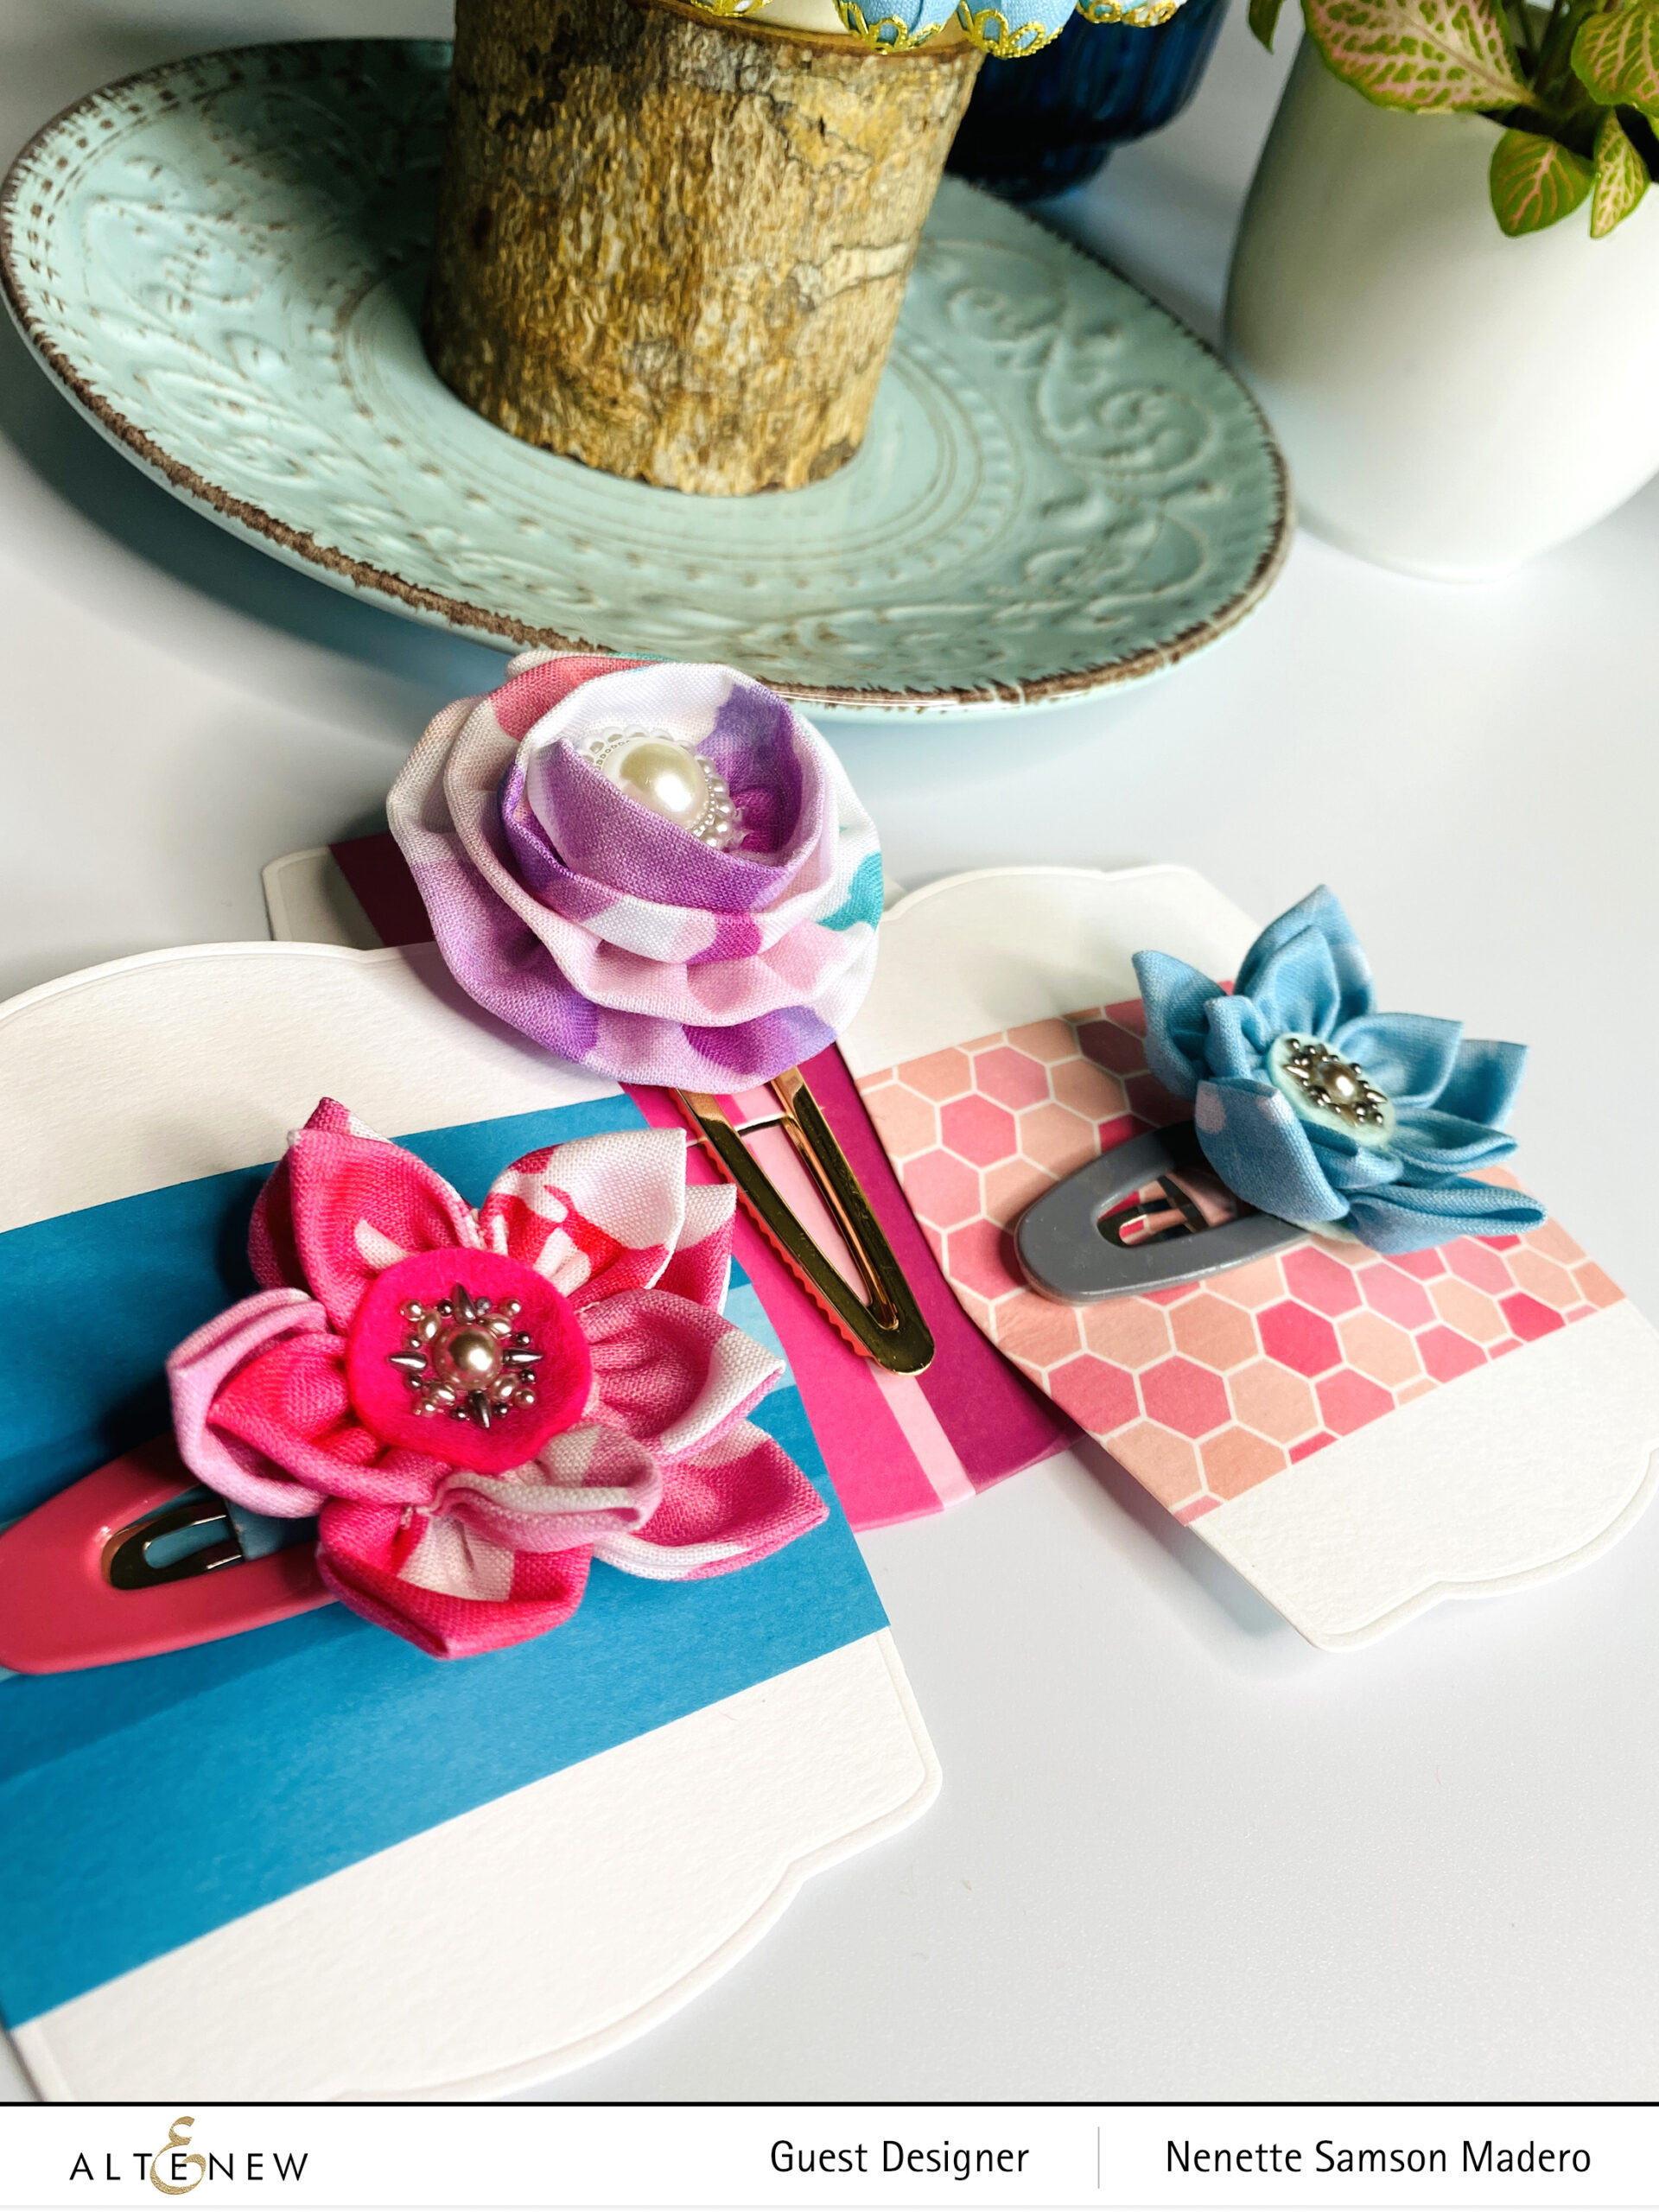
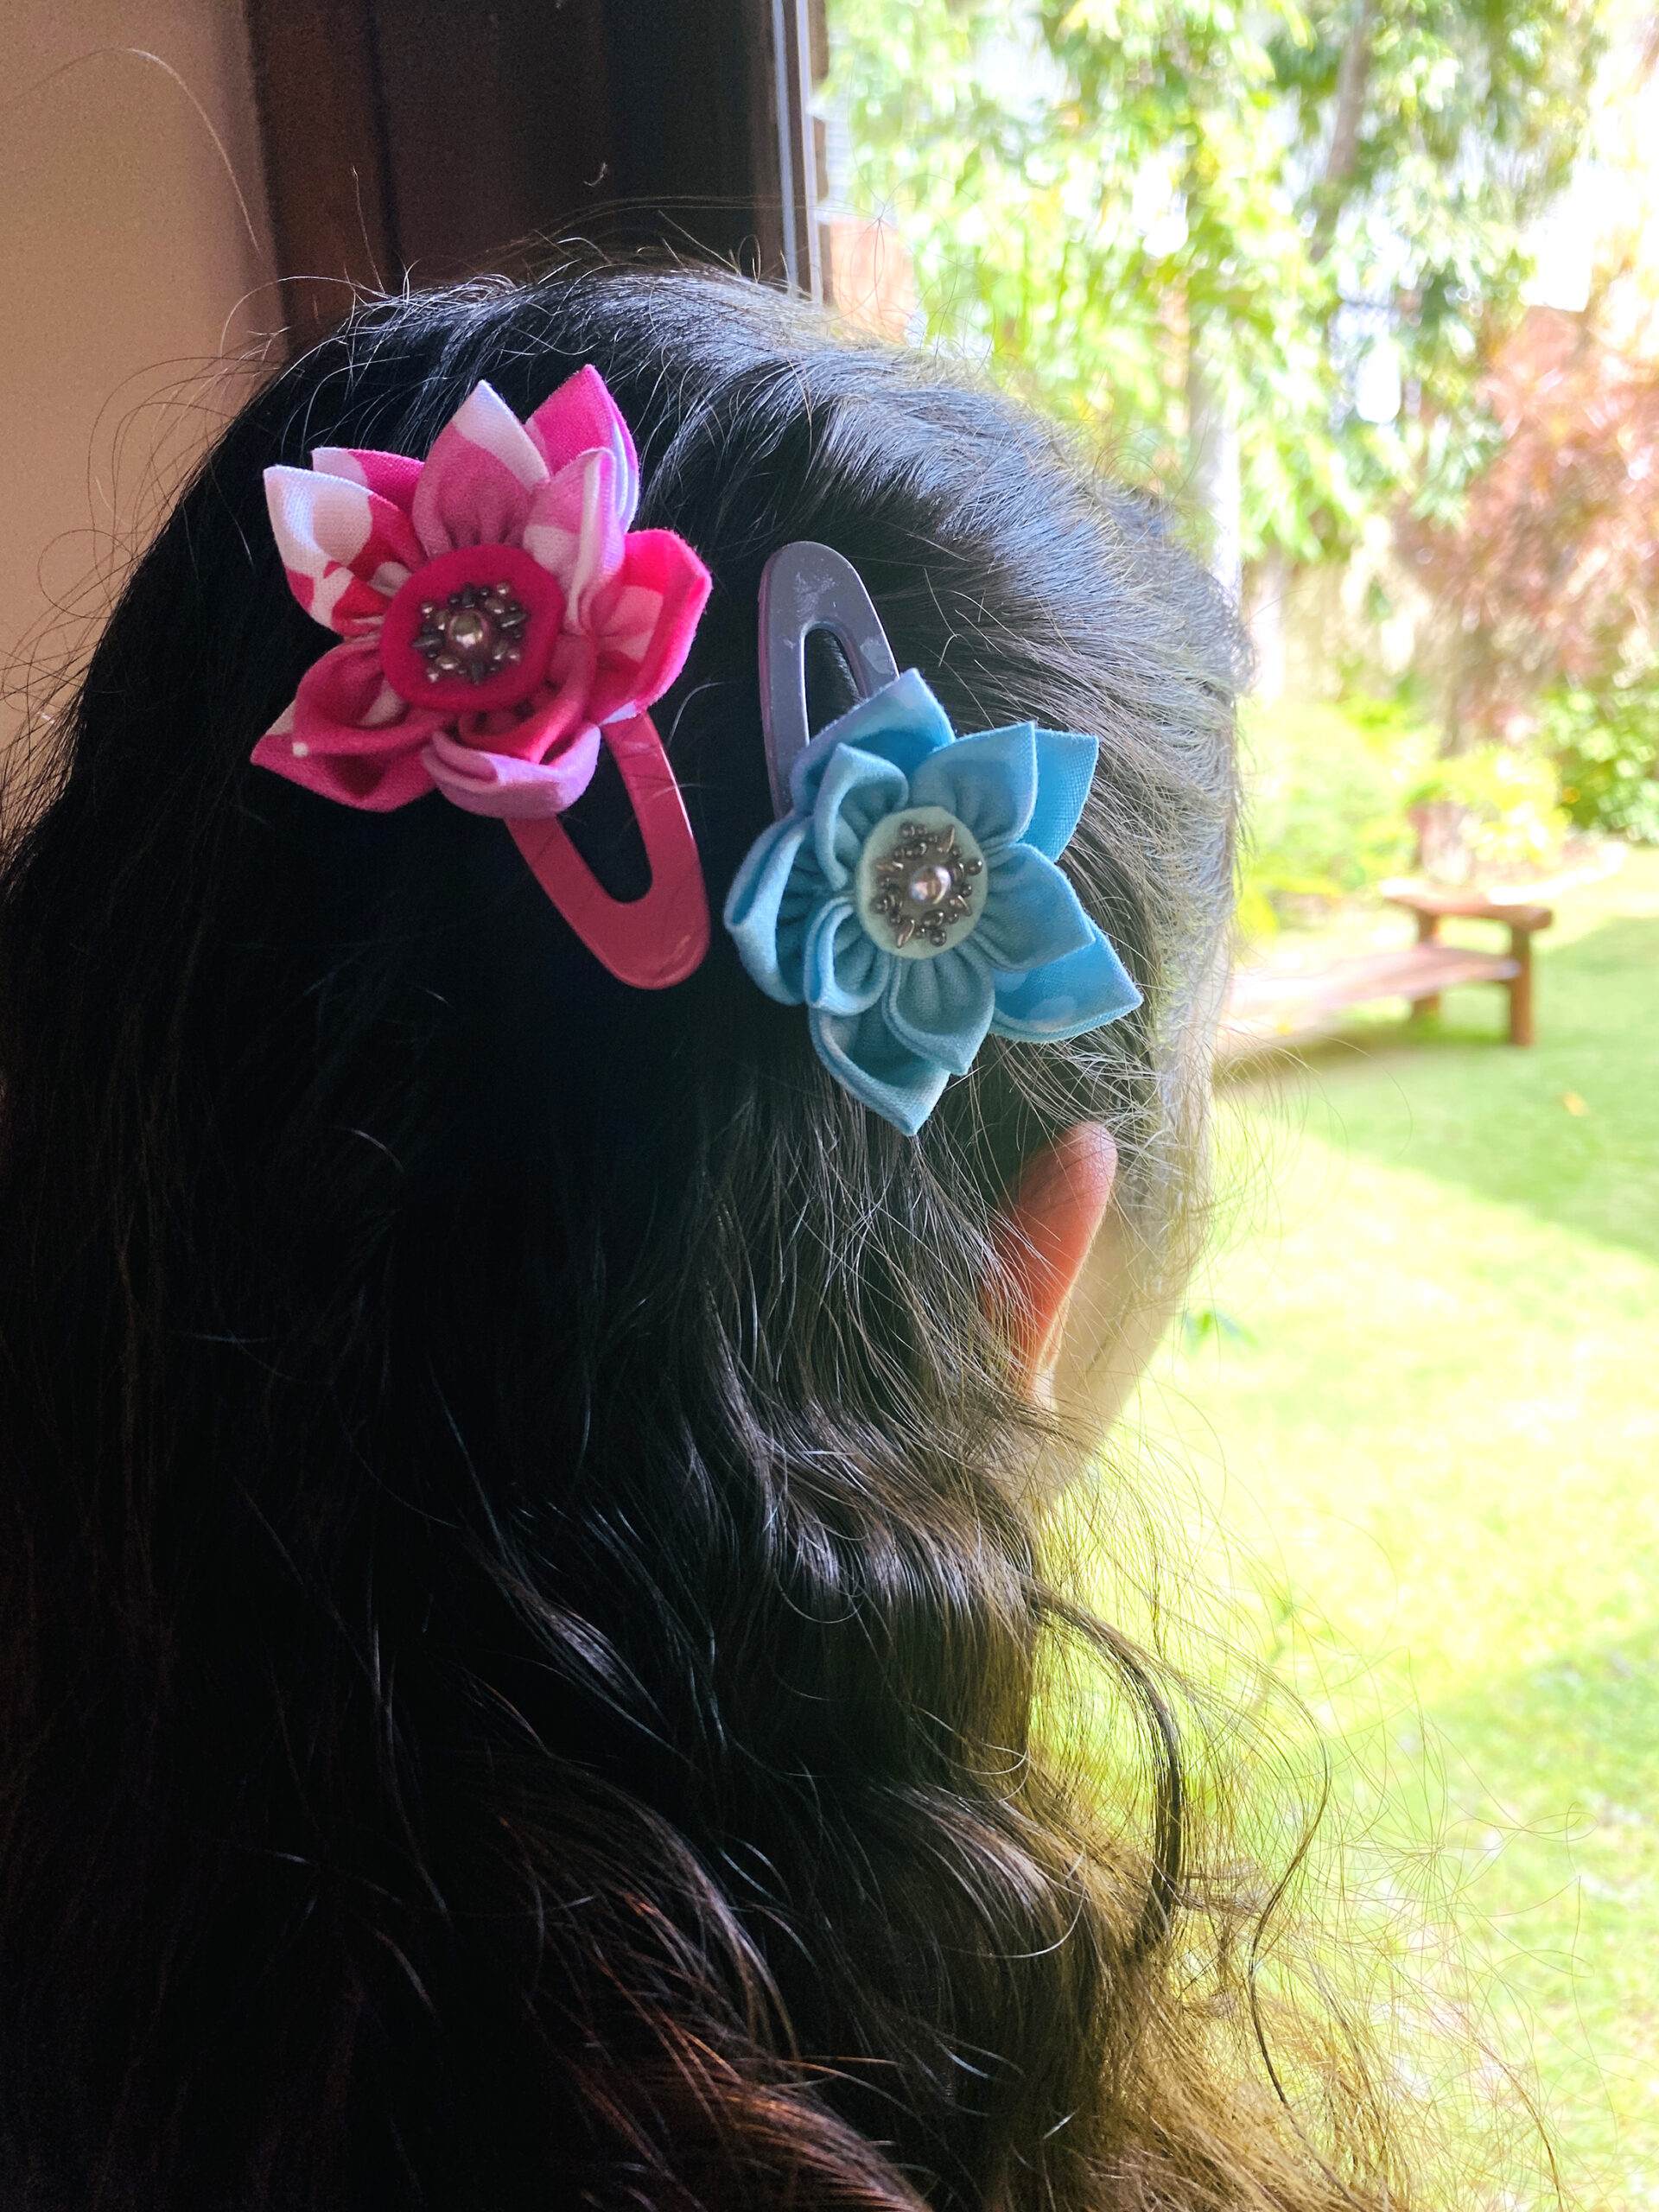
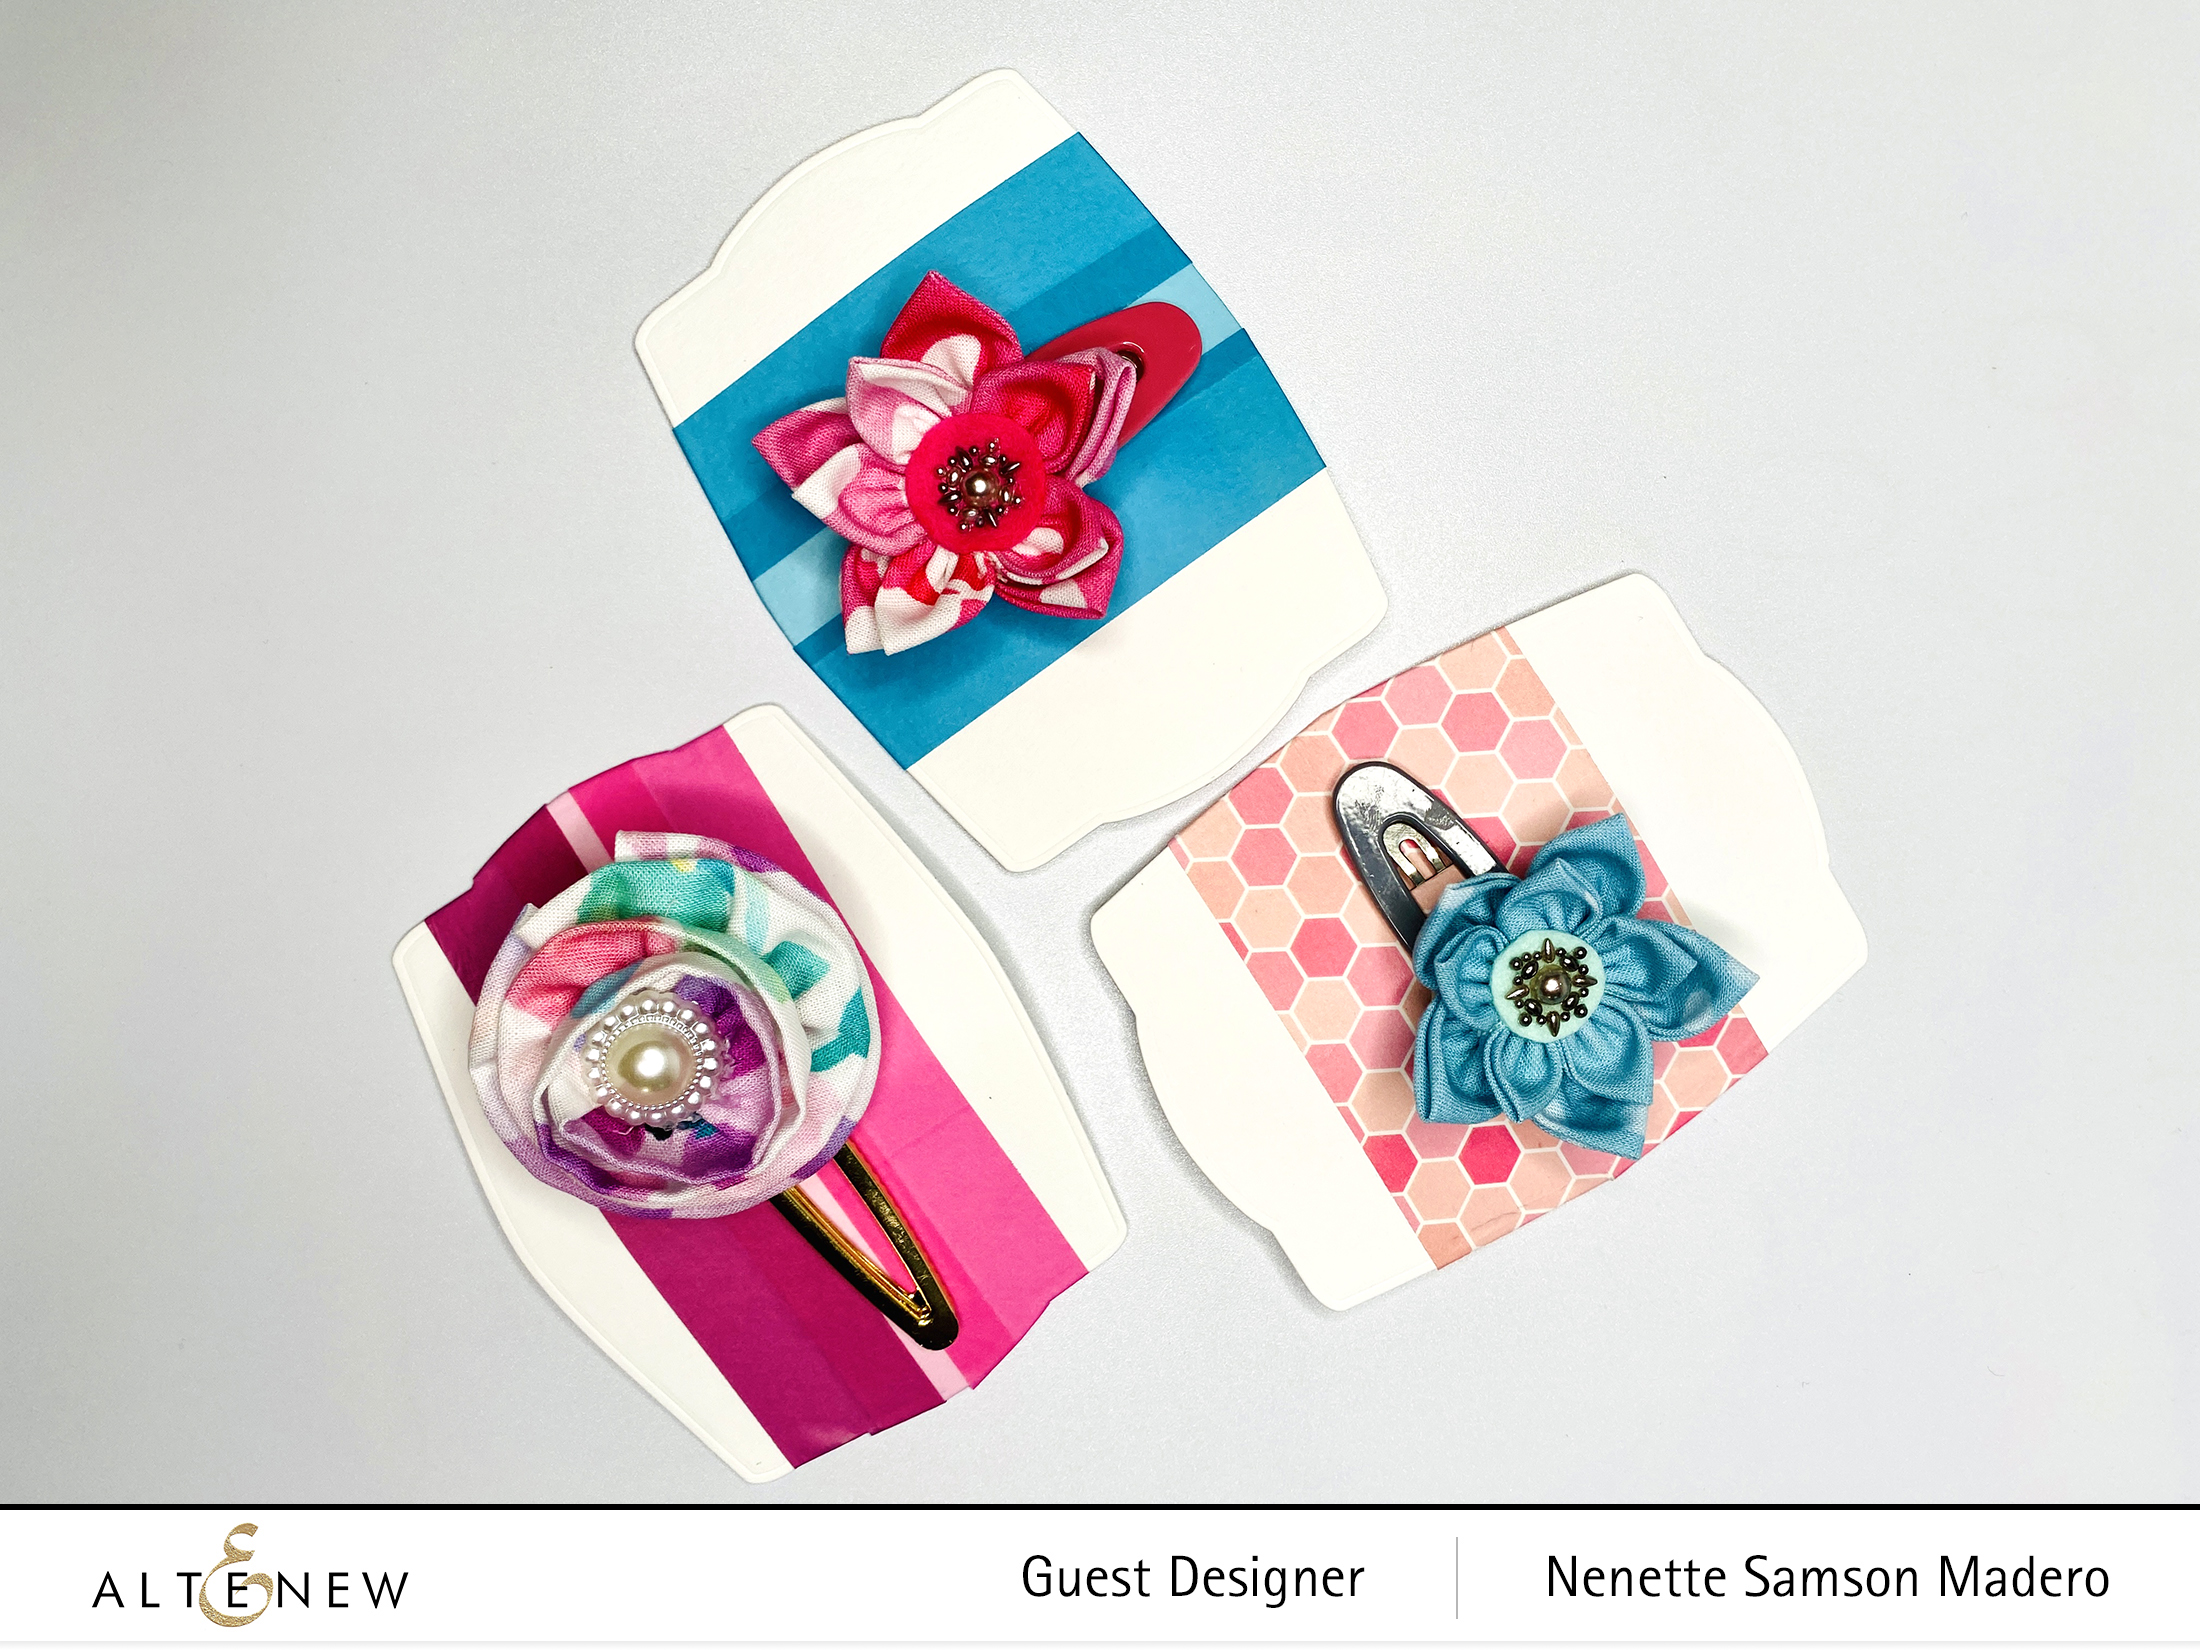
HAIR ACCESSORIES
STEPS:
Cut a strip of fabric to 2″ x 18″.
Fold lengthwise and attach to each other using double sided tape.
Die cut felt using a round die around 2 inches.
Start adhering the strip of fabric with a glue gun. In a spiral manner, start gluing the fabric strip from the outside going in .
Attach a pearl in the middle of the flower.
Glue the flower to an alligator clip.
STEPS FOR FLOWER NO. 2:
Die cut 5 circles from the fabric. (The bigger the circle, the bigger the flower will be.)
Fold in half.
Then fold again in half.
Sew a running stitch along the base of triangles.
Pull the thread to gather all the bases together to form a flower.
Create a second flower using a smaller diameter of circle and layer on top of the first flower using glue gun.
Cut out a matching felt and add bead embellishments to the center.
Attach to felt base then adhere to a clip.
TIP: I used the Nesting Frame Dies and some washi tapes to create the backing for the clips. This would be a nice way to package them for gifts.
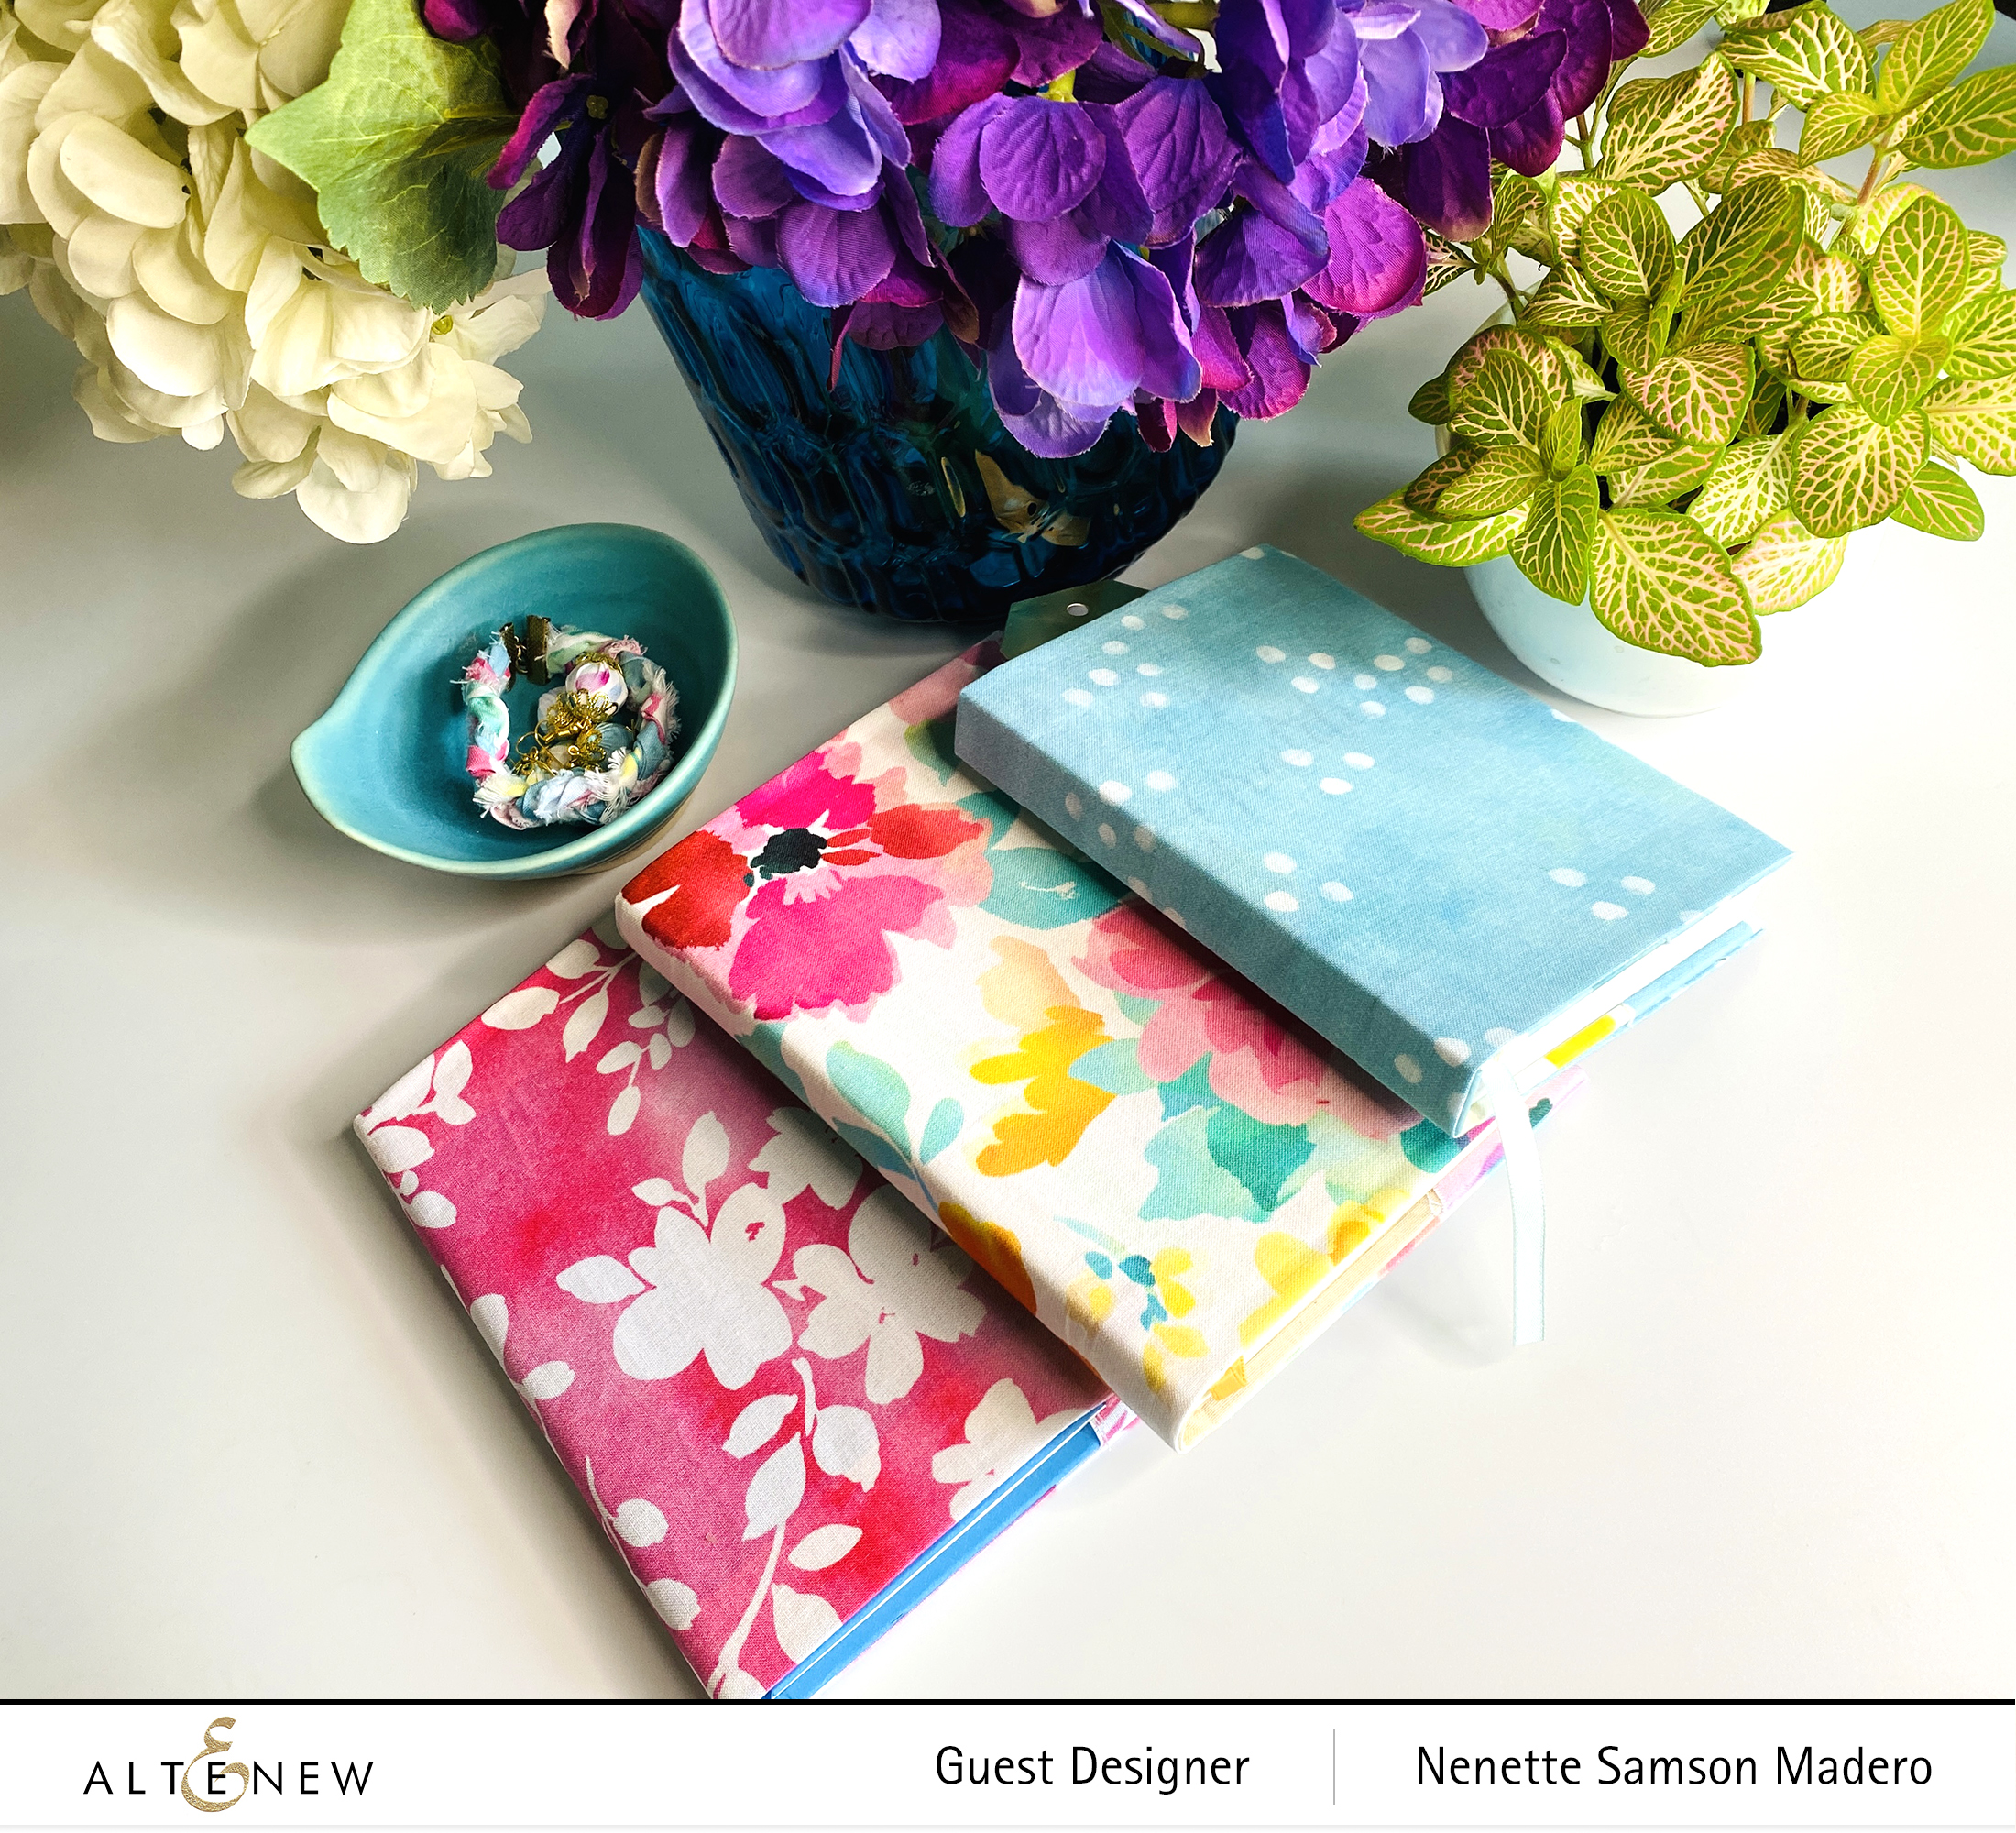
NO SEW FABRIC BOOK COVERINGS
STEPS:
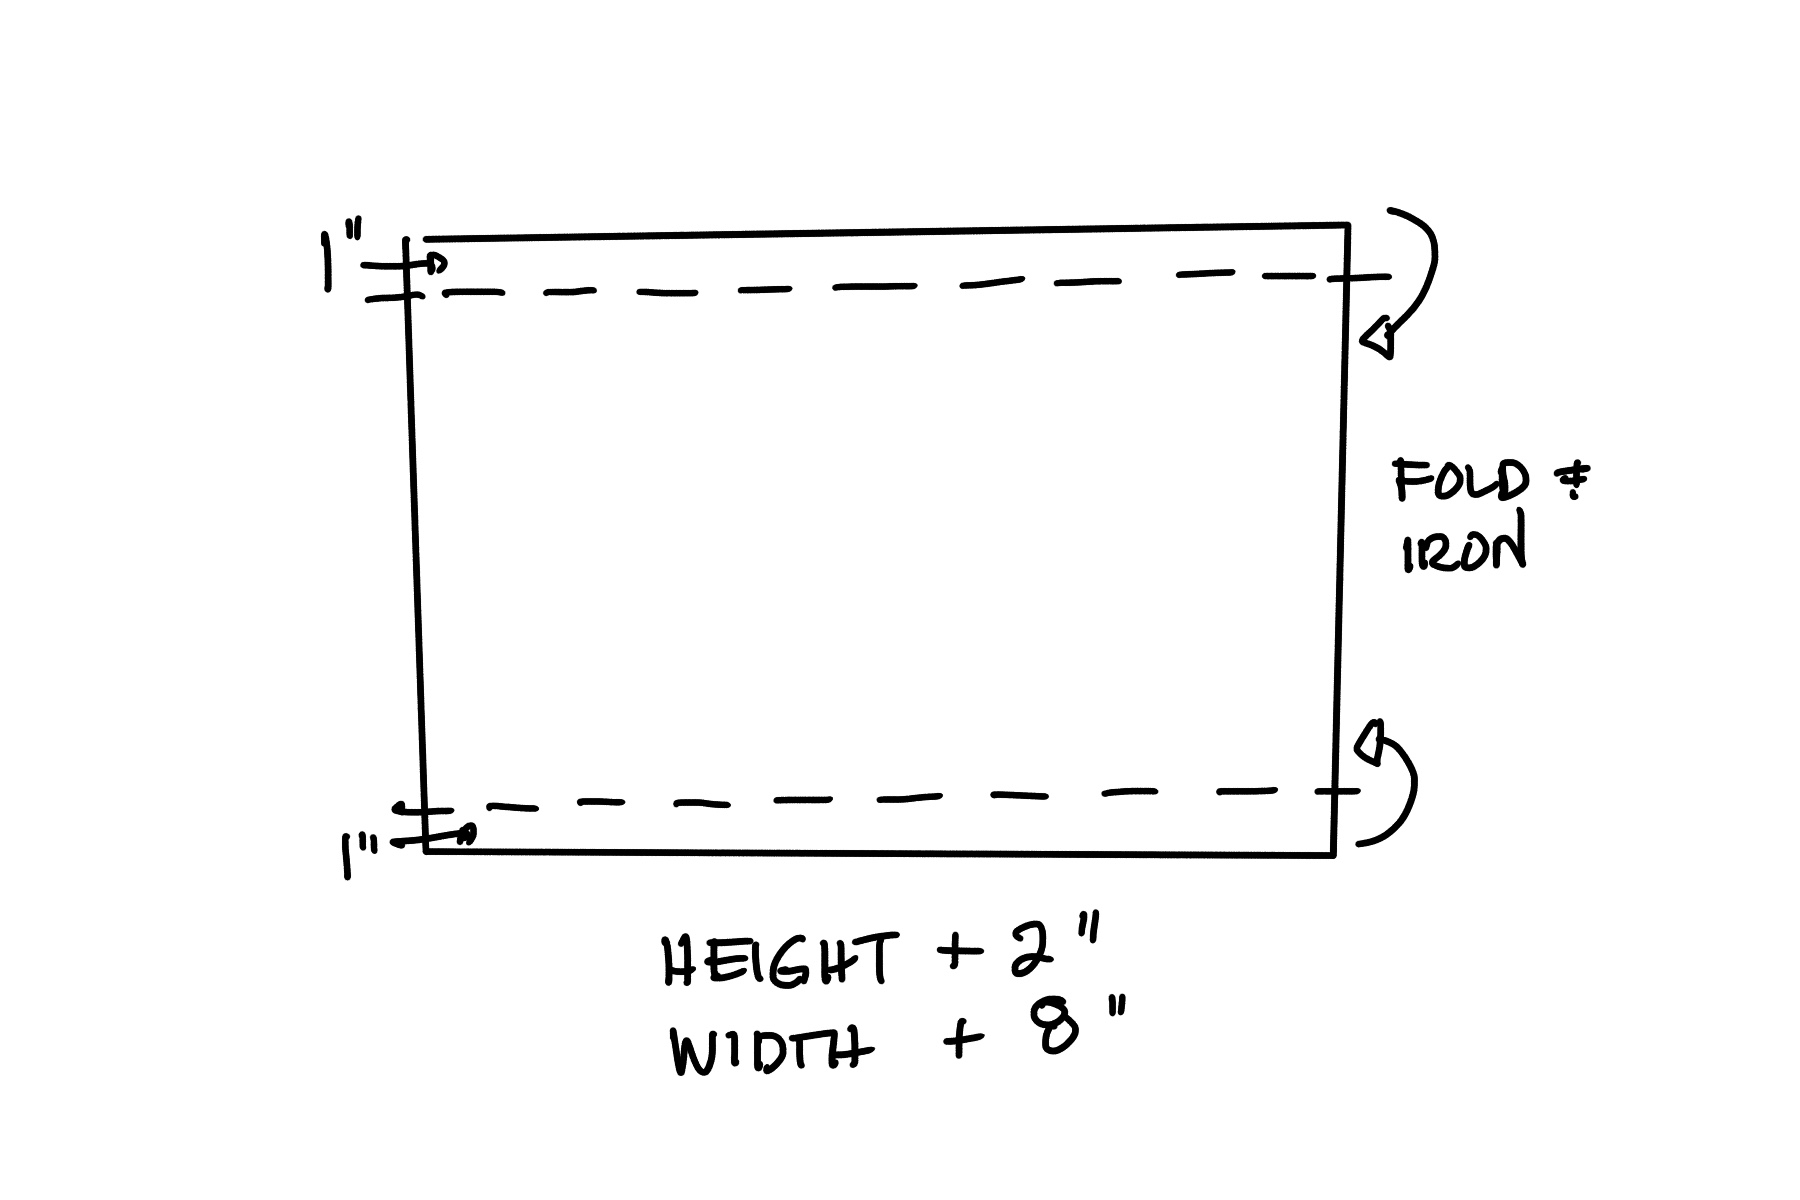
Measure the height of the book and with the book closed, measure the wrap around width of the book.
Cut the fabric but add 2″ to the height and 8 inches to the width.
Iron out the fabric.
With the back of the fabric facing up, fold and iron the long edge at 1″ on both sides.
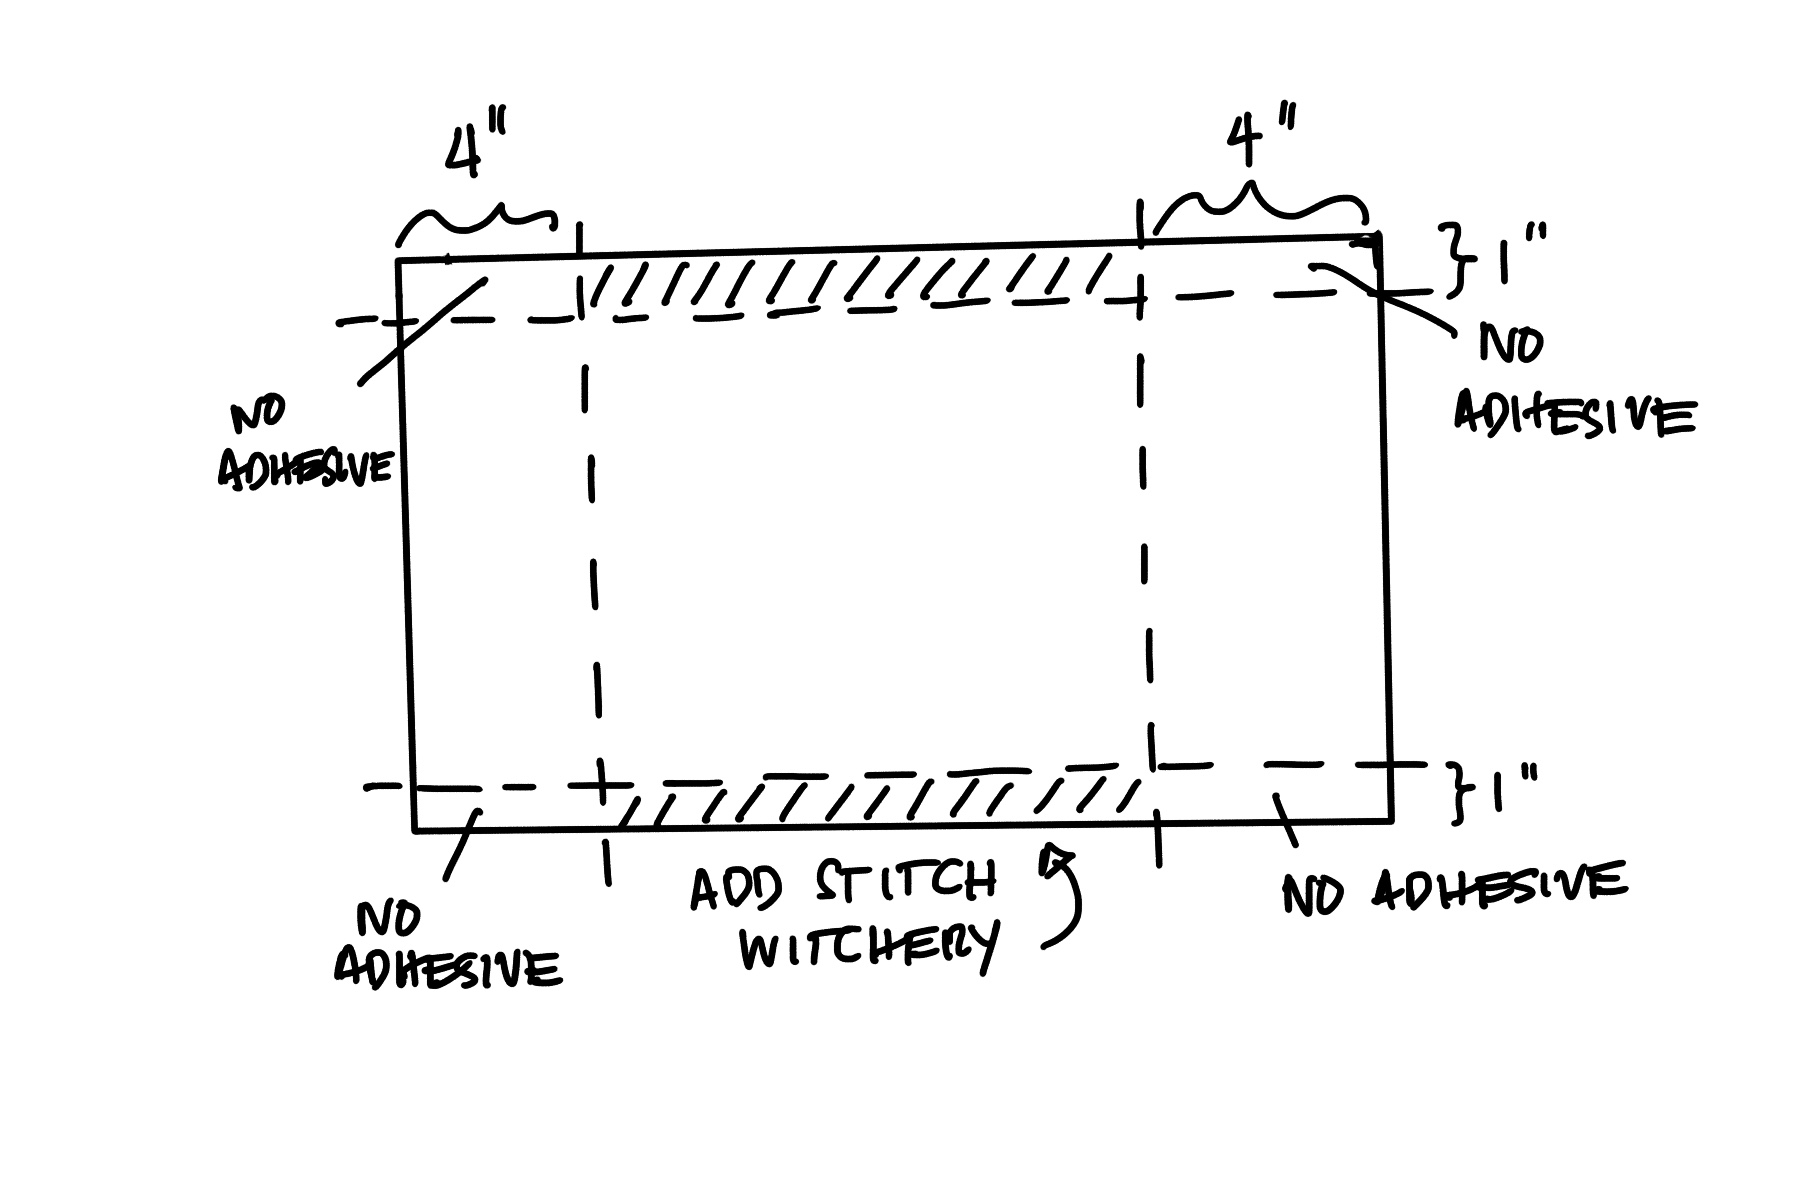
Cut a length of the Stitch Witchery 8″ shorter than the fabric length and place it under one of the fabric folds that you just created starting 4” in from each end. Add a damp cloth before ironing the adhesive in wool setting.
6. Fold your fabric over 4″ from the end and place a 4″ piece of Stitch Witchery inside the top fold. Bond the fabric using the same procedure as before. This will create pockets for the cover of the book.
GIVEAWAYS
$300 in total prizes! To celebrate this release, Altenew is giving away a $50 gift certificate to 2 lucky winners and a $25 gift certificate to 8 winners! Please leave a comment on the Altenew Card Blog and/or each designer’s blog post on the blog hop list below by 02/23/2022 for a chance to win.
Altenew will draw 10 random winners from the comments left on each stop of this blog hop and announce the winners on the Altenew Winners Page on 02/25/2022.
Last but not the least is the talented Teresa Litchfield. I hope you enjoyed looking through the projects I created using the fabrics from this release. Let me know in the comment section below which one is your favorite and you might get the chance to win a fab prize from Altenew. If you liked what you saw, I hope you can follow me on Instagram @mylittleatticstudio cause that’s where I post my latest projects. Thank you so much for dropping by. Until next time! Stay safe and happy crafting! <3
HAPPY NEW YEAR everyone and welcome to my blog! If you just came from Irina Fonina’s blog, then you’re on the right track. For the complete list and details of the hop, please visit the Altenew blog.
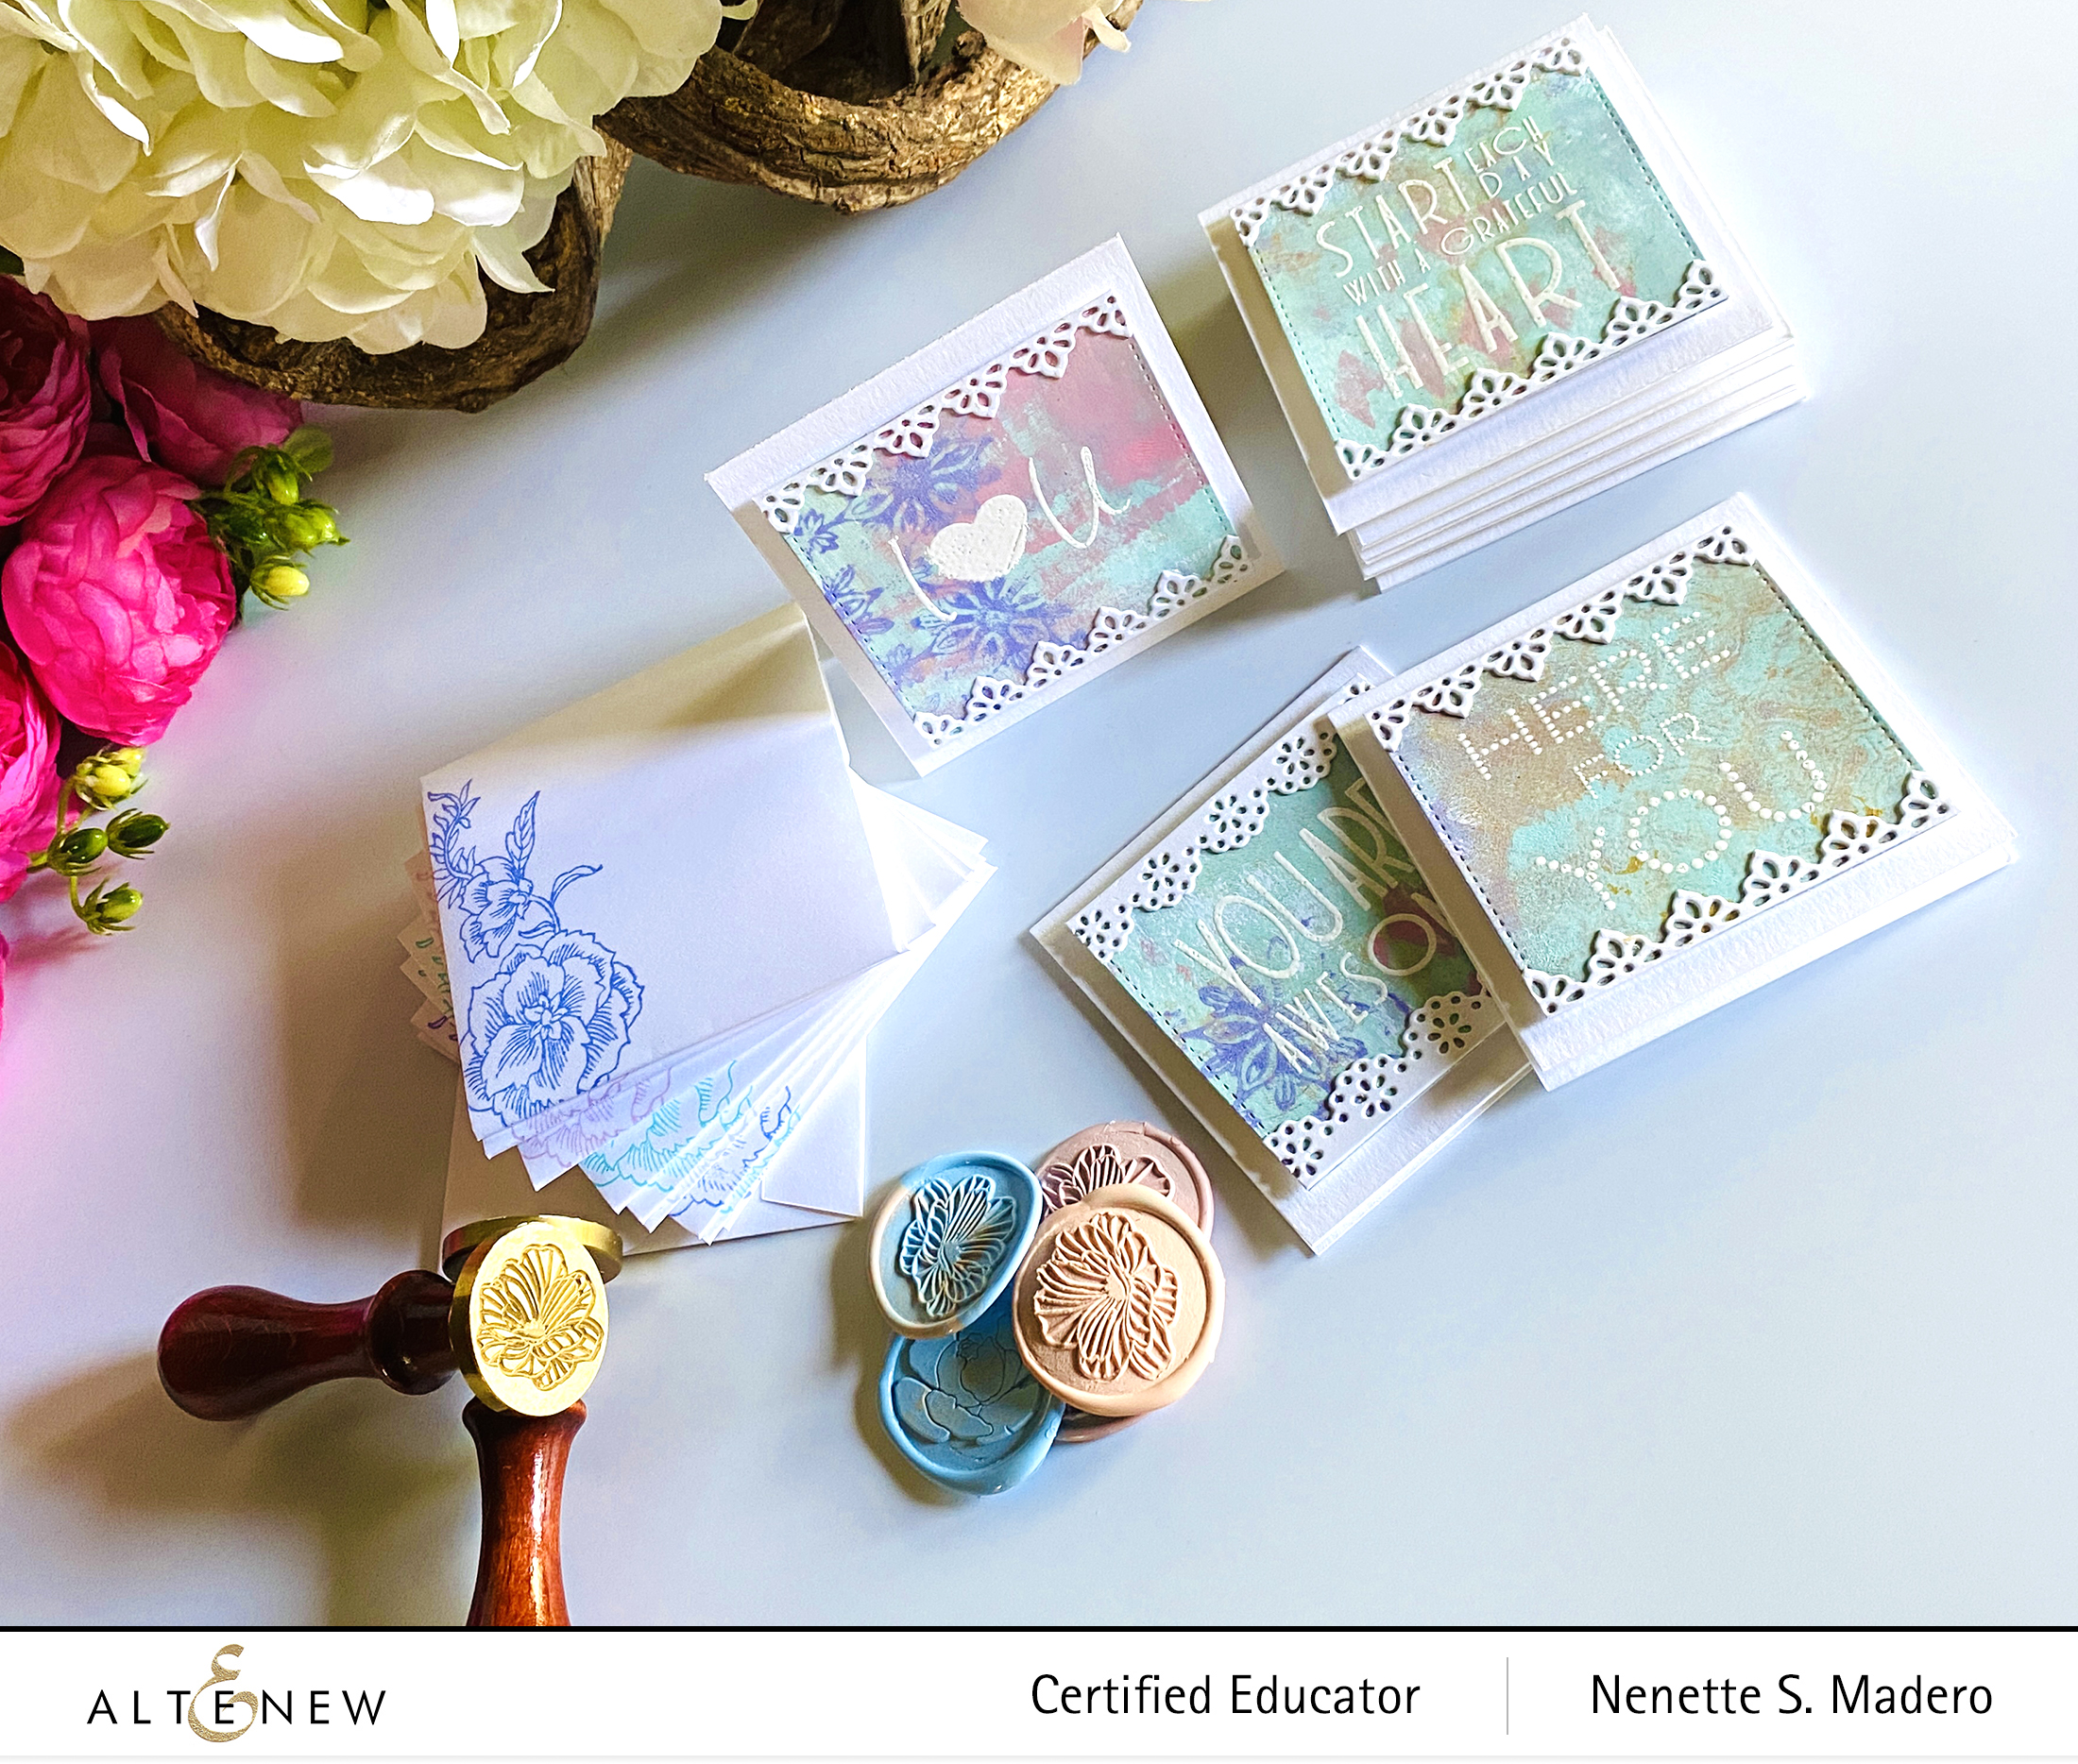
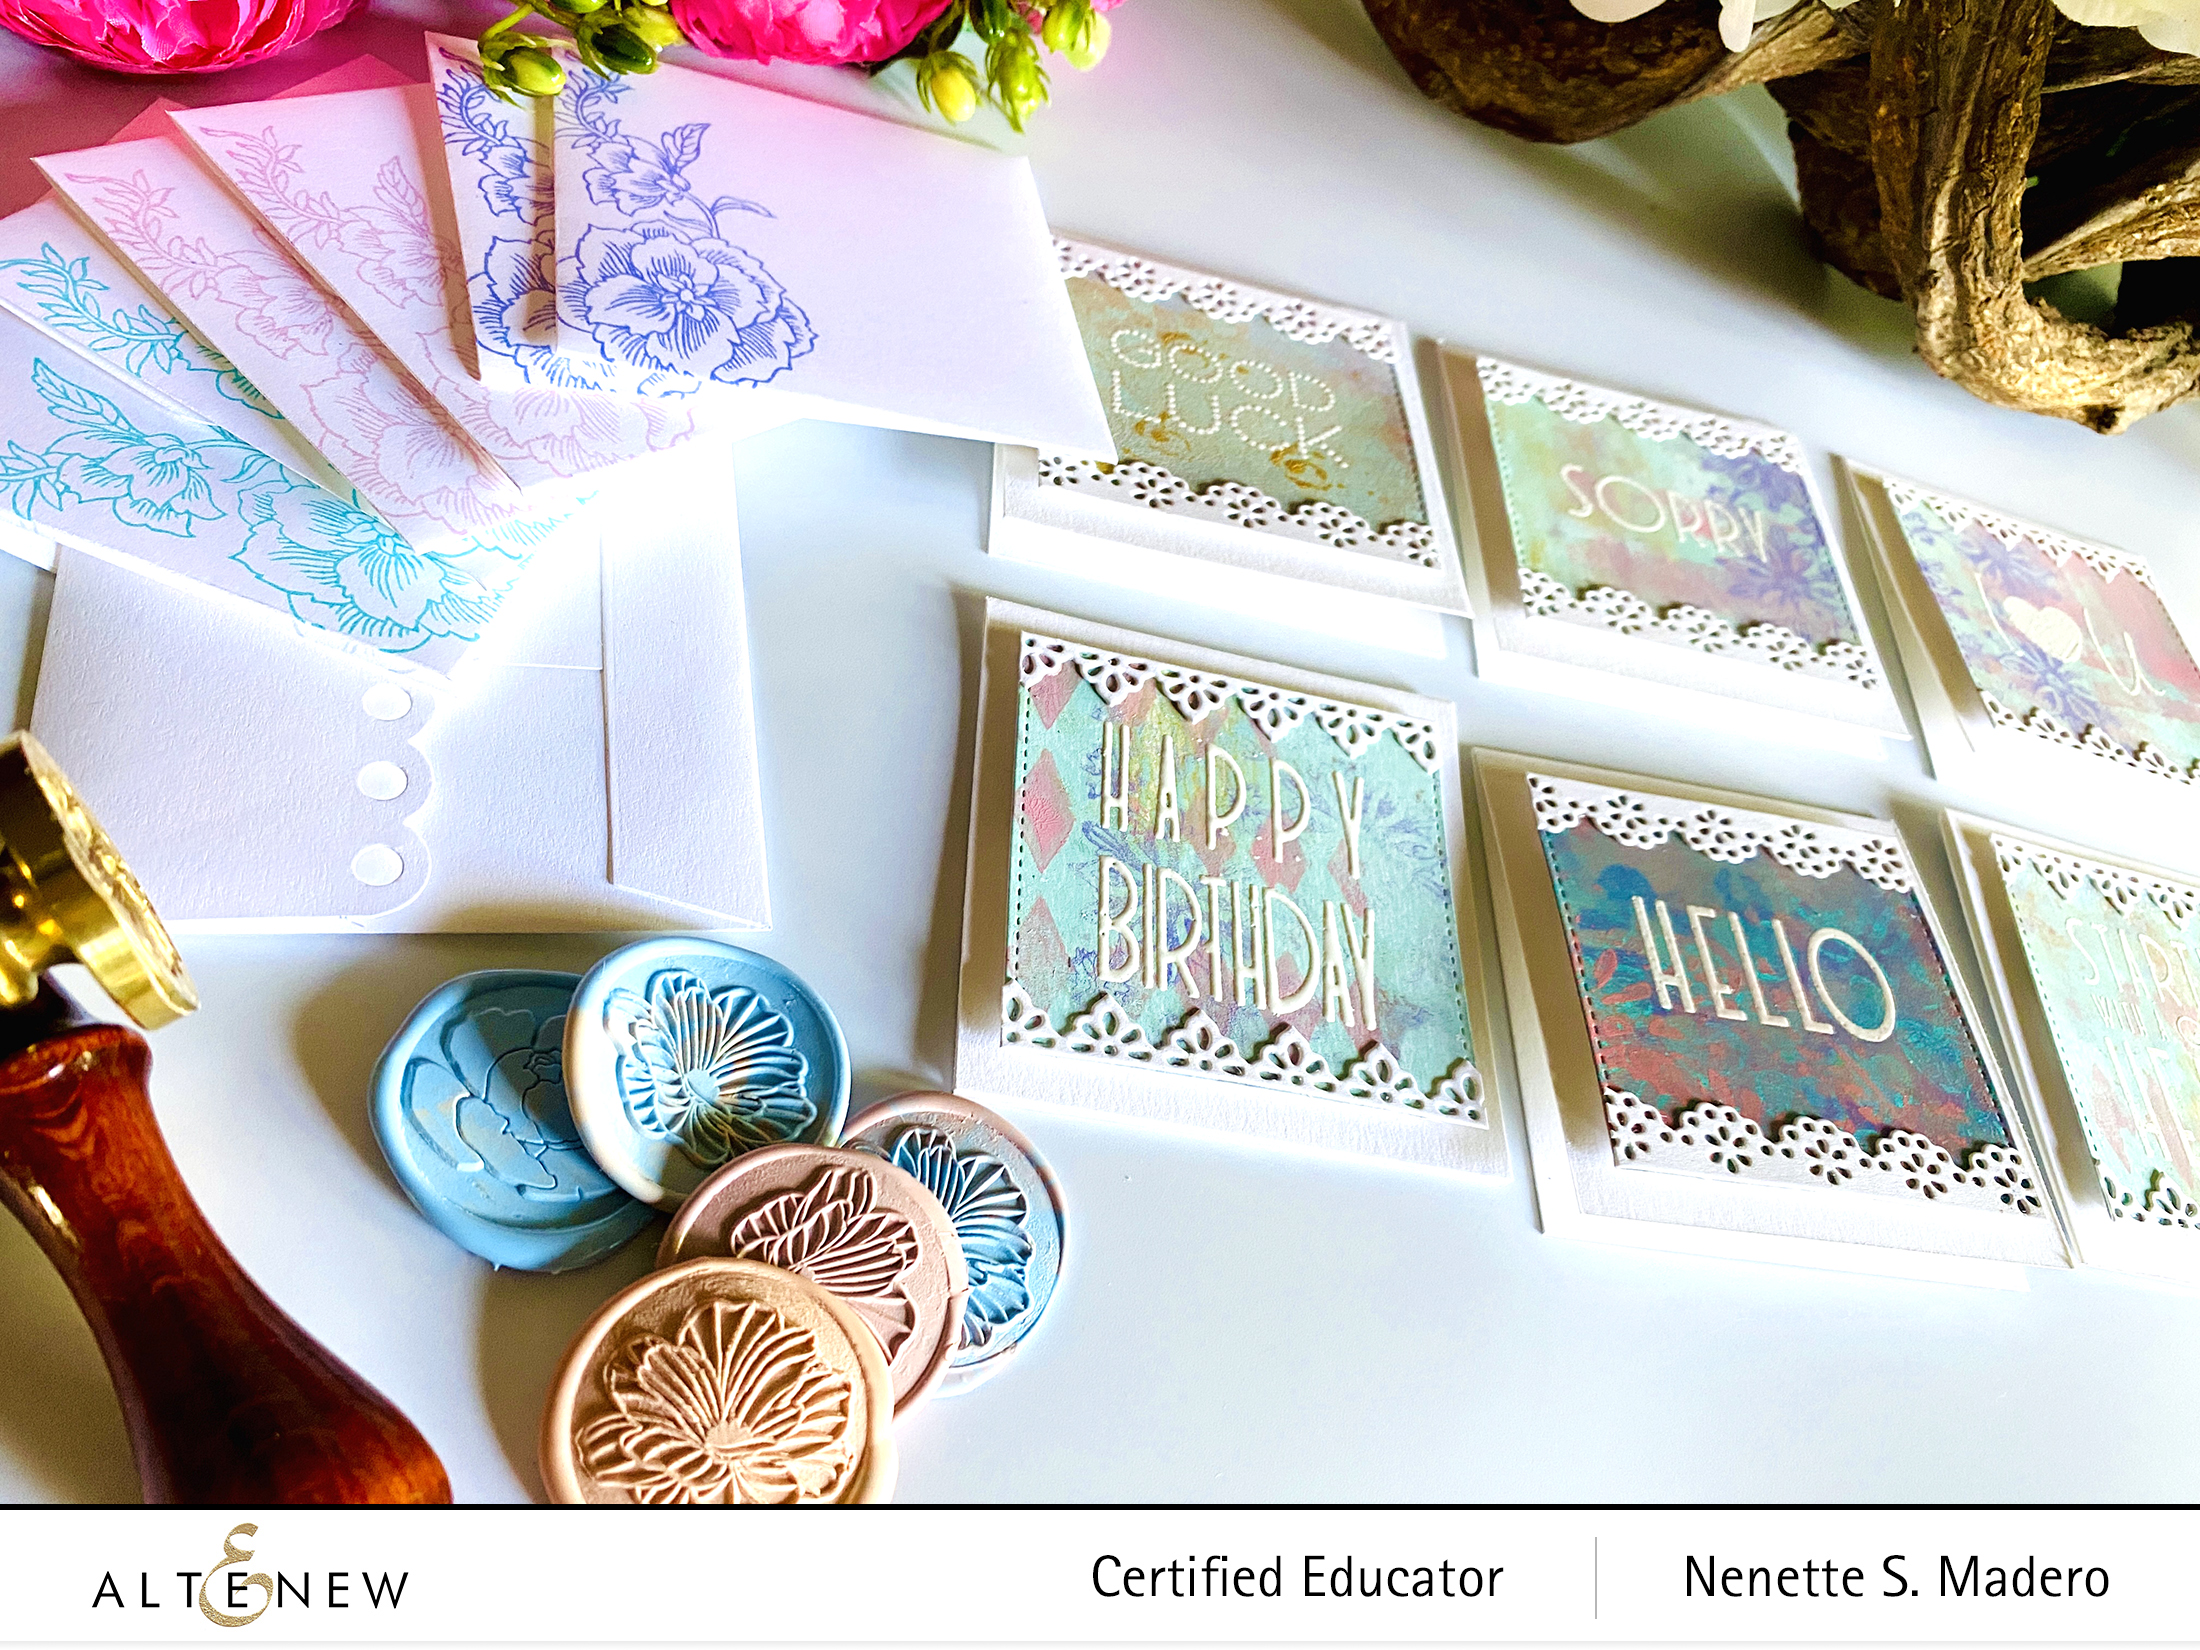
The bundle arrived just in time for Christmas, so I created some handmade Christmas gifts. I love that there are a variety of sentiments that will fit into a 3×3 card base. It also comes with a cute envelope die with an embellished flap! So cute!!! You can stamp or die-cut some borders for a very dainty look.
I used my Gelli prints as my base for all the cards. These were die-cut into squares slightly smaller than 3×3; I stamped the different sentiments using Versamark Ink and Pure White Embossing powder.
II also stamped a floral image from the Engraved Flowers stamp set on the front of the envelopes for added interest. The borders were die-cut using white cardstock and adhered to the top and bottom of the sentiments. These strips are so dainty and look like lace!!! I also included some wax seals created with the Blooming Bud and Delicate Blossom Wax Seal stamps in the gift set.
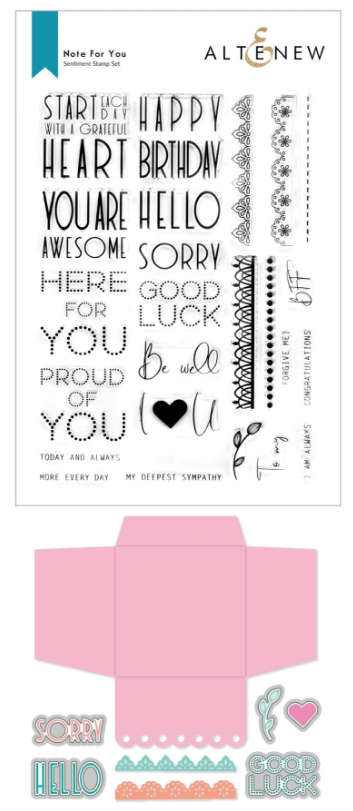
I used the Note for You Stamp set for my second project, using the stamp lace borders instead of the dies. After stamping and embossing in white, Distress Inks were used in creating an ombre background. The sentiment was stamped, embossed, then die-cut.
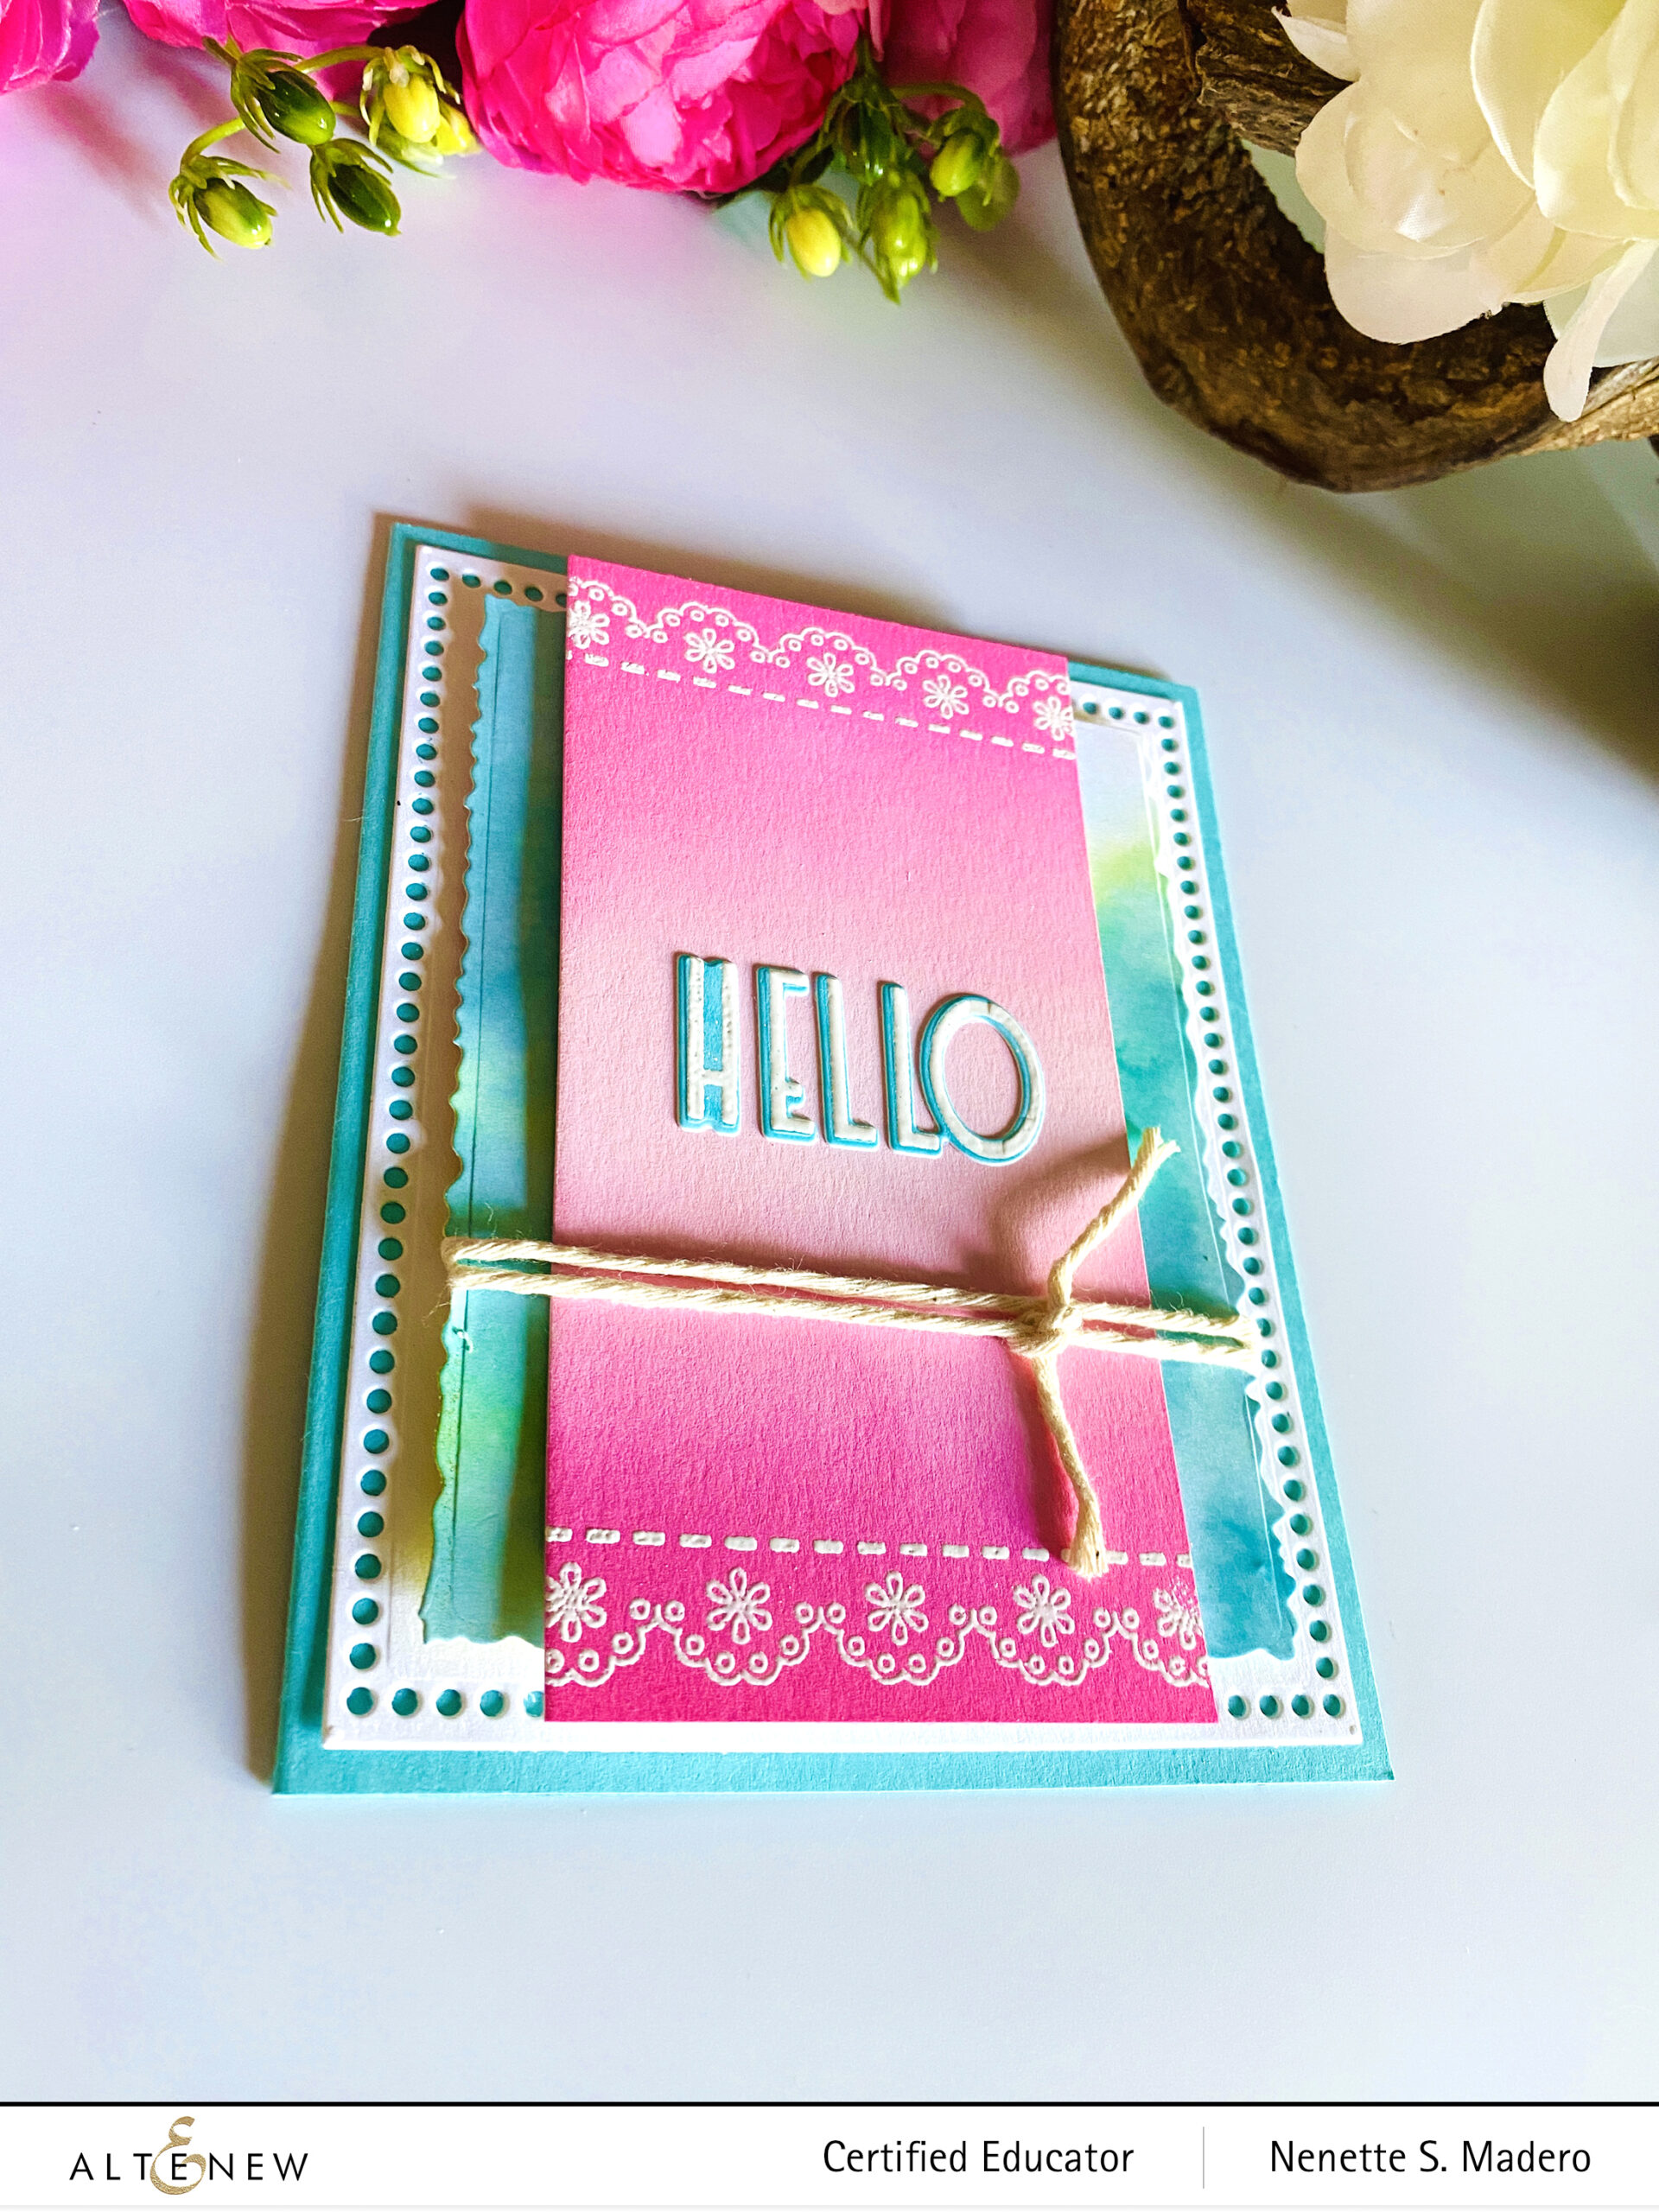
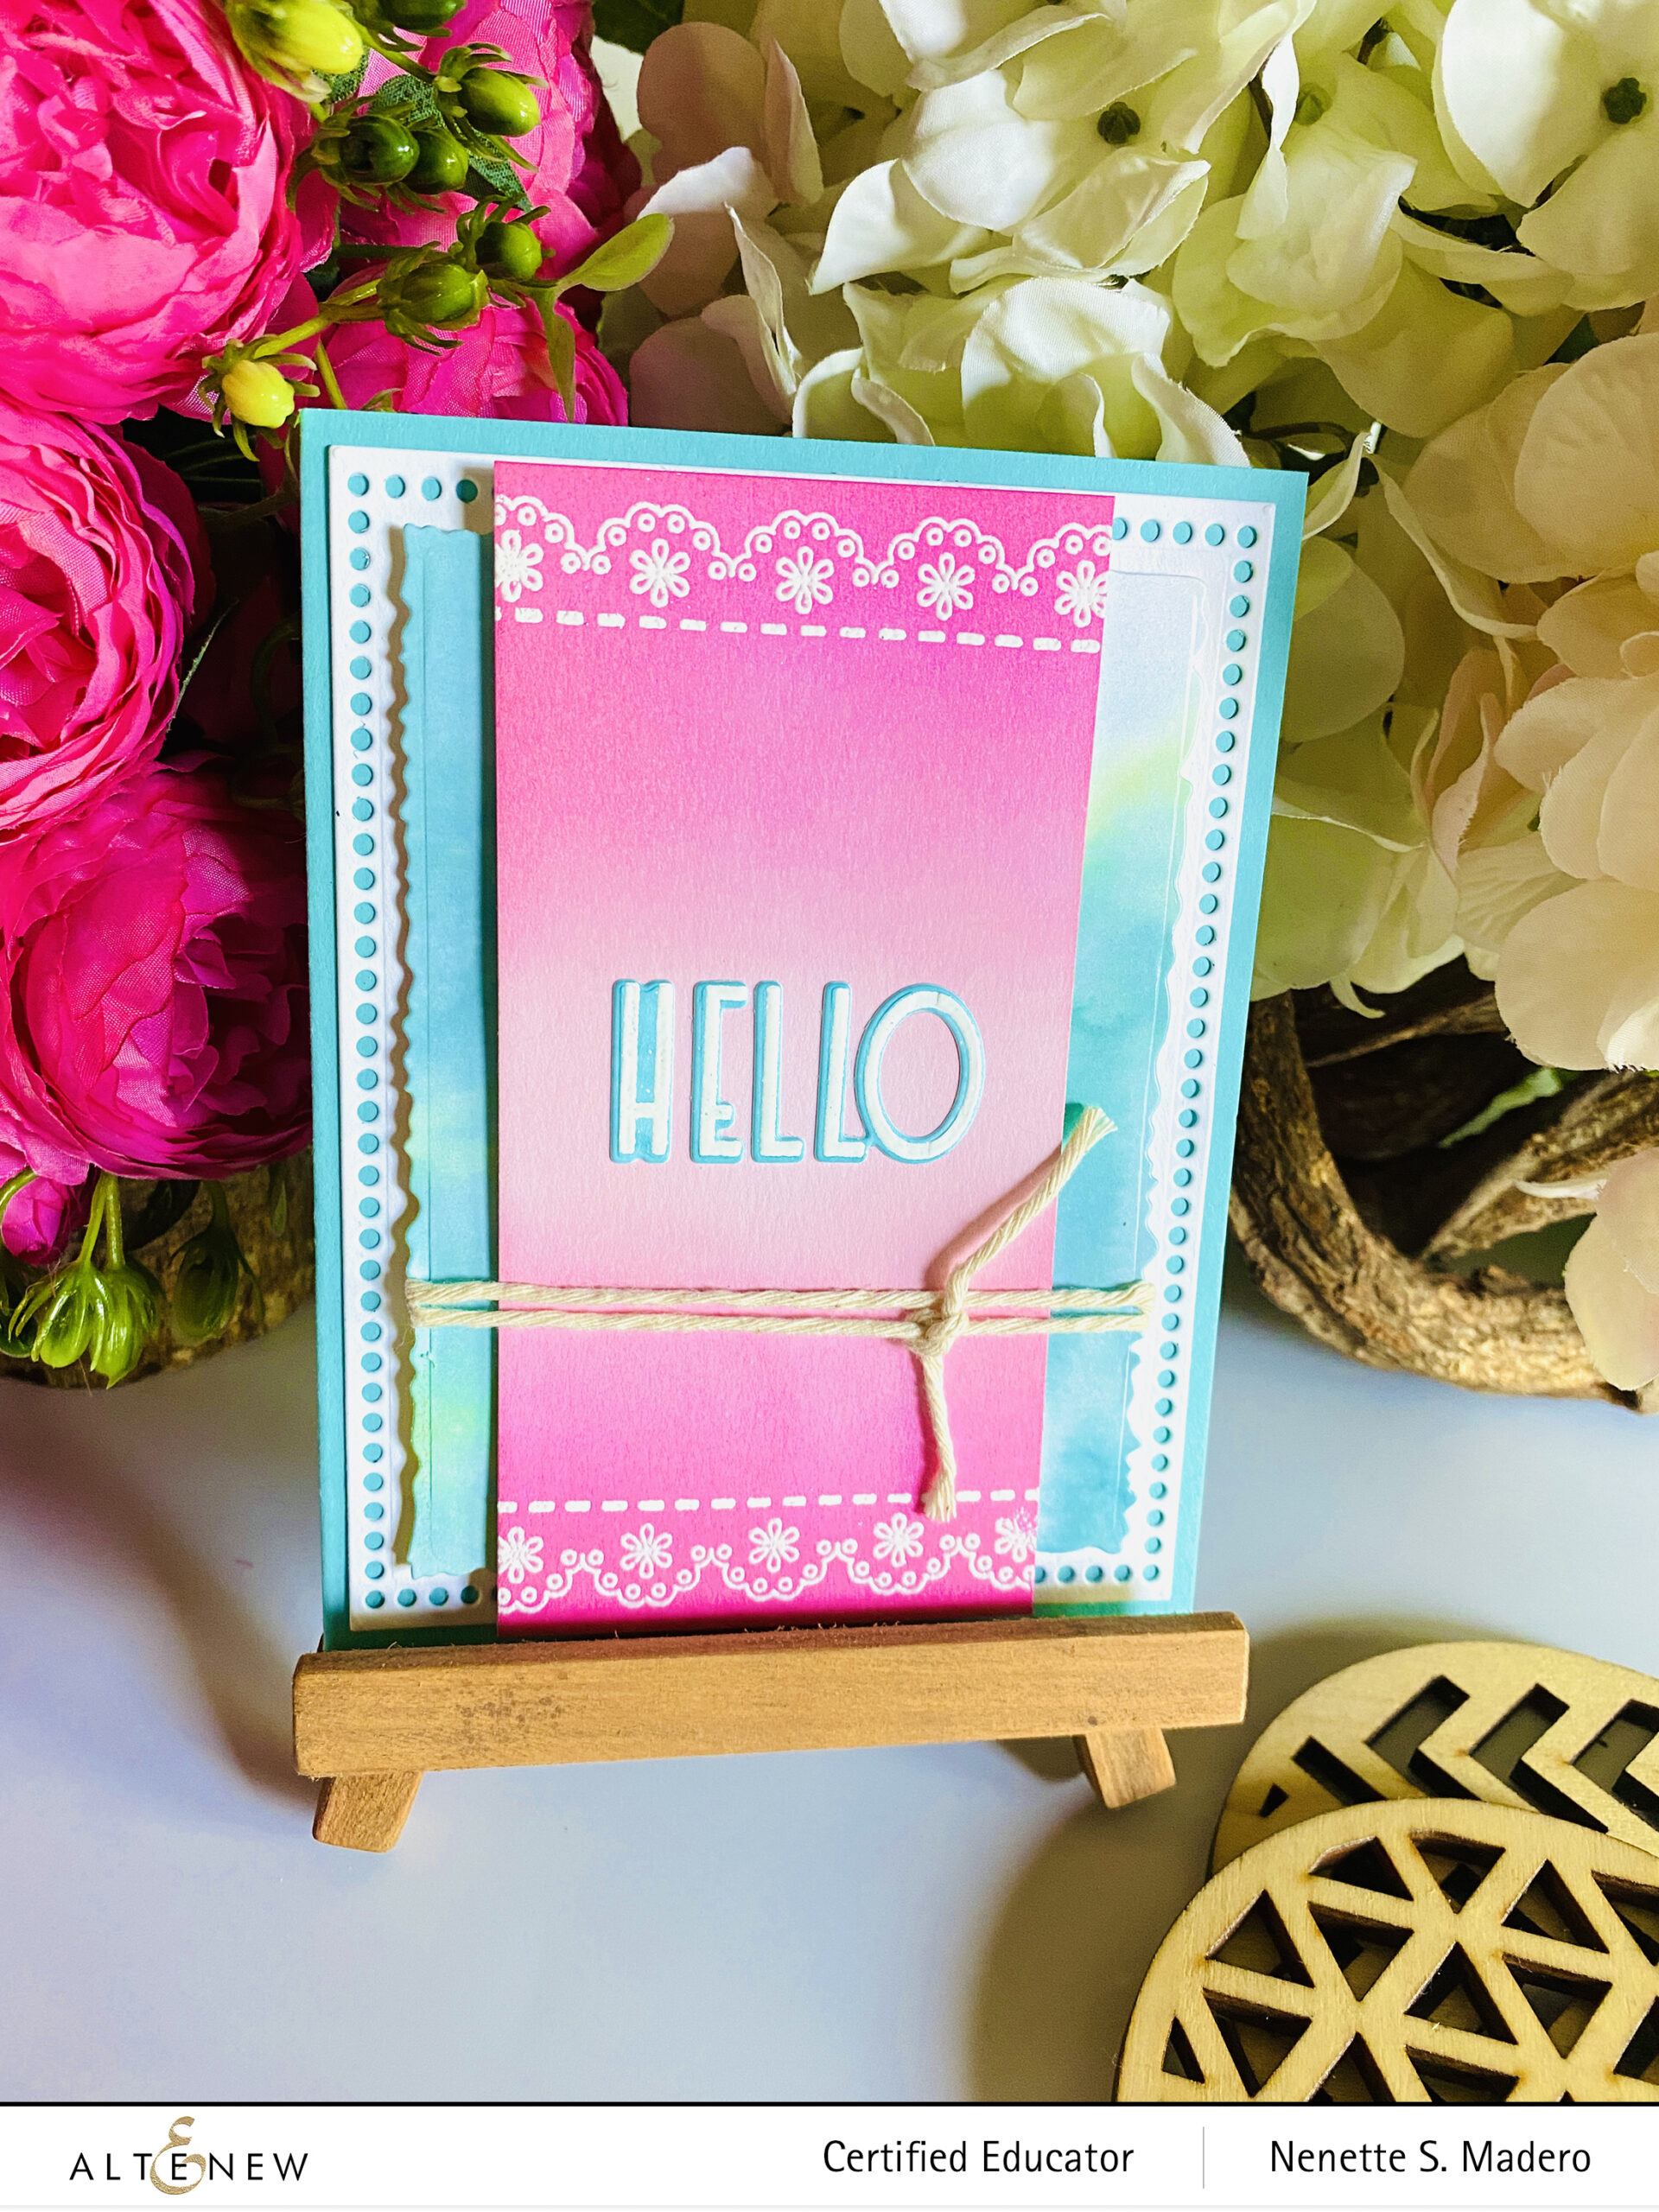
2 of the dies from the Mix & Match Frames dies were used for this card. I layered the die-cut pieces and used foam squares to add dimension. The lacy border and dashed line were stamped using Versamark Ink then embossed with Pure White Crisp Embossing powder.
PRIZES
$130 in total prizes! Altenew is giving away a $20 gift certificate to 3 lucky winners and a $15 gift certificate to 4 winners! Please leave a comment on the Altenew Card Blog and/or each designer’s blog post on the blog hop list below by 01/09/2022 for a chance to win.
There’s MORE! What’s a hop without YOU?! We have included an Inlinkz at the Altenew blog for you to enter your gorgeous Altenew “New Favorite” creations. We will pick one of our favorite handmade creations from those who joined the linky party and they will receive a $10 Altenew gift certificate!
Altenew will draw 7 random winners from the comments left on each stop of this blog hop and announce the winners on the Altenew Winners Page on 01/10/2022.
NEXT UP: Ann Taylor. Thank you so much for dropping by! If you want to see more of my latest creations, please follow my Instagram account @mylittleatticstudio. Don’t forget to leave a comment below to get a chance to win a prize from Altenew.
The Altenew Educators are all looking forward to a productive and creative year ahead!! Stay safe and happy crafting, everyone! 💜


")


")


")