Altenew Craft Your Life Project Kit: Fragrant Florals Release Blog Hop + Giveaway ($300 in total prizes)

Altenew Craft Your Life Project Kit: Fragrant Florals Release Blog Hop + Giveaway ($300 in total prizes)

Welcome to my blog, everyone! Thanks so much, Tenia Nelson, for sending everyone over. For the complete details of this hop, make sure to drop by the Altenew Blog.

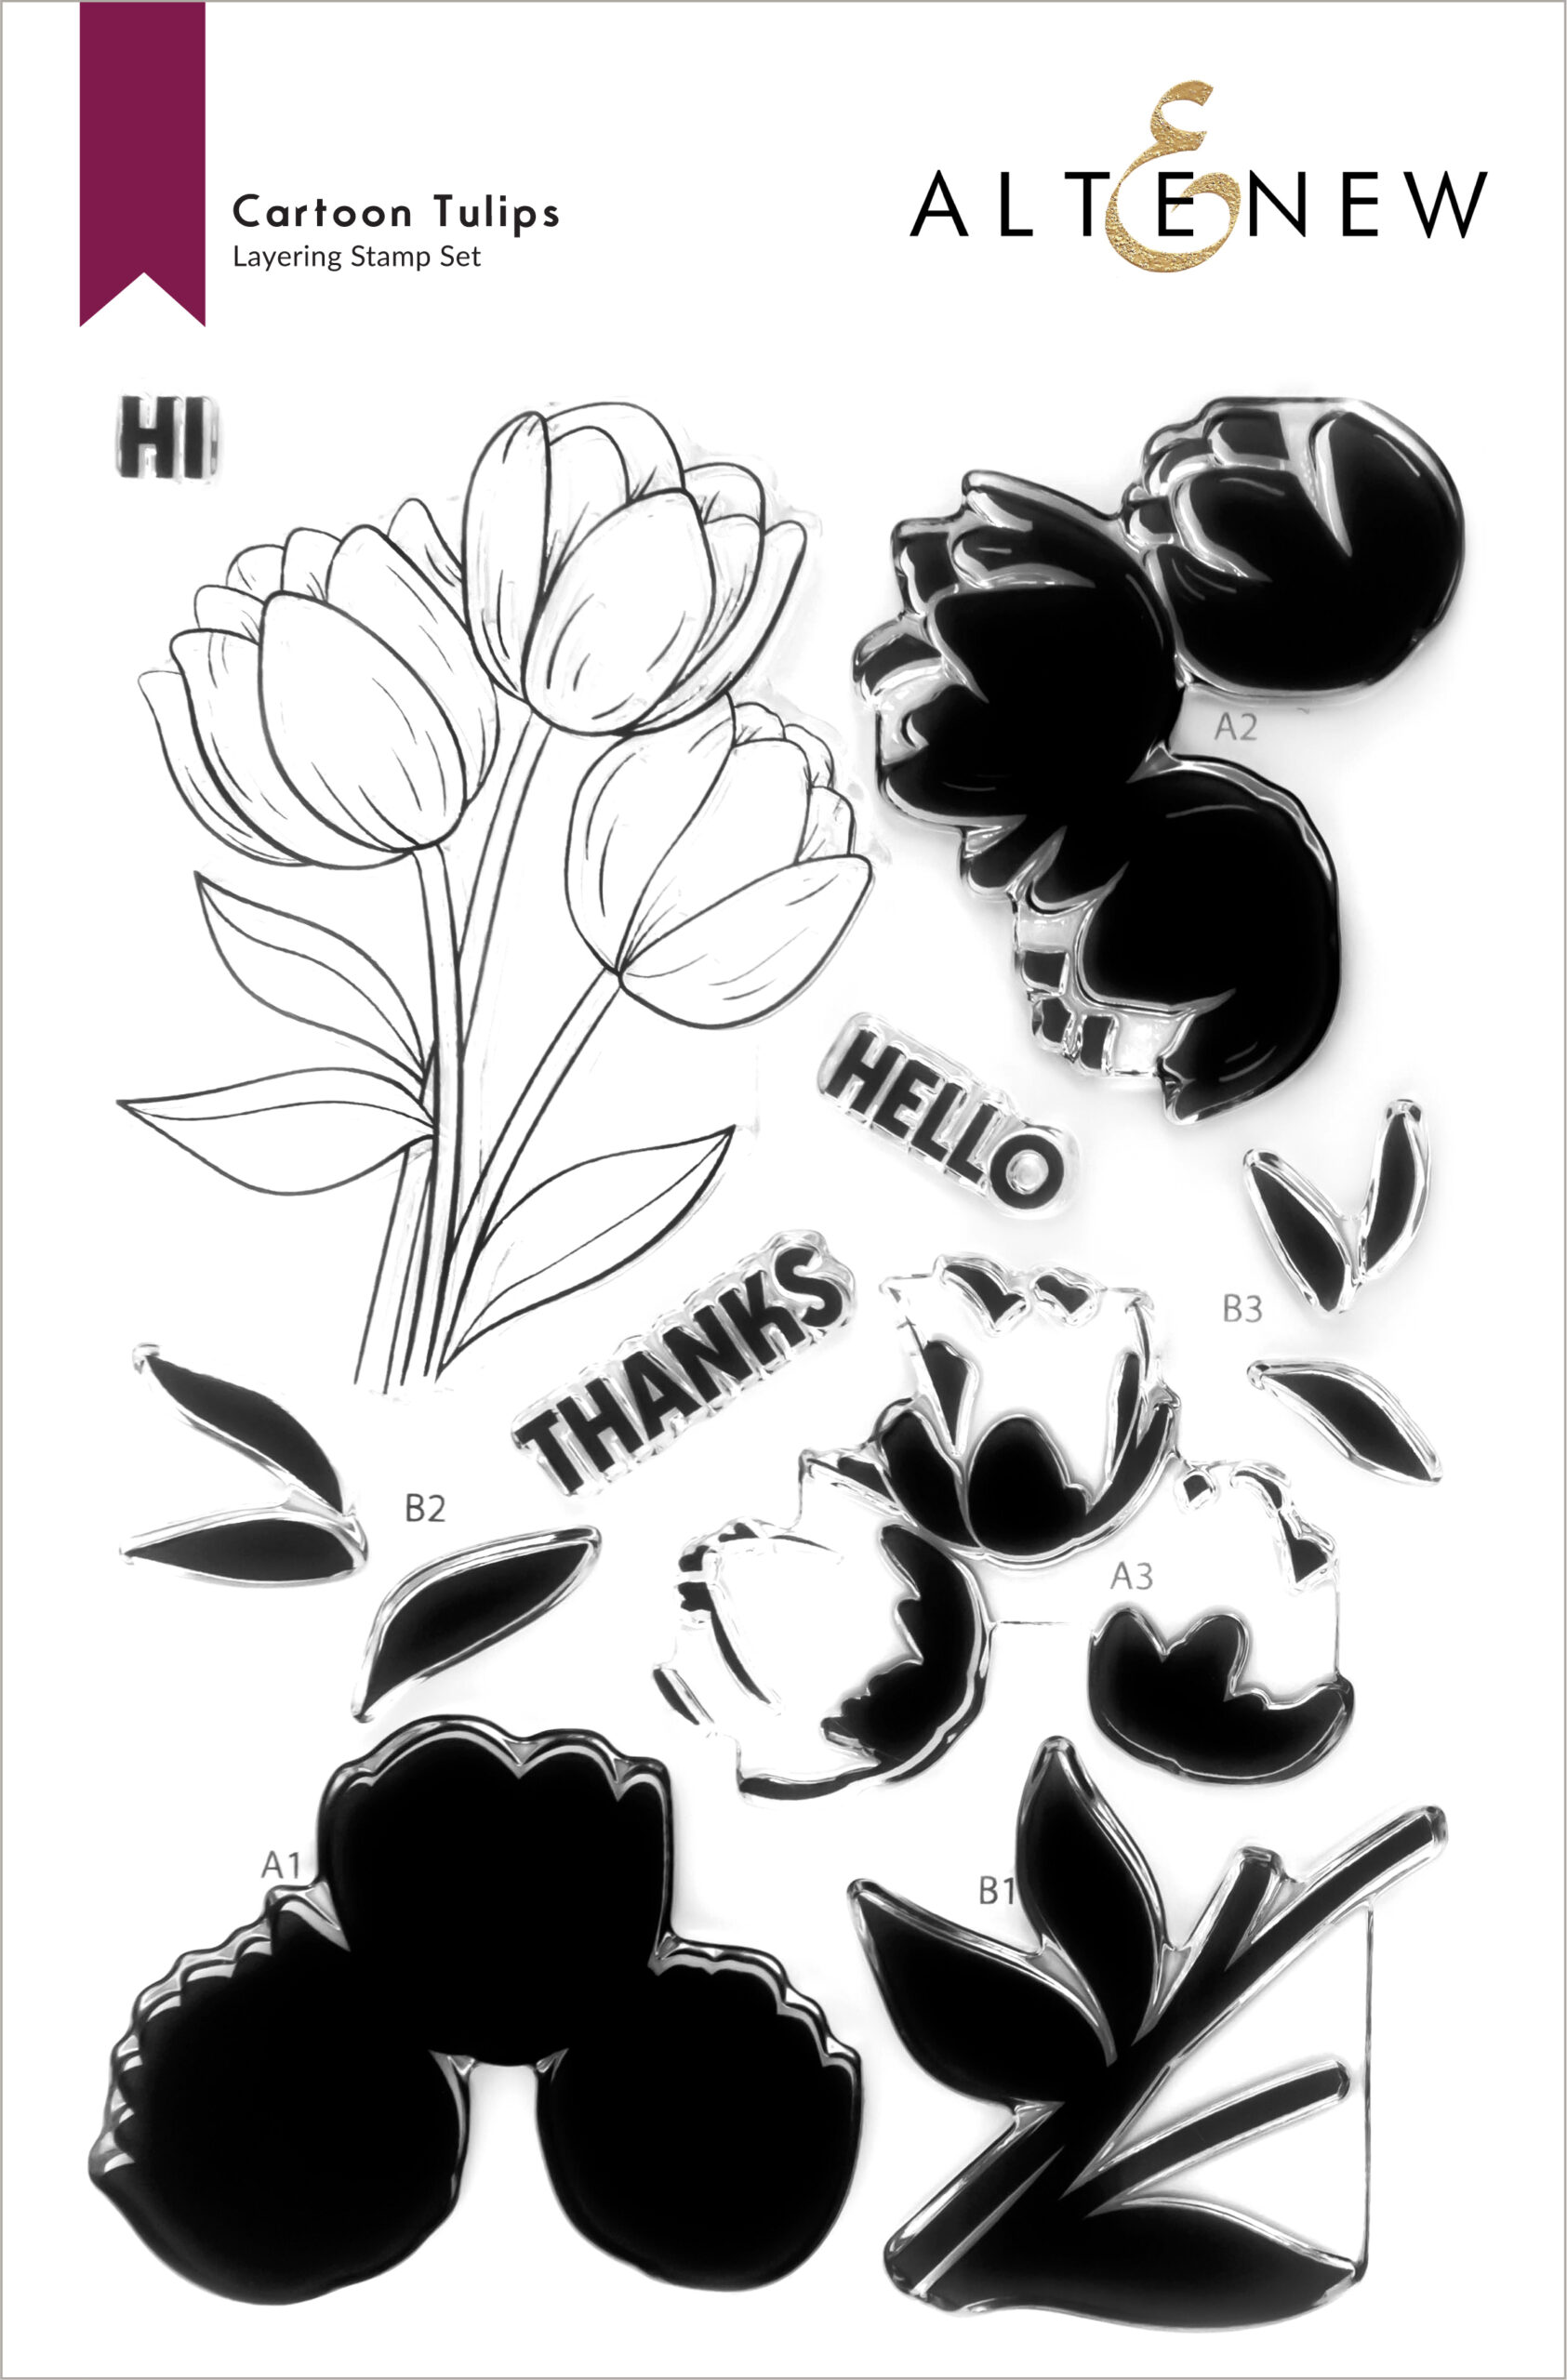
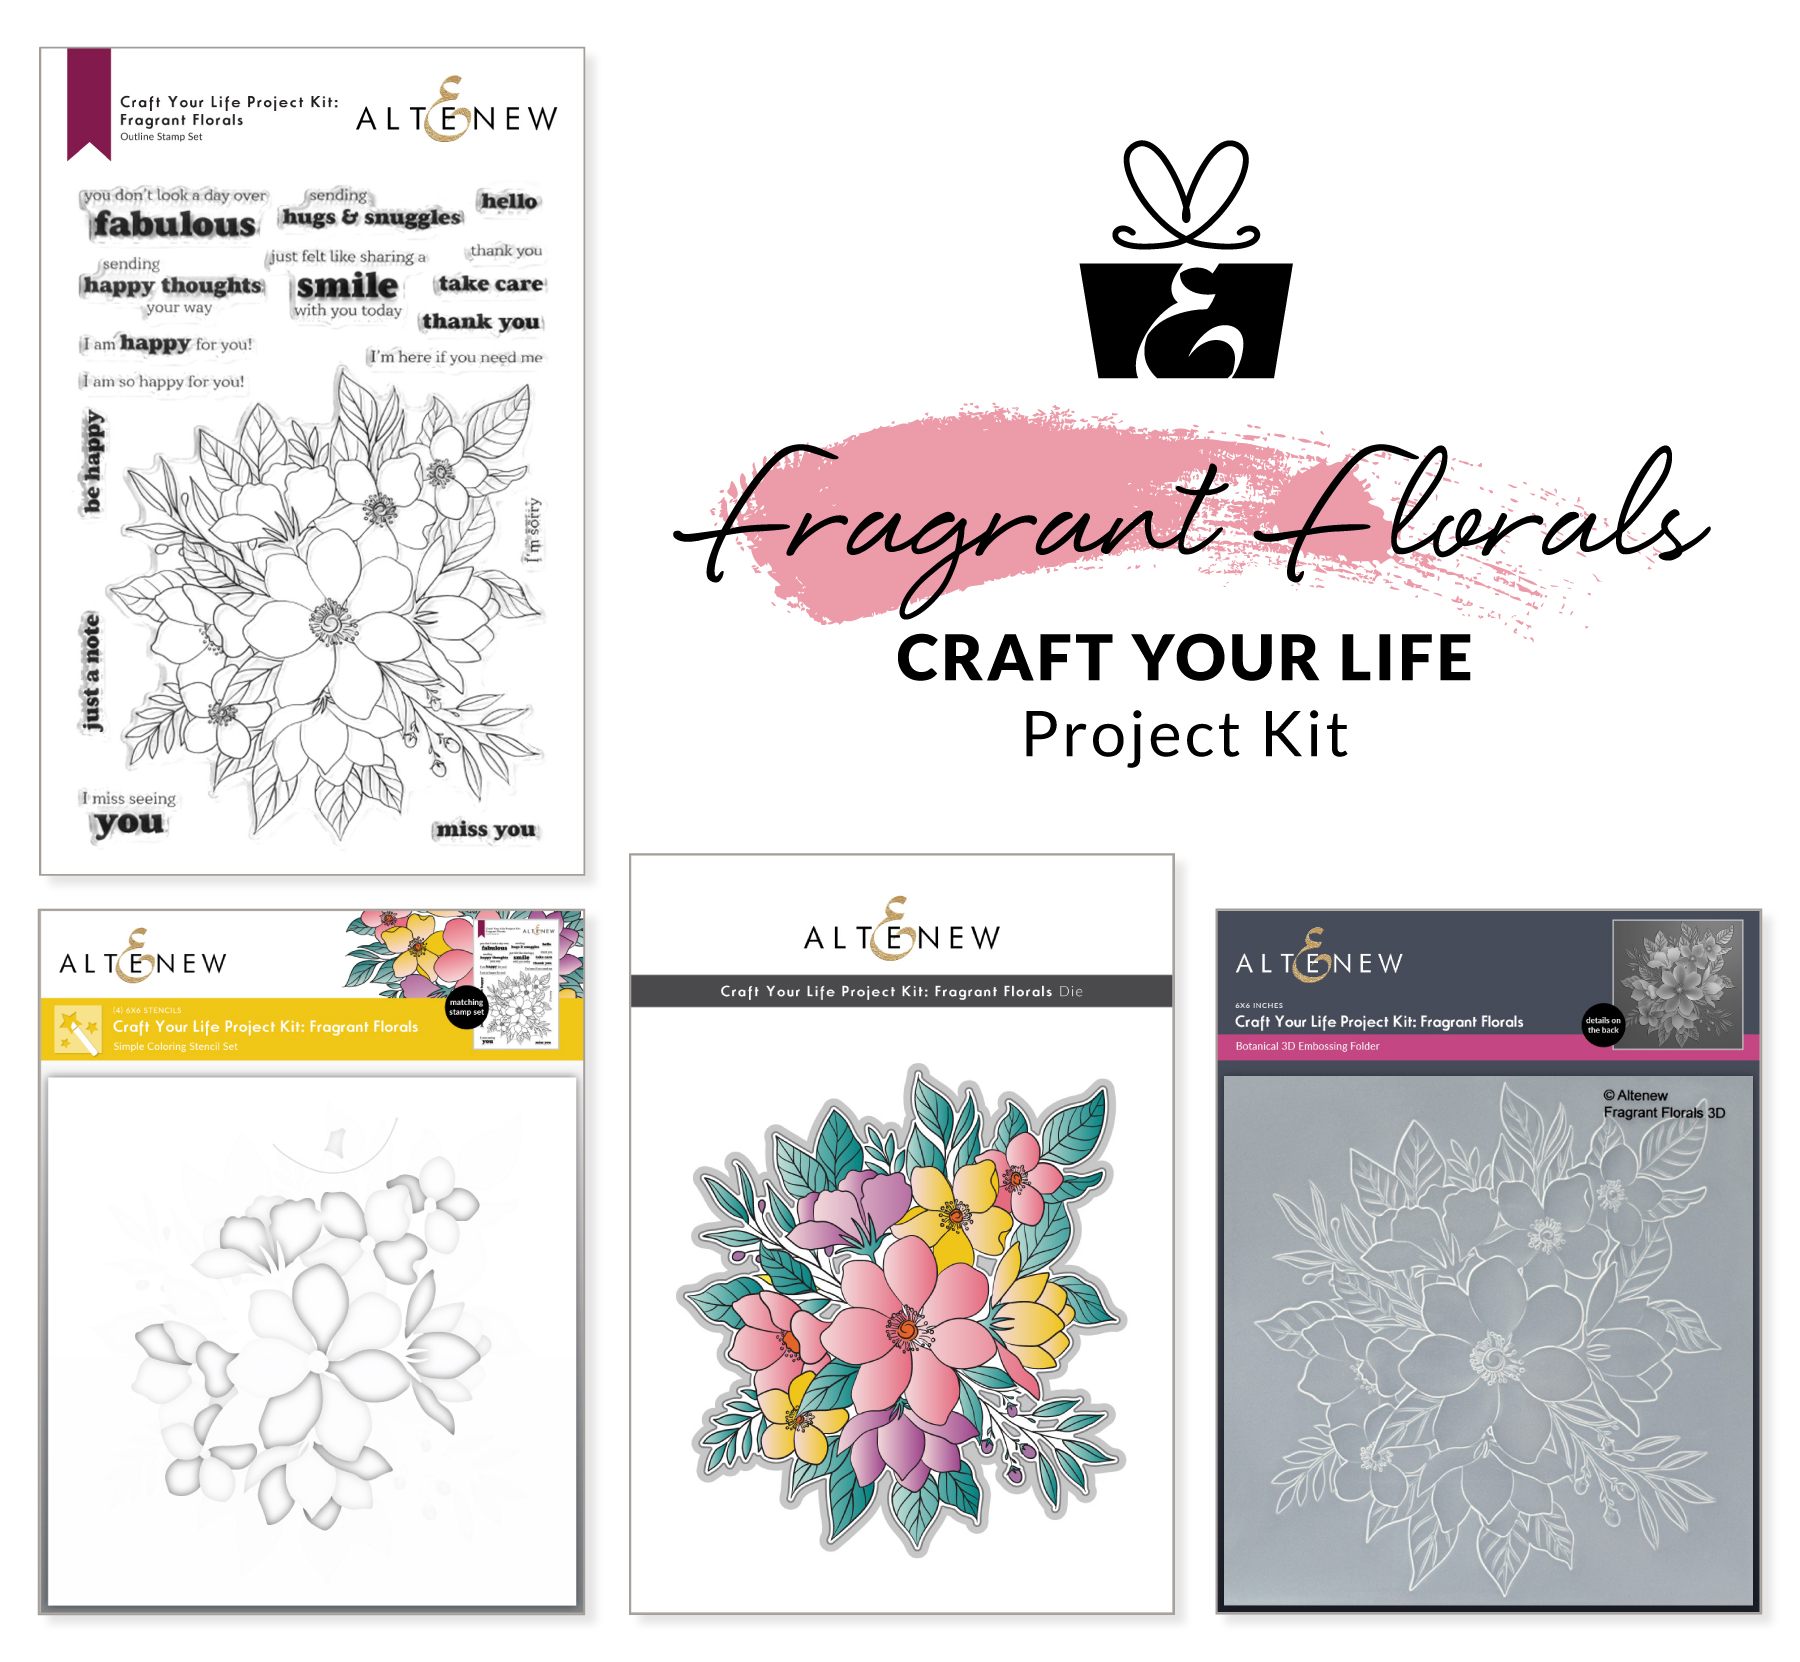
I’m excited to share what I made for the Craft Your Life Project Kit: Fragrant Florals release! You can find this new release here. This is such a gorgeous kit, and there are many ways you can use the stamp, stencil, die, and embossing folder. Here are a few ways you can use them.

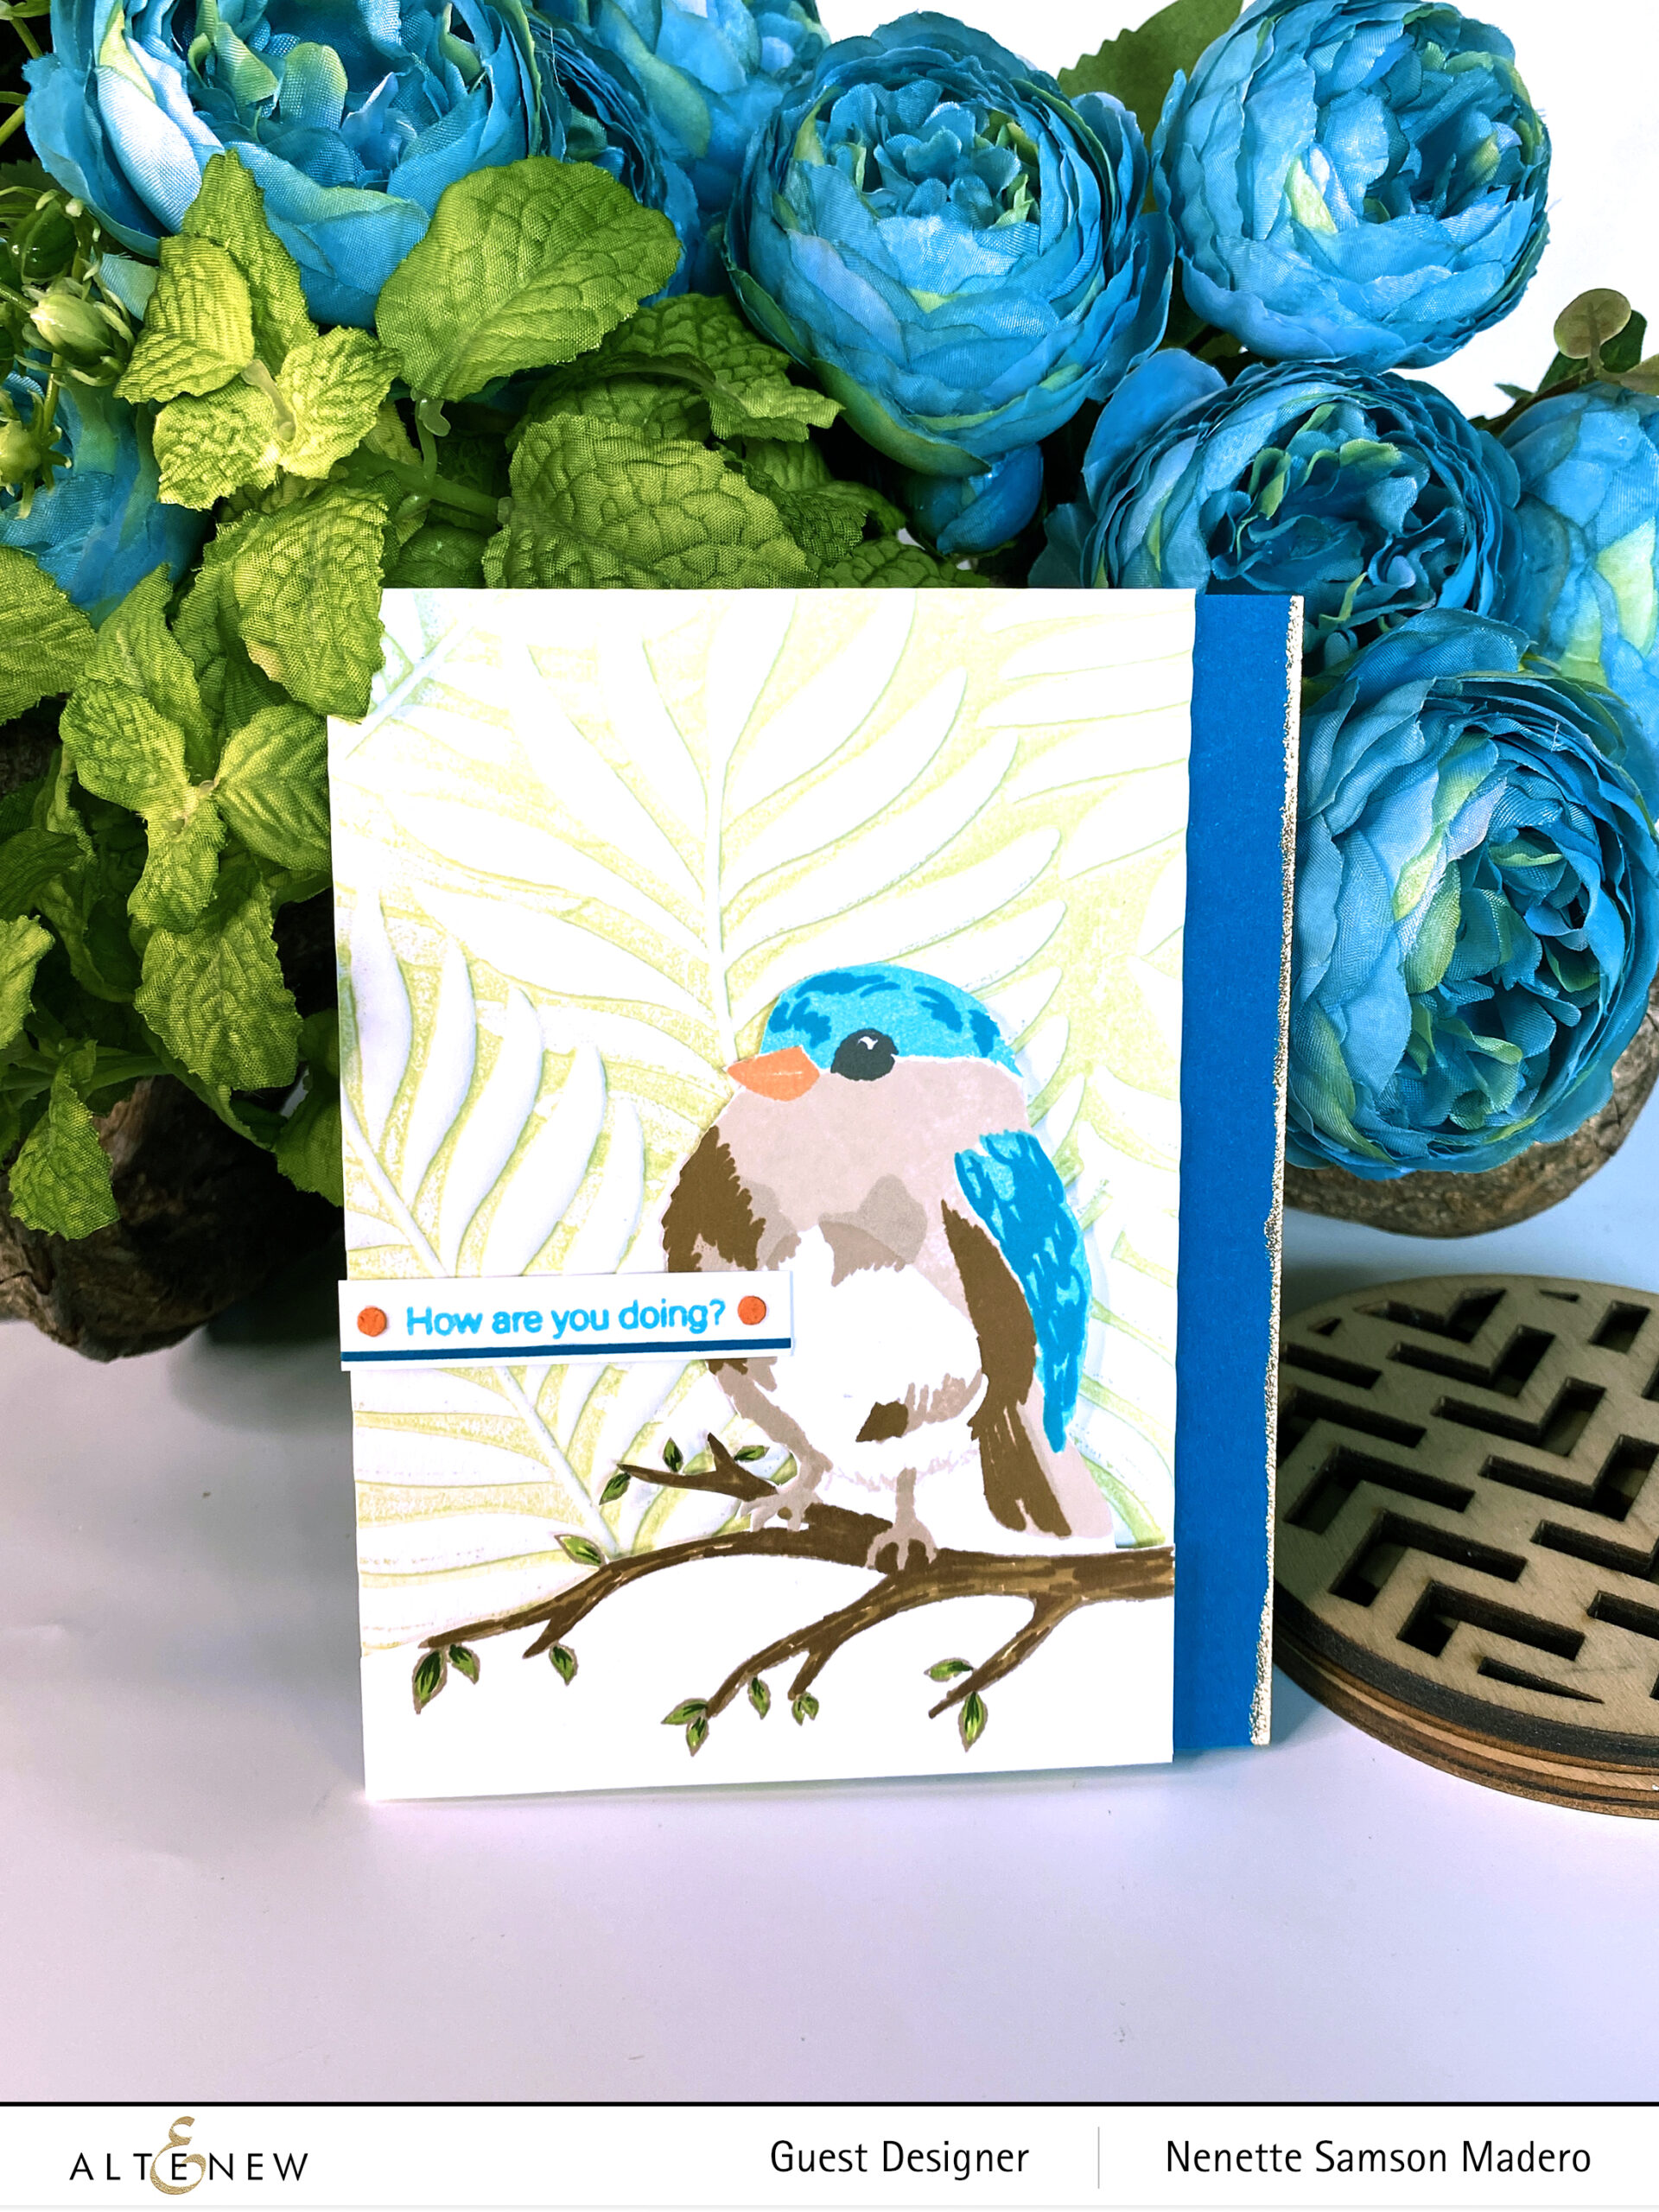
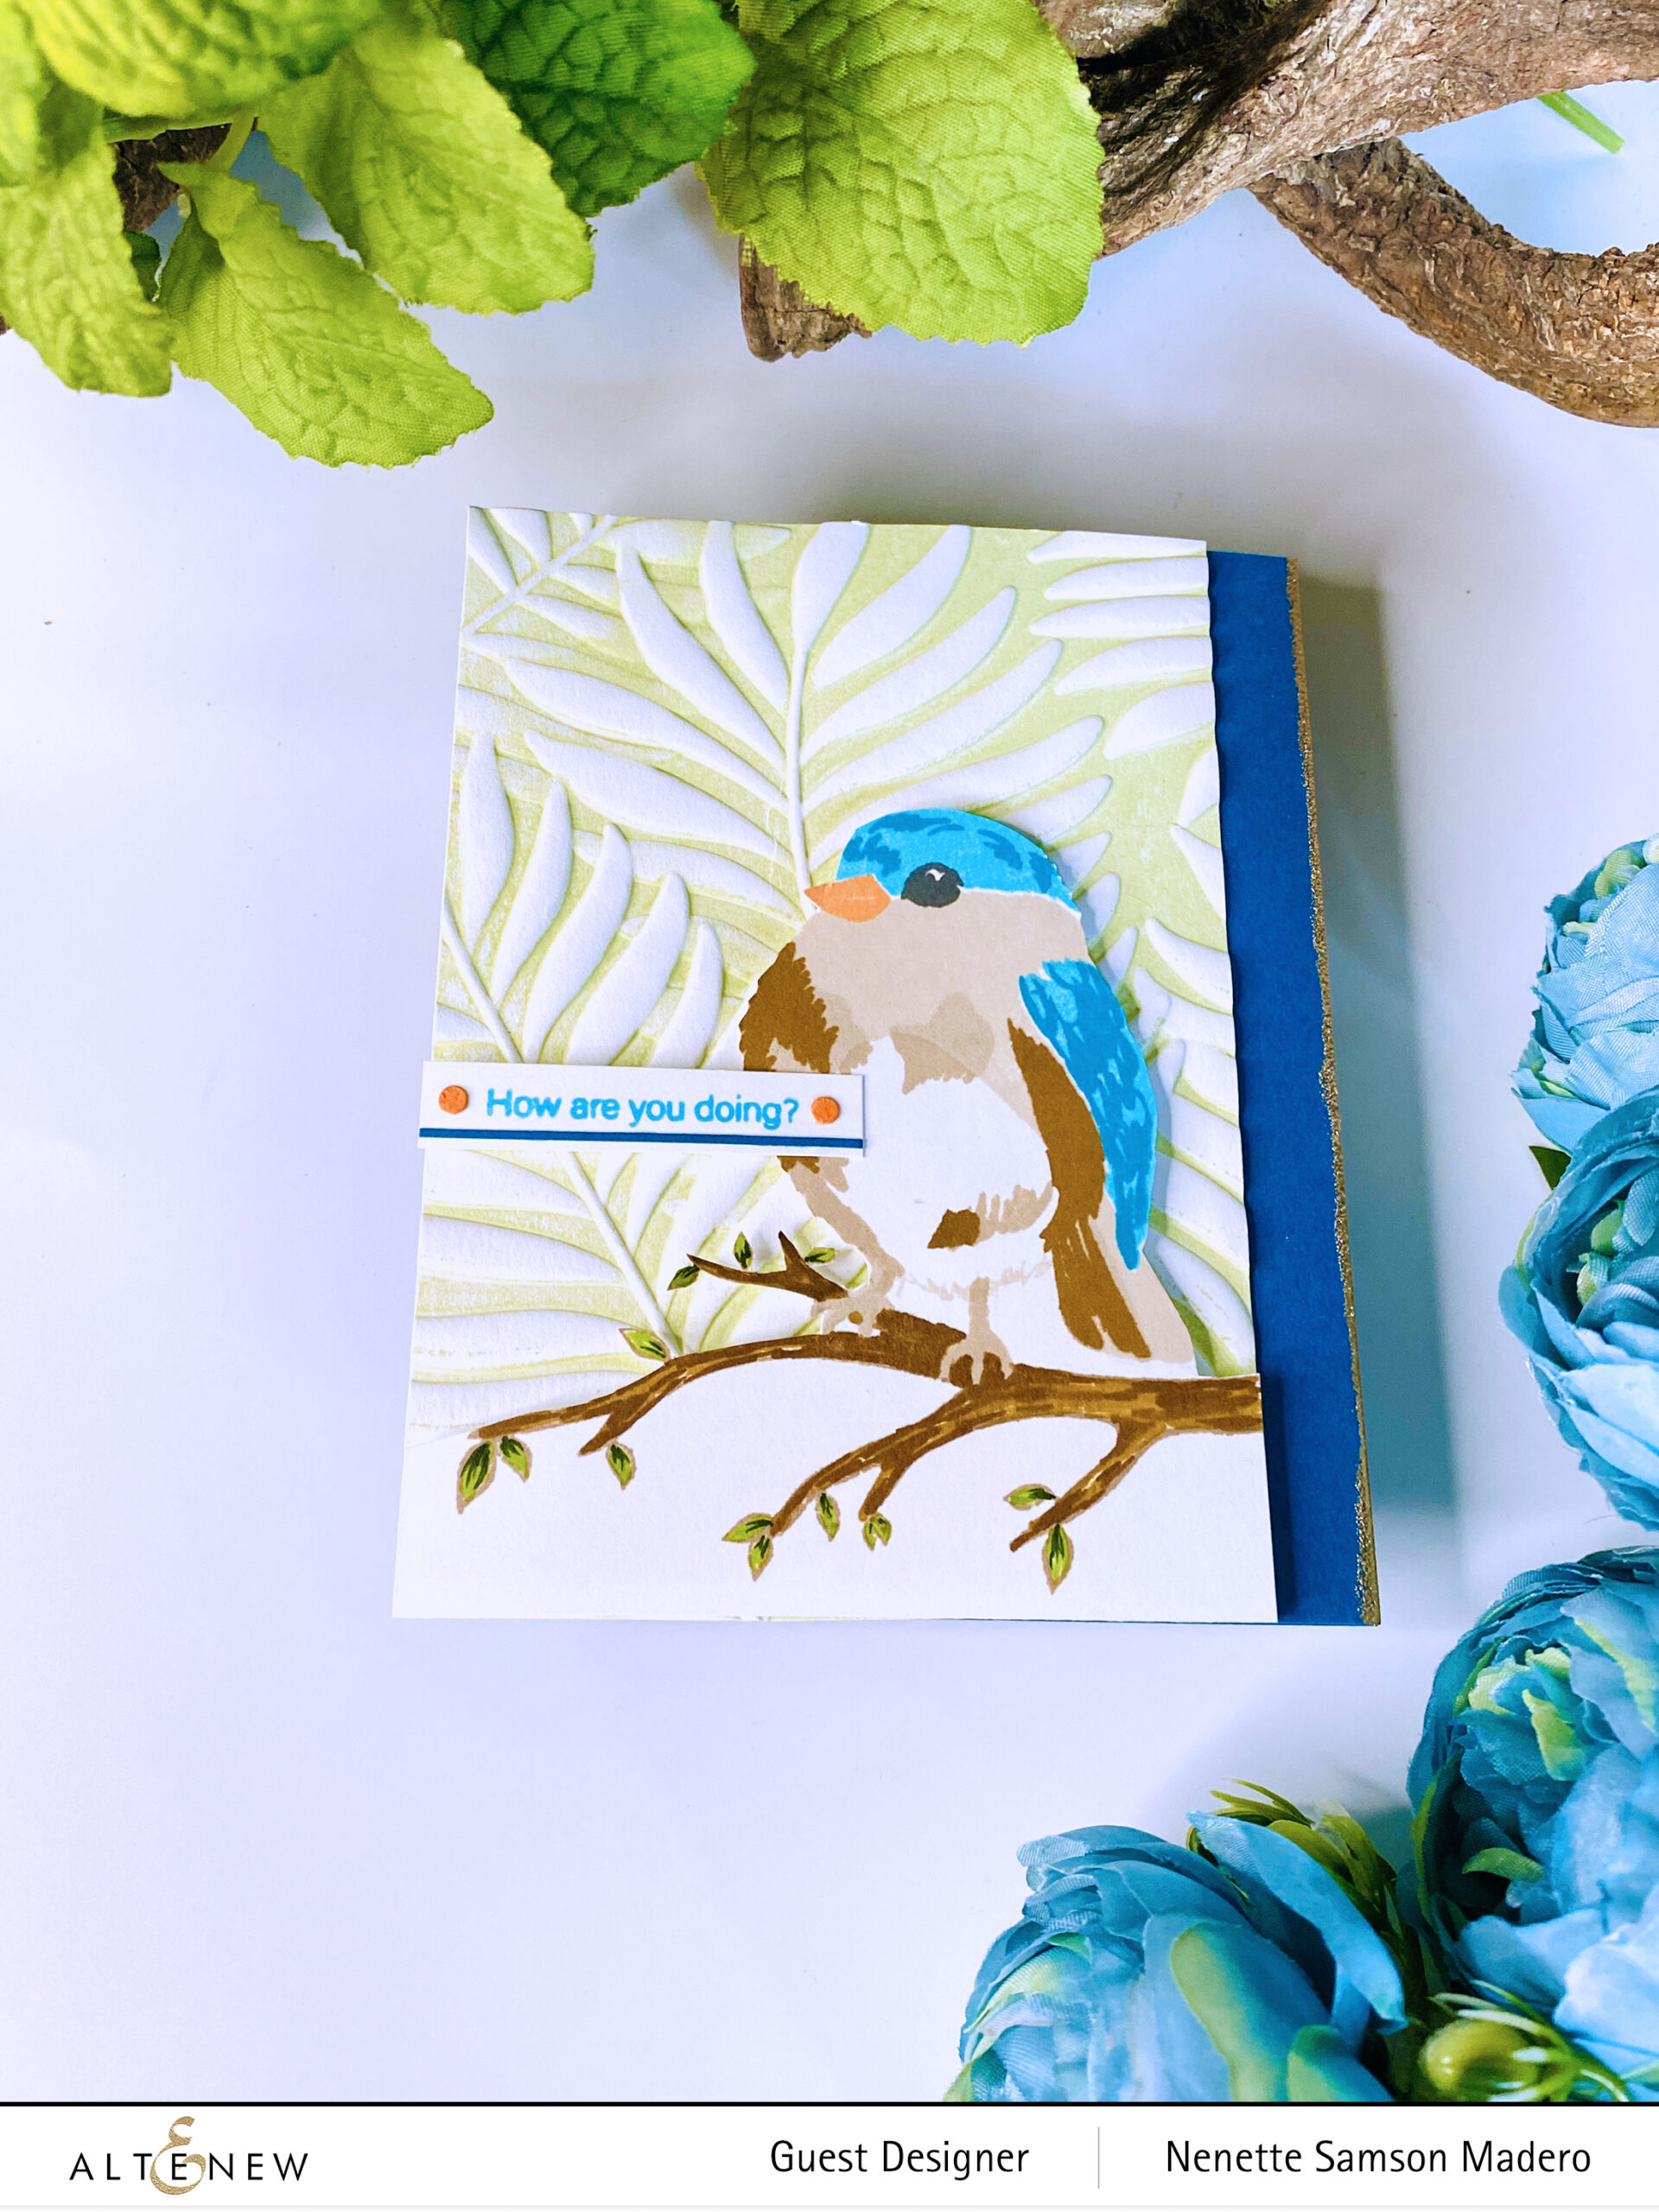
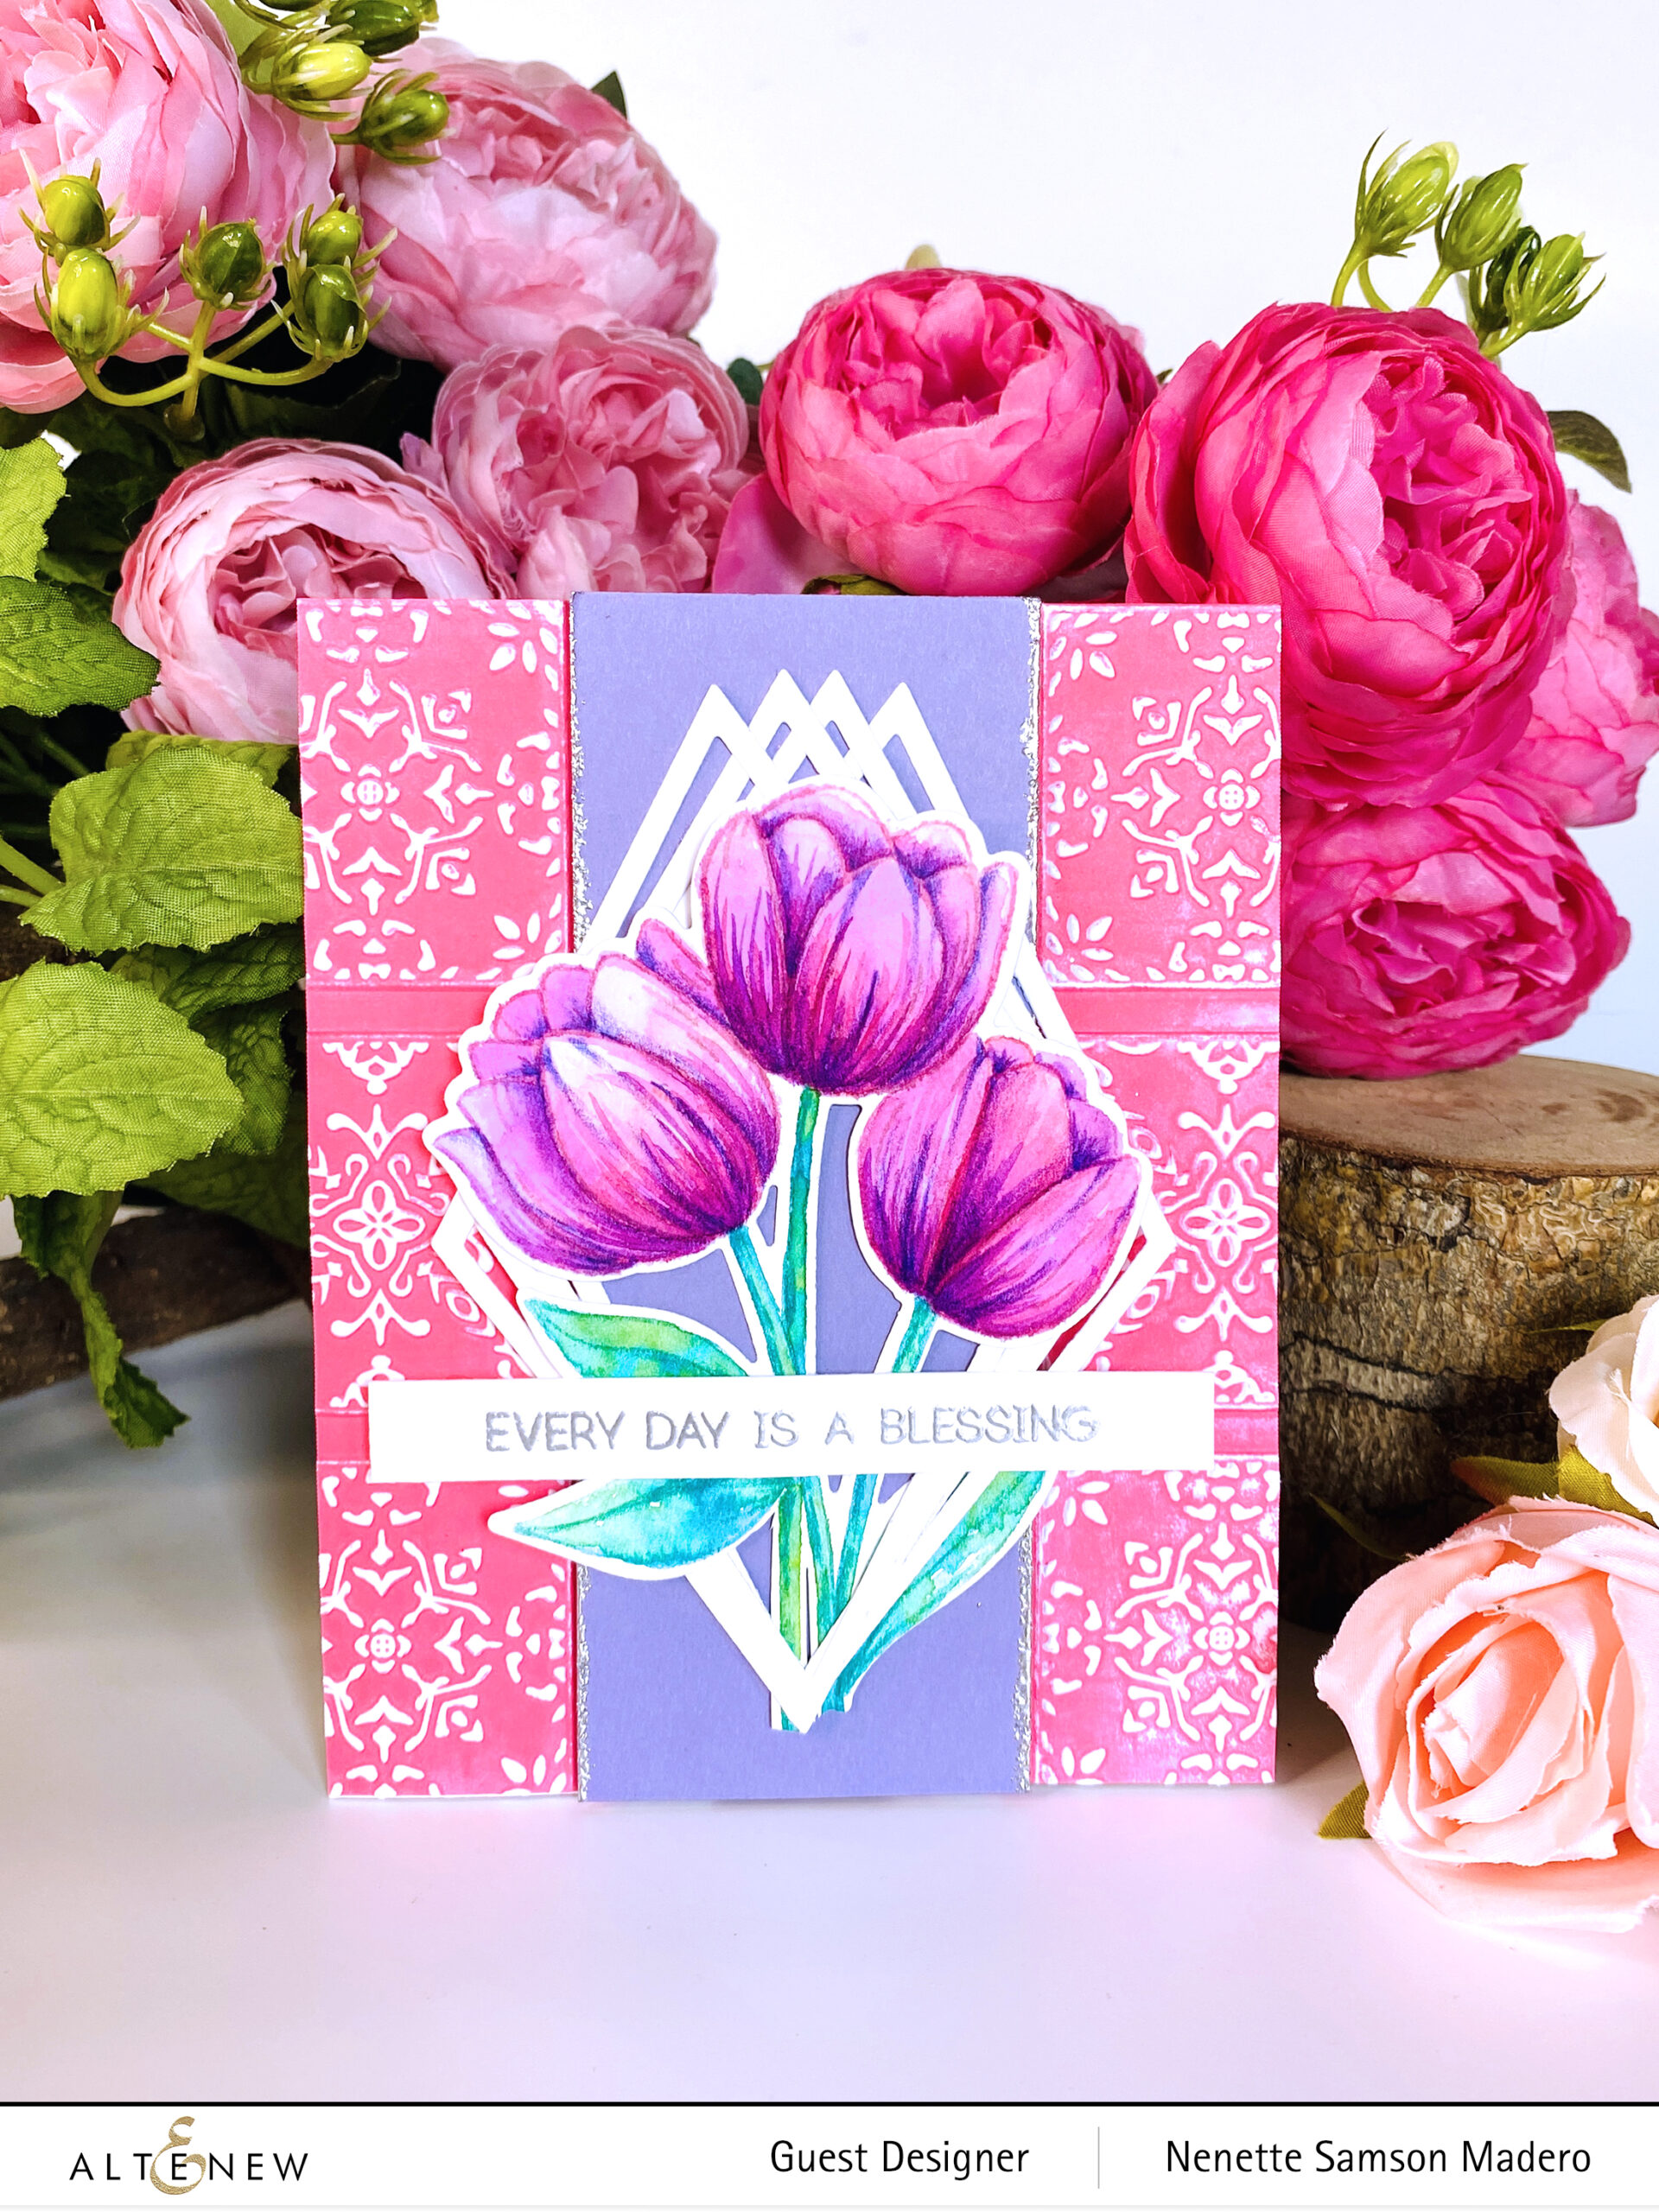
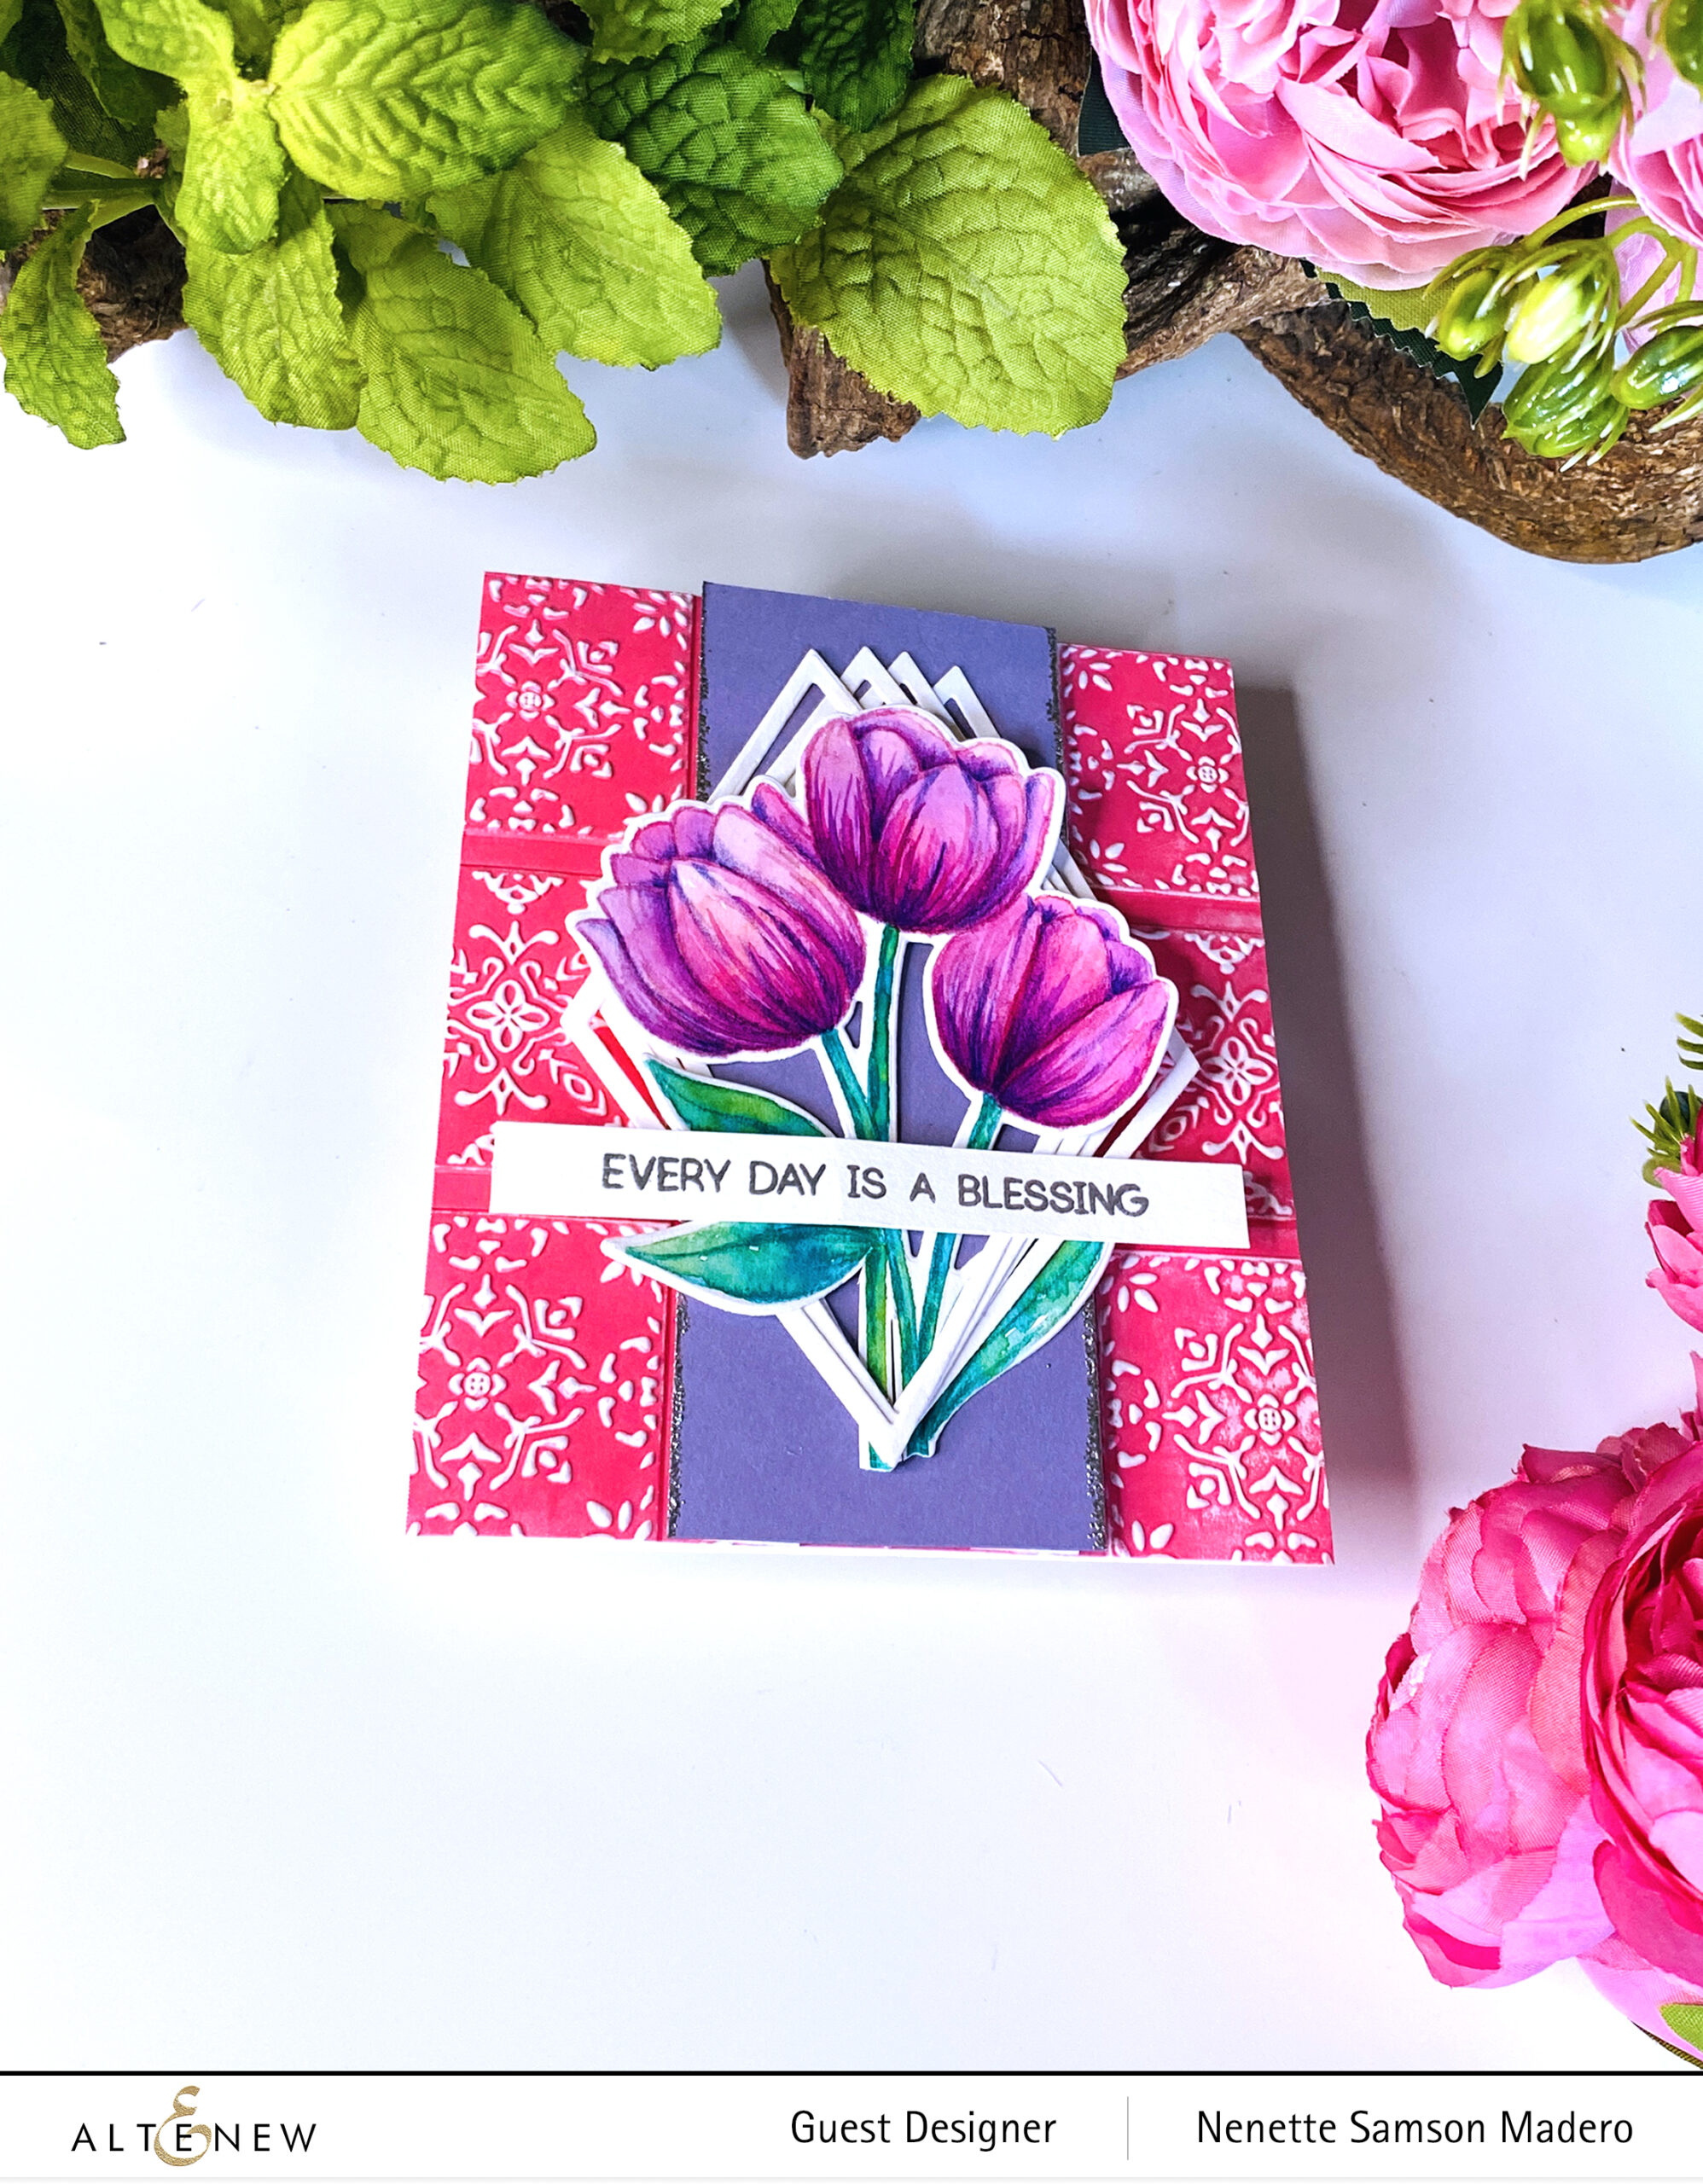
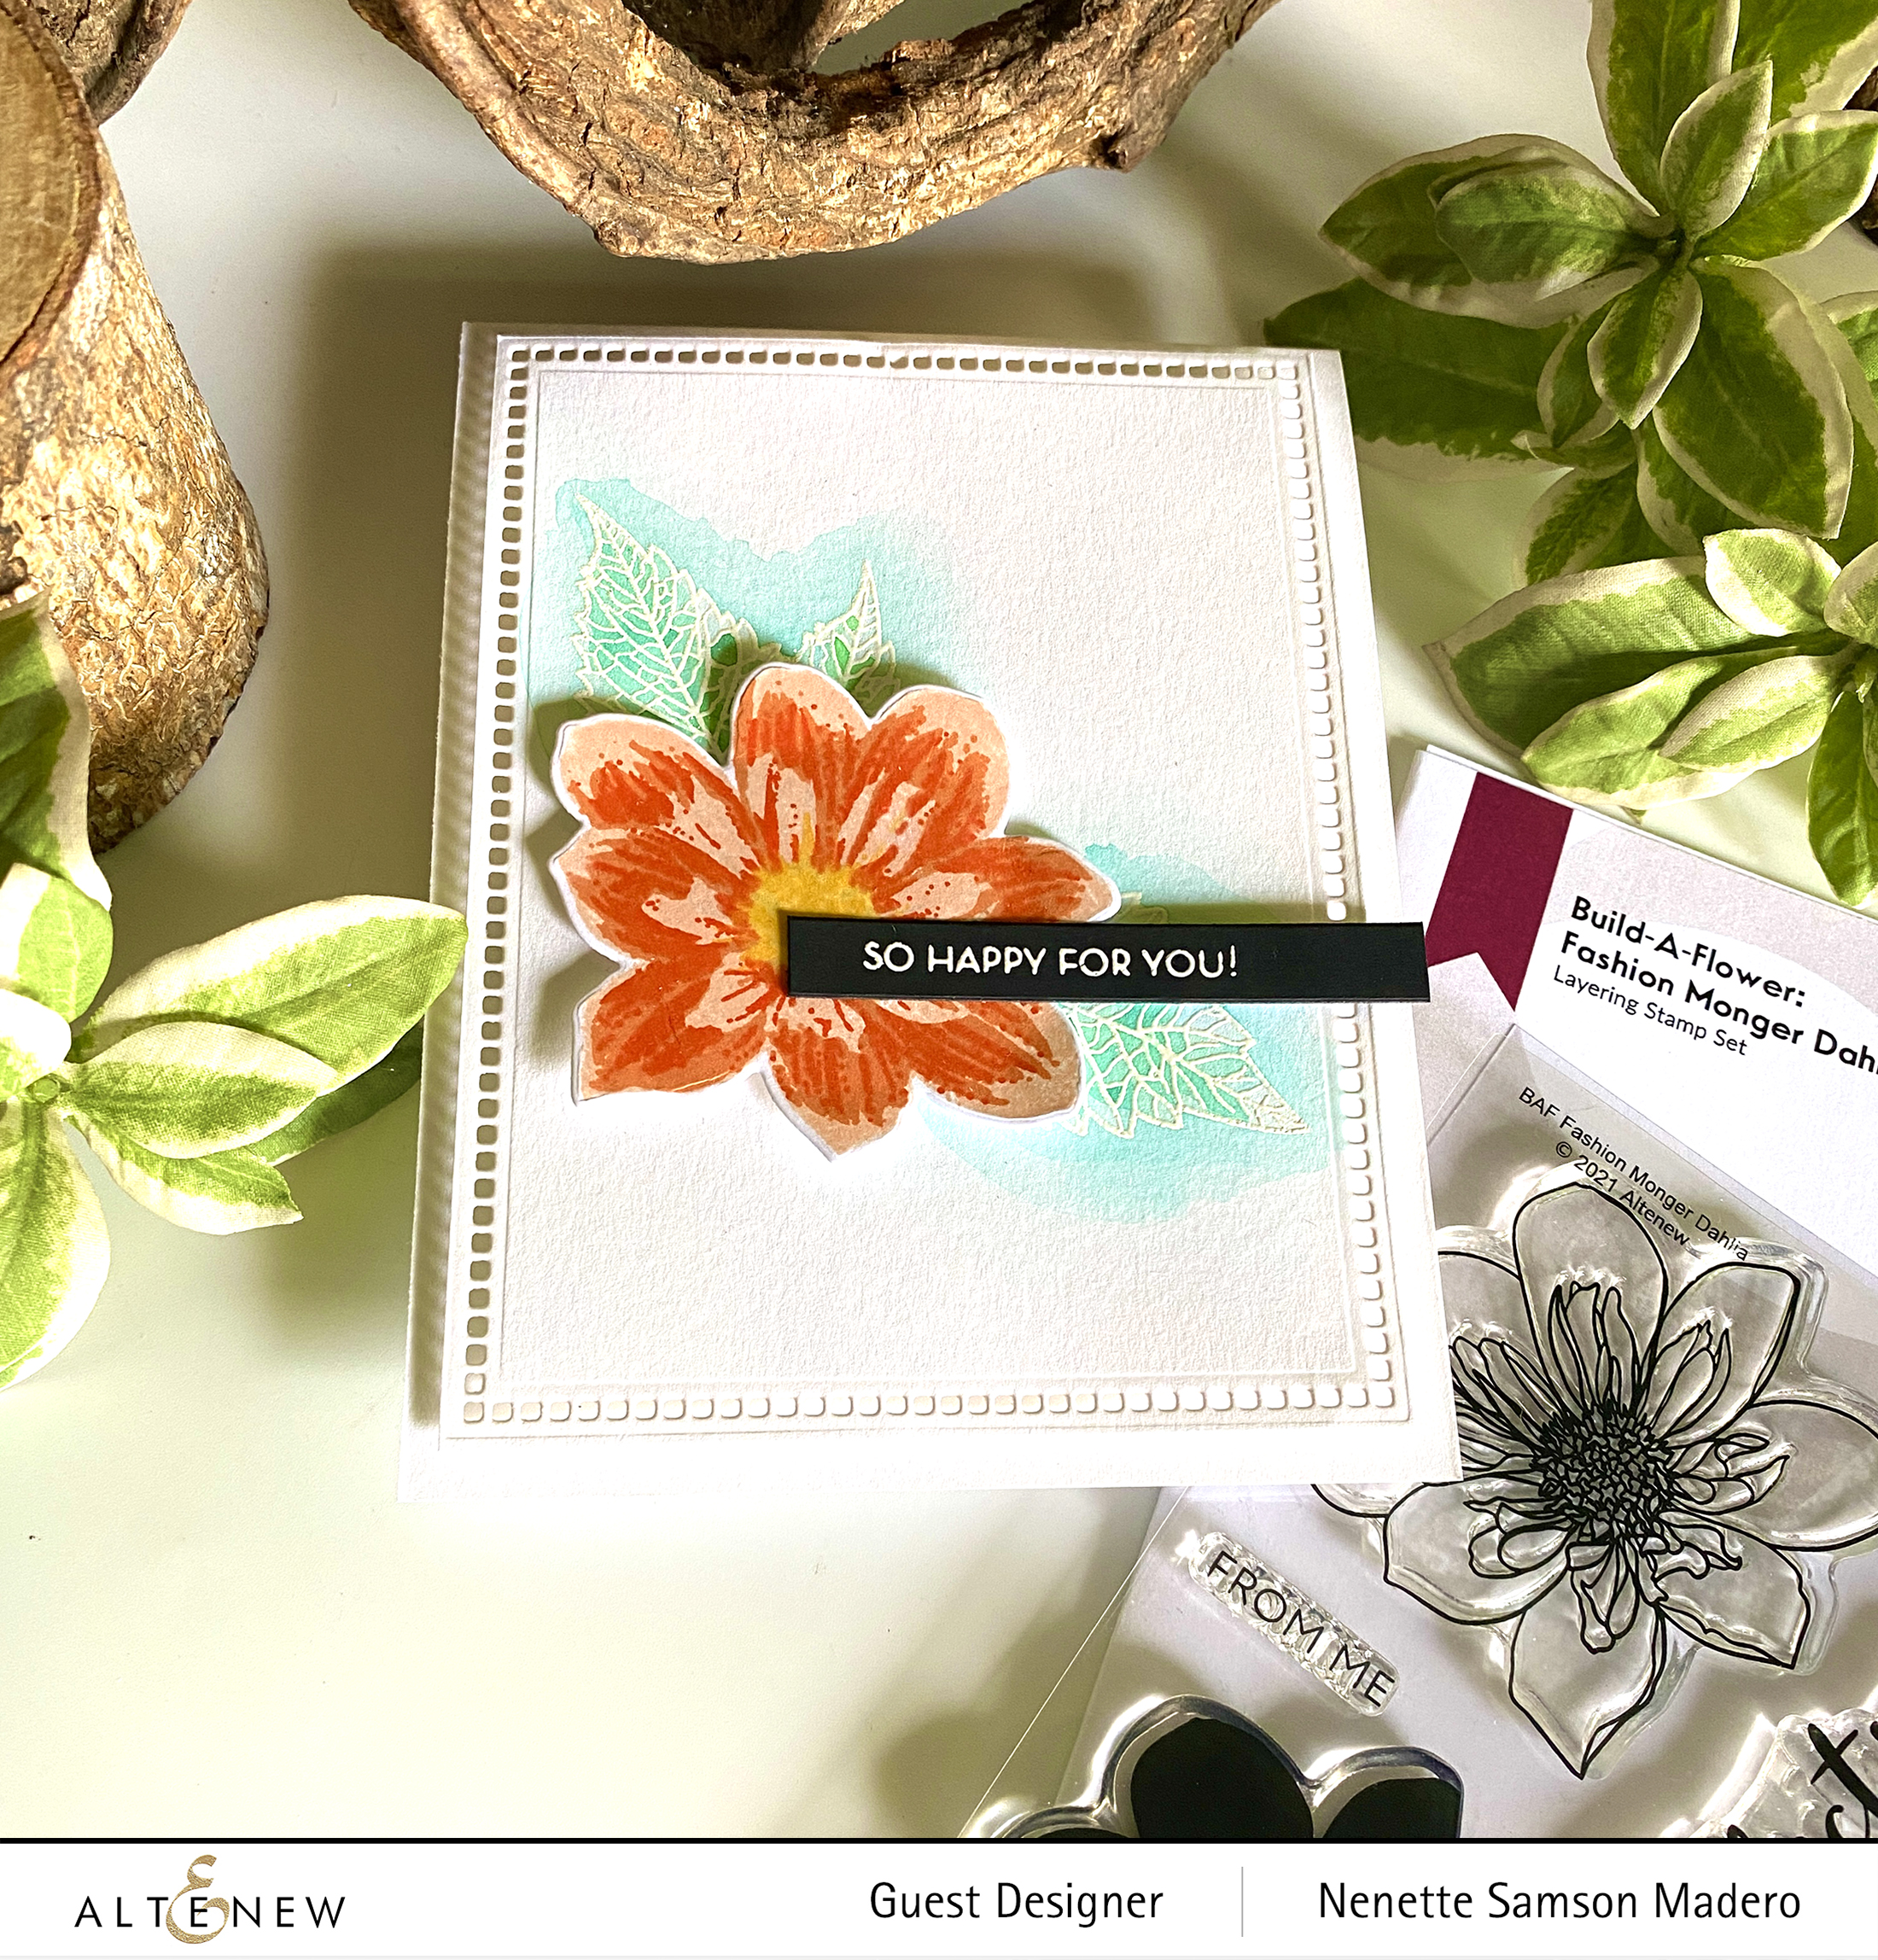
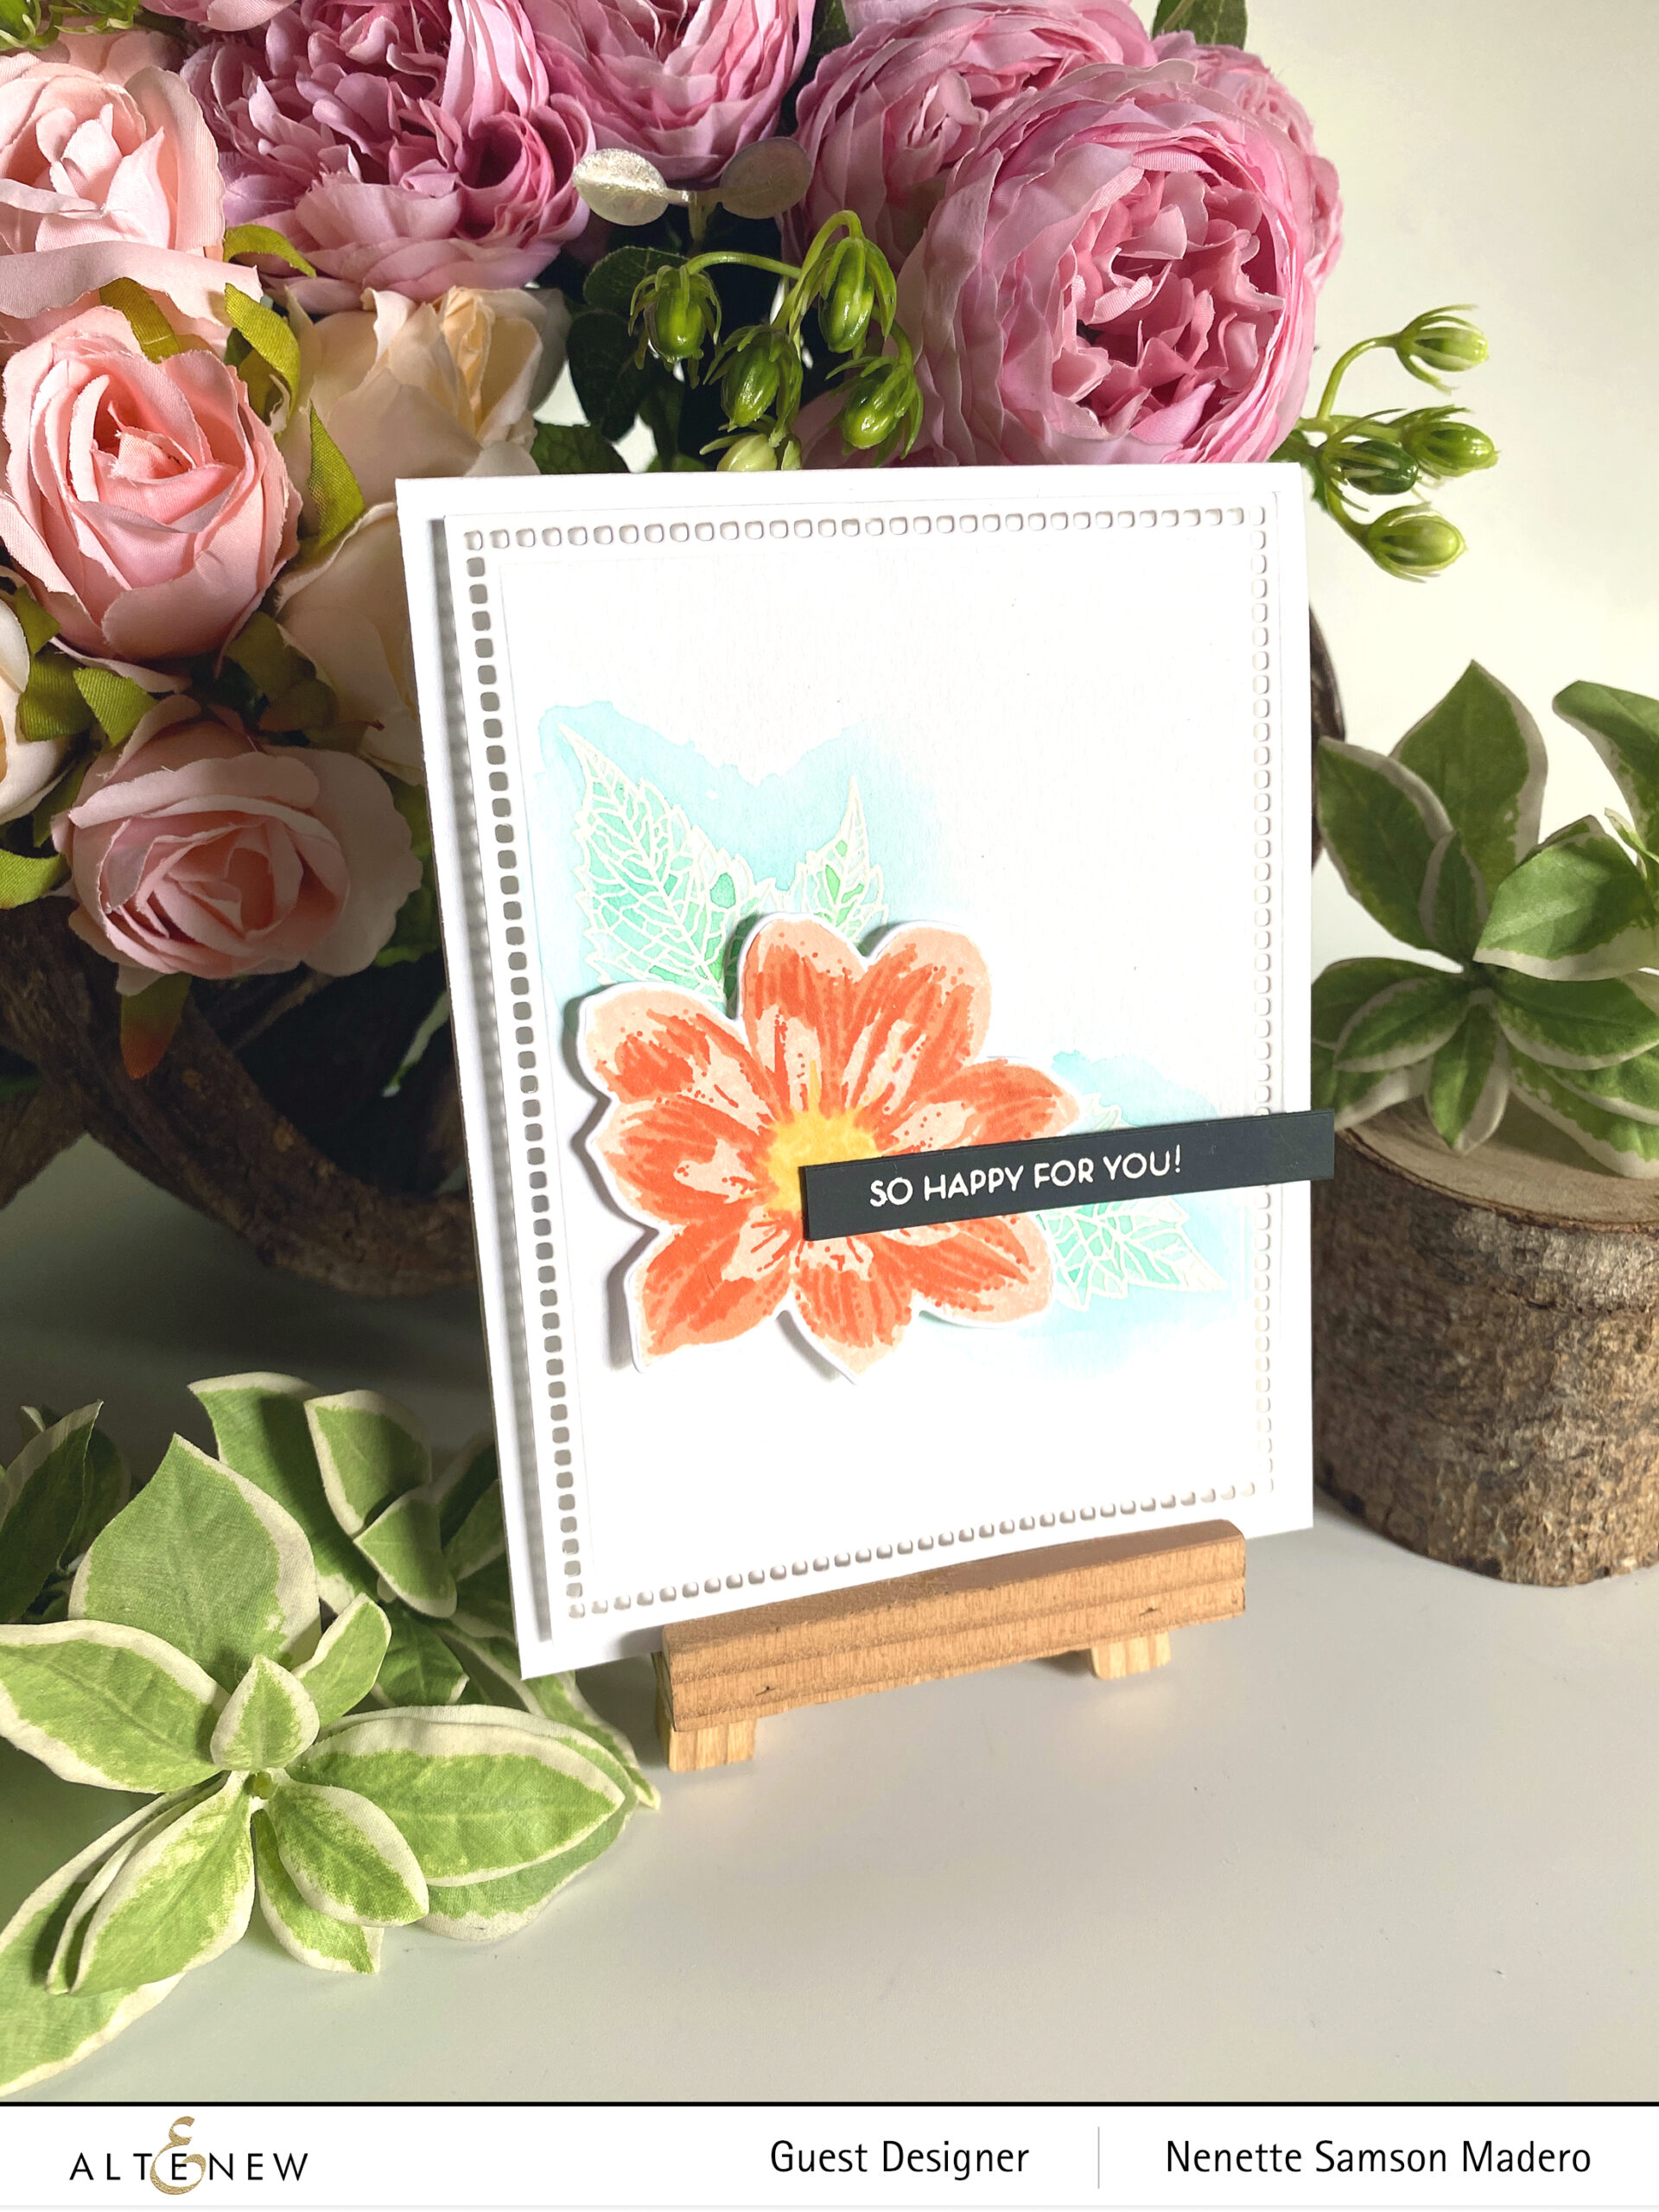
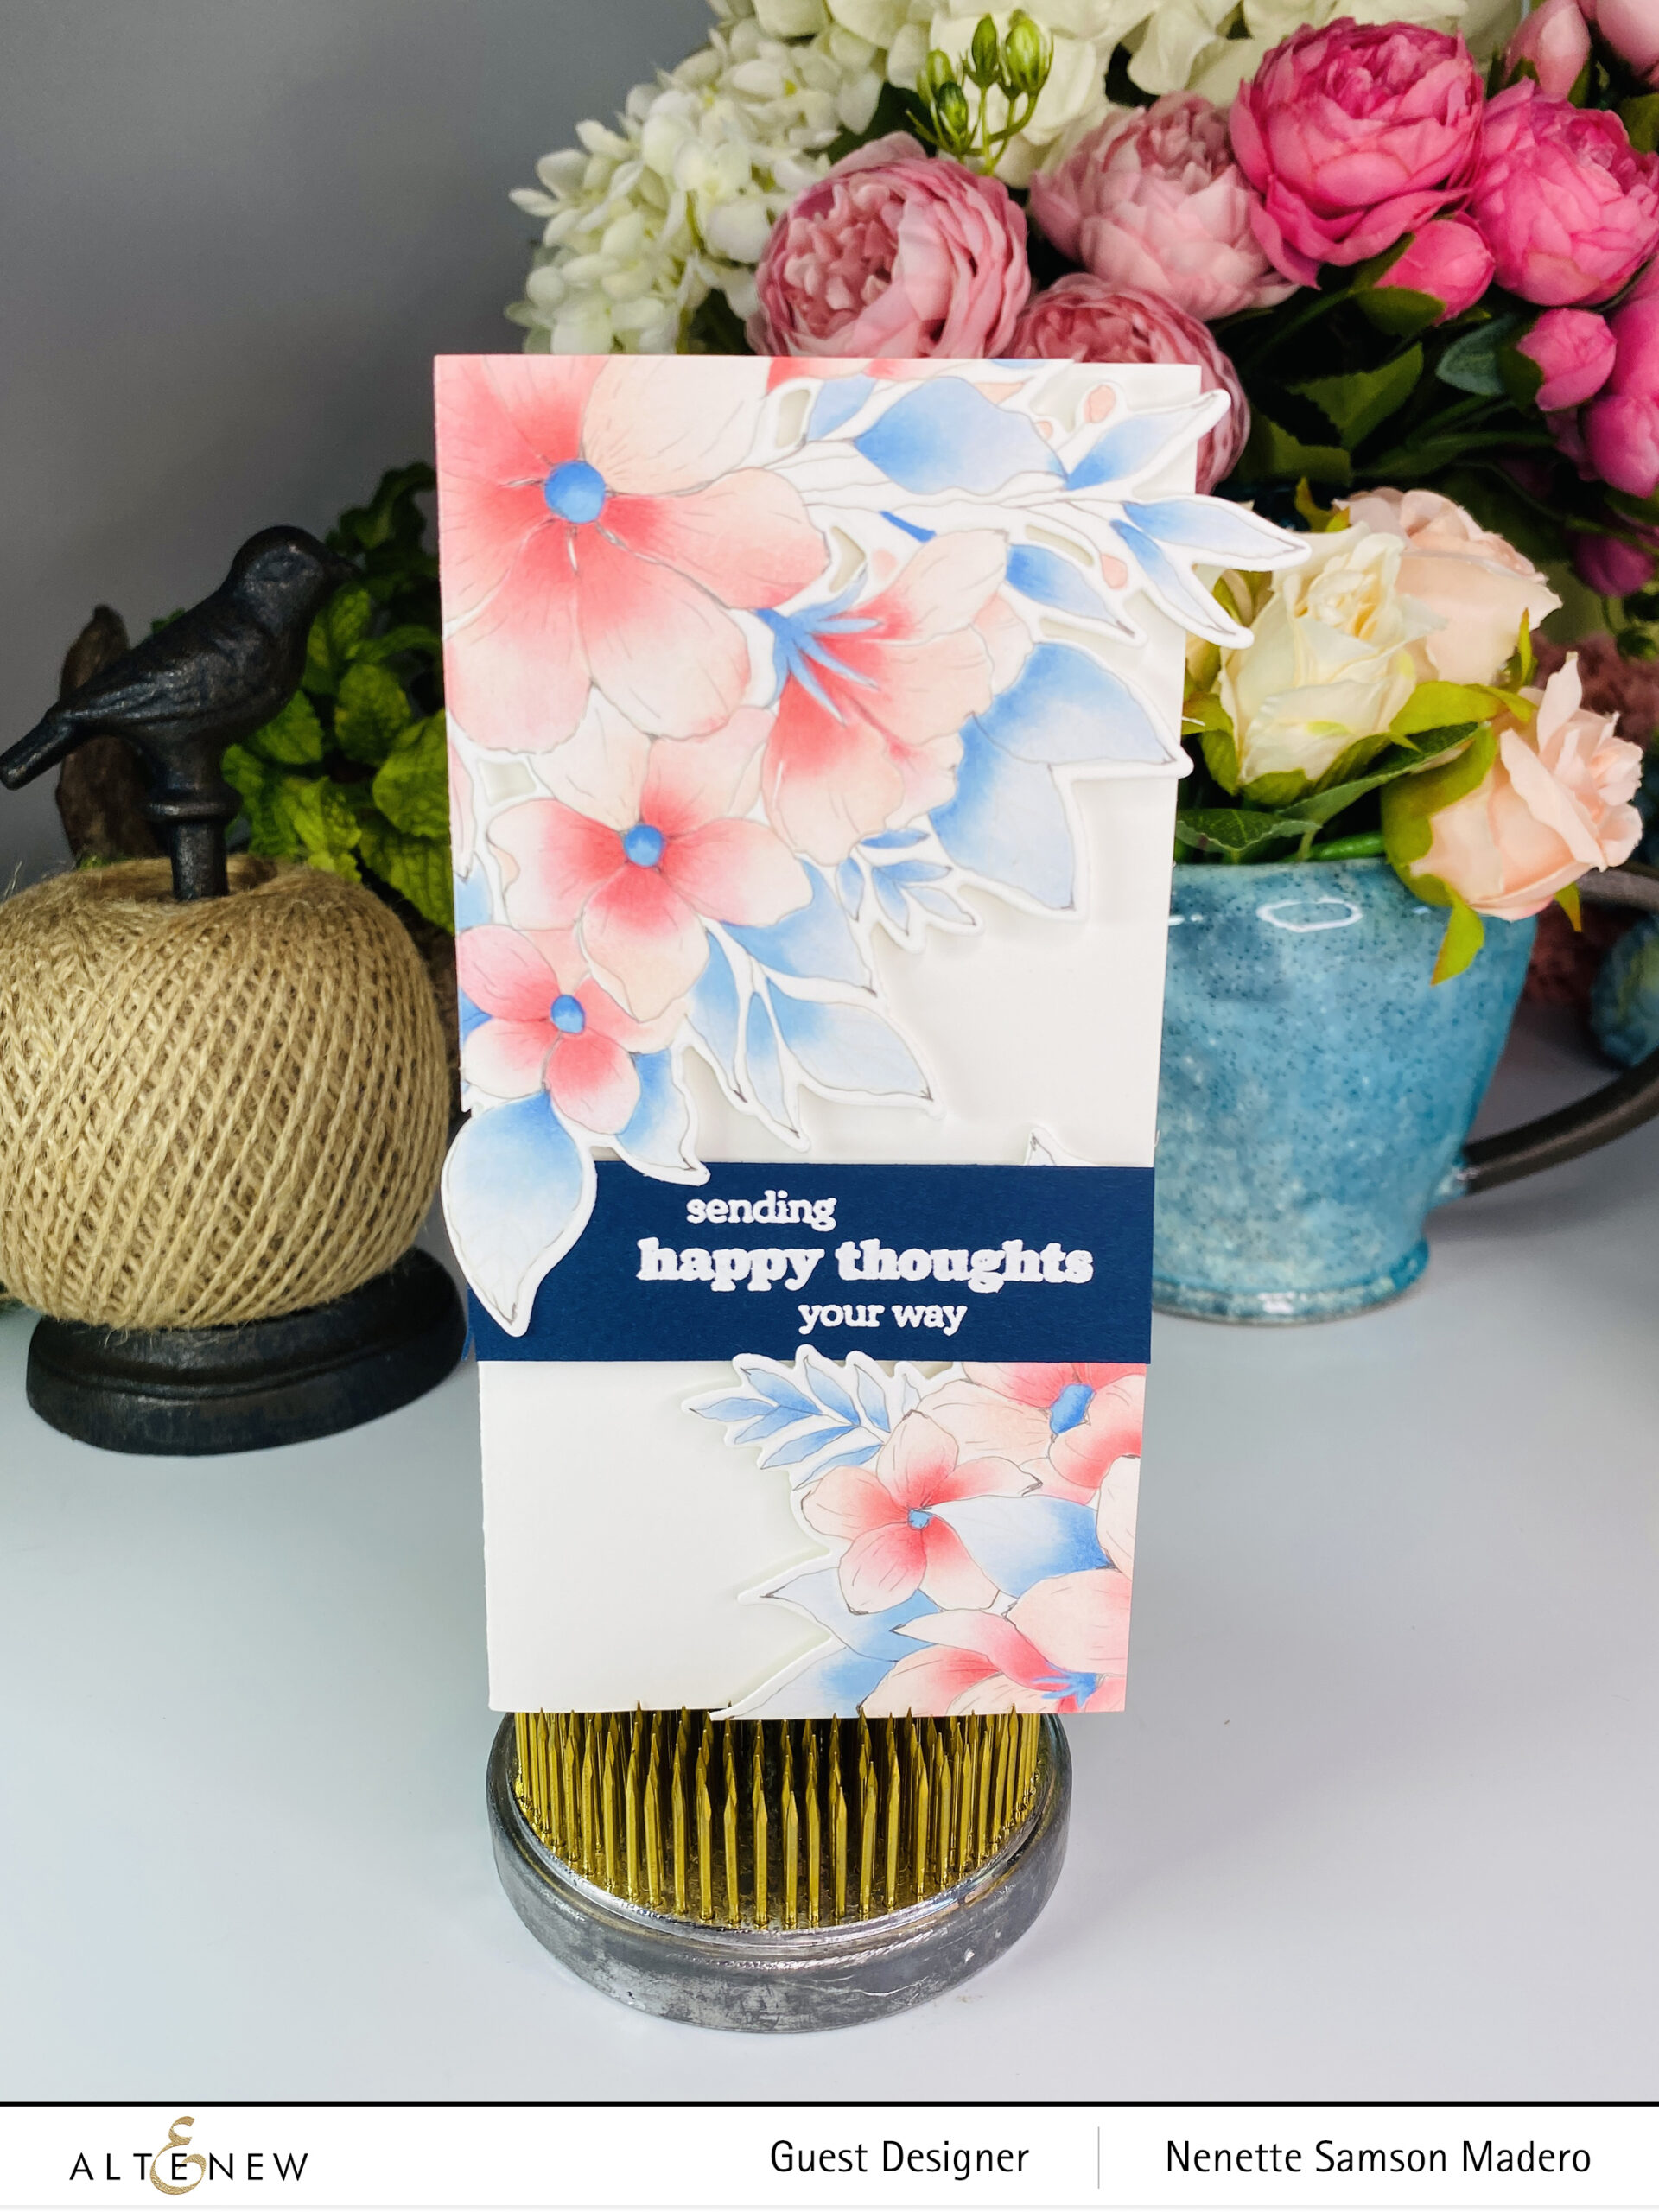
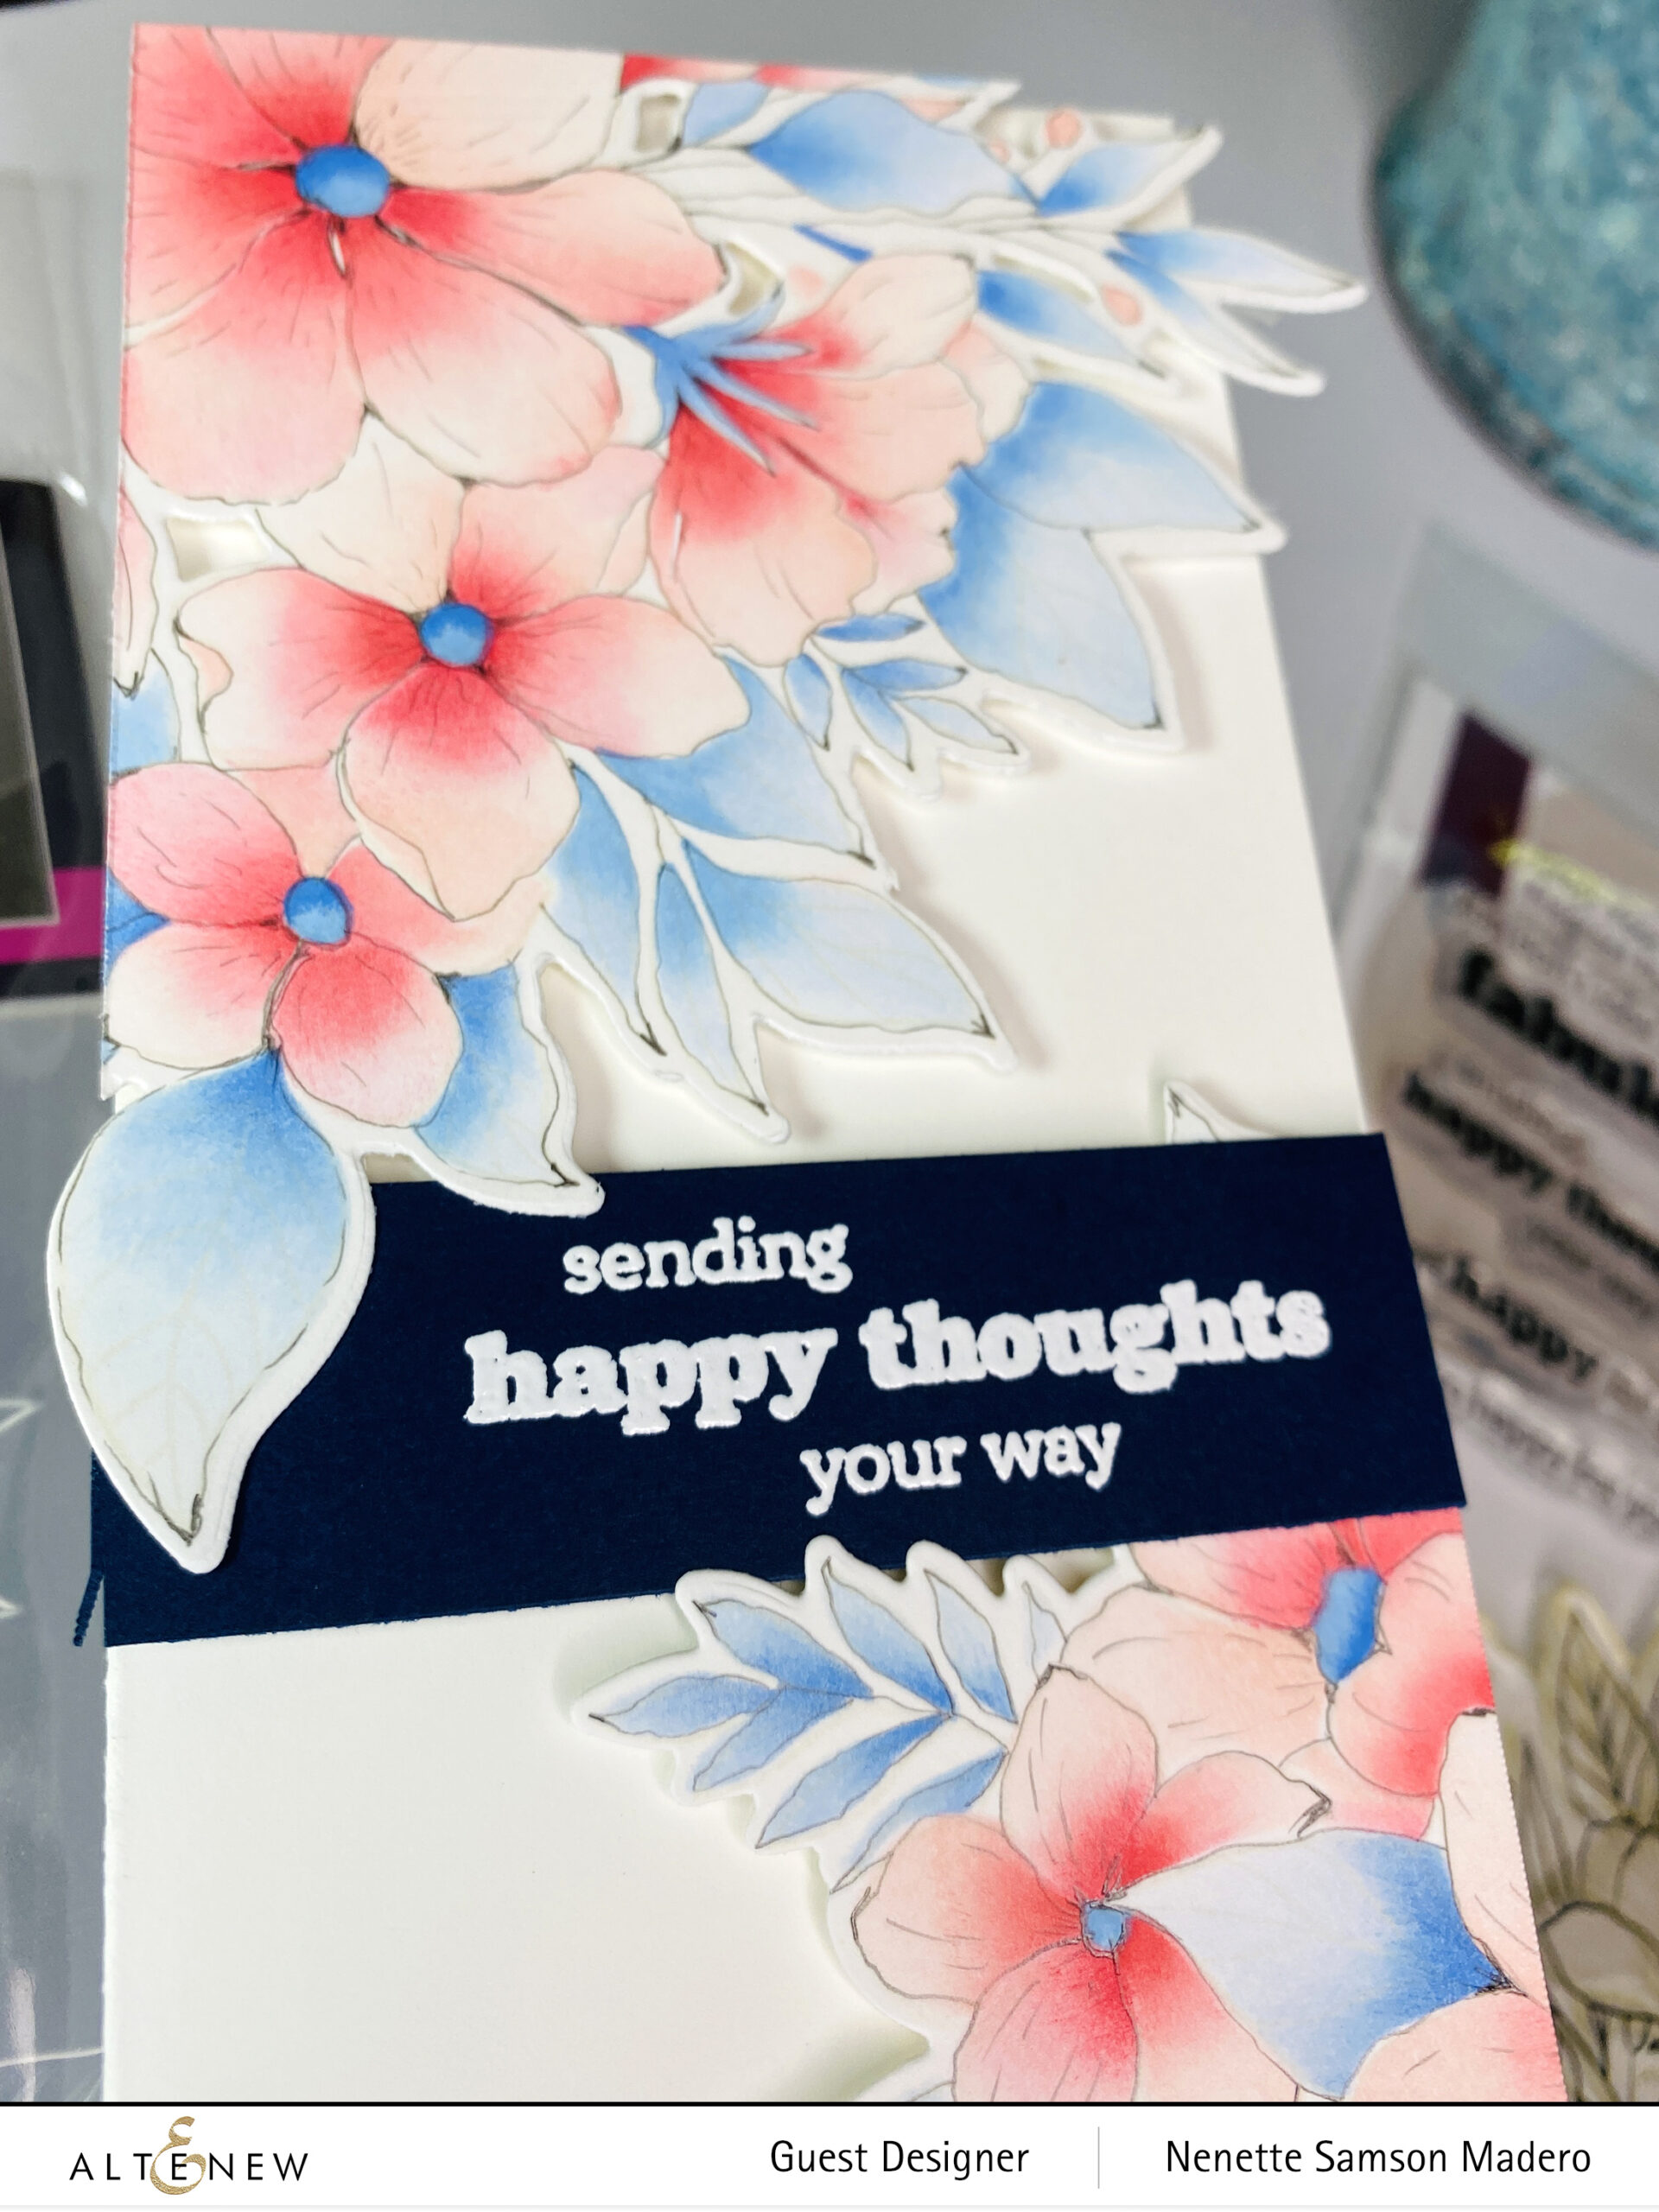
SENDING HAPPY THOUGHTS YOUR WAY

STEPS:

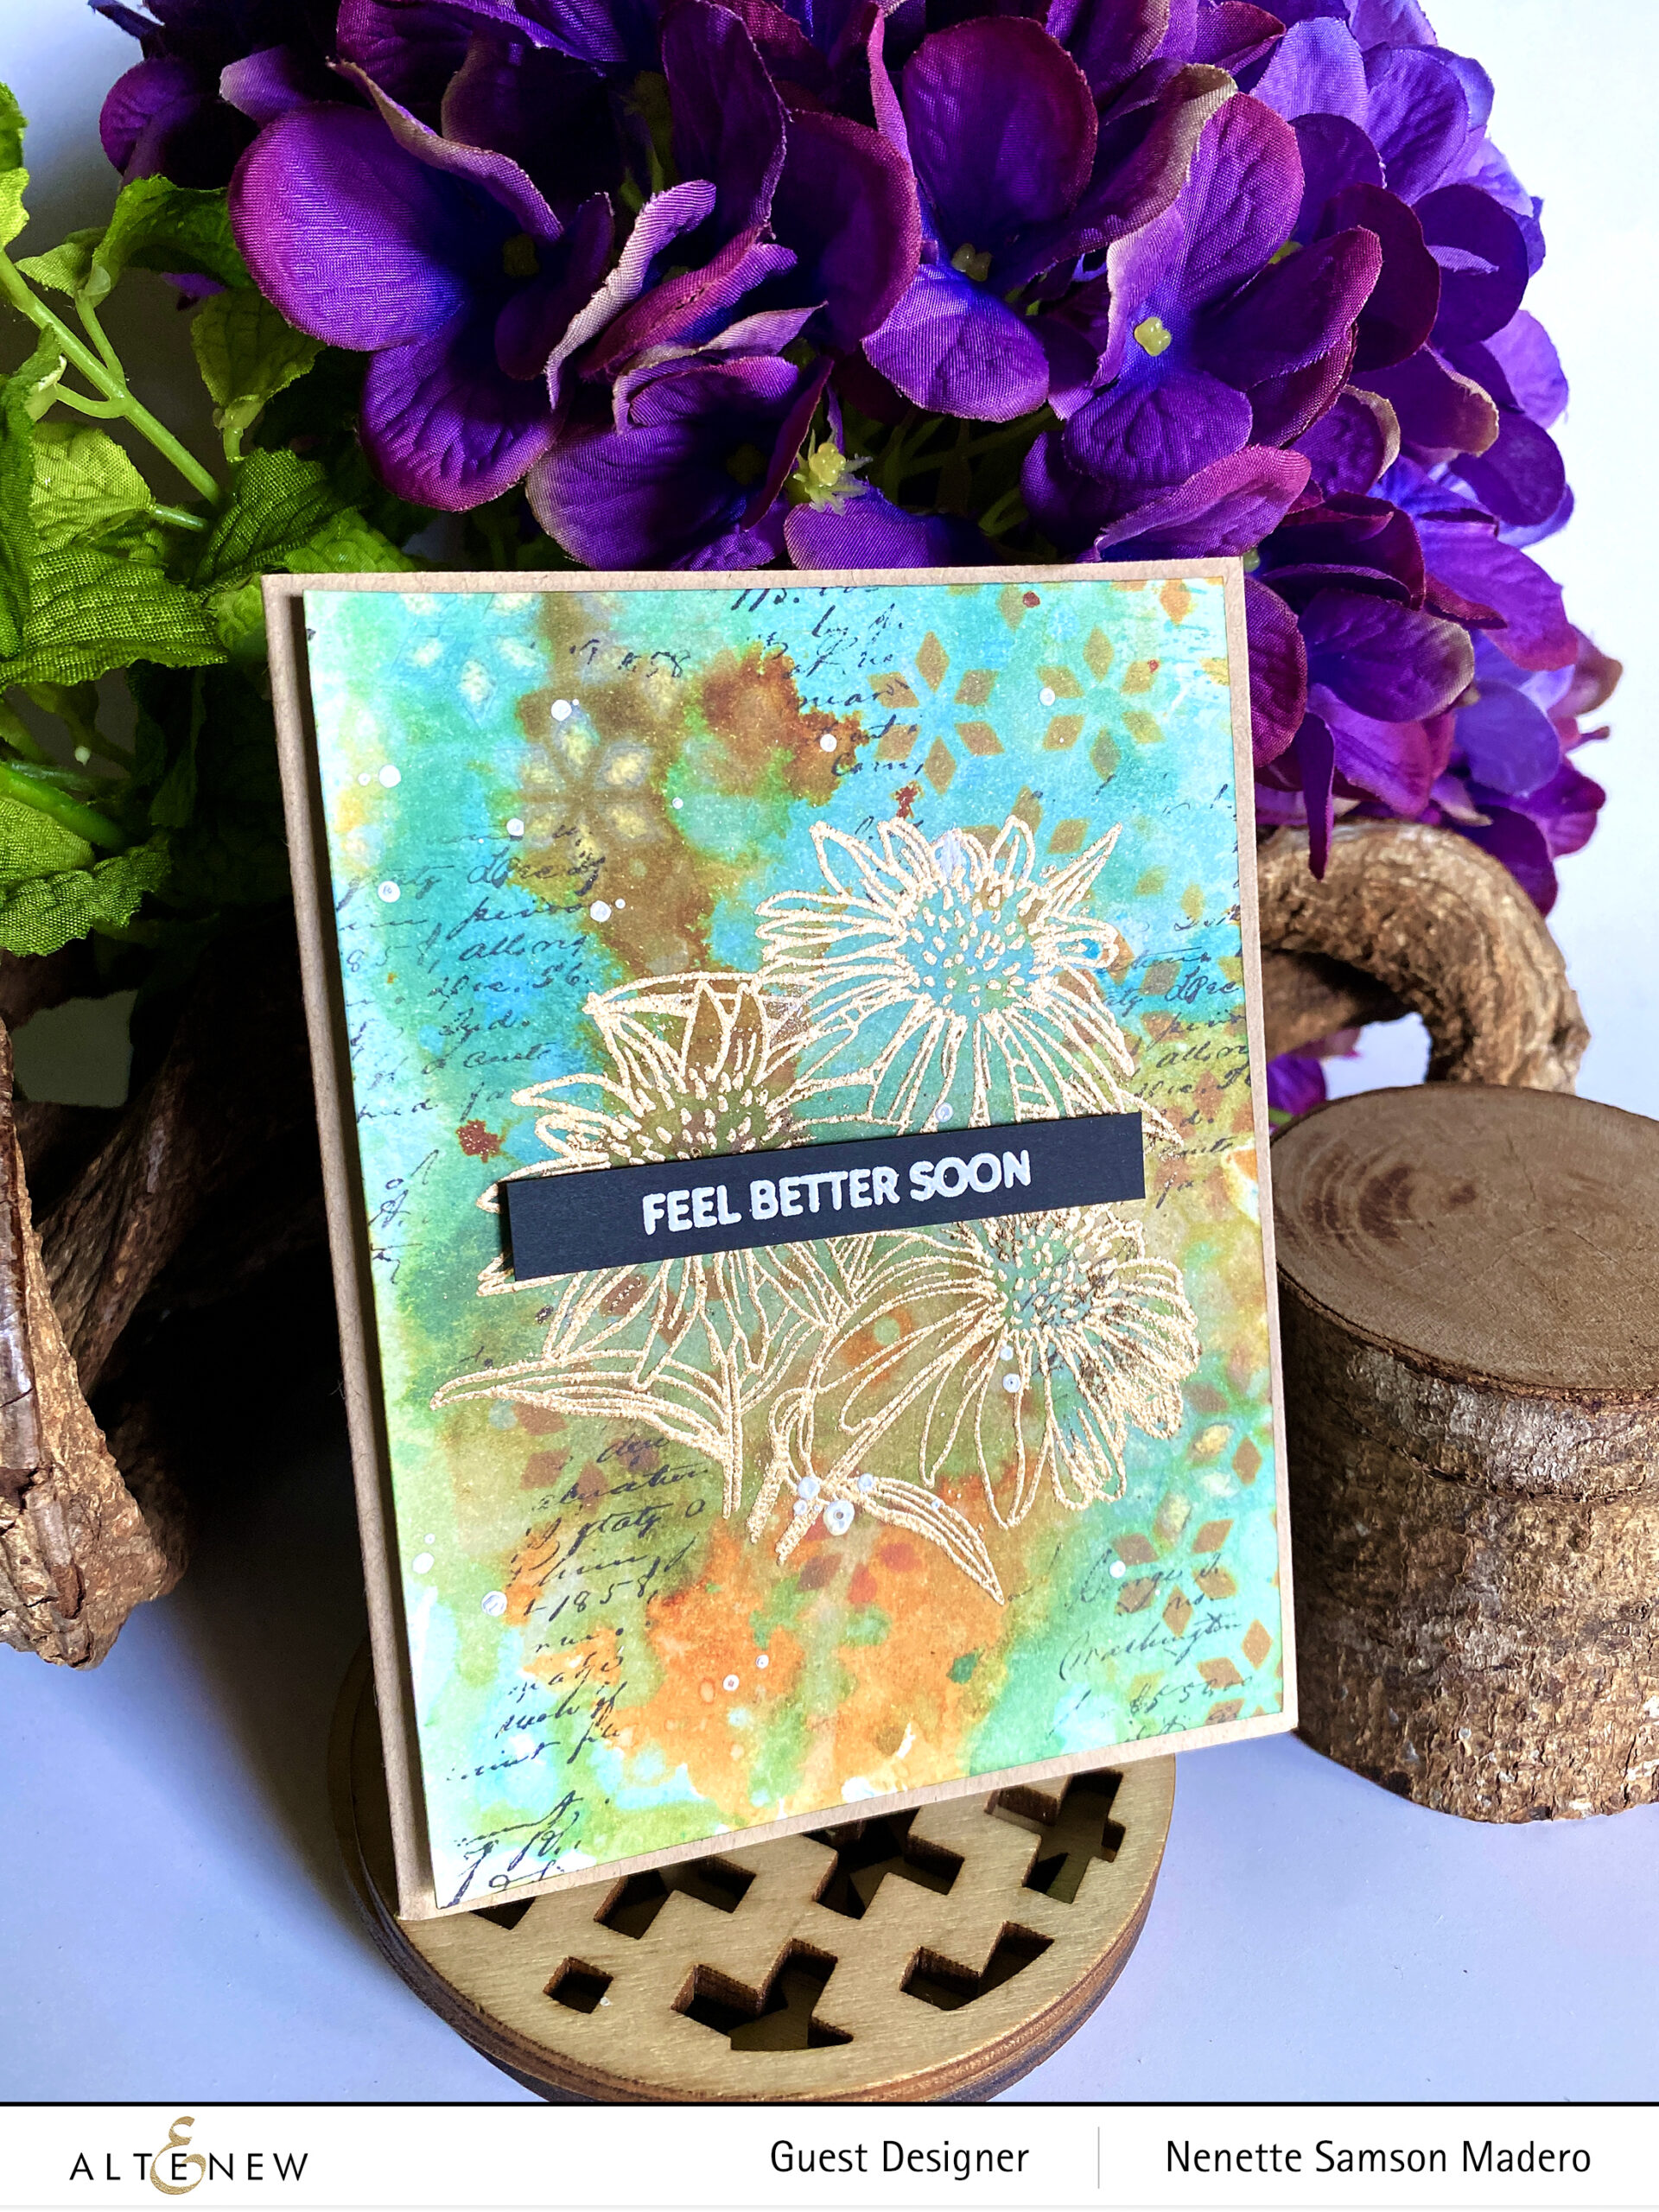
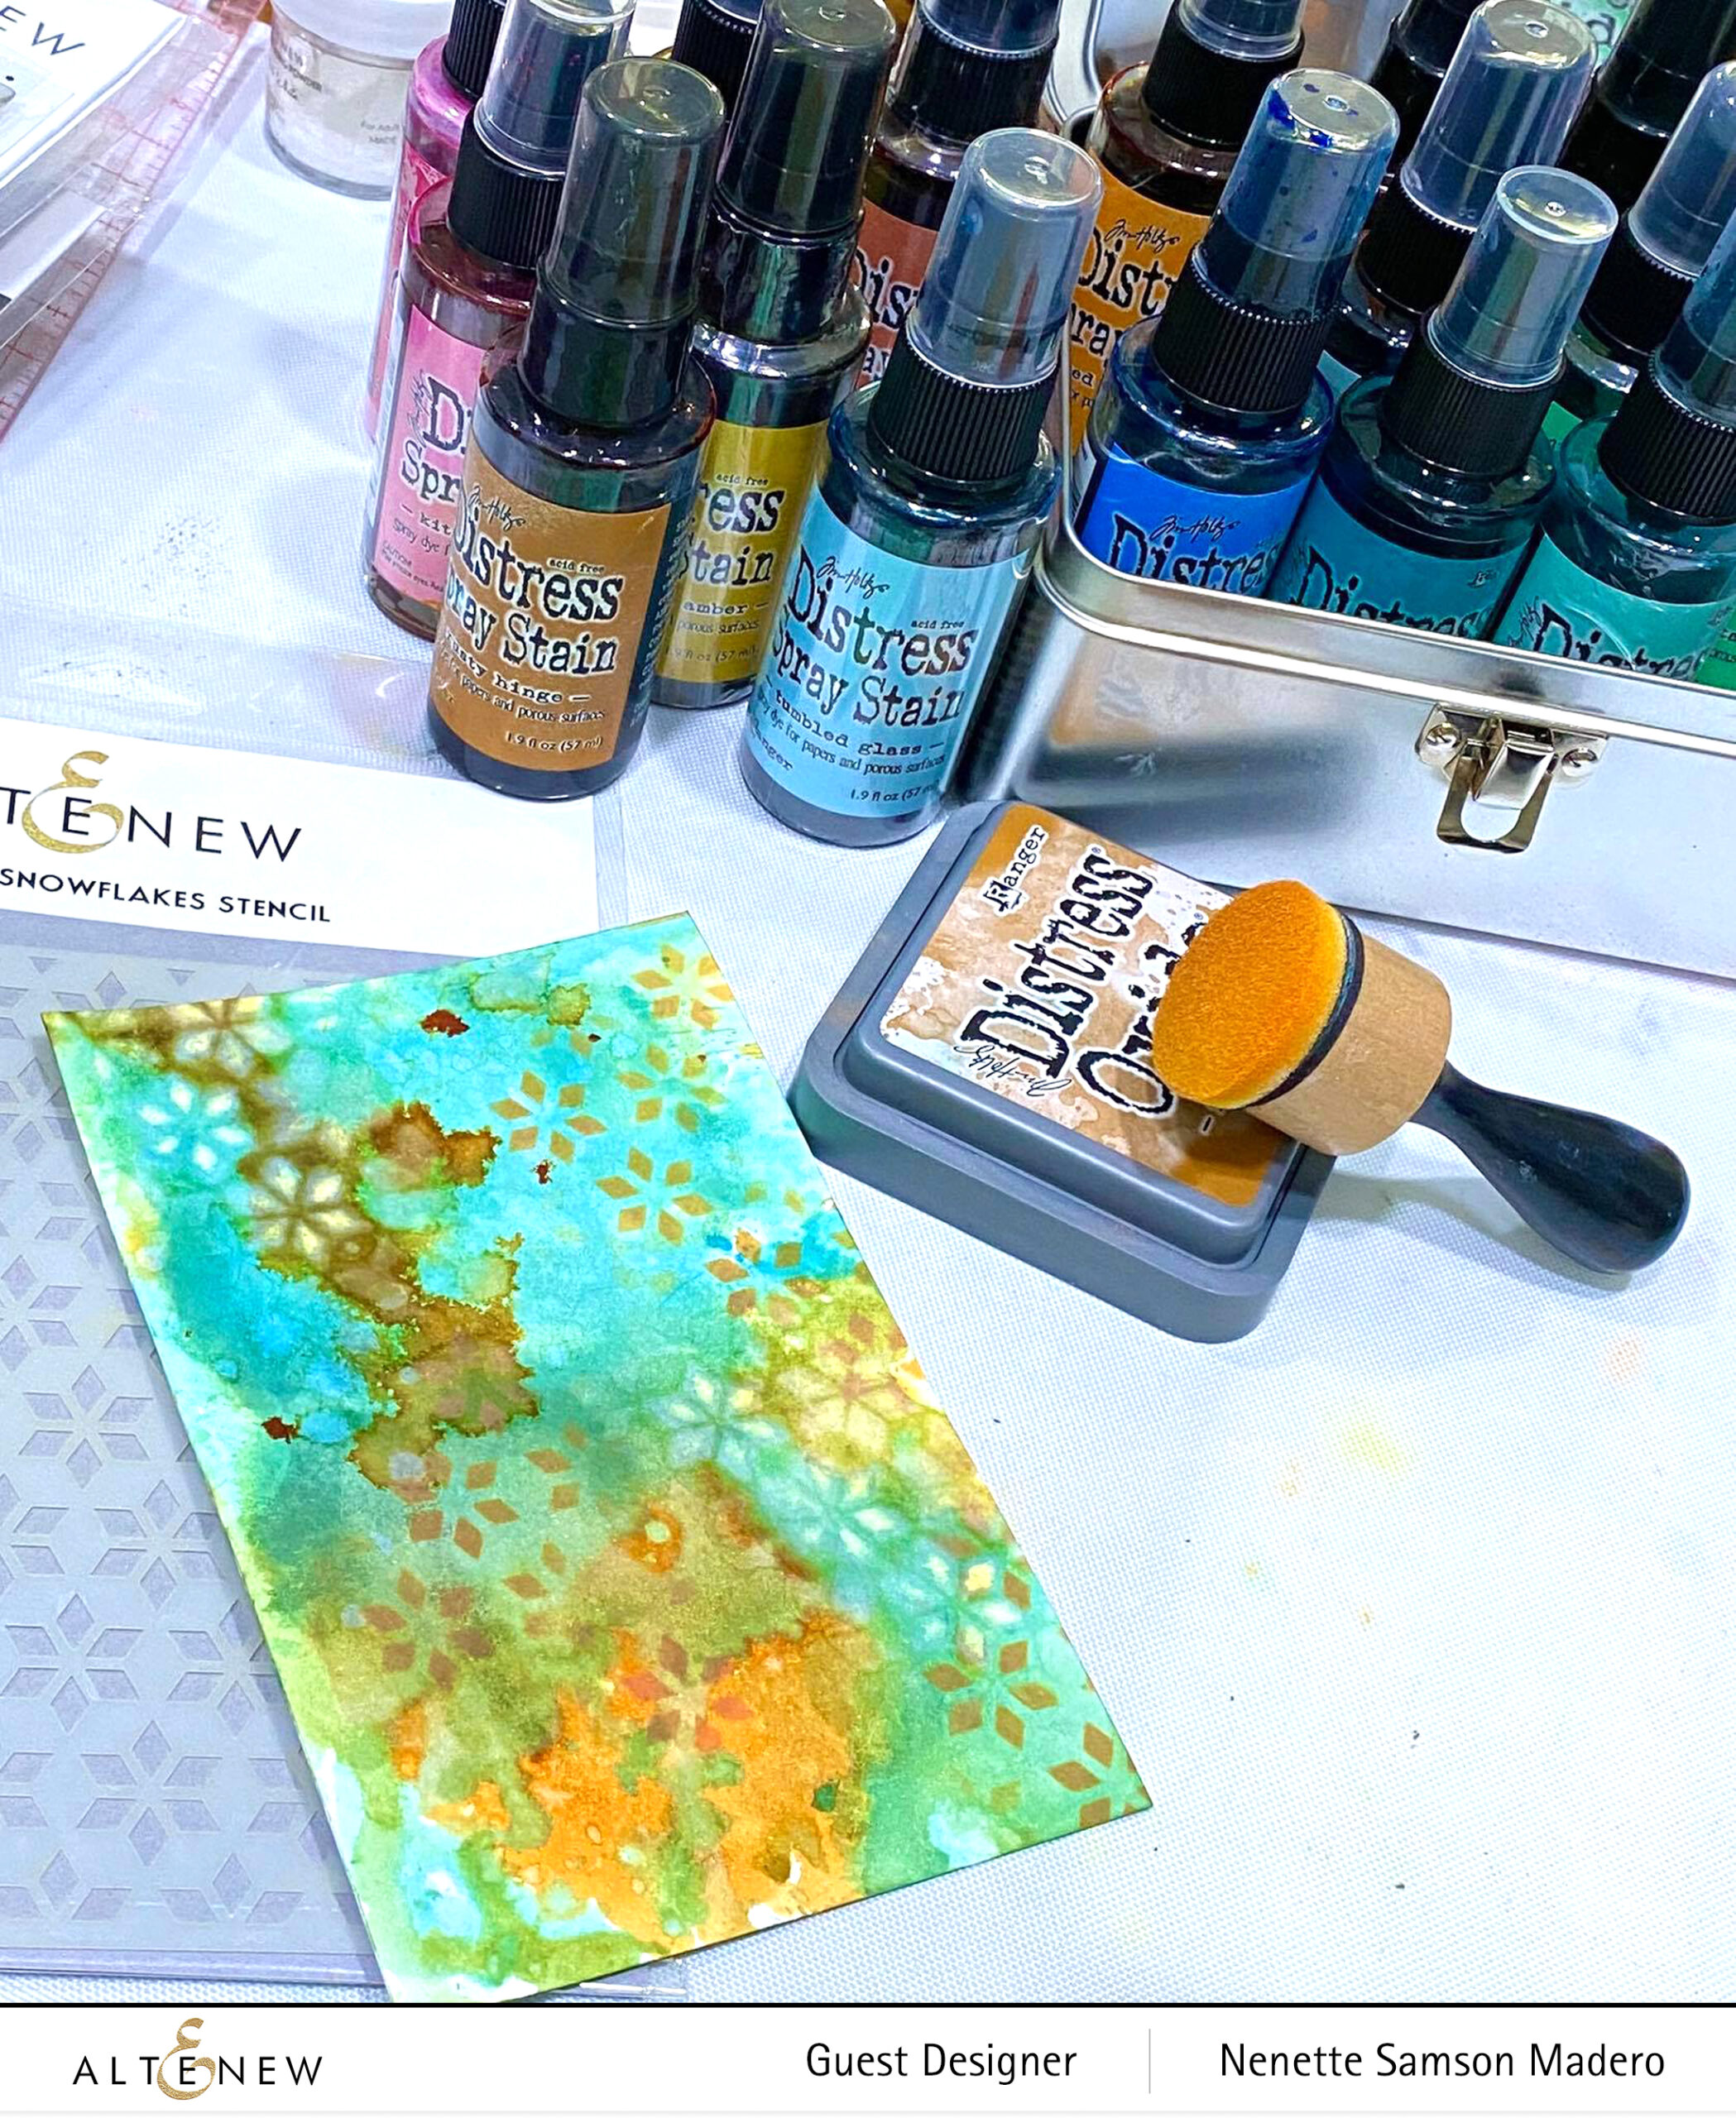
  1. Stamp image using a very light ink.
  2. Color the image using the stencils and Frosty Pink, Corral Berry, Ruby Red, Caribbean Sky, Arctic and Persian Blue Mixed Media Inks with a blender brush and detailed blender brush.
  3. Loosely outline the image with a .03 pencil.
  4. Emboss the sentiment on navy blue cardstock using Pure White Crisp Embossing powder.
  5. Die cut the image and trim down to fit a mini slimline card.
  6. Assemble the sentiments using foam squares.
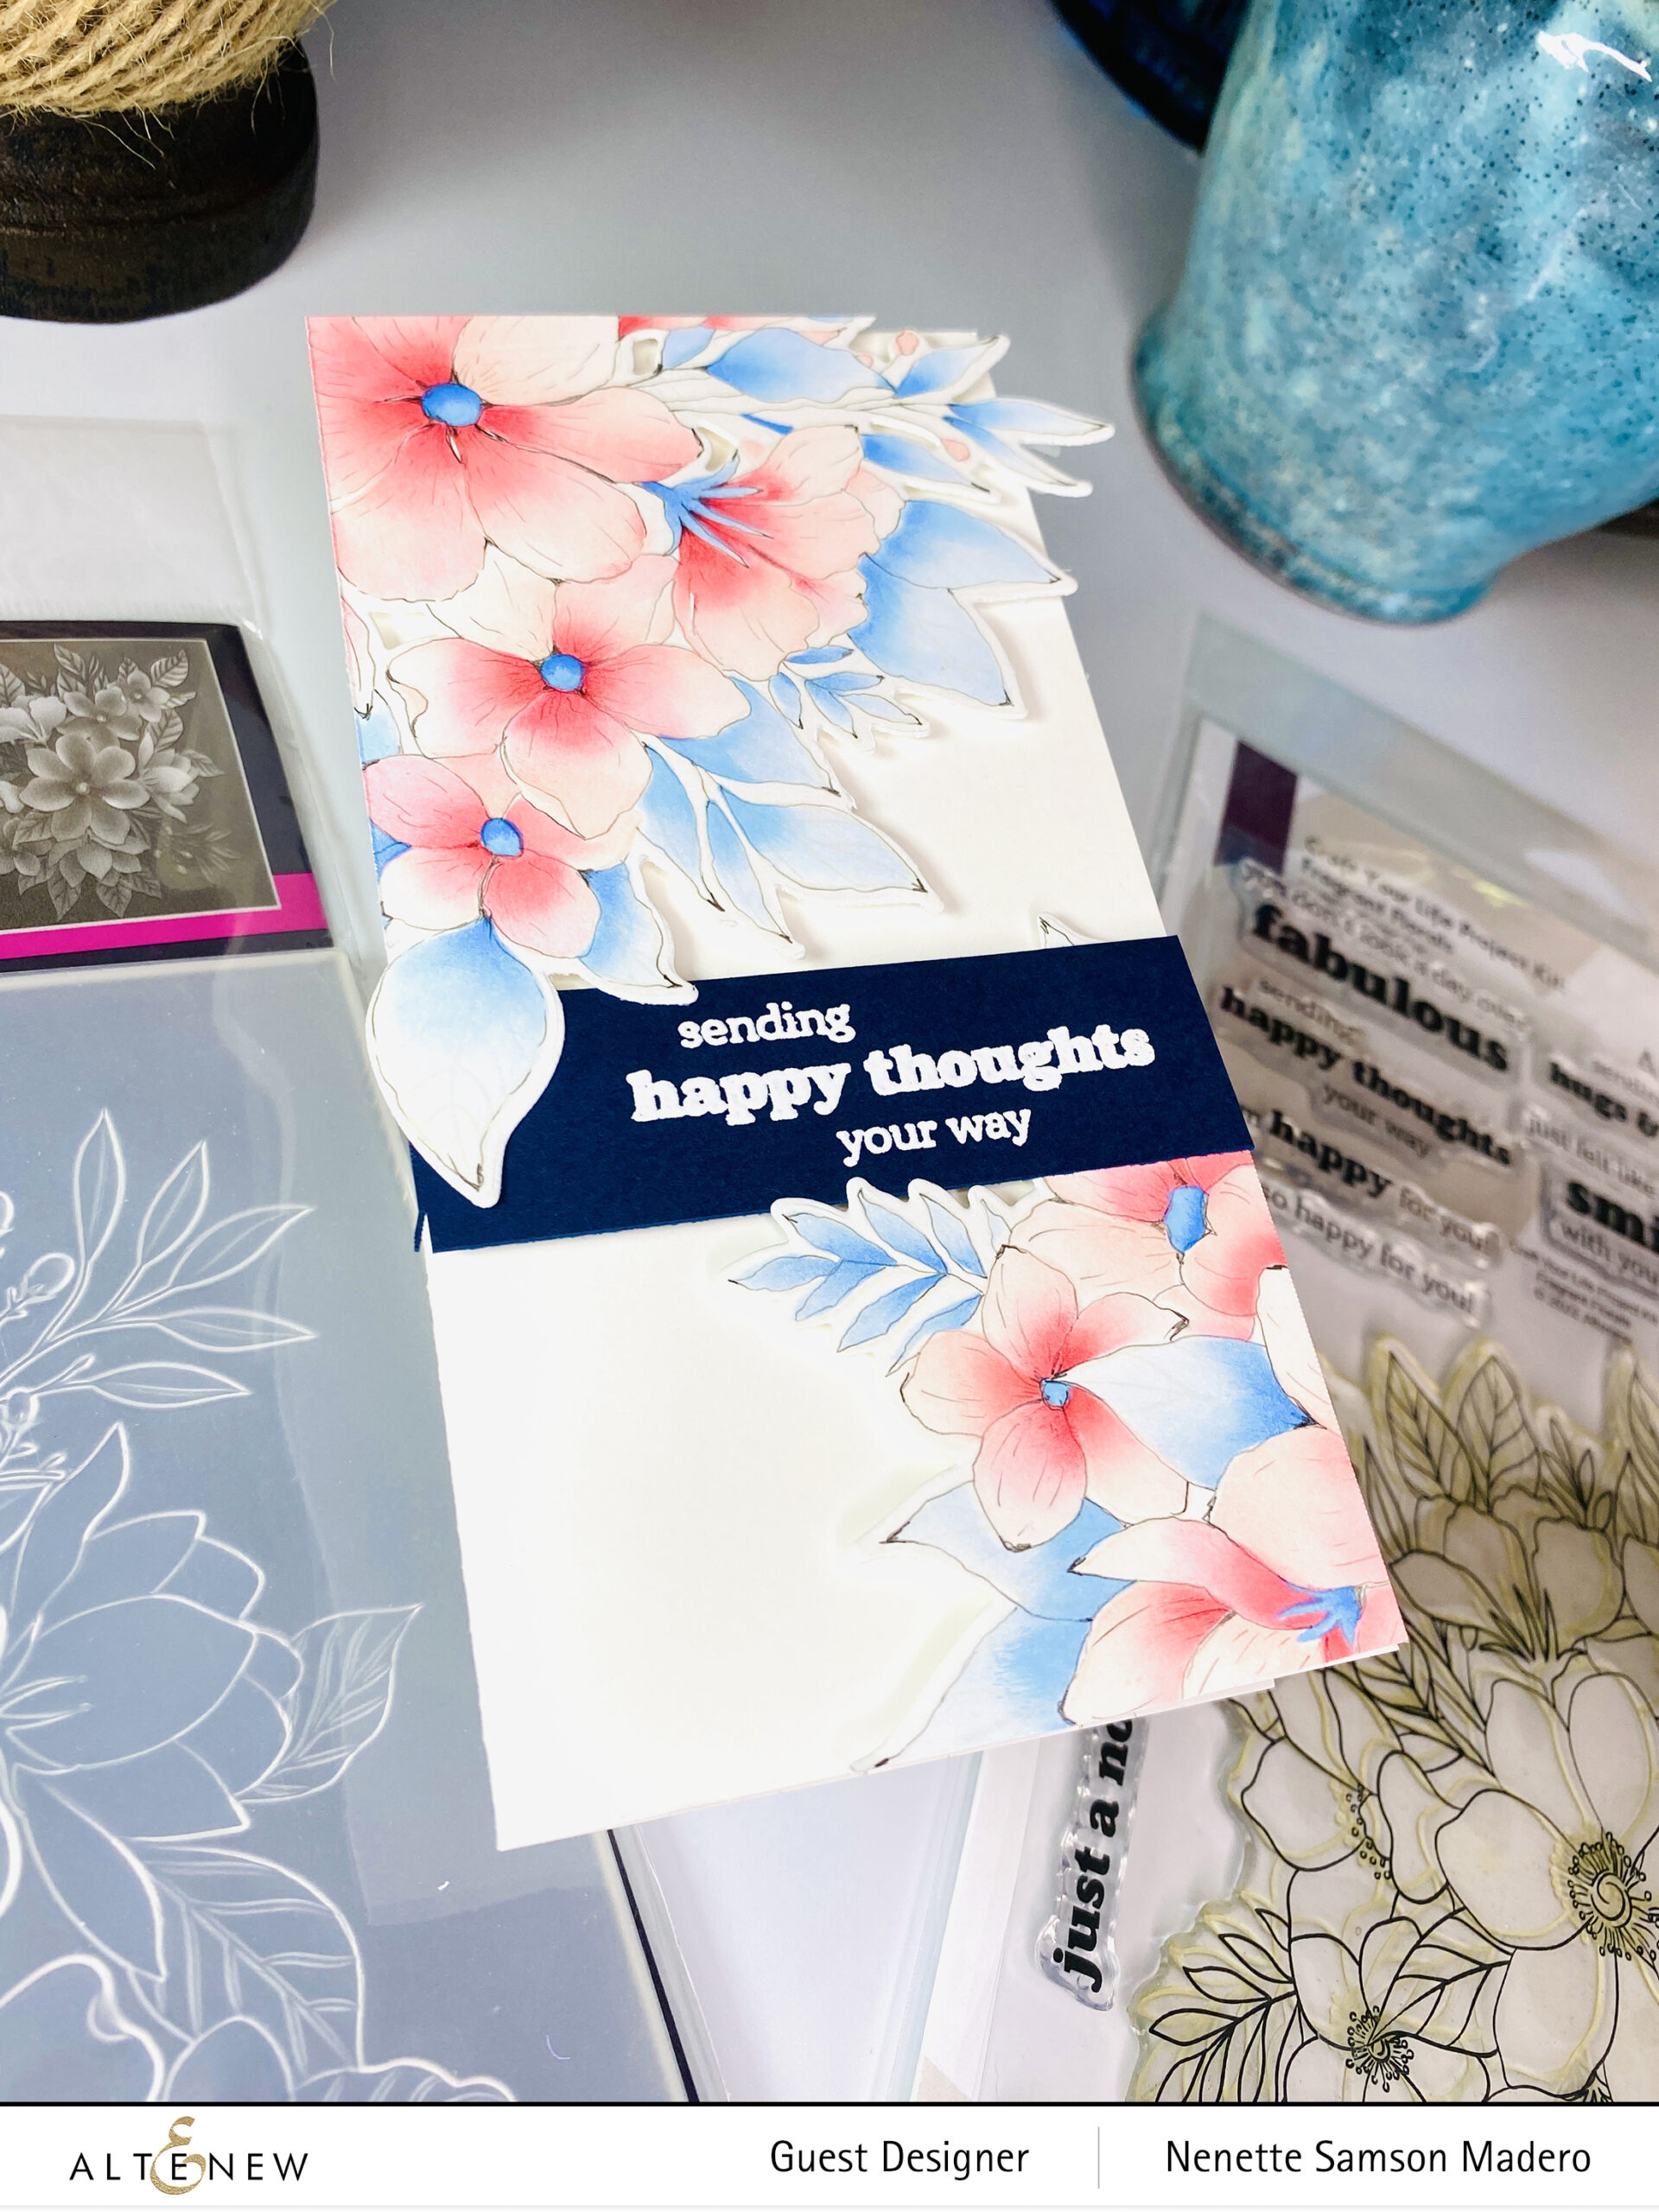
TIP: Don’t throw away leftovers from the colored image. You can always add them to the inside of the card.

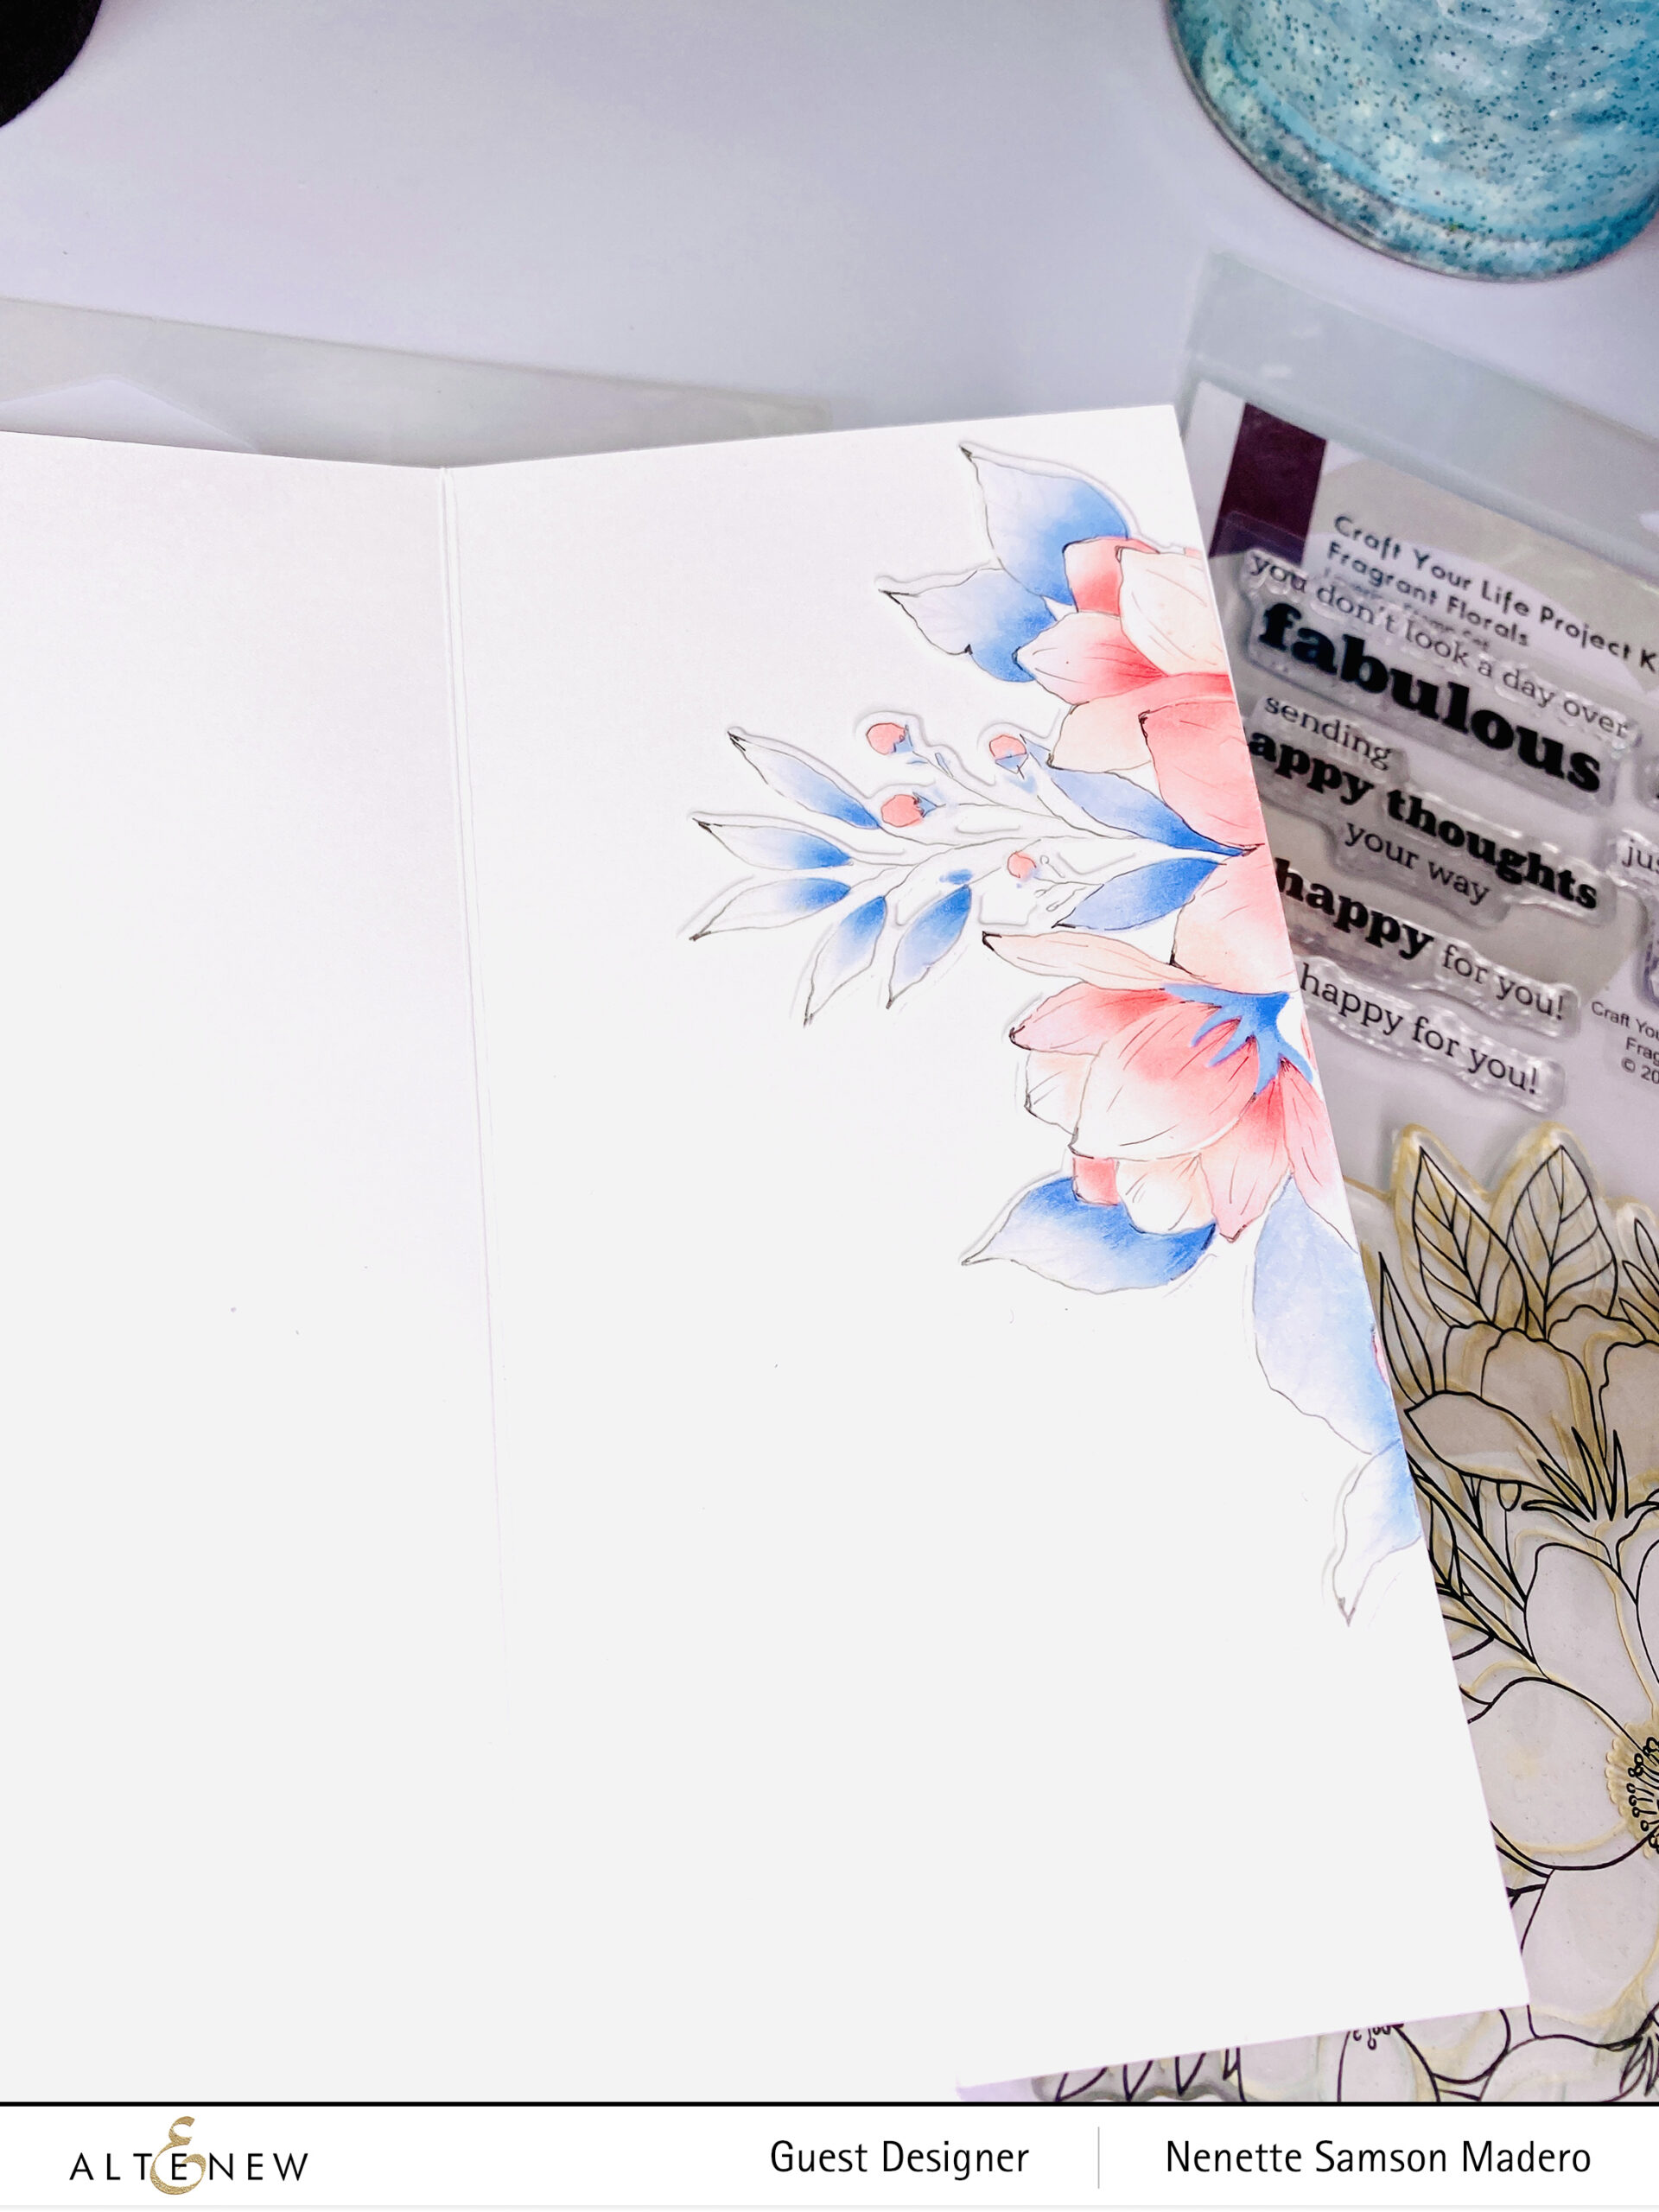
Blending the Mixed Media Inks was a dream!!! Since these are pigment inks, they stay wet long enough so that you can get a nice blend. Just use the same stencil to add layers to the petals and leaves. Always start with the lightest, then work towards the darkest. The detailed blending brushes work well, mainly when you apply the darkest to the areas where there should be shadow. I learned the pencil outline technique from the amazing watercolorist Danielle Donaldson and thought this technique would look wonderful with the Altenew images.
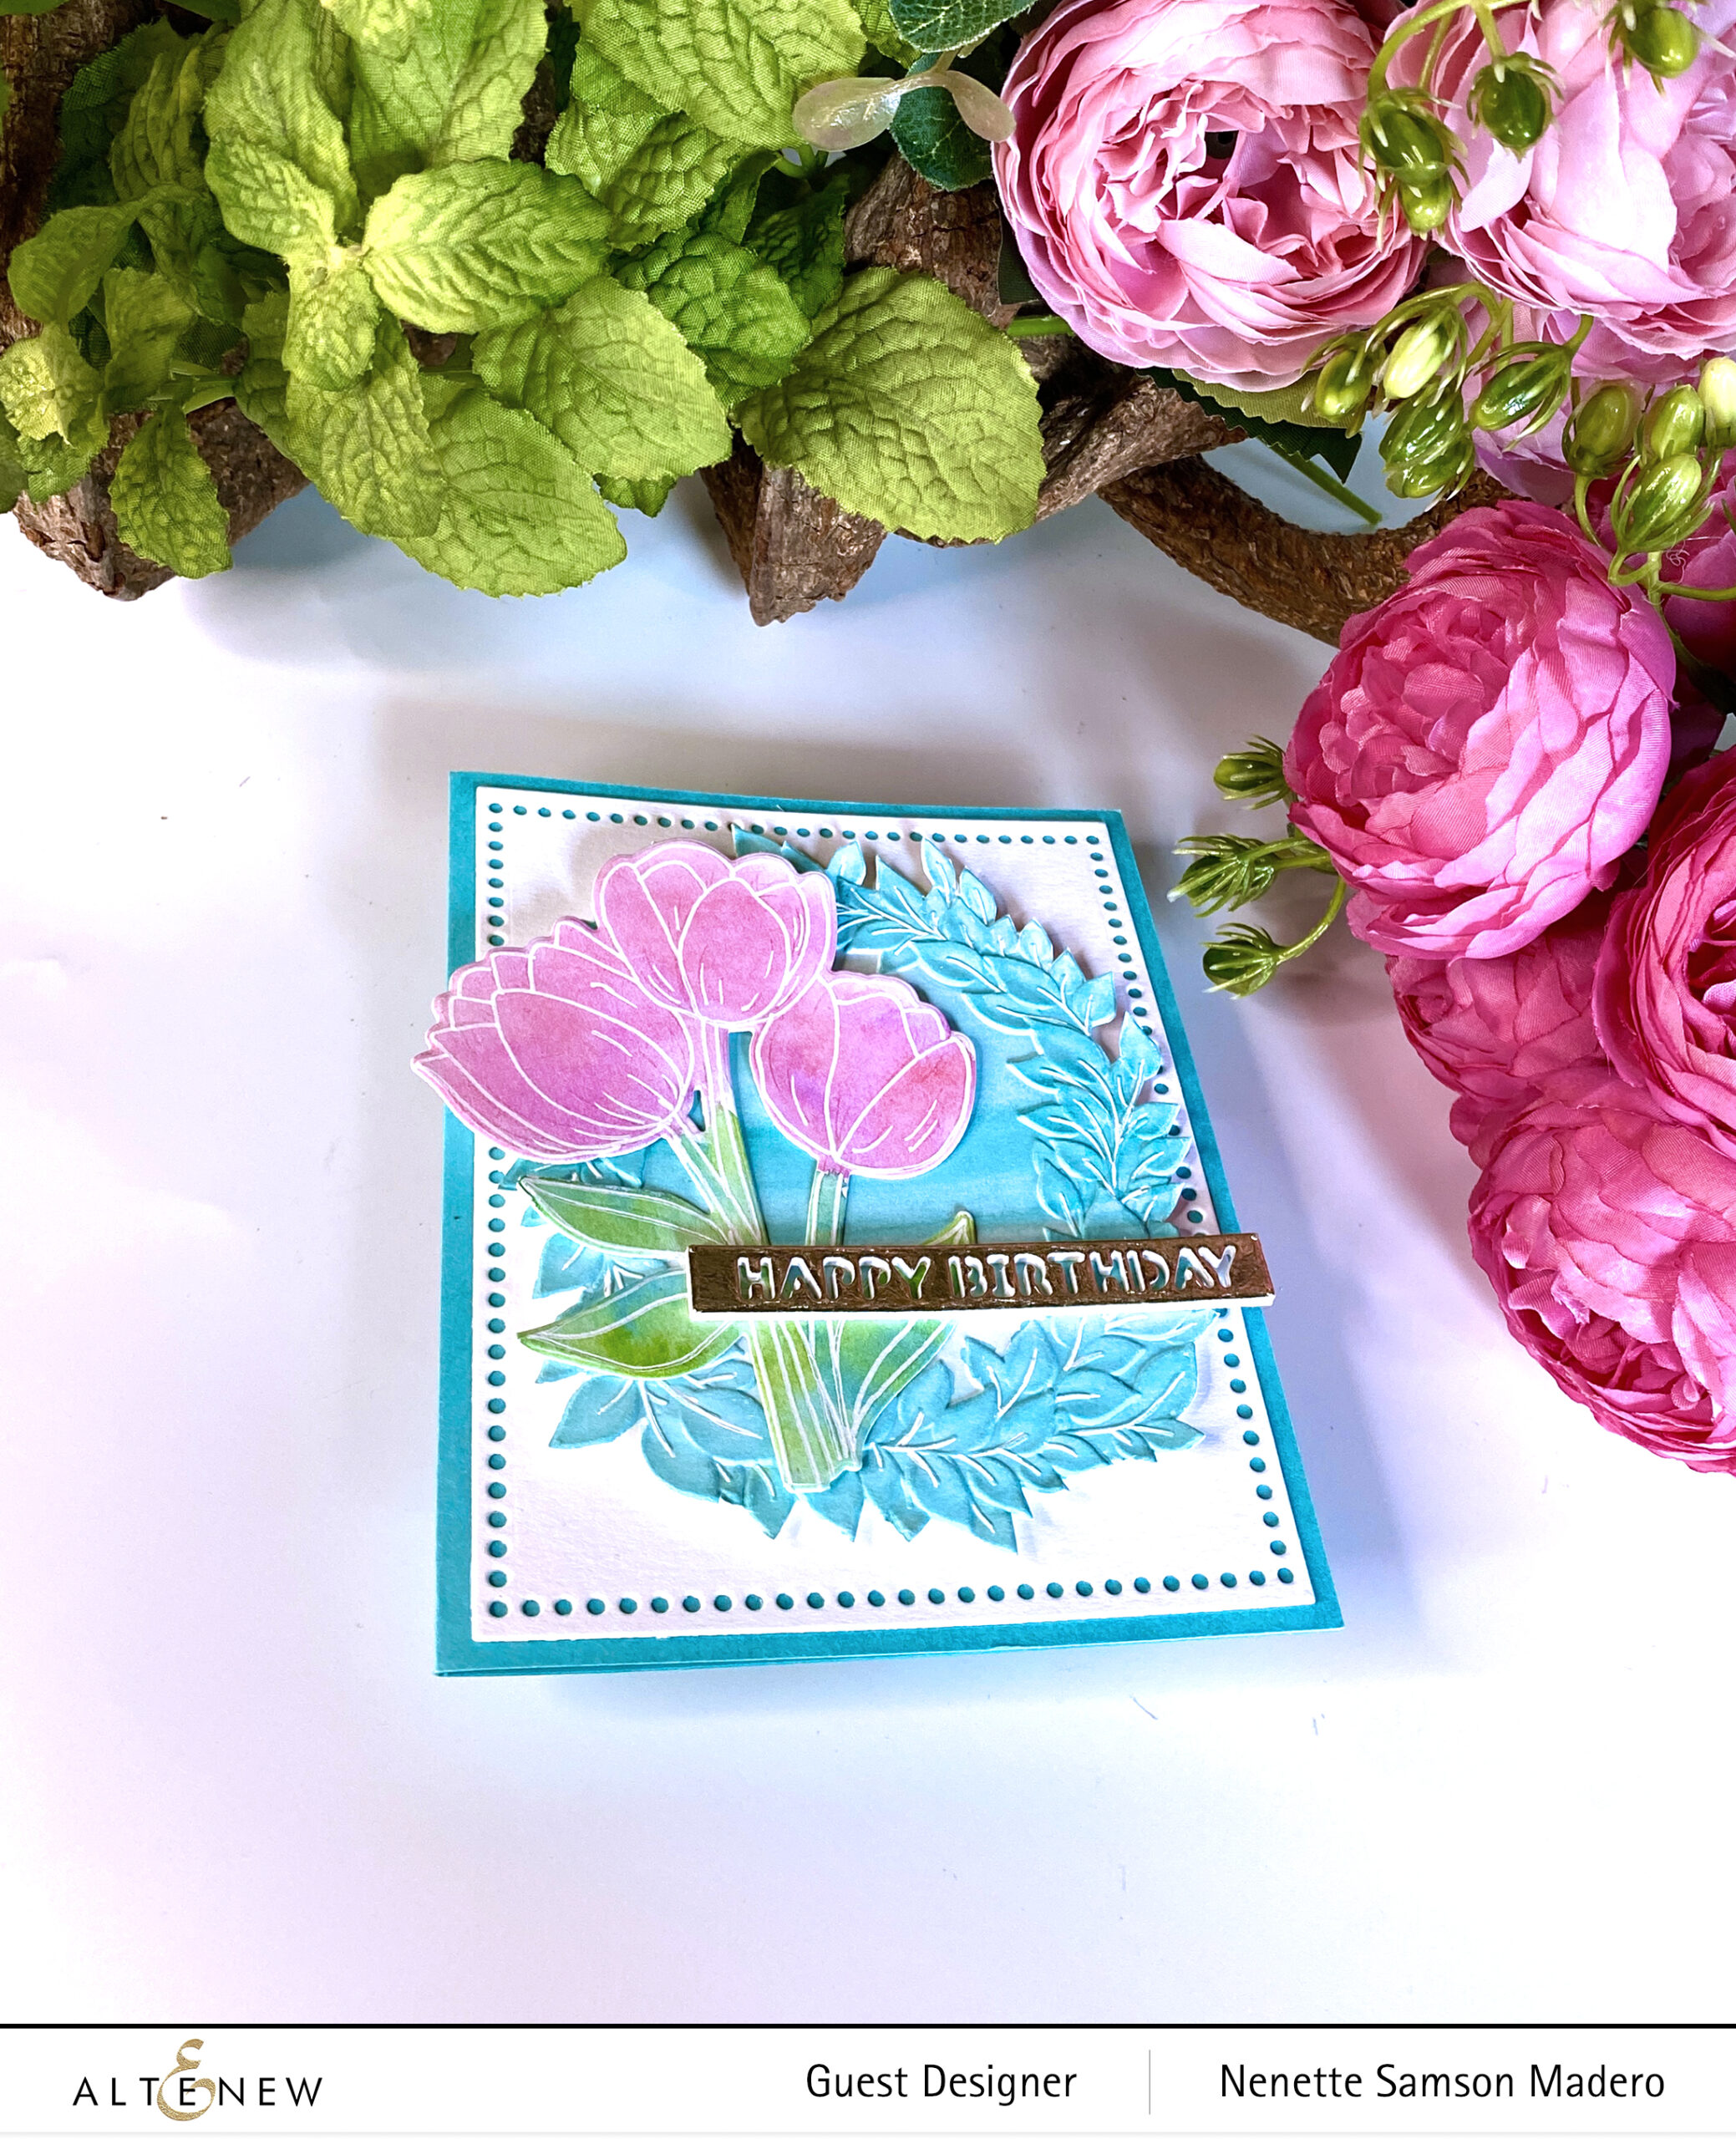
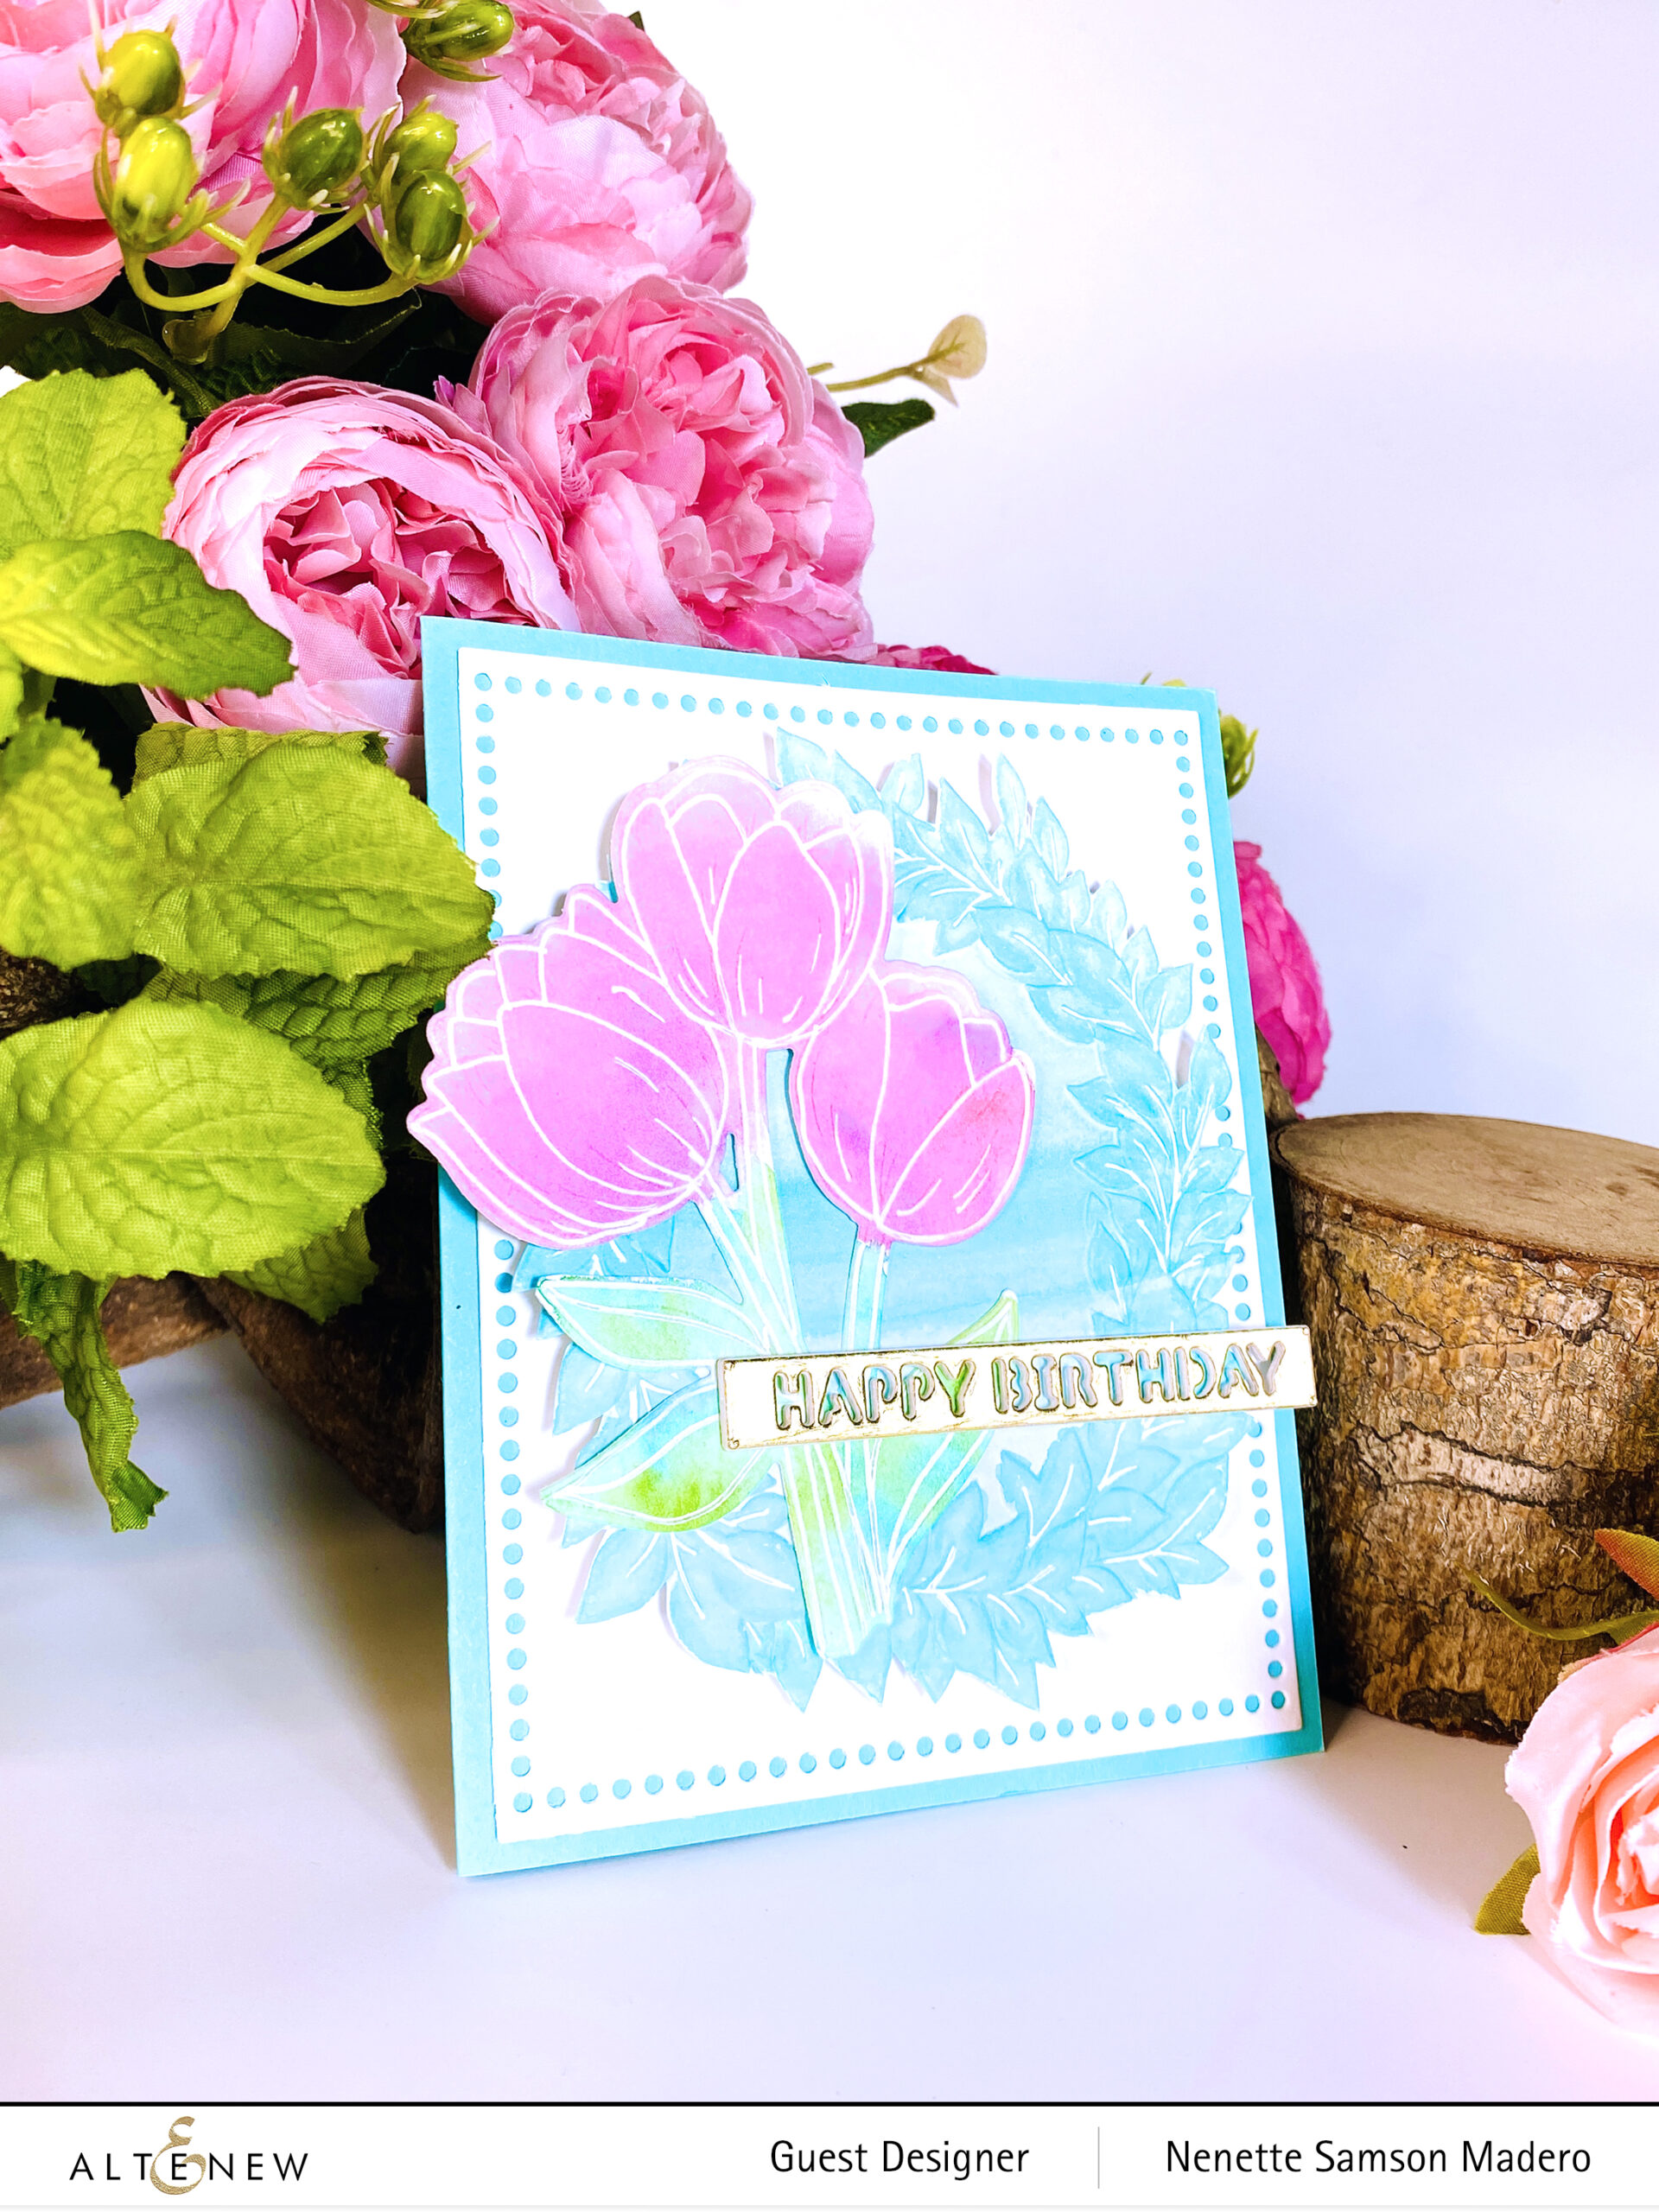
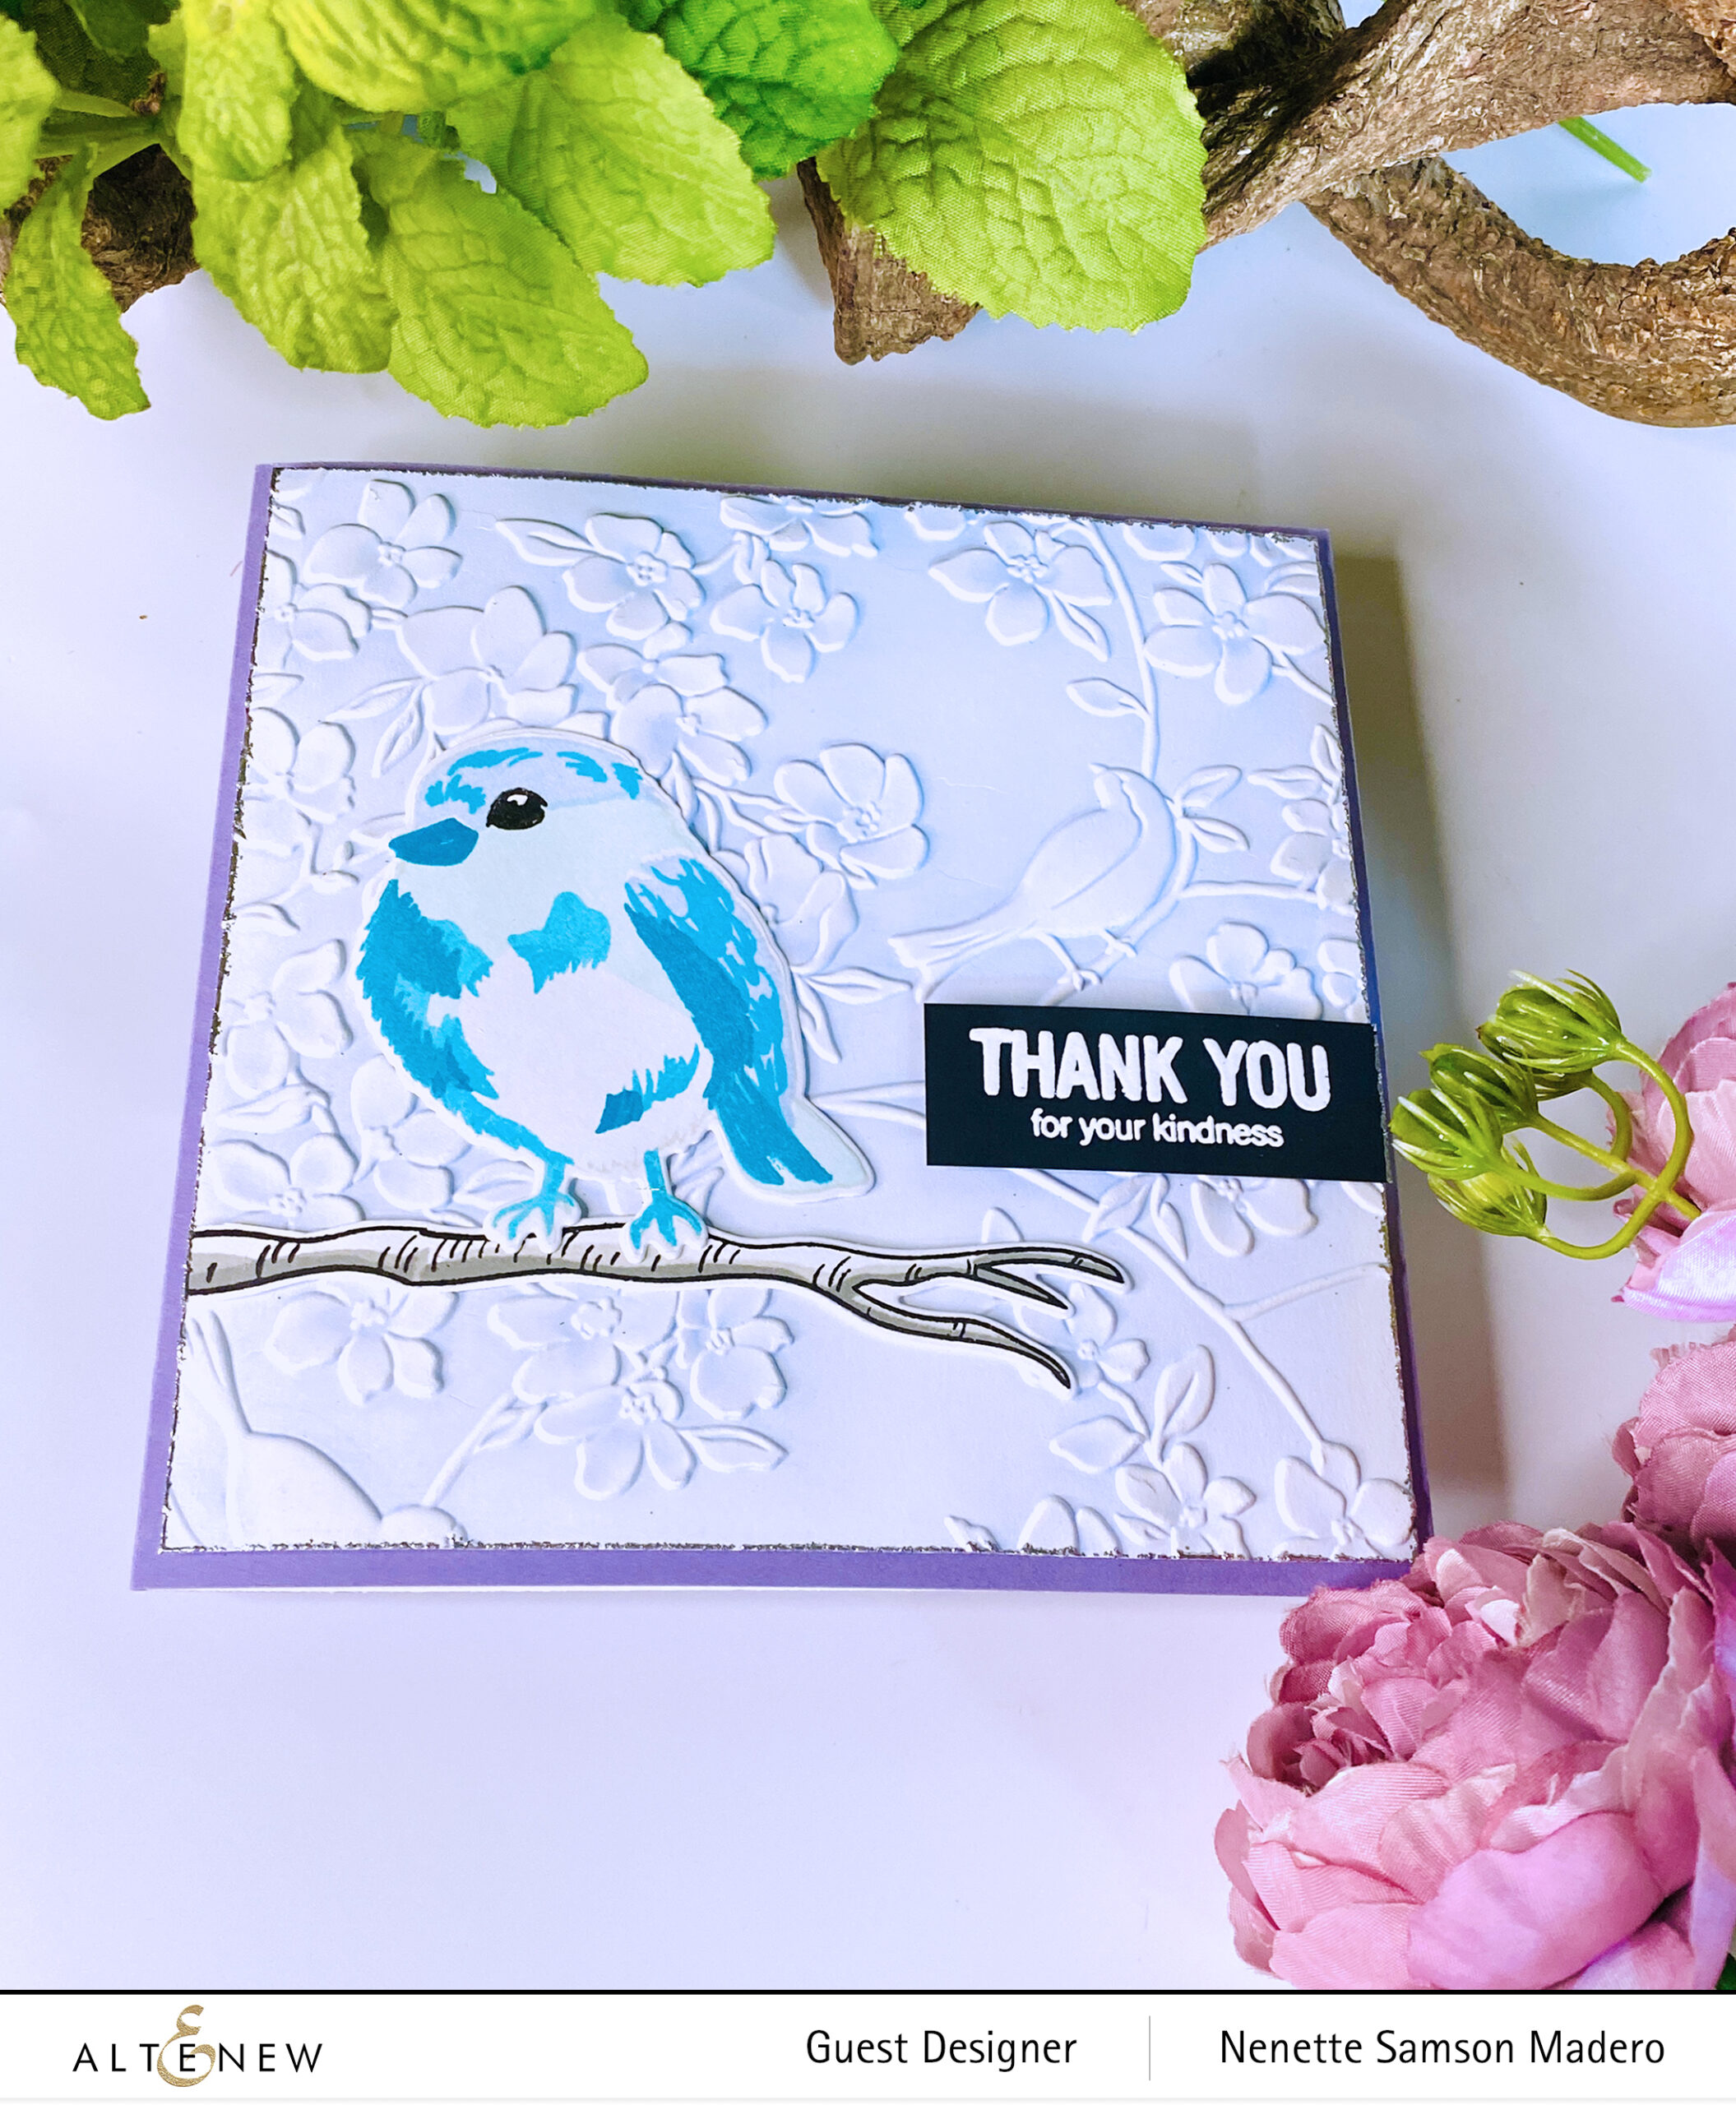
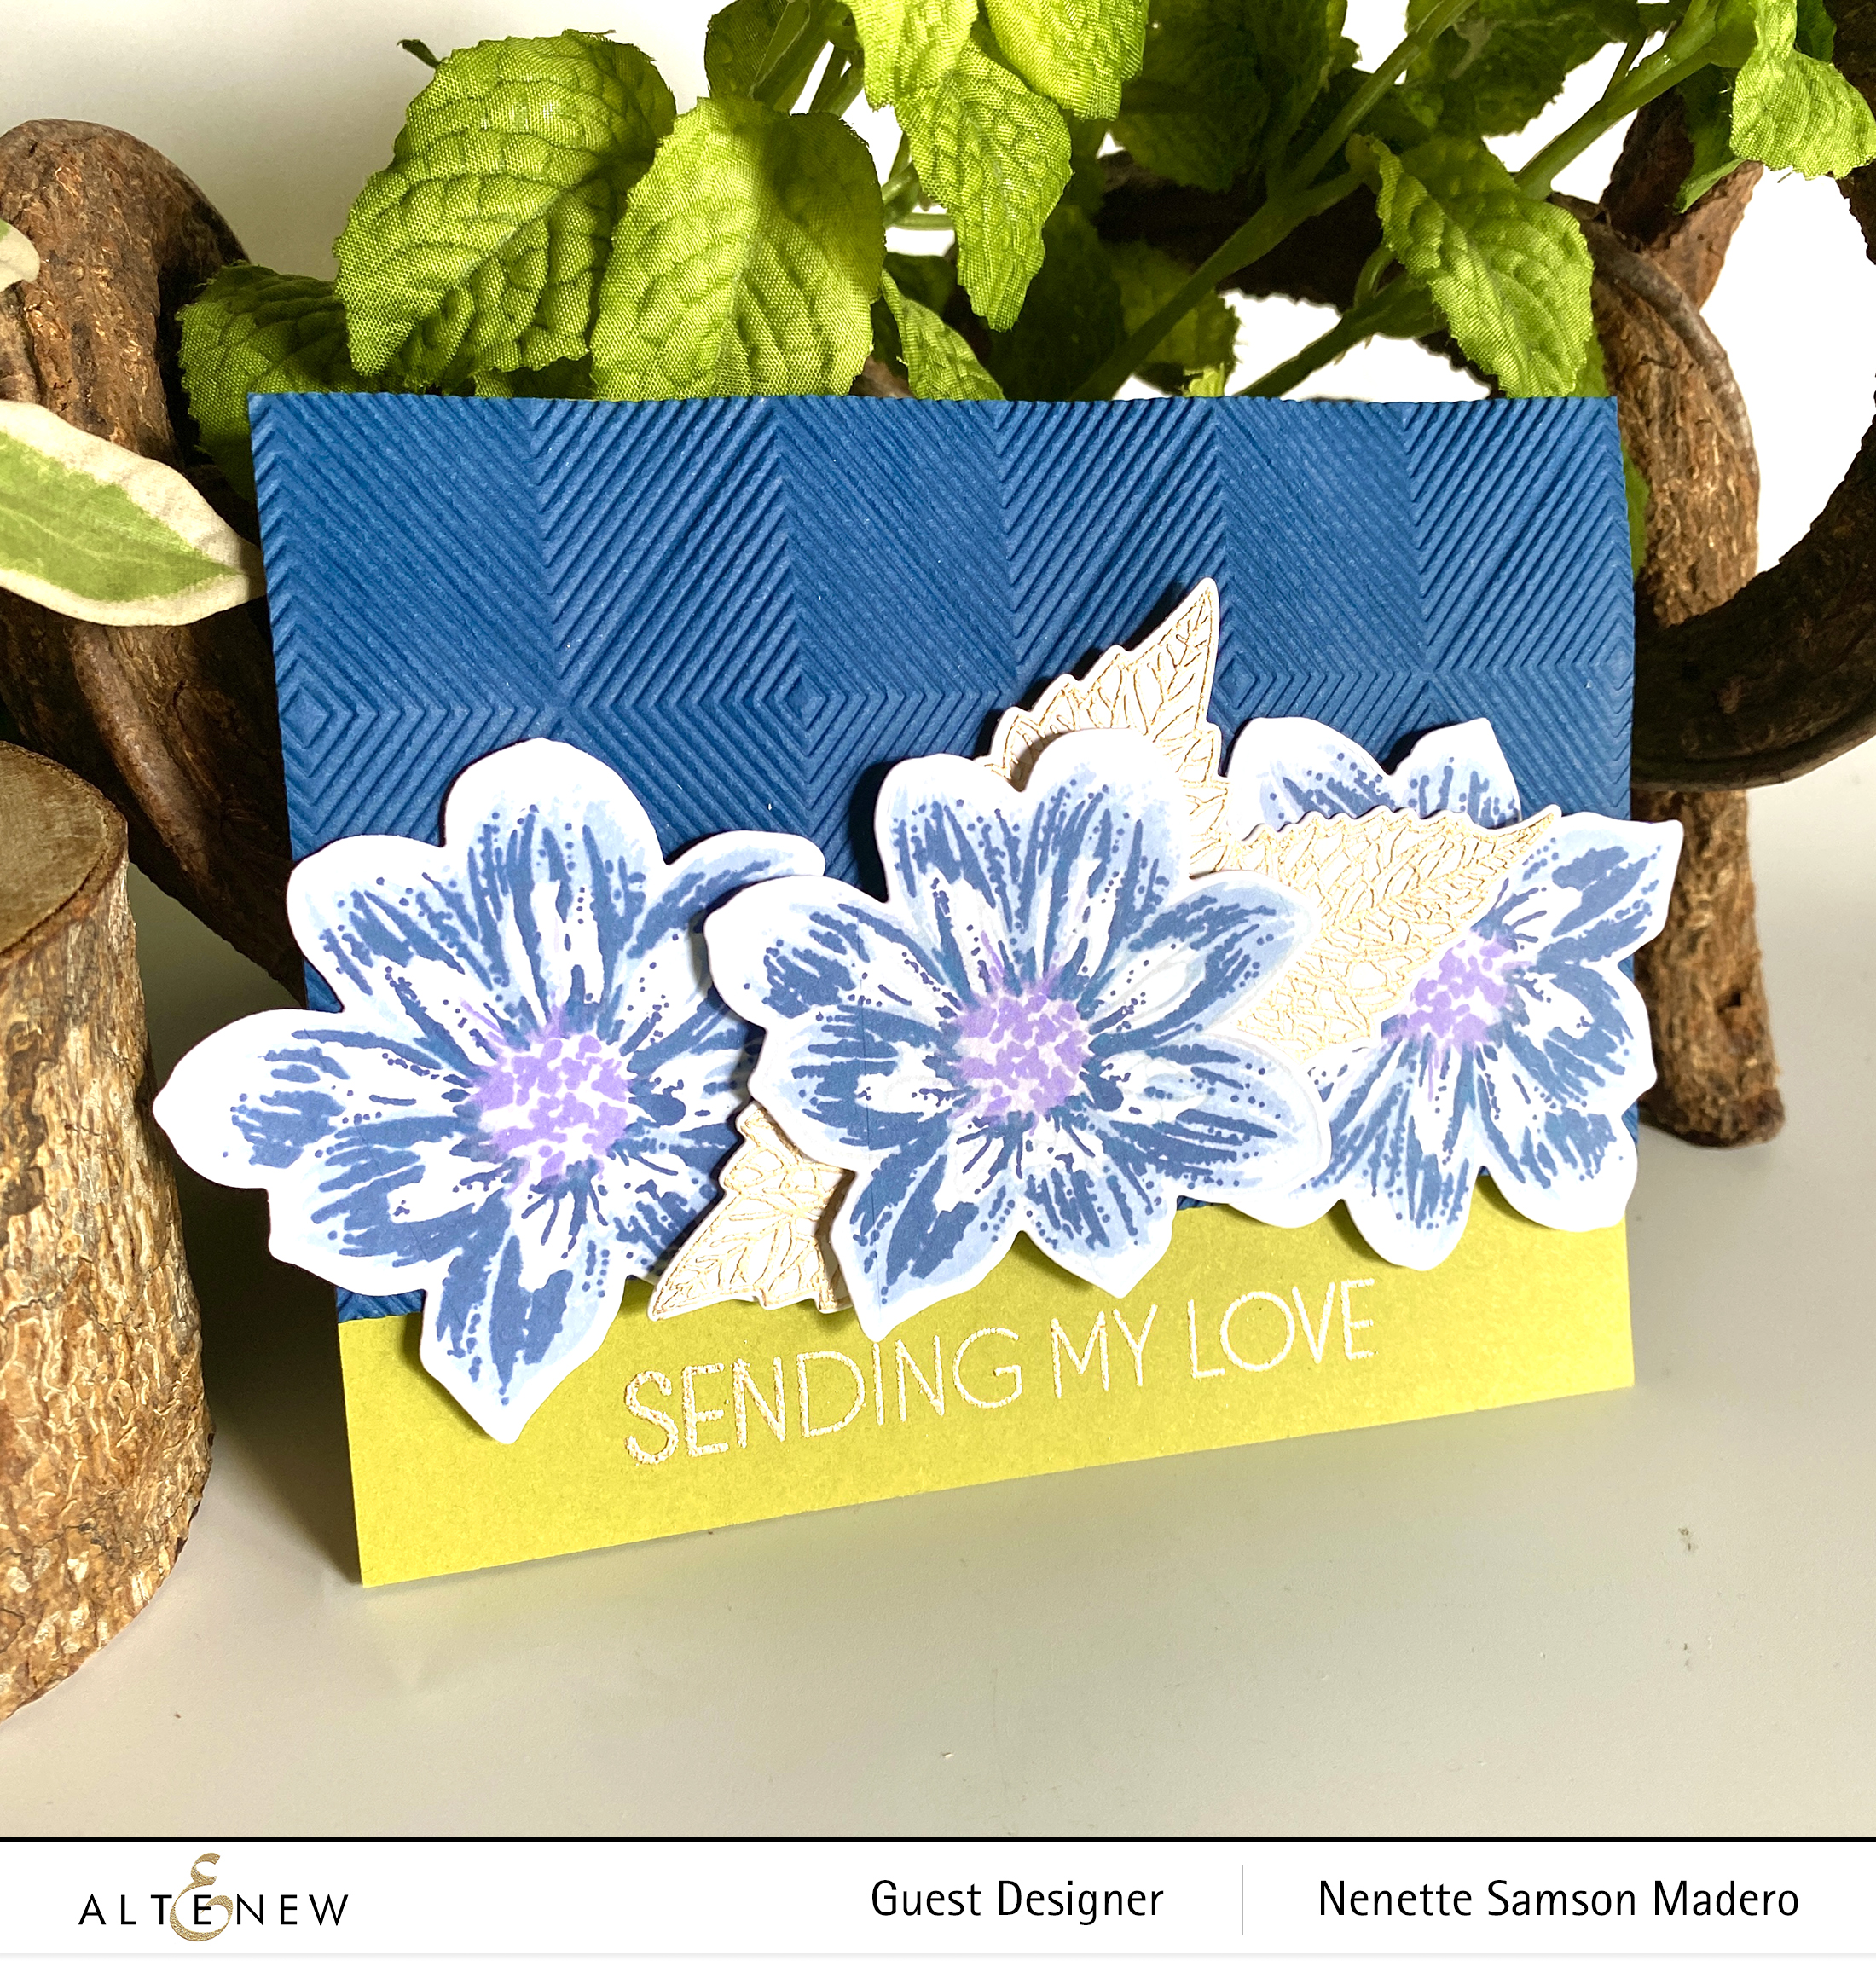
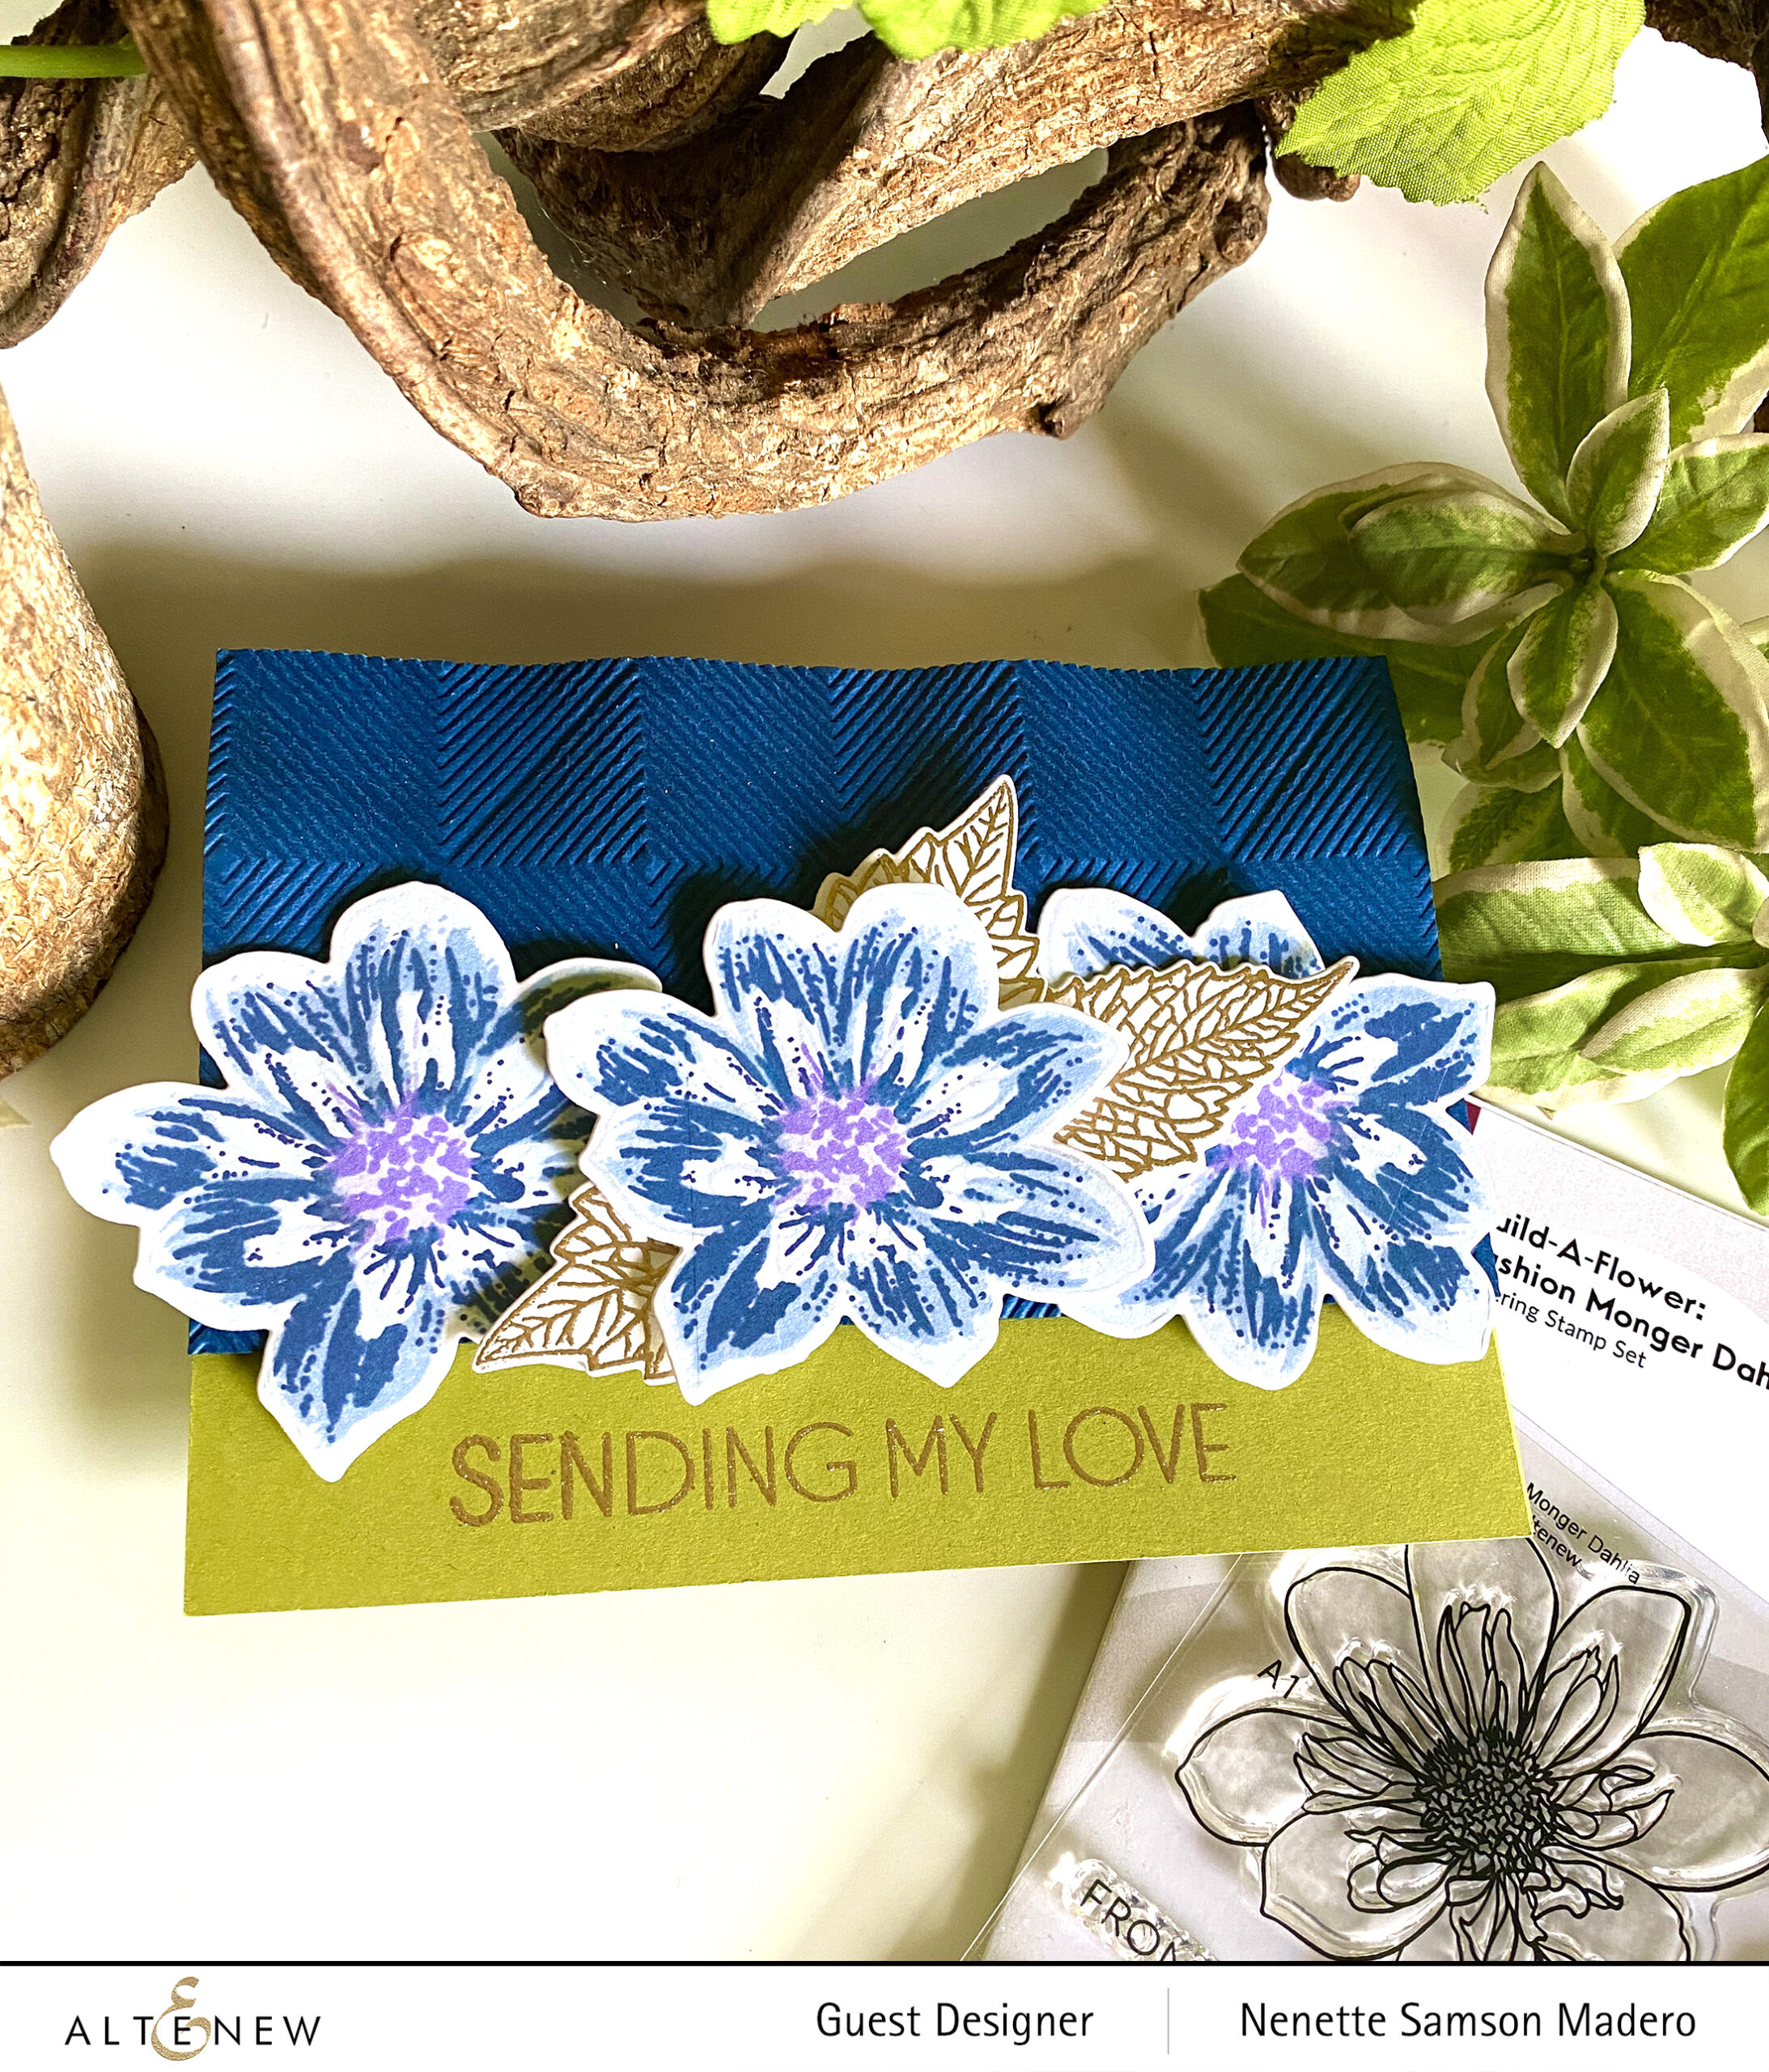
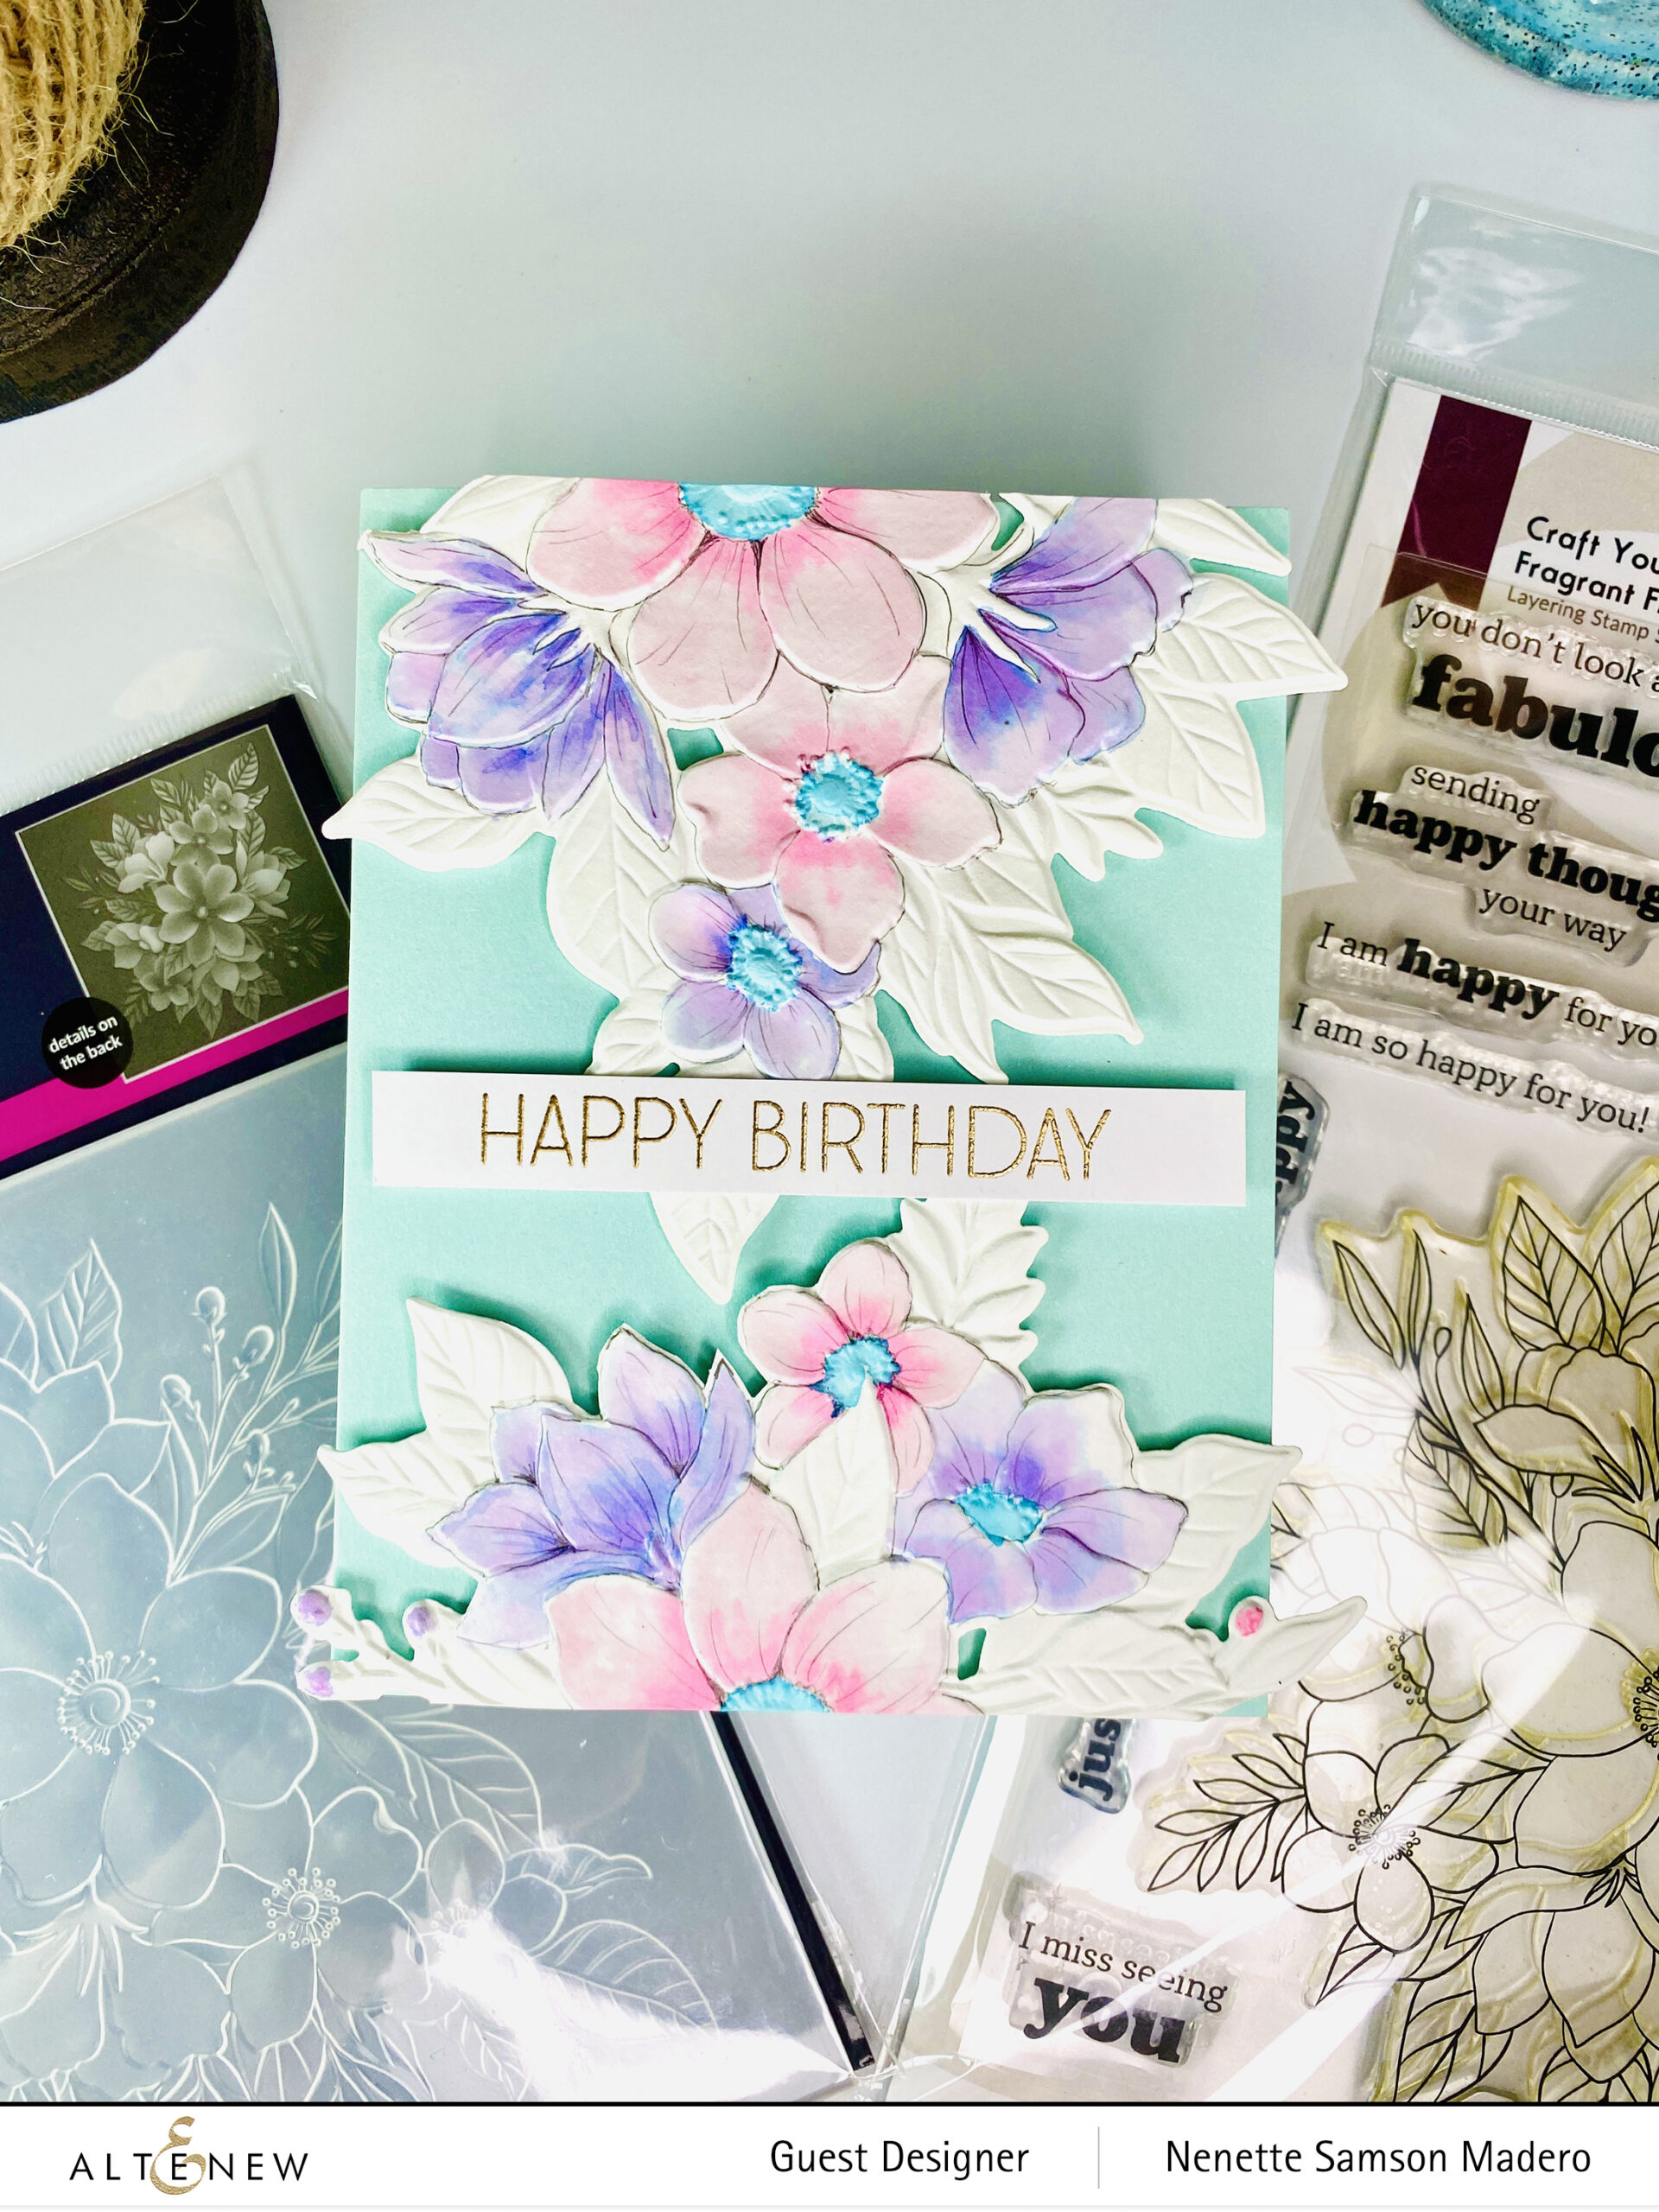
HAPPY BIRTHDAY

STEPS:

  1. Emboss Neenah Solar White cardstock using the CYL Fragrant Florals 3d Embossing folder.
  2. Watercolor using the following dye inks: Hydrangea, Pinkalicious and Turquoise.
  3. Die cut image using the coordinating die.
  4. Emboss the image again with the 3D embossing folder.
  5. Add outline using a mechanical pencil.
  6. Stamp and emboss sentinent from the Ornamental Bliss Stamp set using Rose Gold embossing powder.
  7. Assemble card with foam squares.
TIP: Mist the front and back of the paper with water before embossing. This will help break down the paper fibers and prevent tearing.

SUBSCRIPTION PLAN

GIVEAWAYS

$300 in total prizes! To celebrate this release, Altenew is giving away a $50 gift certificate to 2 lucky winners and a $ 25 gift certificate to 8 winners! Please leave a comment on the Altenew Card Blog and/or each designer’s blog post on the blog hop list below by 04/18/2022 for a chance to win. Altenew will draw 10 random winners from the comments left on each stop of this blog hop and announce the winners on the Altenew Winners Page on 04/20/2022.

Up next: Terri Koszler. Thank you so much for dropping by! I hope you liked the cards I made for this release. Let me know which card you prefer in the comment section below, and you might get a chance to win a prize from Altenew. <3 If you like what you see, please subscribe to this blog and my Instagram @mylittleatticstudio. Stay safe, everyone, and happy crafting!

Altenew Build-A-Flower: Belladonna Lily Release Blog Hop + Giveaway ($200  in total prizes)

Altenew Build-A-Flower: Belladonna Lily Release Blog Hop + Giveaway ($200  in total prizes)

Welcome to my blog, crafty friends! Thanks so much, Emily Midgett, for sending everybody over. For the complete details of this hop, head over to the Altenew blog. Take a look at the latest Build-a-Flower release:

BUILD-A-FLOWER: BELLADONNA LILY

This stamp set is a gorgeous cluster of flowers combined with lovely sentiments. Today, I chose only to use the outline stamp of the flower against an ombre background.

THINKING OF YOU, MY FRIEND

STEPS:

  1. Die cut watercolor paper using the Dotted Swirls Debossing Cover Die.
  2. Use the watercolor brush markers to create an ombre background starting from lightest to darkest.
  3. Stamp the outline image onto Vellum and emboss with Rose Gold embossing powder. Die cut the image using the coordiating die.
  4. Stamp the sentiment on black cardstock and emboss using Pure White embossing powder.
  5. Assemble card.
TIP: Allow the lightest wash to completely dry then add different shades of blue. This will create some added texture on top of the background.

This is a pretty quick card to make. Sometimes, less is more. It can be simple but elegant. Using a contrasting color for the flower will let it stand out more. Since vellum is translucent, you can still see the variations of blue come through the paper. I stamped 2 clusters of flowers and just layered them on top of each other.

GIVEAWAYS

$200 in total prizes! To celebrate this release, Altenew is giving away a $50 gift certificate to 2 lucky winners and a $20 gift certificate to 5 winners! Please leave a comment on the Altenew Card Blog and/or each designer’s blog post on the blog hop list below by 04/06/2022 for a chance to win. Altenew will draw seven random winners from the comments left on each blog hop stop and announce the winners on the Altenew Winners Page on 04/08/2022.

Next up is my uber-talented friend, Erum Tasneem. Drop by her blog and be blown away by her exceptional talent. Thanks for dropping by, and I would love to know if you prefer clean and simple cards or layered and elaborate ones. Make sure to leave a comment and get a chance to win a prize from Altenew! For my latest creations, please follow me on Instagram @mylittleatticstudio. Thanks again, and happy crafting!

Altenew Thanks and Blessings Stamps/Dies/Stencils/Embossing Folders Collection Release Blog Hop + Giveaway ($300 in total prizes)

Altenew Thanks and Blessings Stamps/Dies/Stencils/Embossing Folders Collection Release Blog Hop + Giveaway ($300 in total prizes)

Welcome to my blog, everyone!!! If you just came from Joylita Dsouza‘s blog, then you’re on the right track. For the full blog hop list, head on to the Altenew card blog. There are a lot of wonderful products in this release! You can find the whole collection here. Below are some samples of how you can make use of some of the products from this release.

CARTOON TULIPS STAMP AND DIE BUNDLE
FLOWING WREATH 3D EMBOSSING FOLDER

HAPPY BIRTHDAY


CARTOON TULIPS STAMP AND DIE BUNDLE, FLOWING WREATH 3D EMBOSSING FOLDER, MIX AND MATCH FAME DIE, ESSENTIAL SENTIMENT STRIPS DIE, GOLD FOIL WASHI TAPE, FOAM SQUARES, ADHESIVE, WATEROCOLOR PAPER, CARDSTOCK, WHITE PIGMENT PEN
  1. Create a watercolor wash. Emboss with the Flowing Wreath 3D embossing folder. Use a white pigment pen to highlight the leaf veins. Cut the outer portion to create a frame.
  2. Stamp the Cartoon Tulips image on watercolor paper using Antique Linen distress ink. Do a color wash on the petals and leaves and outline the image with a white gel pen.
  3. Die cut the Happy Birthday sentiment 4 times. Adhere gold washi tape on the 5th before die cutting. Layer on top of each other with glue.
  4. Die cut the dotted border from the Mix and Match Frame die.
  5. Assemble the card.

This tulip outline set comes with layering stamps so that if you are not comfortable in watercoloring, you can easily stamp the layers! It’s also very easy to watercolor because the flowers and leaves have big spaces wherein you can play with blending colors.


THANK YOU FOR YOUR KINDNESS


BIRD OF THE WOODS STAMP AND DIE BUNDLE, ALTENEW DYE INKS, ROSE GOLD EMBOSSING POWDER, FRAYED LEAF MIXED MEDIA INK, ARECA PALM 3D EMBOSSING FOLDER, NEENAH SOLAR WHITE CS, ARTIST MARKERS, CARDSTOCK, FOAM SQUARES
  1. Stamp the different layers of the bird. Mask the bird then stamp the branch.
  2. Fussy cut the bird and the branch without cutting the lower portion.
  3. Apply ink on the flat surface of the Areca Palm 3D embossing folder to create a letterpress look.
  4. Stamp the sentiment. Add two orange dots and a thin line for added interest.
  5. Emboss the edge of the card base using Versamark Ink and Rose Gold embossing powder.
  6. Assemble the card.

Don’t you just love this cute little bird?! <3 You can create a scene using all the foliage 3D embossing folders to change the background.

BLOSSOMING BRANCHES 3D EMBOSSING FOLDER

THANK YOU FOR YOUR KINDNESS


BIRD OF THE WOODS STAMP AND DIE BUNDLE, BLOSSOMING BRANCHES 3D EMBOSSING FOLDER, PURE WHITE EMBOSSING POWDER, PIGMENT INK, ZING SILVER GLITTER FINISH EMBOSSING POWDER, DYE INKS
  1. Add pigment ink to the flat surface of the embossing folder and emboss.
  2. Stamp the bird using dye inks. Stamp the branch as well.
  3. Stamp and emboss the sentiment with Pure white embossing powder.
  4. Emboss the edges of the embossed background with silver glitter finish.
  5. Assemble the card.

I paired the Blossoming Branches 3D embossing folder with the Bird of the Woods. Isn’t this a perfect match? 🙂


EVERY DAY IS A BLESSING


CARTOON TULIPS STAMP AND DIE BUNDLE, GREATEST BLESSING STAMP SET, ANTIQUE SILVER EMBOSSING POWDER, FINE FRAMES DIAMOND DIE, DREAMY TILES 3D EMBOSSING FOLDER, ARTIST WATERCOLOR PAN SET, MIXED MEDIA CORAL BERRY PIGMENT INK, ANTIQUE LINEN DISTRESS INK, FABER-CASTELL COLORED PENCILS
  1. Stamp the Cartoon Tulips on watercolor paper using Anitque Linen Distress Ink and watercolor the flowers, stems and leaves. Add details using colored pencils then die cut.
  2. Stamp and emboss the sentiment with Versamark Ink and Antique Silver embossing powder.
  3. Die cut the fine frames diamond 4 times.
  4. Add Coral Berry pigment ink to the flat surface of the Dreamy Tiles 3D embossing folder and emboss.
  5. Cut out a strip of purple cardstock and emboss the edges with silver embossing powder.
  6. Assemble the card.

All of the elements in this card draw the eye to the tulips– the purple strip, the diamond die cuts and the position of the sentiment strip. I can’t wait to make more cards using this lovely stamp set.

  • Get a FREE brand new Thanks and Blessings Release Mini Inspiration Guide with every order from 09/03/2021 through 09/05/2021. Shop HERE!
  • Get a FREE brand new Online Cardmaking Class with every order from the new Thanks and Blessing Stamp & Die Release Collection from 09/03/2021 through 09/09/2021. Shop HERE!

GIVEAWAY PRIZES


$300 in total prizes! To celebrate this release, Altenew is giving away a $50 gift certificate to 2 lucky winners and a $25 gift certificate to 8 winners! Please leave a comment on the Altenew Card Blog and/or each designer’s blog post on the blog hop list below by 09/09/2021 for a chance to win. 

Altenew will draw 10 random winners from the comments left on each stop of this blog hop and announce the winners on the Altenew Winners Page on 09/11/2021.

Next up is my dear and talented friend, Sandhya Iyer. Make sure to leave a comment below to get a chance to win a prize from Altenew! I hope you liked the cards I created for this hop. I love hearing from all of you and your comments just inspire me to be more creative!

Thank you so much for dropping by. Stay safe and keep on crafting!

Altenew Paint-A-Flower: White Swan Echinacea Release Blog Hop

Altenew Paint-A-Flower: White Swan Echinacea Release Blog Hop

Hello, friends! Welcome to my blog! If you just came from Linda Westfall, you’re on the right track. For the complete list, please visit the Altenew Card Blog. Take a look at the gorgeous stamp set!

PAINT A FLOWER: WHITE SWAN ECHINACEA

I am a huge fan of Seeka and got my inspiration for this card from her beautiful clean and simple cards.


TAKE CARE OF YOURSELF


PAINT-A-FLOWER: WHITE SWAN ECHINACEA STAMP SET, FINE FRAMES COVER DIE, OBSIDIAN PIGMENT INK, DISTRESS OXIDE INKS, CRYSTAL CLEAR EMBOSSING POWDER, MASKING PAPER, FINE FRAMES COVER DIE

I stamped the image 3 times on masking paper then fussy cut them. The middle image was stamped first onto the Neenah Solar White card front. Note that whatever you stamp first will be the image that will appear in front. I placed the mask on top of the stamped image then stamped again on the left and on the right of this image. I covered all the stamped images with the fussy-cut masking papers then created a border using post-it tape.

I then colored the exposed paper by blending 3 colors of Distress Oxide inks. I added water splatters for more texture. The best part is when you remove the tape and the masking paper to reveal the finished card front. The sentiment was stamped using Obsidian Ink then embossed with Clear embossing powder. To finish off the card, I die cut black paper using the Fine Frames Cover Die.


FEEL BETTER SOON


I created the mixed media background using Distress ink stains. Then, using the Diamond Snowflakes stencil, I added the pattern with distress inks as well as removed inks in some areas using baby wipes. I love the ghosting effect it created.

For added texture, I stamped some writings with black ink. (I’ve learned so much from Tiffany Solorio when it comes to mixed media techniques.😊❤️) The PAF White Swan Echinacea image was stamped with Versmark Ink then embossed using Rose Gold embossing powder. Some white splatters were added as well as an embossed sentiment stamped on black cardstock to finish off the card.


GIVEAWAY PRIZES


$200 in total prizes! To celebrate this release, Altenew is giving away a $50 gift certificate to 2 lucky winners and a $20 gift certificate to 5 winners! Please leave a comment on the Altenew Card Blog and/or each designer’s blog post on the blog hop list below by 08/28/2021 for a chance to win. 

Altenew will draw 7 random winners from the comments left on each stop of this blog hop and announce the winners on the Altenew Winners Page on 08/30/2021.

Make sure to check out Seeka’s blog next and get blown away by her amazing talent! Hope you liked the cards I made. Thank you again, Seeka for the inspiration!!! Love the black and white on colored background. I will definitely be making more cards like this. Hope you all have a wonderful week ahead. Happy crafting!

Altenew Build-A-Flower: Fashion Monger Dahlia Release Blog Hop

Altenew Build-A-Flower: Fashion Monger Dahlia Release Blog Hop

Welcome, everyone! If you just came from Joylita Dsouza blog, then you’re on the right track. For the full list of the hop, do drop by the Altenew Card Blog. Want to make a bold statement on your handmade cards? The Fashion Monger Dahlia is the flower for you! This set features one six-layer flower and two three-layer leaves. The leaves have a delicate and lacy feel to them to help you achieve a richer look on your projects. The included sentiments feature a gorgeous pairing of fonts to accompany your floral creations.  Gorgeous, right?

Below are a 2 samples of cards I made using the stamp set.


SENDING MY LOVE


I stamped the Build-a-Flower: Fashion Monger Dahlia using the Altenew dye inks from the Northern Shore ink set– Polar Bear, Icy Water. From the Enchanted Garden Dye Ink set, I used the Wisteria Lake and Hydrangea. The flowers were die cut using the coordinating die set. A blue cardstock was embossed using the Waffled Diamonds 3D embossing folder. The sentiment from the Ornamental Bliss stamp set was stamped using Versamark Ink and embossed with Rose Gold embossing powder.


SO HAPPY FOR YOU


Here’s a simple card I made using this stamp set. I made sure there was a lot of white space to give more emphasis to the flower itself. The leaves were directly stamped on the card front with Versamark Ink then embossed using Pure White embossing powder. Artist watercolor markers were used to color the leaves. The Fashion Monger Dahlia was colored using the following dye inks–Pastel Sunrise, Canyon Clay, Burnt Red, Sunray and Chamomile then cut using the coordinating die cut. The sentiment was stamped on black cardstock then embossed using Pure White embossing powder.

If you don’t want to miss any of the Build-A-Flower series, you can avail of the subscription plan at a discounted rate.

SUBSCRIPTION PLAN

GIVEAWAYS


$200 in total prizes! To celebrate this release, Altenew is giving away a $50 gift certificate to 2 lucky winners and a $20 gift certificate to 5 winners! Please leave a comment on the Altenew Card Blog and/or each designer’s blog post on the blog hop list below by 08/07/2021 for a chance to win. Altenew will draw 7 random winners from the comments left on each stop of this blog hop and announce the winners on the Altenew Winners Page on 08/09/2021.

Next up is the talented Natasha Davies. Don’t forget to leave a comment below to get a chance to win a prize from Altenew! Thank you all for dropping by. I love hearing from all of you and hope we can be friends on IG as well (@mylittleatticstudio). Stay safe and happy crafting!!!