


Hello everyone!!! Welcome to the Altenew Educators’ Floral with Geometric Elements Blog Hop and giveaway! If you just came from the Altenew blog, I’d like to welcome all of you to mine!!! It is truly a thrill to be sharing this blog hop with my co-educators. We have all completed an amazing creative journey through the Altenew Educator Certification Program and each of us has definitely learned so many wonderful tips and techniques through all the amazing classes the program offers. During my time, it was Virginia Lu and Nicole Picadura who were heading the program and were so helpful and encouraging. Now, the talented Erum Tasneem has joined the group. Big, big thanks to these lovely ladies for everything that they do for the educators!!!
I have a number of cards to share so let’s get started! A few weeks back, I was in a creative rut… no inspiration at all. Some of my friends suggested to organize my craft room, learn a new technique, change my workspace etc. but what actually worked for me was making backgrounds using the Gelli plate! I love how unplanned the process is. All I had to do was make sure the colors complemented each other. And it worked! The idea to create backgrounds came from Bridgit Koopsen, an amazing mixed media artist. I had a number of backgrounds to play with and below are some of the cards that I made using the backgrounds I created using some Altenew stencils as my geometric element.
JUST BELIEVE IN YOURSELF/I’VE BEEN THINKING OF YOU

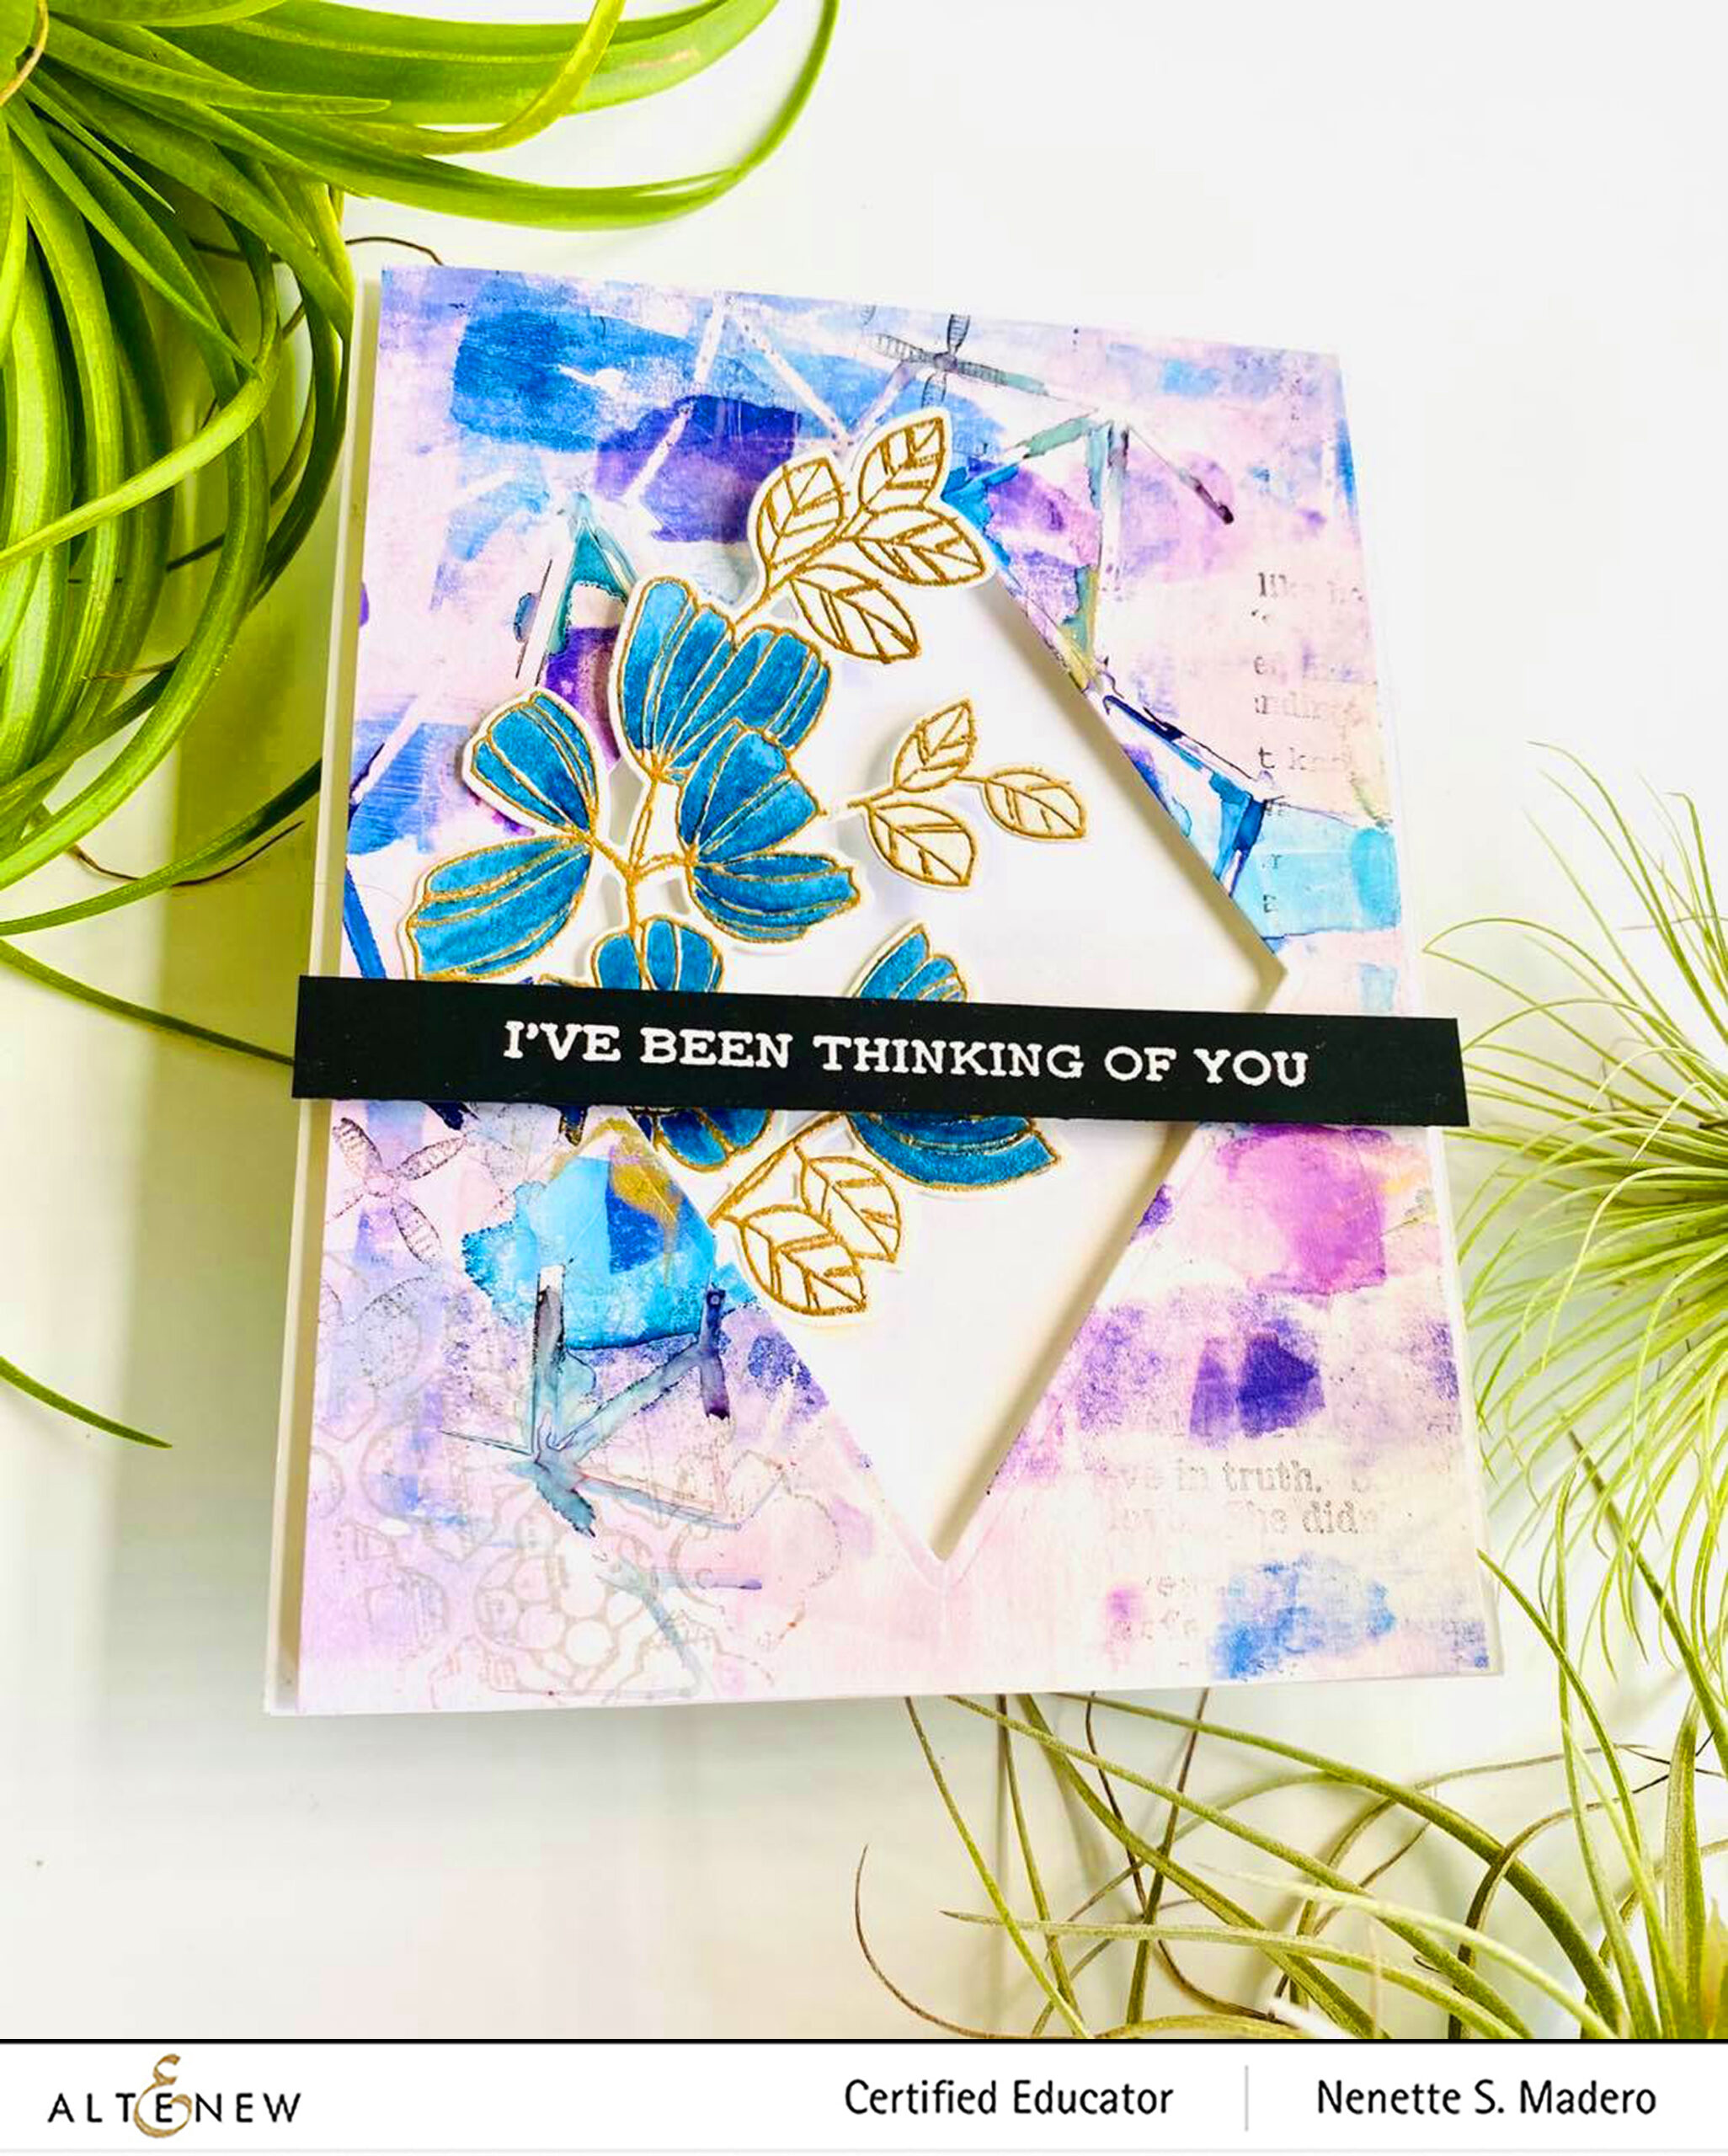
These are what I call my Yin and Yang cards wherein I switch the die cut parts to create two cards. For the background, I dropped alcohol inks on a Gelli plate and used a brayer to spread the inks. I let the first coat dry then placed the stencil on top and dropped a second layer of inks. When the inks were dry to touch, I removed the Geometric Landscape stencil then covered the entire surface with a thin coat of white acrylic paint. Neenah solar white cardstock was placed on top of the paint and I used a brayer to go through the entire surface. A print was then pulled from the gelli pate. It’s amazing how fun this technique was… I really couldn’t tell what the outcome would be. Random images were then stamped using black or grey for added texture.
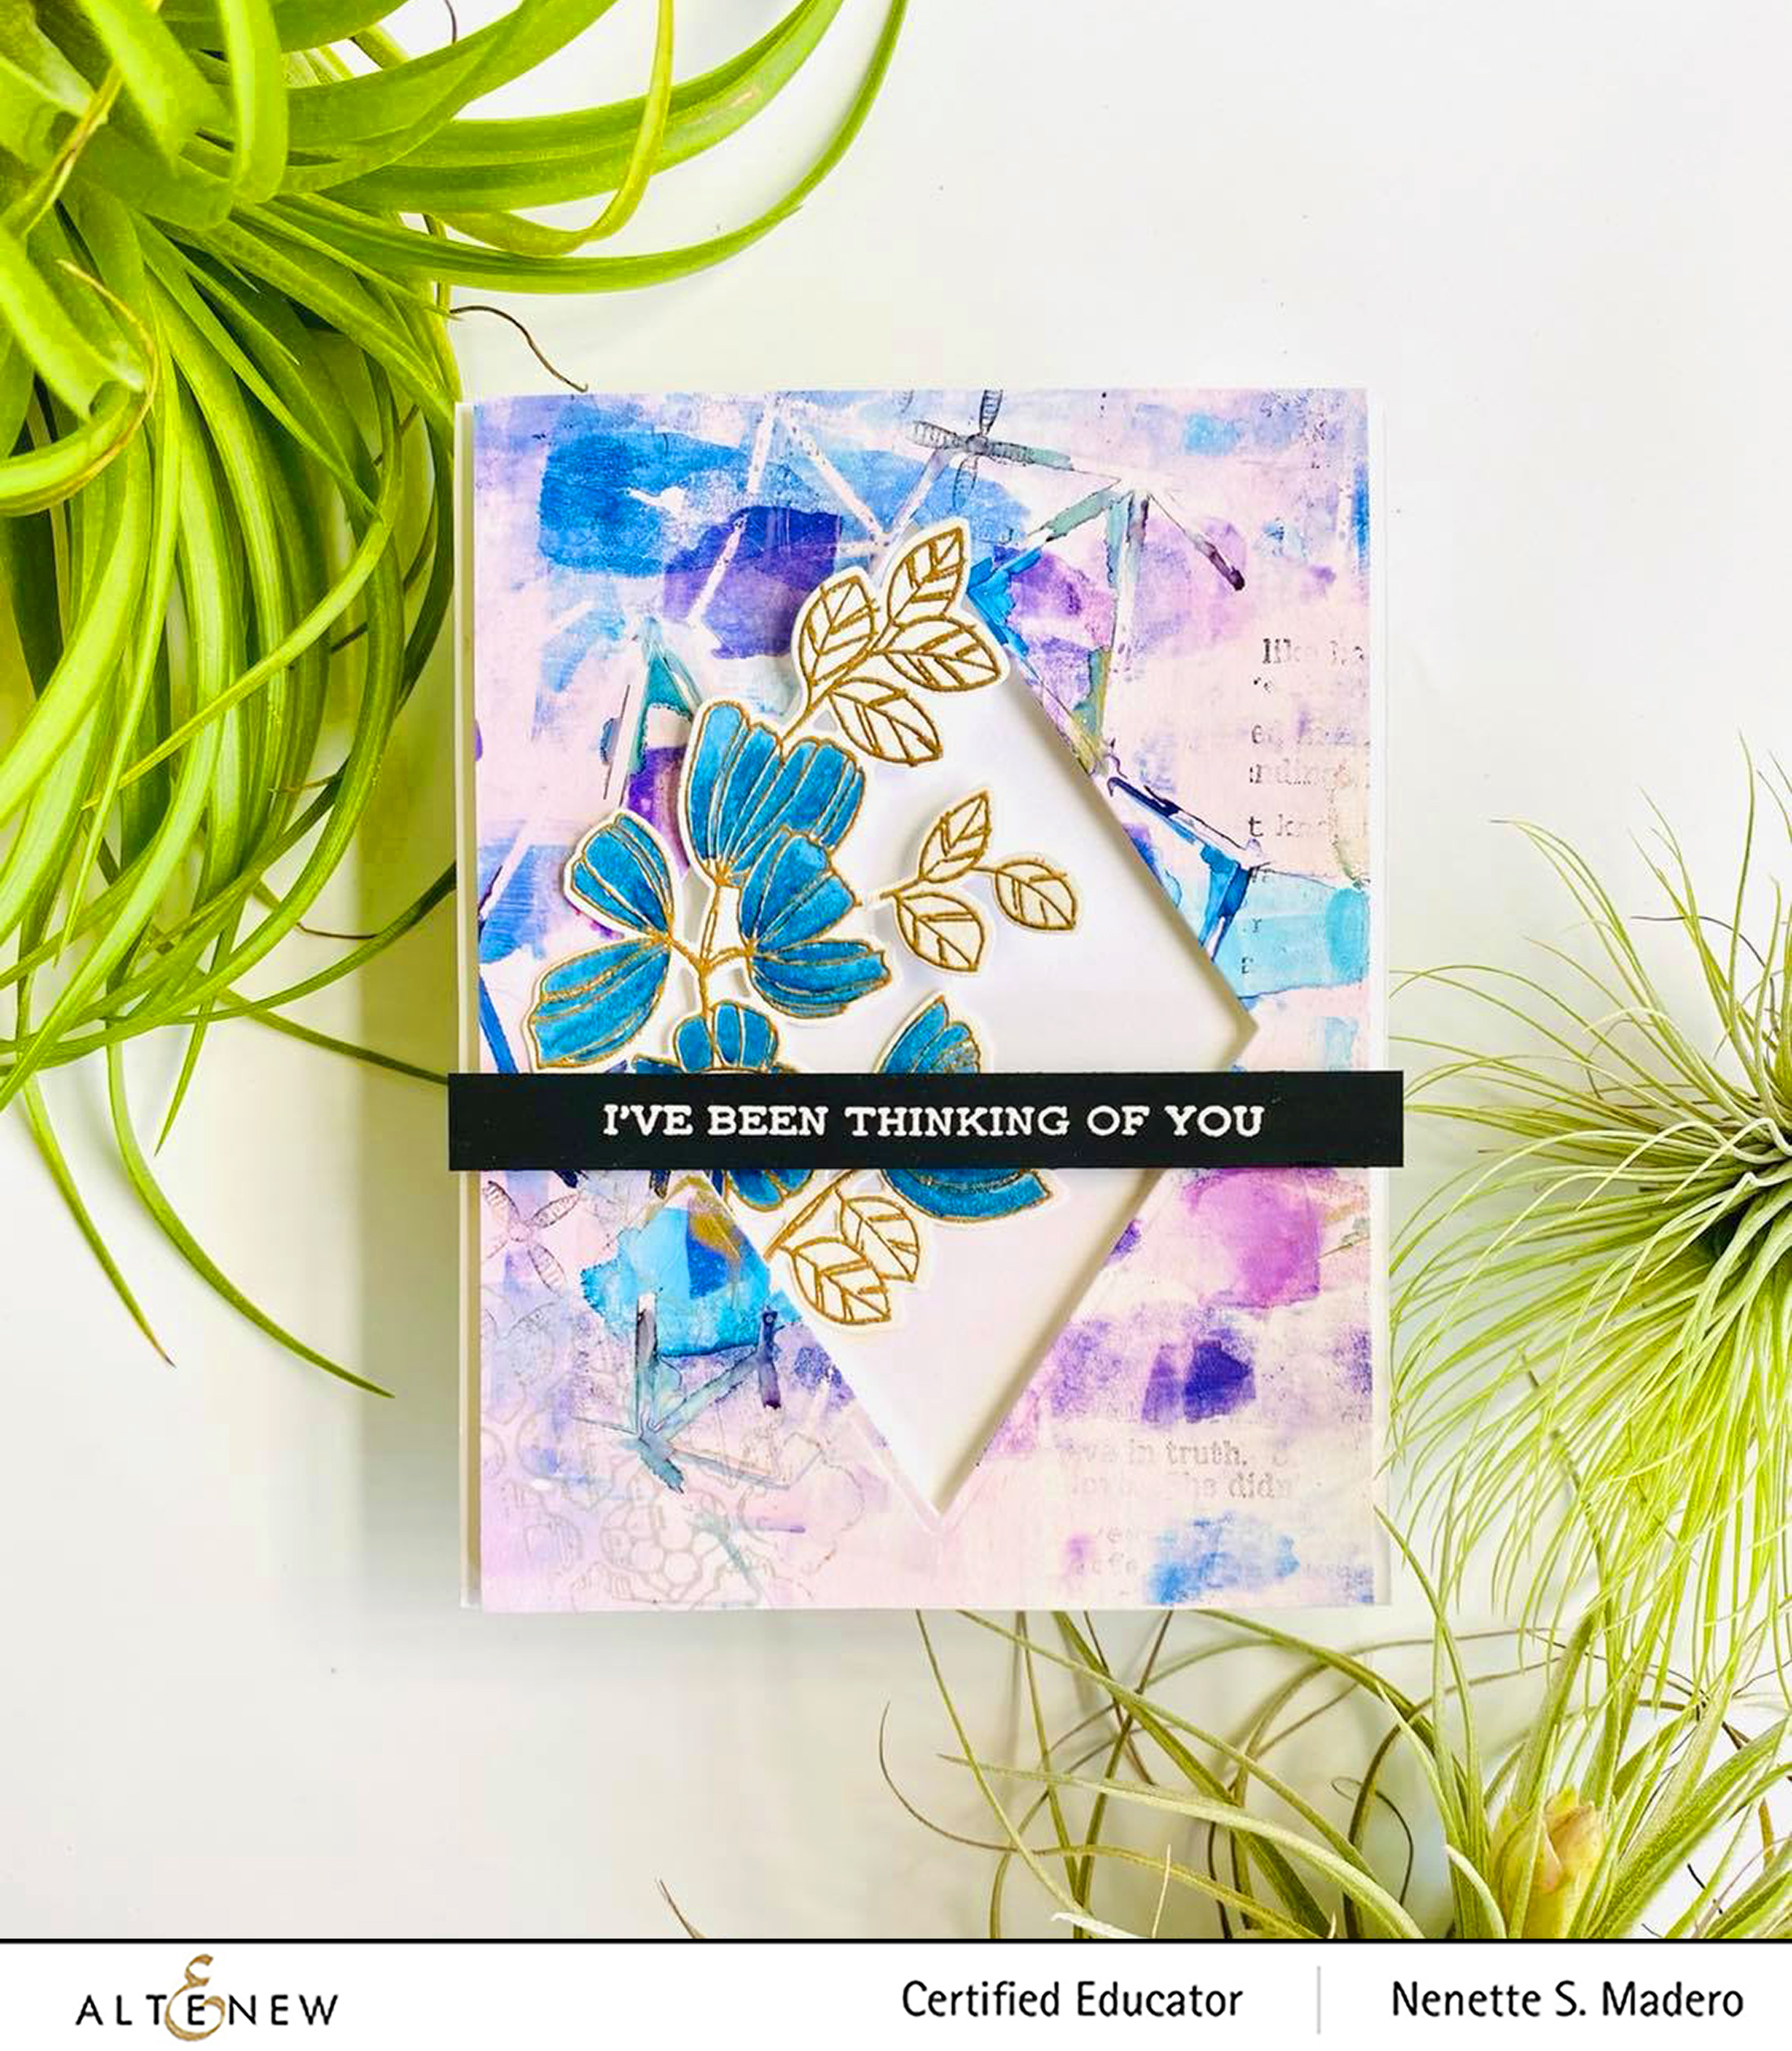
For the “I’ve been thinking of you card”, I die cut the diamond from the center of the printed image and saved the die cut part. Working with the negative part, I adhered it to a top folding A2 card using foam squares and inserted a die cut, embossed and watercolored floral image from the Weekend Doodles stamp set. The sentiment was stamped on black cardstock and embossed using white embossing powder.

For the “Just Believe in Yourself” card, I adhered a purple cardstock on half of the card front. I added embossed floral images from the Poppy Garden Stamp set to the matted diamond die-cut and added this in the middle of the card with foam squares. I love how the weight of the flowers balanced the dark colored cardstock. The diamond at the center also serves as a geometric element.
PRAYING FOR YOU
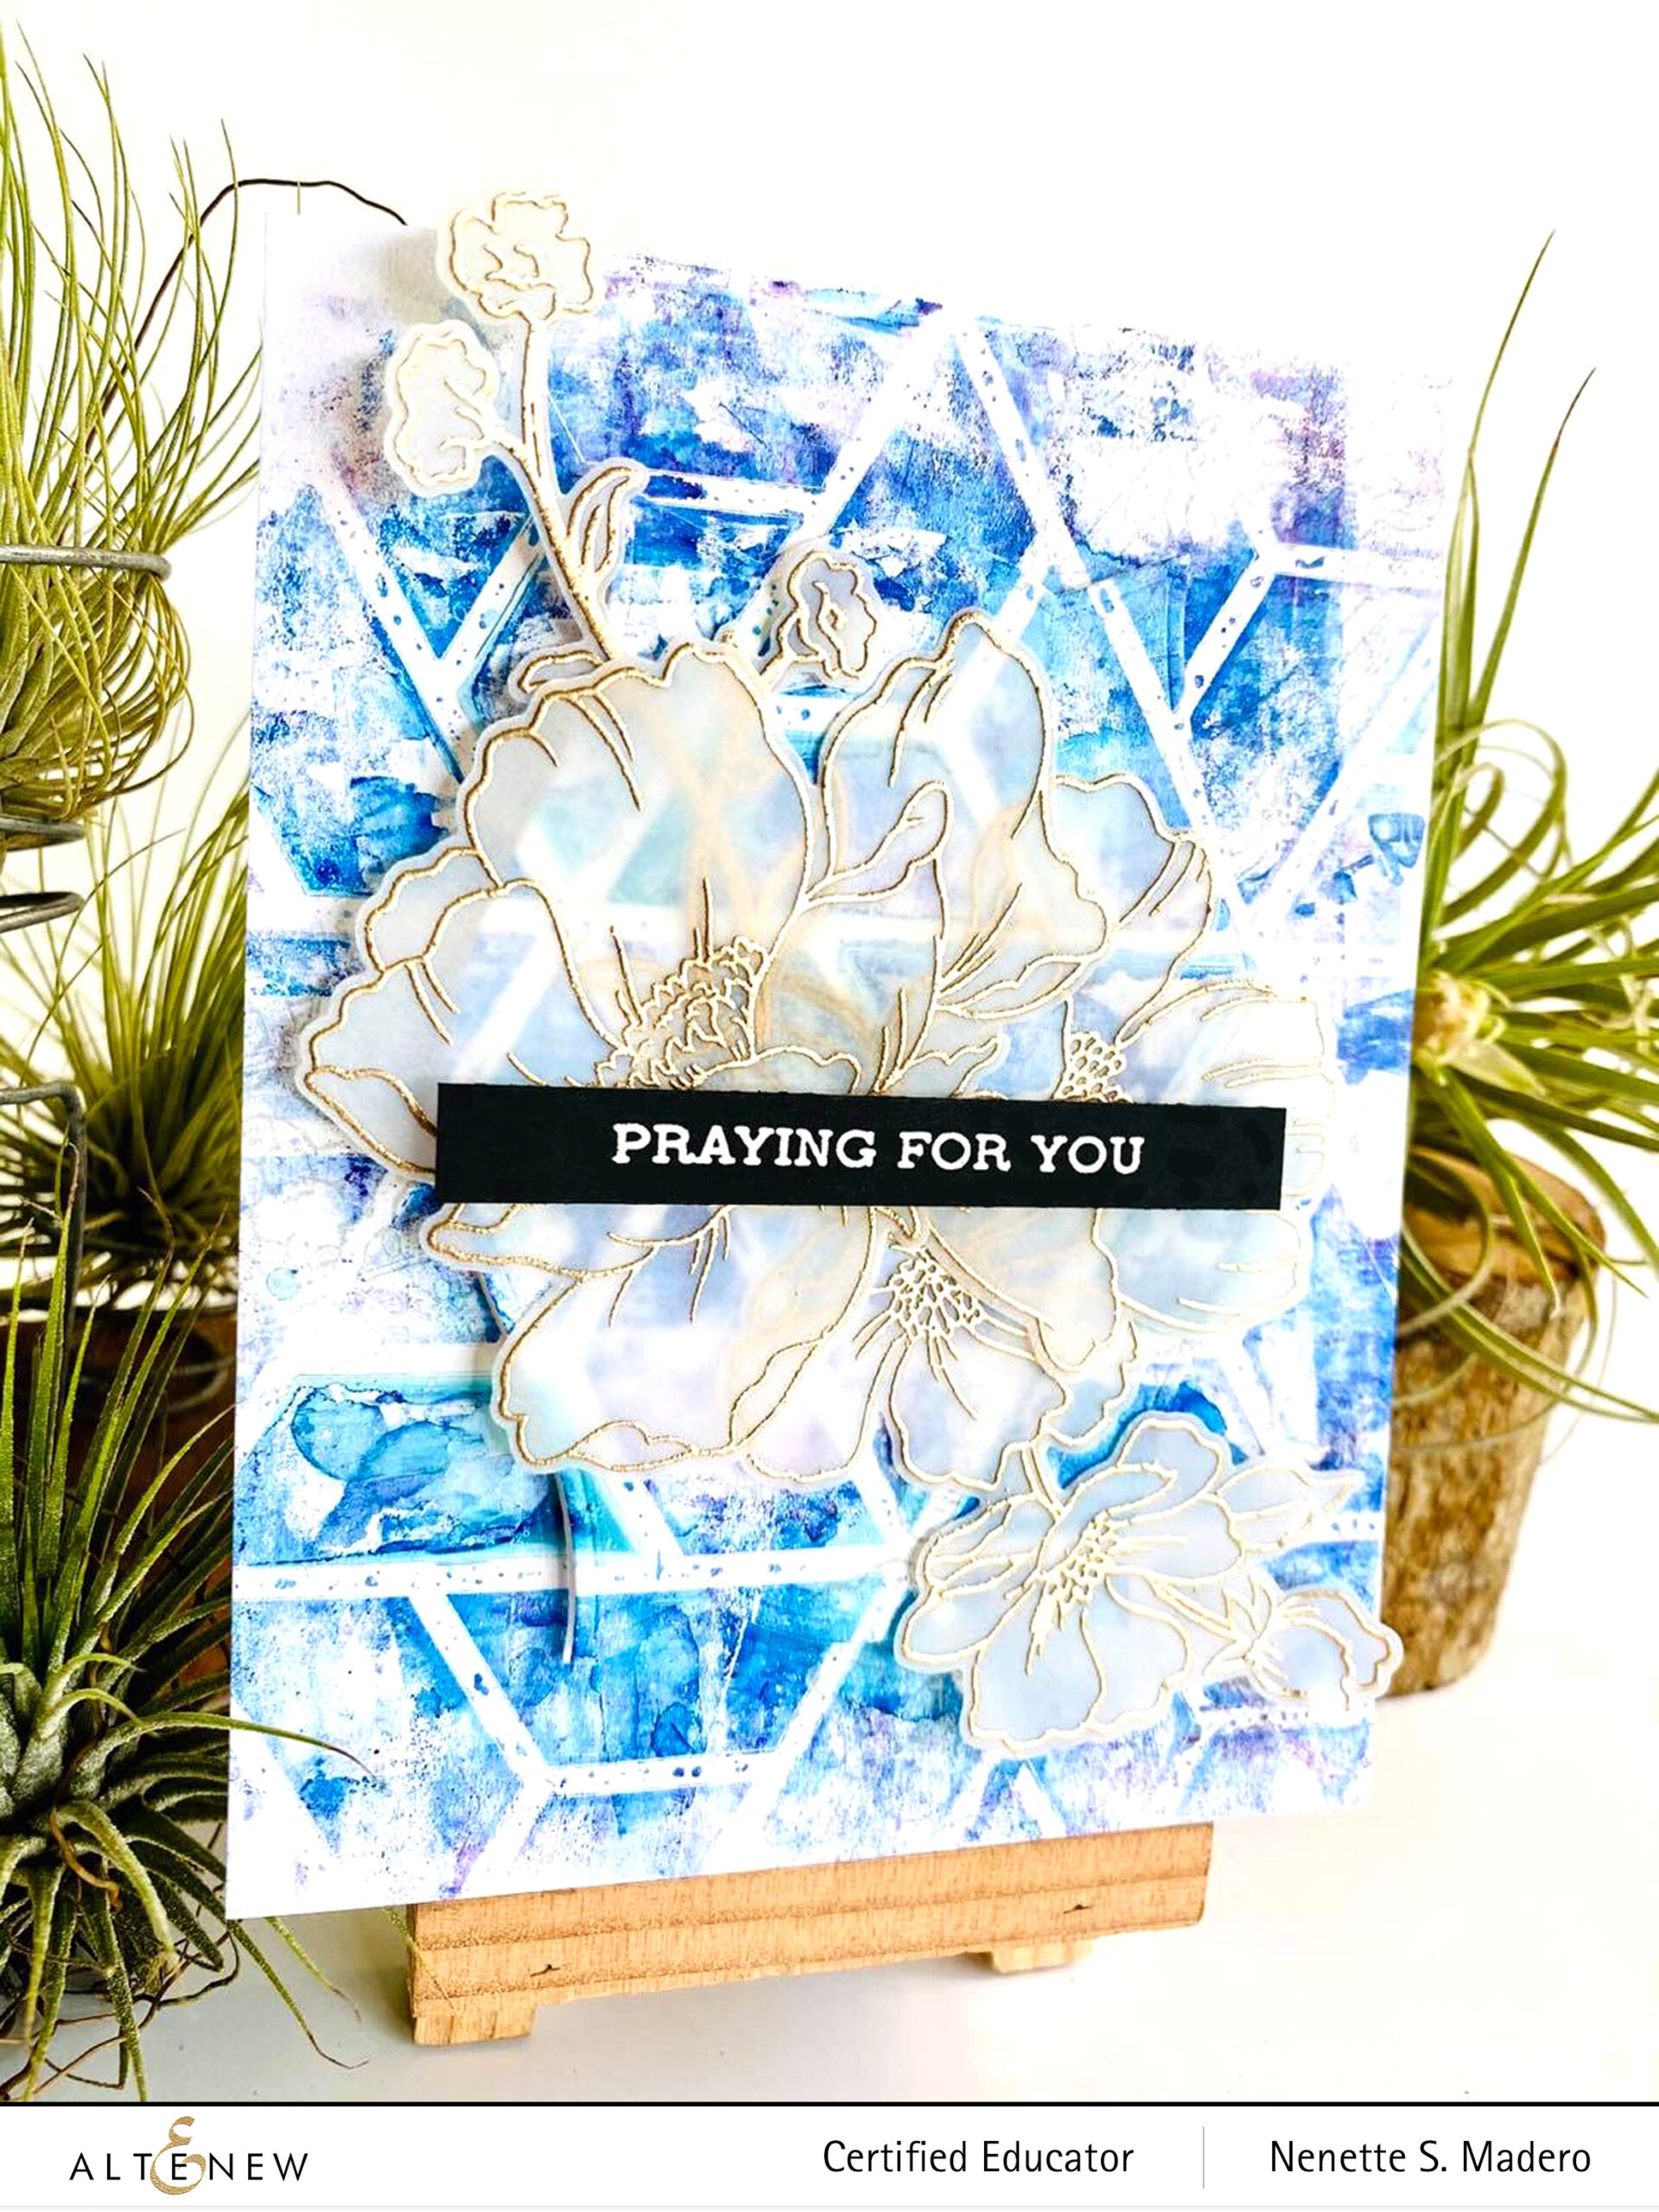
Here’s another card using the background I made. Same procedure as the cards above but this time using the Color Block Triangle Stencil for the geometric element. I die cut the center using the Nesting label die and popped it up with foam sheets so that the images from the Poppy Garden stamped on vellum will stand out more. I love the elegant look of the embossed gold on vellum. Just make sure to heat up your heat tool and heat the image from the back of the vellum to prevent warping.
HAPPY BIRTHDAY
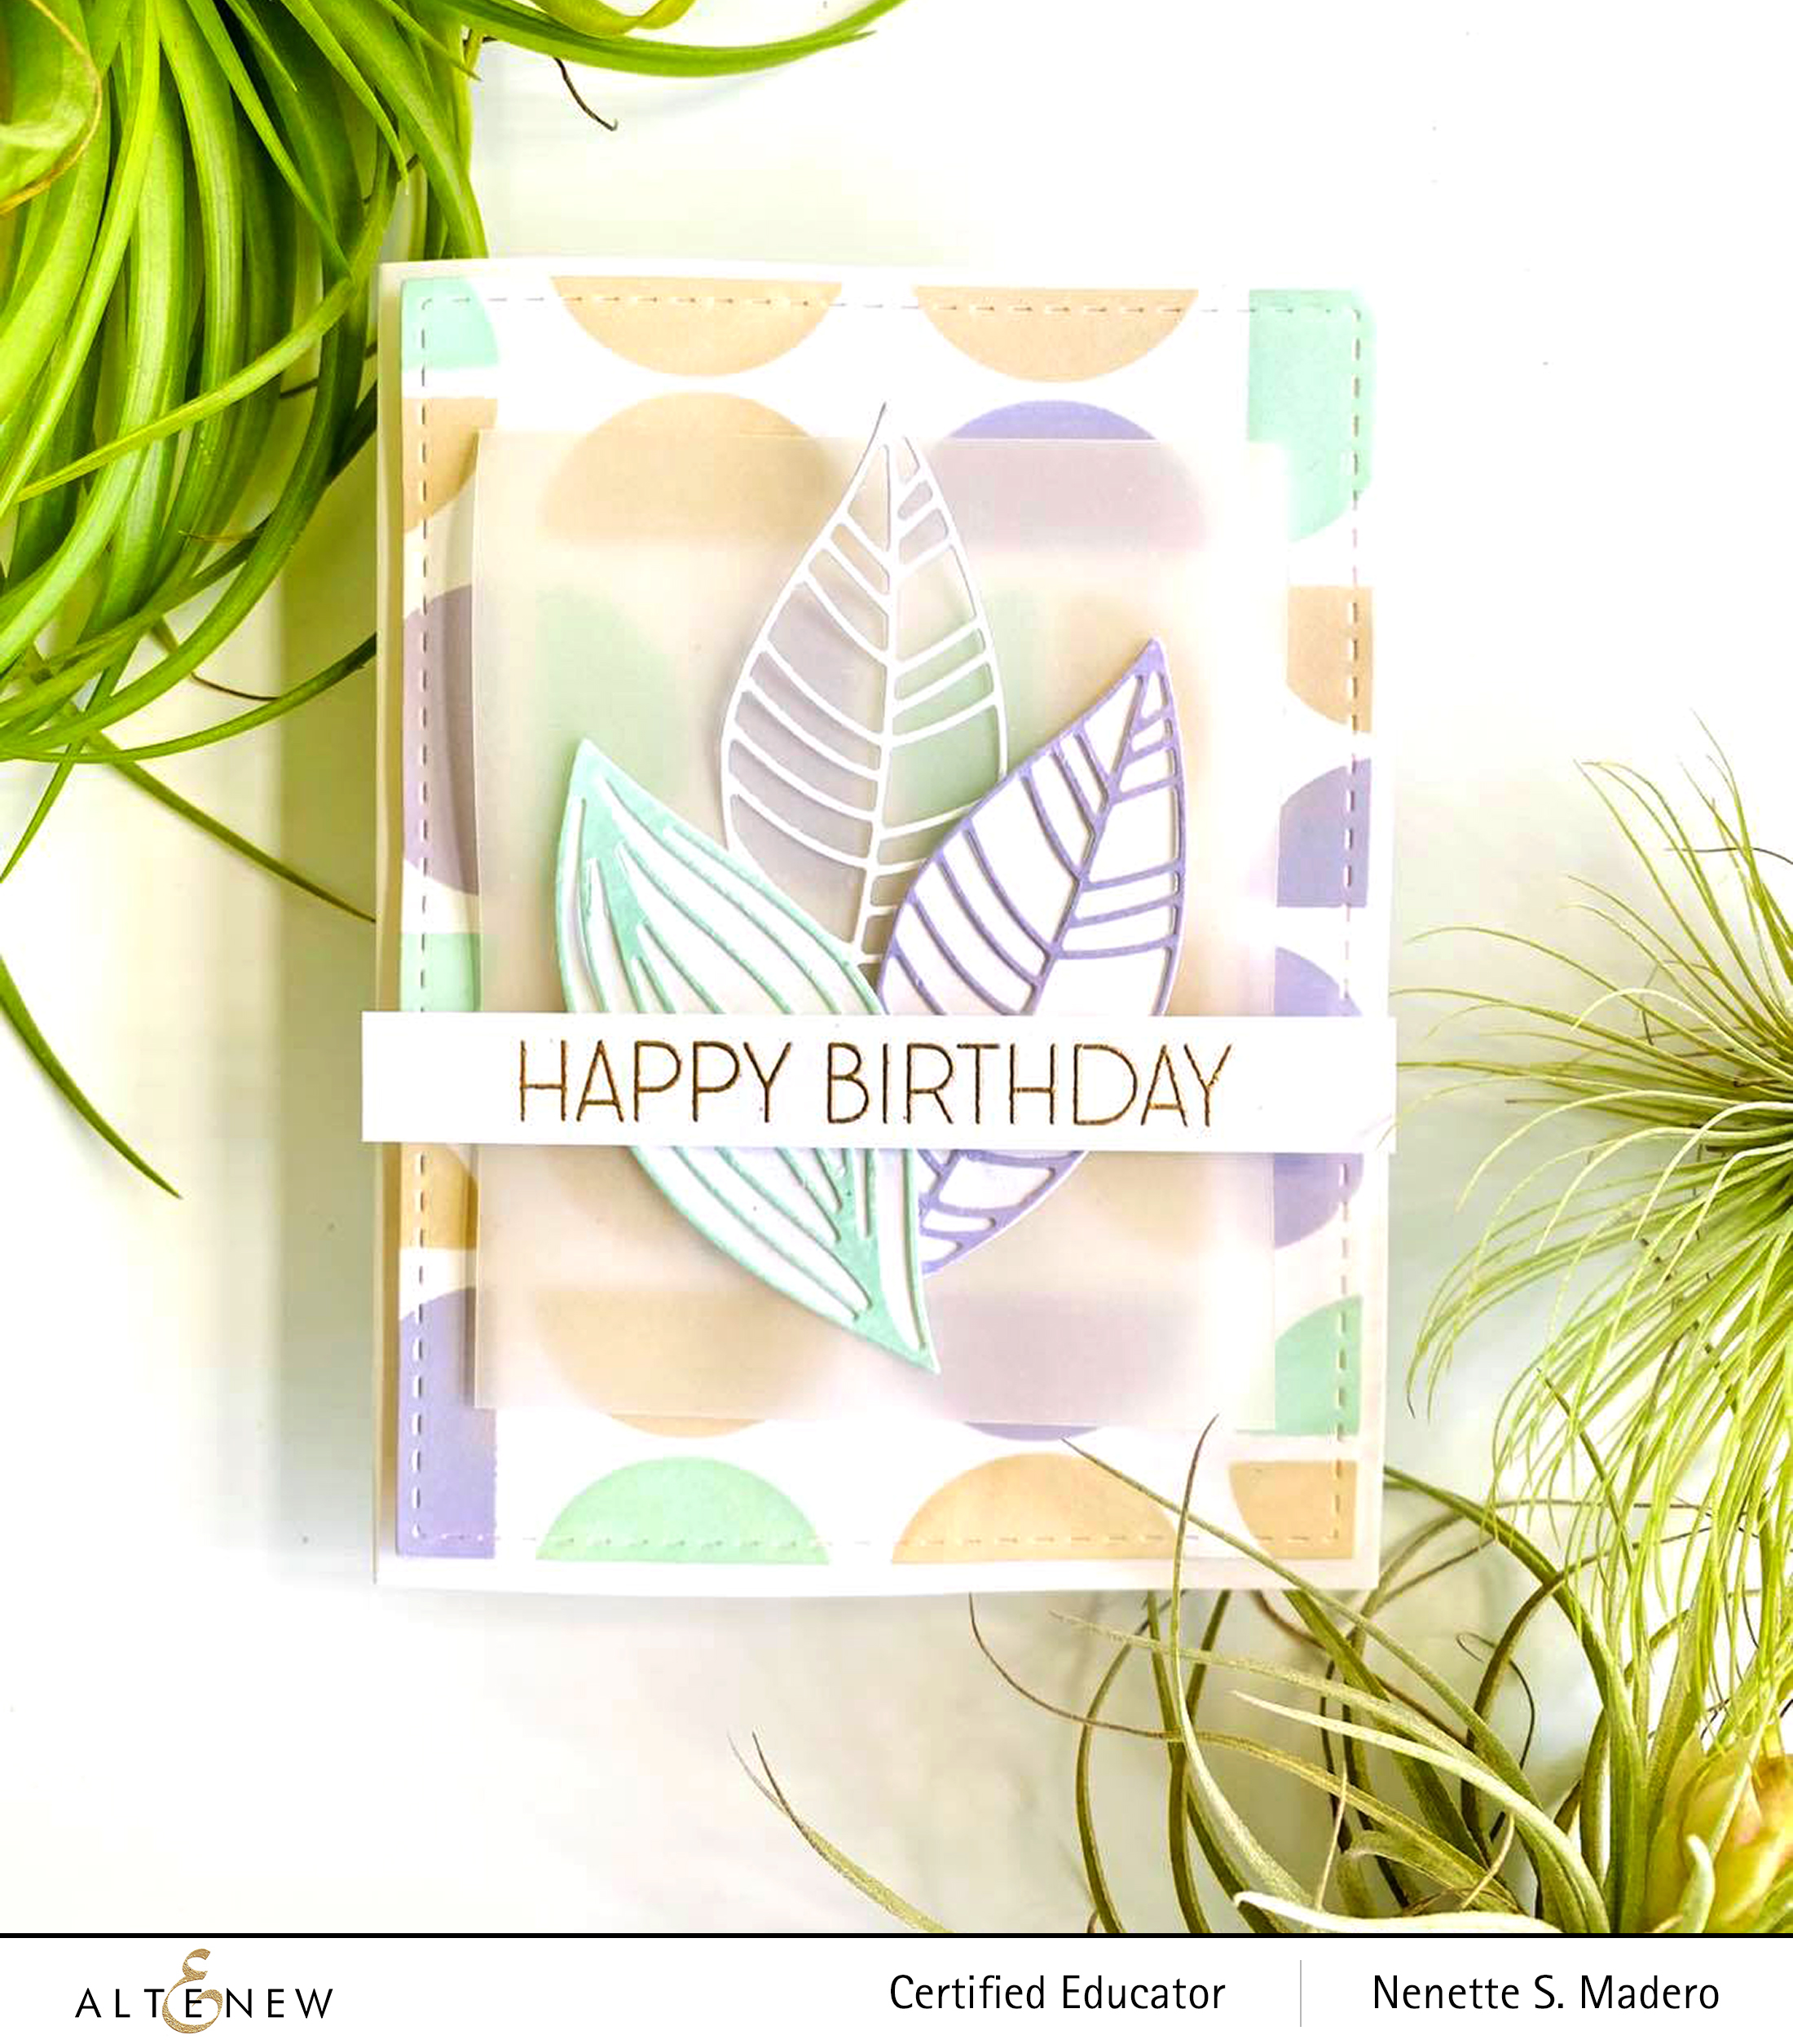
For this card, I wanted to use the Modern Circles Stencil as the geometric element. I chose 3 colors and used a distress tool to add color to the card front. The stencil was rotated and more colors added to fill up the spaces. For the leaves, I just swiped the mini ink cubes directly on the white cardstock then die cut the leaves. These were then arranged on top of vellum and layered to the card front using foam squares.
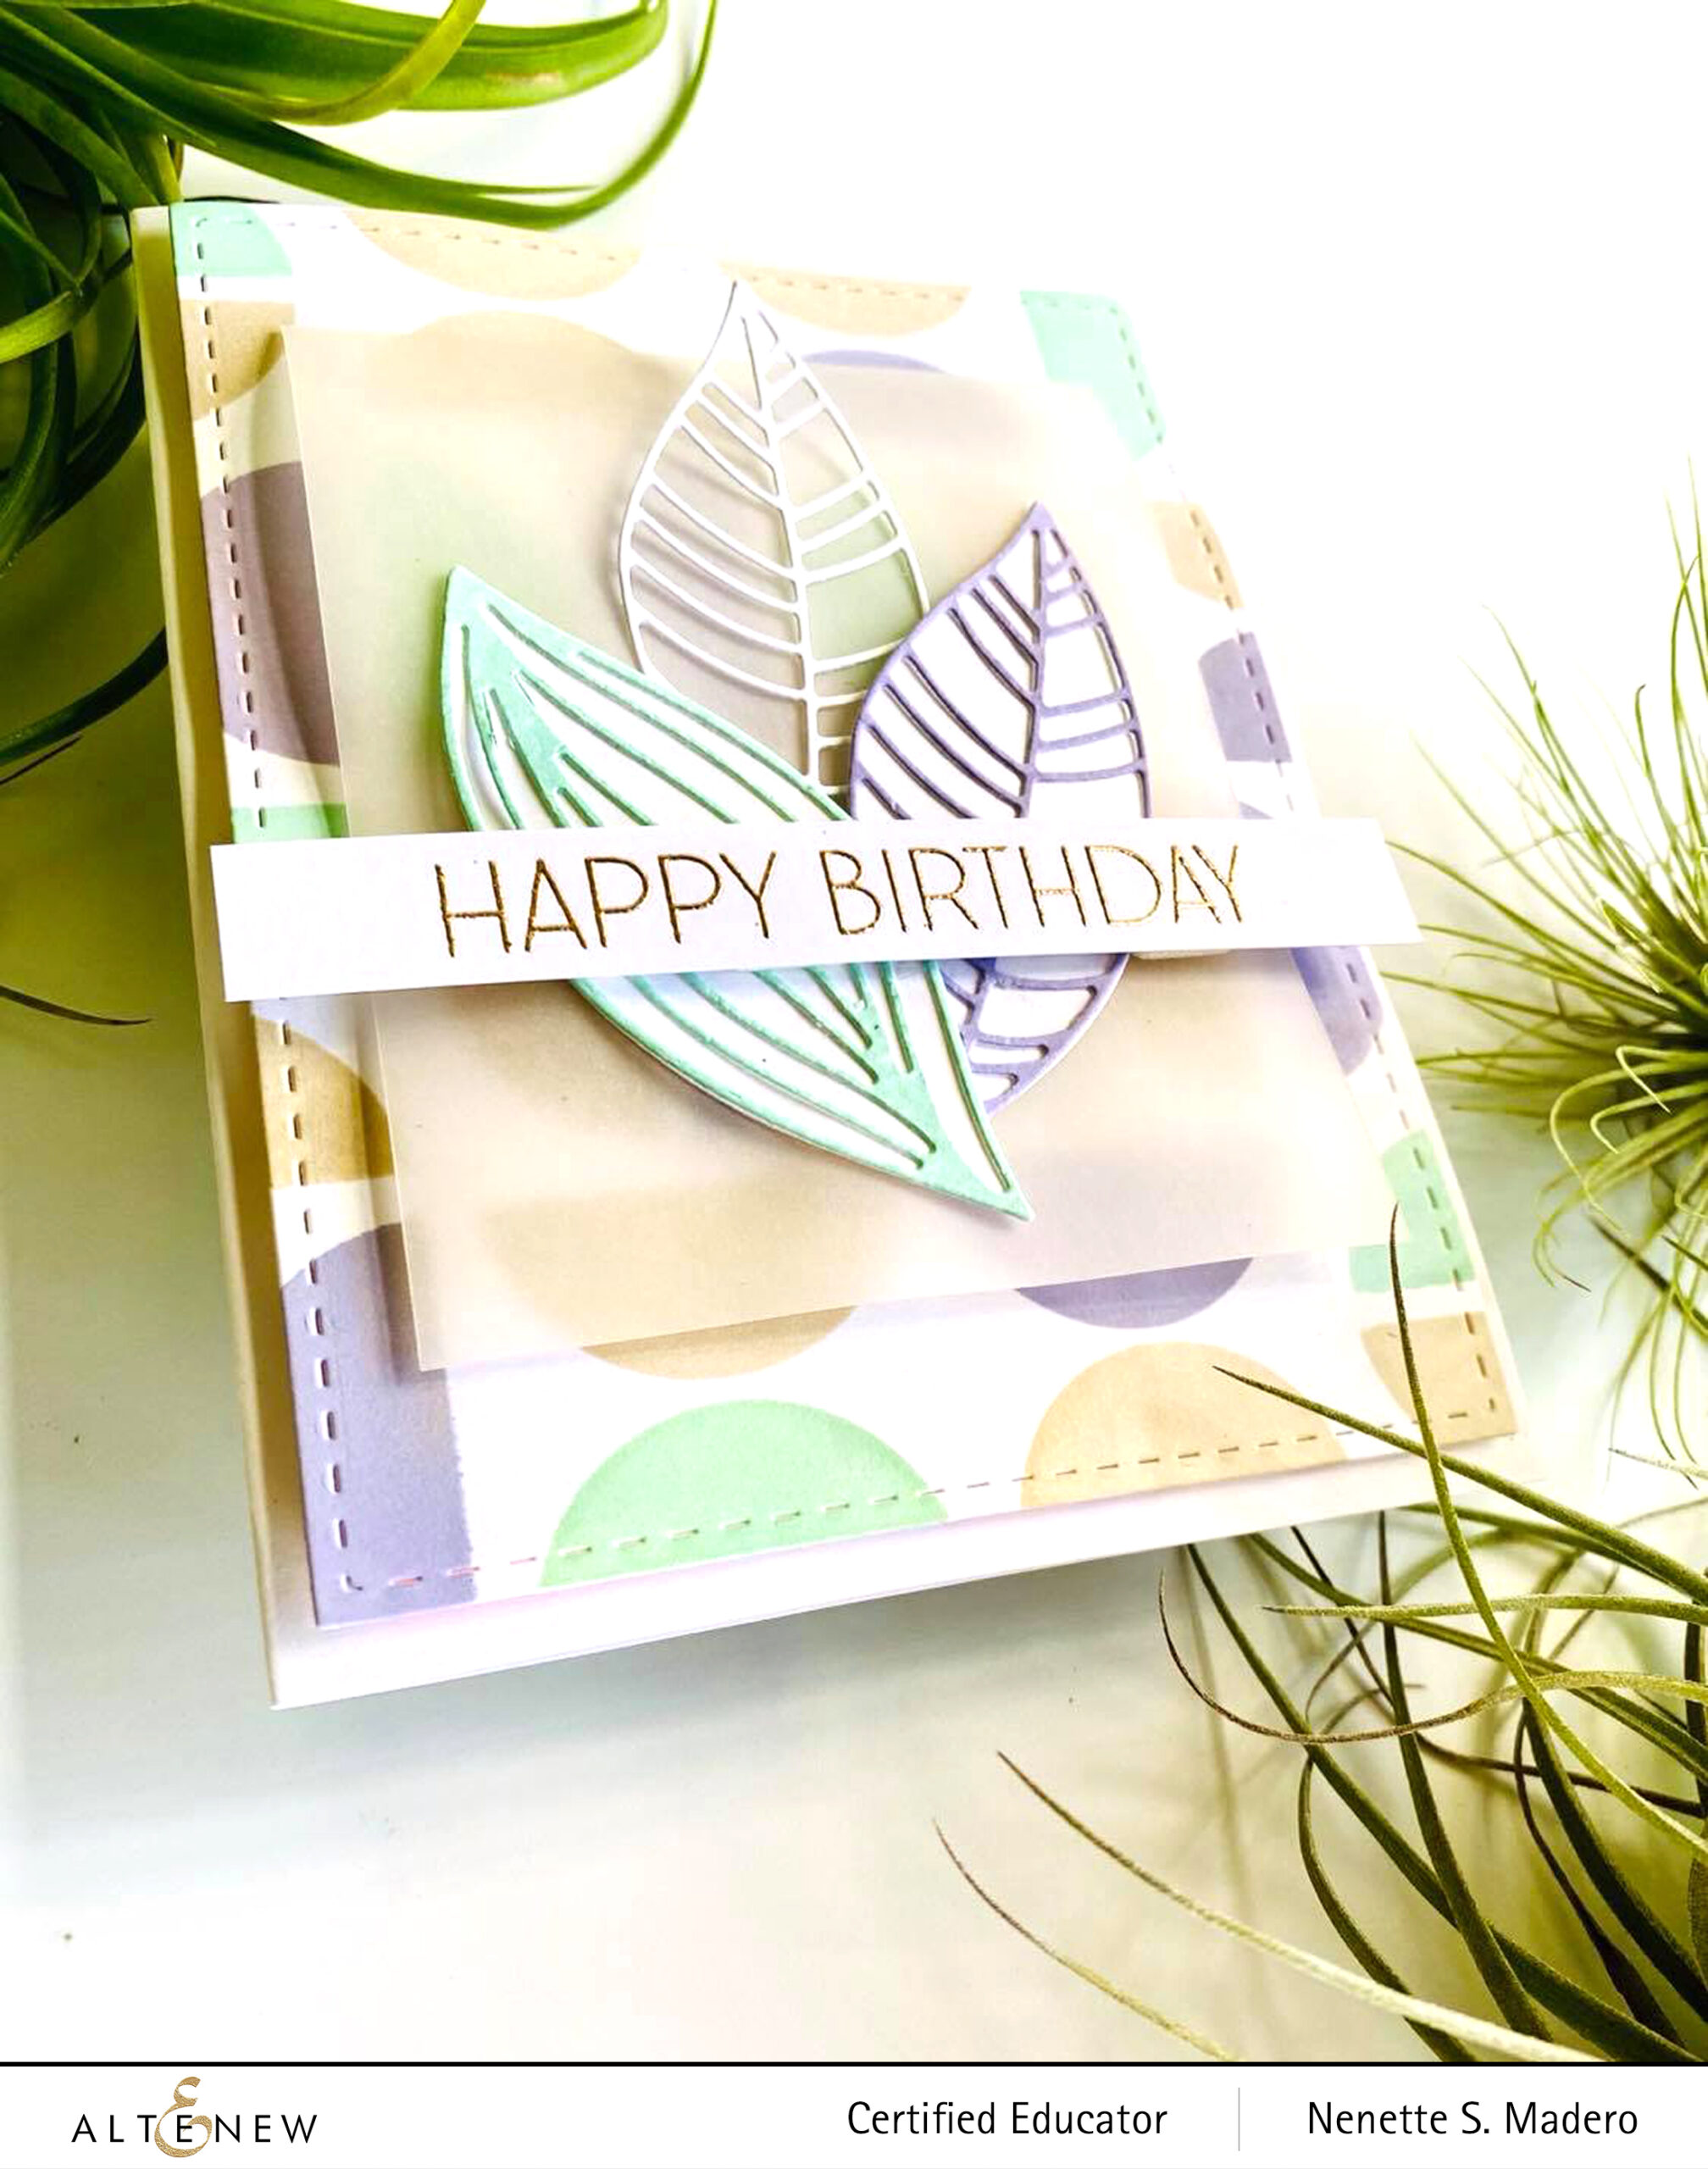
I made sure to use the same colors from the background to match the leaves. This is such a sweet birthday card and the vellum adds some softness to the card. The sentiment from the Ornamental Bliss stamp set was used for this card and embossed with Rose Gold embossing powder .
GRATEFUL FOR YOU EVERYDAY
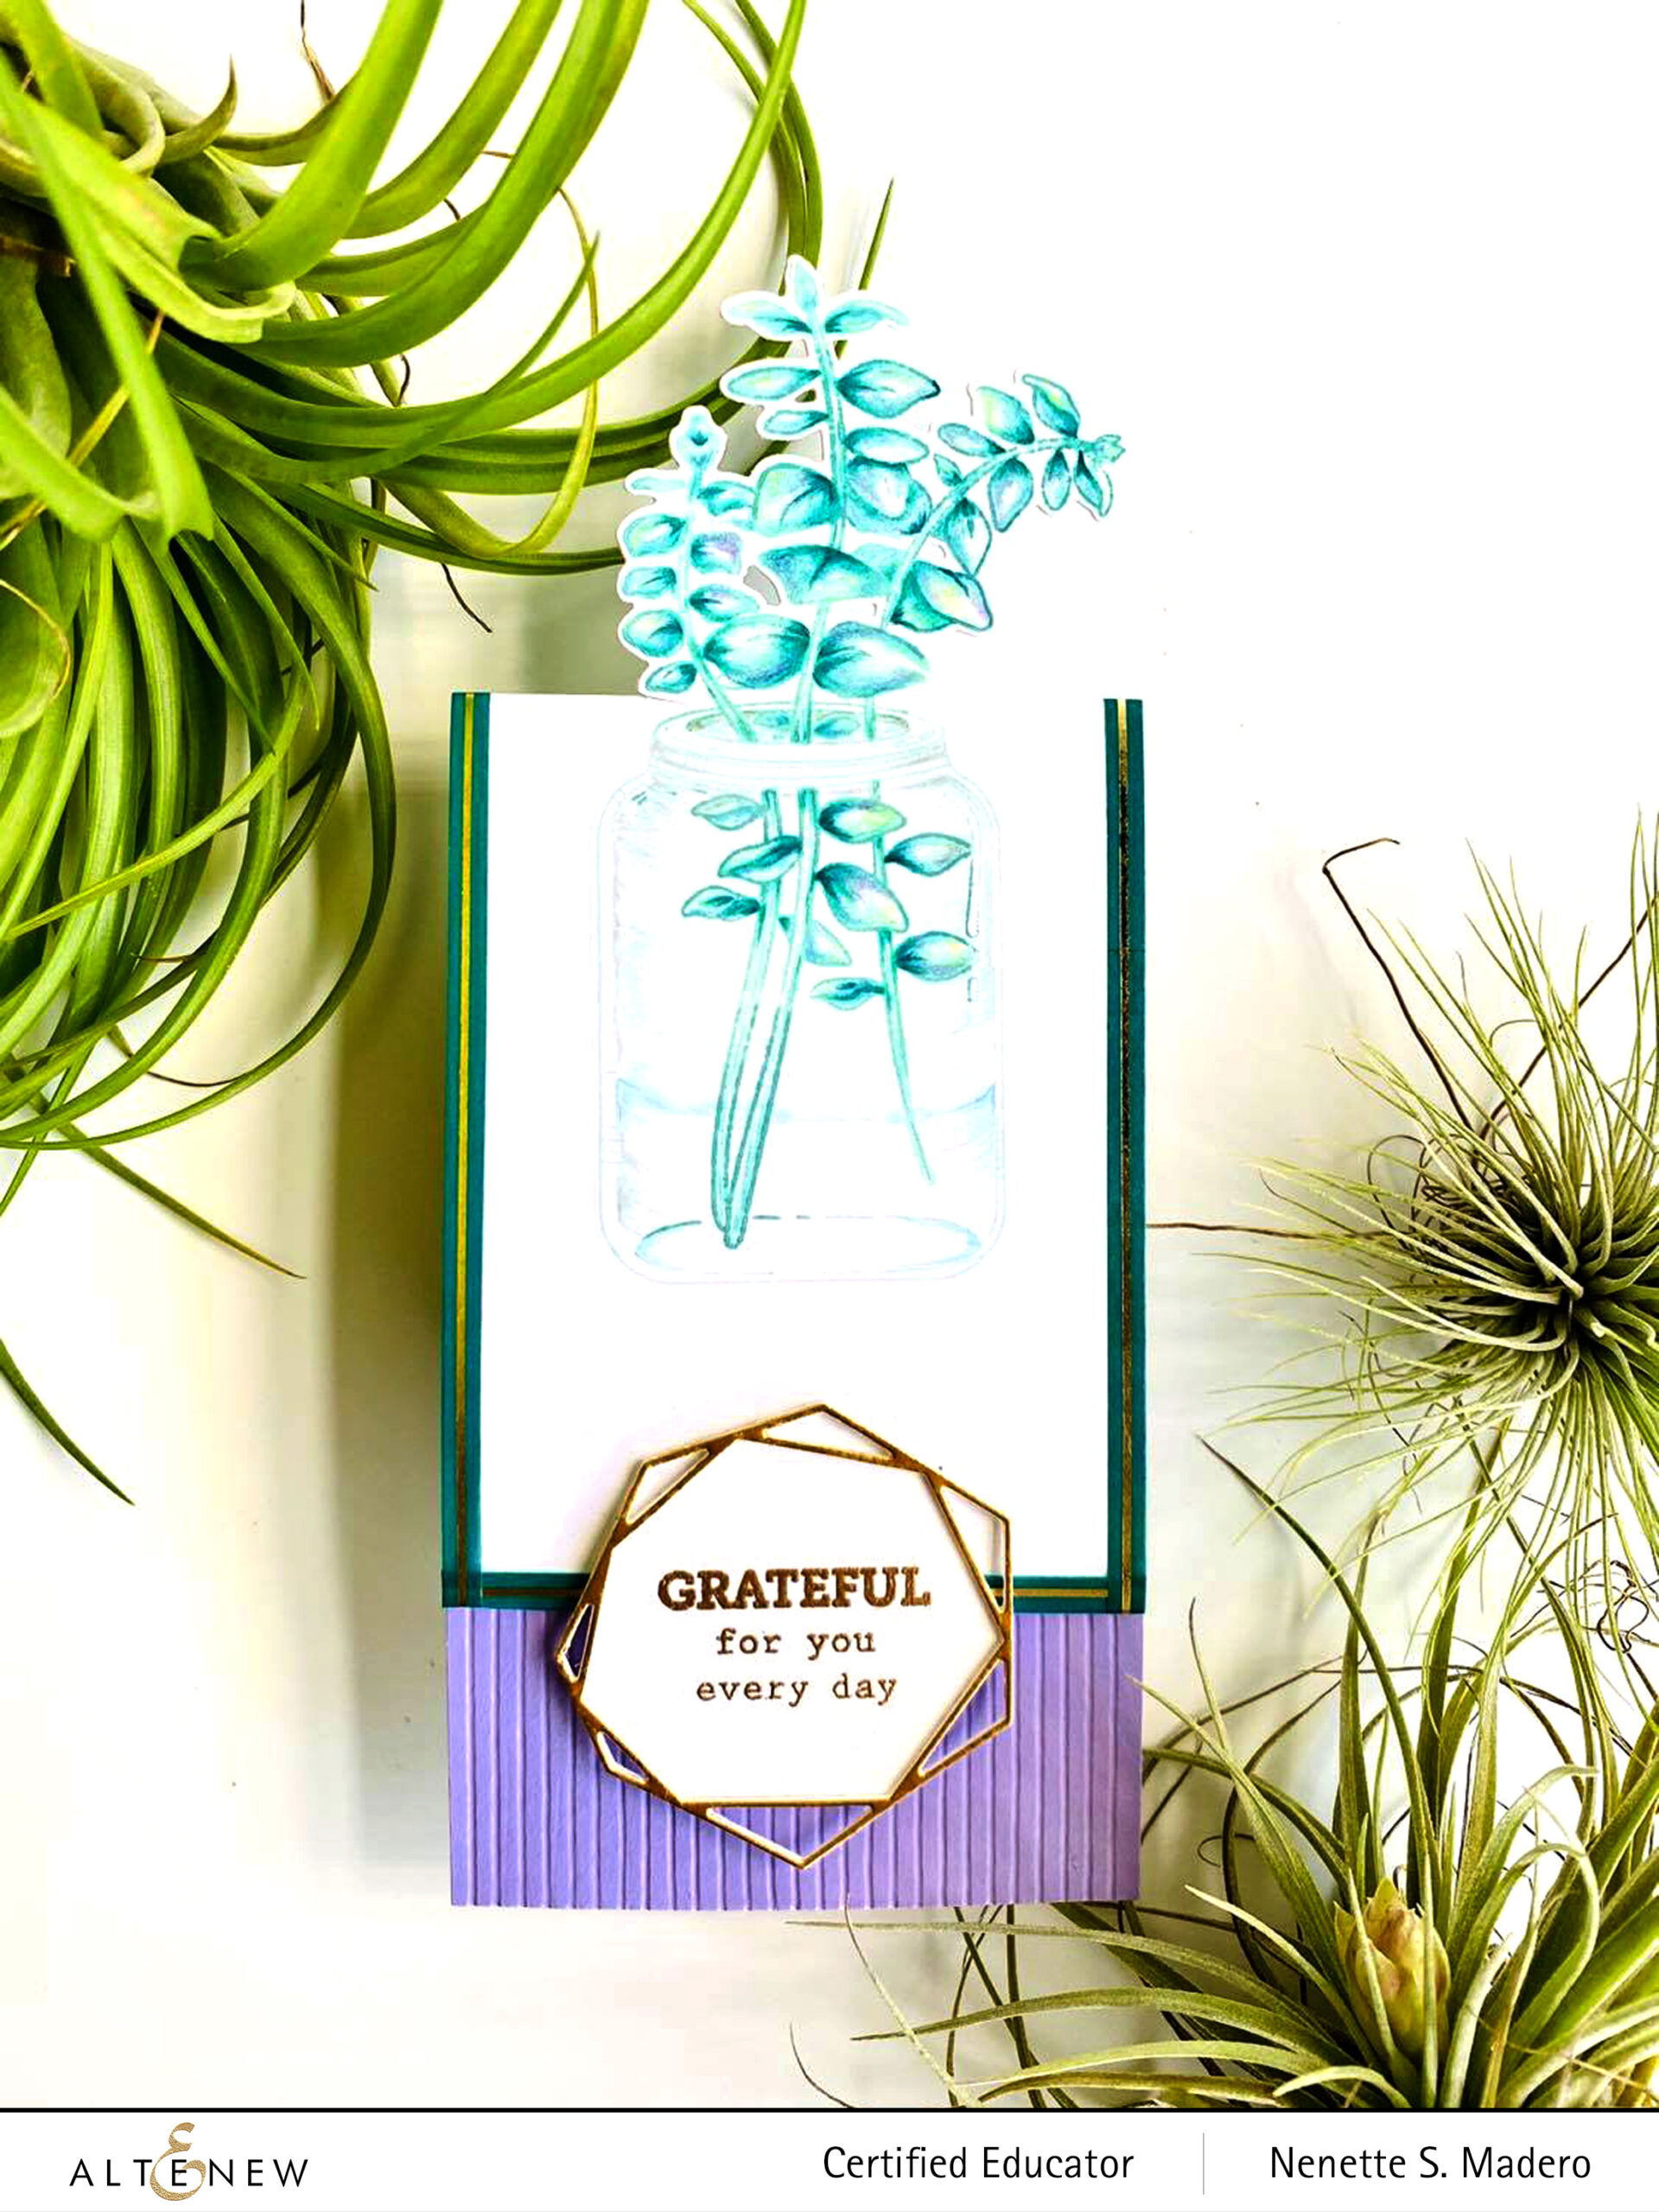
I love the Eucalyptus Jar Stamp set and wanted to use it differently so I created a slim card by doing partial die cutting. First, the image was stamped on Neenah solar white cardstock using the different shades of dye inks (blue greens for the eucalyptus and Sea Glass for the jar). Colored pencils were used to add color. There are many ways to use colored pencils. I prefer to use the medium color first, the lightest next, then lastly the darkest. Just make sure to use a light hand when coloring so that you do not burnish the paper. Once the paper is burnished, you won’t be able to add colors anymore.
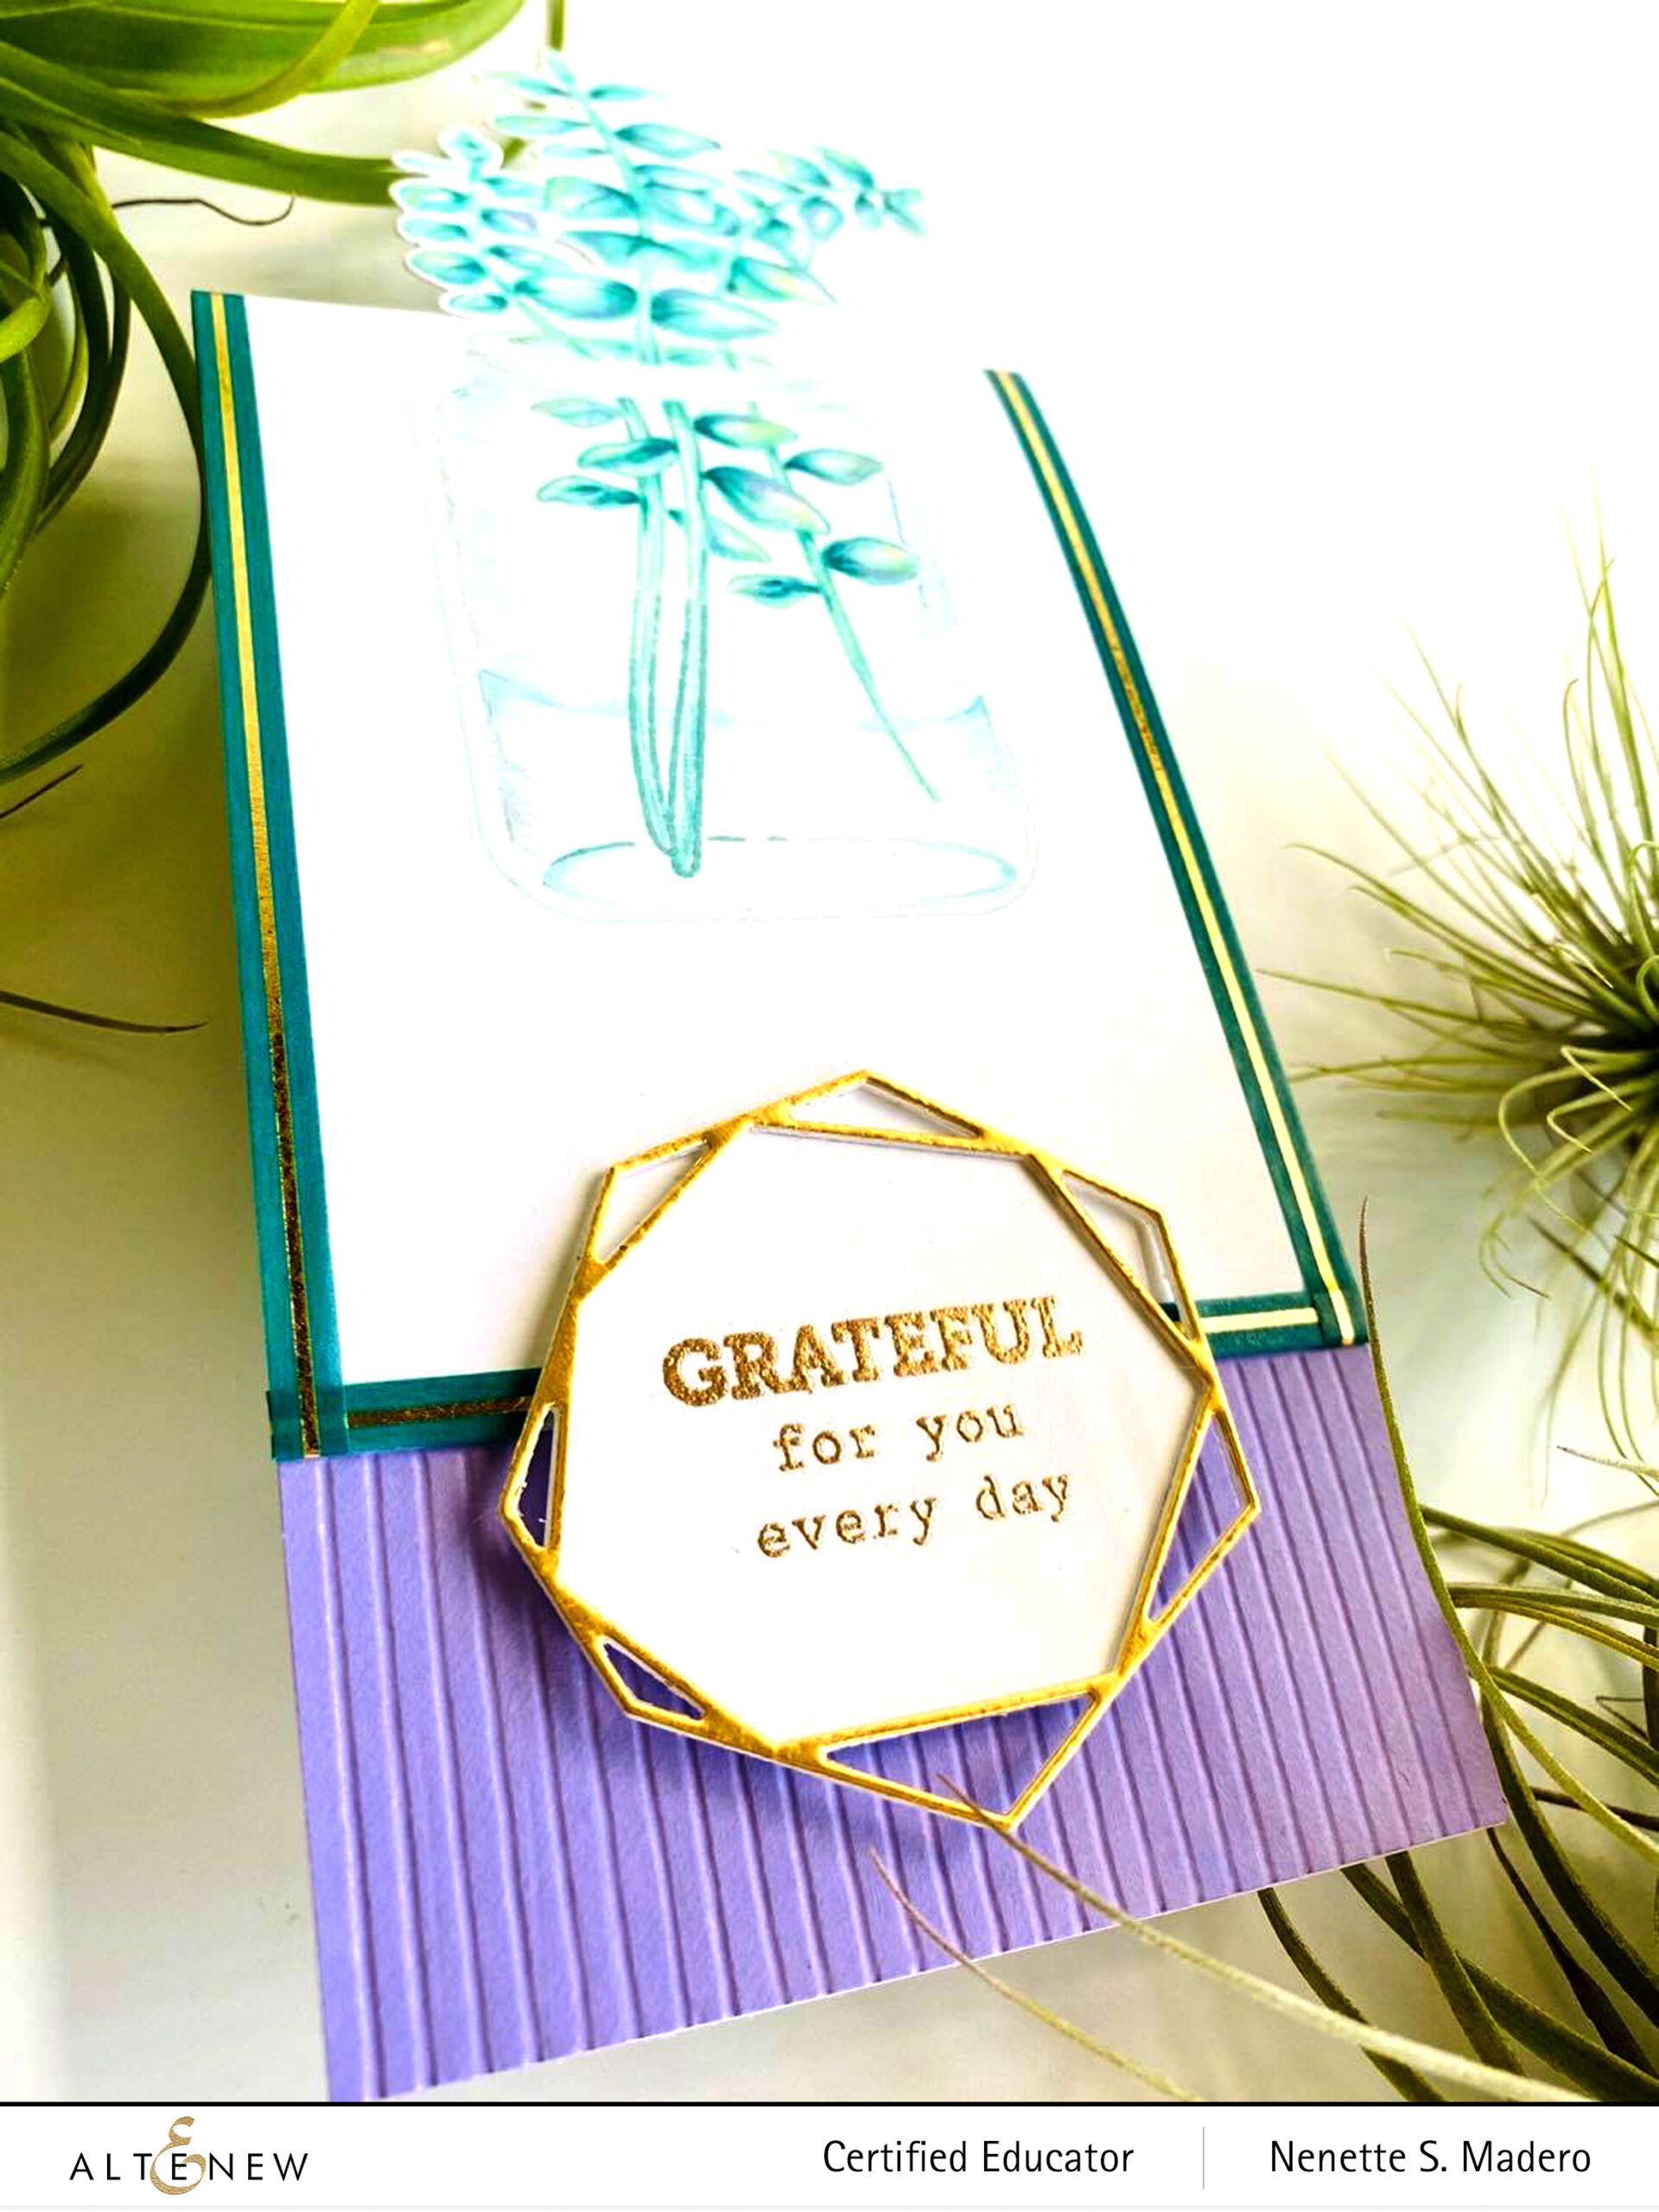
I then used the coordinating die to partially die cut the top part of the image. The cardstock was scored and folded. I added purple cardstock to the inside of the card to hide the back. Debossed stripes were added to the bottom of the card for texture using a bone folder and a scor board. I was happy with the outcome then I remembered that it needed a geometric element for the theme!!! 😱 Good thing I had the Crystal Frames die so I die cut one of the frames using matt gold cardstock and then embossed the sentiment with Rose gold embossing powder. I added the teal/gold washi tape on the edges to frame the image. Such a fun card to make!
THINKING OF YOU
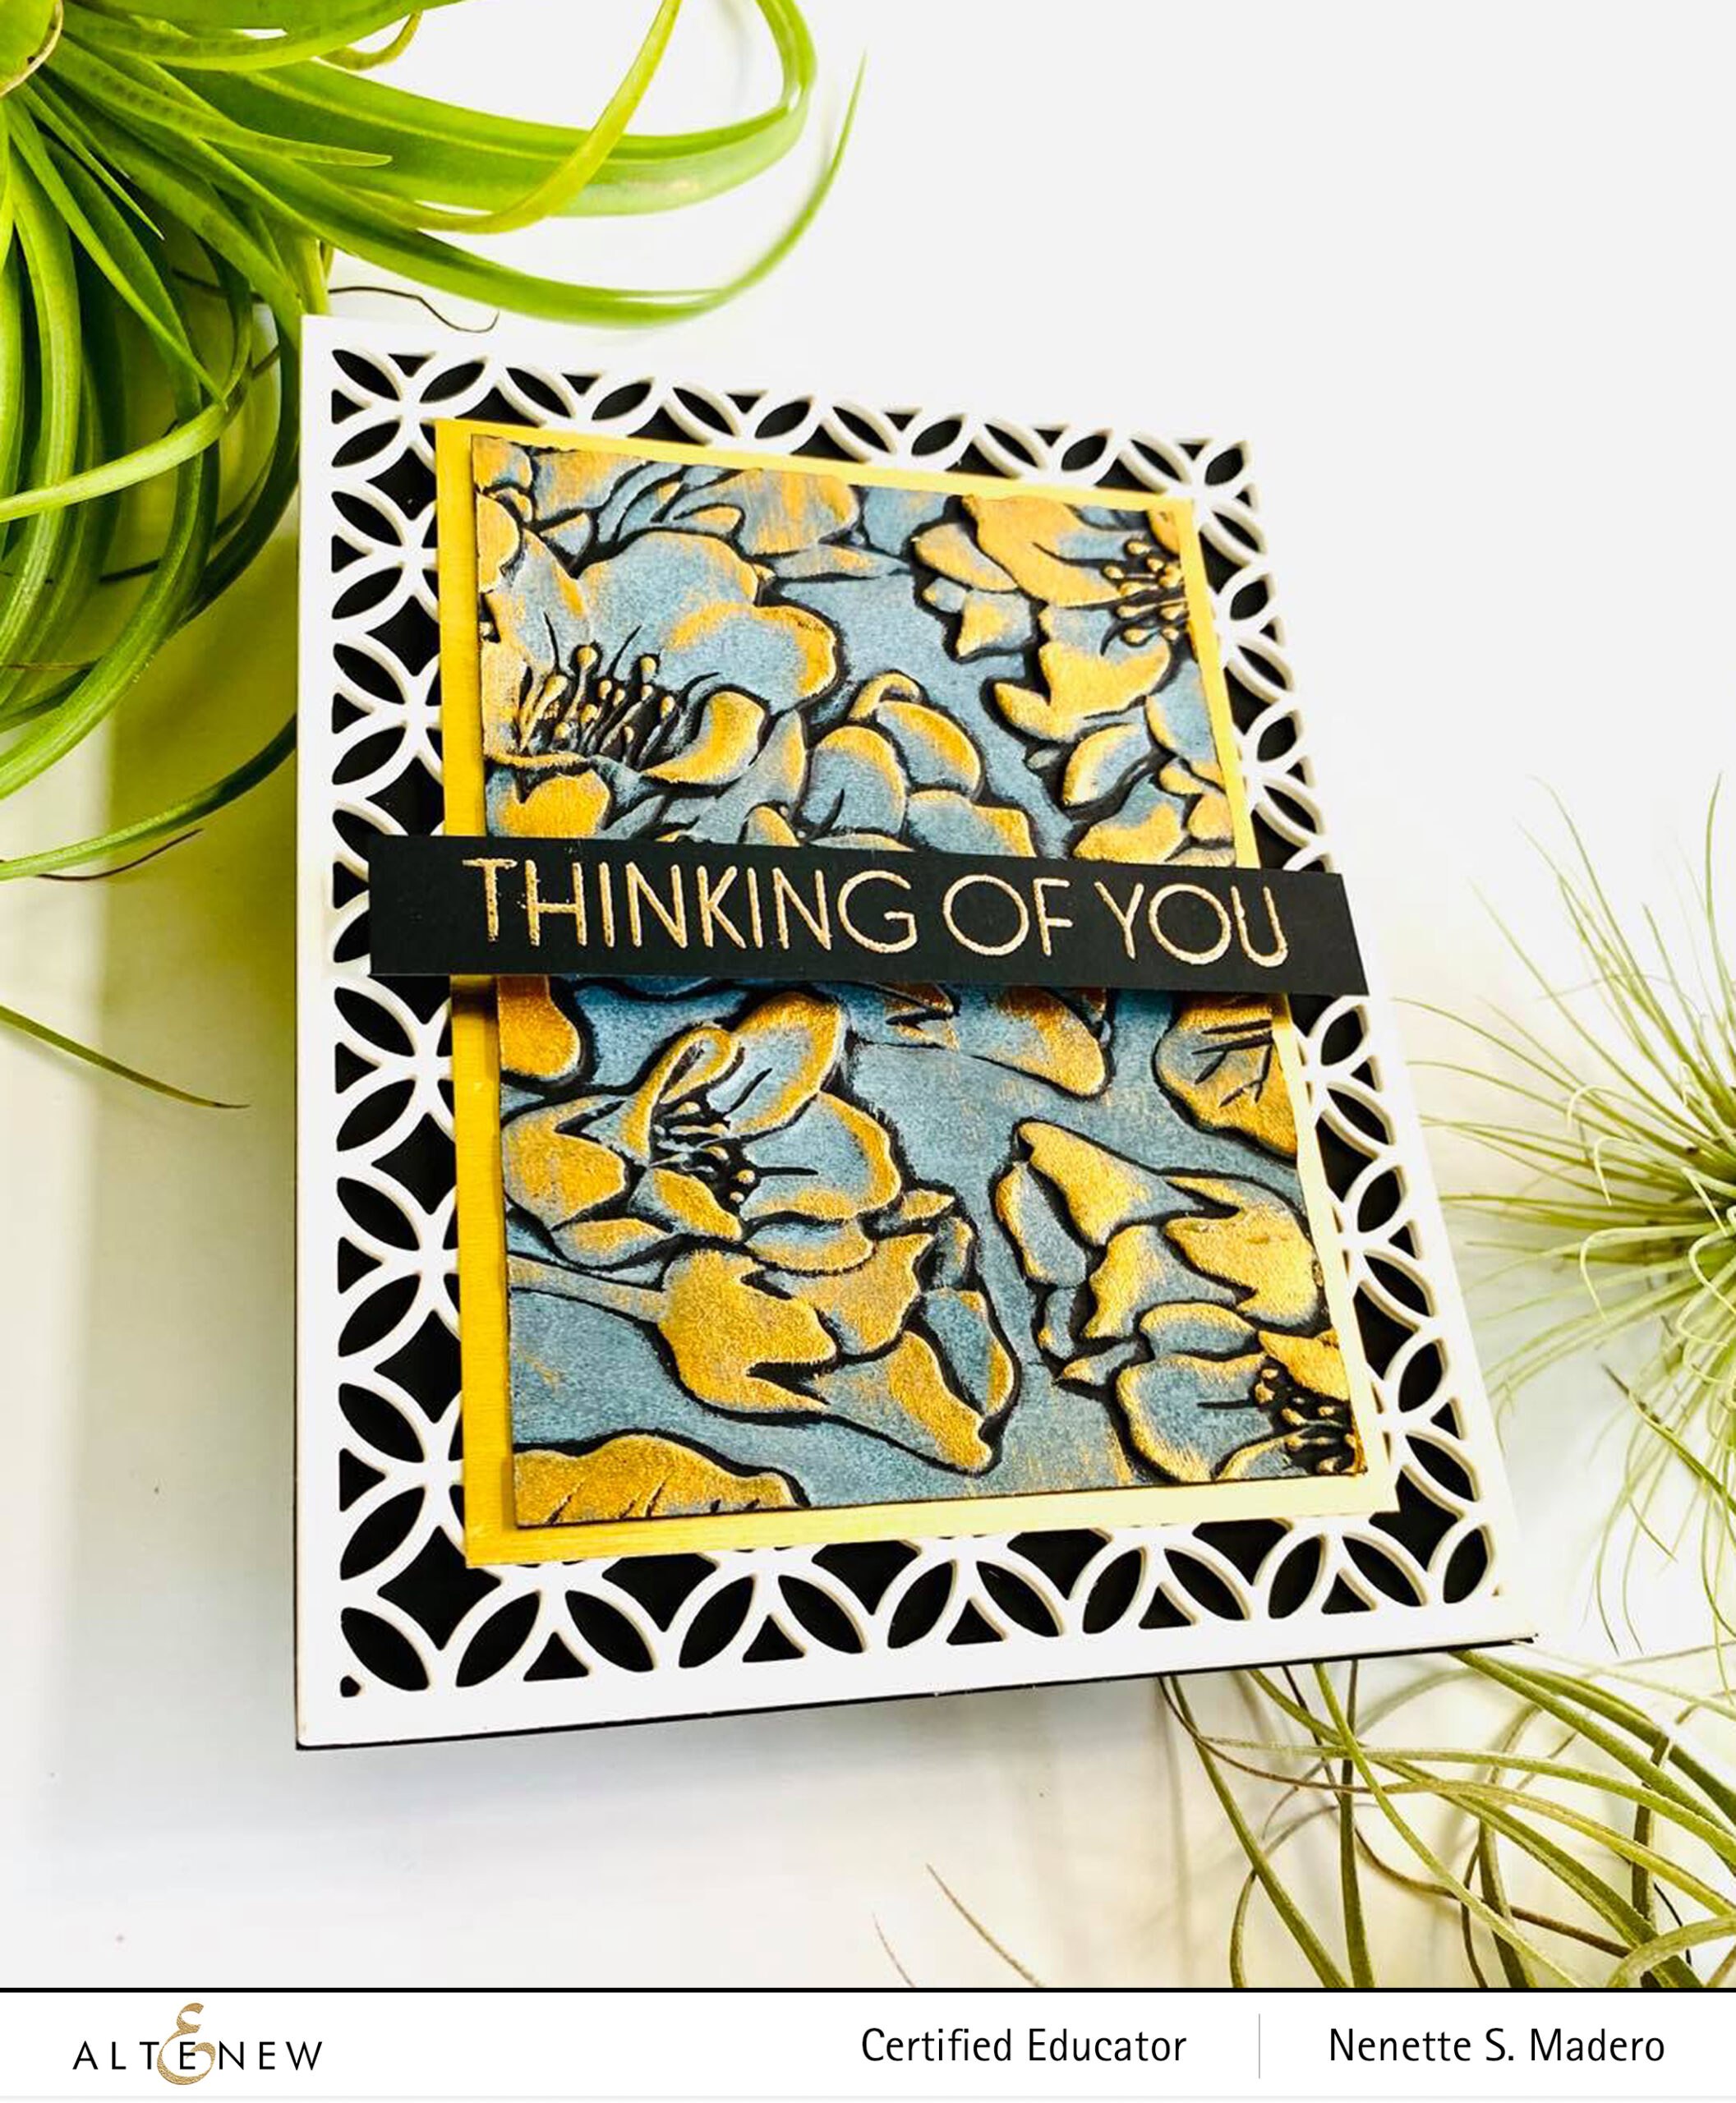
I seldom use black when I make cards but I’m loving the effect that the black cardstock gives when matched with an embossing folder and some inks. I was inspired by Bubblescrap and wanted to try her technique. First, I cut a piece of black cardstock then embossed it with the Beautiful Bergenia 3D embossing folder. I added color to the entire surface of the paper using a distress tool and my inky finger AFTER embossing. The creaminess of the oxide inks makes it easy to apply. When this was dry, I added some gold touches on the embossed parts of the flowers and leaves with a gold gliding polish. Gold cardstock was added to mat the embossed piece.

For my geometric element, the Circle Quilt cover die was used that added a nice contrast to the black cardstock. I stacked 4 pieces on top of each other for more dimension. The sentiment was stamped on black using Versamark ink then embossed with Rose gold embossing powder.
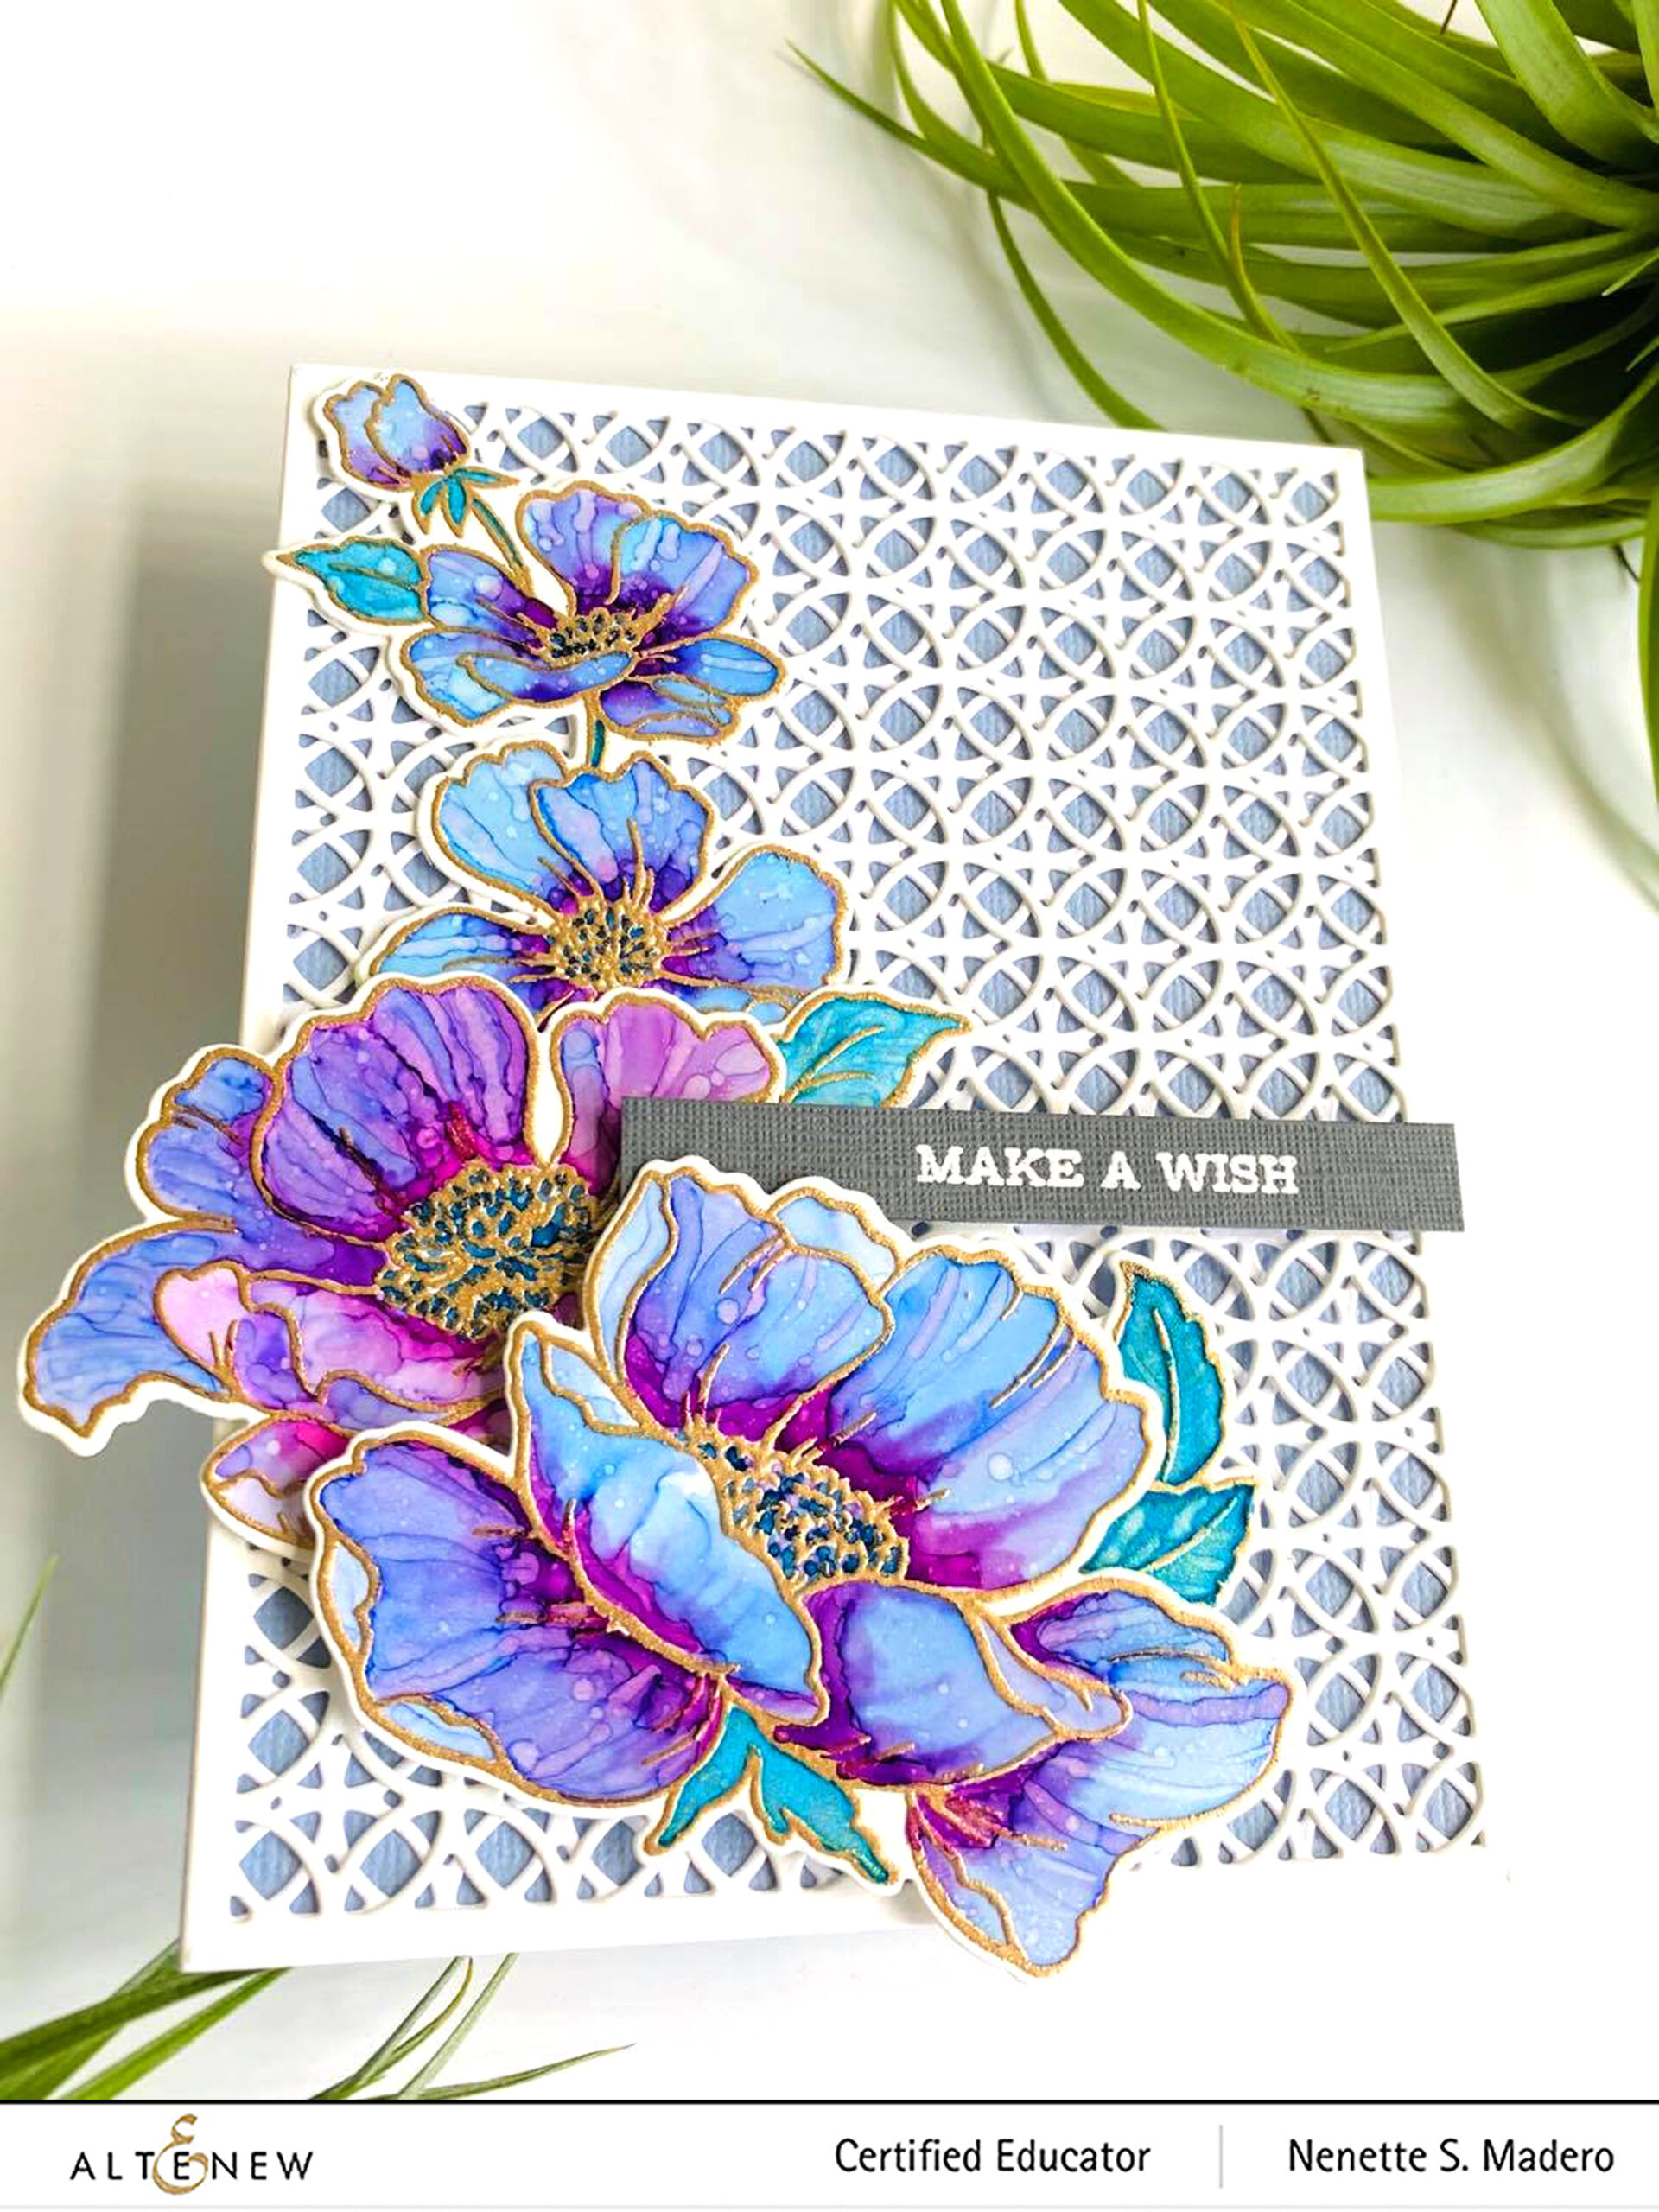
MAKE A WISH/YOU ARE LOVED
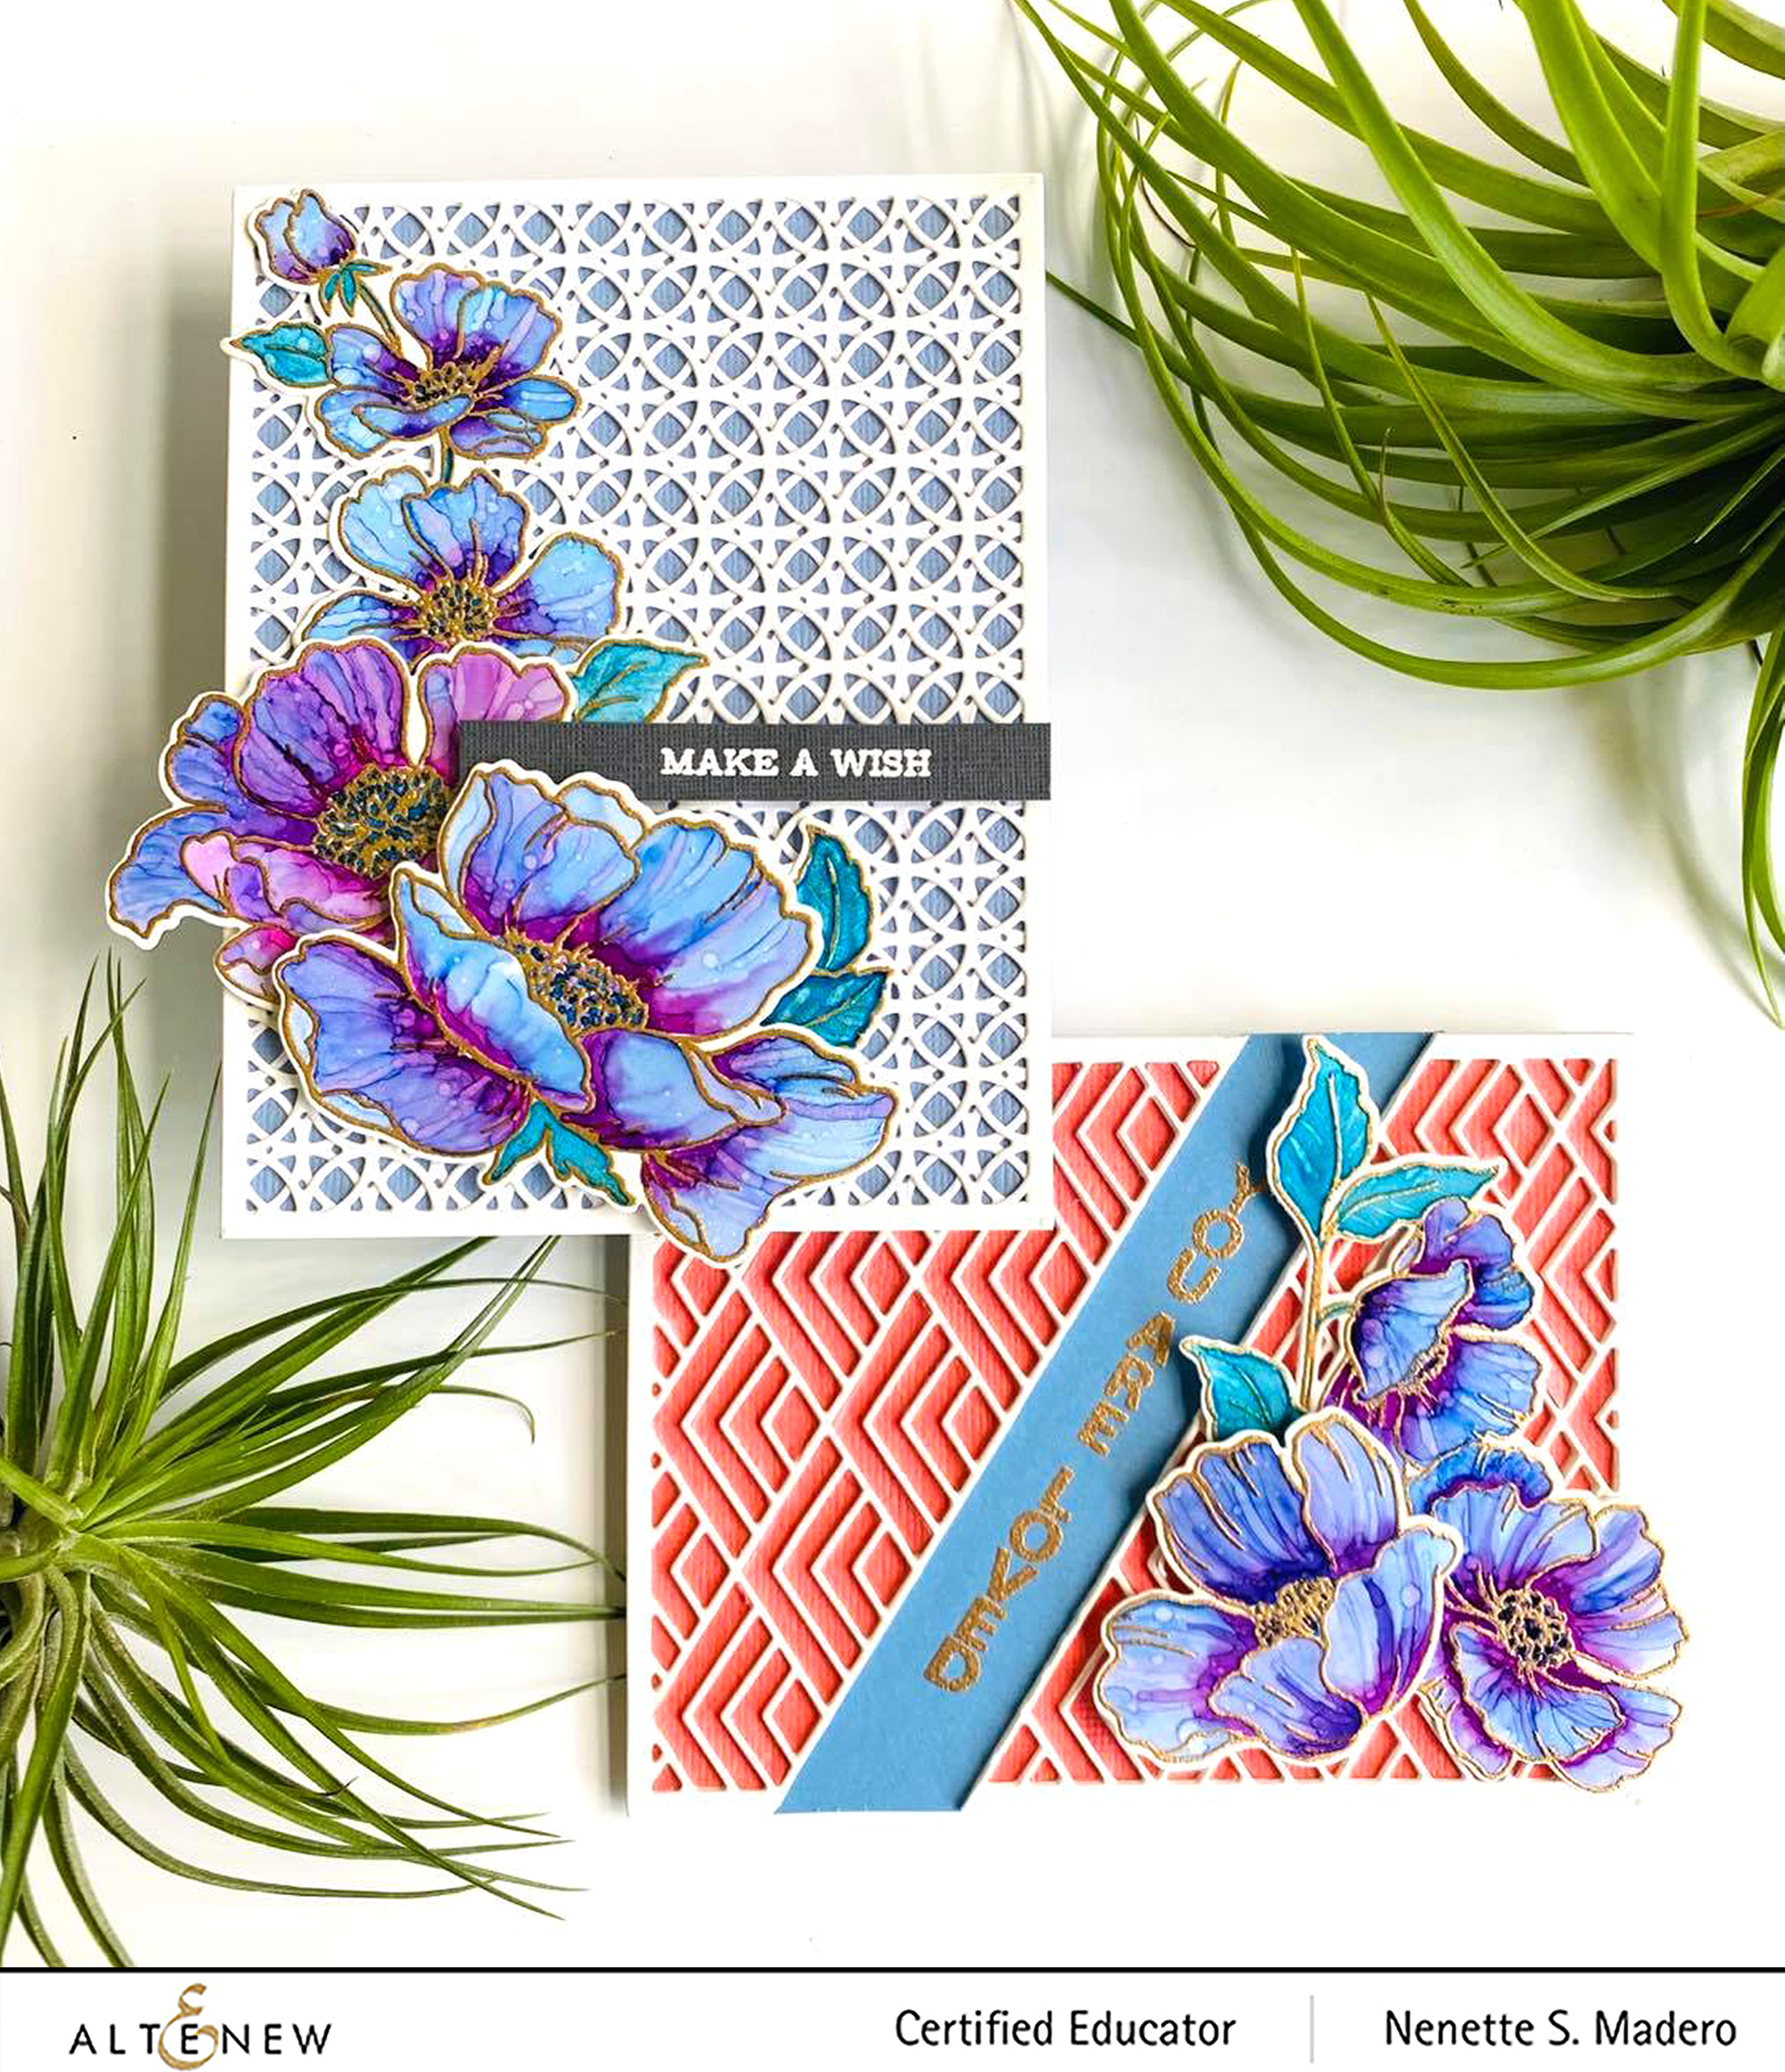
“DON’T BE AFRAID TO FAIL. BE AFRAID NOT TO TRY.”
MICHAEL JORDAN
Lately, I have been trying out alcohol inks. I had them for many years but never really used them for fear of the unknown. 🙂 Their reaction to alcohol or blending solution is so unpredictable but I thought they’d look pretty on Altenew florals. I took some classes with @anujaaggarwal— a talented alcohol ink artist because I wanted to learn how these inks behave using different techniques. There’s still so much to learn but you’ll never know if you don’t try. Here are some of the cards I made using alcohol inks.
If you do plan to try this out, here are some tips you should follow:
- work in a room that is well ventilated. If you have a respirator mask, the better so that it will prevent you from inhaling the fumes.
- wear gloves to protect your hands from the inks and alcohol
- alcohol and the inks are highly flammable so do not work near an open flame especially if you will be spraying alcohol
- cover your work area with an absorbent mat ( I got a pack of disposable training pads for this purpose)
- wipe your canvas/substrate/paper clean with alcohol before starting to remove dust/dirt/ink
- seal your artwork with Kryon Kamar varnish then UV (make sure your painting is thoroughly dry before applying the varnish) 2-3 coats but dry between coats. Nozzle should be around 12-14 inches away from the substrate. Allow it to dry. This will prevent the painted flowers from scratches.
For this technique to work, you will need a floral image that does not have too many details. The POPPY GARDEN STAMP AND DIE SET was perfect for this technique. First, I heat embossed the images on Yupo paper. Do take note that since Yupo paper is made of polypropylene, a thermoplastic resin, it will warp if it is heated for too long. I made sure to keep my heat tool moving to minimize the warpage. The darkest color was added to the centers of the flowers. This was allowed to dry. Then with a brush loaded with alcohol mixed with blue/purple alcohol inks, I colored the rest of the petals slightly touching the dark ink to achieve some blending. Take note that the alcohol ink behaves differently from watercolor cause alcohol will tend to push the pigments away. The alcohol ink/alcohol ratio is also very important. The great thing about this is if you are not happy with the outcome, you can “erase” the area with alcohol. Just note that Yupo paper tends to stain, unlike Nara paper. Patience is needed when working with alcohol inks. I love the texture it gives and how unpredictable the outcome is.
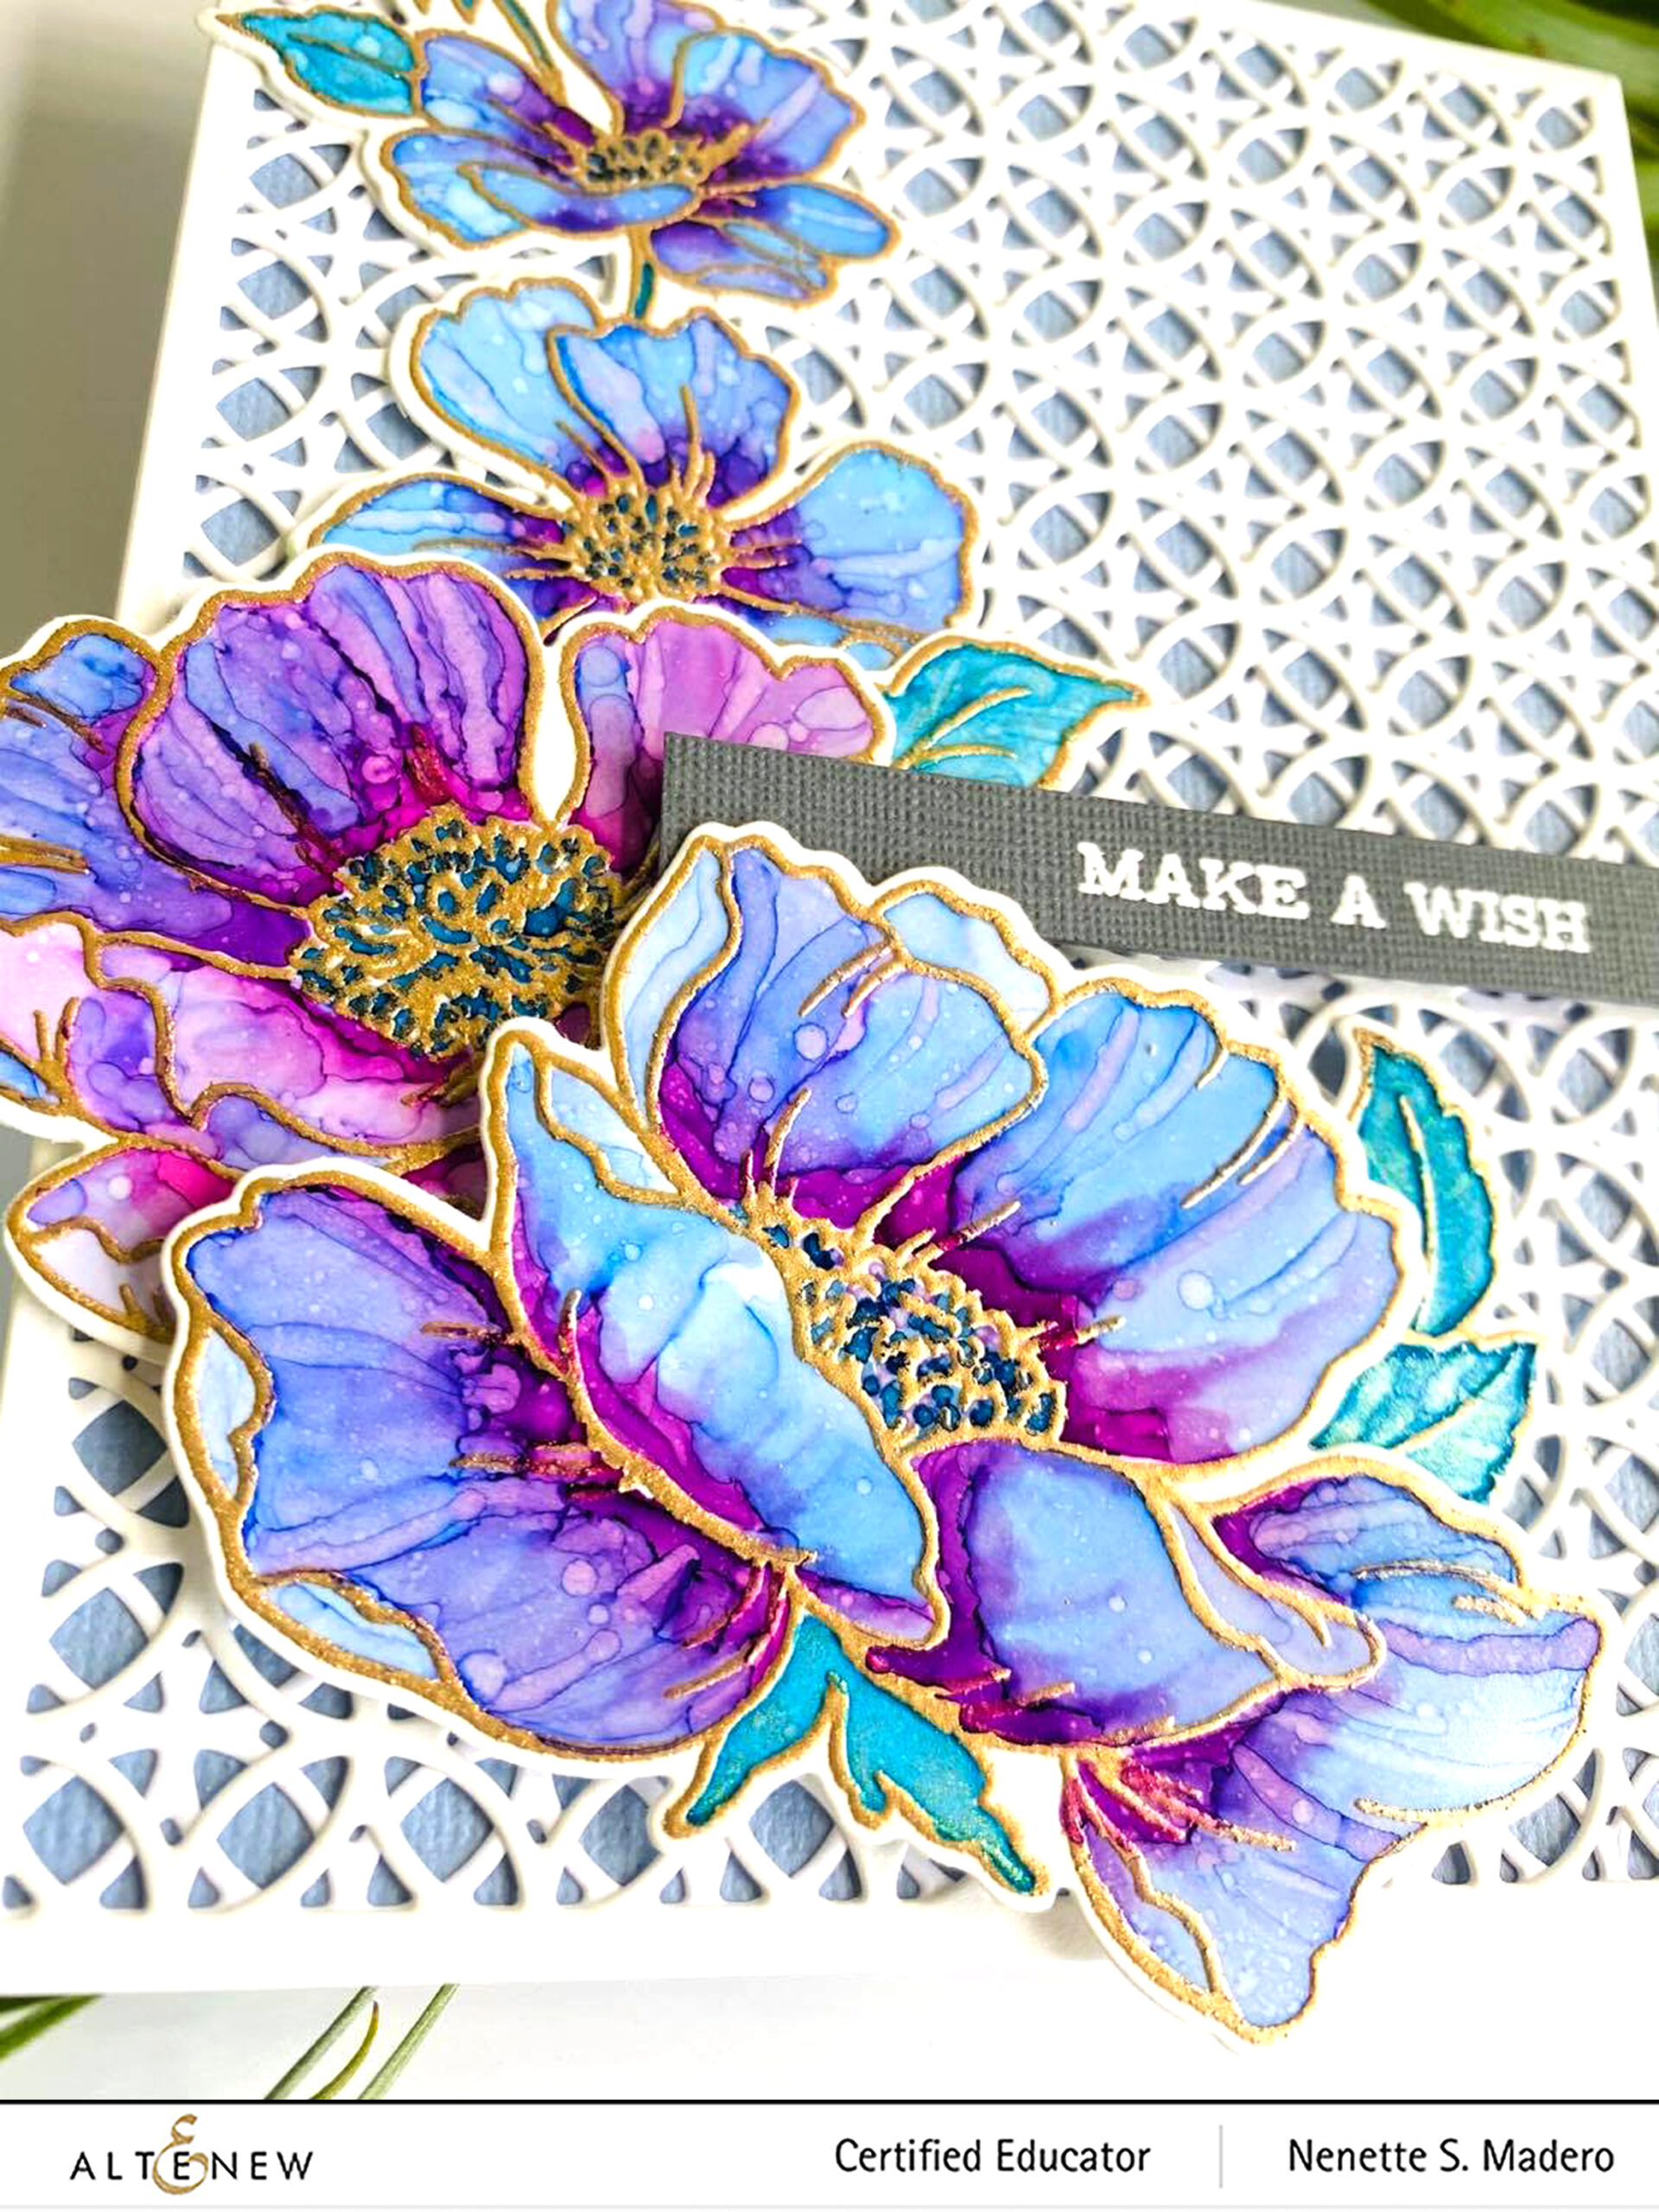
I then used a thin brush to add just plain alcohol for added texture. A fine spray bottle filled with alcohol was used to add tiny specks of alcohol on the entire surface. Make sure it’s far enough from the painted flowers otherwise you will have big blobs of white all over your project. The Circle Quilt die was used to cut 2 sheets of paper and the second was turned upside down before adhering to the 1st die-cut to create a unique geometric pattern for the background. The floral images were die cut using the coordinating dies and adhered to the card front with foam squares for dimension.
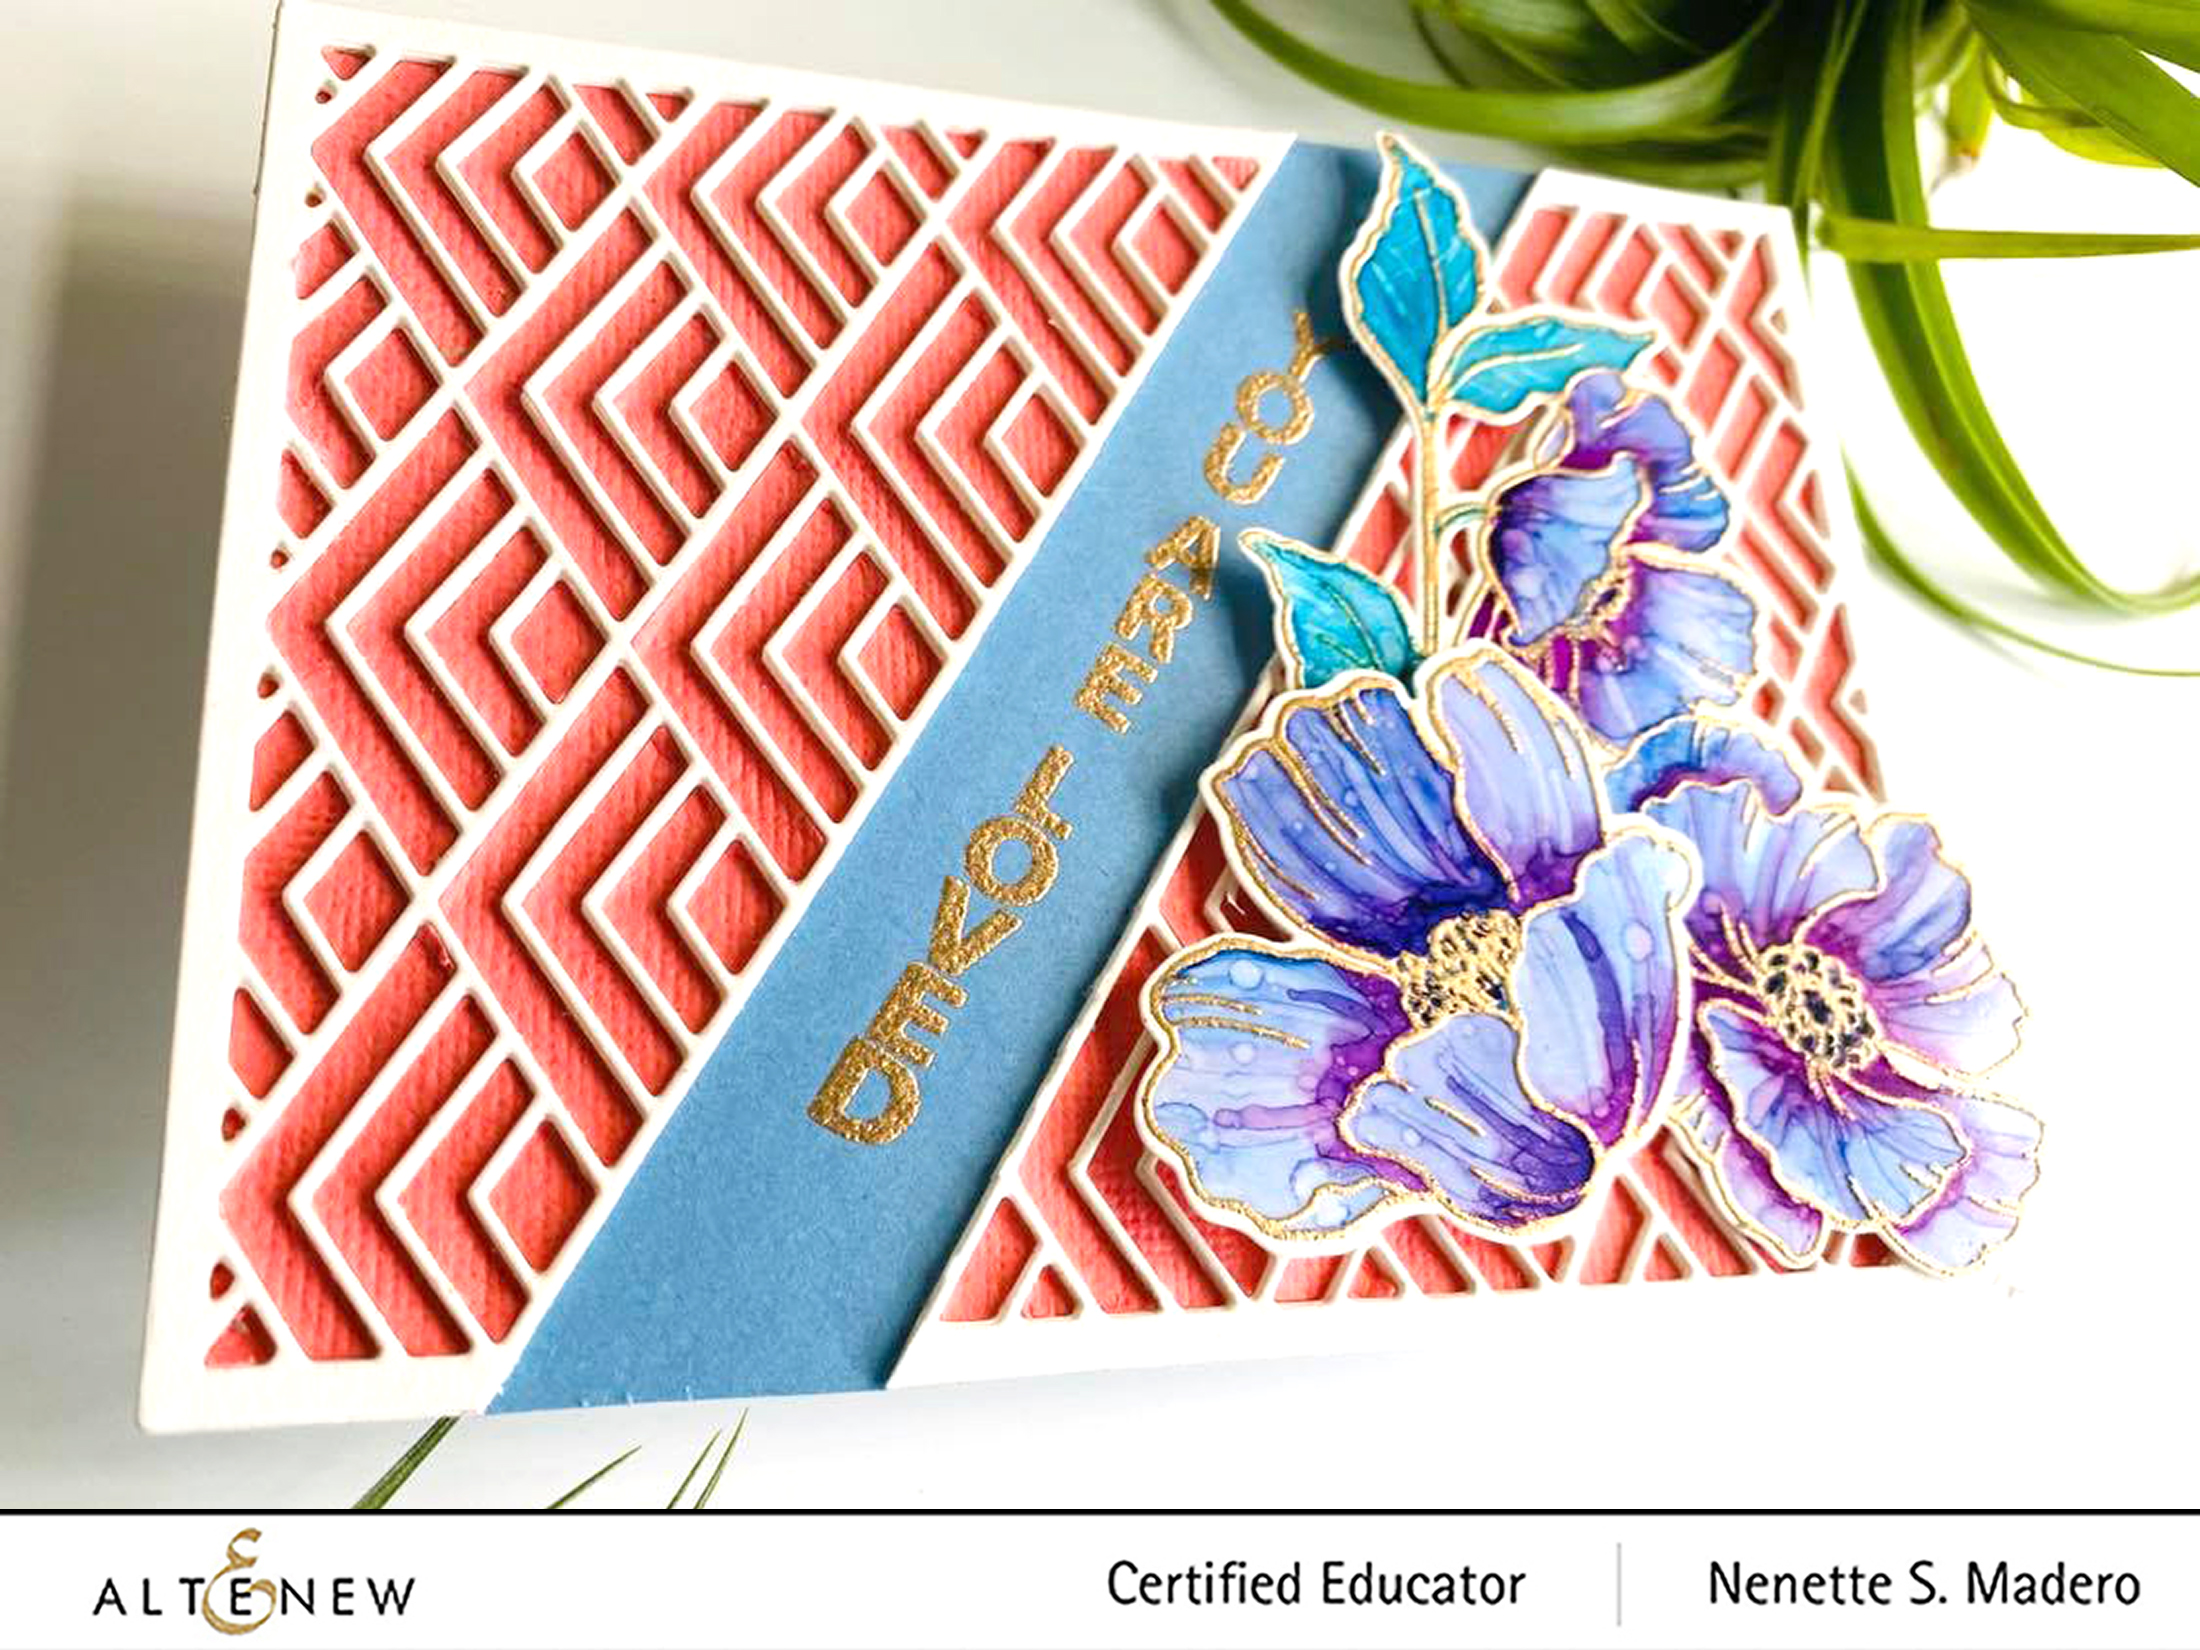
For the second card using the same colored Poppy images, I wanted to create a different kind of background using the Stacked Diamonds cover die. I die cut 5 sheets of Neenah solar white CS and stacked them on top of each other. The middle portion of the die cut was cut off leaving a space for the sentiment.
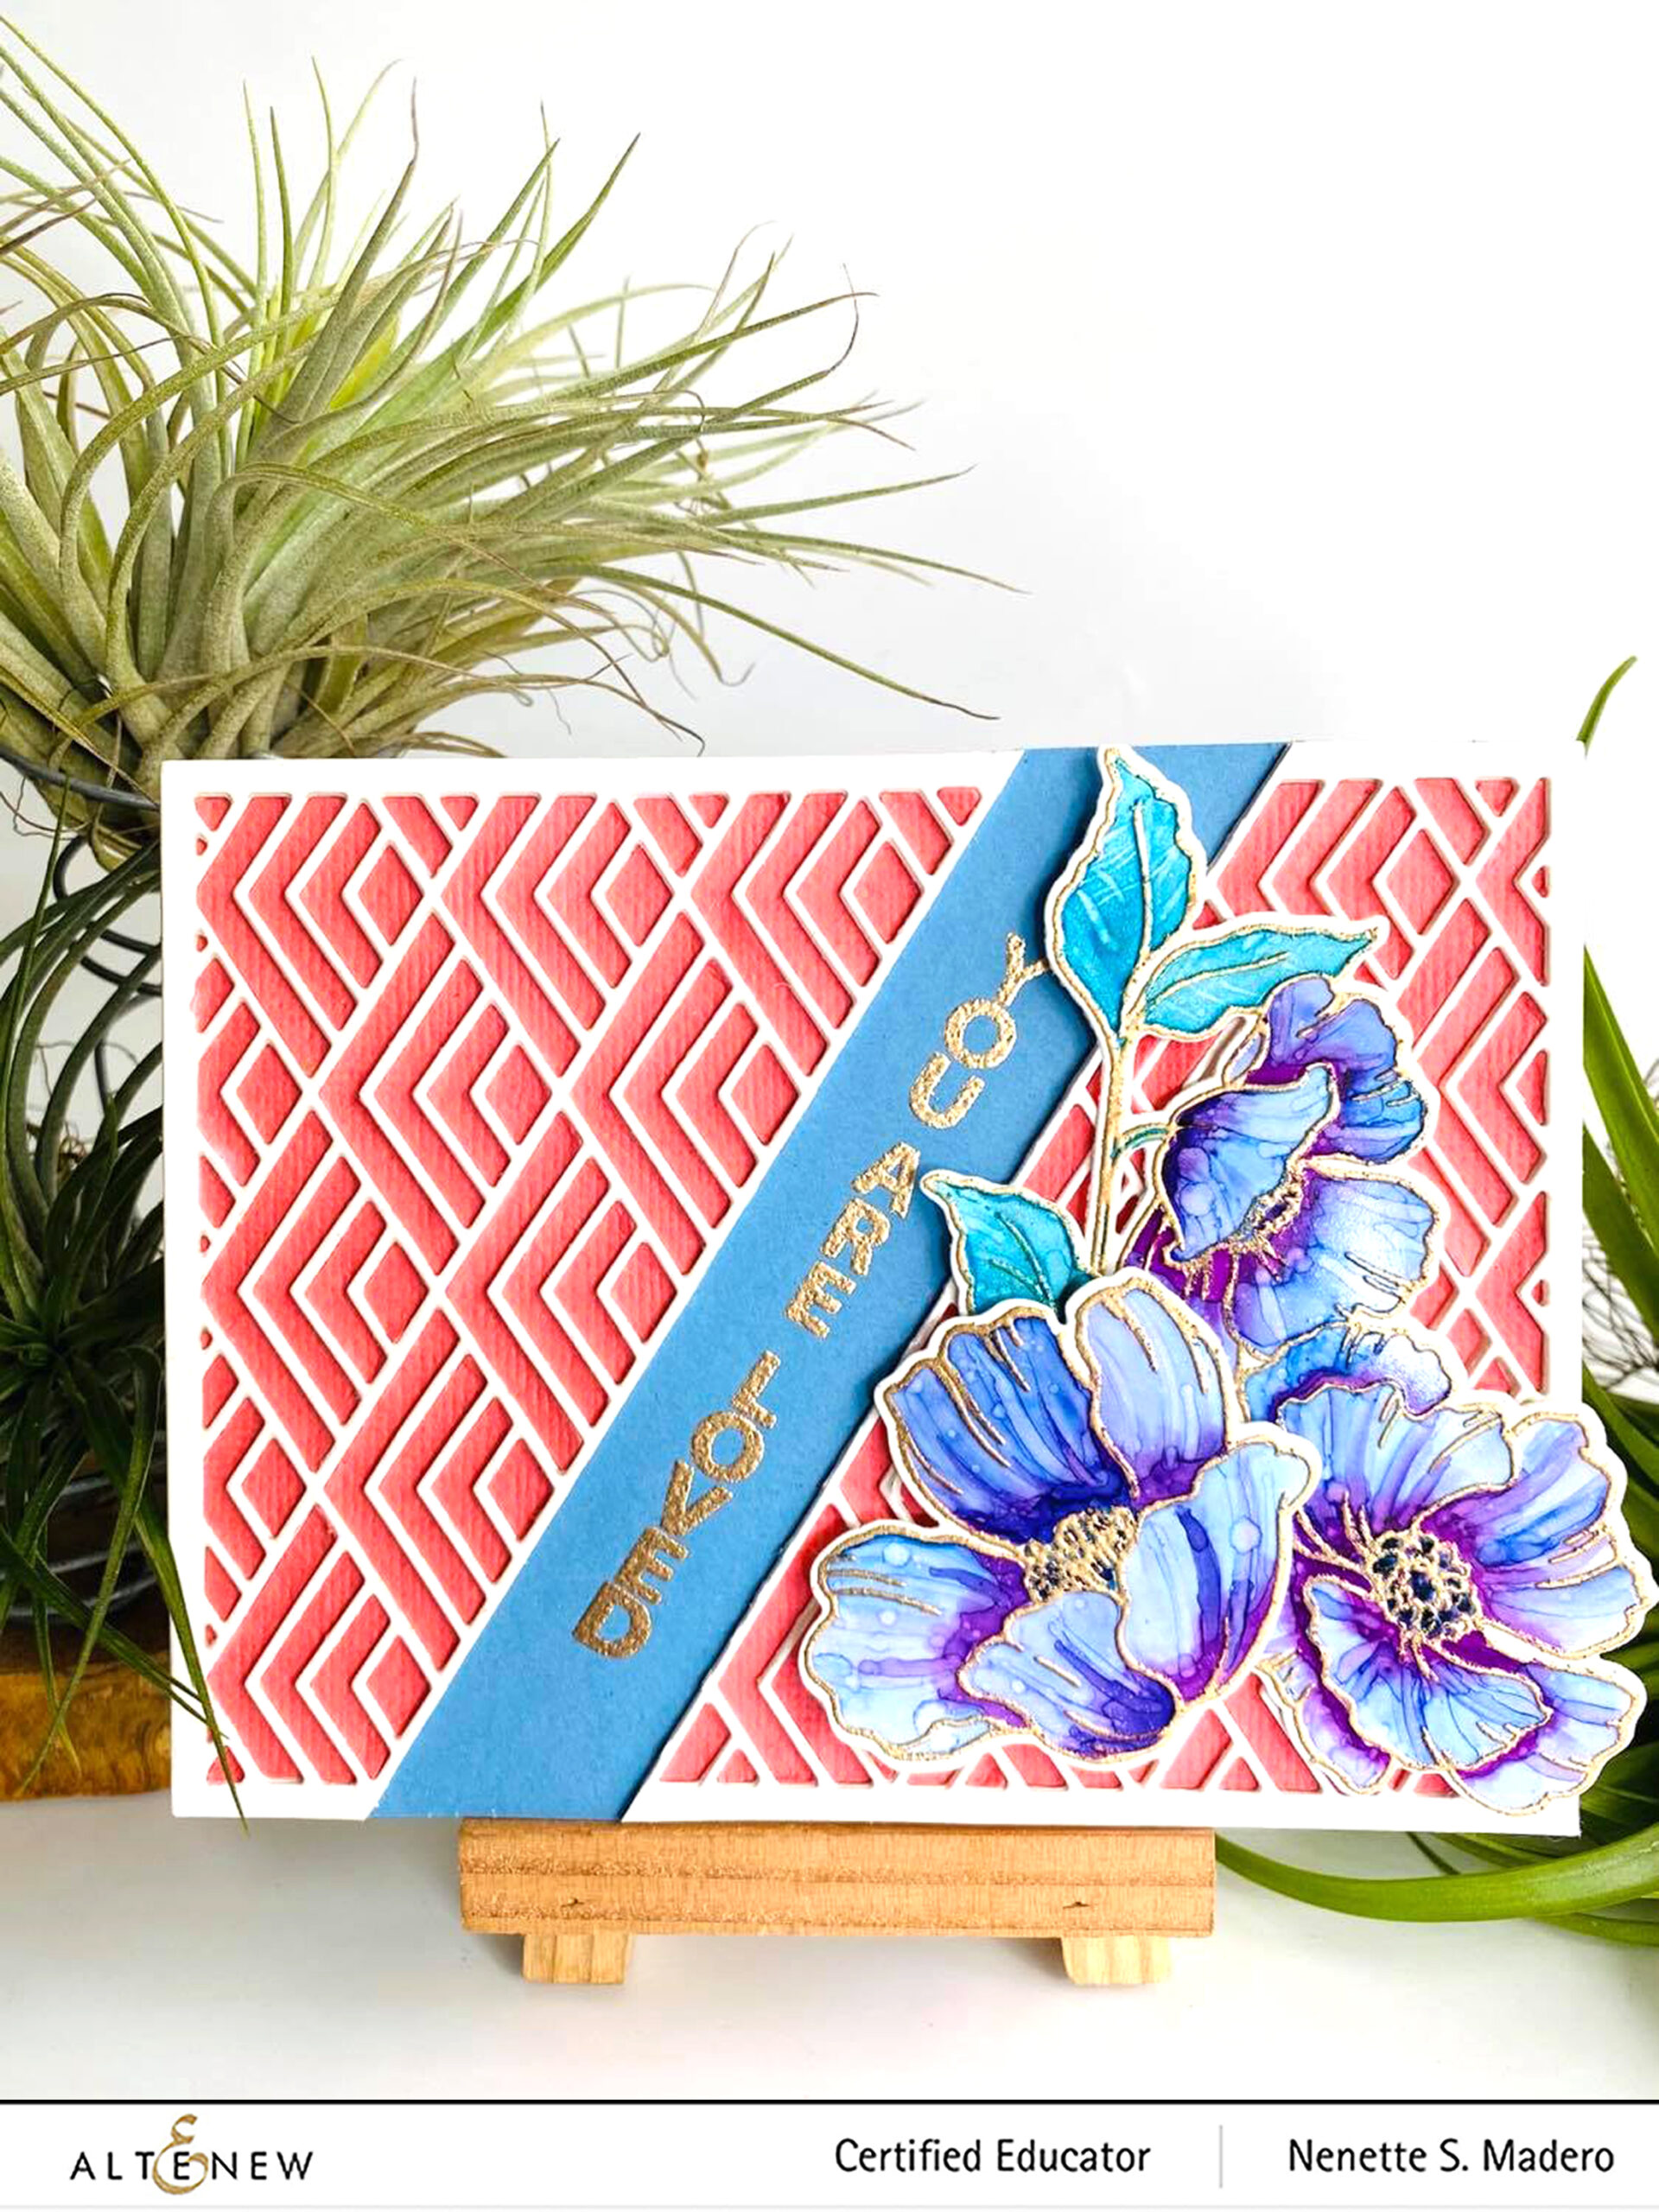
At first, I adhered the sentiment stamped onto blue CS to a card front then glued the Stacked diamonds die-cuts beside it. I wasn’t too happy with the outcome so I decided to die cut a peach-colored cardstock then did the inlay technique and added the positive pieces one by one. This made the Stacked diamonds die cut stand out more. The flowers were arranged in one corner and foam squares were used to add dimension.
I’ve attached a video tutorial below. You can also watch it on Youtube through this link.
PRIZES
Altenew is giving away a $30 gift certificate to 1 lucky winner! Please leave a comment here on the Altenew Card Blog by 12/21/2020 for a chance to win. Altenew will also draw a winner to receive a $15 Altenew gift certificate from the comments left on each designer’s blog on the blog hop list below. All winners will be announced on the Altenew Winners Page on 12/23/2020.
There’s MORE! What’s a hop without YOU?! We have included an Inlinkz on the Altenew blog for you to enter your gorgeous Altenew “Floral with Geometric Elements” creations. We will pick 2 of our favorite handmade creations from those who joined the linky party and they will each receive a $15 Altenew gift certificate!
Hope you liked the cards I made for this hop. Don’t forget to leave a comment here and in all the following blogs to get a chance to win some fabulous prizes from Altenew. I always look forward to reading your heartwarming comments. If you like my cards, I hope you’ll subscribe to my blog so that you’ll get notified once a new post is up. I would love to interact and get to know you more through Instagram as well so please follow me on IG @mylittleatticstudio and say hello. Next up is the talented Kari VanNoy. Thank you so much for dropping by! Wishing everyone a blessed Christmas and a New Year filled with renewed hope, good health and happiness. Stay safe everyone and happy crafting! 😊

BLOG HOP LIST
SUPPLY LIST
 ALTENEW ROSE GOLD CRISP EMBOSSING POWDER Shop at: ALT | MLA |
 ALTENEW HELLO HYDRANGEA STAMP AND DIE Shop at: ALT |
 ALTENEW WEEKEND DOODLES STAMP AND DIE BUNDLE Shop at: ALT |
 ALTENEW CIRCLE QUILT DIE Shop at: ALT |
 ALTENEW CRYSTAL FAMES DIE Shop at: ALT |
 ALTENEW SENTIMENT STRIPS STAMP Shop at: ALT |
 ALTENEW BEAUTIFUL BERGENIA 3D EMBOSSING FOLDER Shop at: ALT |
 ALTENEW WOODLESS WATERCOLOR PENCILS Shop at: ALT |
 YUPO PAPER Shop at: AMZ |
 ALTENEW LEAF MIX DIE SET Shop at: ALT |
 ALTENEW MODERN CIRCLES STENCIL Shop at: ALT |
 ALTENEW EMERALD GOLD WASHI TAPE Shop at: ALT |
 ALTENEW NESTING LABELS DIE SET Shop at: ALT |
 ALTENEW COLOR BLOCK TRIANGLE STENCIL Shop at: ALT |
 ALTENEW POPPY GARDEN STAMP AND DIE Shop at: ALT |
 ALTENEW GEOMETRIC LANDSCAPE STENCIL Shop at: ALT |
 ALTENEW GEO FRAMES DIE Shop at: ALT |
 ALTENEW MOUNTAIN MIST DYE INK Shop at: ALT |
 ALTENEW SAN DUNES DYE INK Shop at: ALT |
 Gelli Plate 8×10 Shop at: AMZ |
 BRAYER Shop at: AMZ |
 LIQUITEX BASICS TITANIUM WHITE ACRYLIC PAINT Shop at: AMZ |
 TEFLON BONE FOLDER Shop at: AMZ |
 SCOR PAL SCOR BOARD Shop at: AMZ |

ALTENEW STACKED DIAMONDS COVER DIE
Shop at:
ALT